- Open a Terminal (under Utilities)
- Convert the ISO to UDRW format
hdiutil convert -format UDRW -o destination_file.img source_file.iso - Run
diskutil listand determine the device node assigned to your flash media (e.g., /dev/disk2) - Run
diskutil unmountDisk /dev/diskN(replace N with the disk number from the last command; in the previous example, N would be 2) - Execute
sudo dd if=/path/to/destination_file.img.dmg of=/dev/diskN bs=1m(replace /path/to/destination_file.img.dmg with the path where the image file is located; for example, ./win7.img.dmg)- Using /dev/rdisk instead of /dev/disk will faster, 20x
- If you see the error dd: Invalid number '1m', you are using GNU dd. Use the same command but replace bs=1m with bs=1M
- If you see the error dd: /dev/diskN: Resource busy, make sure the disk is not in use. Start the 'Disk Utility.app' and unmount (don't eject) the drive
- Run
diskutil eject /dev/diskN, and remove your flash media when the command completes (this can take a few hours on slower drives)
如果参照上面的方式制作的启动盘无法正确启动,那么,说明系统的BIOS把启动盘识别成了USB HDD模式,这个模式下,是需要U盘上存在Windows 7的引导记录MBR的。这种情况下,需要我们手工写入这部分信息。
首先参照让Mac也能拥有apt-get类似的功能——Brew配置好本机的HomeBrew环境。
1. 下载ms-sys, 并且编译出来(也可本站下载ms-sys-2.5.3.tar)
$ cd ~

$ mkdir ms-sys

$ cd ms-sys

$ brew install wget

$ wget http://www.mobibrw.com/wp-content/uploads/2017/10/ms-sys-2.5.3.tar.zip

$ unzip ms-sys-2.5.3.tar.zip

$ tar -zxvf ms-sys-2.5.3.tar

$ brew install gettext

$ export PATH="/usr/local/opt/gettext/bin:$PATH"

$ cd ms-sys-2.5.3

$ make
2. 找一台Windows 7/Windows 10机器,格式化U盘为NTFS格式。
目前尽管非常多的努力,但是从macOS High Sierra (10.13)上编译ntfs-3g,然后格式化出来的NTFS格式的U盘始终无法成功启动Windows 7的安装镜像。原因应该是ntfs-3g在macOS High Sierra (10.13)上无法获取到磁盘的相关参数,从代码上看,macOS High Sierra (10.13)上缺少磁盘的底层操作库(比如:libdh),导致启动部分的参数不正确。即使我们手工指定部分参数,也不能解决这个问题。
对于无法找到Windows电脑的情况,目前我的解决方法是通过VirtualBox安装一个Ubuntu 16.04的虚拟机。插上U盘后,macOS High Sierra (10.13)上执行
$ sudo diskutil partitionDisk /dev/diskN 1 MBRFormat "MS-DOS FAT32" WIN7 100%

$ sudo diskutil unmountDisk /dev/diskN

#修改分区格式为NTFS,就是修改分区ID为 07 类型,07类型为NTFS的分区识别代码,接下来需要重新格式化分区
$ sudo fdisk -e /dev/diskN
fdisk: 1> edit 1
         Starting       Ending
 #: id  cyl  hd sec -  cyl  hd sec [     start -       size]
------------------------------------------------------------------------
 1: 0B 1023 254  63 - 1023 254  63 [         2 -   15633406] Win95 FAT-32
Partition id ('0' to disable)  [0 - FF]: [B] (? for help) 07
Do you wish to edit in CHS mode? [n]
Partition offset [0 - 15633408]: [63]
Partition size [1 - 15633345]: [15633345]
fdisk:*1> write
Writing MBR at offset 0.
fdisk: 1> quit

#如果弹出对话框,请选择 “忽略”

$ sudo diskutil unmountDisk /dev/diskN
然后手工映射U盘到Ubuntu 16.04系统,执行如下命令格式化:
#安装NTFS依赖的软件
$ sudo apt-get install ntfs-3g

#查询U盘所属的磁盘
#此处注意,如果上面已经执行了”sudo fdisk -e /dev/diskN“,那么分区是无法正常挂载的,
#因此这个命令是看不到分区的,但是我们可以在修改分区之前先看看会挂载到哪里,然后再去修改分区类型。
$ df
文件系统         1K-块    已用    可用 已用% 挂载点
udev           1004948       0 1004948    0% /dev
tmpfs           204856    3724  201132    2% /run
/dev/sda1      6060608 5305240  424464   93% /
tmpfs          1024260     172 1024088    1% /dev/shm
tmpfs             5120       4    5116    1% /run/lock
tmpfs          1024260       0 1024260    0% /sys/fs/cgroup
tmpfs           204856      40  204816    1% /run/user/1000
/dev/sdb1      7801448     848 7800600    1% /media/xxx/WIN7

#通过上面的结果,我们了解到U盘被挂载到了/dev/sdb1
#这一步在“sudo fdisk -e /dev/diskN”之后会失败,我们无视这个失败即可。
$ sudo umount /dev/sdb1

$ sudo mkfs.ntfs -f -L WIN7 /dev/sdb1
操作完成后,关闭虚拟机或者手工从菜单中释放U盘,之后我们才能进行下一步的操作。
3. 激活磁盘的启动属性
$ sudo diskutil unmountDisk /dev/diskN

#此处注意,这个一个连贯操作,目的是激活主分区启动属性,也就是设置bootable标志,后面的几个操作都是fdisk里面的命令,直到退出fdisk为止
$ sudo fdisk -e /dev/diskN
fdisk:*1> flag 1
Partition 1 marked active.
fdisk:*1> write
Writing MBR at offset 0.
fdisk: 1> quit
4. 制作安装盘
$ cd ~

$ mkdir disk_image

$ cd disk_image

$ sudo diskutil unmountDisk /dev/diskN

$ sudo ~/ms-sys-2.5.3/bin/ms-sys -7 -f /dev/diskN

$ mkdir iso

$ hdiutil mount win7.iso -mountpoint iso -readonly

$ mkdir usb

$ sudo diskutil unmountDisk /dev/diskN

# 此处实际上利用了macOS High Sierra (10.13)的一个BUG,
# 正常情况下挂载的NTFS分区都是强制只读的,但是如果是他自己格式化成其他分区格式,
# 然后修改成NTFS格式的,在没有拔出之前,可以切换到读写状态。
# 如果哪天这个BUG被修复了,那么再试试NTFS-3G好了
$ sudo mount -t ntfs -o rw,auto,nobrowse /dev/diskNs1 usb

$ cp -r ./iso/* ./usb/ ; sync

$ sudo umount usb

$ hdiutil umount iso

$ rm -rf iso

$ rm -rf usb

$ diskutil eject /dev/diskN
如果安装过程中,出现提示:“缺少所需的CD/DVD驱动器设备驱动程序”。如下图:
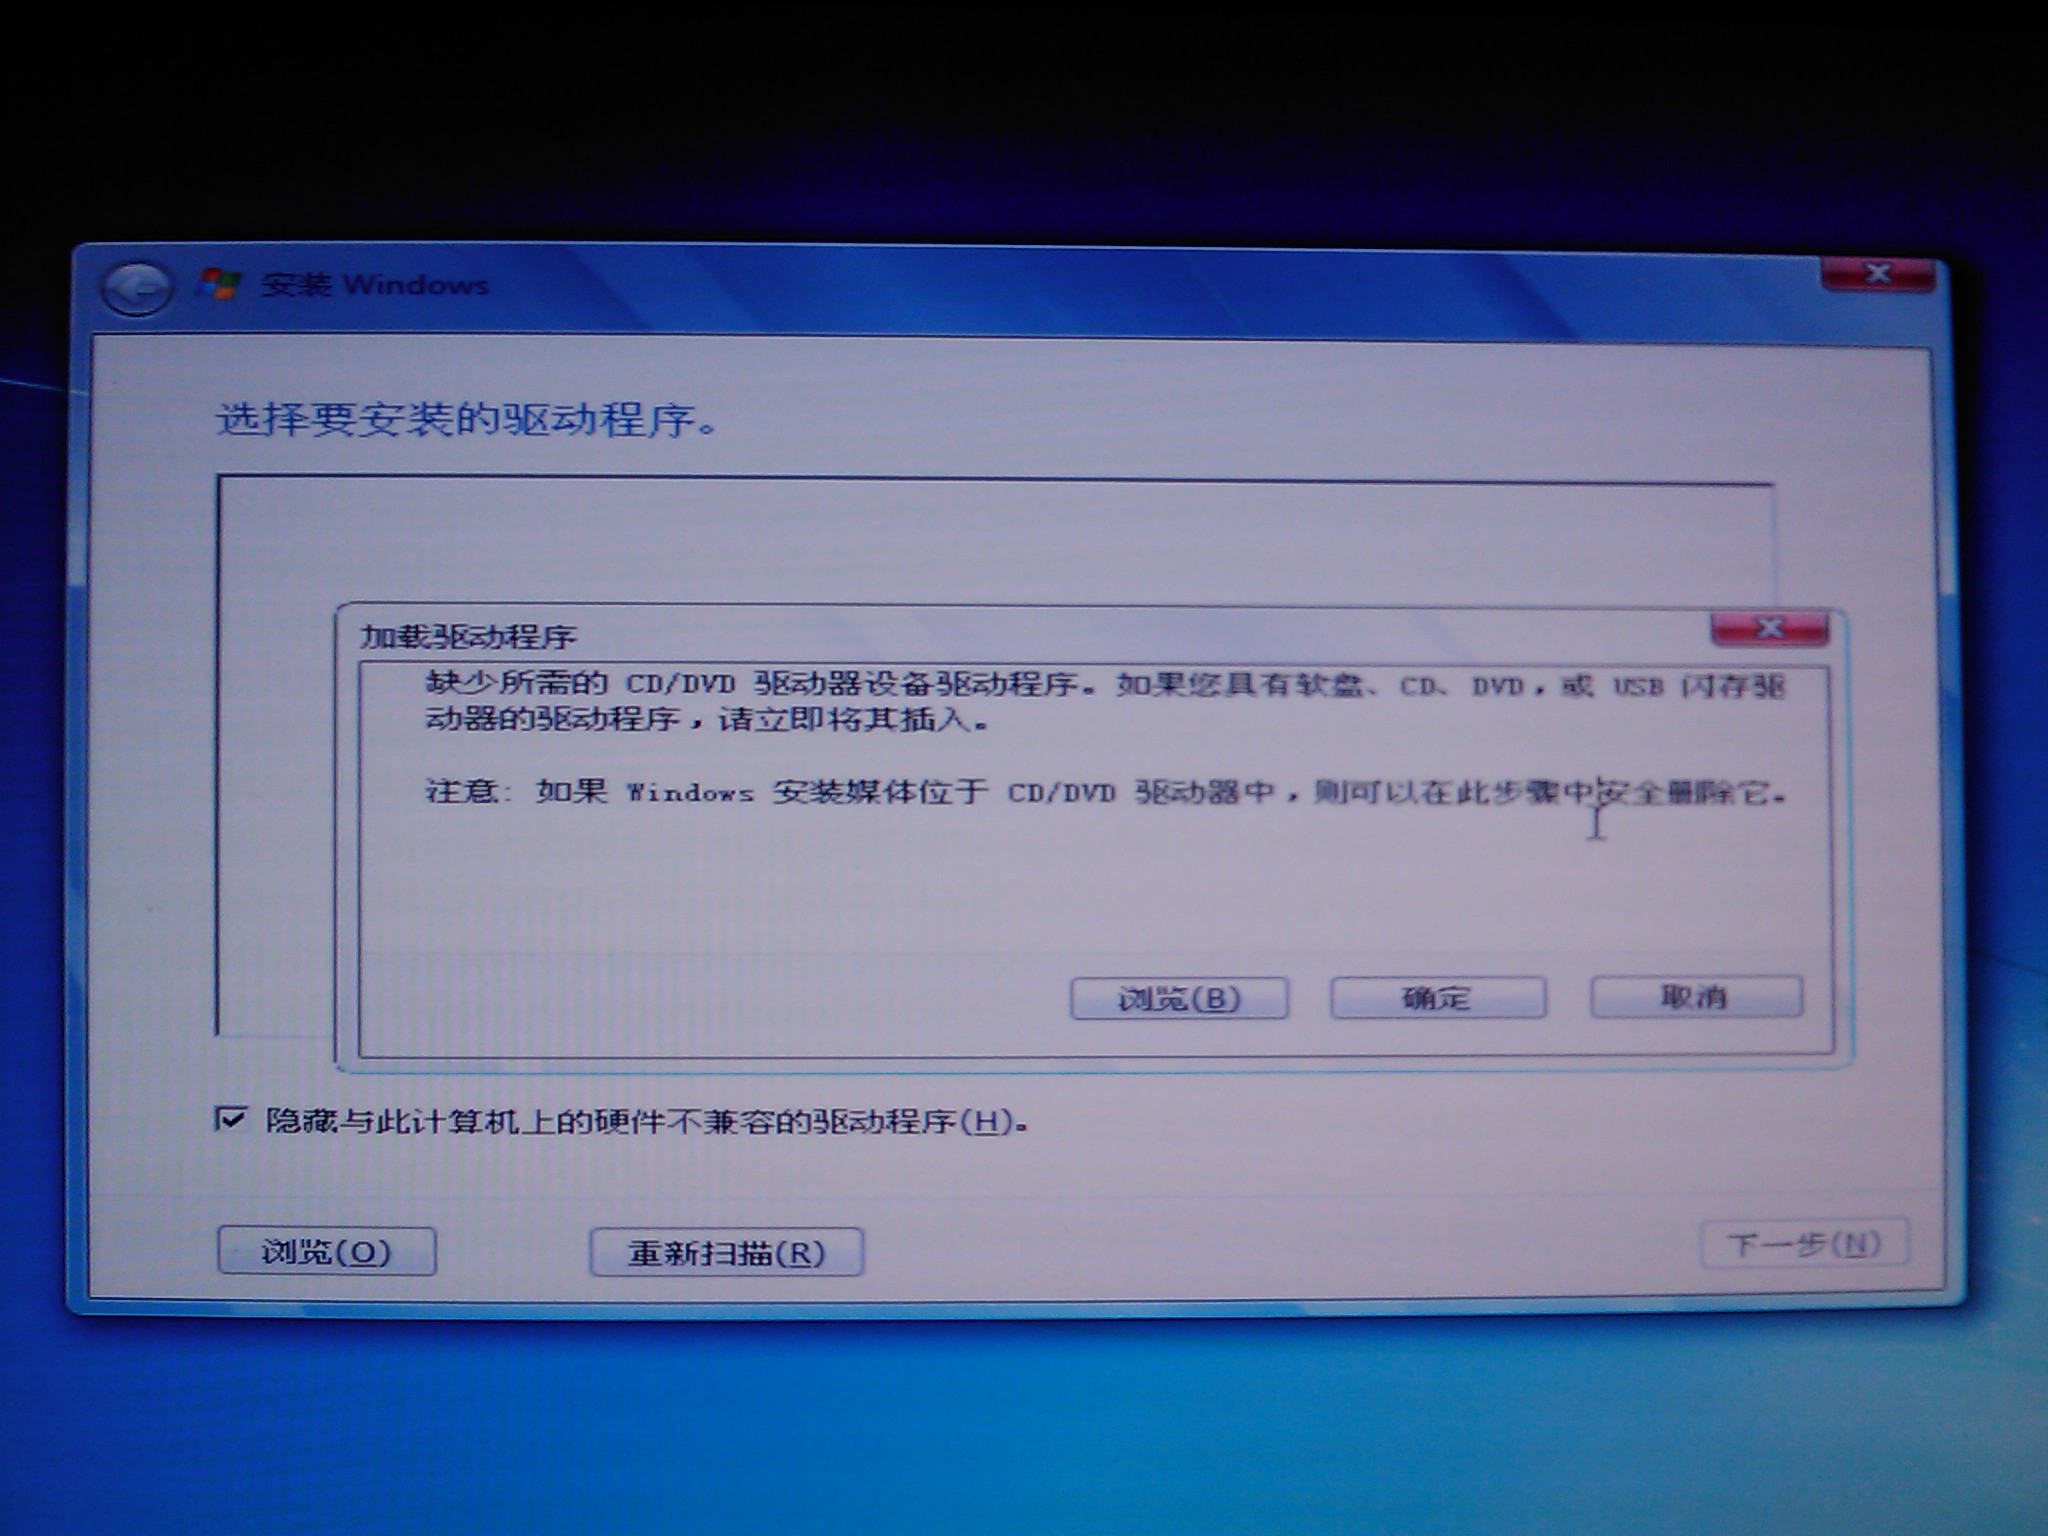 则是由于安装光盘中缺少
USB3.0驱动导致的,请进入BIOS暂时关闭USB3.0,等安装完成后再打开即可。
参考链接
- How to create a bootable USB Windows OS using Mac OS X
- Create bootable USB stick from ISO in Mac OS X
- How to create a bootable USB stick on OS X
- Mac OS: dd with /dev/disk vs /dev/rdisk
- Why is “/dev/rdisk” about 20 times faster than “/dev/disk” in Mac OS X
- How to make Windows 7 USB flash install media from Linux?
- creating windows 7 bootable usb from linux
- pygettext.py and msgfmt.py on Mac OS X
- Creating a SmartOS Bootable USB Key
- Name-error when formatting NTFS on OS X 10.8.4 using “diskutil” (Terminal)
- Mac OS X: Mounting FAT32 external hard drive via Terminal command line
- OS X 原生可读写挂载NTFS分区
- mac系统下读取NTFS格式的超简单办法。
- Mac OS X Mount NTFS
- MAC下磁盘工具无法格式化U盘的时候使用终端DISKUTIL命令给U盘分区
- 制作便携式系统维护盘
- Mac OS X Mount NTFS
- Boot Sector
- r^pi3 error when ./autogen.sh.... error: possibly undefined macro: AC_MSG_CHECKING
- autogen.sh error on Raspberry PI 2
- 在Android 4.4.2上使用fuse开发自己的文件系统
- How do I get the partition offset in OS X with C/C++?
- 安装Windows7系统时,提示:缺少所需的CD/DVD驱动器设备驱动程序