Code Composer Studio 8.2提供的Runtime Object View (ROV)是一个非常好用的功能,能动态监视系统的运行情况。
该功能需要使用TI-RTOS的应用才可以正常使用。
下面是官方的参考文档:
Contents
- 1 Introduction
- 2 Installation
- 3 Starting a ROV Session
- 4 Importing a ROV Dashboard
- 5 Opening Views
- 6 Refreshing Target Data
- 7 Managing Views
- 8 Useful Views
- 9 Saving Data from Views
- 10 Working with Dashboards
- 11 Roadmap
- 12 注意事项
Introduction
The Runtime Object View (ROV) provides tools that let developers quickly visualize the state of embedded applications. ROV reads memory from the target and intelligently displays data.


ROV has the following key benefits:
- ROV does not disturb the run-time behavior of the application on the target (when using a JTAG connection). ROV can read current memory from a running target. ROV also automatically refreshes all of its views whenever the target is stopped--for example when single stepping, when the target hits a breakpoint, or when you halt the target asynchronously.
- ROV adds zero footprint to the target code (when using a JTAG connection).
- ROV provides visual tools that show changes in the target state, memory use, and data structures on the host computer. The tool shows high-level information needed by embedded application developers.
- ROV is provided automatically with the TI-RTOS Kernel component of the SimpleLink SDK, the Processors SDK, TI-RTOS products, and stand-alone SYS/BIOS. If you use Code Composer Studio (CCS) and any of these software products, you have access to ROV. Nothing needs to be enabled in the application code.
- ROV can be extended to work with any embedded library. The examples on this page use the TI-RTOS Kernel, which includes ROV support for its entities including threads, heap memory, and CPU load.
ROV is available in CCS 7.1 or higher. (The images on this page were created with CCS 7.4.)
Runtime Object View is an enhanced version of the RTOS Object View tool, which has been available for several years. This page refers to Runtime Object View as ROV and the older RTOS Object View tool as "ROV Classic". For information about using ROV Classic, see the ROV Classic documentation.
Installation
ROV is available in CCS 7.1 or higher. (The images on this page were created with CCS 7.4.)
You can use the CCS App Center or TI software download pages to make sure you have the most recent version of the SimpleLink SDK, the Processors SDK, TI-RTOS, or stand-alone SYS/BIOS. These products all contain TI-RTOS and support the use of ROV in real-time applications.
Starting a ROV Session
There are several ways to use ROV.
- You can use a CCS project to load and run the image on the target.
- You can connect to a running target without using a CCS project to load the image.
Using an Image Managed by the Active CCS Project
- Use the standard CCS development cycle to build an application and load its image onto the target device.
- Start ROV as described in Connecting to ROV.
Using an Image Without a CCS Project
If you build your applications using another tool (such as makefiles), you can still use CCS and ROV for debugging. Follow these steps to configure CCS with the version and path information needed to run ROV:
- Choose Windows->Preferences from the CCS menus.
- Move to the Code Composer Studio->Products->RTSC category.
- Select the XDCtools version and the product containing TI-RTOS for your application.
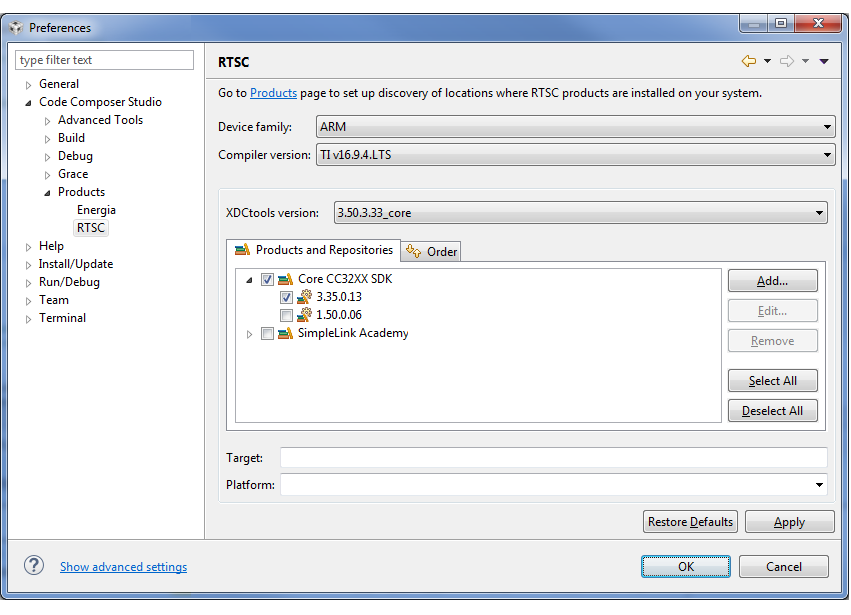
- Click OK.
- Connect the CCS debugger to your application. (See Debugging Without a CCS Project for detailed steps.)
- Start ROV as described in Connecting to ROV.
Debugging Without a CCS Project
In CCS, follow these steps to create a "Target Configuration" the first time you want to use ROV with the CCS Debugger:
- Use the Resource Explorer (choose View->Resource Explorer) to import the TI-RTOS "hello" project for the LaunchPad (or other target) you are using.
- Copy the .ccxml file contained in the
targetConfigssubdirectory of the "hello" project to theC:\Users\<username>\user\CCSTargetConfigurationsdirectory (for Windows) or the~/ti/CCSTargetConfigurationsdirectory (for Linux/UNIX). - In CCS, choose View->Target Configurations and expand the "User Defined" branch of the tree.
- Double-click on your
*.ccxmlfile in CCS's Target Configurations list and edit the target configuration as needed. Click Save when you are finished. - Right-click on your
*.ccxmlfile in CCS's Target Configurations list and choose Launch Selected Configuration. (If you choose Set as Default, you can later launch this target configuration by pressing F11 or choosing Run->Debug.)
Launching the Target Configuration moves you to the Debug Perspective. In the Debug Perspective, follow these steps:
- Choose Run->Connect Target.
- You may want to choose Run->Reset at this point to reset the target.
- Choose Run->Load->Load Program and browse for the program file.
- If you load the image externally or from Flash, you can choose Run->Load->Load Symbols instead to load just the symbol information. This does not modify the target, it simply tells the debugger how to display memory and what source file line should be shown for each code address in the memory map.
Connecting to ROV
After the target is loaded and you have connected to the target with the CCS debugger, you can start ROV as follows:
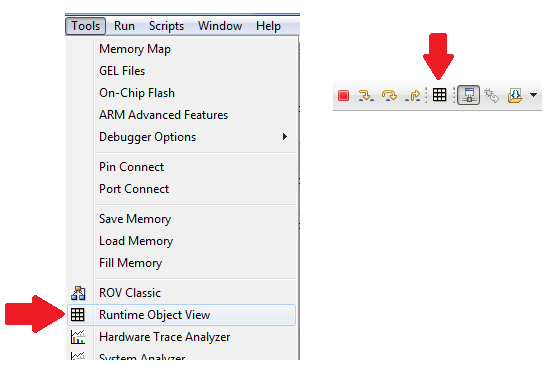
- Move to the CCS Debug perspective.
- Choose Tools->Runtime Object View or click the toolbar icon:
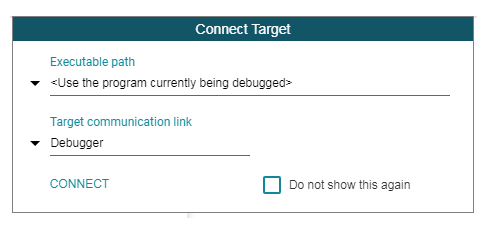
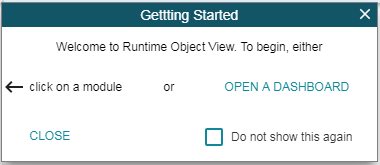
- ROV opens and prompts you to Connect to the target. (Check the "Do not show this again" box if you want to connect automatically in the future.) In the following figure,
Debuggeris the default name for the CCS project's JTAG connection.
Importing a ROV Dashboard
ROV uses "dashboards" to store a set of views you want to use with an application. Many examples included with TI-RTOS provide a dashboard as part of the project you import into CCS. Dashboards are stored as .rov.json files.
Importing a dashboard makes its views available to display and collect data. When you first import a dashboard, its views are opened automatically.
To import a dashboard when you open ROV, click Open a Dashboard in the Getting Started dialog.
Or, in the ROV toolbar, click the Import a Dashboard icon. Then, browse to and open the .rov.json file for the dashboard you want to import. Many example projects contain their own ROV dashboard file, which contains views that are useful for that example.If your SDK or TI-RTOS installation does not include dashboard files in the TI-RTOS example projects, you can download and then import a Sample ROV Dashboard File.
Opening Views
ROV views are visualizations of data provided by a variety of data sources associated with the libraries linked into an application. TI-RTOS, for example, has a collection of modules(roughly equivalent to C++ classes). Each module provides several data sources related to the module's target functionality.
Tabular Views
All data sources have tabular views. To open tabular views, you can click the items outlined in red below:

- Click the name of a module in the left pane to open that module's default view.
- Select a tabular subview from the drop-down list next to the module name.
-

Within a tabular view, click the More view options icon and choose New view for the current module. Then choose a subview.

Add-on Views
ROV also allows graphical visualizations to be designed for any collection of data sources. These visualizations may be provided with the target library or by a third-party. These visualizations are called add-ons. TI-RTOS, for example, provides add-ons for viewing stack and heap usage along with the CPU load.
To open add-on views, you can click the items outlined in red below:

-

Click the Open other view icon and choose a view from the list.
-

Click the Open a dashboard icon and select a dashboard you have imported. This refreshes the arrangement of views to match the arrangement stored the last time you saved the dashboard.
-

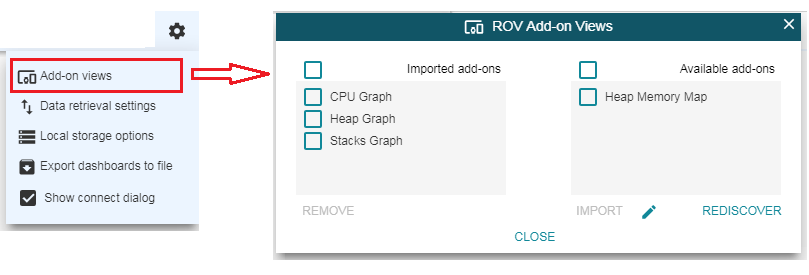
Click the ROV Options icon on the right end of the ROV toolbar and choose Add-on views from the options menu. Some dashboards contain extra views that are not displayed by default. This example shows that you can import the "Heap Memory Map" view by checking the box for that view and clicking Import.
Refreshing Target Data
ROV reads current memory from the running target without disturbing the run-time behavior of the application on the target (when using a JTAG connection).
ROV also automatically refreshes all of its views whenever the target is stopped--for example when single stepping, when the target hits a breakpoint, or when you halt the target asynchronously. But, ROV does not require the use of breakpoints or stop-mode.
To refresh data shown in the ROV views, run your target application and do any of the following:
-

Click the Refresh icon in the top ROV toolbar to get data once from the target for all views.
-

Click the Refresh icon in the toolbar for an individual view to get data once from the target for that view only.
-

Click the Repeat refresh icon in the top ROV toolbar to continuously get data from the target for all views. By default, data is refreshed every second. Click the red square icon to halt continuous data collection.
To change the interval at which data is refreshed, click the ROV options icon on the right end of the ROV toolbar, and select the Data retrieval settings option. In the Data retrieval settings dialog, change the refresh interval in milliseconds.
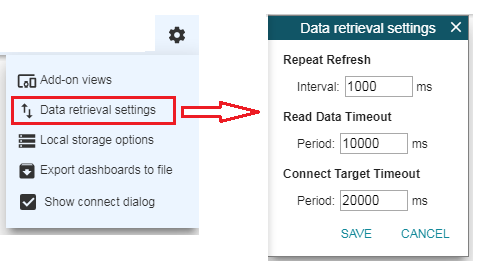
The same dialog also allows you to change the timeout period for the initial connection to the target and for reading data from the target. By default, the connection timeout is 20 seconds and the timeout for reading data is 10 seconds. If a timeout occurs, either the target connection has failed or ROV requested more data from the target than could be transmitted over the target connection in use.
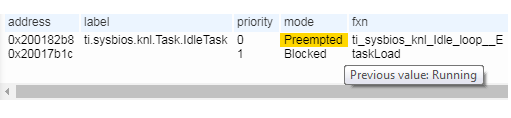
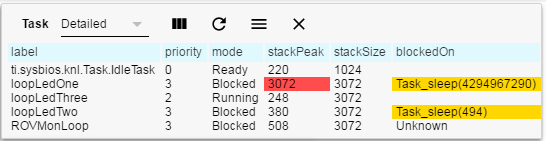
When a value changes from the value that was previously retrieved from the target, it is highlighted in yellow. Hover your cursor over the yellow field to see the previous value.
When an error such as a stack overflow occurs, the corresponding field is highlighted in red. Hover your cursor over a red field to see a brief description of the error.
Intrusiveness
ROV uses the debugger's connection to read device memory without causing the target CPU to run extra instructions. For example, ARM devices can provide Debug Access Ports (DAP) that the debugger uses to access the device's entire address space (but not the CPU's cache). There is a small chance of causing a brief CPU delay if the debugger and the CPU are accessing the same memory location at the same time.
When using ROV with targets other than ARM devices or when using other types of device connections, the intrusiveness of the debugger's access to device memory may vary.
NOTE
Since ROV accesses the target asynchronously, it is possible for data shown in ROV to reflect anomalous states and inconsistencies. This can occur because memory is changing as it is being read. When the target is running, ROV data may be collected over a small range of instructions occurring on the target.ROV is designed to be robust when encountering such data corruption. But warnings may occur that are purely the result of memory changing during an ROV update.
If you encounter such anomalous states (which are rare), try single-stepping though portions of the application where you encounter warnings. Data retrieved by ROV when the target is halted represents the state of the entire application at a single point in time.
Managing Views
ROV remembers your changes within the current CCS session. If you close and reopen a view, the changes you have made to the way that view is displayed are remembered.
If you want to reset views to the original arrangement stored in the dashboard, click the Open a dashboard icon and choose the dashboard to restore.
If you want to reset the views to their original "factory defaults," click the ROV Options icon on the right end of the ROV toolbar and choose Local storage options from the options menu. In the "Delete a view's local storage" dialog, check the boxes for the views that you want to reset to their defaults. Then click Delete Selected and then Close.

The subsections that follow describe other ways to control the appearance of ROV views.
Arranging Views
You can drag and resize ROV views as needed. To resize a view, drag its lower-right corner.
If you have many views open, you can use the Bring to top icon to select a view.
Choosing Subviews
Modules provide several subviews of the information they gather from the target. Choose a subview from the drop-down list.
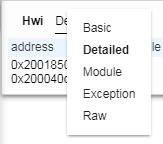
Most modules provide several of the following subviews:
- Basic – Provides the most commonly important information about the instances of the module's object.
- Detailed – Provides further information about the instances of the module's object.
- Module – Provides information about the properties of the module itself.
- Raw – Provides a JSON-formatted view of the current data for the module and its instances.
Modules provide additional subviews that apply to their functionality. For example, the Hwi module provides an "Exception" subview that lists any hardware interrupt exceptions that have occurred. The HeapMem module provides a "FreeList" subview that shows allocated blocks and free memory within the heap. The Timer module provides a "Device" subview that shows information about the timer devices and their addresses, modes, interrupt, periods, and counts.
Controlling the Column Display
You can drag column headings with your mouse to change the order of columns in table views.
For tabular views, you can hide columns that don't interest you and control whether numeric values are shown in decimal, hexadecimal, or scientific notation format. These settings are remembered whenever you reopen that view within the current CCS session. They are stored when you save the dashboard. To modify the columns in a view, follow these steps:
-

Click the Column settings icon in a view.
- Uncheck any Columns you don't want displayed. For example, in a Task view, you might want to hide the curCoreId and affinity columns if this is not a multicore application.
- Change the Format for numeric columns as desired. For example, in a Task view, you might want to view the Task arguments in hex, decimal, or scientific format.
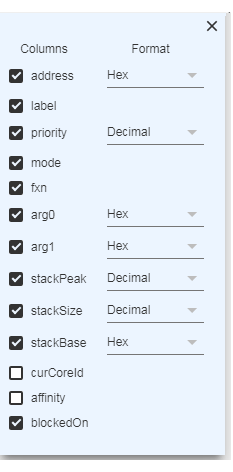
- Changes to the view are made as you use the dialog. Click the "X" to close the dialog after you have made your changes.
Using Fixed Width Font
If you want a view to use a code font such as Courier, click the More view options icon for a view and check the Use fixed width font box.
This changes the current view to fixed width. Notice that the change does not apply to other views of the same module. For example, if you set the font for the Basic view, the Detailed view is not changed automatically.

Controlling the Module List
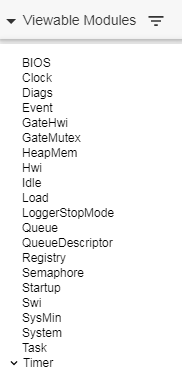
The module list in the left pane of the ROV display can list subsets of the available modules. Use the triangle icon to select which modules to display.
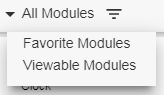
- All Modules – Shows all the modules found in the target application. A number of the modules will not have views defined for use by ROV. The only view available for such modules is the Raw JSON view.
- Viewable Modules – Shows only the modules for which views other than "Raw" are available. These are the views that are more likely to be useful for debugging.
- Favorite Modules – Shows modules you have marked as a favorite. To mark a favorite module, right-click on the module name and choose Add to Favorite Modules.
-

Filtered Modules – Shows modules that match a string you provide. Click the Filter modules icon and type the filter. Delete the filter text when you want to clear the filter.
You can hide the module list to make more space for views by clicking the < icon in the upper-left corner of the right ROV pane.
NOTE
ROV finds the list of modules by examining the .rov.xs file on the host. When you build a TI-RTOS application, this file is generated automatically in a subdirectory of the application's configuration project tree. If you specified a path to the executable when connecting to ROV (rather than using the program currently being debugged in CCS), ROV looks for the .rov.xs file in the same directory that contains the executable and in the configPkg/package/cfg subdirectory.
Useful Views
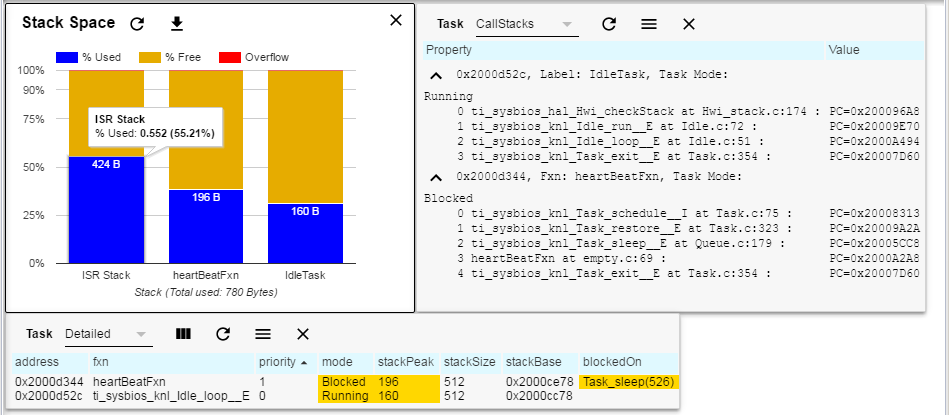
Thread States
Real-time kernels provide a framework for organizing application into separate threads that execute concurrently and have their own run-time stack. The first step in diagnosing an application that fails is to determine the state of each thread in the application in order to answer several basic questions:
- Is each thread executing the function it should be?
- Has any thread overrun its allocated stack space?
- Are the threads in the expected state (blocked, running, ready, ...) and do they have the right priority?
The figure below shows three thread-related views provided by the TI-RTOS library that quickly answer the questions above.
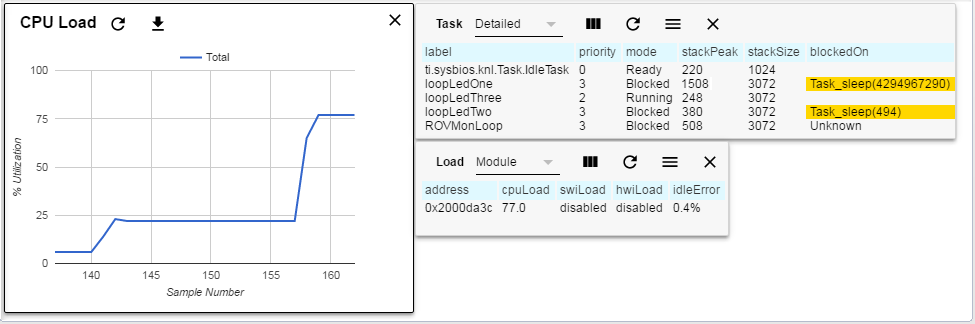
CPU Load
One of the main responsibilities of a real-time kernel is to "allocate" or switch the CPU between the application's threads. As a result, real-time kernels have the ability to easily monitor an application's use of the CPU.
In applications that are not operating as expected, it is natural to ask whether there is sufficient CPU resource to execute the critical threads in the system, how close is the system to overloading the CPU, and are there unexpected loads in the system (perhaps due to interrupt service routines).
The figure below shows some of the CPU load related TI-RTOS library views that provide insight into these types of questions.
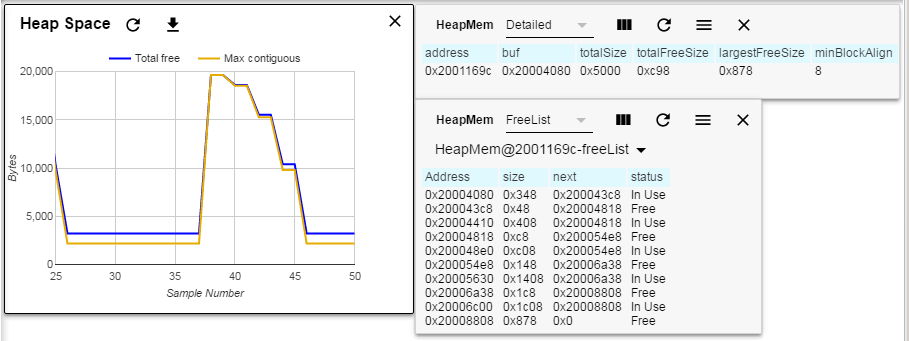
Heap Memory
To enable shared access to global heap memory, real-time kernels provide an alternative implementation of the standard C runtime malloc(). When an application fails, it's important to know whether a lack of memory may have resulted in NULL being returned to some function that does not properly handle "out of memory" conditions.
So, it's natural to ask if the application has (or is about to) run out of memory, is the heap dangerously fragmented (that is, lacks usefully sized contiguous blocks of free memory), and is there a slow leak of memory during long runs of the application?
The figure below shows three of the memory related views provided by TI-RTOS library that help answer these types of questions.
Other Commonly Useful Subviews
Other modules with useful subviews include:
- BIOS module – The "Scan for errors" subview detects any errors that would be highlighted in red in any ROV subview, including subviews you have not opened. The "Module" subview shows the thread type of the currently executing thread.
- Startup module – The "Startup State" module shows the names of the modules that have run their startup functions.
- System module – The "XDCROOT" and "XDCPATH" subviews show the path to the version of XDCtools being used to run ROV and the path to the various repositories available to ROV. These paths allow you to determine which version of various software components is actually being used.
- Hwi module – The "Exception" subview lists any hardware interrupt exceptions that have occurred.
- HeapMem module – The "FreeList" subview shows allocated blocks and free memory within the heap.
- Timer modules – The "Device" subview shows information about the timer devices and their addresses, modes, interrupt, periods, and counts.
Saving Data from Views
ROV allows you to save all data contained in a view to a file in JSON format. By default, such files are saved in your CCS project's workspace directory. Files are saved with the .rod.json extension. (ROD stands for Runtime Object Data).
To save ROV data, do one of the following:
-

Click the Download icon in the ROV toolbar. The default filename is
currentViews.rod.json. - Click the More view options icon in an individual view. Choose the Save data displayed in view option. For modules, the default filename contains the module path and the view name.
Working with Dashboards
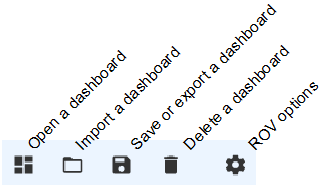
Within CCS, ROV stores your current display settings in a cache. These settings are available in your current CCS session. However, to have the same settings available the next time you open CCS, you should save the dashboard.Use the dashboard toolbar for dashboard-related actions: You can "save" a dashboard or "export" a dashboard.
- Saving a dashboard makes your current settings available the next time you use CCS.
- Exporting a dashboard allows you to share your view settings with other people. For example, you might export a dashboard if you want a co-worker to use it when debugging an application.
To save or export your current settings to a dashboard:
-

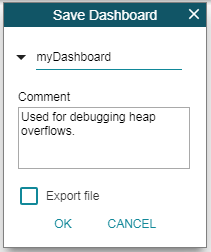
Click the Save icon in the ROV toolbar.
- Type a name for this dashboard. You can click the triangle to select one of your current dashboards to update.
- Type a comment if you want to provide a description of the dashboard.
- If you want to export the dashboard to a separate file, check the Export file box. Otherwise, the dashboard is only saved in your CCS workspace, and so is only available to you within this CCS project on this computer.
- Click OK.
- If you checked the Export file box, browse to the location where you want to save the exported JSON file that contains the dashboard.
You can export multiple dashboards to a single file using these steps:
- Click the ROV options icon on the right end of the ROV toolbar, and selecting the Export dashboards to file option from the options menu.
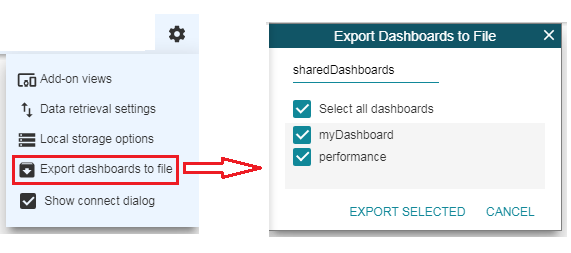
- Type a filename for your exported file.
- Uncheck the boxes next to any dashboards you do not want to export.
- Click Export Selected.
- Browse to the location where you want to save the exported JSON file that contains the selected dashboards.
Roadmap
In the future, ROV may be extended to support the following:
- Connections via UART, WiFi, and other connections
- Use of ROV as a standalone tool outside of CCS
- Views for TI Drivers
- Extensions to work with additional libraries
- Creation of add-on graphical views by users
注意事项
定义对象的时候,需要调用XXX_construct()方法创建的对象才能在Runtime Object View (ROV)中显示出来,对象可以是全局的,也可以是静态的(比如:static Task_Struct taskStruct;)。
比如如下:
Task_Struct taskStruct;
Task_construct(&taskStruct, tsk0Fxn, &taskParams, NULL);
如果使用Task_create创建的线程,则不能在Runtime Object View (ROV)中看到。
另外就是,需要使用Runtime Object View (ROV)查看的对象不能包含在其他结构体内部,必须在外部直接可见才可。
比如如下定义就无法看到:
typedef struct customTask_ {
	Task_Struct taskStruct;
} customTask;

customTask tsk;

Task_construct(&(tsk.taskStruct), tsk0Fxn, &taskParams, NULL);