Mac OSX下执行crosstool-ng提示“Your file system ‘xxxx’ is *not* case-sensitive!”

Mac下面使用HomeBrew安装了crosstool-ng来编译树莓派的代码,结果在执行的时候报告如下错误:

$ ct-ng build
[INFO ] Performing some trivial sanity checks
[ERROR] Your file system in '/Users/Documents/rpi/rpi-linux/.build' is *not* case-sensitive!
[ERROR]
[ERROR] >>
[ERROR] >> Build failed in step '(top-level)'
[ERROR] >>
[ERROR] >> Error happened in: CT_Abort[scripts/functions@329]
[ERROR] >> called from: CT_TestAndAbort[scripts/functions@351]
[ERROR] >> called from: main[scripts/crosstool-NG.sh@93]
[ERROR] >>
[ERROR] >> For more info on this error, look at the file: 'build.log'
[ERROR] >> There is a list of known issues, some with workarounds, in:
[ERROR] >> '/usr/local/Cellar/crosstool-ng/1.22.0/share/doc/crosstool-ng/crosstool-ng-1.22.0/B - Known issues.txt'
[ERROR]
[ERROR] (elapsed: 24422614:07.00)
[00:01] / make: *** [build] Error 1

比较简单的解决方法就是创建一个支持大小写区分的文件,作为一个分区挂载,然后把代码拷贝到这个分区中执行编译。

1.创建分区文件

$ hdiutil create -volname "Raspberry" -type SPARSE -fs 'Case-sensitive Journaled HFS+' -size 20g raspberry.dmg

2.挂载分区

早期版本的Mac OS X

$ hdiutil attach raspberry.dmg -mountpoint /Volumes/raspberry

#  切换到挂载目录
$ cd /Volumes/raspberry/

对于OS X EI Capitan(10.11.5)版本而言,生成的文件名变成了raspberry.dmg.sparseimage因此需要使用这个文件来挂载

$ hdiutil attach raspberry.dmg.sparseimage -mountpoint /Volumes/raspberry

#  切换到挂载目录
$ cd /Volumes/raspberry/

挂载后会在桌面生成一个名为Raspberry的磁盘文件夹生成,直接操作这个目录即可。

3.修改crosstool-ng的编译工具下载目录

$ ct-ng menuconfig

如下图的方式进行操作:

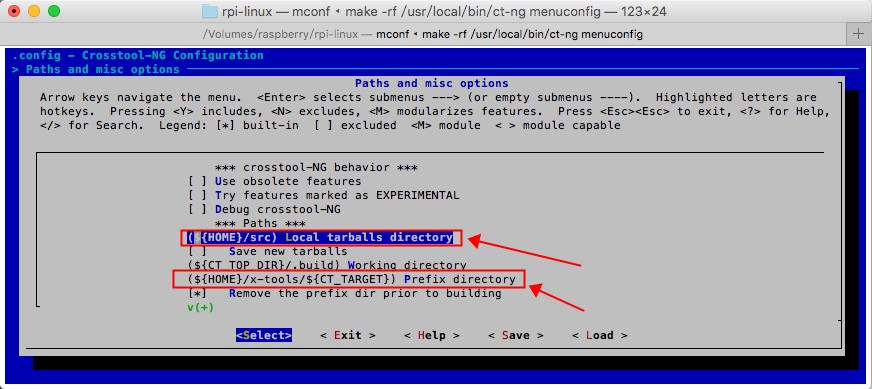
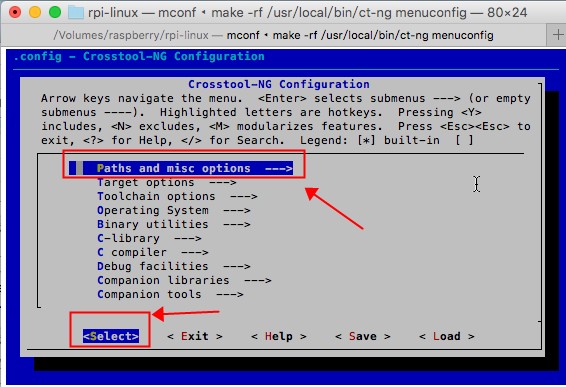
1.选择"Paths and misc options",并选中"Select"之后点击回车按键

Crosstool-NG-PathAndMiscOptions

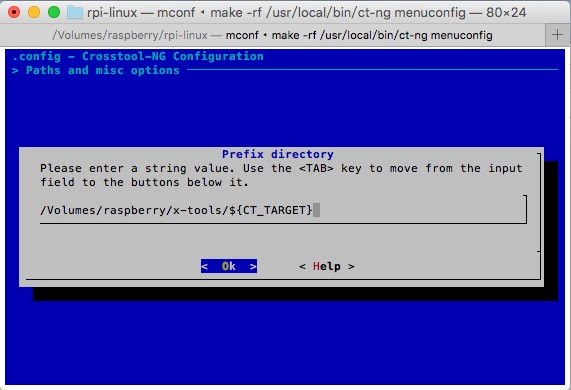
2.点击向下的方向按键,,找到"(${Home}/src) Local tarballs directory",这个项,并选中"Select"之后点击回车按键,修改为"/Volumes/raspberry/src",然后继续向下,找到"(${Home}/x-tools/${CT_TARGET}) Prefix directory",这个项,并选中"Select"之后点击回车按键,修改为"/Volumes/raspberry/x-tools/${CT_TARGET}"

Crosstool-NG-PathAndMiscDirectory
Crosstool-NG-PathAndMiscOptionsPrefixDirectoryVolumesraspberry

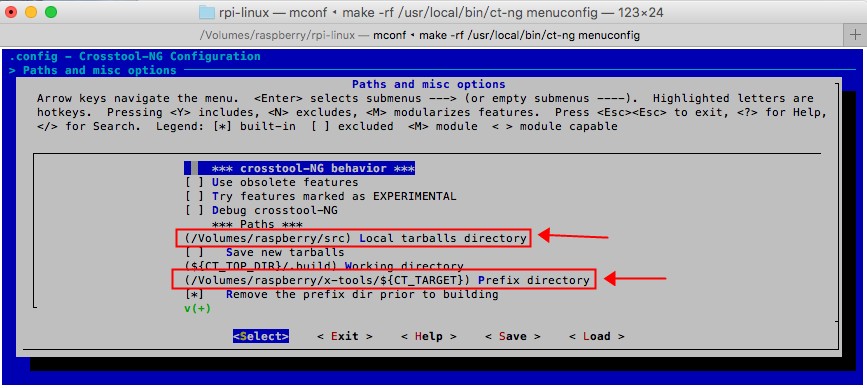
修改后的结果如下图:

Crosstool-NG-PathAndMiscDirectoryChange
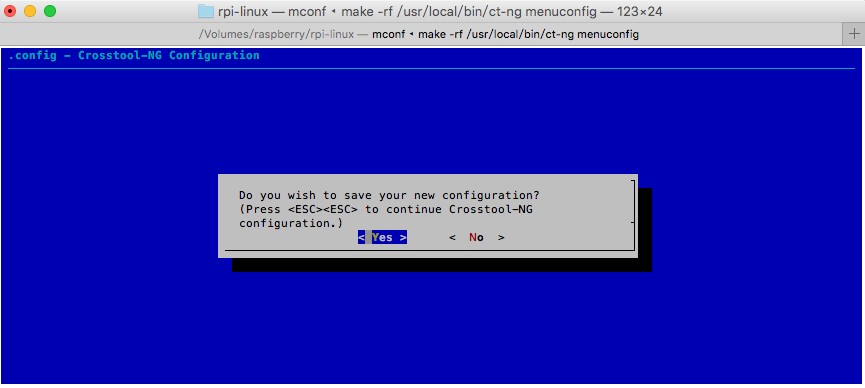
完成操作后,不断快速按下Esc按键,在最后弹出的确认保存窗口中选择保存即可,如下图:

Crosstool-NG-Configure-Save

4.卸载分区

$ hdiutil detach /Volumes/raspberry

JSON相关:JSON-bundle

JSON转成bundle

Intent intent = new Intent();
JSONObject extrasJson = new JSONObject(extras);
Iterator<String> keys=extrasJson.keys();
while (keys.hasNext()) {
    String key = keys.next();
    // 可以根据opt出来的不同类型put
    intent.put(key, extrasJson.optString(key));
}

这里有一个需要注意的地方,SDK19以后,用wrap可以更好的处理get出来是map、array等问题。

bundle转JSON 也就是遍历bundle

JSONObject json = new JSONObject();
Set<String> keys = bundle.keySet();
for (String key : keys) {
    try {
        // json.put(key, bundle.get(key)); see edit below
        json.put(key, JSONObject.wrap(bundle.get(key)));
    } catch(JSONException e) {
        //Handle exception here
    }
}


学习JNI

JNI,是Android中Java与C互通,用法有两种

1.Java 调用C

2.C调用Java


Java调用C比较简单,首先在某个类中声明jni函数

private native void func(String str, String str);

使用javah脚本生成(老司机可以手写)C的头文件,实现该功能即可。

javah使用方法:

在源码根目录,如src目录下,执行

javah packagenamge.class

javah com.android.test.TestClass


C调用Java

C调用Java比较繁琐,需要反射找到Java的方法,google的GLEnvironment有一段很标准的写法

头文件

#include <jni.h>

#ifdef __cplusplus
extern "C"
{
#endif
static struct {
jclass clazzGLEnvironment;
jmethodID lastPageQuit;
} gCallJavaMethod;
void callLastPageQuit(int keycode);
void callCreateVideoView();
void callOnFirstFrame();

#ifdef __cplusplus
}
#endif

实现文件

static int register_javaCallMethod(JNIEnv *env) {
jclass clazz = gCallJavaMethod.clazzGLEnvironment;
if (!gCallJavaMethod.clazzGLEnvironment) {
clazz = env->FindClass("com/yunos/tv/blitz/GLEnvironment");
if (clazz == NULL) {
loge("register_javaCallMethod class not exist!!");
} else {
gCallJavaMethod.clazzGLEnvironment = (jclass)env->NewGlobalRef(clazz);
}
}
if (clazz && !gCallJavaMethod.lastPageQuit) {
gCallJavaMethod.lastPageQuit = env->GetStaticMethodID(clazz, "lastPageQuit", "()V");
}
if (gCallJavaMethod.lastPageQuit == NULL) {
loge("lastPageQuit method get fail!!");
}


void callLastPageQuit(int keycode) {
logi("kecode:%d", keycode);
if (m_Gl_VM == NULL) {
loge("vm null");
return;
}
if (gCallJavaMethod.lastPageQuit == NULL) {
loge("lastPageQuit null");
return;
}
CHECK_JVM_THREAD(m_Gl_VM);
if (error) {
return;
}
env->CallStaticVoidMethod(gCallJavaMethod.clazzGLEnvironment, gCallJavaMethod.lastPageQuit);
if (attached) {
m_Gl_VM->DetachCurrentThread();
}

}


char*-vector


1.如果是想要read到vector中,首先给vector分配足够的大小,之后使用&V[0]即可

std::vector<char> buffer(lSize);
// 如果vector已经存在的话,使用resize方法
// buffer.resize(lSize)
std::fread(&buffer[0], 1, buffer.size(), pFile);

2.非read情况,想要将vector<char>转为char*的话

局部使用可以直接

reinterpret_cast<char*> (&buf[0]);

c++ 11后支持

reinterpret_cast<char*>(buf.data());

非局部需要把vector拷贝到char*,首先给char*分配内存,然后拷贝

char* cbuffer = (char*)malloc(lSize * sizeof(char));

std::copy(buffer.begin(), buffer.end(), cbuffer);

简易hash函数

unsigned long hash(unsigned char *str)
{
unsigned long hash = 5381;
int c;

while (c = *str++)
hash = ((hash << 5) + hash) + c; /* hash * 33 + c */

return hash;
}

用这个函数hash几张图片,得到了同样的值,应该是遇到了0,改进一下

把while循环改成for循环就可以了,不过需要知道字符串的长度

unsigned long hash(unsigned char *str, int size)
{
unsigned long hash = 5381;
int i;

for (i = 0; i < size; i++)
{
int c = (int)str[i];
hash = hash * 33 + c;
}

return hash;
}

提高WEB页面加载速度

从输入url,到打开页面发生了什么?

引用知乎上一个比较好玩的答案:

你发现快要过年了,于是想给你的女朋友买一件毛衣,你打开了www.taobao.com。这时你的浏览器首先查询DNS服务器,将www.taobao.com转换成ip地址。不过首先你会发现,你在不同的地区或者不同的网络(电信、联通、移动)的情况下,转换后的ip地址很可能是不一样的,这首先涉及到负载均衡的第一步,通过DNS解析域名时将你的访问分配到不同的入口,同时尽可能保证你所访问的入口是所有入口中可能较快的一个(这和后文的CDN不一样)。

你通过这个入口成功的访问了www.taobao.com的实际的入口ip地址。这时你产生了一个PV,即Page View,页面访问。每日每个网站的总PV量是形容一个网站规模的重要指标。淘宝网全网在平日(非促销期间)的PV大概是16-25亿之间。同时作为一个独立的用户,你这次访问淘宝网的所有页面,均算作一个UV(Unique Visitor用户访问)。最近臭名昭著的12306.cn的日PV量最高峰在10亿左右,而UV量却远小于淘宝网十余倍,这其中的原因我相信大家都会知道。

因为同一时刻访问www.taobao.com的人数过于巨大,所以即便是生成淘宝首页页面的服务器,也不可能仅有一台。仅用于生成www.taobao.com首页的服务器就可能有成百上千台,那么你的一次访问时生成页面给你看的任务便会被分配给其中一台服务器完成。这个过程要保证公正、公平、平均(暨这成百上千台服务器每台负担的用户数要差不多),这一很复杂的过程是由几个系统配合完成,其中最关键的便是LVS,Linux Virtual Server,世界上最流行的负载均衡系统之一,正是由目前在淘宝网供职的章文嵩博士开发的。

经过一系列复杂的逻辑运算和数据处理,用于这次给你看的淘宝网首页的HTML内容便生成成功了。对web前端稍微有点常识的童鞋都应该知道,下一步浏览器会去加载页面中用到的css、js、图片等样式、脚本和资源文件。但是可能相对较少的同学才会知道,你的浏览器在同一个域名下并发加载的资源数量是有限制的,例如ie6-7是两个,ie8是6个,chrome各版本不大一样,一般是4-6个。我刚刚看了一下,我访问淘宝网首页需要加载126个资源,那么如此小的并发连接数自然会加载很久。所以前端开发人员往往会将上述这些资源文件分布在好多个域名下,变相的绕过浏览器的这个限制,同时也为下文的CDN工作做准备。

据不可靠消息,在双十一当天高峰,淘宝的访问流量最巅峰达到871GB/S。这个数字意味着需要178万个4mb带宽的家庭宽带才能负担的起,也完全有能力拖垮一个中小城市的全部互联网带宽。那么显然,这些访问流量不可能集中在一起。并且大家都知道,不同地区不同网络(电信、联通等)之间互访会非常缓慢,但是你却发现很少发现淘宝网访问缓慢。这便是CDN,Content Delivery Network,即内容分发网络的作用。淘宝在全国各地建立了数十上百个CDN节点,利用一些手段保证你访问的(这里主要指js、css、图片等)地方是离你最近的CDN节点,这样便保证了大流量分散已经在各地访问的加速。
这便出现了一个问题,那就是假若一个卖家发布了一个新的宝贝,上传了几张新的宝贝图片,那么淘宝网如何保证全国各地的CDN节点中都会同步的存在这几张图片供用户使用呢?这里边就涉及到了大量的内容分发与同步的相关技术。淘宝开发了分布式文件系统TFS(taobao file system)来处理这类问题。

好了,这时你终于加载完了淘宝首页,那么你习惯性的在首页搜索框中输入了'毛衣'二字并敲回车,这时你又产生了一个PV,然后,淘宝网的主搜索系统便开始为你服务了。它首先对你输入的内容基于一个分词库进行的分词操作。众所周知,英文是以词为单位的,词和词之间是靠空格隔开,而中文是以字为单位,句子中所有的字连起来才能描述一个意思。例如,英文句子I am a student,用中文则为:“我是一个学生”。计算机可以很简单通过空格知道student是一个单词,但是不能很容易明白“学”、“生”两个字合起来才表示一个词。把中文的汉字序列切分成有意义的词,就是中文分词,有些人也称为切词。我是一个学生,分词的结果是:我 是 一个 学生。

进行分词之后,还需要根据你输入的搜索词进行你的购物意图分析。用户进行搜索时常常有如下几类意图:(1)浏览型:没有明确的购物对象和意图,边看边买,用户比较随意和感性。Query例如:”2010年10大香水排行”,”2010年流行毛衣”, “zippo有多少种类?”;(2)查询型:有一定的购物意图,体现在对属性的要求上。Query例如:”适合老人用的手机”,”500元 手表”;(3)对比型:已经缩小了购物意图,具体到了某几个产品。Query例如:”诺基亚E71 E63″,”akg k450 px200″;(4)确定型:已经做了基本决定,重点考察某个对象。Query例如:”诺基亚N97″,”IBM T60″。通过对你的购物意图的分析,主搜索会呈现出完全不同的结果来。

之后的数个步骤后,主搜索系统便根据上述以及更多复杂的条件列出了搜索结果,这一切是由一千多台搜索服务器完成。然后你开始逐一点击浏览搜索出的宝贝。你开始查看宝贝详情页面。经常网购的亲们会发现,当你买过了一个宝贝之后,即便是商家多次修改了宝贝详情页,你仍然能够通过‘已买到的宝贝’查看当时的快照。这是为了防止商家对在商品详情中承诺过的东西赖账不认。那么显然,对于每年数十上百亿比交易的商品详情快照进行保存和快速调用不是一个简单的事情。这其中又涉及到数套系统的共同协作,其中较为重要的是Tair,淘宝自行研发的分布式KV存储方案。

然后无论你是否真正进行了交易,你的这些访问行为便忠实的被系统记录下来,用于后续的业务逻辑和数据分析。这些记录中访问日志记录便是最重要的记录之一,但是前边我们得知,这些访问是分布在各个地区很多不同的服务器上的,并且由于用户众多,这些日志记录都非常庞大,达到TB级别非常正常。那么为了快速及时传输同步这些日志数据,淘宝研发了TimeTunnel,用于进行实时的数据传输,交给后端系统进行计算报表等操作。

你的浏览数据、交易数据以及其它很多很多的数据记录均会被保留下来。使得淘宝存储的历史数据轻而易举的便达到了十数甚至更多个PB(1PB=1024 TB=1048576GB)。如此巨大的数据量经过淘宝系统1:120的极限压缩存储在淘宝的数据仓库中。并且通过一个叫做云梯的,由2000多台服务器组成的超大规模数据系统不断的进行分析和挖掘。

从这些数据中淘宝能够知道小到你是谁,你喜欢什么,你的孩子几岁了,你是否在谈恋爱,喜欢玩魔兽世界的人喜欢什么样的饮料等,大到各行各业的零售情况、各类商品的兴衰消亡等等海量的信息。

上文中绝大多数是一些WEB后端技术,那么前端能做什么呢?

1.减少HTTP请求数

什么是HTTP请求数,一个css-link标签,一个script标签,一个img-src,都需要一次HTTP请求。当然css-link、script很多时候是同步的,且block页面首次渲染,img是异步的。

页面加载中,大多数时间用在HTTP请求上,如果能减少HTTP请求数,就能大幅提高性能。

1)从设计入手,更少的元素显示更丰富的页面内容。

2)css,js文件合并/压缩,很多优秀的工具如grunt可以很方便的完成这件事。

3)CSS Sprites技术,即把所有背景图放到一张图片内,使用CSS技术:background-image,background-position来显示图片的不同部分。

<div>
    <span id="image1" class="nav"></span>
    <span id="image2" class="nav"></span>
    <span id="image3" class="nav"></span>
    <span id="image4" class="nav"></span>
    <span id="image5" class="nav"></span>
</div>
.nav {
    width: 50px;
    height: 50px;
    display: inline-block;
    border: 1px solid #000;
    background-image: url('E:/1.png');
}
#image1 {
        background-position: 0 0;
}
#image2 {
        background-position: -95px 0;
}
#image3 {
        background-position: -185px 0;
}
#image4 {
        background-position: -275px 0;
}
#image5 {
        background-position: -366px -3px;
}

但这个只适用于图片元素紧挨在一起,而且定位比较繁琐,很容易出错,且不能指定手工形状。

2.减少DNS查找次数

3.避免跳转

值得一提的一个现象,如真正的url是 http://xxx.xxx.xx/,而我们输入了http://xxx.xxx.xx,这就会造成一次跳转。

4.可缓存的AJAX

5.延迟加载

确定一下页面哪些内容是页面首次渲染时必须加载的,哪些内容稍微延后加载效果会更好?

6.预加载

预加载是浏览器引擎的一种技术,如页面加载,遇到了js脚本,就需要同步的去解析/执行JS。这时候,开一个线程,遍历一下页面中其他需要下载的元素,去下载它们。

业务预加载:业务的预加载是指在空闲的时候(onload之后),可以使用JS脚本去加载那些尚未显示出来的内容,一般是img,也可以是css和js。

7.减少DOM数量

8.根据域名划分页面内容

9.尽量少的iframe

10.使用CDN

11.为文件头指定Expires和Cache-Contorl

对于静态内容:设置文件头过期时间Expires的值为“Never expire”(永不过期)
对于动态内容:使用恰当的Cache-Control文件头来帮助浏览器进行有条件的请求

12.Gzip

13.使用Etag

14.使用flush

15.使用GET来完成AJAX请求

16.css置于顶部

17.不使用css表达式

18.使用外部js和css

19.js置于页面底部

20.减少JS对DOM的访问

21.优化图像

22.不要缩放图像

http://lehsyh.iteye.com/blog/2111265


gitlab: MergeRequest、reset

Merge request

什么是Merge request,多人开发项目时,发起将一个远程分支merge到另一个分支(一般为主分支)的请求。

merge request步骤:

1.如果开发完了某个模块的功能,需要提交到线上。

2.首先,git fetch --all,仓库代码图拉下来,把线上的代码更新后合并到自己的本地分支上。

3.解决冲突

4.再次合并代码,没有问题后,git push origin 本地分支名。这样就会在远程仓库创建一个remotes/origin/本地分支名 的分支。

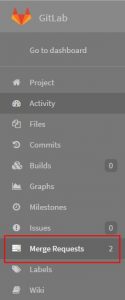
5.gitlab上,,进入mergeRequest页面,选择newMergeRequest(右上角绿色按钮)。merge

6.选择要merge的source分支,CONTINUE。

7.填写描述,添加reviwer(重要)。

8.等待结果,如果有冲突,需要从头再来。

Reset

bg2014061202


git reset 撤销命令

reset有三种模式

git reset --soft HEAD 本地文件不变,撤销掉commit,不撤销index

git reset --hard HEAD 本地文件改为HEAD,所有commit/index都修改掉

git reset HEAD     本地文件不变,撤销掉commit/index


如果只想恢复某一个文件,只需要

git checkout filename

恢复所有文件到当前HEAD

git checkout .


gl接口耗时?

调用glclear接口,发现它耗时比较长,翻了翻stackoverflow。

Measuring the elapsed time of an OpenGL API call is mostly meaningless.

研究OpenGL接口的耗时是无意义的。

Asynchronicity

The key aspect to understand is that OpenGL is an API to pass work to a GPU.

The easiest mental model (which largely corresponds to reality) is that when you make OpenGL API calls, you queue up work that will later be submitted to the GPU. For example, if you make a glDraw*() call, picture the call building a work item that gets queued up, and at some point later will be submitted to the GPU for execution.

In other words, the API is highly asynchronous. The work you request by making API calls is not completed by the time the call returns. In most cases, it's not even submitted to the GPU for execution yet. It is only queued up, and will be submitted at some point later, mostly outside your control.

A consequence of this general approach is that the time you measure to make a glClear() call has pretty much nothing to do with how long it takes to clear the framebuffer.

Synchronization

Now that we established how the OpenGL API is asynchronous, the next concept to understand is that a certain level of synchronization is necessary.

Let's look at a workload where the overall throughput is limited by the GPU (either by GPU performance, or because the frame rate is capped by the display refresh). If we kept the whole system entirely asynchronous, and the CPU can produce GPU commands faster than the GPU can process them, we would be queuing up a gradually increasing amount of work. This is undesirable for a couple of reasons:

  • In the extreme case, the amount of queued up work would grow towards infinity, and we would run out of memory just from storing the queued up GPU commands.
  • In apps that need to respond to user input, like games, we would get increasing latency between user input and rendering.

To avoid this, drivers use throttling mechanisms to prevent the CPU from getting too far ahead. The details of how exactly this is handled can be fairly complex. But as a simple model, it might be something like blocking the CPU when it gets more than 1-2 frames ahead of what the GPU has finished rendering. Ideally, you always want some work queued up so that the GPU never goes idle for graphics limited apps, but you want to keep the amount of queued up work as small as possible to minimize memory usage and latency.

Meaning of Your Measurement

With all this background information explained, your measurements should be much less surprising. By far the most likely scenario is that your glClear() call triggers a synchronization, and the time you measure is the time it takes the GPU to catch up sufficiently, until it makes sense to submit more work.

Note that this does not mean that all the previously submitted work needs to complete. Let's look at a sequence that is somewhat hypothetical, but realistic enough to illustrate what can happen:

  • Let's say you make the glClear() call that forms the start of rendering frame n.
  • At this time, frame n - 3 is on the display, and the GPU is busy processing rendering commands for frame n - 2.
  • The driver decides that you really should not be getting more than 2 frames ahead. Therefore, it blocks in your glClear() call until the GPU finished the rendering commands for frame n - 2.
  • It might also decide that it needs to wait until frame n - 2 is shown on the display, which means waiting for the next beam sync.
  • Now that frame n - 2 is on the display, the buffer that previously contained frame n - 3 is not used anymore. It is now ready to be used for frame n, which means that the glClear()command for frame n can now be submitted.

Note that while your glClear() call did all kinds of waiting in this scenario, which you measure as part of the elapsed time spent in the API call, none of this time was used for actually clearing the framebuffer for your frame. You were probably just sitting on some kind of semaphore (or similar synchronization mechanism), waiting for the GPU to complete previously submitted work.

Conclusion

Considering that your measurement is not directly helpful after all, what can you learn from it? Unfortunately not a whole lot.

If you do observe that your frame rate does not meet your target, e.g. because you observe stuttering, or even better because you measure the framerate over a certain time period, the only thing you know for sure is that your rendering is too slow. Going into the details of performance analysis is a topic that is much too big for this format. Just to give you a rough overview of steps you could take:

  • Measure/profile your CPU usage to verify that you are really GPU limited.
  • Use GPU profiling tools that are often available from GPU vendors.
  • Simplify your rendering, or skip parts of it, and see how the performance changes. For example, does it get faster if you simplify the geometry? You might be limited by vertex processing. Does it get faster if you reduce the framebuffer size? Or if you simplify your fragment shaders? You're probably limited by fragment processing.


OpenGL是GPU的API

API call是以eventloop的形式工作

但需要一定的同步工作,任务数量太多,延迟会变大,开发者又需要尽快响应用户,GPU需要跟CPU保持一定过得同步。简单的来说,如果CPU发出的绘制指令超出GPU太多(1-2帧),GPU会锁住CPU。

在这个背景下,就可以解释为什么glClear耗时了,因为它触发了一次同步。

已3个缓冲区为例,n-3在绘制,n-2在合成,The driver decides that you really should not be getting more than 2 frames ahead。glClear就会block住,直到GPU工作完。

GPU工作渲染完n-2,glClear就会提交n。

最终结论,绘制太慢导致的。

可以看看CPU消耗,看看是不是CPU被锁住了。
安装应用失败:INSTALL_PARSE_FAILED_INCONSISTENT_CERTIFICATES、INSTALL_FAILED_UID_CHANGED、INSTALL_FAILED_ALREADY_EXISTS

adb install 一个apk错误:

INSTALL_FAILED_ALREADY_EXISTS

应用已存在,使用 adb install -r xx.apk 即重新安装

INSTALL_PARSE_FAILED_INCONSISTENT_CERTIFICATES

签名冲突,说明系统存在这个应用,且签名有冲突,先执行 adb uninstall xx.apk

但还是提示这个错误


如何彻底卸载掉一个apk?

去/data/system/packages.xml中,把这个包相关的行全部删掉

INSTALL_FAILED_UID_CHANGED

应用删除不干净,还有残留文件,去

/data/app(apk file), /system/app/(apk file), /data/data/(data file)几个目录下,把应用相关数据删掉。

重启


安装成功。