Ubuntu 14.04系统上使用Apache2.4.10+PHP5+FastCGI的WordPress网站大量php5-cgi defunct引起网站访问异常缓慢

最近网站访问异常缓慢,网站响应时间明显延迟很多,观察系统的处理器占用,一点都不高,带宽也在合理范围之内,因此分析Apache-2.4.10的错误日志

$ cat /var/log/apache2/error.log
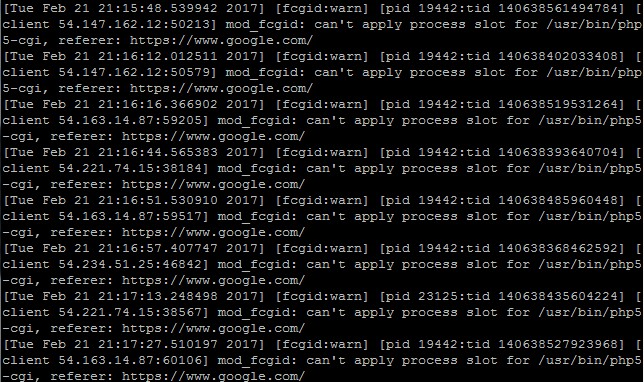
发现大量的出现

[Tue Feb 21 21:16:12.012511 2017] [fcgid:warn] [pid 19442:tid 140638402033408] [client 54.147.162.12:50579] mod_fcgid: can't apply process slot for /usr/bin/php5-cgi, referer: https://www.google.com/

如下图:

感觉很奇怪,于是看了一下php相关的进程,执行命令

$ ps -A | grep php

执行结果如下图:

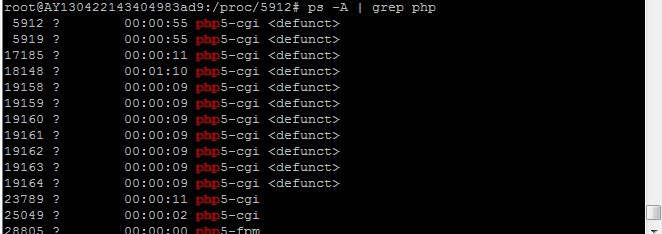
发现大量的php5-cgi进程处于defunct状态(僵尸状态),导致达到了进程数量的限制上限,无法继续提供服务。

但是上面的日志,是已经出现问题的时候的日志,既然进程不足了,自然无法提供服务了,继续向上追踪,发现大量的进程崩溃日志

[Mon Feb 20 18:07:12.857016 2017] [core:warn] [pid 15284:tid 139855916136320] AH00045: child process 15291 still did not exit, sending a SIGTERM
[Mon Feb 20 18:07:12.857024 2017] [core:warn] [pid 15284:tid 139855916136320] AH00045: child process 15408 still did not exit, sending a SIGTERM
[Mon Feb 20 18:07:12.857031 2017] [core:warn] [pid 15284:tid 139855916136320] AH00045: child process 17723 still did not exit, sending a SIGTERM
[Mon Feb 20 18:07:14.859108 2017] [core:warn] [pid 15284:tid 139855916136320] AH00045: child process 16387 still did not exit, sending a SIGTERM
[Mon Feb 20 18:07:14.859170 2017] [core:warn] [pid 15284:tid 139855916136320] AH00045: child process 15291 still did not exit, sending a SIGTERM
[Mon Feb 20 18:07:14.859178 2017] [core:warn] [pid 15284:tid 139855916136320] AH00045: child process 15408 still did not exit, sending a SIGTERM
[Mon Feb 20 18:07:14.859185 2017] [core:warn] [pid 15284:tid 139855916136320] AH00045: child process 17723 still did not exit, sending a SIGTERM

感觉很奇怪,最初以为是由于调整Apache-2.4.10服务器,多次在正常运行中重启服务器,导致正在服务的php5-cgi进程变成了僵尸进程。但是重启服务器之后,过了几天后,问题依旧发生了。

于是网上搜索了一下,感觉应该更像是PHP-CGI进程本身存在内存泄漏问题,导致进程长时间执行之后,由于资源开销问题导致进程崩溃。

目前我的服务器上启用的是Apache2Event MPM模块,查看其中的配置文件:

$ cat /etc/apache2/mods-enabled/mpm_event.conf

可以看到里面的内容如下:

# event MPM
# StartServers: initial number of server processes to start
# MinSpareThreads: minimum number of worker threads which are kept spare
# MaxSpareThreads: maximum number of worker threads which are kept spare
# ThreadsPerChild: constant number of worker threads in each server process
# MaxRequestWorkers: maximum number of worker threads
# MaxConnectionsPerChild: maximum number of requests a server process serves
<IfModule mpm_event_module>
	StartServers			 2
	MinSpareThreads		 25
	MaxSpareThreads		 75
	ThreadLimit			 64
	ThreadsPerChild		 25
	MaxRequestWorkers	  150
	MaxConnectionsPerChild   0
</IfModule>

发现,设置MaxConnectionsPerChild参数为0,根据 Apache MPM Common Directives 里面的介绍,这个参数的作用就是一个进程处理多少个请求后就退出。而如果设置了 0 则代表,除非出现了异常,否则进程会一直存在。这样的话,一旦资源泄漏,进程就会各种异常了。因此需要设置一下这个参数,一般这个参数设置为1000-5000左右,根据实际情况自己调整一下参数。注意这个参数的设置是会影响到网站的访问速度的,尤其是当服务器的连接次数到达限制的时候,此时大量的服务器进程都在重启,导致此时的访问要么被重置要么耗时变的非常长。因此,如果没有资源泄漏的话,可以不设置这个限制。

注意一下这个介绍的最后一句话,讲的就是这个参数可以修正资源泄漏问题,如下:

Setting MaxConnectionsPerChild to a non-zero value limits the amount of memory that process can consume by (accidental) memory leakage.

修改参数后,需要重启服务生效。

按照上面的方法实现后,过了一个礼拜后,这个现象再次发生了。

观察了一下Apache2当前已经启用的模块

$ ls /etc/apache2/mods-enabled/

发现,由于是从Apache2.2升级到的Apache2.4,或许是某次的配置,导致fastcgifcgi两个模块同时被启用了。

是不是两个相同功能的模块同时启用导致功能冲突了呢?

先尝试禁用fastcgi(这个模块已经被fcgi替换了).

$ a2dismod fastcgi

$ service apache2 restart

目前看来,问题依旧发生了!!!

查看Apache2中的FastCGI的配置信息

$ vim /etc/apache2/mods-enabled/fcgid.conf

可以看到如下内容

<IfModule mod_fcgid.c>
  AddHandler    fcgid-script .fcgi .php
  FcgidConnectTimeout 120
  DefaultMaxClassProcessCount 10
  MaxRequestLen  157286400
  IPCCommTimeout 300
</IfModule>

其中的AddHandler中的.php引起了注意,因为在日志中出现问题之前一直会出现如下的错误日志:

[Tue Feb 21 01:56:12.876460 2017] [fcgid:warn] [pid 21582:tid 140134271887104] [client 114.82.132.78:2410] mod_fcgid: can't apply process slot for /usr/bin/php5-cgi, referer: http://www.mobibrw.com/plus/90sec.php
[Tue Feb 21 01:56:16.727715 2017] [fcgid:warn] [pid 20546:tid 140134255101696] [client 114.82.132.78:2647] mod_fcgid: can't apply process slot for /usr/bin/php5-cgi, referer: http://www.mobibrw.com/plus/spider.php
[Tue Feb 21 01:56:20.434429 2017] [fcgid:warn] [pid 21582:tid 140134263494400] [client 114.82.132.78:3049] mod_fcgid: can't apply process slot for /usr/bin/php5-cgi, referer: http://www.mobibrw.com/plus/e7xue.php
[Tue Feb 21 01:56:35.130495 2017] [fcgid:warn] [pid 20546:tid 140134297065216] [client 114.82.132.78:3446] mod_fcgid: can't apply process slot for /usr/bin/php5-cgi, referer: http://www.mobibrw.com/plus/x.php
[Tue Feb 21 01:56:38.668792 2017] [fcgid:warn] [pid 20546:tid 140134238316288] [client 114.82.132.78:3985] mod_fcgid: can't apply process slot for /usr/bin/php5-cgi, referer: http://www.mobibrw.com/plus/service.php
[Tue Feb 21 01:56:42.247574 2017] [fcgid:warn] [pid 22275:tid 140134263494400] [client 114.82.132.78:4368] mod_fcgid: can't apply process slot for /usr/bin/php5-cgi, referer: http://www.mobibrw.com/plus/av.php

而这个配置项是从Ubuntu 12.04中手工引入的,我们尝试去掉这个。另外,可以看到

DefaultMaxClassProcessCount 10

也就是FastCGI的最大进程数是被设置成了10,但是,我这边限制PHP-FPM的最大进程数为5,是不是FastCGI的进程数如果大于PHP-FPM能够提供服务的数量的时候,会导致FastCGI进程出现僵尸状态呢? 是不是这个原因导致的呢? 于是修改后的结果如下:

<IfModule mod_fcgid.c>
  AddHandler    fcgid-script .fcgi
  FcgidConnectTimeout 120
  DefaultMaxClassProcessCount 5
  MaxRequestLen  157286400
  IPCCommTimeout 300
</IfModule>

经过这几天的观察,貌似现象不再出现了,这个应该是Apache 2.4版本引入的BUG,以前的配置的Apache 2.2版本上是没有任何问题的,究竟原因是mod_fcgid无法处理.php格式的脚本导致,还是由于mod_fcgid进程数高于php-fpm的进程数导致mod_fcgid进程长时间无法获取到可用的php-fpm连接,导致进程被饿死,这个暂时不详细追究了。

今天在修改配置的时候,由于配置错误,导致PHP-FPM服务无法正常启动,但是整个服务器竟然一直可以正常访问,那么结论就是Apache 2.4在当前的配置下,根本就没有使用PHP-FPM模式进行通信,而是使用标准的FastCGI的方式调度的。
于是网上搜索半天,结合自己的尝试,找到了根本原因:

<Directory /var/www/wordpress>
		#Options Indexes FollowSymLinks MultiViews
		Options FollowSymLinks MultiViews
		AllowOverride All
		FCGIWrapper /usr/bin/php5-cgi .php
		AddHandler fcgid-script .php
		Options ExecCGI SymLinksIfOwnerMatch
		Order allow,deny
		allow from all
</Directory>

上面的配置在Apache 2.2版本上是不影响后面启用的PHP-FPM配置的,对于PHP的请求,最终都是定向到PHP-FPM的。但是相同的配置在Apache 2.4上面,则被定向到了FastCGI上面。因此修改方式如下(至少要高于2.4.10,否则配置无效):

<Directory /var/www/wordpress>
		#Options Indexes FollowSymLinks MultiViews
		Options FollowSymLinks MultiViews
		AllowOverride All
#		Apache 2.2/2.4.9
#		FCGIWrapper /usr/bin/php5-cgi .php
#		AddHandler fcgid-script .php
#		Options ExecCGI SymLinksIfOwnerMatch
#		Apache 2.4.10
		<FilesMatch \.php$>
			SetHandler "proxy:unix:/var/run/php5-fpm.sock|fcgi://localhost"
		</FilesMatch>	
		Order allow,deny
		allow from all
</Directory>

至此,应该才是从根本上解决了服务器上的问题。

开始的时候忽略了一个基础的问题,那就是php5-cgiphp5-fpm进程本身就不应该同时存在,如果服务器使用php5-fpm,那么php5-cgi的进程就不应该被调用,这个问题没有重视,导致了整个问题分析时间冗长,反复。

本质上是服务器的配置错误导致问题。

Ubuntu 14.04上的Apache服务器限制单个用户的下载带宽

今天突然发现自己的服务器访问异常缓慢,从阿里云的监控平台上看到,CPU的利用率并不高,但是带宽却已经被吃满了,导致网站访问异常缓慢,跟踪了一下发现是某个用户下载网站上的大文件导致了带宽吃紧的情况。因此需要限制某个用户的独占带宽。

具体操作


1.安装带宽限制模块

$ sudo apt-get install libapache2-mod-bw

2.启用模块

$ a2enmod bw

3.配置网站对于带宽的限制规则

$ sudo vim /etc/apache2/sites-enabled/000-default.conf

在原有的

<VirtualHost *:80>
...................
...................
</VirtualHost>

之间增加如下内容

# activate bandwidth limitation
BandwidthModule On
ForceBandWidthModule On
# * 表示文件类型,所有大于1000k的文件下载速度100k , 这里我当时以为两个单位一样的。。。
LargeFileLimit * 1000 100000
# 不限制单个用户的带宽占用
BandWidth all 0
# 每个IP地址建立的最大连接数量,由于NAT上网的存在,多用户可能同一个外网IP,因此这个数字不可太小
MaxConnection all 120

然后重启Apache2.

$ sudo service apache2 restart

注意,如果配置了HTTPS,那么对应的配置文件也需要调整。

参考链接


Ubuntu 14.04服务器Apache禁止某些User Agent抓取网站

最近网站上,被某些爬虫占用了太大的资源,导致访问不畅,网上搜了一下禁止某些爬虫的办法。

下面这些方法需要同时实施才足够稳妥。

1.在网站根目录下修改或创建.htaccess文件

<IfModule mod_rewrite.c>
 RewriteEngine On
 RewriteCond %{HTTP_USER_AGENT} ^YisouSpider* [NC]
 RewriteRule ^(.*)$ - [F,L]
</IfModule>

注意,这个过滤条件需要添加到整个.htaccess文件的头部,否则可能由于其他的过滤条件而跳过了这个过滤条件,导致某些情况下不生效。

2.修改Apache2的配置文件

$ vim /etc/apache2/sites-available/000-default.conf

禁止某些User-Agent的访问

<Directory "/var/www/wordpress">
 SetEnvIfNoCase User-Agent ".*(YisouSpider)" denySpider
 Order allow,deny
 Allow from all
 deny from env=denySpider
</Directory>

注意:

env=denySpider

中间不可用空格,否则无法成功生效。

3.网站根目录下面增加robot.txt,禁止爬虫

#一搜的爬虫访问过于频繁
User-agent:YisouSpider
Disallow:/

4.对于使用ProxyPass,ProxyPassReverse代理转发的情况

使用如下配置进行过滤

<Proxy "*">
 SetEnvIfNoCase User-Agent ".*(YisouSpider)" denySpider
 Order Allow,Deny
 Allow from all
 Deny from env=denySpider
</Proxy>

注意:

env=denySpider

中间不可用空格,否则无法成功生效。

5.验证刚刚的服务器设置是否已生效

刚刚的设置完成后,我们需要修改浏览器的User Agent,来验证一下我们的设置是否已经生效了。
Chrome-55.0为例,Windows下面按下F12,在弹出的窗口中进行如下操作:

参考链接


服务器反爬虫攻略:Apache/Nginx/PHP禁止某些User Agent抓取网站

Apache-2.4使用ServerAlias实现同一个网站绑定多个域名(Ubuntu 14.04)

最近自己申请了多个域名,打算绑定到同一台服务器上面,网上搜索了一下,很多的答案是开多个主机的方式来处理,方式可以,但是比较繁琐,不如使用ServerAlias来的方便。
ServerAlias:服务器别名,在Apache中可以用于设置虚拟主机接收到个域名,也可以用于接收泛解析的域名。具体的设置方法如下:

$ sudo vim /etc/apache2/sites-enabled/000-default.conf

可以看到如下的配置内容:

<VirtualHost *>
	ServerName www.mobibrw.com
	ServerAlias www.mobibrw.com mobibrw.com www.miniab.com miniab.com
	<Directory />
		Options Indexes FollowSymLinks
		AllowOverride all
	</Directory>
</VirtualHost>

注意其中的ServerAlias字段,就是指定多个域名同时指向的这个服务器的。中间用空格来区分。

注意上述的ServerAlias中,包含www字段的域名www.mobibrw.com,跟不包含www字段的域名mobibrw.com声明了两次,目的是某些浏览器在进行域名认证的时候(HTTPS证书校验),采用的是全字匹配,导致尽管这两个实际上是指向同一个地址,但是这些浏览器会报告域名证书不正确。

同样道理,对于使用了HTTPS的服务器来说,这个更重要

$ sudo vim /etc/apache2/sites-enabled/000-default-le-ssl.conf

执行跟上述相同设置即可。
如果跟本站一样使用Let‘s Encrypt颁发的SSL证书的网站来说,修改完成配置后,需要重新申请一下证书。

Tomcat 7使用AJP协议导致AJP端口被意外暴露给外网

使用Ubuntu 13.10 Apache 2.2 通过 AJP 整合 Tomcat 7中的方法配置了通过AJP协议来通过Apache进行访问的代理。

但是最近发现Tomcat有时候会崩溃掉。刚刚开始以为是正常的OOM,后来分析日志,并没有找到相关的记录,反倒是发现如下内容:

Jan 26, 2016 5:06:47 PM org.apache.coyote.ajp.AjpMessage processHeader
SEVERE: Invalid message received with signature 18245
Jan 26, 2016 5:06:48 PM org.apache.coyote.ajp.AjpMessage processHeader
SEVERE: Invalid message received with signature 5635
Jan 26, 2016 5:06:48 PM org.apache.coyote.ajp.AjpMessage processHeader
SEVERE: Invalid message received with signature 18245
Jan 26, 2016 5:06:48 PM org.apache.coyote.ajp.AjpMessage processHeader
SEVERE: Invalid message received with signature 3338
Jan 26, 2016 5:06:48 PM org.apache.coyote.ajp.AjpMessage processHeader
SEVERE: Invalid message received with signature 20304
Jan 26, 2016 5:06:48 PM org.apache.coyote.ajp.AjpMessage processHeader
SEVERE: Invalid message received with signature 20304
Jan 26, 2016 5:06:48 PM org.apache.coyote.ajp.AjpMessage processHeader
SEVERE: Invalid message received with signature 32768
Jan 26, 2016 5:06:48 PM org.apache.coyote.ajp.AjpMessage processHeader
SEVERE: Invalid message received with signature 30

于是感觉有些奇怪,因为AJP协议应该不会发生非常频繁的通信协议错误问题。结果尝试从外网连接TomcatAjp端口8009,发现竟然可以通过telnet连接成功!!说明端口意外暴露给了外网。

那么根据The AJP Connector中的介绍说明(注意address部分),如果没有指定IP地址的话,默认是绑定任意地址,这样就导致外网也可以访问这个端口。因此出于安全考虑,我们需要增加这个address的设置,并且绑定到127.0.0.1。最终结果如下:

<!-- Define an AJP 1.3 Connector on port 8009 -->
<Connector port="8009" protocol="AJP/1.3" address="127.0.0.1" redirectPort="8443" />

而我在配置的时候,恰恰少设置了address="127.0.0.1".这个这种错误有些低级啊。

Ubuntu 14.04系统Apache 2.4.7版本使用mod_headers过滤HTTP响应头中的WP-Super-Cache字段

服务器上面安装了WP-Super-Cache后,服务器的响应报文中会自动增加一个WP-Super-Cache字段,这个字段会暴露服务器的一些细节,而WP-Super-Cache的设置中又没有找到去掉这个字段的设置选项。

如下图:

WP-Super-Cache-Http-Response

比较简单的解决方法就是,使用Apache2自带的mod_headers模块,通过修改.htacess配置文件的方式来去掉这个响应信息。

1.在网站目录下的.htacess文件中增加如下语句

<IfModule mod_headers.c>
	Header always unset WP-Super-Cache
</IfModule>

2.启用mod_headers模块

$ sudo a2enmod headers

3.重启Apache2服务

$ sudo service apache2 restart

Ubuntu 14.04主机优化加速mod_pagespeed安装使用

背景介绍


谷歌优化加速mod_pagespeed作为Apache HTTP Server的module,它能在服务网页请求的即时做出超过15种的优化调整,包括优化缓存,最小化客户端—服务器往返路程,压缩有效传输体积。
经过实验观察,mod_pagespeed最高能使页面加载时间压缩50%。
项目已经被迁移到了GitHub,链接地址为:https://github.com/pagespeed/mod_pagespeed

Apache mod_pagespeed安装方法


1.下载安装包

32位系统

$ wget https://dl-ssl.google.com/dl/linux/direct/mod-pagespeed-stable_current_i386.rpm

64位系统

$ wget https://dl-ssl.google.com/dl/linux/direct/mod-pagespeed-stable_current_amd64.deb

鉴于国内被和谐的情况,可以本站下载 64位Ubuntu点击这里 32位Ubuntu点击这里

2.安装

$ dpkg -i mod-pagespeed-*.deb

3.重启Apache2

$ sudo service apache2 restart

4.检查是否安装成功

$ apachectl -M | grep pagespeed
 pagespeed_module (shared)

5.潜在问题

安装这个插件之后,可能会导致页面在不同操作系统之间的显示错乱问题,目前WordPress上会出现这种问题,应该是缓存导致的问题,因为WordPress会根据系统,浏览器的不同来进行页面兼容处理,如果直接返回缓存数据,反而会出问题。目前暂时只能是禁用这个插件了。

另外,当主机的CPU,内存有限的情况下,这个模块反而增加了系统开销,导致系统响应缓慢。有些Javascript代码被优化后,会工作不正常,目前看来,对小网站来说副作用大于正面作用。

$ sudo a2dismod pagespeed
$ sudo service apache2 restart

参考链接


主机优化加速mod_pagespeed和ngx_pagespeed安装使用

Ubuntu 14.04编译安装Apache 2.4.20

1.安装开发工具包

$ sudo apt-get install build-essential

2.下载Apache 2.4.20的源代码

$ wget http://apache.opencas.org//httpd/httpd-2.4.20.tar.gz

3.安装apr依赖库

$ sudo apt-get install libapr1 libaprutil1 libapr1-dev libaprutil1-dev

4.安装pcre

$ sudo apt-get install libpcre++-dev

5.解压缩代码

$ tar -zxvf httpd-2.4.20.tar.gz

6.配置并编译

$ cd  httpd-2.4.20

$ ./configure \
	--prefix=/opt/apache-2.4.20 \
	--enable-ssl \
	--with-mpm=event \
	--enable-rewrite \
	--enable-proxy \
	--enable-layout=Debian \
	--enable-so \
	--with-suexec-caller=www-data \
	--with-suexec-docroot=/var/www  \
	--enable-deflate \
	--enable-headers \
	--with-program-name=apache2
	
$ make && make install

参考链接


Ubuntu 12.04升级到Ubuntu 14.04导致Apache2从2.2升级到2.4.10版本PHP服务器的重新修正

现象


服务器已经根据Ubuntu 12.04下安装配置Worker工作模式的Apache 支持PHP设置成了Worker模式,但是当系统从Ubuntu 12.04升级到Ubuntu 14.04导致Apache22.2升级到2.4.10版本后,而MPM模块被还原为prefork模式,导致大量的Apache2进程被创建出来,时间稍微一长,系统出现大量的OOM记录,直到系统最后宕机。

Ubuntu 14.04下查看所有可用的MPM模块,命令如下:

$ ls /etc/apache2/mods-available/mpm*
/etc/apache2/mods-available/mpm_event.conf
/etc/apache2/mods-available/mpm_event.load
/etc/apache2/mods-available/mpm_prefork.conf
/etc/apache2/mods-available/mpm_prefork.load
/etc/apache2/mods-available/mpm_worker.conf
/etc/apache2/mods-available/mpm_worker.load

查看当前正在使用的MPM模块,命令如下:

$ ls  /etc/apache2/mods-enabled/mpm*
/etc/apache2/mods-enabled/mpm_prefork.conf
/etc/apache2/mods-enabled/mpm_prefork.load

可以看到,目前正在使用的模块就是prefork模块。

使用apachectl -V | grep -i mpm可以更加清晰的打印出当前使用的模块

$ apachectl -V | grep -i mpm
Server MPM:     prefork

注意,在Ubuntu 14.04下执行apache2 -l命令与Ubuntu 12.04下面的输出结果是不同的,Ubuntu 14.04下如果使用prefork模块输出的信息如下:

$ apache2 -l
Compiled in modules:
  core.c
  mod_so.c
  mod_watchdog.c
  http_core.c
  mod_log_config.c
  mod_logio.c
  mod_version.c
  mod_unixd.c

默认情况下Ubuntu 14.04中的PHP默认是没有线程安全支持,如果使用mpm_event支持的话,会提示如下信息:

Apache is running a threaded MPM, but your PHP Module is not compiled to be threadsafe. 
You need to recompile PHP

修复方式


1.重新安装系统升级过程中可能会被移除的PHP-FPM模块

$ sudo apt-get install libapache2-mod-fastcgi php5-fpm

2.关闭Apache2内建的PHP支持,开启Apache2的FastCGI,PHP5-FPM支持

$ a2dismod php5

$ a2enmod actions fastcgi alias

$ a2enconf php5-fpm

3.修改PHP5-FPM的配置文件

$ sudo vim /etc/php5/fpm/pool.d/www.conf

找到

; The address on which to accept FastCGI requests.
; Valid syntaxes are:
;   'ip.add.re.ss:port'    - to listen on a TCP socket to a specific address on
;                            a specific port;
;   'port'                 - to listen on a TCP socket to all addresses on a
;                            specific port;
;   '/path/to/unix/socket' - to listen on a unix socket.
; Note: This value is mandatory.
listen = 127.0.0.1:9000

; Set listen(2) backlog. A value of '-1' means unlimited.
; Default Value: 128 (-1 on FreeBSD and OpenBSD)
;listen.backlog = -1

; Set permissions for unix socket, if one is used. In Linux, read/write
; permissions must be set in order to allow connections from a web server. Many
; BSD-derived systems allow connections regardless of permissions.
; Default Values: user and group are set as the running user
;                 mode is set to 0666
;listen.owner = www-data
;listen.group = www-data
;listen.mode = 0666

修改为:

; The address on which to accept FastCGI requests.
; Valid syntaxes are:
;   'ip.add.re.ss:port'    - to listen on a TCP socket to a specific address on
;                            a specific port;
;   'port'                 - to listen on a TCP socket to all addresses on a
;                            specific port;
;   '/path/to/unix/socket' - to listen on a unix socket.
; Note: This value is mandatory.
;listen = 127.0.0.1:9000
listen = /var/run/php5-fpm.sock

; Set listen(2) backlog. A value of '-1' means unlimited.
; Default Value: 128 (-1 on FreeBSD and OpenBSD)
;listen.backlog = -1

; Set permissions for unix socket, if one is used. In Linux, read/write
; permissions must be set in order to allow connections from a web server. Many
; BSD-derived systems allow connections regardless of permissions.
; Default Values: user and group are set as the running user
;                 mode is set to 0666
listen.owner = www-data
listen.group = www-data
listen.mode = 0666

注意,上面修改了四处地方,listen,listen.owner,listen.group,listen.mode
注意,如果提示如下错误:

[Fri May 09 09:13:06.149292 2014] [fastcgi:error] [pid 18537:tid 139690281211648] (13)Permission denied: [client 192.168.33.101:35036] FastCGI: failed to connect to server "/usr/lib/cgi-bin/php5-fcgi": connect() failed
[Fri May 09 09:13:06.255308 2014] [fastcgi:error] [pid 18537:tid 139690281211648] [client 192.168.33.101:35036] FastCGI: incomplete headers (0 bytes) received from server "/usr/lib/cgi-bin/php5-fcgi"

则说明listen.owner,listen.group,listen.mode这三行没有打开。
4.重启PHP5-FPM服务

$ sudo /etc/init.d/php5-fpm restart

5.切换Apache2Event-MPM模式

$ sudo a2dismod mpm_prefork

$ sudo a2dismod mpm_worker

$ sudo a2dismod mpm_itk

$ sudo a2enmod mpm_event

6.启用Apache2cache,expire,gzip模块,加强服务器性能

$ sudo a2enmod cache

$ sudo a2enmod expires

$ sudo a2enmod deflate

7.卸载libapache2-mod-php5,否则每次这个模块更新之后,都会导致apache2被自动切换到mpm_prefork模式

$ sudo apt-get remove libapache2-mod-php5

8.调整配置文件

Apache 2.4.10的配置文件如果按照Apache 2.2的配置文件的话,是没办法启用PHP-FPM的,Apache 2.4.10版本使用SetHandler的方式支持PHP-FPM是改动最少的一种方式了。

$ sudo vim /etc/apache2/sites-enabled/000-default.conf

找到

<Directory /var/www/wordpress>
  #Options Indexes FollowSymLinks MultiViews
  Options FollowSymLinks MultiViews
  AllowOverride All
  FCGIWrapper /usr/bin/php5-cgi .php
  AddHandler fcgid-script .php
  Options ExecCGI SymLinksIfOwnerMatch
  Order allow,deny
  allow from all
</Directory>

调整为如下:

<Directory /var/www/wordpress>
  #Options Indexes FollowSymLinks MultiViews
  Options FollowSymLinks MultiViews
  AllowOverride All
  #Apache 2.2/2.4.9
  #FCGIWrapper /usr/bin/php5-cgi .php
  #AddHandler fcgid-script .php
  #Options ExecCGI SymLinksIfOwnerMatch
  #Apache 2.4.10
  <FilesMatch \.php$>
    SetHandler "proxy:unix:/var/run/php5-fpm.sock|fcgi://localhost"
  </FilesMatch>	
  Order allow,deny
  allow from all
</Directory>

同理,调整HTTPS的配置文件。

9.重启Apache2服务

$ sudo service apache2 restart

参考链接


Ubuntu 14.04隐藏Apache-2.4的版本号与操作系统类型

一般情况下,软件的漏洞信息和特定版本,特定操作系统是相关的,因此,软件的版本号以及操作系统类型对攻击者来说是很有价值的。

在默认情况下,Apache会在返回信息中把自身的版本号,操作系统类型都显示出来,如下图:
Apache2-403

这样做会造成潜在的安全风险,导致不必要的攻击行为。

Ubuntu 14.04系统上隐藏Apache-2.4的版本号与操作系统类型的方法如下:

$ sudo vim /etc/apache2/conf-enabled/security.conf

把文件中的的ServerTokens OS修改为ServerTokens Prod,ServerSignature On修改为ServerSignature Off,如下图所示:

apache2-security-conf

修改完成后,重启Apache2的服务

$ sudo service apache2 restart

修改后的结果如下图所示,已经没有系统类型信息了,仅仅返回了一个403错误。

Apache2-404-Modify