Ubuntu 12.04 Server安装Bittorrent Transmission

Ubuntu Server 没有图形界面,如果作为BT 下载服务器的话,可以使用Bittorrent Transmission 来通过Web界面操作,类似http://192.168.1.X:9091这样的方式管理下载。

1.安装服务器端

sudo apt-get install transmission-daemon

2.配置文件修改

sudo vim /var/lib/transmission-daemon/info/settings.json

主要调整如下部分的内容

"rpc-enabled": true,
"rpc-password": "password",
"rpc-port": 9091,
"rpc-username": "transmission",
"rpc-whitelist": "127.0.0.1,*.*.*.*",
"rpc-whitelist-enabled": true,
 "download-dir": "/var/lib/transmission-daemon/downloads"

也就是调整白名单为所有地址都可以网络访问,同时修改用户名密码到自己熟悉的即可。其中  "download-dir" 用来调整文件下载到的地址,这个自己调整即可。

3.使得配置信息生效(注意,必须使用此命令,否则Bittorrent Transmission 会在重启的时候把数据写回磁盘,导致修改无效)

sudo service transmission-daemon reload

4.修改系统配置文件,开放对于UDP的访问限制

sudo vim /etc/sysctl.conf

增加如下语句

#udp set for Transmission
#UDP receive buffer size
net.core.rmem_max = 4194304
#UDP send buffer size
net.core.wmem_max = 1048576

然后重启服务器。

5.通过浏览器访问即可。

Ubuntu 12.04 安装socks5代理服务器dante-server

dante-server是一个很好的socks4/5代理服务器软件。

  • 使用apt-get安装
apt-get install dante-server
  • 添加一个用户
useradd proxyuser
passwd proxyuser
  • 禁止proxyuser用户登录系统(安全考虑)
sudo vim /etc/passwd

将proxyuser的shell改成 /bin/false

  • 配置danted.conf
sudo mv /etc/danted.conf /etc/danted.conf_old
sudo vim /etc/danted.conf

输入以下内容:

#
#logoutput: stderr
#logoutput: syslog
logoutput: /var/log/sockd/sockd.log

internal: 0.0.0.0 port = 10080

external: eth0

#method: username none
#method: pam
method: username

user.privileged: root

user.notprivileged: proxyuser

user.libwrap: nobody

compatibility: sameport
compatibility: reuseaddr
extension: bind

client pass {

        from: 0.0.0.0/0 to: 0.0.0.0/0

        log: connect disconnect error

}

pass {

        from: 0.0.0.0/0 to: 0.0.0.0/0

        command: bind

        log: connect disconnect error

}

pass {

                from: 0.0.0.0/0 to: 0.0.0.0/0

                command: bindreply udpreply

                log: connect error

}

pass {

                from: 0.0.0.0/0 to: 0.0.0.0/0 port 1-65535

                protocol: tcp udp

}

pass {

                from: 0.0.0.0/0 to: 0.0.0.0/0 port 1-65535

                command: udpassociate

}

#block {
#				from: 0.0.0.0/0 to: 0.0.0.0/0 port 1-65535
#				protocol: tcp udp
#				log: connect erro
#}
  • 创建log文件夹
mkdir /var/log/sockd
  • 启动dante-server
/etc/init.d/danted start
  • 查看是否监听成功:
netstat -anp | grep 10080

现在你就可以使用socks5了

Ubuntu 13.10 IDT 92HD71B7X 声卡插入耳机无声问题

DELL E5400 笔记本,安装Ubuntu 13.10 ,今天突然发现,插入外置音响,耳机的时候,没有声音了,而内置的喇叭是正常的,网上查询了一下得到解决方法,目前仅仅针对IDT 92HD71B7X  芯片组,其他芯片组不保证能用。

查看声卡芯片组

cat /proc/asound/card0/codec#0 | grep Codec

输出结果如果为

Codec: IDT 92HD71B7X

则尝试本方法

sudo vim /etc/modprobe.d/alsa-base.conf

如果文件存在,则在文件的最后增加

#for Codec: IDT 92HD71B7X
options snd-hda-intel model=auto position_fix=0

重启机器,如果不想重启机器,可以尝试

sudo alsa force-reload

注意,重启,或者强制声卡重新加载之后,可能声音被强制设置为静音了,因此,需要手动打开音量,这个要注意一下。

Ubuntu无法进入桌面报告 Could not update /home/$USER/.ICEauthority

使用Ubuntu和Fedora的用户经常会在进入GNOME时出现

Could not update /home/$USER/.ICEauthority

这样的提示。然后就不能正常进入GNOME了(之前在GNOME上的配置都消失了)

解决办法:以root的用户执行

chown $USER:$USER -R  /home/$USER/
chmod 644 /home/$USER/.ICEauthority

解决问题很简单,但为什么会出现这种情况呢?下面是我的一些个人理解

首先:先介绍下sudo和gksudo

sudo和gksudo都是使用root权限来执行应用,sudo执行程序时使用的是当前用户的配置和家目录,而gksudo使用的是root用户 的家目录和配置,一般情况下看不出什么区别,但是对于那些针对不同用户有不同的配置文件和表现形式的应用程序来说,这两种方式的结果区别就很明显了。比如 下面原文中举的firefox例子。在不通过终端运行程序时,sudo没有办法提供一个界面来输入管理员密码,比如在快捷方式中。还有些GUI程序只能用 gksudo。细心的朋友肯定发现了,在/root下并没有.ICEauthority。那么当用sudo运行程序之后,由于使用的是当前用户的配置和家 目录,

系统将整个家目录的所属者和所属组归属到root:root下,并将.ICEauthority的权限修改成600。故当再次以普通用户身份登入系统时,由于没有权限故无法读取用户的配置文件。根据上述分析,显然,当使用gksudo将能避免这种情况的发生。
一般情况下,可以这样,运行命令行程序时使用sudo,运行GUI程序时用gksudo。

下面是原文:

What’s the Issue?
Since most Ubuntu documentation asks you to use sudo even with graphical applications, I often get asked by Ubuntu users why I recommendgksudo or kdesu for graphical applications instead of sudo.

For example, a lot of guides (including the first book ever published about Ubuntu) will ask you to type this sort of command:

sudo gedit /etc/apt/sources.list

I will always recommend, however, that people use instead this sort of command:

gksudo gedit /etc/apt/sources.list

And reserve sudo for command-line applications, like so:

sudo nano /etc/apt/sources.list

Why is it an issue?
Well, to be perfectly honest, most of the time it isn’t. For a lot of applications, you can run them the improper way—using sudo for graphical applications and see no adverse side effects.

1. There are other times, though, when side effects can be as mild as Firefox extensions not sticking or as extreme as as not being able to log in any more because the permissions on your .ICEauthority changed. You can read a full discussion on the issue here.

These errors occur because sometimes when sudo launches an application, it launches with root privileges but uses the user’s configuration file.

5616035720110414233611022

For example, if you launch Firefox with the command

gksudo firefox

it uses root’s Firefox configuration file.
5616035720110414233935037
But if you launch Firefox with the command

sudo firefox

Change a few settings while launched as root, and you'll see if you dig into your Firefox profile that certain files are now owned by root.

56160357201104142343300785616035720110414233611022 (1)

it runs with root privileges but uses the user’s configuration file (in this case, you can see the homepage and theme are different).
2. Running graphical applications with sudo also has the downside of always having to be run from the terminal. If you don’t use the proper command—gksudo or kdesu, you will not be able to use the command as an icon launcher or keyboard shortcut because there will be no graphical dialogue box to enter your sudo password in.

3. There are also some graphical applications that simply will not run with the sudo command. Kate, for example, can be run as

kdesu kate

but cannot be run as

sudo kate

Why not make exceptions?
Bottom line: most of the time when you use sudo for graphical applications, it’s fine. Some of the time, though, it is not fine, and is, in fact, extremely bad.

If you made exceptions, you would have to give people a list of all the graphical applications that are okay to run as sudo and a list of all the graphical applications that must be run as gksudo or kdesu.

Why make a list that needs to be compiled and updated, that most people won’t refer to, and that is completely unnecessary? Just be consistent in suggesting good practice: gksudo and kdesu for graphical applications. sudo for command-line applications.

But gksudo sometimes gives me an error… even though it appears to work…

You may notice that even though gksudo is the proper way to launch graphical applications, if you launch a gksudo application it will sometimes give you what appears to be an error. This, for example:

(gedit:####): GnomeUI-WARNING **: While connecting to session manager:
Authentication Rejected, reason : None of the authentication protocols specified are supported and host-based authentication failed.

or these

Initializing nautilus-gdu extension
Nautilus-Share-Message: Called "net usershare info" but it failed: 'net usershare' returned error 255: net usershare: cannot open usershare directory /var/lib/samba/usershares. Error No such file or directory
Please ask your system administrator to enable user sharing.

That is not a real error, and there’s already been a bug report filed on the message appearing. The developers have seen the bug and labeled it a low priority. In the meantime, just ignore the message and keep encouraging people to not use sudo for graphical applications so they won’t potentially mess up their ~/.ICEauthority and other user configuration files.

参考:http://czmmiao.iteye.com/blog/1003810

linux top命令的TIME/TIME+值

top命令的TIME/TIME+是指的进程所使用的CPU时间,不是进程启动到现在的时间,因此,如果一个进程使用的cpu很少,那即使这个进程已经存在N长时间,TIME/TIME+也是很小的数值。

此外,如果你的系统有多个CPU,或者是多核CPU的话,那么,进程占用多个cpu的时间是累加的。

top的manual page:http://linux.die.net/man/1/top
看看他的帮助说明:
l: TIME — CPU Time
Total CPU time the task has used since it started. When ‘Cumulative mode’ is On, each process is listed with the cpu time that it and its dead children has used. You toggle ‘Cumulative mode’ with ‘S’, which is a command-line option and an interactive command. See the ‘S’ interactive command for additional information regarding this mode.
m: TIME+ — CPU Time, hundredths
The same as ‘TIME’, but reflecting more granularity through hundredths of a second.

参考 http://1.guotie.sinaapp.com/?p=24

WordPress安装插件提示“无法创建目录”

WordPress安装插件提示“无法创建目录”,这个是由于目录的权限设置导致的,一般情况下可以直接给目录/wp-content目录下面的plugins  themes   uploads upgrade目录增加 777 权限即可,但是这样做会导致服务器配置的不够安全,因此找到个更合适的方案处理。

前提,服务器系统为Ubuntu 12.04 版本,几个目录的默认所有者为 root,使用的FTP为 vsftpd ,服务器为 Apache2 ,这些条件主要限制了默认的用户组名字,如果系统不同,用户组的名字可能需要调整一下。

1.给这几个目录 755 权限,即,只有所有者才有权限写入。

chmod -R 755 plugins/ 
chmod -R 755 themes/
chmod -R 755 uploads/
chmod -R 755 upgrade/

2.逐个授权,vsftpd 的默认用户分组为ftpgroup,用户名自定义的,我们假定为 ftpuser.  Apache2 的用户分组默认都为www-data,其中plugins  themes  upgrade目录主要是ftp安装插件用的,因此写入权限只要给ftpuser 就可以了,其他用户读取权限足够了。而uploads目录是上传图片资源文件的目录,因此只要给www-data 用户写入权限就可以了。

chown -R www-data:www-data uploads/
chown -R ftpuser:ftpgroup plugins/
chown -R ftpuser:ftpgroup themes/
chown -R ftpuser:ftpgroup upgrade/

这样子,基本就安全多了。

Ubuntu 12.04/14.04/18.04使用squid架设Http正向代理服务器

配置普通HTTP正向代理

安装

$ sudo apt-get install squid squid-common

配置squid3

# ubuntu 12.04/14.04默认配置文件路径
$ sudo vim /etc/squid3/squid.conf

# ubuntu 18.04默认配置文件路径
$ sudo vim /etc/squid/squid.conf

搜索此句

http_access deny all

修改为

http_access allow all

搜索此句(squid默认允许访问本地(localhost)服务,但建议禁止

http_access allow localhost

修改为

http_access deny localhost

启动/重启squid3

# ubuntu 12.04/14.04
$ sudo service squid3 restart

# ubuntu 18.04
$ sudo service squid restart

注意: squidhttp默认代理端口为3128

配置HTTPS正向代理(单向认证)

由于ubuntu 12.04/14.04/18.04默认安装的squid版本是不支持SSL的,因此只能重新编译支持SSL.

1.安装编译依赖

$ cd ~

$ mkdir squid_src

$ cd squid_src

$ sudo apt-get install build-essential fakeroot devscripts gawk gcc-multilib dpatch

$ sudo apt-get build-dep squid3

$ sudo apt-get build-dep openssl

$ sudo apt-get install libssl-dev

$ sudo apt-get install openssl

$ apt-get source squid3

2.修改默认的编译选项,增加SSL支持
ubuntu 12.04

$ vim squid3-3.1.19/debian/rules

DEB_CONFIGURE_EXTRA_FLAGS字段中增加--enable-ssl

...
DEB_CONFIGURE_EXTRA_FLAGS := --datadir=/usr/share/squid3 \
                --sysconfdir=/etc/squid3 \
                --mandir=/usr/share/man \
                --with-cppunit-basedir=/usr \
                --enable-inline \
                --enable-ssl \
...

ubuntu 14.04/18.04

# ubuntu 14.04
$ vim squid3-3.3.8/debian/rules

# ubuntu 18.04
$ vim squid3-3.5.27/debian/rules

对于Ubuntu 14.04来说,除了要在DEB_CONFIGURE_EXTRA_FLAGS字段中增加--enable-ssl外,由于squid3-3.3.8默认去掉了对于NCSA的支持,而我们下面认证密码的配置是基于NCSA算法的,因此需要在DEB_CONFIGURE_EXTRA_FLAGS--enable-auth-basic字段中增加对于NCSA的支持,否则无法使用NCSA算法进行账号认证,修改后的样子如下:

...
DEB_CONFIGURE_EXTRA_FLAGS := --datadir=/usr/share/squid3 \
                --sysconfdir=/etc/squid3 \
                --mandir=/usr/share/man \
                --enable-inline \
                --enable-ssl\
                --enable-async-io=8 \
                --enable-storeio="ufs,aufs,diskd,rock" \
                --enable-removal-policies="lru,heap" \
                --enable-delay-pools \
                --enable-cache-digests \
                --enable-underscores \
                --enable-icap-client \
                --enable-follow-x-forwarded-for \
                --enable-auth-basic="NCSA,DB,fake,getpwnam,LDAP,MSNT,MSNT-multi-domain,NCSA,NIS,PAM,POP3,RADIUS,SASL,SMB" \
...

注意,这样修改后squid3-3.3.8版本编译出来的在/usr/lib/squid3/下的ncsa_auth被重命名成了basic_ncsa_auth,因此配置文件中制定认证应用的时候要修改一下。

对于Ubuntu 18.04来说,这个参数不需要调整,默认支持NCSA

注意,如果需要禁用`ipv6`的支持,则增加`--disable-ipv6`选项,这个目前是唯一的可以彻底禁用`ipv6`代理访问的方式。这个需求的原因是由于配置问题,某些网站的`ipv6`地址存在,但是无法正常访问

3.配置编译
ubuntu 12.04

$ cd squid3-3.1.19/

$ debuild -us -uc -b

ubuntu 14.04

$ cd squid3-3.3.8/

$ debuild -us -uc -b

ubuntu 18.04

$ cd squid3-3.5.27/

$ debuild -us -uc -b

4.安装(编译后的文件存在在上层的squid_src目录下面)
ubuntu 12.04

$ cd ..

$ sudo dpkg -i squid3_3.1.19-1ubuntu3.12.04.2_amd64.deb squid3-common_3.1.19-1ubuntu3.12.04.2_all.deb squid3-dbg_3.1.19-1ubuntu3.12.04.2_amd64.deb

ubuntu 14.04

$ cd ..

$ sudo dpkg -i squid3-common_3.3.8-1ubuntu6.6_all.deb squid_3.3.8-1ubuntu6.6_amd64.deb squid3_3.3.8-1ubuntu6.6_amd64.deb squid3-dbg_3.3.8-1ubuntu6.6_amd64.deb

ubuntu 18.04

$ cd ..

$ sudo dpkg -i squid-common_3.5.27-1ubuntu1.9_all.deb squid_3.5.27-1ubuntu1.9_amd64.deb squid_3.5.27-1ubuntu1.9_amd64.deb squid-dbg_3.5.27-1ubuntu1.9_amd64.deb

5.验证安装后的版本是否支持SSL

$ squid3 -v | grep enable-ssl

如果看到enable-ssl输出,则说明编译成功。

6.生成自签名证书

$ openssl req -new -keyout key.pem -nodes -x509 -days 365 -out cert.pem

7.移动服务器证书到squid3配置目录

$ sudo mv cert.pem /etc/squid3/cert.pem

$ sudo mv key.pem /etc/squid3/key.pem

8.配置squit3

$ sudo vim /etc/squid3/squid.conf

搜索https_port,如果搜索到,则在搜索到的位置增加,搜索不到则在文件的最后增加

https_port 443 cert=/etc/squid3/cert.pem key=/etc/squid3/key.pem

9.验证配置文件是否配置正确

$ squid3 -k parse

10.启动/重启squid

# ubuntu 12.04/14.04
$ sudo service squid3 restart

# ubuntu 18.04
$ sudo service squid restart

11.安装stunnel,配置安装目录下的stunnel.conf,把原来的内容都删掉,粘贴下面的内容

client = yes
[https]
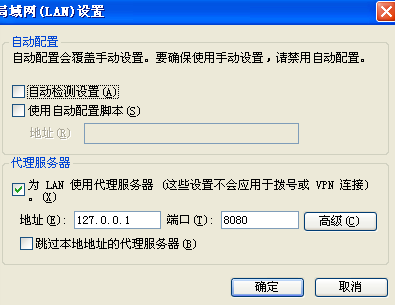
accept = 127.0.0.1:8080
connect = www.mobibrw.com:443

12.设置浏览器代理服务器地址

7442F5AA-EF60-49C8-B7BB-97D750C72231

13.重新启动stunnel

注意,如果只支持Https协议,可以注释掉原来的 

http_port 3128

配置Squid3用户名密码认证

1. 安装htpasswd(如果装了apache就省掉这一步)
(这个是用来产生密码的)

$ sudo apt-get install apache2-utils

也可以

$ sudo apt-get install mini-httpd

2.生成密码文件

$ htpasswd -c /etc/squid3/passwd user1

会让你输入user1的密码
3.改一下权限,确保squid能够读出密码文件

$ sudo chmod o+r /etc/squid3/passwd

4.修改squid.conf,增加或修改成下面的样子

对于ubuntu 12.04版本上编译出来的的Squid3-3.1.19,执行如下配置:

auth_param basic program /usr/lib/squid/ncsa_auth /etc/squid3/passwd
acl ncsa_users proxy_auth REQUIRED
http_access allow ncsa_users

对于ubuntu 14.04版本上编译出来的的Squid3-3.3.8,由于验证程序的名字被修改成了basic_ncsa_auth,因此执行如下配置:

auth_param basic program /usr/lib/squid/basic_ncsa_auth /etc/squid3/passwd
acl ncsa_users proxy_auth REQUIRED
http_access allow ncsa_users

简单的修改可以在VIM中查询 "auth_param basic program /usr/lib/squid/ncsa_auth" 找到后修改一下即可.
然后搜索 "http_access allow all" 找到后替换为 "http_access allow ncsa_users"
在"http_access allow all" 上面就是acl控制部分,直接增加"acl ncsa_users proxy_auth REQUIRED"
如果配置文件是从Squid3-3.1.19升级到Squid3-3.3.8版本的,那么根据如下两个链接的描述:
http://wiki.squid-cache.org/SquidFaq/ConfiguringSquid
https://forums.gentoo.org/viewtopic-t-952948-start-0.html

3.2 further configuration cleanups have been done to make things easier and safer. The manager, localhost, and to_localhost ACL definitions are now built-in.

这两个链接上的信息,从Squid3-3.2版本开始,原来配置文件中的acl控制信息已经不需要再从配置文件中读取了,这部分的功能已经集成进入应用内部了。
因此需要注释掉下面这几句话,否则无法正常启动Squid3.

# Recommended minimum configuration:
#
acl manager proto cache_object
acl localhost src 127.0.0.1/32 ::1
acl to_localhost dst 127.0.0.0/8 0.0.0.0/32 ::1

5.重启squid3

# ubuntu 12.04/14.04
$ sudo service squid3 restart

# ubuntu 18.04
$ sudo service squid restart

限制单个用户的下载速度

squid3在默认编译的时候,已经包含了--enable-delay-pools选项,因此已经默认支持限速了,我们只需要设置限速配置就可以了。

$ sudo vim /etc/squid3/squid.conf

在文件最后增加如下配置:

delay_pools 1
delay_class 1 1
delay_access 1 allow all
delay_parameters 1 50000/50000 # 限制网速在50K以内
delay_initial_bucket_level 50

参数的具体解释请在squid.conf中搜索delay-pools查看。

重启squid3

# ubuntu 12.04/14.04
$ sudo service squid3 restart

# ubuntu 18.04
$ sudo service squid restart

参考链接


删除目录下所有的 .svn .git 隐藏子目录

使用SVN 1.6 之前版本 checkout出来的代码,在本地每个文件夹下都有个 .svn ,可利用这个命令来删除

Linux

find . -name .svn -print0 | xargs -0 rm -r -f

Windows(需要在批处理文件中执行)

for /r . %%a in (.) do @if exist %%a\.svn rd /s /q %%a\.svn

对于Git的目录也可以如此操作:

Linux

find . -name .git -print0 | xargs -0 rm -r -f

Windows(需要在批处理文件中执行)

for /r . %%a in (.) do @if exist %%a\.git rd /s /q %%a\.git

Ubuntu 13.10 运行VirtualBox虚拟机编译出现错误提示运行"/etc/init.d/vboxdrv setup"的问题

运行虚拟机提示:

The virtual machine 'XXX' has terminated unexpectedly during startup with exit code 1.

之后提示:

    Kernel driver not installed (rc=-1908)

    The VirtualBox Linux kernel driver (vboxdrv) is either not loaded or there is a permission problem with /dev/vboxdrv. Please reinstall the kernel module by executing

    '/etc/init.d/vboxdrv setup'

    as root. If it is available in your distribution, you should install the DKMS package first. This package keeps track of Linux kernel changes and recompiles the vboxdrv kernel module if necessary.

在终端下运行:

sudo /etc/init.d/vboxdrv setup

提示信息

Stopping VirtualBox kernel modules [ OK ]
* Recompiling VirtualBox kernel modules
* Look at /var/log/vbox-install.log to find out what went wrong

提示有错误,查看了一下错误日志

cat /var/log/vbox-install.log

内容如下

Makefile:181: *** Error: unable to find the sources of your current Linux kernel. Specify KERN_DIR= and run Make again。 停止。

根据提示应该是没有找到对应的源文件,查看了一下系统版本号:

uname -r

在进入/usr/src里发现果然没有对应的版本号头文件。

解决方法:

sudo apt-get install dkms build-essential linux-headers-generic
sudo /etc/init.d/vboxdrv setup

Linux SVN提交时强制写日志

SVN默认可以不写注释提交,有时候可能忘记写注释,有的人也没有写注释的习惯,导致翻看history的时候都不知道做了哪些更改,可以依照以下步骤修改SVN配置,强制提交SVN前写注释

步骤:

1.进入svn/code/hooks目录,在svn版本库的hooks文件夹下面,复制模版pre-commit.tmpl

cp pre-commit.tmpl pre-commit
chmod +x pre-commit

2.编辑pre-commit文件:

$SVNLOOK log -t "$TXN" "$REPOS" | \
grep "[a-zA-Z0-9]" > /dev/null || exit 1

"$REPOS"/hooks/commit-access-control.pl "$REPOS" $TXN \
"$REPOS"/hooks/commit-access-control.cfg

上面这几行注释掉(前面加#符号),在此位置添加如下几行:

#必须填写注释且不少于5个字
# Make sure that the log message contains some text.
SVNLOOK=/usr/bin/svnlook #如果这句被注释掉,请打开注释
LOGMSG=`$SVNLOOK log -t "$TXN" "$REPOS" | grep "[a-zA-Z0-9]" | wc -c`
if [ "$LOGMSG" -lt 5 ];#要求注释不能少于5个字符,您可自定义
then
echo -e "注释信息不能为空且不少于5个字!" 1>&2
exit 1
fi
exit 0