Content scripts are JavaScript files that run in the context of web pages. By using the standard Document Object Model (DOM), they can read details of the web pages the browser visits, or make changes to them.
继续阅读Chrome扩展:内容脚本
月度归档: 2018 年 2 月
Chrome Extension:Content Scripts
Content scripts are JavaScript files that run in the context of web pages. By using the standard Document Object Model (DOM), they can read details of the web pages the browser visits, or make changes to them.
Here are some examples of what content scripts can do:
- Find unlinked URLs in web pages and convert them into hyperlinks
- Increase the font size to make text more legible
- Find and process microformat data in the DOM
However, content scripts have some limitations. They cannot:
- Use chrome.* APIs, with the exception of:
- extension ( getURL , inIncognitoContext , lastError , onRequest ,sendRequest )
- i18n
- runtime ( connect , getManifest , getURL , id , onConnect , onMessage , sendMessage )
- storage
- Use variables or functions defined by their extension's pages
- Use variables or functions defined by web pages or by other content scripts
These limitations aren't as bad as they sound. Content scripts can indirectly use the chrome.* APIs, get access to extension data, and request extension actions by exchanging messages with their parent extension. Content scripts can also make cross-site XMLHttpRequests to the same sites as their parent extensions, and they cancommunicate with web pages using the shared DOM. For more insight into what content scripts can and can't do, learn about the execution environment.
Manifest
If your content script's code should always be injected, register it in the extension manifest using the content_scripts field, as in the following example.
{
"name": "My extension",
...
"content_scripts": [
{
"matches": ["http://www.google.com/*"],
"css": ["mystyles.css"],
"js": ["jquery.js", "myscript.js"]
}
],
...
}
"name": "My extension",
...
"content_scripts": [
{
"matches": ["http://www.google.com/*"],
"css": ["mystyles.css"],
"js": ["jquery.js", "myscript.js"]
}
],
...
}
If you want to inject the code only sometimes, use the permissions field instead, as described in Programmatic injection.
{
"name": "My extension",
...
"permissions": [
"tabs", "http://www.google.com/*"
],
...
}
"name": "My extension",
...
"permissions": [
"tabs", "http://www.google.com/*"
],
...
}
Using the content_scripts field, an extension can insert multiple content scripts into a page; each of these content scripts can have multiple JavaScript and CSS files. Each item in the content_scripts array can have the following properties:
| Name | Type | Description |
|---|---|---|
matches |
array of strings | Required. Specifies which pages this content script will be injected into. See Match Patterns for more details on the syntax of these strings and Match patterns and globs for information on how to exclude URLs. |
exclude_matches |
array of strings | Optional. Excludes pages that this content script would otherwise be injected into. See Match Patternsfor more details on the syntax of these strings and Match patterns and globs for information on how to exclude URLs. |
match_about_blank |
boolean | Optional. Whether to insert the content script on about:blank and about:srcdoc. Content scripts will only be injected on pages when their inherit URL is matched by one of the declared patterns in thematches field. The inherit URL is the URL of the document that created the frame or window.Content scripts cannot be inserted in sandboxed frames.Defaults to false. |
css |
array of strings | Optional. The list of CSS files to be injected into matching pages. These are injected in the order they appear in this array, before any DOM is constructed or displayed for the page. |
js |
array of strings | Optional. The list of JavaScript files to be injected into matching pages. These are injected in the order they appear in this array. |
run_at |
string | Optional. Controls when the files in js are injected. Can be "document_start", "document_end", or "document_idle". Defaults to "document_idle".
In the case of "document_start", the files are injected after any files from In the case of "document_end", the files are injected immediately after the DOM is complete, but before subresources like images and frames have loaded. In the case of "document_idle", the browser chooses a time to inject scripts between "document_end" and immediately after the Note: With "document_idle", content scripts may not necessarily receive the |
all_frames |
boolean | Optional. Controls whether the content script runs in all frames of the matching page, or only the top frame.
Defaults to |
include_globs |
array of string | Optional. Applied after matches to include only those URLs that also match this glob. Intended to emulate the @include Greasemonkey keyword. See Match patterns and globs below for more details. |
exclude_globs |
array of string | Optional. Applied after matches to exclude URLs that match this glob. Intended to emulate the @excludeGreasemonkey keyword. See Match patterns and globs below for more details. |
Match patterns and globs
The content script will be injected into a page if its URL matches any matches pattern and any include_globspattern, as long as the URL doesn't also match an exclude_matches or exclude_globs pattern. Because the matches property is required, exclude_matches, include_globs, and exclude_globs can only be used to limit which pages will be affected.
For example, assume matches is ["http://*.nytimes.com/*"]:
- If
exclude_matchesis["*://*/*business*"], then the content script would be injected into "http://www.nytimes.com/health" but not into "http://www.nytimes.com/business". - If
include_globsis["*nytimes.com/???s/*"], then the content script would be injected into "http:/www.nytimes.com/arts/index.html" and "http://www.nytimes.com/jobs/index.html" but not into "http://www.nytimes.com/sports/index.html". - If
exclude_globsis["*science*"], then the content script would be injected into "http://www.nytimes.com" but not into "http://science.nytimes.com" or "http://www.nytimes.com/science".
Glob properties follow a different, more flexible syntax than match patterns. Acceptable glob strings are URLs that may contain "wildcard" asterisks and question marks. The asterisk (*) matches any string of any length (including the empty string); the question mark (?) matches any single character.
For example, the glob "http://???.example.com/foo/*" matches any of the following:
- "http://www.example.com/foo/bar"
- "http://the.example.com/foo/"
However, it does not match the following:
- "http://my.example.com/foo/bar"
- "http://example.com/foo/"
- "http://www.example.com/foo"
Programmatic injection
Inserting code into a page programmatically is useful when your JavaScript or CSS code shouldn't be injected into every single page that matches the pattern — for example, if you want a script to run only when the user clicks a browser action's icon.
To insert code into a page, your extension must have cross-origin permissions for the page. It also must be able to use the chrome.tabs module. You can get both kinds of permission using the manifest file'spermissions field.
Once you have permissions set up, you can inject JavaScript into a page by calling tabs.executeScript. To inject CSS, use tabs.insertCSS.
The following code (from the make_page_red example) reacts to a user click by inserting JavaScript into the current tab's page and executing the script.
chrome.browserAction.onClicked.addListener(function(tab) {
  chrome.tabs.executeScript({
    code: 'document.body.style.backgroundColor="red"'
  });
});
"permissions": [
    "activeTab"
],
When the browser is displaying an HTTP page and the user clicks this extension's browser action, the extension sets the page's bgcolor property to 'red'. The result, unless the page has CSS that sets the background color, is that the page turns red.
Usually, instead of inserting code directly (as in the previous sample), you put the code in a file. You inject the file's contents like this:
chrome.tabs.executeScript(null, {file: "content_script.js"});
Execution environment
Content scripts execute in a special environment called an isolated world. They have access to the DOM of the page they are injected into, but not to any JavaScript variables or functions created by the page. It looks to each content script as if there is no other JavaScript executing on the page it is running on. The same is true in reverse: JavaScript running on the page cannot call any functions or access any variables defined by content scripts.
For example, consider this simple page:
<html>
  <button id="mybutton">click me</button>
  <script>
    var greeting = "hello, ";
    var button = document.getElementById("mybutton");
    button.person_name = "Bob";
    button.addEventListener("click", function() {
      alert(greeting + button.person_name + ".");
    }, false);
  </script>
</html>
Now, suppose this content script was injected into hello.html:
var greeting = "hola, ";
var button = document.getElementById("mybutton");
button.person_name = "Roberto";
button.addEventListener("click", function() {
  alert(greeting + button.person_name + ".");
}, false);
Now, if the button is pressed, you will see both greetings.
Isolated worlds allow each content script to make changes to its JavaScript environment without worrying about conflicting with the page or with other content scripts. For example, a content script could include JQuery v1 and the page could include JQuery v2, and they wouldn't conflict with each other.
Another important benefit of isolated worlds is that they completely separate the JavaScript on the page from the JavaScript in extensions. This allows us to offer extra functionality to content scripts that should not be accessible from web pages without worrying about web pages accessing it.
It's worth noting what happens with JavaScript objects that are shared by the page and the extension - for example, the window.onload event. Each isolated world sees its own version of the object. Assigning to the object affects your independent copy of the object. For example, both the page and extension can assign to window.onload, but neither one can read the other's event handler. The event handlers are called in the order in which they were assigned.
Communication with the embedding page
Although the execution environments of content scripts and the pages that host them are isolated from each other, they share access to the page's DOM. If the page wishes to communicate with the content script (or with the extension via the content script), it must do so through the shared DOM.
An example can be accomplished using window.postMessage (or window.webkitPostMessage for Transferable objects):
var port = chrome.runtime.connect();

window.addEventListener("message", function(event) {
  // We only accept messages from ourselves
  if (event.source != window)
    return;

  if (event.data.type && (event.data.type == "FROM_PAGE")) {
    console.log("Content script received: " + event.data.text);
    port.postMessage(event.data.text);
  }
}, false);
document.getElementById("theButton").addEventListener("click",
    function() {
  window.postMessage({ type: "FROM_PAGE", text: "Hello from the webpage!" }, "*");
}, false);
In the above example, example.html (which is not a part of the extension) posts messages to itself, which are intercepted and inspected by the content script, and then posted to the extension process. In this way, the page establishes a line of communication to the extension process. The reverse is possible through similar means.
Security considerations
When writing a content script, you should be aware of two security issues. First, be careful not to introduce security vulnerabilities into the web site your content script is injected into. For example, if your content script receives content from another web site (for example, by making an XMLHttpRequest), be careful to filter that content for cross-site scripting attacks before injecting the content into the current page. For example, prefer to inject content via innerText rather than innerHTML. Be especially careful when retrieving HTTP content on an HTTPS page because the HTTP content might have been corrupted by a network "man-in-the-middle" if the user is on a hostile network.
Second, although running your content script in an isolated world provides some protection from the web page, a malicious web page might still be able to attack your content script if you use content from the web page indiscriminately. For example, the following patterns are dangerous:
var data = document.getElementById("json-data")
// WARNING! Might be evaluating an evil script!
var parsed = eval("(" + data + ")")
var elmt_id = ...
// WARNING! elmt_id might be "); ... evil script ... //"!
window.setTimeout("animate(" + elmt_id + ")", 200);
Instead, prefer safer APIs that do not run scripts:
var data = document.getElementById("json-data")
// JSON.parse does not evaluate the attacker's scripts.
var parsed = JSON.parse(data);
var elmt_id = ...
// The closure form of setTimeout does not evaluate scripts.
window.setTimeout(function() {
  animate(elmt_id);
}, 200);
Referring to extension files
Get the URL of an extension's file using chrome.extension.getURL(). You can use the result just like you would any other URL, as the following code shows.
//Code for displaying <extensionDir>/images/myimage.png:
var imgURL = chrome.extension.getURL("images/myimage.png");
document.getElementById("someImage").src = imgURL;
var imgURL = chrome.extension.getURL("images/myimage.png");
document.getElementById("someImage").src = imgURL;
Examples
You can find many examples that use content scripts. A simple example of communication via messages is in the Message Timer. See Page Redder and Email This Page for examples of programmatic injection.
Videos
The following videos discuss concepts that are important for content scripts. The first video describes content scripts and isolated worlds.
The next video describes message passing, featuring an example of a content script sending a request to its parent extension.
macOS High Sierra下使用brew安装支持x265的ffmpeg以及转码
使用
$ brew install ffmpeg
安装ffmpeg默认是不支持x265的
使用
$ brew reinstall ffmpeg --with-x265
重新安装即可。
一般直接的H265数据流(比如从摄像头抓取的H265裸数据流保存的文件),是没办法在MacOS上直接播放的,必须进行转码。简单的转码命令如下:
$ ffmpeg -i input.h265 -c:v libx265 output.mp4
参考链接
Chrome扩展:调试指南
这篇指南将要向你介绍使用 Google Chrome 内建的开发者工具来调试扩展程序。
Chrome Extension:Debugging
This tutorial introduces you to using Google Chrome's built-in Developer Tools to interactively debug an extension.
View extension information
To follow this tutorial, you need the Hello World extension that was featured inGetting Started. In this section, you'll load the extension and take a look at its information in the Extensions page.
- Load the Hello World extension if it isn't already running. If the extension is running, you'll see the Hello World icon
 to the right of your browser's address bar.If the Hello World extension isn't already running, find the extension files and load them. If you don't have a handy copy of the files, extract them from this ZIP file. See Getting Started if you need instructions for loading the extension.
 - Go to the Extensions page (chrome://extensions), and make sure the page is in Developer mode.
- Look at the Hello World extension's information on that page. You can see details such as the extension's name, description, and ID.
Inspect the popup
As long as your browser is in Developer mode, it's easy to inspect popups.
- Go to the Extensions page (chrome://extensions), and make sure Developer mode is still enabled. The Extensions page doesn't need to be open for the following to work. The browser remembers the setting, even when the page isn't shown.
- Right-click the Hello World icon and choose the Inspect popup menu item. The popup appears, and a Developer Tools window like the following should display the code for popup.html.
 The popup remains open as long as the Developer Tools window does.
 - If the Scripts button isn't already selected, click it.
- Click the console button
 (second from left, at the bottom of the Developer Tools window) so that you can see both the code and the console.
Use the debugger
In this section, you'll follow the execution of the popup page as it adds images to itself.
-
- Set a breakpoint inside the image-adding loop by searching for the string img.src and clicking the number of the line where it occurs (for example, 37):
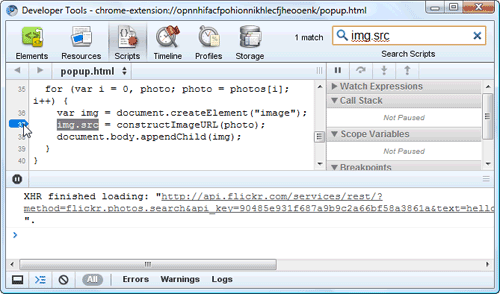
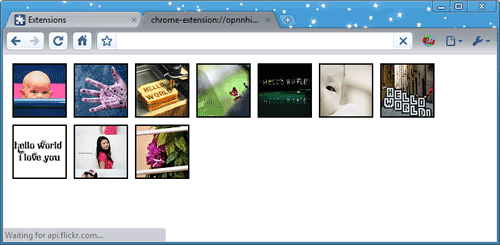
- Make sure you can see the popup.html tab. It should show 20 "hello world" images.
- At the console prompt, reload the popup page by entering location.reload(true):
> location.reload(true)
The popup page goes blank as it begins to reload, and its execution stops at line 37.
- In the upper right part of the tools window, you should see the local scope variables. This section shows the current values of all variables in the current scope. For example, in the following screenshot the value of
iis 0, andphotosis a node list that contains at least a few elements. (In fact, it contains 20 elements at indexes 0 through 19, each one representing a photo.)
- Click the play/pause button
 (near the top right of the Developer Tools window) to go through the image-processing loop a single time. Each time you click that button, the value of
 iincrements and another icon appears in the popup page. For example, wheniis 10, the popup page looks something like this:
- Set a breakpoint inside the image-adding loop by searching for the string img.src and clicking the number of the line where it occurs (for example, 37):
- Use the buttons next to the play/pause button to step over, into, and out of function calls. To let the page finish loading, click line 37 to disable the breakpoint, and then press play/pause to continue execution.
Summary
This tutorial demonstrated some techniques you can use to debug your extensions:
- Find your extension's ID and links to its pages in the Extensions page (chrome://extensions).
- View hard-to-reach pages (and any other file in your extension) using chrome-extension://extensionId/filename.
- Use Developer Tools to inspect and step through a page's JavaScript code.
- Reload the currently inspected page from the console using location.reload(true).
Now what?
Now that you've been introduced to debugging, here are suggestions for what to do next:
- Watch the extensions video Developing and Debugging.
- Try installing and inspecting other extensions, such as the samples.
- Try using widely available debugging APIs such as
console.log()andconsole.error()in your extension's JavaScript code. Example:console.log("Hello, world!") - Follow the Developer Tools tutorial, explore the Developer Tools site, and watch some video tutorials.
For more ideas, see the Now what? section of Getting Started.
Content available under the CC-By 3.0 license
CMake如何编译CUDA(.cu)源文件
现在的项目,如果需要用到计算加速,Nvidia的CUDA往往是首选。那么如何在CMake中编译写好的CUDA源代码,可以参考如下。
首先使用FIND_PACKAGE找到已经安装的CUDA,此时需要配置的环境变量等,应该已经自动配置完成了
SET(CUDA_VERSION 8.0)
FIND_PACKAGE(CUDA ${CUDA_VERSION} REQUIRED)
STRING (TOLOWER ${CMAKE_SYSTEM_NAME} LOWER_SYSTEM_NAME)
SET(CUDA_TARGET_INCLUDE  ${CUDA_TOOLKIT_ROOT_DIR}-${CUDA_VERSION}/targets/${CMAKE_HOST_SYSTEM_PROCESSOR}-${LOWER_SYSTEM_NAME}/include)
接下来,使用CUDA_ADD_LIBRARY取代原来的ADD_LIBRARY,如下:
CUDA_ADD_LIBRARY(mylib SHARED
    file1.cpp
    file2.cu
    file3.cpp
    OPTIONS -arch sm_20
)

TARGET_LINK_LIBRARIES(mylib ${CUDA_LIBRARIES})
如果是可执行程序,请使用CUDA_ADD_EXECUTABLE取代ADD_EXECUTABLE。
参考链接
Getting Started: Building a Chrome Extension
Extensions allow you to add functionality to Chrome without diving deeply into native code. You can create new extensions for Chrome with those core technologies that you're already familiar with from web development: HTML, CSS, and JavaScript. If you've ever built a web page, you should feel right at home with extensions pretty quickly; we'll put that to the test right now by walking through the construction of a simple extension that will allow the user to change the background color of the current webpage.
linux如何查看已加载的动态库
首先用ps命令找到进程的pid。
然后执行如下命令中的任意一个即可:
$ cat /proc/$PID/maps
$ lsof -p $PID | grep .so
$ pmap $PID
参考链接
Chrome扩展:Manifest文件格式
任何扩展程序都有一个 JSON 格式的 manifest 文件,以 manifest.json 命名,记录了重要信息。
字段一览
下列代码展示了扩展程序支持的 manifest 字段,点击字段链接可以查看详情。
{
"manifest_version": 2,
"name": "My Extension",
"version": "versionString",// Recommended
"default_locale": "en",
"description": "A plain text description",
"icons": {...},// Pick one (or none)
"browser_action": {...},
"page_action": {...},// Optional
"author": ...,
"automation": ...,
"background": {
// Recommended
"persistent": false
},
"background_page": ...,
"chrome_settings_overrides": {...},
"chrome_ui_overrides": {
"bookmarks_ui": {
"remove_bookmark_shortcut": true,
"remove_button": true
}
},
"chrome_url_overrides": {...},
"commands": {...},
"content_capabilities": ...,
"content_scripts": [{...}],
"content_security_policy": "policyString",
"converted_from_user_script": ...,
"current_locale": ...,
"devtools_page": "devtools.html",
"event_rules": [{...}],
"externally_connectable": {
"matches": ["*://*.example.com/*"]
},
"file_browser_handlers": [...],
"file_system_provider_capabilities": {
"configurable": true,
"multiple_mounts": true,
"source": "network"
},
"homepage_url": "http://path/to/homepage",
"import": [{"id": "aaaaaaaaaaaaaaaaaaaaaaaaaaaaaaaa"}],
"incognito": "spanning, split, or not_allowed",
"input_components": ...,
"key": "publicKey",
"minimum_chrome_version": "versionString",
"nacl_modules": [...],
"oauth2": ...,
"offline_enabled": true,
"omnibox": {
"keyword": "aString"
},
"optional_permissions": ["tabs"],
"options_page": "options.html",
"options_ui": {
"chrome_style": true,
"page": "options.html"
},
"permissions": ["tabs"],
"platforms": ...,
"plugins": [...],
"requirements": {...},
"sandbox": [...],
"short_name": "Short Name",
"signature": ...,
"spellcheck": ...,
"storage": {
"managed_schema": "schema.json"
},
"system_indicator": ...,
"tts_engine": {...},
"update_url": "http://path/to/updateInfo.xml",
"version_name": "aString",
"web_accessible_resources": [...]
}
Chrome扩展:构建一个 Chrome 扩展程序
扩展程序可以让我们不需要深入了解Chrome的原生代码就可以扩展Chrome浏览器的功能。 你可以用已经掌握的web开发核心技术HTML,CSS,和JavaScript来创建Chrome扩展程序。 如果你以前开发过网页,你可以很快地上手开发扩展程序; 接下来我们就马上开始,一步步地开发一个简单的扩展程序,这个扩展程序的作用是找出当前页面中所使用的谷歌服务器图片。