MicroPython入坑记(四)关于MicroPython的代码保护

脚本开发东西,可能面临的第一个问题就是:拷给别人,代码怎么写的他不就都知道了?不行,我要保住我的小秘密!

先说下结果:没有攻不破的堡垒,即使你写成C语言,只要能拿到二进制结果,都可以反汇编逆向出你是怎么实现的,关键是值不值得

另外,这跟逆向者对系统的了解程度有关,比如对方连代码都不会上传,那你即使把源文件放进去也他也无可奈何。

好了,言归正传,我们知道普通python有个编译成字节码的功能,也就是源代码会在解释时先编译成一个类似java中间代码的结果,这是不可读的(但是这也不排除反编译的可能,毕竟JAVA的class文件是有反编译软件的)。

micropython也有这个功能,不过这个文件的扩展名是mpy,也不能在运行时自动生成,需要一款软件:mpy-cross.exe,这是micropython官方提供的,可以用python pip直接安装,安装完成后,可以运行mpy-cross.exe pythonfile,py,就可以生成一个pythonfile.mpy的字节码文件,这文件使用跟py文件是等效的。把所有文件生成mpy,可以在一定程度上保护你的代码。

更进一步的方式:把mpy文件藏到固件中去,这不光能保护代码,还能降低程序的内存占用,官方的描述如下:

Cross-installing packages with freezing

For the low-memory MicroPython ports, the process described in the previous section does not provide the most efficient resource usage,because the packages are installed in the source form, so need to be compiled to the bytecome on each import. This compilation requires RAM, and the resulting bytecode is also stored in RAM, reducing its amount available for storing application data. Moreover, the process above requires presence of the filesystem on a device, and the most resource-constrained devices may not even have it.

The bytecode freezing is a process which resolves all the issues mentioned above:

  • The source code is pre-compiled into bytecode and store as such.
  • The bytecode is stored in ROM, not RAM.
  • Filesystem is not required for frozen packages.

Using frozen bytecode requires building the executable (firmware) for a given MicroPython port from the C source code. Consequently, the process is:

  1. Follow the instructions for a particular port on setting up a toolchain and building the port. For example, for ESP8266 port, study instructions in ports/esp8266/README.md and follow them. Make sure you can build the port and deploy the resulting executable/firmware successfully before proceeding to the next steps.
  2. Build MicroPython Unix port and make sure it is in your PATH and you can execute micropython.
  3. Change to port’s directory (e.g. ports/esp8266/ for ESP8266).
  4. Run make clean-frozen. This step cleans up any previous modules which were installed for freezing (consequently, you need to skip this step to add additional modules, instead of starting from scratch).
  5. Run micropython -m upip install -p modules <packages>... to install packages you want to freeze.
  6. Run make clean.
  7. Run make.

After this, you should have the executable/firmware with modules as the bytecode inside, which you can deploy the usual way.

大体的意思是这样的:运行py文件不能有效的使用内存资源,因为代码执行时需要被编译成bytecode代码,该编译需要RAM,生成的字节码也存在RAM中,这就降低了可用内存。并且存储py文件需要文件系统,而一些嵌入设备本身不存在文件系统。

嗯,神一样的保护功能,不但降低了内存占用,还把字节码藏到了固件中,代价就是需要自己编译micropython固件。

参考链接


MicroPython入坑记(四)关于MicroPython的代码保护

是否有Python PIL的抗锯齿方法?

在进行SVG转换成PNG图片的时候,后续对转换后的图片使用PIL进行操作,结果发现锯齿严重。经过网上搜到,发现只能通过超采样然后缩放的方式来进行抗锯齿操作,效果还不错。

代码参考如下:

import os
import math
import cairosvg

temp_image = os.path.join(fileDir, "splash.png")

# PIL 本身不具备抗锯齿功能,输出的图片锯齿严重,我们进行四倍超采样,然后缩放的方式进行抗锯齿操作
scale = 4.0

# background_color='#FFFFFF'
# 注意如果不设置DPI,默认dpi是96 人眼低于326dpi的可见明显锯齿
cairosvg.svg2png(url=raw, write_to=temp_image, output_width=math.ceil(image_width*scale), dpi=400,
                 output_height=math.ceil(image_height*scale))

from PIL import Image
bg = Image.new("RGBA", (math.ceil(output_width*scale), math.ceil(output_height*scale)))
fg = Image.open(temp_image)
bg.paste(fg, (math.ceil((output_width - image_width)*scale/2),
         math.ceil((output_height - image_height)*scale/2)), fg)

bg.resize((output_width, output_height), Image.ANTIALIAS);
bg.save(out)
os.remove(temp_image)

参考链接


Python-移除PNG透明图的alpha通道

在利用 Photoshop 等得到的 PNG 透明图中,一般都是包含 alpha channel 的.

但是IOS图标不允许图标中包含 Alpha通道。

下面的代码实现的功能:Remove PNG Transparency

#!/usr/bin/python3
#!--*-- coding:utf-8 --*--


def remove_transparency(img_pil, bg_colour=(255, 255, 255)):
    # Only process if image has transparency
    if img_pil.mode in ('RGBA', 'LA') or \
        (img_pil.mode == 'P' and 'transparency' in img_pil.info):
        # Need to convert to RGBA if LA format due to a bug in PIL (http://stackoverflow.com/a/1963146)
        alpha = img_pil.convert('RGBA').split()[-1]

        # Create a new background image of our matt color.
        # Must be RGBA because paste requires both images have the same format
        # (http://stackoverflow.com/a/8720632  and  http://stackoverflow.com/a/9459208)
        bg = Image.new("RGBA", img_pil.size, bg_colour + (255,))
        bg.paste(img_pil, mask=alpha)
        return bg

    else:
        return img_pil

From: Remove transparency/alpha from any image using PIL - stackoverflow

参考链接


Python - 移除PNG透明图的alpha通道

高性能 PyTorch 训练:性能瓶颈的调查与分析

PyTorch

在 2014 年之前,神经网络与深度学习还没有大规模地应用于工业界。研究者们开发了一些基本而有效的工具包,来搭建神经网络。其中的代表就是 Caffe、Torch 和 Theano。由于当时的研究主流方向是卷积神经网络 (CNN) 在计算机视觉 (CV) 中的应用,所以这些框架主要关注的是 layers。这种设计完全可以满足研究者们拼接不同卷积层、了解不同神经网络结构效果的目的。

而在之后,随着循环神经网络 (RNN) 和自然语言处理 (NLP) 的兴起,以 layers 为“first class citizen”的工具包们就开始力不从心了。而工业界也开始对模型构建、训练以及部署的效率提出了新的要求。随着以 Google、Microsoft、Facebook、Amazon 等巨头的加入,以数据流 (Data Flow) 为中心的体系被提出,TensorFlow、CNTK、MXNet、PyTorch 等新一代的深度学习框架应运而生。

PyTorch 是一个基于 Torch 库的开源机器学习库,用于计算机视觉和自然语言处理等应用,主要由 Facebook 的人工智能研究实验室 (FAIR) 开发。它是在修改后的 BSD 2.0 许可协议下发布的免费开源软件。

正如同它名字的前缀一般,PyTorch 主要采用 Python 语言接口。与 TensorFlow 1.x 相比,PyTorch 的编写方式更简单自然,API 更 pythonic,对 debug 也更加友好。因此,PyTorch 在学术界赢得了更多的拥趸,近年来顶级会议中,PyTorch 的代码提交量遥遥领先于第二名的 TensorFlow (Keras)。而在工业界,PyTorch 后来居上,已经逐渐和 TensorFlow 分庭抗礼。

很多学术界最新的成果都是以 PyTorch 构建的,并被作者开源在了 GitHub。但也有很多声音表示 PyTorch 在训练中比 TensorFlow 更慢。

高性能 PyTorch 的训练流程是什么样的?是产生最高准确率的模型?是最快的运行速度?是易于理解和扩展?还是容易并行化?

答案是,上述所有。

结合我自己给 PyTorch 提速的经历,本文将给出一些提升 PyTorch 性能的方向。当然,作为本文的读者,您需要对 Linux 操作系统和 PyTorch 足够熟悉。

了解瓶颈所在

首先,当感受到训练缓慢时,我们应当检查系统的状态来得知代码的性能被哪些因素限制了。计算,是一个由应用程序(代码)、存储设备(硬盘、内存)、运算设备(CPU、GPU)共同参与的过程,有着非常明显的木桶效应,即其中任意一个环节都有可能成为性能瓶颈的来源。

工具

此时,熟悉一些运维工具可以有效地帮助你了解当前整个计算机以及各个硬件设备的工作状态。只有将性能瓶颈定位到 CPU、GPU、I/O 或是代码中,才能开始解决问题。

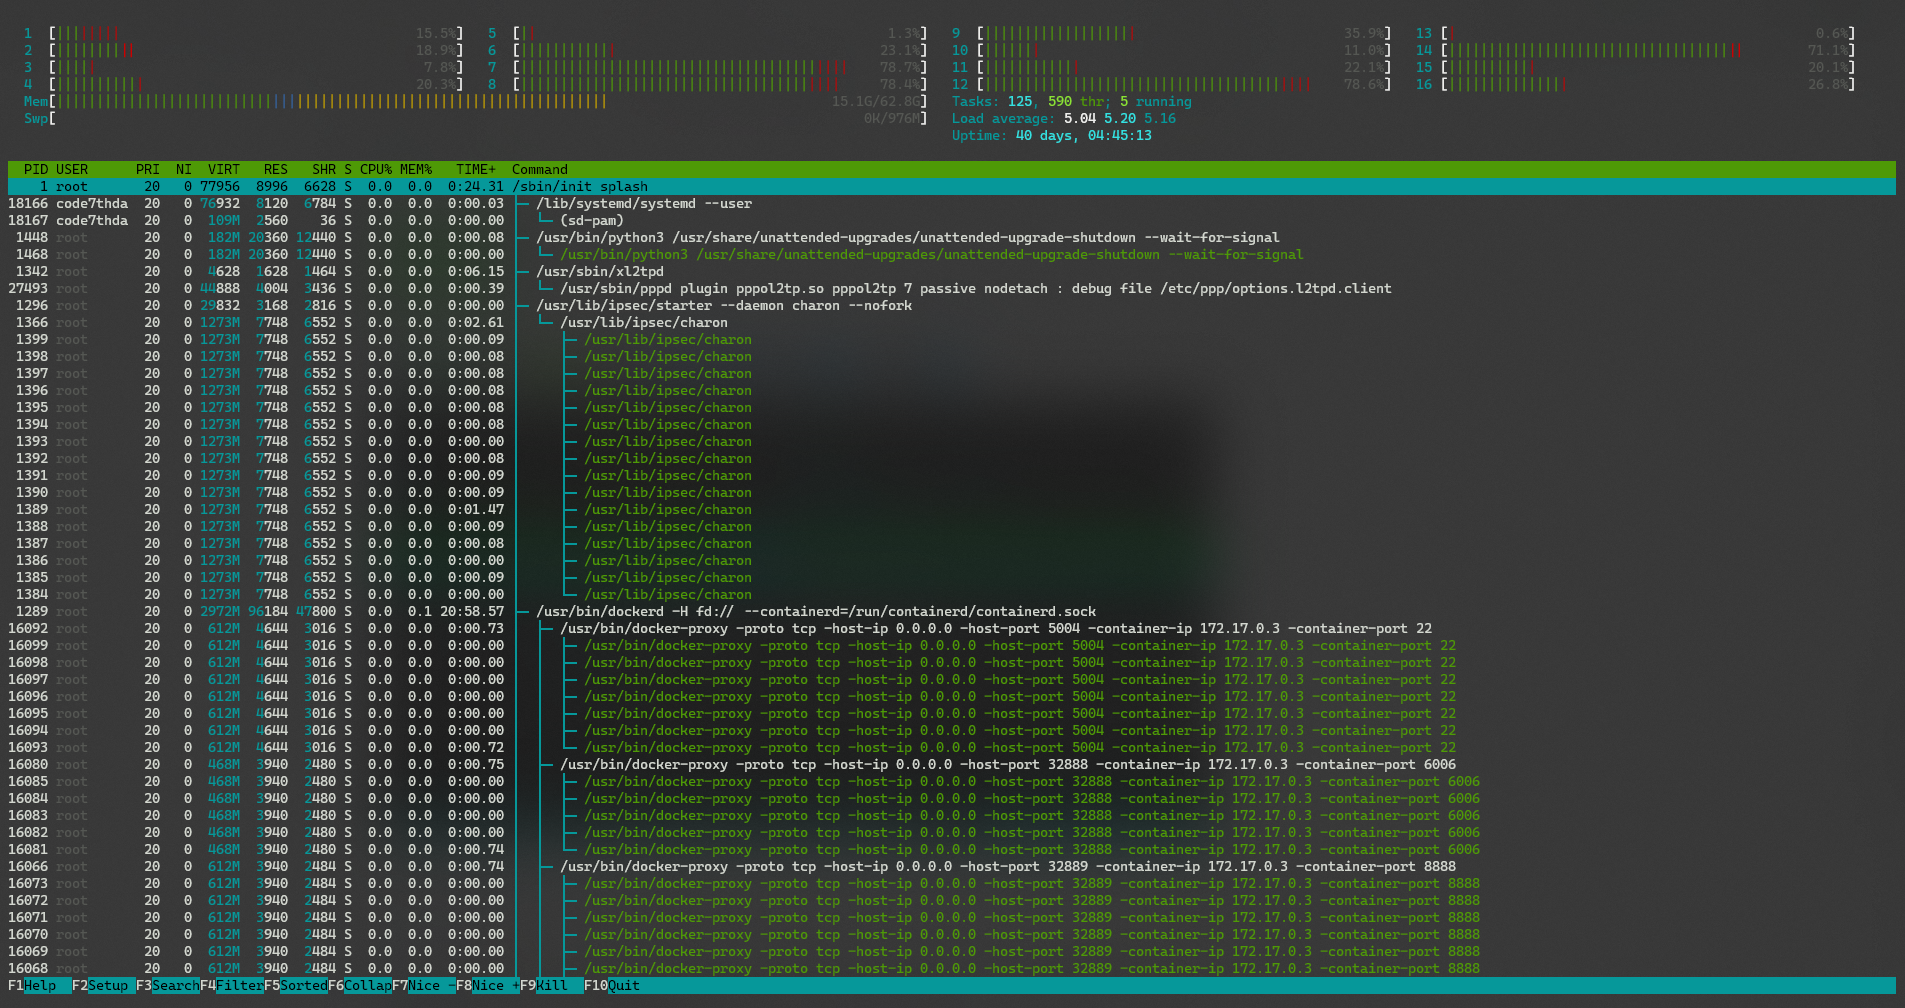
htop

htop 是一个跨平台的交互式流程查看器。

htop 允许垂直和水平滚动进程列表,以查看它们的完整命令行以及内存和CPU消耗等相关信息。显示的信息可以通过图形设置进行配置,并且可以交互地进行排序和过滤。与进程相关的任务(例如终止和更新)可以在不输入其 PID 的情况下完成。

从 htop 顶部的信息集合中,可以监视 CPU 和内存的使用情况。

一个好的高性能程序,应当尽可能多地进行异步运算,来充分发挥多核 CPU 的能力。同时,尽量多地使用内存,能够大大提高数据的交流效率。当然,这并不意味着你可以把所有的 CPU 和内存资源耗尽,这将使系统不能够正常调度资源,反而拖累计算。

在所有的 Linux 发行版中,你都可以直接从软件仓库中安装 htop,例如:

$ sudo apt install htop # Ubuntu/Debian

$ sudo yum install htop # RHEL/CentOS

$ sudo zypper install htop # openSUSE

$ sudo pacman -Syyu htop # Archlinux/Manjaro
iotop 和 iostat

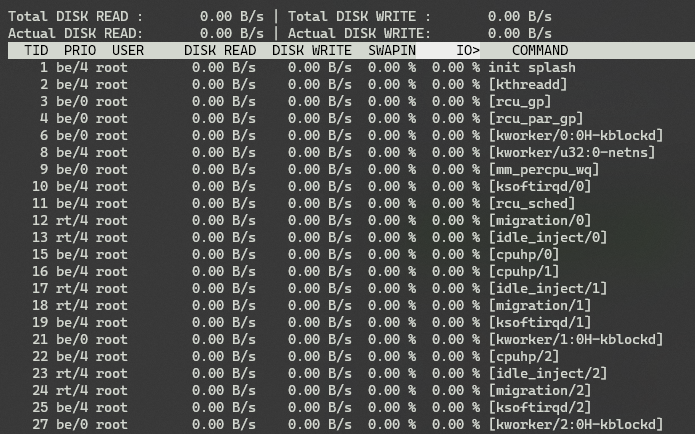
iotop 是用来监视每个命令所占用的 I/O 情况的命令行应用程序。

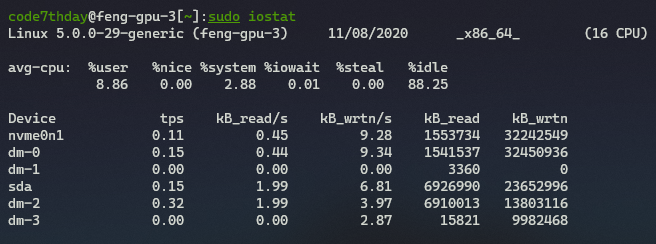
iostat 则是属于 sysstat 工具包中的一个组件,可以监视外部存储设备(硬盘)当前的 I/O 情况。

安装命令分别为:

$ sudo apt install iotop 

$ sudo apt install syssat

需要注意的是,因为涉及到 I/O 情况的监视,所以以上两款程序均需要 root 权限才能正常运行。

nvidia-smi

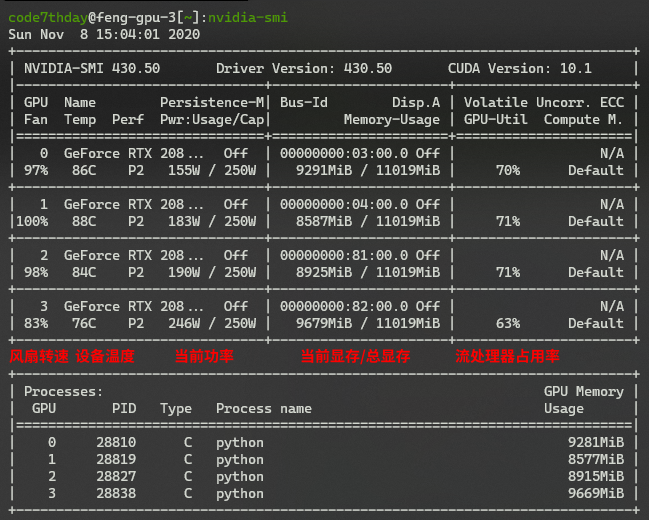
NVIDIA System Management Interface 是基于 NVIDIA Management Library (NVML) 的命令行应用程序,旨在帮助管理和监视 NVIDIA GPU 设备。

一般来说,GPU 的流处理器使用率越高,就说明 GPU 是在以更高的效率运转的。设备的当前功率也能从侧面反映这个问题。换言之,如果你发现你的流处理器利用率低于 50%,则说明模型没能很好地利用 GPU 的并行能力。

在通过 sh 脚本安装 NVIDIA GPU 驱动后,nvidia-smi 会被自动安装。如果是从发行版的仓库中安装的驱动,可以尝试在软件源中搜索安装 nvidia-smi

nvtop

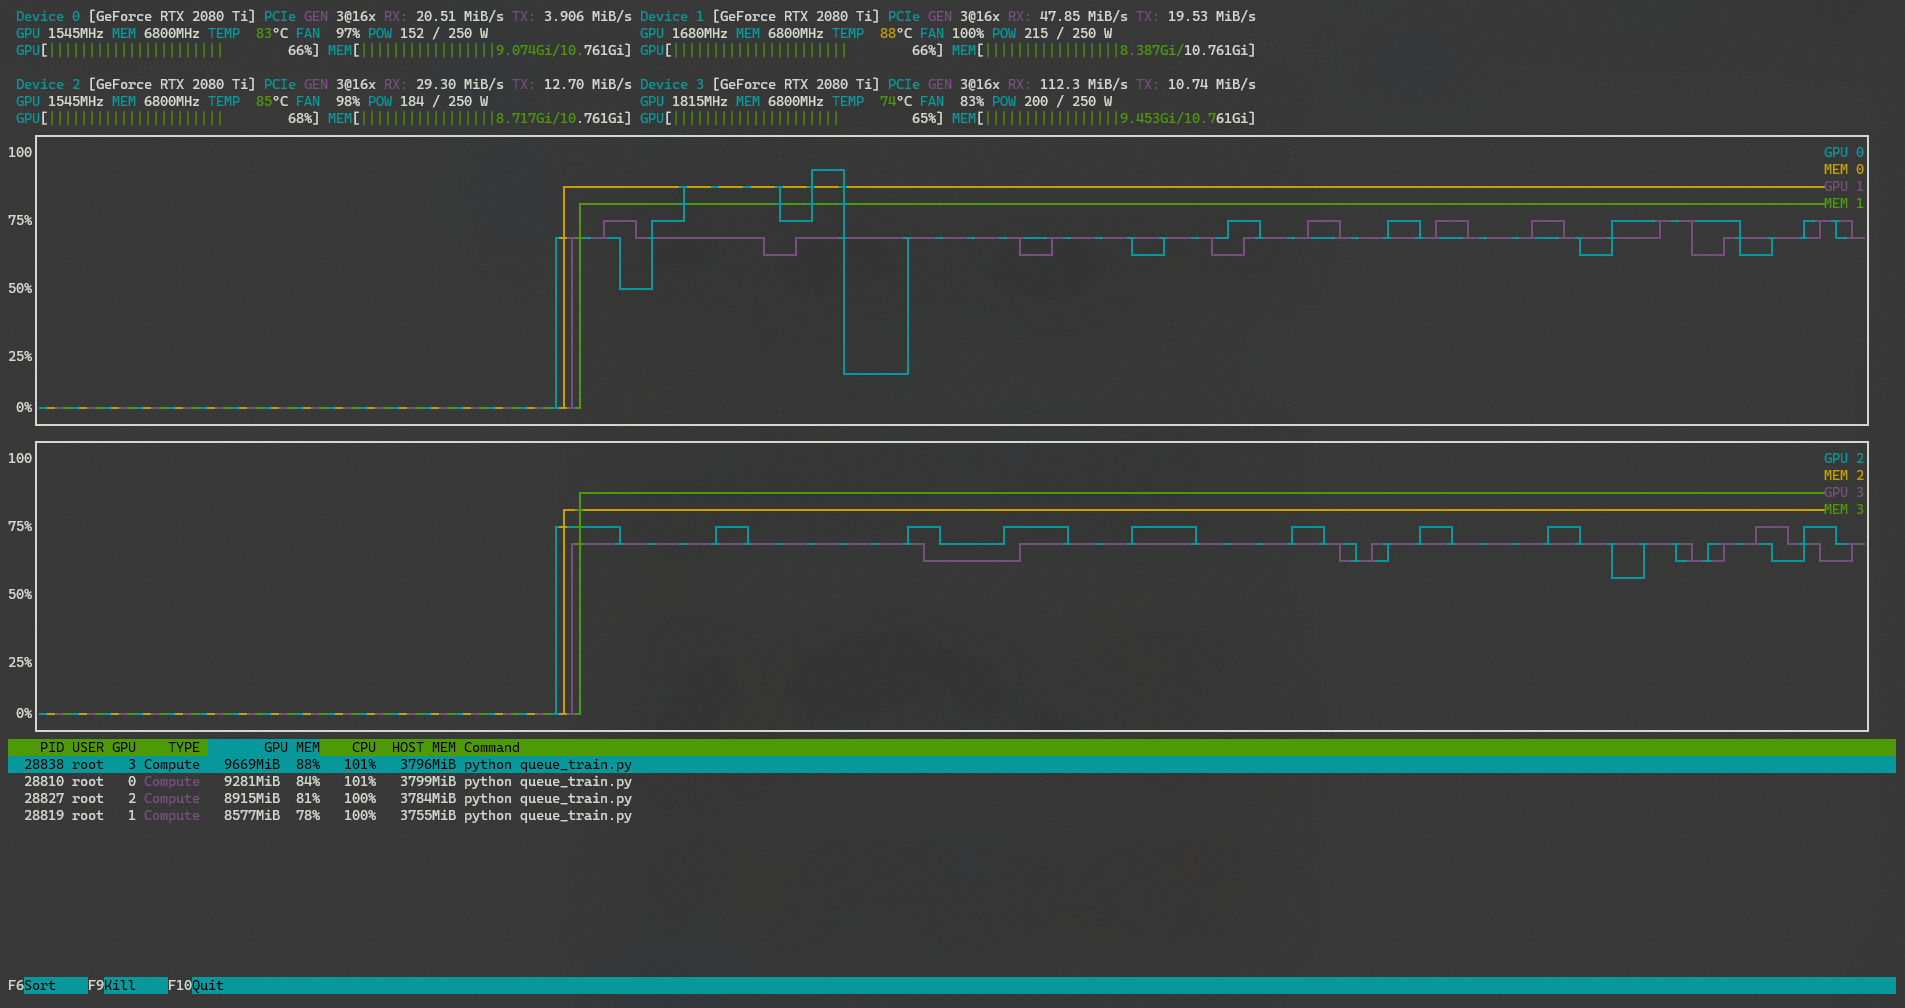
nvtop 代表 NVIDIA top,由开发者 Maxime Schmitt 发布于 GitHub,是一款用于观察和记录 NVIDIA GPU 使用情况的 (h)top 任务监视器。你会发现 nvtop 有着与 htop 非常相似的 UI。

它可以用于 GPU,并以曲线图的形式输出在一段时间内 GPU 流处理器和显存使用情况的变化。

相比于 nvidia-sminvtop 会关注到更关键的设备信息,并给出其在时间序列上的变化情况。

你可以参考 Syllo/nvtop 中的描述自行编译安装 nvtop

py-spy

py-spy 是一个针对 Python 程序的采样分析器。

它使您可以直观地看到 Python 程序正在花费时间,而无需重新启动程序或以任何方式修改代码。 py-spy 的开销非常低:为了提高速度,它是用 Rust 编写的,并且不会在所分析的 Python 程序相同的进程中运行。这意味着对生产 Python 代码使用 py-spy 是安全的。

py-spy 可以生成如下的 SVG 图像,来帮助你统计每一个 package、model 甚至每一个 function 在运行时所耗费的时间。

py-spy 同样能够以 top 的方式实时显示 Python 程序中哪些函数花费的时间最多。

只需要在 pypi 中安装即可:

$ pip install py-spy

问题分析与解决思路

有了以上工具所收集的信息,我们就可以开始分析限制程序性能发挥的原因了。

PyTorch Workflow

而首先,我们要了解 PyTorch 的工作流程。

因为 PyTorch 使用 Python 接口,同时在底层调用了相当多的 C 库,所以在使用 PyTorch 时,很多细节对用户是不暴露的。实际上,在常见的训练过程中,用户和 PyTorch 一起,大致完成了以下的步骤:

  1. 构建模型。将编写好的模型类实例化为 nn.Module 对象。
  2. 准备数据。将训练数据和测试数据进行预处理,然后组织为 Dataloader 的形式,并设置好数据增强方案。
  3. 定义 Loss Function 和 Optimizer。
  4. 主训练循环。

其中,主训练循环决定了网络经过多少次完整的数据集,即我们常说的 epoch:

  1. 从 Dataloader 中提取当前 batch 的数据。一般 Dataloader 中只记录了数据的 index 信息,所以每次训练循环时,对应的数据都会从硬盘被读取到内存,然后再从内存放入显存中,交由 GPU 进行后续步骤。
  2. 数据经过模型。
  3. 将得到的输出送到 Loss Function 中计算损失,随后进行 backward 求导。
  4. Optimizer 执行梯度下降,更新参数。

一般来说,PyTorch 训练的过程的快慢决定于主训练循环。主循环中的每一步都将被执行上万次乃至几十万次,任何的效率提升都能够带来极大的收益。

CPU 瓶颈

CPU 和 GPU 的计算特点,决定了它们不同的功用:CPU 具有更高的主频和精度,适合于进行串行任务;GPU 拥有几千到上万个 Stream 核心,可以进行大规模的并行任务。

所以,对于数据增强等没有相互依赖的任务交给 CPU 来进行,很大程度上会拖慢训练的进程。在每次的数据导入时,都会产生一定时间的等待。这是一种非常普遍的 CPU 瓶颈,即将不适合 CPU 的任务交给它来处理。

GPU 瓶颈

如果你熟悉梯度下降 (Gradient Descent) 的原理,那么你一定能够理解 batch size 对训练速度的影响。梯度下降将一个 batch 中的平均梯度作为总体梯度方向的近似,进行一次参数更新。Batch size 越大,那么 GPU 内同时并行计算的数据也就越多,相应的训练速度会有很大的提升。

Batch size 的设定对最终的训练结果有一定的影响,但是在一定范围内的调整并不会产生非常大的扰动。

主流观点中,在不过分影响最终的模型性能的前提下,batch size 的选取以最大化利用显存和流处理器为佳。

I/O 瓶颈

I/O 瓶颈是最常见、最普遍的训练效率影响因素。

正如上文中所描述的,数据将会在硬盘、内存和显存中不断地转移和复制。不同存储设备的读写速度,可能有几个数量级上的差异。

出现 I/O 瓶颈的标志主要有:

  1. 系统 I/O 读写(尤其是硬盘读写)占用过高;
  2. 内存占用和 CPU 占用都普遍偏低;
  3. 显存占用较高的情况下,流处理器的利用率过低。

将数据预读入内存中、异步进行数据加载都是有效的解决方案。一个简单稳定的方式是直接使用 DALI 库。

NVIDIA Data Loading Library (DALI) 是一个可移植的开源库,用于解码和增强图像、视频和语音,以加速深度学习应用程序。DALI 通过重叠训练和预处理减少了延迟和训练时间,缓解了瓶颈。它为流行的深度学习框架中内置的数据加载器和数据迭代器提供了一个插件,便于集成或重定向到不同的框架。

用图像训练神经网络需要开发人员首先对这些图像进行归一化处理。此外,图像通常会被压缩以节省存储空间。因此,开发人员构建了多阶段数据处理流程,包括加载、解码、裁剪、调整大小和许多其他增强算子。这些目前在 CPU 上执行的数据处理流水线已经成为瓶颈,限制了整体吞吐量。

DALI 是内置数据加载器和数据迭代器的高性能替代品。开发人员现在可以在 GPU 上运行他们的数据处理工作。

参考链接


高性能 PyTorch 训练 (1):性能瓶颈的调查与分析

python2.7解决UnicodeEncodeError: 'ascii' codec can't encode character问题

最近业务中需要用 Python 写一些脚本。尽管脚本的交互只是命令行 + 日志输出,但是为了让界面友好些,我还是决定用中文输出日志信息。

遇到了异常:

UnicodeEncodeError: 'ascii' codec can't encode characters in position 0-3: ordinal not in range(128)  

为了解决问题,研究了一下 Python 的字符编码处理。网上也有不少文章讲 Python 的字符编码,但是看过一遍,觉得自己可以讲得更明白些。

下面先复述一下 Python 字符串的基础,熟悉此内容的可以跳过。

 1.引入

对应 C/C++ 的 char 和 wchar_t, Python 也有两种字符串类型,str 与 unicode:

# -*- coding: utf-8 -*-  
# file: example1.py  
import string  
  
# 这个是 str 的字符串  
s = '关关雎鸠'  
  
# 这个是 unicode 的字符串  
u = u'关关雎鸠'  
  
print isinstance(s, str)      # True  
print isinstance(u, unicode)  # True  
  
print s.__class__   # <type 'str'>  
print u.__class__   # <type 'unicode'>

前面的申明:# -*- coding: utf-8 -*- 表明,上面的 Python 代码由 utf-8 编码。

为了保证输出不会在 linux 终端上显示乱码,需要设置好 linux 的环境变量:export LANG=en_US.UTF-8

如果你和我一样是使用 SecureCRT,请设置 Session Options/Terminal/Appearance/Character EncodingUTF-8 ,保证能够正确的解码 linux 终端的输出。

两个 Python 字符串类型间可以用 encode / decode 方法转换:

# 从 str 转换成 unicode  
print s.decode('utf-8')   # 关关雎鸠  
  
# 从 unicode 转换成 str  
print u.encode('utf-8')   # 关关雎鸠 

为什么从 unicode 转 str 是 encode,而反过来叫 decode? 

因为 Python 认为 16 位的 unicode 才是字符的唯一内码,而大家常用的字符集如 gb2312,gb18030/gbk,utf-8,以及 ascii 都是字符的二进制(字节)编码形式。把字符从 unicode 转换成二进制编码,当然是要 encode。

反过来,在 Python 中出现的 str 都是用字符集编码的 ansi 字符串。Python 本身并不知道 str 的编码,需要由开发者指定正确的字符集 decode。

(补充一句,其实 Python 是可以知道 str 编码的。因为我们在代码前面申明了 # -*- coding: utf-8 -*-,这表明代码中的 str 都是用 utf-8 编码的,我不知道 Python 为什么不这样做。)

如果用错误的字符集来 encode/decode 会怎样?

# 用 ascii 编码含中文的 unicode 字符串  
u.encode('ascii')  # 错误,因为中文无法用 ascii 字符集编码  
                   # UnicodeEncodeError: 'ascii' codec can't encode characters in position 0-3: ordinal not in range(128)  
  
# 用 gbk 编码含中文的 unicode 字符串  
u.encode('gbk')  # 正确,因为 '关关雎鸠' 可以用中文 gbk 字符集表示  
                 # '\xb9\xd8\xb9\xd8\xf6\xc2\xf0\xaf'  
                 # 直接 print 上面的 str 会显示乱码,修改环境变量为 zh_CN.GBK 可以看到结果是对的  
  
# 用 ascii 解码 utf-8 字符串  
s.decode('ascii')  # 错误,中文 utf-8 字符无法用 ascii 解码  
                   # UnicodeDecodeError: 'ascii' codec can't decode byte 0xe5 in position 0: ordinal not in range(128)  
  
# 用 gbk 解码 utf-8 字符串  
s.decode('gbk')  # 不出错,但是用 gbk 解码 utf-8 字符流的结果,显然只是乱码  
                 # u'\u934f\u51b2\u53e7\u95c6\u5ea8\u7b2d'

这就遇到了我在本文开头贴出的异常:UnicodeEncodeError: 'ascii' codec can't encode characters in position 0-3: ordinal not in range(128)

现在我们知道了这是个字符串编码异常。接下来, 为什么 Python 这么容易出现字符串编/解码异常? 

这要提到处理 Python 编码时容易遇到的两个陷阱。第一个是有关字符串连接的:

# -*- coding: utf-8 -*-  
# file: example2.py  
  
# 这个是 str 的字符串  
s = '关关雎鸠'  
  
# 这个是 unicode 的字符串  
u = u'关关雎鸠'  
  
s + u  # 失败,UnicodeDecodeError: 'ascii' codec can't decode byte 0xe5 in position 0: ordinal not in range(128)  

简单的字符串连接也会出现解码错误?

陷阱一:在进行同时包含 str 与 unicode 的运算时,Python 一律都把 str 转换成 unicode 再运算,当然,运算结果也都是 unicode。

由于 Python 事先并不知道 str 的编码,它只能使用 sys.getdefaultencoding() 编码去 decode。在我的印象里,sys.getdefaultencoding() 的值总是 'ascii' ——显然,如果需要转换的 str 有中文,一定会出现错误。

除了字符串连接,% 运算的结果也是一样的:

# 正确,所有的字符串都是 str, 不需要 decode  
"中文:%s" % s   # 中文:关关雎鸠  
  
# 失败,相当于运行:"中文:%s".decode('ascii') % u  
"中文:%s" % u  # UnicodeDecodeError: 'ascii' codec can't decode byte 0xe5 in position 0: ordinal not in range(128)  
  
# 正确,所有字符串都是 unicode, 不需要 decode  
u"中文:%s" % u   # 中文:关关雎鸠  
  
# 失败,相当于运行:u"中文:%s" % s.decode('ascii')  
u"中文:%s" % s  # UnicodeDecodeError: 'ascii' codec can't decode byte 0xe5 in position 0: ordinal not in range(128)  

我不理解为什么 sys.getdefaultencoding() 与环境变量 $LANG 全无关系。如果 Python 用 $LANG 设置 sys.getdefaultencoding() 的值,那么至少开发者遇到 UnicodeDecodeError 的几率会降低 50%。

另外,就像前面说的,我也怀疑为什么 Python 在这里不参考 # -*- coding: utf-8 -*- ,因为 Python 在运行前总是会检查你的代码,这保证了代码里定义的 str 一定是 utf-8 。

对于这个问题,我的唯一建议是在代码里的中文字符串前写上 u。另外,在 Python 3 已经取消了 str,让所有的字符串都是 unicode ——这也许是个正确的决定。

其实,sys.getdefaultencoding() 的值是可以用“后门”方式修改的,我不是特别推荐这个解决方案,但是还是贴一下,因为后面有用:

# -*- coding: utf-8 -*-  
# file: example3.py  
import sys  
  
# 这个是 str 的字符串  
s = '关关雎鸠'  
  
# 这个是 unicode 的字符串  
u = u'关关雎鸠'  
  
# 使得 sys.getdefaultencoding() 的值为 'utf-8'  
reload(sys)                      # reload 才能调用 setdefaultencoding 方法  
sys.setdefaultencoding('utf-8')  # 设置 'utf-8'  
  
# 没问题  
s + u  # u'\u5173\u5173\u96ce\u9e20\u5173\u5173\u96ce\u9e20'  
  
# 同样没问题  
"中文:%s" % u   # u'\u4e2d\u6587\uff1a\u5173\u5173\u96ce\u9e20'  
  
# 还是没问题  
u"中文:%s" % s  # u'\u4e2d\u6587\uff1a\u5173\u5173\u96ce\u9e20'  

可以看到,问题魔术般的解决了。但是注意! sys.setdefaultencoding() 的效果是全局的,如果你的代码由几个不同编码的 Python 文件组成,用这种方法只是按下了葫芦浮起了瓢,让问题变得复杂。

另一个陷阱是有关标准输出的。

刚刚怎么来着?我一直说要设置正确的 linux $LANG 环境变量。那么,设置错误的 $LANG,比如 zh_CN.GBK 会怎样?(避免终端的影响,请把 SecureCRT 也设置成相同的字符集。)

显然会是乱码,但是不是所有输出都是乱码。

# -*- coding: utf-8 -*-  
# file: example4.py  
import string  
  
# 这个是 str 的字符串  
s = '关关雎鸠'  
  
# 这个是 unicode 的字符串  
u = u'关关雎鸠'  
  
# 输出 str 字符串, 显示是乱码  
print s   # 鍏冲叧闆庨笭  
  
# 输出 unicode 字符串,显示正确  
print u  # 关关雎鸠  

为什么是 unicode 而不是 str 的字符显示是正确的? 首先我们需要了解 print。与所有语言一样,这个 Python 命令实际上是把字符打印到标准输出流 —— sys.stdout。而 Python 在这里变了个魔术,它会按照 sys.stdout.encoding 来给 unicode 编码,而把 str 直接输出,扔给操作系统去解决。

这也是为什么要设置 linux $LANG 环境变量与 SecureCRT 一致,否则这些字符会被 SecureCRT 再转换一次,才会交给桌面的 Windows 系统用编码 CP936 或者说 GBK 来显示。

通常情况,sys.stdout.encoding 的值与 linux $LANG 环境变量保持一致:

# -*- coding: utf-8 -*-  
# file: example5.py  
import sys  
  
# 检查标准输出流的编码  
print sys.stdout.encoding  # 设置 $LANG = zh_CN.GBK,  输出 GBK  
                           # 设置 $LANG = en_US.UTF-8,输出 UTF-8  
  
# 这个是 unicode 的字符串  
u = u'关关雎鸠'  
  
# 输出 unicode 字符串,显示正确  
print u  # 关关雎鸠  

但是,这里有 陷阱二:一旦你的 Python 代码是用管道 / 子进程方式运行,sys.stdout.encoding 就会失效,让你重新遇到 UnicodeEncodeError。

比如,用管道方式运行上面的 example4.py 代码:

python -u example5.py | more  
  
UnicodeEncodeError: 'ascii' codec can't encode characters in position 0-3: ordinal not in range(128)  
None  

可以看到,第一:sys.stdout.encoding 的值变成了 None;第二:Python 在 print 时会尝试用 ascii 去编码 unicode.

由于 ascii 字符集不能用来表示中文字符,这里当然会编码失败。

怎么解决这个问题? 不知道别人是怎么搞定的,总之我用了一个丑陋的办法:

# -*- coding: utf-8 -*-  
# file: example6.py  
import os  
import sys  
import codecs  
  
# 无论如何,请用 linux 系统的当前字符集输出:  
if sys.stdout.encoding is None:  
    enc = os.environ['LANG'].split('.')[1]  
    sys.stdout = codecs.getwriter(enc)(sys.stdout)  # 替换 sys.stdout  
  
# 这个是 unicode 的字符串  
u = u'关关雎鸠'  
  
# 输出 unicode 字符串,显示正确  
print u  # 关关雎鸠  

  这个方法仍然有个副作用:直接输出中文 str 会失败,因为 codecs 模块的 writer 与 sys.stdout 的行为相反,它会把所有的 str 用 sys.getdefaultencoding() 的字符集转换成 unicode 输出。

# 这个是 str 的字符串  
s = '关关雎鸠'  
  
# 输出 str 字符串, 异常  
print s   # UnicodeDecodeError: 'ascii' codec can't decode byte 0xe5 in position 0: ordinal not in range(128)  

显然,sys.getdefaultencoding() 的值是 'ascii', 编码失败。

解决办法就像 example3.py 里说的,你要么给 str 加上 u 申明成 unicode,要么通过“后门”去修改 sys.getdefaultencoding():

# 使得 sys.getdefaultencoding() 的值为 'utf-8'  
reload(sys)                      # reload 才能调用 setdefaultencoding 方法  
sys.setdefaultencoding('utf-8')  # 设置 'utf-8'  
  
# 这个是 str 的字符串  
s = '关关雎鸠'  
  
# 输出 str 字符串, OK  
print s   # 关关雎鸠

总而言之,在 Python 2 下进行中文输入输出是个危机四伏的事,特别是在你的代码里混合使用 str 与 unicode 时。

有些模块,例如 json,会直接返回 unicode 类型的字符串,让你的 % 运算需要进行字符解码而失败。而有些会直接返回 str, 你需要知道它们的真实编码,特别是在 print 的时候。

为了避免一些陷阱,上文中说过,最好的办法就是在 Python 代码里永远使用 u 定义中文字符串。另外,如果你的代码需要用管道 / 子进程方式运行,则需要用到 example6.py 里的技巧。

 2.python 自动解编码机制导致报错

1.string 和 unicode 对象合并
>>> s + u''
Traceback (most recent call last):
  File "<input>", line 1, in <module>
UnicodeDecodeError: 'ascii' codec can't decode byte 0xe4 in position 0: ordinal not in range(128)
>>>
2.列表合并
>>> as_list = [u, s]
>>> ''.join(as_list)
Traceback (most recent call last):
  File "<input>", line 1, in <module>
UnicodeDecodeError: 'ascii' codec can't decode byte 0xe4 in position 0: ordinal not in range(128)
3.格式化字符串
>>> '%s-%s'%(s,u)
Traceback (most recent call last):
  File "<input>", line 1, in <module>
UnicodeDecodeError: 'ascii' codec can't decode byte 0xe4 in position 0: ordinal not in range(128)
>>>
4.打印 unicode 对象
#test.py
# -*- coding: utf-8 -*-
u = u'中文'
print u
#outpt
Traceback (most recent call last):
  File "/Users/zhyq0826/workspace/zhyq0826/blog-code/p20161030_python_encoding/uni.py", line 3, in <module>
    print u
UnicodeEncodeError: 'ascii' codec can't encode characters in position 0-1: ordinal not in range(128)
5.输出到文件
>>> f = open('text.txt','w')
>>> f.write(u)
Traceback (most recent call last):
  File "<input>", line 1, in <module>
UnicodeEncodeError: 'ascii' codec can't encode characters in position 0-1: ordinal not in range(128)
>>>

1,2,3 的例子中,python 自动用 ascii 把 string 解码为 unicode 对象然后再进行相应操作,所以都是 decode 错误, 4 和 5 python 自动用 ascii 把 unicode 对象编码为字符串然后输出,所以都是 encode 错误。

只要涉及到 unicode 对象和 string 的转换以及 unicode 对象输出、输入的地方可能都会触发 python 自动进行解码/编码,比如写入数据库、写入到文件、读取 socket 等等。

到此,这两个异常产生的真正原因了基本已经清楚了: unicode 对象需要编码为相应的 string(字符串)才可以存储、传输、打印,字符串需要解码为对应的 unicode 对象才能完成 unicode 对象的各种操作,lenfind 等。

string.decode('utf-8') --> unicode
unicode.encode('utf-8') --> string

3.如何避免这些的错误

1.理解编码或解码的转换方向

无论何时发生编码错误,首先要理解编码方向,然后再针对性解决。

2.设置默认编码为 utf-8

在文件头写入

# -*- coding: utf-8 -*-

python 会查找: coding: name or coding=name,并设置文件编码格式为 name,此方式是告诉 python 默认编码不再是 ascii ,而是要使用声明的编码格式。

3.输入对象尽早解码为 unicode,输出对象尽早编码为字节流

无论何时有字节流输入,都需要尽早解码为 unicode 对象。任何时候想要把 unicode 对象写入到文件、数据库、socket 等外界程序,都需要进行编码。

4.使用 codecs 模块来处理输入输出 unicode 对象

codecs 模块可以自动的完成解编码的工作。

>>> import codecs
>>> f = codecs.open('text.txt', 'w', 'utf-8')
>>> f.write(u)
>>> f.close()

参考链接


python2.7 的中文编码处理,解决UnicodeEncodeError: 'ascii' codec can't encode character 问题

Python编写AES加密代码

最近需要 Python 实现 AES 加解密操作,在目前的 macOS Big Sur (11.4) 上使用 PyCryptodomePyCrypto 都会报错:

ImportError: No module named 'Crypto' 

经过测试,我们可以使用 cryptography 来实现这个功能,如下:

>>> import os
>>> from cryptography.hazmat.primitives.ciphers import Cipher, algorithms, modes
>>> key = os.urandom(32)
>>> iv = os.urandom(16)
>>> cipher = Cipher(algorithms.AES(key), modes.CBC(iv))
>>> encryptor = cipher.encryptor()
>>> ct = encryptor.update(b"a secret message") + encryptor.finalize()
>>> decryptor = cipher.decryptor()
>>> decryptor.update(ct) + decryptor.finalize()
b'a secret message'

参考 AES 算法实现代码:

#!/usr/bin/python
#
# aes.py: implements AES - Advanced Encryption Standard
# from the SlowAES project, http://code.google.com/p/slowaes/
#
# Copyright (c) 2008    Josh Davis ( http://www.josh-davis.org ),
#           Alex Martelli ( http://www.aleax.it )
#
# Ported from C code written by Laurent Haan ( http://www.progressive-coding.com )
#
# Licensed under the Apache License, Version 2.0
# http://www.apache.org/licenses/
#
import os
import sys
import math

class AES(object):
    '''AES funtions for a single block
    '''
    # Very annoying code:  all is for an object, but no state is kept!
    # Should just be plain functions in a AES modlule.
    
    # valid key sizes
    keySize = dict(SIZE_128=16, SIZE_192=24, SIZE_256=32)

    # Rijndael S-box
    sbox =  [0x63, 0x7c, 0x77, 0x7b, 0xf2, 0x6b, 0x6f, 0xc5, 0x30, 0x01, 0x67,
            0x2b, 0xfe, 0xd7, 0xab, 0x76, 0xca, 0x82, 0xc9, 0x7d, 0xfa, 0x59,
            0x47, 0xf0, 0xad, 0xd4, 0xa2, 0xaf, 0x9c, 0xa4, 0x72, 0xc0, 0xb7,
            0xfd, 0x93, 0x26, 0x36, 0x3f, 0xf7, 0xcc, 0x34, 0xa5, 0xe5, 0xf1,
            0x71, 0xd8, 0x31, 0x15, 0x04, 0xc7, 0x23, 0xc3, 0x18, 0x96, 0x05,
            0x9a, 0x07, 0x12, 0x80, 0xe2, 0xeb, 0x27, 0xb2, 0x75, 0x09, 0x83,
            0x2c, 0x1a, 0x1b, 0x6e, 0x5a, 0xa0, 0x52, 0x3b, 0xd6, 0xb3, 0x29,
            0xe3, 0x2f, 0x84, 0x53, 0xd1, 0x00, 0xed, 0x20, 0xfc, 0xb1, 0x5b,
            0x6a, 0xcb, 0xbe, 0x39, 0x4a, 0x4c, 0x58, 0xcf, 0xd0, 0xef, 0xaa,
            0xfb, 0x43, 0x4d, 0x33, 0x85, 0x45, 0xf9, 0x02, 0x7f, 0x50, 0x3c,
            0x9f, 0xa8, 0x51, 0xa3, 0x40, 0x8f, 0x92, 0x9d, 0x38, 0xf5, 0xbc,
            0xb6, 0xda, 0x21, 0x10, 0xff, 0xf3, 0xd2, 0xcd, 0x0c, 0x13, 0xec,
            0x5f, 0x97, 0x44, 0x17, 0xc4, 0xa7, 0x7e, 0x3d, 0x64, 0x5d, 0x19,
            0x73, 0x60, 0x81, 0x4f, 0xdc, 0x22, 0x2a, 0x90, 0x88, 0x46, 0xee,
            0xb8, 0x14, 0xde, 0x5e, 0x0b, 0xdb, 0xe0, 0x32, 0x3a, 0x0a, 0x49,
            0x06, 0x24, 0x5c, 0xc2, 0xd3, 0xac, 0x62, 0x91, 0x95, 0xe4, 0x79,
            0xe7, 0xc8, 0x37, 0x6d, 0x8d, 0xd5, 0x4e, 0xa9, 0x6c, 0x56, 0xf4,
            0xea, 0x65, 0x7a, 0xae, 0x08, 0xba, 0x78, 0x25, 0x2e, 0x1c, 0xa6,
            0xb4, 0xc6, 0xe8, 0xdd, 0x74, 0x1f, 0x4b, 0xbd, 0x8b, 0x8a, 0x70,
            0x3e, 0xb5, 0x66, 0x48, 0x03, 0xf6, 0x0e, 0x61, 0x35, 0x57, 0xb9,
            0x86, 0xc1, 0x1d, 0x9e, 0xe1, 0xf8, 0x98, 0x11, 0x69, 0xd9, 0x8e,
            0x94, 0x9b, 0x1e, 0x87, 0xe9, 0xce, 0x55, 0x28, 0xdf, 0x8c, 0xa1,
            0x89, 0x0d, 0xbf, 0xe6, 0x42, 0x68, 0x41, 0x99, 0x2d, 0x0f, 0xb0,
            0x54, 0xbb, 0x16]

    # Rijndael Inverted S-box
    rsbox = [0x52, 0x09, 0x6a, 0xd5, 0x30, 0x36, 0xa5, 0x38, 0xbf, 0x40, 0xa3,
            0x9e, 0x81, 0xf3, 0xd7, 0xfb , 0x7c, 0xe3, 0x39, 0x82, 0x9b, 0x2f,
            0xff, 0x87, 0x34, 0x8e, 0x43, 0x44, 0xc4, 0xde, 0xe9, 0xcb , 0x54,
            0x7b, 0x94, 0x32, 0xa6, 0xc2, 0x23, 0x3d, 0xee, 0x4c, 0x95, 0x0b,
            0x42, 0xfa, 0xc3, 0x4e , 0x08, 0x2e, 0xa1, 0x66, 0x28, 0xd9, 0x24,
            0xb2, 0x76, 0x5b, 0xa2, 0x49, 0x6d, 0x8b, 0xd1, 0x25 , 0x72, 0xf8,
            0xf6, 0x64, 0x86, 0x68, 0x98, 0x16, 0xd4, 0xa4, 0x5c, 0xcc, 0x5d,
            0x65, 0xb6, 0x92 , 0x6c, 0x70, 0x48, 0x50, 0xfd, 0xed, 0xb9, 0xda,
            0x5e, 0x15, 0x46, 0x57, 0xa7, 0x8d, 0x9d, 0x84 , 0x90, 0xd8, 0xab,
            0x00, 0x8c, 0xbc, 0xd3, 0x0a, 0xf7, 0xe4, 0x58, 0x05, 0xb8, 0xb3,
            0x45, 0x06 , 0xd0, 0x2c, 0x1e, 0x8f, 0xca, 0x3f, 0x0f, 0x02, 0xc1,
            0xaf, 0xbd, 0x03, 0x01, 0x13, 0x8a, 0x6b , 0x3a, 0x91, 0x11, 0x41,
            0x4f, 0x67, 0xdc, 0xea, 0x97, 0xf2, 0xcf, 0xce, 0xf0, 0xb4, 0xe6,
            0x73 , 0x96, 0xac, 0x74, 0x22, 0xe7, 0xad, 0x35, 0x85, 0xe2, 0xf9,
            0x37, 0xe8, 0x1c, 0x75, 0xdf, 0x6e , 0x47, 0xf1, 0x1a, 0x71, 0x1d,
            0x29, 0xc5, 0x89, 0x6f, 0xb7, 0x62, 0x0e, 0xaa, 0x18, 0xbe, 0x1b ,
            0xfc, 0x56, 0x3e, 0x4b, 0xc6, 0xd2, 0x79, 0x20, 0x9a, 0xdb, 0xc0,
            0xfe, 0x78, 0xcd, 0x5a, 0xf4 , 0x1f, 0xdd, 0xa8, 0x33, 0x88, 0x07,
            0xc7, 0x31, 0xb1, 0x12, 0x10, 0x59, 0x27, 0x80, 0xec, 0x5f , 0x60,
            0x51, 0x7f, 0xa9, 0x19, 0xb5, 0x4a, 0x0d, 0x2d, 0xe5, 0x7a, 0x9f,
            0x93, 0xc9, 0x9c, 0xef , 0xa0, 0xe0, 0x3b, 0x4d, 0xae, 0x2a, 0xf5,
            0xb0, 0xc8, 0xeb, 0xbb, 0x3c, 0x83, 0x53, 0x99, 0x61 , 0x17, 0x2b,
            0x04, 0x7e, 0xba, 0x77, 0xd6, 0x26, 0xe1, 0x69, 0x14, 0x63, 0x55,
            0x21, 0x0c, 0x7d]

    def getSBoxValue(self,num):
        """Retrieves a given S-Box Value"""
        return self.sbox[num]

    def getSBoxInvert(self,num):
        """Retrieves a given Inverted S-Box Value"""
        return self.rsbox[num]

    def rotate(self, word):
        """ Rijndael's key schedule rotate operation.

        Rotate a word eight bits to the left: eg, rotate(1d2c3a4f) == 2c3a4f1d
        Word is an char list of size 4 (32 bits overall).
        """
        return word[1:] + word[:1]

    # Rijndael Rcon
    Rcon = [0x8d, 0x01, 0x02, 0x04, 0x08, 0x10, 0x20, 0x40, 0x80, 0x1b, 0x36,
            0x6c, 0xd8, 0xab, 0x4d, 0x9a, 0x2f, 0x5e, 0xbc, 0x63, 0xc6, 0x97,
            0x35, 0x6a, 0xd4, 0xb3, 0x7d, 0xfa, 0xef, 0xc5, 0x91, 0x39, 0x72,
            0xe4, 0xd3, 0xbd, 0x61, 0xc2, 0x9f, 0x25, 0x4a, 0x94, 0x33, 0x66,
            0xcc, 0x83, 0x1d, 0x3a, 0x74, 0xe8, 0xcb, 0x8d, 0x01, 0x02, 0x04,
            0x08, 0x10, 0x20, 0x40, 0x80, 0x1b, 0x36, 0x6c, 0xd8, 0xab, 0x4d,
            0x9a, 0x2f, 0x5e, 0xbc, 0x63, 0xc6, 0x97, 0x35, 0x6a, 0xd4, 0xb3,
            0x7d, 0xfa, 0xef, 0xc5, 0x91, 0x39, 0x72, 0xe4, 0xd3, 0xbd, 0x61,
            0xc2, 0x9f, 0x25, 0x4a, 0x94, 0x33, 0x66, 0xcc, 0x83, 0x1d, 0x3a,
            0x74, 0xe8, 0xcb, 0x8d, 0x01, 0x02, 0x04, 0x08, 0x10, 0x20, 0x40,
            0x80, 0x1b, 0x36, 0x6c, 0xd8, 0xab, 0x4d, 0x9a, 0x2f, 0x5e, 0xbc,
            0x63, 0xc6, 0x97, 0x35, 0x6a, 0xd4, 0xb3, 0x7d, 0xfa, 0xef, 0xc5,
            0x91, 0x39, 0x72, 0xe4, 0xd3, 0xbd, 0x61, 0xc2, 0x9f, 0x25, 0x4a,
            0x94, 0x33, 0x66, 0xcc, 0x83, 0x1d, 0x3a, 0x74, 0xe8, 0xcb, 0x8d,
            0x01, 0x02, 0x04, 0x08, 0x10, 0x20, 0x40, 0x80, 0x1b, 0x36, 0x6c,
            0xd8, 0xab, 0x4d, 0x9a, 0x2f, 0x5e, 0xbc, 0x63, 0xc6, 0x97, 0x35,
            0x6a, 0xd4, 0xb3, 0x7d, 0xfa, 0xef, 0xc5, 0x91, 0x39, 0x72, 0xe4,
            0xd3, 0xbd, 0x61, 0xc2, 0x9f, 0x25, 0x4a, 0x94, 0x33, 0x66, 0xcc,
            0x83, 0x1d, 0x3a, 0x74, 0xe8, 0xcb, 0x8d, 0x01, 0x02, 0x04, 0x08,
            0x10, 0x20, 0x40, 0x80, 0x1b, 0x36, 0x6c, 0xd8, 0xab, 0x4d, 0x9a,
            0x2f, 0x5e, 0xbc, 0x63, 0xc6, 0x97, 0x35, 0x6a, 0xd4, 0xb3, 0x7d,
            0xfa, 0xef, 0xc5, 0x91, 0x39, 0x72, 0xe4, 0xd3, 0xbd, 0x61, 0xc2,
            0x9f, 0x25, 0x4a, 0x94, 0x33, 0x66, 0xcc, 0x83, 0x1d, 0x3a, 0x74,
            0xe8, 0xcb ]

    def getRconValue(self, num):
        """Retrieves a given Rcon Value"""
        return self.Rcon[num]

    def core(self, word, iteration):
        """Key schedule core."""
        # rotate the 32-bit word 8 bits to the left
        word = self.rotate(word)
        # apply S-Box substitution on all 4 parts of the 32-bit word
        for i in range(4):
            word[i] = self.getSBoxValue(word[i])
        # XOR the output of the rcon operation with i to the first part
        # (leftmost) only
        word[0] = word[0] ^ self.getRconValue(iteration)
        return word

    def expandKey(self, key, size, expandedKeySize):
        """Rijndael's key expansion.

        Expands an 128,192,256 key into an 176,208,240 bytes key

        expandedKey is a char list of large enough size,
        key is the non-expanded key.
        """
        # current expanded keySize, in bytes
        currentSize = 0
        rconIteration = 1
        expandedKey = [0] * expandedKeySize

        # set the 16, 24, 32 bytes of the expanded key to the input key
        for j in range(size):
            expandedKey[j] = key[j]
        currentSize += size

        while currentSize < expandedKeySize:
            # assign the previous 4 bytes to the temporary value t
            t = expandedKey[currentSize-4:currentSize]

            # every 16,24,32 bytes we apply the core schedule to t
            # and increment rconIteration afterwards
            if currentSize % size == 0:
                t = self.core(t, rconIteration)
                rconIteration += 1
            # For 256-bit keys, we add an extra sbox to the calculation
            if size == self.keySize["SIZE_256"] and ((currentSize % size) == 16):
                for l in range(4): t[l] = self.getSBoxValue(t[l])

            # We XOR t with the four-byte block 16,24,32 bytes before the new
            # expanded key.  This becomes the next four bytes in the expanded
            # key.
            for m in range(4):
                expandedKey[currentSize] = expandedKey[currentSize - size] ^ \
                        t[m]
                currentSize += 1

        return expandedKey

    def addRoundKey(self, state, roundKey):
        """Adds (XORs) the round key to the state."""
        for i in range(16):
            state[i] ^= roundKey[i]
        return state

    def createRoundKey(self, expandedKey, roundKeyPointer):
        """Create a round key.
        Creates a round key from the given expanded key and the
        position within the expanded key.
        """
        roundKey = [0] * 16
        for i in range(4):
            for j in range(4):
                roundKey[j*4+i] = expandedKey[roundKeyPointer + i*4 + j]
        return roundKey

    def galois_multiplication(self, a, b):
        """Galois multiplication of 8 bit characters a and b."""
        p = 0
        for counter in range(8):
            if b & 1: p ^= a
            hi_bit_set = a & 0x80
            a <<= 1
            # keep a 8 bit
            a &= 0xFF
            if hi_bit_set:
                a ^= 0x1b
            b >>= 1
        return p

    #
    # substitute all the values from the state with the value in the SBox
    # using the state value as index for the SBox
    #
    def subBytes(self, state, isInv):
        if isInv: getter = self.getSBoxInvert
        else: getter = self.getSBoxValue
        for i in range(16): state[i] = getter(state[i])
        return state

    # iterate over the 4 rows and call shiftRow() with that row
    def shiftRows(self, state, isInv):
        for i in range(4):
            state = self.shiftRow(state, i*4, i, isInv)
        return state

    # each iteration shifts the row to the left by 1
    def shiftRow(self, state, statePointer, nbr, isInv):
        for i in range(nbr):
            if isInv:
                state[statePointer:statePointer+4] = \
                        state[statePointer+3:statePointer+4] + \
                        state[statePointer:statePointer+3]
            else:
                state[statePointer:statePointer+4] = \
                        state[statePointer+1:statePointer+4] + \
                        state[statePointer:statePointer+1]
        return state

    # galois multiplication of the 4x4 matrix
    def mixColumns(self, state, isInv):
        # iterate over the 4 columns
        for i in range(4):
            # construct one column by slicing over the 4 rows
            column = state[i:i+16:4]
            # apply the mixColumn on one column
            column = self.mixColumn(column, isInv)
            # put the values back into the state
            state[i:i+16:4] = column

        return state

    # galois multiplication of 1 column of the 4x4 matrix
    def mixColumn(self, column, isInv):
        if isInv: mult = [14, 9, 13, 11]
        else: mult = [2, 1, 1, 3]
        cpy = list(column)
        g = self.galois_multiplication

        column[0] = g(cpy[0], mult[0]) ^ g(cpy[3], mult[1]) ^ \
                    g(cpy[2], mult[2]) ^ g(cpy[1], mult[3])
        column[1] = g(cpy[1], mult[0]) ^ g(cpy[0], mult[1]) ^ \
                    g(cpy[3], mult[2]) ^ g(cpy[2], mult[3])
        column[2] = g(cpy[2], mult[0]) ^ g(cpy[1], mult[1]) ^ \
                    g(cpy[0], mult[2]) ^ g(cpy[3], mult[3])
        column[3] = g(cpy[3], mult[0]) ^ g(cpy[2], mult[1]) ^ \
                    g(cpy[1], mult[2]) ^ g(cpy[0], mult[3])
        return column

    # applies the 4 operations of the forward round in sequence
    def aes_round(self, state, roundKey):
        state = self.subBytes(state, False)
        state = self.shiftRows(state, False)
        state = self.mixColumns(state, False)
        state = self.addRoundKey(state, roundKey)
        return state

    # applies the 4 operations of the inverse round in sequence
    def aes_invRound(self, state, roundKey):
        state = self.shiftRows(state, True)
        state = self.subBytes(state, True)
        state = self.addRoundKey(state, roundKey)
        state = self.mixColumns(state, True)
        return state

    # Perform the initial operations, the standard round, and the final
    # operations of the forward aes, creating a round key for each round
    def aes_main(self, state, expandedKey, nbrRounds):
        state = self.addRoundKey(state, self.createRoundKey(expandedKey, 0))
        i = 1
        while i < nbrRounds:
            state = self.aes_round(state,
                                   self.createRoundKey(expandedKey, 16*i))
            i += 1
        state = self.subBytes(state, False)
        state = self.shiftRows(state, False)
        state = self.addRoundKey(state,
                                 self.createRoundKey(expandedKey, 16*nbrRounds))
        return state

    # Perform the initial operations, the standard round, and the final
    # operations of the inverse aes, creating a round key for each round
    def aes_invMain(self, state, expandedKey, nbrRounds):
        state = self.addRoundKey(state,
                                 self.createRoundKey(expandedKey, 16*nbrRounds))
        i = nbrRounds - 1
        while i > 0:
            state = self.aes_invRound(state,
                                      self.createRoundKey(expandedKey, 16*i))
            i -= 1
        state = self.shiftRows(state, True)
        state = self.subBytes(state, True)
        state = self.addRoundKey(state, self.createRoundKey(expandedKey, 0))
        return state

    # encrypts a 128 bit input block against the given key of size specified
    def encrypt(self, iput, key, size):
        output = [0] * 16
        # the number of rounds
        nbrRounds = 0
        # the 128 bit block to encode
        block = [0] * 16
        # set the number of rounds
        if size == self.keySize["SIZE_128"]: nbrRounds = 10
        elif size == self.keySize["SIZE_192"]: nbrRounds = 12
        elif size == self.keySize["SIZE_256"]: nbrRounds = 14
        else: return None

        # the expanded keySize
        expandedKeySize = 16*(nbrRounds+1)

        # Set the block values, for the block:
        # a0,0 a0,1 a0,2 a0,3
        # a1,0 a1,1 a1,2 a1,3
        # a2,0 a2,1 a2,2 a2,3
        # a3,0 a3,1 a3,2 a3,3
        # the mapping order is a0,0 a1,0 a2,0 a3,0 a0,1 a1,1 ... a2,3 a3,3
        #
        # iterate over the columns
        for i in range(4):
            # iterate over the rows
            for j in range(4):
                block[(i+(j*4))] = iput[(i*4)+j]

        # expand the key into an 176, 208, 240 bytes key
        # the expanded key
        expandedKey = self.expandKey(key, size, expandedKeySize)

        # encrypt the block using the expandedKey
        block = self.aes_main(block, expandedKey, nbrRounds)

        # unmap the block again into the output
        for k in range(4):
            # iterate over the rows
            for l in range(4):
                output[(k*4)+l] = block[(k+(l*4))]
        return output

    # decrypts a 128 bit input block against the given key of size specified
    def decrypt(self, iput, key, size):
        output = [0] * 16
        # the number of rounds
        nbrRounds = 0
        # the 128 bit block to decode
        block = [0] * 16
        # set the number of rounds
        if size == self.keySize["SIZE_128"]: nbrRounds = 10
        elif size == self.keySize["SIZE_192"]: nbrRounds = 12
        elif size == self.keySize["SIZE_256"]: nbrRounds = 14
        else: return None

        # the expanded keySize
        expandedKeySize = 16*(nbrRounds+1)

        # Set the block values, for the block:
        # a0,0 a0,1 a0,2 a0,3
        # a1,0 a1,1 a1,2 a1,3
        # a2,0 a2,1 a2,2 a2,3
        # a3,0 a3,1 a3,2 a3,3
        # the mapping order is a0,0 a1,0 a2,0 a3,0 a0,1 a1,1 ... a2,3 a3,3

        # iterate over the columns
        for i in range(4):
            # iterate over the rows
            for j in range(4):
                block[(i+(j*4))] = iput[(i*4)+j]
        # expand the key into an 176, 208, 240 bytes key
        expandedKey = self.expandKey(key, size, expandedKeySize)
        # decrypt the block using the expandedKey
        block = self.aes_invMain(block, expandedKey, nbrRounds)
        # unmap the block again into the output
        for k in range(4):
            # iterate over the rows
            for l in range(4):
                output[(k*4)+l] = block[(k+(l*4))]
        return output


class AESModeOfOperation(object):
    '''Handles AES with plaintext consistingof multiple blocks.
    Choice of block encoding modes:  OFT, CFB, CBC
    '''
    # Very annoying code:  all is for an object, but no state is kept!
    # Should just be plain functions in an AES_BlockMode module.
    aes = AES()

    # structure of supported modes of operation
    modeOfOperation = dict(OFB=0, CFB=1, CBC=2)

    # converts a 16 character string into a number array
    def convertString(self, string, start, end, mode):
        if end - start > 16: end = start + 16
        if mode == self.modeOfOperation["CBC"]: ar = [0] * 16
        else: ar = []

        i = start
        j = 0
        while len(ar) < end - start:
            ar.append(0)
        while i < end:
            ar[j] = ord(string[i])
            j += 1
            i += 1
        return ar

    # Mode of Operation Encryption
    # stringIn - Input String
    # mode - mode of type modeOfOperation
    # hexKey - a hex key of the bit length size
    # size - the bit length of the key
    # hexIV - the 128 bit hex Initilization Vector
    def encrypt(self, stringIn, mode, key, size, IV):
        if len(key) % size:
            return None
        if len(IV) % 16:
            return None
        # the AES input/output
        plaintext = []
        iput = [0] * 16
        output = []
        ciphertext = [0] * 16
        # the output cipher string
        cipherOut = []
        # char firstRound
        firstRound = True
        if stringIn != None:
            for j in range(int(math.ceil(float(len(stringIn))/16))):
                start = j*16
                end = j*16+16
                if  end > len(stringIn):
                    end = len(stringIn)
                plaintext = self.convertString(stringIn, start, end, mode)
                # print 'PT@%s:%s' % (j, plaintext)
                if mode == self.modeOfOperation["CFB"]:
                    if firstRound:
                        output = self.aes.encrypt(IV, key, size)
                        firstRound = False
                    else:
                        output = self.aes.encrypt(iput, key, size)
                    for i in range(16):
                        if len(plaintext)-1 < i:
                            ciphertext[i] = 0 ^ output[i]
                        elif len(output)-1 < i:
                            ciphertext[i] = plaintext[i] ^ 0
                        elif len(plaintext)-1 < i and len(output) < i:
                            ciphertext[i] = 0 ^ 0
                        else:
                            ciphertext[i] = plaintext[i] ^ output[i]
                    for k in range(end-start):
                        cipherOut.append(ciphertext[k])
                    iput = ciphertext
                elif mode == self.modeOfOperation["OFB"]:
                    if firstRound:
                        output = self.aes.encrypt(IV, key, size)
                        firstRound = False
                    else:
                        output = self.aes.encrypt(iput, key, size)
                    for i in range(16):
                        if len(plaintext)-1 < i:
                            ciphertext[i] = 0 ^ output[i]
                        elif len(output)-1 < i:
                            ciphertext[i] = plaintext[i] ^ 0
                        elif len(plaintext)-1 < i and len(output) < i:
                            ciphertext[i] = 0 ^ 0
                        else:
                            ciphertext[i] = plaintext[i] ^ output[i]
                    for k in range(end-start):
                        cipherOut.append(ciphertext[k])
                    iput = output
                elif mode == self.modeOfOperation["CBC"]:
                    for i in range(16):
                        if firstRound:
                            iput[i] =  plaintext[i] ^ IV[i]
                        else:
                            iput[i] =  plaintext[i] ^ ciphertext[i]
                    # print 'IP@%s:%s' % (j, iput)
                    firstRound = False
                    ciphertext = self.aes.encrypt(iput, key, size)
                    # always 16 bytes because of the padding for CBC
                    for k in range(16):
                        cipherOut.append(ciphertext[k])
        return mode, len(stringIn), cipherOut

    # Mode of Operation Decryption
    # cipherIn - Encrypted String
    # originalsize - The unencrypted string length - required for CBC
    # mode - mode of type modeOfOperation
    # key - a number array of the bit length size
    # size - the bit length of the key
    # IV - the 128 bit number array Initilization Vector
    def decrypt(self, cipherIn, originalsize, mode, key, size, IV):
        # cipherIn = unescCtrlChars(cipherIn)
        if len(key) % size:
            return None
        if len(IV) % 16:
            return None
        # the AES input/output
        ciphertext = []
        iput = []
        output = []
        plaintext = [0] * 16
        # the output plain text character list
        chrOut = []
        # char firstRound
        firstRound = True
        if cipherIn != None:
            for j in range(int(math.ceil(float(len(cipherIn))/16))):
                start = j*16
                end = j*16+16
                if j*16+16 > len(cipherIn):
                    end = len(cipherIn)
                ciphertext = cipherIn[start:end]
                if mode == self.modeOfOperation["CFB"]:
                    if firstRound:
                        output = self.aes.encrypt(IV, key, size)
                        firstRound = False
                    else:
                        output = self.aes.encrypt(iput, key, size)
                    for i in range(16):
                        if len(output)-1 < i:
                            plaintext[i] = 0 ^ ciphertext[i]
                        elif len(ciphertext)-1 < i:
                            plaintext[i] = output[i] ^ 0
                        elif len(output)-1 < i and len(ciphertext) < i:
                            plaintext[i] = 0 ^ 0
                        else:
                            plaintext[i] = output[i] ^ ciphertext[i]
                    for k in range(end-start):
                        chrOut.append(chr(plaintext[k]))
                    iput = ciphertext
                elif mode == self.modeOfOperation["OFB"]:
                    if firstRound:
                        output = self.aes.encrypt(IV, key, size)
                        firstRound = False
                    else:
                        output = self.aes.encrypt(iput, key, size)
                    for i in range(16):
                        if len(output)-1 < i:
                            plaintext[i] = 0 ^ ciphertext[i]
                        elif len(ciphertext)-1 < i:
                            plaintext[i] = output[i] ^ 0
                        elif len(output)-1 < i and len(ciphertext) < i:
                            plaintext[i] = 0 ^ 0
                        else:
                            plaintext[i] = output[i] ^ ciphertext[i]
                    for k in range(end-start):
                        chrOut.append(chr(plaintext[k]))
                    iput = output
                elif mode == self.modeOfOperation["CBC"]:
                    output = self.aes.decrypt(ciphertext, key, size)
                    for i in range(16):
                        if firstRound:
                            plaintext[i] = IV[i] ^ output[i]
                        else:
                            plaintext[i] = iput[i] ^ output[i]
                    firstRound = False
                    if originalsize is not None and originalsize < end:
                        for k in range(originalsize-start):
                            chrOut.append(chr(plaintext[k]))
                    else:
                        for k in range(end-start):
                            chrOut.append(chr(plaintext[k]))
                    iput = ciphertext
        return "".join(chrOut)


def append_PKCS7_padding(s):
    """return s padded to a multiple of 16-bytes by PKCS7 padding"""
    numpads = 16 - (len(s)%16)
    return s + numpads*chr(numpads)

def strip_PKCS7_padding(s):
    """return s stripped of PKCS7 padding"""
    if len(s)%16 or not s:
        raise ValueError("String of len %d can't be PCKS7-padded" % len(s))
    numpads = ord(s[-1])
    if numpads > 16:
        raise ValueError("String ending with %r can't be PCKS7-padded" % s[-1])
    return s[:-numpads]

def encryptData(key, data, mode=AESModeOfOperation.modeOfOperation["CBC"]):
    """encrypt `data` using `key`

    `key` should be a string of bytes.

    returned cipher is a string of bytes prepended with the initialization
    vector.

    """
    key = map(ord, key)
    if mode == AESModeOfOperation.modeOfOperation["CBC"]:
        data = append_PKCS7_padding(data)
    keysize = len(key)
    assert keysize in AES.keySize.values(), 'invalid key size: %s' % keysize
    # create a new iv using random data
    iv = [ord(i) for i in os.urandom(16)]
    moo = AESModeOfOperation()
    (mode, length, ciph) = moo.encrypt(data, mode, key, keysize, iv)
    # With padding, the original length does not need to be known. It's a bad
    # idea to store the original message length.
    # prepend the iv.
    return ''.join(map(chr, iv)) + ''.join(map(chr, ciph))

def decryptData(key, data, mode=AESModeOfOperation.modeOfOperation["CBC"]):
    """decrypt `data` using `key`

    `key` should be a string of bytes.

    `data` should have the initialization vector prepended as a string of
    ordinal values.
    """

    key = map(ord, key)
    keysize = len(key)
    assert keysize in AES.keySize.values(), 'invalid key size: %s' % keysize
    # iv is first 16 bytes
    iv = map(ord, data[:16])
    data = map(ord, data[16:])
    moo = AESModeOfOperation()
    decr = moo.decrypt(data, None, mode, key, keysize, iv)
    if mode == AESModeOfOperation.modeOfOperation["CBC"]:
        decr = strip_PKCS7_padding(decr)
    return decr

def generateRandomKey(keysize):
    """Generates a key from random data of length `keysize`.    
    The returned key is a string of bytes.    
    """
    if keysize not in (16, 24, 32):
        emsg = 'Invalid keysize, %s. Should be one of (16, 24, 32).'
        raise ValueError, emsg % keysize
    return os.urandom(keysize)

def testStr(cleartext, keysize=16, modeName = "CBC"):
    '''Test with random key, choice of mode.'''
    print 'Random key test', 'Mode:', modeName
    print 'cleartext:', cleartext
    key =  generateRandomKey(keysize)
    print 'Key:', [ord(x) for x in key]
    mode = AESModeOfOperation.modeOfOperation[modeName]
    cipher = encryptData(key, cleartext, mode)
    print 'Cipher:', [ord(x) for x in cipher]
    decr = decryptData(key, cipher, mode)
    print 'Decrypted:', decr
    
    
if __name__ == "__main__":
    moo = AESModeOfOperation()
    cleartext = "This is a test with several blocks!"
    cypherkey = [143,194,34,208,145,203,230,143,177,246,97,206,145,92,255,84]
    iv = [103,35,148,239,76,213,47,118,255,222,123,176,106,134,98,92]
    mode, orig_len, ciph = moo.encrypt(cleartext, moo.modeOfOperation["CBC"],
            cypherkey, moo.aes.keySize["SIZE_128"], iv)
    print 'm=%s, ol=%s (%s), ciph=%s' % (mode, orig_len, len(cleartext), ciph)
    decr = moo.decrypt(ciph, orig_len, mode, cypherkey,
            moo.aes.keySize["SIZE_128"], iv)
    print decr
    testStr(cleartext, 16, "CBC")

参考链接

ubuntu 20.04将Python3交叉编译移植到Android平台

最近想在Android环境中集成Python3,参考了一下网上的实现,发现已经有项目实现这个功能的,具体的编译过程参考下面:

$ sudo apt-get install make

# makeinfo工具,包编译时候需要
$ sudo apt-get install texinfo 
 
$ sudo apt-get install git

$ sudo apt-get install aria2

$ cd ~

$ aria2c -c https://dl.google.com/android/repository/android-ndk-r21b-linux-x86_64.zip

$ unzip android-ndk-r21b-linux-x86_64.zip

# 安装pyenv,配置python 3.6.6 编译的是这个版本,需要安装这个版本的python,其他版本的Python编译会失败
$ git clone https://github.com/pyenv/pyenv.git

$ cd pyenv

$ make

$ cd bin

$ sudo apt-get install openssl

$ sudo apt-get install libssl-dev

$ sudo apt-get install libbz2-dev

$ sudo apt-get install libreadline-dev

$ sudo apt-get install sqlite3

$ sudo apt-get install libsqlite3-dev

# for scikit-learn
$ sudo apt-get install python-numpy

$ sudo pip2 install --upgrade pip

$ sudo apt-get install cython

$ ./pyenv install 3.6.6

# 全局设置版本 
$ ./pyenv global 3.6.6

$ eval "$(./pyenv init -)" 

$ cd ~

$ git clone https://github.com/qpython-android/qpython3-toolchain.git

$ cd qpython3-toolchain

$ sed -i 's/PYTHON?=python/PYTHON?=python3/g' Makefile

$ export ANDROID_NDK=~/android-ndk-r21b

# for python2
$ export CLANG_FLAGS_BASE=

# for pycryptodome
$ export PY_BRANCH=3

$ export PY_M_BRANCH=6m

# 目标编译代码为 aarch64
$ export TARGET_ARCH_ANDROID=aarch64

$ export TARGET_ARCH_NAME=android

$ export ANDROID_VER=29

$ make clean

$ make

# 目前 scikit-learn 部分还是编译不通过

参考链接


Python发送form-data请求提交表单数据

最近在处理服务器接口的时候,需要使用`Python`模拟发送表单数据到服务器,搜索了一下,找到如下例子:

# encoding=utf8
import urllib
import urllib2
import httplib
import os

HOST = 'xx.xx.xx.xx'
PORT = 8000
P_ID = xx
U_NAME = 'xxx'
API_KEY = 'xxx'
API_SEC = 'xxx'
UP_APK = xx

def sign(src, key):
  HEX_CHARS = [ '0', '1', '2', '3', '4', '5', '6', '7', '8', '9', 'a', 'b', 'c', 'd', 'e', 'f' ]
  from hashlib import sha1
  import hmac
  hashed = hmac.new(key, src, sha1)
  sv = str(hashed.digest())
  ret = ''
  for b in bytearray(sv):
    bite = b & 0xff
    ret += HEX_CHARS[ bite >> 4 ]
    ret += HEX_CHARS[ bite & 0xf ]
  return ret

def encode_multipart_formdata(fields, files):
  """
  fields is a sequence of (name, value) elements for regular form fields.
  files is a sequence of (name, filename, value) elements for data to be uploaded as files
  Return (content_type, body) ready for httplib.HTTP instance
  """
  import random
  BOUNDARY = '----------%s' % ''.join(random.sample('0123456789abcdefghijklmnopqrstuvwxyzABCDEFGHIGKLMNOPQRSTUVWXYZ', 62))
  CRLF = '\r\n'
  L = []
  for (key, value) in fields:
    L.append('--' + BOUNDARY)
    L.append('Content-Disposition: form-data; name="%s"' % key)
    L.append('')
    L.append(value)
  for (key, filename, value) in files:
    L.append('--' + BOUNDARY)
    L.append('Content-Disposition: form-data; name="%s"; filename="%s"' % (key, filename))
    L.append('Content-Type: %s' % get_content_type(filename))
    L.append('')
    L.append(value)
  L.append('--' + BOUNDARY + '--')
  L.append('')
  body = CRLF.join(L)
  content_type = 'multipart/form-data; boundary=%s' % BOUNDARY
  return content_type, body, BOUNDARY

def get_content_type(filename):
  import mimetypes
  return mimetypes.guess_type(filename)[0] or 'application/octet-stream'

def post_apk_sign(apk_file):
  filename = os.path.basename(apk_file)
  url = 'http://' + HOST + ':' + str(PORT) + 'xxx'
  fields = [('un', U_NAME), ('p_id', str(P_ID)), ('up_type', str(UP_APK))]
  with open(apk_file, 'r') as f:
    files = [('apk_file', filename, f.read())]
  content_type, body, boundary = encode_multipart_formdata(fields, files)
  si = sign(API_KEY + str(P_ID) + str(UP_APK) + U_NAME, API_SEC)
  # print si
  req = urllib2.Request(url)
  req.add_header('api_key', API_KEY)
  req.add_header('sign', si)
  req.add_header('Content-Type', 'multipart/form-data; boundary='+boundary)
  resp = urllib2.urlopen(req, body)
  res = resp.read()
  print res

if __name__=='__main__':
  # b38d73bb278800dd3c0c3cf11ad20c106d17944c
  # print(sign(b'123test123456', b'456'))

  apk_file = 'xxx.apk'
  post_apk_sign(apk_file)

参考链接


ubuntu 18.04系统报错ModuleNotFoundError: No module named 'pip._internal'

重新安装的ubuntu 18.04系统上初次安装`python3-pip`之后,执行升级命令,出现如下错误信息:

$ sudo apt-get install python3-pip

$ sudo pip3 install --upgrade pip
Traceback (most recent call last):
  File "/usr/local/bin/pip3", line 7, in <module>
    from pip._internal import main
ModuleNotFoundError: No module named 'pip._internal'

解决方法为重新升级安装一次 pip,如下:

$ python3 -m pip install --upgrade pip

参考链接


No module named 'pip._internal.cli.main'