Ubuntu 14.04主机优化加速mod_pagespeed安装使用

背景介绍


谷歌优化加速mod_pagespeed作为Apache HTTP Server的module,它能在服务网页请求的即时做出超过15种的优化调整,包括优化缓存,最小化客户端—服务器往返路程,压缩有效传输体积。
经过实验观察,mod_pagespeed最高能使页面加载时间压缩50%。
项目已经被迁移到了GitHub,链接地址为:https://github.com/pagespeed/mod_pagespeed

Apache mod_pagespeed安装方法


1.下载安装包

32位系统

$ wget https://dl-ssl.google.com/dl/linux/direct/mod-pagespeed-stable_current_i386.rpm

64位系统

$ wget https://dl-ssl.google.com/dl/linux/direct/mod-pagespeed-stable_current_amd64.deb

鉴于国内被和谐的情况,可以本站下载 64位Ubuntu点击这里 32位Ubuntu点击这里

2.安装

$ dpkg -i mod-pagespeed-*.deb

3.重启Apache2

$ sudo service apache2 restart

4.检查是否安装成功

$ apachectl -M | grep pagespeed
 pagespeed_module (shared)

5.潜在问题

安装这个插件之后,可能会导致页面在不同操作系统之间的显示错乱问题,目前WordPress上会出现这种问题,应该是缓存导致的问题,因为WordPress会根据系统,浏览器的不同来进行页面兼容处理,如果直接返回缓存数据,反而会出问题。目前暂时只能是禁用这个插件了。

另外,当主机的CPU,内存有限的情况下,这个模块反而增加了系统开销,导致系统响应缓慢。有些Javascript代码被优化后,会工作不正常,目前看来,对小网站来说副作用大于正面作用。

$ sudo a2dismod pagespeed
$ sudo service apache2 restart

参考链接


主机优化加速mod_pagespeed和ngx_pagespeed安装使用

Ubuntu 14.04使用OpCache提升PHP5.5+程序性能

概述


PHP 5.5以后内建了OpCache,OpCache的加速原理是把编译后的bytecode存储在内存里面, 避免重复编译 PHP 所造成的资源浪费.Ubuntu 14.04默认自带 PHP 5.5.9,已经集成了这个功能。但是默认是不启用的。

启用


修改 php.ini 文件

$ sudo vim /etc/php5/fpm/php.ini
$ sudo vim /etc/php5/cgi/php.ini
$ sudo vim /etc/php5/apache2/php.ini

在文件最后面加入:

; 开关打开
opcache.enable=1
; 可用内存, 酌情而定, 单位 megabytes
opcache.memory_consumption=128
; 对多缓存文件限制, 命中率不到 100% 的话, 可以试着提高这个值
opcache.max_accelerated_files=5000
; Opcache 会在一定时间内去检查文件的修改时间, 这里设置检查的时间周期, 默认为 2, 单位为秒
opcache.revalidate_freq=240

重启服务器

$ sudo service php5-fpm restart
$ sudo service apache2 restart

效果


加速效果极端明显,强烈建议启用这个功能。

Ubuntu14.04升级到Ubuntu16.04出现错误

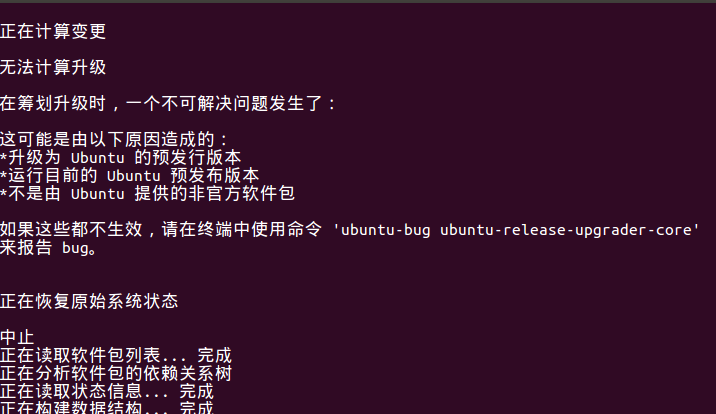
Ubuntu14.04升级到Ubuntu16.04出现错误,如下图所示:
from_ubuntu_14_upgrade_ubuntu_16_error
如果机器上安装了postgresql,则是由于postgresql处于升级黑名单中,因此无法升级。
一般建议手工卸载postgresql

$ sudo apt-get remove postgresql*

$ sudo apt-get remove pgadmin3

卸载完成后继续执行升级命令

$ sudo do-release-upgrade -d

具体参考这个BUG的链接:
postgresql packages in the removal blacklist making it hard to upgrade

Ubuntu 14.04编译安装Apache 2.4.20

1.安装开发工具包

$ sudo apt-get install build-essential

2.下载Apache 2.4.20的源代码

$ wget http://apache.opencas.org//httpd/httpd-2.4.20.tar.gz

3.安装apr依赖库

$ sudo apt-get install libapr1 libaprutil1 libapr1-dev libaprutil1-dev

4.安装pcre

$ sudo apt-get install libpcre++-dev

5.解压缩代码

$ tar -zxvf httpd-2.4.20.tar.gz

6.配置并编译

$ cd  httpd-2.4.20

$ ./configure \
	--prefix=/opt/apache-2.4.20 \
	--enable-ssl \
	--with-mpm=event \
	--enable-rewrite \
	--enable-proxy \
	--enable-layout=Debian \
	--enable-so \
	--with-suexec-caller=www-data \
	--with-suexec-docroot=/var/www  \
	--enable-deflate \
	--enable-headers \
	--with-program-name=apache2
	
$ make && make install

参考链接


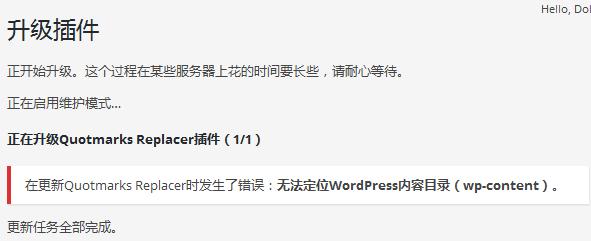
Ubuntu 14.04系统WordPress 4.5升级到PHP7之后执行插件升级报错“无法定位WordPress内容目录(wp-content)”

Ubuntu 14.04系统上WordPress 4.5升级到PHP7之后执行插件升级报错,

无法定位WordPress内容目录(wp-content)

如下图所示:WordPres_wp-content

这个是由于PHP升级之后,有些函数的支持出现了变化,导致调用失败。

目前已知的修复方法是修改wp-admin/includes/class-wp-filesystem-ssh2.php中的如下的几个函数:

/**
 * @access public
 *
 * @param string $file
 * @return bool
 */
public function exists($file) {
	return file_exists( $this->sftp_path( $file ) );
}

/**
 * @access public
 *
 * @param string $file
 * @return bool
 */
public function is_file($file) {
	return is_file( $this->sftp_path( $file ) );
}

/**
 * @access public
 *
 * @param string $path
 * @return bool
 */
public function is_dir($path) {
	return is_dir( $this->sftp_path( $path ) );
}
/**
 * @access public
 *
 * @param string $file
 * @return bool
 */
public function is_readable($file) {
    return is_readable( $this->sftp_path( $file ) );
}

/**
 * @access public
 *
 * @param string $file
 * @return int
 */
public function atime($file) {
    return fileatime( $this->sftp_path( $file ) );
}

/**
 * @access public
 *
 * @param string $file
 * @return int
 */
public function mtime($file) {
    return filemtime( $this->sftp_path( $file ) );
}

/**
 * @access public
 *
 * @param string $file
 * @return int
 */
public function size($file) {
    return filesize( $this->sftp_path( $file ) );
}

修改为:

/**
 * @access public
 *
 * @param string $file
 * @return bool
 */
public function exists($file) {
	//return file_exists( $this->sftp_path( $file ) );
	if(version_compare(PHP_VERSION,'7.0.0','ge')){
		$stat = @ssh2_sftp_stat( $this->sftp_link, $file );
		if ( false === $stat ) {
			return false; 
		}
		return (true);
	}else{
		return file_exists( $this->sftp_path( $file ) );
	}
}

/**
 * @access public
 *
 * @param string $file
 * @return bool
 */
public function is_file($file) {
	//return is_file( $this->sftp_path( $file ) );
	if(version_compare(PHP_VERSION,'7.0.0','ge')){
		$stat = @ssh2_sftp_stat( $this->sftp_link, $file ); 
		if( false === $stat ){
			return false;
		}
		$mode = $stat['mode'];
		$type = $mode & 0xf000;
		return ($type == 0x8000);
	}else{
		return is_file( $this->sftp_path( $file ) );
	}
}

/**
 * @access public
 *
 * @param string $path
 * @return bool
 */
public function is_dir($path) {
	//return is_dir( $this->sftp_path( $path ) );
	if(version_compare(PHP_VERSION,'7.0.0','ge')){
		$stat = @ssh2_sftp_stat( $this->sftp_link, $path );
		if ( false === $stat ) {
			return false;
		}
		$mode = $stat['mode'];
		$type = $mode & 0xf000;
		return ($type == 0x4000);
	}else{
		return is_dir( $this->sftp_path( $path ) );
	}
}

/**
 * @access public
 *
 * @param string $file
 * @return bool
 */
public function is_readable($file) {
    //return is_readable( $this->sftp_path( $file ) );
    if(version_compare(PHP_VERSION,'7.0.0','ge')){
	    $stat = @ssh2_sftp_stat( $this->sftp_link, $file );
	    if ( false === $stat ) {
	        return false; 
	    }
	    $mode = $stat['mode'];
	    return ($mode & 0x0004);
	}else{
		return is_readable( $this->sftp_path( $file ) );
	}
}

/**
 * @access public
 *
 * @param string $file
 * @return int
 */
public function atime($file) {
    //return fileatime( $this->sftp_path( $file ) );
	if(version_compare(PHP_VERSION,'7.0.0','ge')){
	    $stat = @ssh2_sftp_stat( $this->sftp_link, $file );
	    if ( false === $stat ) {
	        return false;
	    }
	    return $stat['atime']; 
	}else{
    	return fileatime( $this->sftp_path( $file ) );
	}
}

/**
 * @access public
 *
 * @param string $file
 * @return int
 */
public function mtime($file) {
    //return filemtime( $this->sftp_path( $file ) );
	if(version_compare(PHP_VERSION,'7.0.0','ge')){
    	$stat = @ssh2_sftp_stat( $this->sftp_link, $file );
    	if ( false === $stat ) {
        	return false; 
    	}
    	return $stat['mtime'];
	}else{
		return filemtime( $this->sftp_path( $file ) );
	}
}

/**
 * @access public
 *
 * @param string $file
 * @return int
 */
public function size($file) {
    //return filesize( $this->sftp_path( $file ) );
	if(version_compare(PHP_VERSION,'7.0.0','ge')){
	    $stat = @ssh2_sftp_stat( $this->sftp_link, $file );
	    if ( false === $stat ) {
	        return false;
	    }
	    return $stat['size'];
	}else{
		return filesize( $this->sftp_path( $file ) );
	}
}

参考链接


Work around PHP7 php-ssh2 breakage

Ubuntu 14.04(64位)编译安装PHP7.0.5后编译安装libssh2-php

在使用Ubuntu 14.04(64位)源码编译安装PHP7并配置Apache2支持之后,无法直接通过命令安装libssh2-php,因此需要手工编译安装。

1.安装编译libssh2-php需要的依赖库

$ sudo apt-get install libssh2-1-dev libssh2-1

2.下载libssh2-php的源代码

$ wget https://github.com/Sean-Der/pecl-networking-ssh2/archive/php7.zip

3.解压缩文件

$ unzip php7.zip

4.切换到目录

$ cd pecl-networking-ssh2-php7

5.使用phpize配置插件编译环境

$ /opt/php-7.0.5/bin/phpize

6.配置编译环境

$ ./configure --with-php-config=/opt/php-7.0.5/bin/php-config

7.编译并安装

$ sudo make
$ sudo make install

执行之后,文件被安装到了/opt/php-7.0.5/lib/php/extensions/no-debug-zts-20151012目录下面。

8.配置php.ini加载插件

$ sudo vim /opt/php-7.0.5/etc/php.ini

找到如下内容

;;;;;;;;;;;;;;;;;;;;;;
; Dynamic Extensions ;
;;;;;;;;;;;;;;;;;;;;;;

; If you wish to have an extension loaded automatically, use the following
; syntax:
;
;   extension=modulename.extension
;
; For example, on Windows:
;
;   extension=msql.dll
;
; ... or under UNIX:
;
;   extension=msql.so
;
; ... or with a path:
;
;   extension=/path/to/extension/msql.so
;
; If you only provide the name of the extension, PHP will look for it in its
; default extension directory.
;
; Windows Extensions
; Note that ODBC support is built in, so no dll is needed for it.
; Note that many DLL files are located in the extensions/ (PHP 4) ext/ (PHP 5+)
; extension folders as well as the separate PECL DLL download (PHP 5+).
; Be sure to appropriately set the extension_dir directive.
;
;extension=php_bz2.dll
;extension=php_curl.dll
;extension=php_fileinfo.dll
;extension=php_gd2.dll
;extension=php_gettext.dll
;extension=php_gmp.dll
;extension=php_intl.dll
;extension=php_imap.dll
;extension=php_interbase.dll
;extension=php_ldap.dll
;extension=php_mbstring.dll
;extension=php_exif.dll      ; Must be after mbstring as it depends on it
;extension=php_mysqli.dll
;extension=php_oci8_12c.dll  ; Use with Oracle Database 12c Instant Client
;extension=php_openssl.dll
;extension=php_pdo_firebird.dll
;extension=php_pdo_mysql.dll
;extension=php_pdo_oci.dll
;extension=php_pdo_odbc.dll
;extension=php_pdo_pgsql.dll
;extension=php_pdo_sqlite.dll
;extension=php_pgsql.dll
;extension=php_shmop.dll

; The MIBS data available in the PHP distribution must be installed.
; See http://www.php.net/manual/en/snmp.installation.php
;extension=php_snmp.dll

;extension=php_soap.dll
;extension=php_sockets.dll
;extension=php_sqlite3.dll
;extension=php_tidy.dll
;extension=php_xmlrpc.dll
;extension=php_xsl.dll

在最下面增加

extension=ssh2.so

9.重启Apache2加载动态模块

$ sudo service apache2 restart

gl接口耗时?

调用glclear接口,发现它耗时比较长,翻了翻stackoverflow。

Measuring the elapsed time of an OpenGL API call is mostly meaningless.

研究OpenGL接口的耗时是无意义的。

Asynchronicity

The key aspect to understand is that OpenGL is an API to pass work to a GPU.

The easiest mental model (which largely corresponds to reality) is that when you make OpenGL API calls, you queue up work that will later be submitted to the GPU. For example, if you make a glDraw*() call, picture the call building a work item that gets queued up, and at some point later will be submitted to the GPU for execution.

In other words, the API is highly asynchronous. The work you request by making API calls is not completed by the time the call returns. In most cases, it's not even submitted to the GPU for execution yet. It is only queued up, and will be submitted at some point later, mostly outside your control.

A consequence of this general approach is that the time you measure to make a glClear() call has pretty much nothing to do with how long it takes to clear the framebuffer.

Synchronization

Now that we established how the OpenGL API is asynchronous, the next concept to understand is that a certain level of synchronization is necessary.

Let's look at a workload where the overall throughput is limited by the GPU (either by GPU performance, or because the frame rate is capped by the display refresh). If we kept the whole system entirely asynchronous, and the CPU can produce GPU commands faster than the GPU can process them, we would be queuing up a gradually increasing amount of work. This is undesirable for a couple of reasons:

  • In the extreme case, the amount of queued up work would grow towards infinity, and we would run out of memory just from storing the queued up GPU commands.
  • In apps that need to respond to user input, like games, we would get increasing latency between user input and rendering.

To avoid this, drivers use throttling mechanisms to prevent the CPU from getting too far ahead. The details of how exactly this is handled can be fairly complex. But as a simple model, it might be something like blocking the CPU when it gets more than 1-2 frames ahead of what the GPU has finished rendering. Ideally, you always want some work queued up so that the GPU never goes idle for graphics limited apps, but you want to keep the amount of queued up work as small as possible to minimize memory usage and latency.

Meaning of Your Measurement

With all this background information explained, your measurements should be much less surprising. By far the most likely scenario is that your glClear() call triggers a synchronization, and the time you measure is the time it takes the GPU to catch up sufficiently, until it makes sense to submit more work.

Note that this does not mean that all the previously submitted work needs to complete. Let's look at a sequence that is somewhat hypothetical, but realistic enough to illustrate what can happen:

  • Let's say you make the glClear() call that forms the start of rendering frame n.
  • At this time, frame n - 3 is on the display, and the GPU is busy processing rendering commands for frame n - 2.
  • The driver decides that you really should not be getting more than 2 frames ahead. Therefore, it blocks in your glClear() call until the GPU finished the rendering commands for frame n - 2.
  • It might also decide that it needs to wait until frame n - 2 is shown on the display, which means waiting for the next beam sync.
  • Now that frame n - 2 is on the display, the buffer that previously contained frame n - 3 is not used anymore. It is now ready to be used for frame n, which means that the glClear()command for frame n can now be submitted.

Note that while your glClear() call did all kinds of waiting in this scenario, which you measure as part of the elapsed time spent in the API call, none of this time was used for actually clearing the framebuffer for your frame. You were probably just sitting on some kind of semaphore (or similar synchronization mechanism), waiting for the GPU to complete previously submitted work.

Conclusion

Considering that your measurement is not directly helpful after all, what can you learn from it? Unfortunately not a whole lot.

If you do observe that your frame rate does not meet your target, e.g. because you observe stuttering, or even better because you measure the framerate over a certain time period, the only thing you know for sure is that your rendering is too slow. Going into the details of performance analysis is a topic that is much too big for this format. Just to give you a rough overview of steps you could take:

  • Measure/profile your CPU usage to verify that you are really GPU limited.
  • Use GPU profiling tools that are often available from GPU vendors.
  • Simplify your rendering, or skip parts of it, and see how the performance changes. For example, does it get faster if you simplify the geometry? You might be limited by vertex processing. Does it get faster if you reduce the framebuffer size? Or if you simplify your fragment shaders? You're probably limited by fragment processing.


OpenGL是GPU的API

API call是以eventloop的形式工作

但需要一定的同步工作,任务数量太多,延迟会变大,开发者又需要尽快响应用户,GPU需要跟CPU保持一定过得同步。简单的来说,如果CPU发出的绘制指令超出GPU太多(1-2帧),GPU会锁住CPU。

在这个背景下,就可以解释为什么glClear耗时了,因为它触发了一次同步。

已3个缓冲区为例,n-3在绘制,n-2在合成,The driver decides that you really should not be getting more than 2 frames ahead。glClear就会block住,直到GPU工作完。

GPU工作渲染完n-2,glClear就会提交n。

最终结论,绘制太慢导致的。

可以看看CPU消耗,看看是不是CPU被锁住了。
Ubuntu 14.04(64位)源码编译安装PHP7并配置Apache2支持

下载PHP7源代码


$ cd ~

$ wget http://cn2.php.net/distributions/php-7.0.5.tar.gz

解压缩到当前目录


$ tar -zxvf php-7.0.5.tar.gz

安装编译需要的依赖


安装libxml2-dev

$ sudo apt-get update

$ sudo apt-get install libxml2-dev

安装gcc

$ sudo apt-get install build-essential

安装依赖的库

$ sudo apt-get install openssl

$ sudo apt-get install libssl-dev

$ sudo apt-get install make

$ sudo apt-get install curl

$ sudo apt-get install libcurl4-gnutls-dev

$ sudo apt-get install libfreetype6-dev

$ sudo apt-get install libjpeg-dev

$ sudo apt-get install libpng-dev

$ sudo apt-get install libmcrypt-dev

$ sudo apt-get install libreadline6 libreadline6-dev

安装apache2-dev,否则无法指定--with-apxs2=/usr/bin/apxs来生成libphp7.so

$ sudo apt-get install apache2-dev

切换到编译目录

$ cd php-7*

配置并编译


配置开启php-fpm支持,开启多线程支持--enable-maintainer-zts,否则无法使用Apache2Event MPM功能。

./configure --prefix=/opt/php-7.0.5 --with-config-file-path=/opt/php-7.0.5/etc --enable-fpm --with-fpm-user=www-data --with-fpm-group=www-data --with-mysql-sock --with-mysqli --with-pdo-mysql --with-iconv-dir --with-freetype-dir --with-jpeg-dir --with-png-dir --with-libxml-dir=/usr --disable-rpath --enable-bcmath --enable-shmop --enable-inline-optimization --with-curl --enable-mbregex --enable-mbstring --enable-ftp --with-gd --enable-gd-native-ttf --enable-sockets --enable-soap --without-pear --with-gettext --disable-fileinfo --enable-maintainer-zts --disable-debug --enable-shared --enable-opcache --enable-pdo --with-iconv --with-mcrypt --with-mhash --with-openssl --enable-xml --with-xmlrpc --with-libxml-dir --enable-pcntl --enable-sysvmsg --enable-sysvsem --enable-sysvshm --with-zlib --enable-zip --with-readline --without-sqlite3 --without-pdo-sqlite --with-libdir=/lib/x86_64-linux-gnu --with-jpeg-dir=/usr/lib --with-apxs2=/usr/bin/apxs --enable-cgi

配置并安装PHP7


$ make && make test

$ make && sudo make install

拷贝PHP7的配置文件


$ cd ~/php-7.0.5

$ cp php.ini-production /opt/php-7.0.5/etc/php.ini

$ cp /opt/php-7.0.5/etc/php-fpm.conf.default /opt/php-7.0.5/etc/php-fpm.conf

$ cp /opt/php-7.0.5/etc/php-fpm.d/www.conf.default /opt/php-7.0.5/etc/php-fpm.d/www.conf

设置PHP7的配置文件php.ini


PHP7已经默认加载opcache.so了,因此不需要声明zend_extension=opcache.so.

######避免PHP信息暴露在http头中
expose_php = Off

######在关闭display_errors后开启PHP错误日志(路径在php-fpm.conf中配置)
log_errors = On

######开启opcache
[opcache]
; Determines if Zend OPCache is enabled
;opcache.enable=0
opcache.enable=1

; Determines if Zend OPCache is enabled for the CLI version of PHP
;opcache.enable_cli=0
opcache.enable_cli=1

启用Apache2PHP7模块


$ sudo a2dismod php5

$ sudo a2enmod php7

$ sudo service apache2 restart

启用Apache2Event模块


$ sudo a2dismod mpm_prefork

$ sudo a2enmod mpm_worker

$ sudo service apache2 restart

参考链接


ubuntu 14.04上源码编译安装php7
How to install PHP 7 as PHP-FPM & FastCGI for ISPConfig 3 on Debian 8 (Jessie)

Ubuntu 12.04升级到Ubuntu 14.04导致Apache2从2.2升级到2.4.10版本PHP服务器的重新修正

现象


服务器已经根据Ubuntu 12.04下安装配置Worker工作模式的Apache 支持PHP设置成了Worker模式,但是当系统从Ubuntu 12.04升级到Ubuntu 14.04导致Apache22.2升级到2.4.10版本后,而MPM模块被还原为prefork模式,导致大量的Apache2进程被创建出来,时间稍微一长,系统出现大量的OOM记录,直到系统最后宕机。

Ubuntu 14.04下查看所有可用的MPM模块,命令如下:

$ ls /etc/apache2/mods-available/mpm*
/etc/apache2/mods-available/mpm_event.conf
/etc/apache2/mods-available/mpm_event.load
/etc/apache2/mods-available/mpm_prefork.conf
/etc/apache2/mods-available/mpm_prefork.load
/etc/apache2/mods-available/mpm_worker.conf
/etc/apache2/mods-available/mpm_worker.load

查看当前正在使用的MPM模块,命令如下:

$ ls  /etc/apache2/mods-enabled/mpm*
/etc/apache2/mods-enabled/mpm_prefork.conf
/etc/apache2/mods-enabled/mpm_prefork.load

可以看到,目前正在使用的模块就是prefork模块。

使用apachectl -V | grep -i mpm可以更加清晰的打印出当前使用的模块

$ apachectl -V | grep -i mpm
Server MPM:     prefork

注意,在Ubuntu 14.04下执行apache2 -l命令与Ubuntu 12.04下面的输出结果是不同的,Ubuntu 14.04下如果使用prefork模块输出的信息如下:

$ apache2 -l
Compiled in modules:
  core.c
  mod_so.c
  mod_watchdog.c
  http_core.c
  mod_log_config.c
  mod_logio.c
  mod_version.c
  mod_unixd.c

默认情况下Ubuntu 14.04中的PHP默认是没有线程安全支持,如果使用mpm_event支持的话,会提示如下信息:

Apache is running a threaded MPM, but your PHP Module is not compiled to be threadsafe. 
You need to recompile PHP

修复方式


1.重新安装系统升级过程中可能会被移除的PHP-FPM模块

$ sudo apt-get install libapache2-mod-fastcgi php5-fpm

2.关闭Apache2内建的PHP支持,开启Apache2的FastCGI,PHP5-FPM支持

$ a2dismod php5

$ a2enmod actions fastcgi alias

$ a2enconf php5-fpm

3.修改PHP5-FPM的配置文件

$ sudo vim /etc/php5/fpm/pool.d/www.conf

找到

; The address on which to accept FastCGI requests.
; Valid syntaxes are:
;   'ip.add.re.ss:port'    - to listen on a TCP socket to a specific address on
;                            a specific port;
;   'port'                 - to listen on a TCP socket to all addresses on a
;                            specific port;
;   '/path/to/unix/socket' - to listen on a unix socket.
; Note: This value is mandatory.
listen = 127.0.0.1:9000

; Set listen(2) backlog. A value of '-1' means unlimited.
; Default Value: 128 (-1 on FreeBSD and OpenBSD)
;listen.backlog = -1

; Set permissions for unix socket, if one is used. In Linux, read/write
; permissions must be set in order to allow connections from a web server. Many
; BSD-derived systems allow connections regardless of permissions.
; Default Values: user and group are set as the running user
;                 mode is set to 0666
;listen.owner = www-data
;listen.group = www-data
;listen.mode = 0666

修改为:

; The address on which to accept FastCGI requests.
; Valid syntaxes are:
;   'ip.add.re.ss:port'    - to listen on a TCP socket to a specific address on
;                            a specific port;
;   'port'                 - to listen on a TCP socket to all addresses on a
;                            specific port;
;   '/path/to/unix/socket' - to listen on a unix socket.
; Note: This value is mandatory.
;listen = 127.0.0.1:9000
listen = /var/run/php5-fpm.sock

; Set listen(2) backlog. A value of '-1' means unlimited.
; Default Value: 128 (-1 on FreeBSD and OpenBSD)
;listen.backlog = -1

; Set permissions for unix socket, if one is used. In Linux, read/write
; permissions must be set in order to allow connections from a web server. Many
; BSD-derived systems allow connections regardless of permissions.
; Default Values: user and group are set as the running user
;                 mode is set to 0666
listen.owner = www-data
listen.group = www-data
listen.mode = 0666

注意,上面修改了四处地方,listen,listen.owner,listen.group,listen.mode
注意,如果提示如下错误:

[Fri May 09 09:13:06.149292 2014] [fastcgi:error] [pid 18537:tid 139690281211648] (13)Permission denied: [client 192.168.33.101:35036] FastCGI: failed to connect to server "/usr/lib/cgi-bin/php5-fcgi": connect() failed
[Fri May 09 09:13:06.255308 2014] [fastcgi:error] [pid 18537:tid 139690281211648] [client 192.168.33.101:35036] FastCGI: incomplete headers (0 bytes) received from server "/usr/lib/cgi-bin/php5-fcgi"

则说明listen.owner,listen.group,listen.mode这三行没有打开。
4.重启PHP5-FPM服务

$ sudo /etc/init.d/php5-fpm restart

5.切换Apache2Event-MPM模式

$ sudo a2dismod mpm_prefork

$ sudo a2dismod mpm_worker

$ sudo a2dismod mpm_itk

$ sudo a2enmod mpm_event

6.启用Apache2cache,expire,gzip模块,加强服务器性能

$ sudo a2enmod cache

$ sudo a2enmod expires

$ sudo a2enmod deflate

7.卸载libapache2-mod-php5,否则每次这个模块更新之后,都会导致apache2被自动切换到mpm_prefork模式

$ sudo apt-get remove libapache2-mod-php5

8.调整配置文件

Apache 2.4.10的配置文件如果按照Apache 2.2的配置文件的话,是没办法启用PHP-FPM的,Apache 2.4.10版本使用SetHandler的方式支持PHP-FPM是改动最少的一种方式了。

$ sudo vim /etc/apache2/sites-enabled/000-default.conf

找到

<Directory /var/www/wordpress>
  #Options Indexes FollowSymLinks MultiViews
  Options FollowSymLinks MultiViews
  AllowOverride All
  FCGIWrapper /usr/bin/php5-cgi .php
  AddHandler fcgid-script .php
  Options ExecCGI SymLinksIfOwnerMatch
  Order allow,deny
  allow from all
</Directory>

调整为如下:

<Directory /var/www/wordpress>
  #Options Indexes FollowSymLinks MultiViews
  Options FollowSymLinks MultiViews
  AllowOverride All
  #Apache 2.2/2.4.9
  #FCGIWrapper /usr/bin/php5-cgi .php
  #AddHandler fcgid-script .php
  #Options ExecCGI SymLinksIfOwnerMatch
  #Apache 2.4.10
  <FilesMatch \.php$>
    SetHandler "proxy:unix:/var/run/php5-fpm.sock|fcgi://localhost"
  </FilesMatch>	
  Order allow,deny
  allow from all
</Directory>

同理,调整HTTPS的配置文件。

9.重启Apache2服务

$ sudo service apache2 restart

参考链接


WORDPRESS 4.5 后台/登录页面强制HTTPS

这段时间貌似服务器经常被人攻击,由于服务器已经支持HTTPS登陆,而全站SSL加密又不是那么迫切,遂考虑后台SSL加密,强制HTTPS。
设置方法如下:
修改wp-config.php

require_once(ABSPATH . 'wp-settings.php');

之前(貌似放在后面也可以),加

define('FORCE_SSL_ADMIN', true);

就能使得后台强制加密了;
而加入一行

define('FORCE_SSL_LOGIN', true);

就可以使登录页面强制加密了。