配置普通HTTP正向代理
安装
|
1 |
$ sudo apt-get install squid squid-common |
配置squid3
|
1 2 3 4 5 |
# ubuntu 12.04/14.04默认配置文件路径 $ sudo vim /etc/squid3/squid.conf # ubuntu 18.04默认配置文件路径 $ sudo vim /etc/squid/squid.conf |
搜索此句
|
1 |
http_access deny all |
修改为
|
1 |
http_access allow all |
搜索此句(squid默认允许访问本地(localhost)服务,但建议禁止)
|
1 |
http_access allow localhost |
修改为
|
1 |
http_access deny localhost |
启动/重启squid3
|
1 2 3 4 5 |
# ubuntu 12.04/14.04 $ sudo service squid3 restart # ubuntu 18.04 $ sudo service squid restart |
注意: squid的http默认代理端口为3128
配置HTTPS正向代理(单向认证)
由于ubuntu 12.04/14.04/18.04默认安装的squid版本是不支持SSL的,因此只能重新编译支持SSL。
1.安装编译依赖
|
1 2 3 4 5 6 7 8 9 10 11 12 13 14 15 16 17 |
$ cd ~ $ mkdir squid_src $ cd squid_src $ sudo apt-get install build-essential fakeroot devscripts gawk gcc-multilib dpatch $ sudo apt-get build-dep squid3 $ sudo apt-get build-dep openssl $ sudo apt-get install libssl-dev $ sudo apt-get install openssl $ apt-get source squid3 |
2.修改默认的编译选项,增加SSL支持
ubuntu 12.04
|
1 |
$ vim squid3-3.1.19/debian/rules |
在DEB_CONFIGURE_EXTRA_FLAGS字段中增加--enable-ssl
|
1 2 3 4 5 6 7 8 |
... DEB_CONFIGURE_EXTRA_FLAGS := --datadir=/usr/share/squid3 \ --sysconfdir=/etc/squid3 \ --mandir=/usr/share/man \ --with-cppunit-basedir=/usr \ --enable-inline \ --enable-ssl \ ... |
ubuntu 14.04/18.04
|
1 2 3 4 5 |
# ubuntu 14.04 $ vim squid3-3.3.8/debian/rules # ubuntu 18.04 $ vim squid3-3.5.27/debian/rules |
对于Ubuntu 14.04来说,除了要在DEB_CONFIGURE_EXTRA_FLAGS字段中增加--enable-ssl外,由于squid3-3.3.8默认去掉了对于NCSA的支持,而我们下面认证密码的配置是基于NCSA算法的,因此需要在DEB_CONFIGURE_EXTRA_FLAGS的--enable-auth-basic字段中增加对于NCSA的支持,否则无法使用NCSA算法进行账号认证,修改后的样子如下:
|
1 2 3 4 5 6 7 8 9 10 11 12 13 14 15 16 |
... DEB_CONFIGURE_EXTRA_FLAGS := --datadir=/usr/share/squid3 \ --sysconfdir=/etc/squid3 \ --mandir=/usr/share/man \ --enable-inline \ --enable-ssl\ --enable-async-io=8 \ --enable-storeio="ufs,aufs,diskd,rock" \ --enable-removal-policies="lru,heap" \ --enable-delay-pools \ --enable-cache-digests \ --enable-underscores \ --enable-icap-client \ --enable-follow-x-forwarded-for \ --enable-auth-basic="NCSA,DB,fake,getpwnam,LDAP,MSNT,MSNT-multi-domain,NCSA,NIS,PAM,POP3,RADIUS,SASL,SMB" \ ... |
注意,这样修改后squid3-3.3.8版本编译出来的在/usr/lib/squid3/下的ncsa_auth被重命名成了basic_ncsa_auth,因此配置文件中制定认证应用的时候要修改一下。
对于Ubuntu 18.04来说,这个参数不需要调整,默认支持NCSA。
注意,如果需要禁用ipv6的支持,则增加--disable-ipv6选项,这个目前是唯一的可以彻底禁用ipv6代理访问的方式。这个需求的原因是由于配置问题,某些网站的ipv6地址存在,但是无法正常访问。
3.配置编译
ubuntu 12.04
|
1 2 3 |
$ cd squid3-3.1.19/ $ debuild -us -uc -b |
ubuntu 14.04
|
1 2 3 |
$ cd squid3-3.3.8/ $ debuild -us -uc -b |
ubuntu 18.04
|
1 2 3 |
$ cd squid3-3.5.27/ $ debuild -us -uc -b |
4.安装(编译后的文件存在在上层的squid_src目录下面)
ubuntu 12.04
|
1 2 3 |
$ cd .. $ sudo dpkg -i squid3_3.1.19-1ubuntu3.12.04.2_amd64.deb squid3-common_3.1.19-1ubuntu3.12.04.2_all.deb squid3-dbg_3.1.19-1ubuntu3.12.04.2_amd64.deb |
ubuntu 14.04
|
1 2 3 |
$ cd .. $ sudo dpkg -i squid3-common_3.3.8-1ubuntu6.6_all.deb squid_3.3.8-1ubuntu6.6_amd64.deb squid3_3.3.8-1ubuntu6.6_amd64.deb squid3-dbg_3.3.8-1ubuntu6.6_amd64.deb |
ubuntu 18.04
|
1 2 3 |
$ cd .. $ sudo dpkg -i squid-common_3.5.27-1ubuntu1.9_all.deb squid_3.5.27-1ubuntu1.9_amd64.deb squid_3.5.27-1ubuntu1.9_amd64.deb squid-dbg_3.5.27-1ubuntu1.9_amd64.deb |
5.验证安装后的版本是否支持SSL
|
1 |
$ squid3 -v | grep enable-ssl |
如果看到enable-ssl输出,则说明编译成功。
6.生成自签名证书
|
1 |
$ openssl req -new -keyout key.pem -nodes -x509 -days 365 -out cert.pem |
7.移动服务器证书到squid3配置目录
|
1 2 3 |
$ sudo mv cert.pem /etc/squid3/cert.pem $ sudo mv key.pem /etc/squid3/key.pem |
8.配置squid3
|
1 |
$ sudo vim /etc/squid3/squid.conf |
搜索https_port,如果搜索到,则在搜索到的位置增加,搜索不到则在文件的最后增加
|
1 |
https_port 443 cert=/etc/squid3/cert.pem key=/etc/squid3/key.pem |
9.验证配置文件是否配置正确
|
1 |
$ squid3 -k parse |
10.启动/重启squid
|
1 2 3 4 5 |
# ubuntu 12.04/14.04 $ sudo service squid3 restart # ubuntu 18.04 $ sudo service squid restart |
11.安装 stunnel 配置安装目录下的stunnel.conf,把原来的内容都删掉,粘贴下面的内容
|
1 2 3 4 |
client = yes [https] accept = 127.0.0.1:8080 connect = www.mobibrw.com:443 |
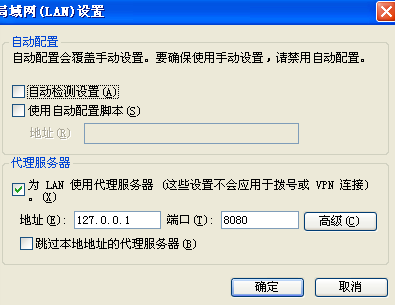
12.设置浏览器代理服务器地址
13.重新启动stunnel。
注意,如果只支持Https协议,可以注释掉原来的
|
1 |
http_port 3128 |
配置Squid3用户名密码认证
1. 安装htpasswd(如果装了apache就省掉这一步)
(这个是用来产生密码的)
|
1 |
$ sudo apt-get install apache2-utils |
也可以
|
1 |
$ sudo apt-get install mini-httpd |
2.生成密码文件
|
1 |
$ htpasswd -c /etc/squid3/passwd user1 |
会让你输入user1的密码
3.改一下权限,确保squid能够读出密码文件
|
1 |
$ sudo chmod o+r /etc/squid3/passwd |
4.修改squid.conf,增加或修改成下面的样子
对于ubuntu 12.04版本上编译出来的的Squid3-3.1.19,执行如下配置:
|
1 2 3 |
auth_param basic program /usr/lib/squid/ncsa_auth /etc/squid3/passwd acl ncsa_users proxy_auth REQUIRED http_access allow ncsa_users |
对于ubuntu 14.04版本上编译出来的的Squid3-3.3.8,由于验证程序的名字被修改成了basic_ncsa_auth,因此执行如下配置:
|
1 2 3 |
auth_param basic program /usr/lib/squid/basic_ncsa_auth /etc/squid3/passwd acl ncsa_users proxy_auth REQUIRED http_access allow ncsa_users |
简单的修改可以在VIM中查询 "auth_param basic program /usr/lib/squid/ncsa_auth" 找到后修改一下即可.
然后搜索 "http_access allow all" 找到后替换为 "http_access allow ncsa_users"
在"http_access allow all" 上面就是acl控制部分,直接增加"acl ncsa_users proxy_auth REQUIRED"
如果配置文件是从Squid3-3.1.19升级到Squid3-3.3.8版本的,那么根据如下两个链接的描述:
http://wiki.squid-cache.org/SquidFaq/ConfiguringSquid
https://forums.gentoo.org/viewtopic-t-952948-start-0.html
|
1 |
3.2 further configuration cleanups have been done to make things easier and safer. The manager, localhost, and to_localhost ACL definitions are now built-in. |
这两个链接上的信息,从Squid3-3.2版本开始,原来配置文件中的acl控制信息已经不需要再从配置文件中读取了,这部分的功能已经集成进入应用内部了。
因此需要注释掉下面这几句话,否则无法正常启动Squid3.
|
1 2 3 4 5 |
# Recommended minimum configuration: # acl manager proto cache_object acl localhost src 127.0.0.1/32 ::1 acl to_localhost dst 127.0.0.0/8 0.0.0.0/32 ::1 |
5.重启squid3
|
1 2 3 4 5 |
# ubuntu 12.04/14.04 $ sudo service squid3 restart # ubuntu 18.04 $ sudo service squid restart |
限制单个用户的下载速度
squid3在默认编译的时候,已经包含了--enable-delay-pools选项,因此已经默认支持限速了,我们只需要设置限速配置就可以了。
|
1 |
$ sudo vim /etc/squid3/squid.conf |
在文件最后增加如下配置:
|
1 2 3 4 5 |
delay_pools 1 delay_class 1 1 delay_access 1 allow all delay_parameters 1 50000/50000 # 限制网速在50K以内 delay_initial_bucket_level 50 |
参数的具体解释请在squid.conf中搜索delay-pools查看。
重启squid3
|
1 2 3 4 5 |
# ubuntu 12.04/14.04 $ sudo service squid3 restart # ubuntu 18.04 $ sudo service squid restart |
