| 设备型号 | 名称 |
|---|---|
| iPhone3,1 | iPhone 4 |
| iPhone3,2 | iPhone 4 |
| iPhone3,3 | iPhone 4 |
| iPhone4,1 | iPhone 4S |
| iPhone5,1 | iPhone 5 |
| iPhone5,2 | iPhone 5 |
| iPhone5,3 | iPhone 5c |
| iPhone5,4 | iPhone 5c |
| iPhone6,1 | iPhone 5s |
| iPhone6,2 | iPhone 5s |
| iPhone7,1 | iPhone 6 Plus |
| iPhone7,2 | iPhone 6 |
| iPhone8,1 | iPhone 6s |
| iPhone8,2 | iPhone 6s Plus |
| iPhone8,4 | iPhone SE |
| iPhone9,1 | iPhone 7 |
| iPhone9,2 | iPhone 7 Plus |
| iPhone9,3 | iPhone 7 |
| iPhone9,4 | iPhone 7 Plus |
| iPhone10,1 | iPhone 8 |
| iPhone10,2 | iPhone 8 Plus |
| iPhone10,4 | iPhone 8 |
| iPhone10,5 | iPhone 8 Plus |
| iPhone10,3 | iPhone X |
| iPhone10,6 | iPhone X |
| iPhone11,2 | iPhone XS |
| iPhone11,4 | iPhone XS Max |
| iPhone11,6 | iPhone XS Max |
| iPhone11,8 | iPhone XR |
| iPhone12,1 | iPhone 11 |
| iPhone12,3 | iPhone 11 Pro |
| iPhone12,5 | iPhone 11 Pro Max |
| iPhone12,8 | iPhone SE 2 |
| iPhone13,1 | iPhone 12 mini |
| iPhone13,2 | iPhone 12 |
| iPhone13,3 | iPhone 12 Pro |
| iPhone13,4 | iPhone 12 Pro Max |
| iPhone14,4 | iPhone 13 mini |
| iPhone14,5 | iPhone 13 |
| iPhone14,2 | iPhone 13 Pro |
| iPhone14,3 | iPhone 13 Pro Max |
| iPhone14,6 | iPhone SE 3 |
| iPhone14,7 | iPhone 14 |
| iPhone14,8 | iPhone 14 Plus |
| iPhone15,2 | iPhone 14 Pro |
| iPhone15,3 | iPhone 14 Pro Max |
| iPhone15,4 | iPhone 15 |
| iPhone15,5 | iPhone 15 Plus |
| iPhone16,1 | iPhone 15 Pro |
| iPhone16,2 | iPhone 15 Pro Max |
| i386 | Simulator |
| x86_64 | Simulator |
| iPod1,1 | iPod Touch 1G |
| iPod2,1 | iPod Touch 2G |
| iPod3,1 | iPod Touch 3G |
| iPod4,1 | iPod Touch 4G |
| iPod5,1 | iPod Touch 5G |
| iPod7,1 | iPod Touch 6G |
| iPod9,1 | iPod Touch 7G |
| iPad1,1 | iPad |
| iPad1,2 | iPad 3G |
| iPad2,1 | iPad 2 |
| iPad2,2 | iPad 2 |
| iPad2,3 | iPad 2 |
| iPad2,4 | iPad 2 |
| iPad2,5 | iPad Mini |
| iPad2,6 | iPad Mini |
| iPad2,7 | iPad Mini |
| iPad3,1 | iPad 3 |
| iPad3,2 | iPad 3 |
| iPad3,3 | iPad 3 |
| iPad3,4 | iPad 4 |
| iPad3,5 | iPad 4 |
| iPad3,6 | iPad 4 |
| iPad4,1 | iPad Air |
| iPad4,2 | iPad Air |
| iPad4,3 | iPad Air |
| iPad4,4 | iPad Mini 2 |
| iPad4,5 | iPad Mini 2 |
| iPad4,6 | iPad Mini 2 |
| iPad4,7 | iPad Mini 3 |
| iPad4,8 | iPad Mini 3 |
| iPad4,9 | iPad Mini 3 |
| iPad5,1 | iPad Mini 4 |
| iPad5,2 | iPad Mini 4 |
| iPad5,3 | iPad Air 2 |
| iPad5,4 | iPad Air 2 |
| iPad6,3 | iPad Pro 9.7 |
| iPad6,4 | iPad Pro 9.7 |
| iPad6,7 | iPad Pro 12.9 |
| iPad6,8 | iPad Pro 12.9 |
| iPad6,11 | iPad 5 |
| iPad6,12 | iPad 5 |
| iPad7,1 | iPad Pro 12.9 inch 2nd gen |
| iPad7,2 | iPad Pro 12.9 inch 2nd gen |
| iPad7,3 | iPad Pro 10.5 inch |
| iPad7,4 | iPad Pro 10.5 inch |
| iPad7,5 | iPad 6 |
| iPad7,6 | iPad 6 |
| iPad7,11 | iPad 7 |
| iPad7,12 | iPad 7 |
| iPad8,1 ~ 8,4 | iPad Pro 11-inch |
| iPad8,5 ~ 8,8 | iPad Pro 12.9-inch 3rd gen |
| iPad8,9 ~ 8,10 | iPad Pro 11-inch 2nd gen |
| iPad8,11 ~ 8,12 | iPad Pro 12.9-inch 4th gen |
| iPad11,1 | iPad Mini 5 |
| iPad11,2 | iPad Mini 5 |
| iPad11,3 | iPad Air 3 |
| iPad11,4 | iPad Air 3 |
| iPad11,6 | iPad 8 |
| iPad11,7 | iPad 8 |
| iPad13,1 | iPad Air 4 |
| iPad13,2 | iPad Air 4 |
| iPad12,1 | iPad 9 |
| iPad12,2 | iPad 9 |
| iPad14,1 | iPad Mini 6 |
| iPad14,2 | iPad Mini 6 |
| iPad13,4 ~ 13,7 | iPad Pro 11-inch 3nd gen |
| iPad13,8 ~ 13,11 | iPad Pro 12.9-inch 5th gen |
| iPad13,16 | iPad Air 5 |
| iPad13,17 | iPad Air 5 |
| iPad13,18 | iPad 10 |
| iPad13,19 | iPad 10 |
| iPad14,3 ~ 14,4 | iPad Pro 11-inch 4th gen |
| iPad14,5 ~ 14,6 | iPad Pro 12.9-inch 6th gen |
分类: iOS
苹果iOS是由苹果公司开发的移动操作系统。苹果公司最早于2007年1月9日的Macworld大会上公布这个系统,最初是设计给iPhone使用的,后来陆续套用到iPod touch、iPad以及Apple TV等产品上。iOS与苹果的Mac OS X操作系统一样,它也是以Darwin为基础的,因此同样属于类Unix的商业操作系统。原本这个系统名为iPhone OS,直到2010WWDC大会上宣布改名为iOS。
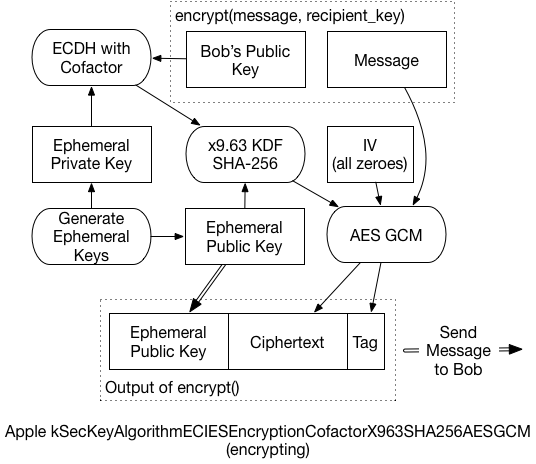
Encrypting for Apple's Secure Enclave
Encryption, once you have a safe and well-implemented algorithm, is all about the keys. Lose control of your keys, and it’s “Game over, man!” What if we could put our keys somewhere completely out of reach, where even their owner can’t get to them? Yibikeys and HSMs can provide that security, but they’re external devices. However, recent iOS devices and MacBook Pros have something just as good: the Secure Enclave (SE).
Fortunately, using the Secure Enclave for encryption is super well documented. No, wait, it’s hardly documented at all. Trail of Bits encountered this with Tidas, and I recently plunged into the same abyss.
Some demonstration libraries are available on GitHub, but they’re all self-contained. I wanted to generate a message somewhere else, and then decrypt it in the SE. But nothing I found addressed cross-system interoperability.
This led to a long and frustrating detective story. I looked for official docs. Pored over Apple header files and source code. Investigated other example projects, read ECIES papers, and ran down several blind alleys. And of course, I made plenty of stupid mistakes along the way. But I’ll cut to the chase: I eventually figured it out, though it doesn’t quite match the formal specifications. And now, I’ll show exactly how it all works.
Theory
Let me back up a little and explain exactly what I’m trying to achieve. Current MacBook Pros and iOS devices (those with Touch ID and, as I’d forgotten, Face ID) include a Secure Enclave. The Secure Enclave is a separate computer, used for high-security features like TouchID. It comes with its own encrypted firmware, memory, and storage, and hardware-based encryption. Programs talk to the SE through a “mailbox” system, rather than a direct connection. The application places data and commands in a specific memory location, then asks the SE to execute the command. The SE then returns results in the same way.
One feature added in iOS 9, and macOS 10.13, is the ability to store keys and perform cryptography entirely within the Secure Enclave. The application asks the SE to create a public/private keypair. The SE returns the public key (which should then be stored somewhere safe), but it holds onto the private key. Then it can ask “Here, sign this message” and the SE will grab the private key, sign the message, and return the result. Or “Here, decrypt this,” and it’ll decrypt the message using the private key, and return the plaintext. The application itself never has direct access to the private key, so the key should be very secure.
Algorithm Details
Large quantities of data are usually encrypted using a symmetric key. Symmetric algorithms are fast, efficient, and can handled by dedicated hardware. But it uses the same key for encryption and decryption, which means it the Secure Enclave can’t store it. Asymmetric encryption solves this problem, but with a cost: It’s much slower. So in practice, most systems making use of public key encryption use a hybrid approach.
According to Apple’s documentation, the algorithm used for Symmetric Encryption with the Secure Enclave is called:
|
1 |
kSecKeyAlgorithmECIESEncryptionCofactorX963SHA256AESGCM |
which refers to an ECIES standard algorithm. The details are a little arcane, but that’s exactly why we’re here. Let’s take this ugly string one part at a time:
-
ECIES: Elliptic Curve Integrated Encryption System - an open standard that defines exactly how to do what we’re about to do
-
Cofactor: Include the elliptic curve’s “cofactor” when completing the Diffie-Hellman key agreement process
-
X963SHA256: Use the ANSI x9.63 key derivation function (KDF), with SHA-256 as an underlying hash function
-
AESGCM: For the final symmetric encryption, use AES in Galois Counter Mode (GCM), a form of authenticated encryption
The actual process that takes place is what took some digging to understand. It’s slightly different from the EICES standards, and even from Apple’s published code. Simplified, it works like this:
-
Create a brand-new, “ephemeral” public/private keypair. We’ll use it for only this message and then throw it away.
-
Create a unique shared secret for the message, using the ephemeral private key, and the recipient’s public key. The Elliptic-Curve Diffie-Hellman Key Agreement Process (ECDH) generates the secret.
-
In some circumstances, this shared secret can leak information about the private keys. The x9.63 KDF prevents that, reducing the risk of an attacker decrypting the message. Additionally, the ephemeral public key is used as “Shared Information” for this process.
-
The final key then encrypts the message, and generates an AES-GCM authentication tag.
-
The ephemeral public key, the ciphertext, and the GCM tag are all concatenated, and returned as the final encrypted message.
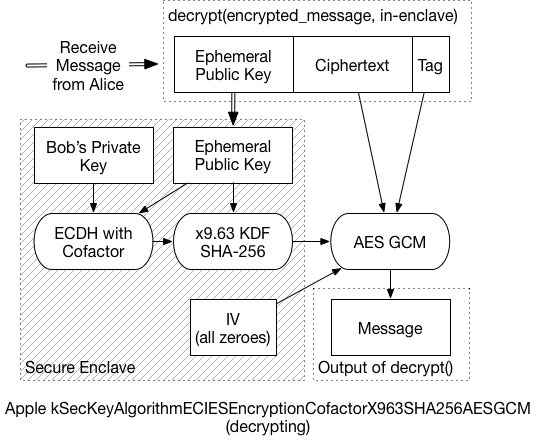
To decrypt the message, the recipient must:
-
Extract the ephemeral public key from the front of the message, and send it to the Secure Enclave.
-
Using the ephemeral key, and the recipient’s private key, the SE performs the same ECDH process. In the end, it should generate the same shared secret as the sender.
-
The SE then applies the x9.63 KDF to generate the symmetric key
-
Using that final symmetric key, the message can be decrypted.
Because the SE communicates in small chunks of data, it could take a while to decrypt a large message. So, that last bit is probably handled by the application processor, and not the SE. That is, the SE would return the final key, and application code decrypts the message. (I didn’t dig enough into this to know for certain, but it seems a reasonable assumption).
As mentioned before, this Implementation var slightly from the expected standard:
-
AES-GCM for encryption instead of XOR
-
Relies on GCM tag instead of separate authentication algorithms
-
Reorders final message to {pubkey} + {ct} + {tag} (instead of key, tag, ct)
Yet, it’s hard to completely fault Apple for straying from the vast array of choices in ECIES. In A Survey of the Elliptic Curve Integrated Encryption Scheme, the authors conclude:
|
1 |
After analyzing the ECIES descriptions contained in ANSI X9.63, IEEE 1363a, ISO/IEC 18033-2, and SECG SEC 1, it can be stated that it is not possible to implement a software version compatible with all those standards, regarding both the specific operations and the list of allowed functions and algorithms. |
So, it seems unlikely that we’ll ever see any broadly interoperable ECIES implementations. Given that, cherry-picking the best components to create a similar system isn’t much of a stretch. A later paper from the same authors reaches similar conclusions.
Technical Details
The curve generated by the SE in the demo application is a “prime256v1” curve, also known as “SecP256R1”. By reviewing keychain/SecKey.h, I was able to learn some of the deeper technical details. One such detail is the fact that this algorithm I’m spending so much time discussing is now considered “legacy” and shouldn’t be used for new code:
|
1 2 3 4 5 |
@constant kSecKeyAlgorithmECIESEncryptionCofactorX963SHA256AESGCM Legacy ECIES encryption or decryption, use kSecKeyAlgorithmECIESEncryptionCofactorVariableIVX963SHA256AESGCM in new code. Encryption is done using AES-GCM with key negotiated by kSecKeyAlgorithmECDHKeyExchangeCofactorX963SHA256. AES Key size is 128bit for EC keys <=256bit and 256bit for bigger EC keys. Ephemeral public key data is used as sharedInfo for KDF, and static public key data is used as authenticationData for AES-GCM processing. AES-GCM uses 16 bytes long TAG and all-zero 16 byte long IV (initialization vector). |
This comment also indicates that the AES-GCM uses the “static public key data” (the recipient’s public key) as additional authentication data (AAD). But it doesn’t work if you include that. So the docs are wrong, or the implementation is broken…or both.
For the preferred “VariableIV” algorithm, the KDF generates the IV, as well as the key. Instead of deriving 16 bytes, the KDF returns 32 bytes: The first 16 are the 128-bit AES key, the following 16 are the IV. For a curve that’s larger than 256 bits, you’d derive 48 bytes – 32 bytes of key material, then 16 bytes of IV. This VariableIV algorithm also does not appear to use AAD.
The KDF itself is actually less of a black box than I’d initially thought. It’s simply a hash of three concatenated values: sha-256( { shared_key } + counter + { shared_info} ):
- The shared_key is the result of the ECDH function.
- Shared_info is the ephemeral public key data
- The counter is a four-byte, big-endian number, starting at ‘0000 0001’
- The counter increments by one for every block that the KDF produces
Since SHA-256 produces 32-byte outputs, we only need to run through the KDF once. If we have to produce a 2nd block (bytes 33-64), then the counter changes to ‘0000 0002’, and a new hash is generated. And so on.
Example Code
None of this would’ve been possible if I hadn’t found some library to help me with the various primitives. The x9.63 KDF is pretty simple, but I needed to find the ECDH function, and AES-GCM. The last isn’t as widely available in popular python cryptography libraries.
I’m making use of the “hazmat” primitives available in the pyca/cryptography library. I also used PyCryptodome to verify the GCM output. For fun, I replicated the KDF function myself using an off-the-shelf SHA-256 routine (not shown here). So the only black box left (to me, anyway) is the ECDH key agreement phase, but that’s standard too. Plus, the script works with the SE demo code, so I’m confident that everything is working fine.
Again, I’m using this macOS demo application, from GitHub. To use my test script:
- Start up the demo application, and click on Encryption
- Then click “Encrypt” to fill the lower box with a ciphertext. We don’t need it, but we do need the public key.
- Copy the public key displayed in the interface
- Replace the “bob_pem” value in the script with the public key
- Run the script, and copy the result into the demo app, overwriting the original ciphertext. (You may need to backspace once to get rid of any trailing newlines).
- Click “Decrypt”, and if necessary, authenticate via TouchID
- Gaze in wonder at the properly decrypted message
Here’s the bare minimum of the test script. A full, commented version can be found in this Gist on Github.
|
1 2 3 4 5 6 7 8 9 10 11 12 13 14 15 16 17 18 19 20 21 22 23 24 25 26 27 28 29 30 31 32 33 34 35 36 37 38 39 40 41 42 43 44 |
message = 'The Magic Words are still Squeamish Ossifrage' bob_pem = ''' -----BEGIN PUBLIC KEY----- MFkwEwYHKoZIzj0CAQYIKoZIzj0DAQcDQgAEHiG0sllsW2K9uX/Ey1nxJsv4u/1z 28JgocZcuFcmE/BuKXZ1w5CB35VxrYqF6RKUucnaauk4VfjSAfYr6gC+GA== -----END PUBLIC KEY-----''' import binascii, base64 from cryptography.hazmat.backends import default_backend from cryptography.hazmat.primitives import hashes from cryptography.hazmat.primitives.asymmetric import ec from cryptography.hazmat.primitives.serialization import Encoding, PublicFormat, load_pem_public_key from cryptography.hazmat.primitives.kdf.x963kdf import X963KDF from cryptography.hazmat.primitives.ciphers.aead import AESGCM backend = default_backend() bob_public = load_pem_public_key(bob_pem, backend) bob_pub_bytes = bob_public.public_bytes(Encoding.DER, PublicFormat.SubjectPublicKeyInfo)[-65:] alice_priv = ec.generate_private_key(ec.SECP256R1(), backend) alice_pub_bytes = alice_priv.public_key().public_bytes(Encoding.DER, PublicFormat.SubjectPublicKeyInfo)[-65:] shared_key = alice_priv.exchange(ec.ECDH(), bob_public) xkdf = X963KDF( algorithm=hashes.SHA256(), length=16, sharedinfo=alice_pub_bytes, backend=backend ) key_enc = xkdf.derive(shared_key) iv = binascii.a2b_hex('00000000000000000000000000000000') C = AESGCM(key_enc) ct = C.encrypt(iv, message, "") final_ct = alice_pub_bytes + ct print "\nFinal message, Base-64 Encoded, to drop back into the demo app:\n" print base64.b64encode(final_ct) |
上面的例子,介绍了 Python 下编解码 Apple's Secure Enclave 算法的逻辑。那么如何在 Java 下实现相同的逻辑呢?可以参考 iOS-compatible ECIES implementation in Java 中的代码实现(可以点击这里下载代码拷贝)。需要注意的是,工程介绍里面声明实现的是 SecKeyAlgorithmECIESEncryptionCofactorVariableIV* 算法,而我们使用的是 SecKeyAlgorithmECIESEncryptionCofactor* 算法。我们只需要在代码中,加解密的地方传入16位全零的数组,即可兼容两者。
如下:
|
1 2 3 4 5 6 7 8 9 10 11 12 13 14 15 16 17 18 19 20 21 22 23 24 25 26 |
private static String encrypt(String plaintext, byte[] publicKeyBytes, String curveName) throws Exception { org.bouncycastle.jce.spec.ECNamedCurveParameterSpec spec = ECNamedCurveTable.getParameterSpec(curveName); KeyFactory keyFactory = KeyFactory.getInstance("EC", new BouncyCastleProvider()); org.bouncycastle.jce.spec.ECNamedCurveSpec curvedParams = new ECNamedCurveSpec(curveName, spec.getCurve(), spec.getG(), spec.getN()); java.security.spec.ECPoint point = org.bouncycastle.jce.ECPointUtil.decodePoint(curvedParams.getCurve(), publicKeyBytes); java.security.spec.ECPublicKeySpec pubKeySpec = new ECPublicKeySpec(point, curvedParams); org.bouncycastle.jce.interfaces.ECPublicKey publicKey = (ECPublicKey) keyFactory.generatePublic(pubKeySpec); byte[] inputBytes = plaintext.getBytes(); final BlockCipher aesCipher = AESEngine.newInstance(); // kSecKeyAlgorithmECIESEncryptionCofactorX963SHA256AESGCM 算法 org.bouncycastle.jce.spec.IESParameterSpec params = new IESParameterSpec(null, null, 128, 128, new byte[16]); // kSecKeyAlgorithmECIESEncryptionCofactorVariableIVX963SHA256AESGCM 算法 // org.bouncycastle.jce.spec.IESParameterSpec params = new IESParameterSpec(null, null, 128, 128, null); IESCipherGCM cipher = new IESCipherGCM( new IESEngineGCM( new ECDHBasicAgreement(), new KDF2BytesGenerator(new SHA256Digest()), new AESGCMBlockCipher(aesCipher)), 16); cipher.engineInit(Cipher.ENCRYPT_MODE, publicKey, params, new SecureRandom()); byte[] cipherResult = cipher.engineDoFinal(inputBytes, 0, inputBytes.length); return Base64.encodeToString(cipherResult, Base64.DEFAULT); } |
Changes for Variable IV, Other Curves
I mentioned before that this algorithm has been deprecated by Apple. The recommended algorithm is now “kSecKeyAlgorithmECIESEncryptionCofactorVariableIVX963SHA256AESGCM.” To support this algorithm, which derives a unique IV instead of using all zeroes, we only need minor changes:

This rough demo script isn’t set up to handle curves other than Prime256v1. But since the Secure Enclave only supports 256-bit curves, it’s not really an issue. We’d need to inspect the recipient’s public key, and use the same curve for the ephemeral keys. Then, if the curve is larger than 256 bits, we need to derive a larger symmetric key. In the above snippet, change the length from 32 to 48. The encryption key comes from the first 32 bytes, while the IV is the last 16.
Conclusion
So why is all this cool? Because we can be confident that nobody can read our data without our device. Granted, this presumes that the Secure Enclave is, in fact, Secure. We haven’t yet seen any (public) breaks of SE security, but that doesn’t mean it’s impossible. But since it’s so crucial to iOS and now MacBook security, I expect it’s likely pretty good.
What would be even better is if some decrypted items could remain in the Secure Enclave. Consider a system with many layers of encryption keys. The iOS Data Protection hierarchy is a good example of such a system. If you decrypt a group key with the Secure Enclave, then the key gets returned to the application. An attacker may be able to extract that key from the process' memory space. But if that key never leaves the SE, then there’s no risk of it getting leaked through application memory.
Hopefully features like this are in the works for future versions of iOS and macOS. In the meantime, it’s still a very powerful tool, and definitely worth investigating.
References
- Standards for Efficient Cryptography, SEC 1: Elliptic Curve Cryptography, Daniel R. L. Brown, Certicom Research, May 2009: http://www.secg.org/sec1-v2.pdf
- Integrated Encryption Scheme, Wikipedia: https://en.wikipedia.org/wiki/Integrated_Encryption_Scheme
- A Survey of the Elliptic Curve Integrated Encryption Scheme, Martínez, Encinas, and Ávila, 2010: https://www.researchgate.net/publication/255970113_A_Survey_of_the_Elliptic_Curve_Integrated_Encryption_Scheme
- Security and Practical Considerations When Implementing the Elliptic Curve Integrated Encryption Scheme, Martínez, Encinas, and Dios, 2015: https://www.researchgate.net/publication/277941706
- Storing Keys in the Secure Enclave, Apple: https://developer.apple.com/documentation/security/certificate_key_and_trust_services/keys/storing_keys_in_the_secure_enclave?language=objc
参考链接
iOS Keychain: using Secure Enclave-stored keys
One of the great hardware features of iPhone is Secure Enclave — a special hardware element designed to protect user’s sensitive data, including biometric data like fingerprints when device has a Touch ID sensor and face scans in case of Face ID. Secure Enclave ensures that this kind of data is safe even if a hacker gets access to device RAM or disk storage — the thing is that this data never gets to RAM and is never processed by OS or by programs in user space. OS or a program can only interact with Secure Enclave hardware using a predefined set of commands which doesn’t allow access to raw data.
Besides biometric data, Secure Enclave can store cryptographic keys. Such keys are generated inside this hardware element and never “leave” it — there’s no way to get them (unless you break somehow the hardware protection — as for now, there were no reports, suggesting that this is possible).
Currently, only Elliptic-curve cryptography keys can be stored in Secure Enclave. This is an asymmetric cryptography approach so we can talk about public and private keys here. The private key is generated and stored in Secure Enclave. The corresponding public key is available for export and can be transmitted to a communication counterparty or used for encryption locally.
Generating and fetching a key
To generate a Secure Enclave-stored key we can use a SecKeyCreateRandomKey call with special attributes. Here’s how this can be done:
|
1 2 3 4 5 6 7 8 9 10 11 12 13 14 15 16 17 18 19 20 21 22 23 24 25 26 27 28 29 30 31 32 33 34 35 |
static func makeAndStoreKey(name: String, requiresBiometry: Bool = false) throws -> SecKey { let flags: SecAccessControlCreateFlags if #available(iOS 11.3, *) { flags = requiresBiometry ? [.privateKeyUsage, .biometryCurrentSet] : .privateKeyUsage } else { flags = requiresBiometry ? [.privateKeyUsage, .touchIDCurrentSet] : .privateKeyUsage } let access = SecAccessControlCreateWithFlags(kCFAllocatorDefault, kSecAttrAccessibleWhenUnlockedThisDeviceOnly, flags, nil)! let tag = name.data(using: .utf8)! let attributes: [String: Any] = [ kSecAttrKeyType as String : kSecAttrKeyTypeEC, kSecAttrKeySizeInBits as String : 256, kSecAttrTokenID as String : kSecAttrTokenIDSecureEnclave, kSecPrivateKeyAttrs as String : [ kSecAttrIsPermanent as String : true, kSecAttrApplicationTag as String : tag, kSecAttrAccessControl as String : access ] ] var error: Unmanaged<CFError>? guard let privateKey = SecKeyCreateRandomKey(attributes as CFDictionary, &error) else { throw error!.takeRetainedValue() as Error } return privateKey } |
The key type is set to kSecAttrKeyTypeEC and its size is indicated as 256 bits — only this kind of keys can be stored in Secure Enclave presently.
We can additionally use biometry to protect the key. This means that in order to use it, user will be required to go through Touch ID or Face ID authentication (see my previous post about biometry-protected keychain entries). In the fragment of code above we have a requiresBiometry parameter which being set to true enables such protection. This is done by setting the .biometryCurrentSet flag when we create the SecAccessControl instance that we later use to create the key.
Note that at the end of this procedure we’re getting a SecKey instance that we later can use in our program. This, however, doesn't mean that the private key we just created is loaded into RAM. Our SecKey is just a handle object allowing access to the key stored in Secure Enclave.
When we have our key in keychain, we can always load it using a function like this:
|
1 2 3 4 5 6 7 8 9 10 11 12 13 14 15 16 |
static func loadKey(name: String) -> SecKey? { let tag = name.data(using: .utf8)! let query: [String: Any] = [ kSecClass as String : kSecClassKey, kSecAttrApplicationTag as String : tag, kSecAttrKeyType as String : kSecAttrKeyTypeEC, kSecReturnRef as String : true ] var item: CFTypeRef? let status = SecItemCopyMatching(query as CFDictionary, &item) guard status == errSecSuccess else { return nil } return (item as! SecKey) } |
We’re getting the key calling the SecItemCopyMatching function and using the same “application tag” value (the kSecAttrApplicationTag field) that we indicated at the key creation stage.
Encryption and decryption algorithm
Now let’s look how we can use the key that we just created. Before we proceed we have to decide what encryption algorithm we’re going to use and check that our current device/OS supports it.
In the official documentation Apple suggests using the following algorithm: eciesEncryptionCofactorX963SHA256AESGCM. This long name basically means that we are usign Elliptic Curve Integrated Encryption Scheme. It refers to the ANSI X9.63 standard. A key derivation function defined in that standard (with SHA-256 hash) is used to generate an encryption key that’s finally used to encrypt the data using the AES-GCM algorithm. The “cofactor” term in the name of the algorithm tells us that some additional measures are taken for protection from certain types of attacks (we won’t delve into details here).
If we take a look at the corresponding constant kSecKeyAlgorithmECIESEncryptionCofactorX963SHA256AESGCMdefined in SecKey.h (see here for example) then we can see that this algorithm is considered “legacy” and the recommended one is kSecKeyAlgorithmECIESEncryptionCofactorVariableIVX963SHA256AESGCMinstead (in Swift it’s eciesEncryptionCofactorVariableIVX963SHA256AESGCM). We’ll use this recommendation in our example. The only difference between these two algorithms is that in the old algorithm an all-zero initialization vector was used to perform AES-GCM encryption. In the newer algorithm the IV is generated together with shared encryption key during the ECDH procedure (see below).
ECIES and ECDH overview
All this sounds a bit scary so let’s first look at the way ECIES works in general. As we’re talking about cryptography, of course we’ll be talking about Alice and Bob. Suppose Bob wants to send an encrypted message to Alice. The following diagram describes how Alice and Bob can in a safe way agree on a shared key that later can be used for encryption by both of them. Here we omit all the technical and mathematical details to make it as simple as possible.
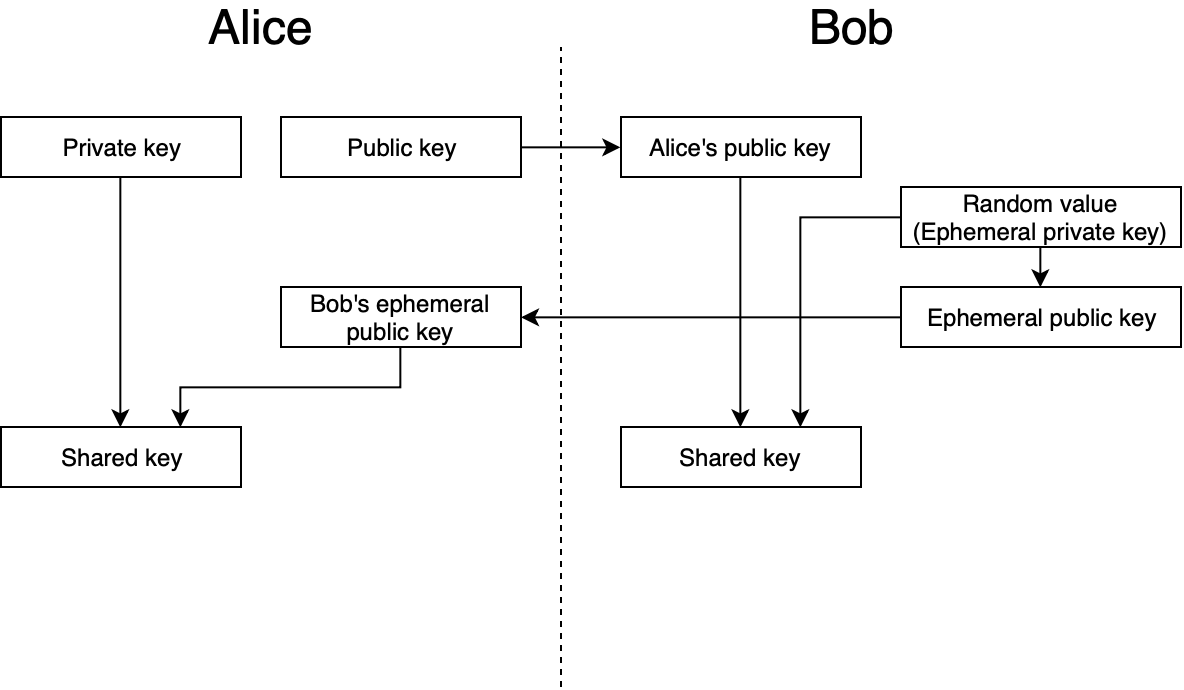
Elliptic-curve Diffie–Hellman (ECDH)
Here’s what happens on this diagram:
- First Bob gets Alice’s public key.
- Then Bob generates a random value. This random value is also referred as an “ephemeral private key”. “Ephemeral” means that this key will be used only once — for this encryption session only.
- After that Bob generates a public key for his ephemeral key and sends that to Alice
- Now Bob generates a symmetrical key that can be used for encryption. For this he uses Alice’s public key and his own ephemeral private key.
- On the other side Alice can reconstruct the same key using her private key and Bob’s ephemeral public key
So both sides have the same key and Bob can successfully encrypt his message and send it to Alice and she won’t have any problems decrypting it.
This is all nice but how is this related to our case with a key stored in Secure Enclave? We don’t have any network communications in our basic scenario. We just want to encrypt some data. Who is playing the role of Alice and who is playing the role of Bob? We’ll try to answer these questions in the next section.
How does it work in Apple’s crypto-APIs?
Sadly, Apple documentation is quite far from being full and detailed when it comes to this topic. So it takes a bit of guess work and reverse engineering to fully understand what exactly happens when you use these APIs. I can recommend this great post by David Schuetz for detailed description of this matter. It will be especially useful if you’re thinking about some encryption data interoperability (with your backend or other systems).
Here we will focus mostly on the practical side of the problem omiting some low level details. We have already seen how to generate a private key that’s stored in Secure Enclave (makeAndStoreKey method described above). Now let’s look how we can obtain the corresponding public key and how we can check that a given encryption algorithm is supported by the system.
If we have a key returned by the makeAndStoreKey method, then getting the corresponding public key is as easy as calling SecKeyCopyPublicKey and passing the original key as parameter.
Once we have our keys we can check if the algorithm we want to use is supported by the system. Here’s a fragment of code where we get our public key and check that we can encrypt data with it using the eciesEncryptionCofactorVariableIVX963SHA256AESGCM algorithm:
|
1 2 3 4 5 6 7 8 9 10 |
guard let publicKey = SecKeyCopyPublicKey(key) else { // Can't get public key return } let algorithm: SecKeyAlgorithm = .eciesEncryptionCofactorVariableIVX963SHA256AESGCM guard SecKeyIsAlgorithmSupported(publicKey, .encrypt, algorithm) else { // Algorith not supported return } // Now we're ready to encrypt data using publicKey |
As far as I know it will be supported on all iOS 10+ devices with Secure Enclave, but anyway it won’t hurt you to have such checks in your code.
As you can see SecKeyIsAlgorithmSupported has three parameters: key, operation and algorithm. And all the three parameters are important. You can have different keys, and for each key type different algorithms and operations can be supported. If you experiment a little bit with the code above, you’ll see that if you change the operation to .decrypt, the method will return false. At the same time, if you try it with our private key, then you’ll get true for decryption and false for encryption.
With this information let’s look at our ECIES scheme again. We know that our private key is stored in Secure Enclave, so in our scenario it is Alice who owns (and uses for decryption) the private key, and it is Bob who uses Alice’s public key to encrypt the message.
But what about the ephemeral key? It turns out that it’s generated every time some data is encrypted. And Bob puts the ephemeral public key together with the ciphertext he generates. Then Alice can pick it up, reconstruct the shared key and decrypt the data.
In Apple’s crypto API SecKeyCreateEncryptedData is used to encrypt data and SecKeyCreateDecryptedData is used for decryption. When Bob will call SecKeyCreateEncryptedData, this function will return a CFData object containing the ephemeral public key (generated and used during this particular call) and the actual ciphertext. Now Alice can call SecKeyCreateDecryptedData to decrypt this data. All she needs is her key in Secure Enclave and the ephemeral public key that comes with the data from Bob.
A few more words on the ciphertext generated by SecKeyCreateEncryptedData: since it’s generated by AES-GCM, besides the encypted data itself, it contains an authentication tag (a piece of information used to verify the integrity of the data). At the same time initialization vector (IV) is not put into the output because it’s generated together with the shared key. It means that both parties (Alice and Bob) can reconstruct not only the shared key used for encryption but also the IV used to initialize the AES-GCM procedure (see ECIES/ECDH scheme).
Here’s a short example demonstrating how to call the encryption and decryption functions. For encryption:
|
1 2 3 4 5 6 7 8 9 10 11 12 13 14 15 16 17 18 19 20 21 |
let clearText = "Hello" let algorithm: SecKeyAlgorithm = .eciesEncryptionCofactorVariableIVX963SHA256AESGCM guard SecKeyIsAlgorithmSupported(publicKey, .encrypt, algorithm) else { UIAlertController.showSimple(title: "Can't encrypt", text: "Algorith not supported", from: self) return } var error: Unmanaged<CFError>? let clearTextData = clearText.data(using: .utf8)! cipherTextData = SecKeyCreateEncryptedData(publicKey, algorithm, clearTextData as CFData, &error) as Data? guard cipherTextData != nil else { UIAlertController.showSimple(title: "Can't encrypt", text: (error!.takeRetainedValue() as Error).localizedDescription, from: self) return } // Use cipherTextData ... |
And for decryption:
|
1 2 3 4 5 6 7 8 9 10 11 12 13 14 15 16 17 18 19 20 21 22 23 24 25 26 27 28 29 |
// cipherTextData is our encrypted data let algorithm: SecKeyAlgorithm = .eciesEncryptionCofactorVariableIVX963SHA256AESGCM guard SecKeyIsAlgorithmSupported(self.key!, .decrypt, algorithm) else { UIAlertController.showSimple(title: "Can't decrypt", text: "Algorith not supported", from: self) return } // SecKeyCreateDecryptedData call is blocking when the used key // is protected by biometry authentication. If that's not the case, // dispatching to a background thread isn't necessary. DispatchQueue.global().async { var error: Unmanaged<CFError>? let clearTextData = SecKeyCreateDecryptedData(self.key!, algorithm, self.cipherTextData! as CFData, &error) as Data? DispatchQueue.main.async { guard clearTextData != nil else { UIAlertController.showSimple(title: "Can't decrypt", text: (error!.takeRetainedValue() as Error).localizedDescription, from: self) return } let clearText = String(decoding: clearTextData!, as: UTF8.self) // clearText is our decrypted string } } |
Note that we call SecKeyCreateDecryptedData on a background thread because if our key is biometry-protected, then this call will trigger Touch ID or Face ID authentication UI and won’t return until user authenticates or cancels the authentication. We don’t want to block the main thread while this function waits for user authentication.
Signing and verifying signature
Keys that are stored in Secure Enclave can be used not only for data encryption but also for digital signature. To sign a message you need your private key (stored in Secure Enclave). To verify the signature another party needs the corresponding public key. Of course we suppose that the public key is handed to the other party in a secure manner to avoid man-in-the-middle attack.
For digital signature we will be using the following algorithm: ecdsaSignatureMessageX962SHA256. This means that an ANSI X9.62-compliant version of ECDSA (Elliptic Curve Digital Signature Algorithm) is used and SHA256 is used as a cryptographic hash function. A SHA256 hash value is calculated for the original message and all the other steps of ECDSA are applied to it. By the way, if you already have that SHA256 value calculated, you can use the ecdsaSignatureDigestX962SHA256 algorithm which does exactly the same taking a SHA256 hash value as its input instead of the original message.
This is an example where we show how to calculate digital signature using our Secure Enclave-stored key:
|
1 2 3 4 5 6 7 8 9 10 11 12 13 14 15 16 17 18 19 20 21 22 23 24 25 26 27 28 29 |
// cipherTextData is our encrypted data let algorithm: SecKeyAlgorithm = .eciesEncryptionCofactorVariableIVX963SHA256AESGCM guard SecKeyIsAlgorithmSupported(self.key!, .decrypt, algorithm) else { UIAlertController.showSimple(title: "Can't decrypt", text: "Algorith not supported", from: self) return } // SecKeyCreateDecryptedData call is blocking when the used key // is protected by biometry authentication. If that's not the case, // dispatching to a background thread isn't necessary. DispatchQueue.global().async { var error: Unmanaged<CFError>? let clearTextData = SecKeyCreateDecryptedData(self.key!, algorithm, self.cipherTextData! as CFData, &error) as Data? DispatchQueue.main.async { guard clearTextData != nil else { UIAlertController.showSimple(title: "Can't decrypt", text: (error!.takeRetainedValue() as Error).localizedDescription, from: self) return } let clearText = String(decoding: clearTextData!, as: UTF8.self) // clearText is our decrypted string } } |
First we check that our digital signature algorithm is supported and then the digital signature value is calculated by the SecKeyCreateSignature function. We call it on a background thread to prevent the main thread from blocking in case our key is protected by biometry.
You can call the sign function presented above in the following ways:
|
1 2 3 4 5 6 7 |
let clearTextData = clearText.data(using: .utf8)! // Signing the original message sign(algorithm: .ecdsaSignatureMessageX962SHA256, data: clearTextData) // Signing precalculated sha256 hash of the original message (produces the same result) sign(algorithm: .ecdsaSignatureDigestX962SHA256, data: sha256(data: clearTextData)) |
Note that these two calls will give you exactly the same result.
Now, let’s look how we can verify the signature that we just calculated:
|
1 2 3 4 5 6 7 8 9 10 11 12 13 14 15 16 17 18 19 20 21 22 23 24 25 26 |
guard let publicKey = SecKeyCopyPublicKey(key!) else { UIAlertController.showSimple(title: "Can't verify signature", text: "Can't get public key", from: self) return } let algorithm: SecKeyAlgorithm = .ecdsaSignatureMessageX962SHA256 guard SecKeyIsAlgorithmSupported(publicKey, .verify, algorithm) else { UIAlertController.showSimple(title: "Can't verify signature", text: "Algorithm is not supported", from: self) return } let clearTextData = clearText.data(using: .utf8)! var error: Unmanaged<CFError>? guard SecKeyVerifySignature(publicKey, algorithm, clearTextData as CFData, signature! as CFData, &error) else { // Can't verify/wrong signature // ... return } // Signature check: OK // ... |
Here we also check that the algorithm is supported and then call SecKeyVerifySignature to verify the signatue. This function takes as its arguments the original message and the digital signature that we previously calculated. The function returns true if the signature is valid.
I hope that this article will help you to make your iOS app more secure by applying some of the features coming with secure hardware element that’s included in iOS devices (Secure Enclave).
Full code samples for this article can be found here:
If you want to store small bits of generic data in iOS keychain (not EC encryption keys as described here) and protect them with a password or biometry (Touch ID/Face ID), you can take a look at my other posts: Password-protected entries in iOS keychain and Biometry-protected entries in iOS keychain.
参考链接
Xcode 12.x添加iOS 10.x模拟器
背景
笔者昨天遇到个问题,有用户反馈在iOS 10.3.1的手机上,有个网页打开白屏。但是问题是笔者手头都没有10.x版本的手机,所以想安装模拟器来尝试复现。
然而,笔者发现电脑上的Xcode版本是12.5.1,已经不支持iOS 10.3.1的模拟器下载了。
API Availability and Target Conditionals
Writing code for multiple Apple platforms can be tricky, this post aims to provide some guidance and explanations for ways to write code that works on different Apple platforms (iOS, macOS, watchOS, tvOS) and different versions of SDKs, and the OSes at runtime.
Target conditionals
First, let’s take a look at how to tell apart the OS you are compiling for at build time, using the preprocessor (in case of Objective-C) or compilation conditions (Swift).
Swift
In Swift checking the OS you are building for at comile time is done using compilation conditionals and specific platform condition functions:
The os() function can be used to check for the OS the code is compiled for, it takes one argument, which is the operating system name (not quoted). Possible operating system names at the time of writing are macOS, iOS, tvOS, watchOS and Linux.
For example:
|
1 2 3 4 5 |
#if os(macOS) // This code is only compiled for macOS #elseif os(iOS) || os(tvOS) // This code is only compiled for iOS or tvOS #endif |
Of course sometimes you need to check if you are running the simualtor or not, to do that there is the targetEnvironment() function. It takes one argument, which is the target environment name (not quoted). Possible values are simulator and macCatalyst (since Swift 5.1).
|
1 2 3 |
#if os(iOS) && targetEnvironment(simulator) // This code is only compiled for the iOS simulator #endif |
Objective-C, C and C++
For Objective-C, C and C++ conditional compilation is handled by the preprocessor. Apple provides the TargetConditionals.h header which contains specific defines for this.
This header has a lot of defines, I will only list the most useful ones here:
TARGET_OS_OSX- Compiling for macOS
TARGET_OS_IOS- Compiling for iOS
TARGET_OS_TV- Compiling for tvOS
TARGET_OS_WATCH- Compiling for watchOS
TARGET_OS_MACCATALYST- Compiling for Catalyst
TARGET_OS_SIMULATOR- Compiling for Simulator
For example:
|
1 2 3 4 5 |
#if TARGET_OS_OSX // This code is only compiled for macOS #elif TARGET_OS_IOS || TARGET_OS_TV // This code is only compiled for iOS or tvOS #endif |
To check if compiling for the simulator, just use the TARGET_OS_SIMULATOR define:
|
1 2 3 |
#if TARGET_OS_IOS && TARGET_OS_SIMULATOR // This code is only compiled for the iOS simulator #endif |
Note that there is a TARGET_OS_MAC define, while this sounds like it will be true only for macOS, it is actually true for all Darwin OSes including iOS and tvOS. Another define which can be confusing is the TARGET_OS_IPHONE, which is actually true for all “mobile” platforms, so iOS, tvOS, watchOS and Catalyst.
Clang-specific preprocessor extensions
Since Clang 6.0 or Xcode 9.3 (r320734) Clang has preprocessor extensions similar to the Swift condition functions which can be used to achieve the same as with the target conditional defines above.
To check the OS code is compiled for, there is the __is_target_os() preprocessor macro, which takes a single argument, the operating system name. Possible values for Apple OSes are macOS, iOS, tvOS, watchOS.
For example:
|
1 2 3 4 5 |
#if __is_target_os(macOS) // This code is only compiled for macOS #elif __is_target_os(iOS) || __is_target_os(tvOS) // This code is only compiled for iOS or tvOS #endif |
To check what environement the code is compiled for, similar to Swift there is the __is_target_environment() preprocessor macro, which takes as argument the environment name. Possible values are simulator and macabi (Catalyst).
|
1 2 3 |
#if __is_target_os(iOS) && __is_target_environment(simulator) // This code is only compiled for the iOS simulator #endif |
API availability
Something that usually is closely related to above discussed conditional compilation is the need to handle API availability gracefully. There are various aspects to consider about API availability, one is API availability at runtime, another is API availability at compile time depending on the used SDK version.
What is API availability?
API availability, as the name suggests, means if a specific API (function, class, method, etc.) is actually available.
macOS, iOS, tvOS and watchOS handle API availability in the same way, when a new API is introduced it is annotate with a specific macro that indicates the availability of that API. The macro expands to annotations for the API that indicate how the linker is expected to handle linking to it and can provide additional warnings or errors during compilation when using a deprecated API or trying to use a “too new” API in an application set to run on older appleOS versions that lack this API.
This sounds all very abstract and complex, so let’s have a look at this using an example, the clock_gettime() function. If we look at the manpage for clock_gettime we can see that it was introduced in macOS 10.12:
So let’s have a look at how the header declares this function:
|
1 2 |
__CLOCK_AVAILABILITY int clock_gettime(clockid_t __clock_id, struct timespec *__tp); |
So these functions are annotate with __CLOCK_AVAILABILITY, which expands to:
|
1 |
__OSX_AVAILABLE(10.12) __IOS_AVAILABLE(10.0) __TVOS_AVAILABLE(10.0) __WATCHOS_AVAILABLE(3.0) |
So to be more precise than what the man page tells us, this API is available since macOS 10.12, iOS 10.0, tvOS 10.0 and watchOS 3.0, great!
Of course that still doesn’t provide the full story, to understand what exactly the availability macros do, let’s have a look at the header defining those, Availability.h. Checking this header, we can see that these macros actually expand to (indirectly using a other macros) use of the availability attribute. I recommend reading this for all the details about how exactly this works. The most important takeaway for the purpose of this article is the following:
A declaration can typically be used even when deploying back to a platform version prior to when the declaration was introduced. When this happens, the declaration is weakly linked, as if the weak_import attribute were added to the declaration. A weakly-linked declaration may or may not be present a run-time, and a program can determine whether the declaration is present by checking whether the address of that declaration is non-NULL.
Note that in addition to the Availability.h header, there is the AvailabilityMacros.h header which works similar to the Availability.h header. Depending on the Framework, it might use either the Availability.h or the older AvailabilityMacros.h header.
Checking API availability at runtime
Now let’s see how we can use such a “partially” avaialble function:
|
1 2 3 4 5 6 7 8 9 10 |
#include <stdio.h> #include <time.h> int main(int argc, char const *argv[]) { struct timespec value; if (clock_gettime(CLOCK_REALTIME, &value) == 0) { printf("Realtime seconds: %ld\n", value.tv_sec); } } |
If we now compile this targeting macOS 10.14 like that, it just works as expected:
|
1 2 3 |
$ clang --target=x86_64-apple-macosx10.14 -Wunguarded-availability availability.c && ./a.out Realtime seconds: 1572996298 |
But if we were to try to compile targeting macOS 10.10, we would get a warning:
|
1 2 3 4 5 6 7 8 9 |
$ clang --target=x86_64-apple-macosx10.10 -Wunguarded-availability availability.c && ./a.out availability.c:7:9: warning: 'clock_gettime' is only available on macOS 10.12 or newer [-Wunguarded-availability] if (clock_gettime(CLOCK_REALTIME, &value) == 0) { ^~~~~~~~~~~~~ […]/usr/include/time.h:178:5: note: 'clock_gettime' has been marked as being introduced in macOS 10.12 here, but the deployment target is macOS 10.10.0 […] Realtime seconds: 1572996508 |
The -Wunguarded-availability flag is what causes the compiler to emit this warning. For APIs available since macOS 10.13, iOS 11, watchOS 4 and tvOS 11 you will get these warnings even without specifying this flag, as there is a new flag, -Wunguarded-availability-new which is enabled by default in recent Clang/Xcode versions.
As the name of the warning already gives it away, it only warns about “unguarded” availability, which implies we can “guard” such API usage. There are two ways how this can be done.
Checking the symbols address
The “old” way to check if a partially available function is available would be to check its address:
|
1 2 3 |
if (&clock_gettime == NULL) { // clock_gettime is not available! } |
Not only is this a bit weird to read, it has some downsides:
- The compiler will still warn about this
- Objective-C methods and classes can’t easily be checked this way
- It is cumbersome to check all relevant symbols this way
Using the availability helper
Fortunately since some time there is a bette way to handle this! In fact, the compiler would already points this out in the partial availability warning:
note: enclose 'clock_gettime' in a __builtin_available check to silence this warning
So let’s do that:
|
1 2 3 4 5 6 7 8 9 10 11 12 13 14 15 |
#include <stdio.h> #include <time.h> int main(int argc, char const *argv[]) { struct timespec value; if (__builtin_available(macOS 10.12, *)) { if (clock_gettime(CLOCK_REALTIME, &value) == 0) { printf("Realtime seconds: %ld\n", value.tv_sec); } } else { // clock_gettime not available! return 1; } } |
And now it will compile without warning again! On macOS at least, that is. We can check multiple platform versions just by listing them all:
|
1 2 3 |
if (__builtin_available(macOS 10.12, iOS 10.0, *)) { // Running on macOS 10.12 or iOS 10.0 or higher } |
The star at the end is mandatory and means “all other platforms”. So the previous check that just listed macOS would still compile for iOS and crash at runtime when ran on iOS versions lower than iOS 10 which lack clock_gettime. So take care to cover all cases where the code will run in your availability check!
In Objective-C there is the @available helper which looks a bit nicer than the longer version from C but is used in the exact same way:
|
1 2 3 |
if (@available(macOS 10.12, iOS 10.0, *)) { // Running on macOS 10.12 or iOS 10.0 or higher } |
In Swift there is #available, again the usage is the same except for the different name:
|
1 2 3 |
if #available(macOS 10.12, iOS 10.0, *) { // Running on macOS 10.12 or iOS 10.0 or higher } |
Note that negating the check or using it together with any other condition is not supported and does not properly guards availability!
Additionally keep in mind that this is a runtime check, so using APIs inside a availability check that are missing in the current SDK version that is compiled with is still an error. To support multiple SDK versions, see the next section for how to check at compile-time!
Checking API availability at compile-time
Sometimes it is necessary to check the availability of a specific API at compile-time, for example when you want to remain compatible with multiple Apple SDKs, where some versions offer new API that you want to use and some versions lack this API.
In the previous section I already mentioned two headers, Availability.h and AvailabilityMacros.h. These headers define two important macros:
__<OS-VARIANT>_VERSION_MAX_ALLOWED- Indicates the maximum version that we are allowed to use APIs from.
__<OS-VARIANT>_VERSION_MIN_REQUIRED- Indicates the minimum required version that we are allowed to use APIs from.
The <OS-VARIANT> needs to be replaced with the OS variant we want to check for and can be MAC_OS_X, IPHONE_OS, TV_OS or WATCH_OS.
The above sounds quite abstract so lets illustrate it with a example. Suppose we have a new API introduced for macOS 10.12, so it is first present in the macOS 10.12 SDK. If we were to compile with that SDK, the __MAC_OS_X_VERSION_MAX_ALLOWED macro is automatically set to the version of the SDK, as that is the maximum macOS version that we can use APIs from, we cannot ever use any APIs newer than the SDK we are using because those are simply not declared. So in case of the 10.12 SDK, __MAC_OS_X_VERSION_MAX_ALLOWED will be 101200.
If we want to stay compatible with older SDKs, we can use the following preprocessor macros:
|
1 2 3 4 5 6 7 8 9 10 |
#include <Availability.h> #if (TARGET_OS_OSX && __MAC_OS_X_VERSION_MAX_ALLOWED >= 101200) if (@available(macOS 10.12, *)) { // Use API available since macOS 10.12 SDK } else { // Fallback to some other API available in 10.11 and older SDKs } #else // Fallback to some other API available in 10.11 and older SDKs #endif |
Note that there are defines for the specific appleOS versions in the availability headers, like __MAC_10_12 so it is tempting to write __MAC_OS_X_VERSION_MAX_ALLOWED >= __MAC_10_12 but this will not work because lower SDK versions, like for example the macOS 10.11 SDK will not have the define for higher macOS versions like macOS 10.12!
What is important to note is that the preprocessor checks are done at compile-time, so proper availability handling at runtime is still needed, see the previous section for details about that!
The second macro, __<OS-VARIANT>_VERSION_MIN_REQUIRED, is useful when you have legacy code that you want to disable when targeting recent enough appleOS versions. Suppose we have function needed for macOS <= 10.11, we can easily disable that when targeting macOS 10.12 or higher by using the __MAC_OS_X_VERSION_MIN_REQUIRED macro:
|
1 2 3 4 5 6 |
#include <Availability.h> #if (TARGET_OS_OSX && __MAC_OS_X_VERSION_MIN_REQUIRED <= 101100) void compat_stuff_for_1011() { // ... } #endif |
Of course a lot of other and more complex scenarios are possible with more complex checks, but I won’t cover all of the possibilities here.
Note that the AvailabilityMacros.h header defines MAC_OS_X_VERSION_MIN_REQUIRED without the two leading underscores, but the Availability.h header does not define those. Both define the version with the leading underscores so to prevent confusing code I would recommend to not use the version without the leading underscores.
Note that the above only works for C/C++/Objective-C code, in Swift there is currently no way to check the SDK at compile-time.
参考链接
不同版本的TLS在Android/iOS中的支持情况
本文要解决的两类问题:
- 在Android4.1-Android5.0的系统上启用TLSv1.1和TLSv1.2
- java.lang.IllegalArgumentException: protocol TLSv1.1 is not supported
这两个问题比较具有代表性,在群里面讨论的时候见过的次数也是最多的,因此有些人遇到的问题也许协议名称不一样,但是本质都是类似的。
问题原因和解决思路分析
从 Android5.0 行为变更 可以看到 Android 5.0 开始默认启用了 TLSv1.1 和 TLSv1.2,但是从 Android 4.1 开始 TLSv1.1 和 TLSv1.2 其实就被支持了,只是默认没有启用而已。
我们最常用到的几种协议是SSLv3、TLSv1、TLSv1.1和 TLSv1.2,解决上面两个问题要搞清楚的是这几个协议在Android 系统中被支持的情况和被启用的情况,然后我们结合 minSdkVersion 和 targetSdkVersion 来选择协议即可,不同版本的 Android 系统对上述协议的支持情况:
客户端(SSLSocket)的支持情况:
| 协议 | 被支持(Api级别) | 被启用(Api级别) |
|---|---|---|
| SSLv3 | 1–25 | 1–22 |
| TLSv1 | 1+ | 1+ |
| TLSv1.1 | 16+ | 20+ |
| TLSv1.2 | 16+ | 20+ |
服务端(SSLServerSocket)的支持情况:
| 协议 | 被支持(Api级别) | 被启用(Api级别) |
|---|---|---|
| SSLv3 | 1–25 | 1–22 |
| TLSv1 | 1+ | 1+ |
| TLSv1.1 | 16+ | 16+ |
| TLSv1.2 | 16+ | 16+ |
数据来源:https://developer.android.com/reference/javax/net/ssl/SSLSocket
注意:这里说的客户端和服务端不是指Android端和JavaEE端/PHP端(还有Python、.NET等等),是指的在Android开发中的客户端Socket(SSLSocket)和服务端Socket(SSLServerSocket)。
到这里其实已经知道本文开始处的问题的原因了,TLSv1.1和TLSv1.2从Android4.1(Api级别16)开始才被支持,从Android4.4 Wear(Api级别20)才被启用(手机是Android5.0,Api级别21),因此在不同版本的Android系统中会出现需要被启用和启用时报不被支持的问题。
我们可以写一个TLS协议通用的兼容类,在所有的Android中强制启用已经被支持的所有协议,总结一下就是Android8.0及以上系统可以强制启用TLSv1、TLSv1.1和TLSv1.2协议,Android4.1-Android7.1.1系统可以强制启用SSLv3、TLSv1、TLSv1.1和TLSv1.2协议,其它版本系统可以强制启用SSLv3和TLSv1协议。
综上所述,如果开发者使用SSLv3协议,那么minSdkVersion不限制,targetSdkVersion不高于25,并且需要尽快更新为TLSv1.1协议或者TLS1.2协议;如果开发者使用TLSv1.1协议或者TLSv1.2协议,那么minSdkVersion应该不低于16,targetSdkVersion不限制;如果开发者使用TLSv1协议,那么目前不受限制。
代码实现
我们需要让SSLSocket启用对应的协议,代码对应的方法是:
|
1 |
SSLSocket#setEnabledProtocols(String[]); |
因此我们需要先在不同版本的Android系统中生成不同的协议数组:
|
1 2 3 4 5 6 7 8 9 10 11 |
private static final String PROTOCOL_ARRAY[]; static { if (Build.VERSION.SDK_INT >= Build.VERSION_CODES.O) { PROTOCOL_ARRAY = new String[]{"TLSv1", "TLSv1.1", "TLSv1.2"}; } else if (Build.VERSION.SDK_INT >= Build.VERSION_CODES.JELLY_BEAN) { PROTOCOL_ARRAY = new String[]{"SSLv3", "TLSv1", "TLSv1.1", "TLSv1.2"}; } else { PROTOCOL_ARRAY = new String[]{"SSLv3", "TLSv1"}; } } |
SSLSocket是由SSLSocketFactory负责生成的,我们再写一个SSLSocketFactory的包装类,主要代码如下:
|
1 2 3 4 5 6 7 8 9 10 11 12 13 14 15 16 17 18 19 20 21 22 23 24 25 26 27 28 29 30 31 32 33 34 35 36 37 38 39 40 41 42 43 44 45 46 47 |
public class TLSSocketFactory extends SSLSocketFactory { private static final String PROTOCOL_ARRAY[]; static { if (Build.VERSION.SDK_INT >= Build.VERSION_CODES.O) { PROTOCOL_ARRAY = new String[]{"TLSv1", "TLSv1.1", "TLSv1.2"}; } else if (Build.VERSION.SDK_INT >= Build.VERSION_CODES.JELLY_BEAN) { PROTOCOL_ARRAY = new String[]{"SSLv3", "TLSv1", "TLSv1.1", "TLSv1.2"}; } else { PROTOCOL_ARRAY = new String[]{"SSLv3", "TLSv1"}; } } private SSLSocketFactory delegate; /** * 默认构造方法,直接生成启用所有协议的SSLSocket。 */ public TLSSocketFactory() { try { SSLContext sslContext = SSLContext.getInstance("TLS"); sslContext.init(null, new TrustManager[]{DEFAULT_TRUST_MANAGERS}, new SecureRandom()); delegate = sslContext.getSocketFactory(); } catch (GeneralSecurityException e) { throw new AssertionError(); // The system has no TLS. Just give up. } } /** * 包装SSLSocketFactory的构造方法,让外部生成的SSLScoket启用所有协议。 */ public TLSSocketFactory(SSLSocketFactory factory) { this.delegate = factory; } /** * 如果是SSLSocket,启用所有协议。 */ private static void setSupportProtocolAndCipherSuites(Socket socket) { if (socket instanceof SSLSocket) { ((SSLSocket) socket).setEnabledProtocols(PROTOCOL_ARRAY); } } // TODO 下面省去每一个createSocket()方法调用setSupportProtocolAndCipherSuites()方法的代码。 } |
iOS客户端支持情况
iOS 客户端(SSLSocket)的支持情况:
TLS 1.2 从 iOS 5 开始支持(TLS 1.2 was first added to iOS in iOS 5)
另外 对于在 2020 年 9 月 1 日格林尼治标准时间/世界标准时间 00:00 或之后颁发的 TLS 服务器证书,其有效期不得超过 398 天。
参考链接
Android/iOS手机朝向获取
对于iOS手机:
苹果公司给出了一个枚举,如下:
|
1 2 3 4 5 6 7 8 9 |
typedef NS_ENUM (NSInteger, UIDeviceOrientation) { UIDeviceOrientationUnknown, UIDeviceOrientationPortrait, // 竖向,home键向下 UIDeviceOrientationPortraitUpsideDown, // 竖向,home键向上 UIDeviceOrientationLandscapeLeft, // 横向,home键向右 UIDeviceOrientationLandscapeRight, // 横向,home键向左 UIDeviceOrientationFaceUp, // 屏幕平放,向上 UIDeviceOrientationFaceDown // 屏幕平放,向下 } |
|
1 2 3 4 5 6 7 8 9 10 11 12 13 |
typedef NS_ENUM(NSInteger, UIInterfaceOrientation) { UIInterfaceOrientationUnknown = UIDeviceOrientationUnknown, UIInterfaceOrientationPortrait = UIDeviceOrientationPortrait, UIInterfaceOrientationPortraitUpsideDown = UIDeviceOrientationPortraitUpsideDown, UIInterfaceOrientationLandscapeLeft = UIDeviceOrientationLandscapeRight, UIInterfaceOrientationLandscapeRight = UIDeviceOrientationLandscapeLeft } |
2、对于获取手机屏幕
(1)
|
1 2 3 4 5 |
[[ UIDevice currentDevice ] beginGeneratingDeviceOrientationNotifications ]; dispatch_async ( dispatch_get_main_queue (), ^{ NSLog ( @"=========%zd" ,[[ UIDevice currentDevice ] orientation ]); }); [[ UIDevice currentDevice ] endGeneratingDeviceOrientationNotifications ]; |
(2)
|
1 |
UIInterfaceOrientation orientation = [ UIApplication sharedApplication ]. statusBarOrientation ; |
3、对于当前手机是不是横屏或者竖屏的判断
(1)判断是否是竖屏
|
1 2 3 |
static inline BOOL UIDeviceOrientationIsPortrait( UIDeviceOrientation orientation) { return ((orientation) == UIDeviceOrientationPortrait || (orientation) == UIDeviceOrientationPortraitUpsideDown ); } |
(2)判断是否是横屏
|
1 2 3 |
static inline BOOL UIDeviceOrientationIsLandscape( UIDeviceOrientation orientation) { return ((orientation) == UIDeviceOrientationLandscapeLeft || (orientation) == UIDeviceOrientationLandscapeRight ); } |
对于Android手机:
|
1 2 3 4 5 6 7 8 9 10 11 12 13 14 15 16 17 18 19 20 21 22 23 24 25 26 27 28 29 30 31 32 33 |
public class SimpleOrientationActivity extends Activity { OrientationEventListener mOrientationListener; @Override public void onCreate(Bundle savedInstanceState) { super.onCreate(savedInstanceState); setContentView(R.layout.main); mOrientationListener = new OrientationEventListener(this, SensorManager.SENSOR_DELAY_NORMAL) { @Override public void onOrientationChanged(int orientation) { Log.v(DEBUG_TAG, "Orientation changed to " + orientation); } }; if (mOrientationListener.canDetectOrientation()) { Log.v(DEBUG_TAG, "Can detect orientation"); mOrientationListener.enable(); } else { Log.v(DEBUG_TAG, "Cannot detect orientation"); mOrientationListener.disable(); } } @Override protected void onDestroy() { super.onDestroy(); mOrientationListener.disable(); } } |
判断手机方向的具体判断代码如下:
|
1 2 3 4 5 6 7 8 9 10 11 12 13 14 15 16 17 18 19 20 |
if (OrientationEventListener.ORIENTATION_UNKNOWN == orientation) { return; //手机平放时,检测不到有效的角度 } // 我们只关心 0, 90, 180 ,270 测试发现,很多设备返回的数据是很混乱的,但是这四个度数比较稳定 if((0 == orientation % 90) && (orientation < 360) && (orientation >= 0)) { //只检测是否有四个角度的改变 if (orientation > 350 || orientation < 10) { //0度 orientation = 0; } else if (orientation > 80 && orientation < 100) { //90度 orientation = 90; } else if (orientation > 170 && orientation < 190) { //180度 orientation = 180; } else if (orientation > 260 && orientation < 280) { //270度 orientation = 270; } else { return; } Log.i("MyOrientationDetector ", "onOrientationChanged:" + orientation); } |
对于 Flutter:
使用 native_device_orientation 插件完成相同的检测功能。
参考链接
LocalAuthentication开发实践
在iPhone 5s加入Touch ID后,指纹识别的功能在App中逐渐受到青睐,特别是对于本地安全较高的应用(如带支付的App)指纹识别是必备的功能,它既能解决在验证过程中输入密码的繁琐过程,同时指纹识的安全等级更高。那么,要想在自己开发的应用中使用指纹识别,就必须要LocalAuthentication.framework提供的API,下面将详细地介绍如何使用这个框架来实现指纹识别功能。
基础用法
我们先来看下面的例子:
|
1 2 3 4 5 6 7 8 9 10 11 12 13 14 15 16 17 18 19 20 21 22 |
LAContext *context = [[LAContext alloc] init]; NSError *error = nil; if ([context canEvaluatePolicy:LAPolicyDeviceOwnerAuthenticationWithBiometrics error:&error]) { [context evaluatePolicy:LAPolicyDeviceOwnerAuthenticationWithBiometrics localizedReason:@"输入指纹进行验证" reply:^(BOOL success, NSError * _Nullable error) { if (success) { NSLog(@"验证成功"); } else { NSLog(@"验证失败"); } }]; } else { NSLog(@"识别功能不可用"); } |
移动端系统生物认证技术详解
相信大家对于生物认证应该不会陌生,使用指纹登陆或者 FaceId 支付等的需求场景如今已经很普遍,所以基本上只要涉及移动端开发,不管是 Android 、iOS 或者是 RN 、Flutter 都多多少少会接触到这一业务场景。
当然,不同之处可能在于大家对于平台能力或者接口能力的熟悉程度,所以本篇主要介绍 Android 和 iOS 上使用系统的生物认证需要注意什么,具体流程是什么,给需要或者即将需要的大家出一份汇总的资料。
iOS开发-Xcode配置真机进行无线(WiFi)调试的方法
Xcode 9以上 和iOS 11以上:两者缺一不可