Robolectric 4.8.2修改进程名/私有静态变量

Roboletric 4.8.2 修改进程名:

import org.robolectric.shadows.ShadowApplication;

ShadowApplication.setProcessName();

Roboletric 4.8.2 修改私有静态变量:

import org.robolectric.util.ReflectionHelpers;

ReflectionHelpers.setStaticField(xx.class, "static filed name", value);

如果报错:

java.lang.IllegalStateException: No instrumentation registered! Must run under a registering instrumentation.

	at androidx.test.platform.app.InstrumentationRegistry.getInstrumentation(InstrumentationRegistry.java:45)
	at androidx.test.core.app.ApplicationProvider.getApplicationContext(ApplicationProvider.java:41)

则修改方式如下:

@PowerMockIgnore({"org.mockito.*", "org.robolectric.*", "android.*", "androidx.*"})

完整的例子如下:

    import org.junit.runner.RunWith;
    import org.powermock.core.classloader.annotations.PowerMockIgnore;
    import org.powermock.modules.junit4.PowerMockRunner;
    import org.powermock.modules.junit4.PowerMockRunnerDelegate;
    import org.robolectric.RobolectricTestRunner;
    import org.robolectric.annotation.Config;
    
    
    /**
     * Base class extended by every Robolectric test in this project.
     * <p/>
     * You can use Powermock together with Robolectric.
     */
    @RunWith(PowerMockRunner.class)
    @PowerMockRunnerDelegate(RobolectricTestRunner.class)
    @Config(constants = BuildConfig.class,
            sdk = 21)
    @PowerMockIgnore({"org.mockito.*", "org.robolectric.*", "android.*", "androidx.*"})
    public abstract class RobolectricTest {
    
    }

参考链接


Using PowerMock - robolectric/robolectric Wiki

JUnit中对Exception的判断

对于使用验证 Test Case 方法中抛出的异常,我起初想到的是一种比较简单的方法,但是显得比较繁琐:

    @Test
    public void testOldStyle() {
        try {
            double value = Math.random();
            if(value < 0.5) {
                throw new IllegalStateException("test");
            }
            Assert.fail("Expect IllegalStateException");
        } catch(IllegalStateException e) {
        }
    }

Google了一下,找到另外几种更加方便的方法:1,使用Test注解中的expected字段判断抛出异常的类型。2,使用ExpectedExceptionRule注解。
个人偏好用Test注解中的expected字段,它先的更加简洁,不管读起来还是写起来都很方便,并且一目了然:

    @Test(expected = IllegalStateException.class)
    public void testThrowException() {
        throw new IllegalStateException("test");
    }
    
    @Test(expected = IllegalStateException.class)
    public void testNotThrowException() {
        System.out.println("No Exception throws");
    }

Rule注解的使用(只有在JUnit4.7以后才有这个功能),它提供了更加强大的功能,它可以同时检查异常类型以及异常消息内容,这些内容可以只包含其中的某些字符,ExpectedException还支持使用hamcrest中的Matcher,默认使用IsInstanceOfStringContains Matcher。在BlockJUnit4ClassRunner的实现中,每一个Test Case运行时都会重新创建Test Class的实例,因而在使用ExpectedException这个Rule时,不用担心在多个Test Case之间相互影响的问题:

    @Rule
    public final ExpectedException expectedException = ExpectedException.none();
    
    @Test
    public void testThrowExceptionWithRule() {
        expectedException.expect(IllegalStateException.class);
        
        throw new IllegalStateException("test");
    }
    
    @Test
    public void testThrowExceptionAndMessageWithRule() {
        expectedException.expect(IllegalStateException.class);
        expectedException.expectMessage("fail");
        
        throw new IllegalStateException("expect fail");
    }

stackoverflow中还有人提到了使用google-code中的catch-exception工程,今天没时间看了,回去好好研究一下。

地址是:http://code.google.com/p/catch-exception/

参考链接


JUnit中对Exception的判断

Android中的@SmallTest,@MediumTest和@LargeTest注解的目的是什么?

Android中的@SmallTest,@MediumTest和@LargeTest注解的目的是什么?

例如:

@SmallTest
public void testStuff() {
    TouchUtils.tapView(this, anEditTextView);
    sendKeys("H E L P SPACE M E PERIOD");
    assertEquals("help me.", anEditTextView.getText().toString());
}

参考下图:

继续阅读Android中的@SmallTest,@MediumTest和@LargeTest注解的目的是什么?

Robolectric 3.x编写屏幕分辨率/多语言/资源文件相关测试用例

在编写 Android 测试用例的时候,有时候我们需要涉及到屏幕分辨率相关测试用例。

比如不同分辨率得到不同的像素数值,可以参考如下:

@RunWith(RobolectricTestRunner.class)
@PowerMockIgnore({"org.mockito.*", "org.robolectric.*", "android.*"})
@Config(sdk = Build.VERSION_CODES.P)
public class DimensUnitTest {

    @Test
    @Config(qualifiers = "w480dp-h800dp")
    public void dimens800x480_isCorrect() {
        final Context context = RuntimeEnvironment.application;
        final double ref100DpBase = 42.666667;

        float expectDp = 110;
        double dips = context.getResources().getDimension(R.dimen.dimen_110);

        assertEquals(ref100DpBase * expectDp / 100, dips, delta);

        for (Map.Entry<Integer, Double> entry : expectDimens.entrySet()) {
            dips = context.getResources().getDimension(entry.getKey());
            assertEquals(ref100DpBase * entry.getValue() / 100, dips, delta);
        }
    }
	
}

比如不同语言得到不同的字符串,可以参考如下:

@RunWith(RobolectricTestRunner.class)
@PowerMockIgnore({"org.mockito.*", "org.robolectric.*", "android.*"})
@Config(sdk = Build.VERSION_CODES.P)
public class LangUnitTest {

    /**
     * 使用qualifiers加载对应的资源文件
     *
     * @throws Exception
     */
    @Config(qualifiers = "zh-rCN")
    @Test
    public void testString() throws Exception {
        final Context context = RuntimeEnvironment.application;
        assertThat(context.getString(R.string.app_name), is("单元测试Demo"));
    }
	
}

其他相关的测试参数,参考 Device Configuration

注意需要在 build.gradle 中增加资源包含信息,否则在测试的时候会找不到指定的资源文件,默认只测试代码,被测试的资源文件不打包进入应用。

参考如下:

    testOptions {
        unitTests {
            includeAndroidResources = true
            all {
                //命令行下 单元测试可能卡住的问题
                jvmArgs '-noverify'
                //robolectric外部指定下载资源链接的参数,使用 -D 参数指定 bash gradlew clean build -Drobolectric.dependency.repo.url=http://127.0.0.1/jcenter
                systemProperty 'robolectric.dependency.repo.url', System.getProperty("robolectric.dependency.repo.url")
                systemProperty 'robolectric.dependency.repo.id', System.getProperty("robolectric.dependency.repo.id")
            }
        }
    }

参考链接


Android单元测试--使用DummyActivity

在编写Android测试用例的时候,有时候我们需要测试与Activity相关的功能,同时又没办法直接调用被测试代码中的Activity的时候,我们需要创建DummyActivity的方式来进行。

我们希望这个DummyActivity只在测试代码中存在,相关的资源也只存在于测试代码里面使用,不侵入主代码。

可以参考如下布局进行项目的处理。

androidTest/
├── AndroidManifest.xml
├── java
│   └── com
│       └── mobibrw
│           └── lib_phone
│               ├── MainActivityTest.java
│               ├── TestActivity.java
│               └── actions
│                   ├── HintViewAction.java
│                   ├── KeepHintViewAction.java
│                   └── SetTextViewAction.java
└── res
    ├── layout
    │   └── activity_main.xml
    └── values
        └── styles.xml

上述代码同样适用于Android资源文件相关的测试逻辑。

只是需要注意的是,当引入资源的时候,我们需要使用 {module_package}.test.R 的方式进行引入,否则代码中会提示找不到资源文件。

参考链接


Spring Junit 读取WEB-INF下的配置文件

假设spring配置文件为applicationContext.xml

一.Spring配置文件在类路径下面

SpringJava应用程序中,一般我们的Spring的配置文件都是放在放在类路径下面(也即编译后会进入到classes目录下)。

以下是我的项目,因为是用maven管理的,所以配置文件都放在"src/main/resources"目录下,这时候,在代码中可以通过

ApplicationContext applicationContext = new ClassPathXmlApplicationContext("applicationContext.xml");

然后获取相应的bean

如果代码想用Junit测试框架来测试,则Spring提供了对Junit支持,还可以使用注解的方式:

@RunWith(SpringJUnit4ClassRunner.class)
@ContextConfiguration(locations={"classpath:applicationContext.xml"})

只需要在相应的Test类前面加上此两个注解(第二个注解用来指明Spring的配置文件位置),就可以在Junit Test类使用中Spring提供的依赖注入功能。

二.Spring配置文件在WEB-INF下面

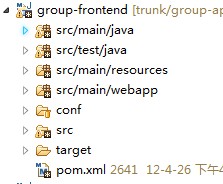
当然在做J2EE开发时,有些人习惯把Spring文件放在WEB-INF目录(虽然更多人习惯放在类路径下面)下面,或者有些Spring配置文件是放在类路径下面,而有些又放在WEB-INF目录下面,如下图:

1336538723_9420

这时候,在代码中就不可以使用ClassPathXmlApplicationContext来加载配置文件了,而应使用FileSystemXmlApplicationContext

ApplicationContext applicationContext = new FileSystemXmlApplicationContext("src/main/webapp/WEB-INF/applicationContext.xml");

然后获取相应的bean

如果代码想用Junit测试框架来测试,则Spring提供了对Junit支持,还可以使用注解的方式:

@RunWith(SpringJUnit4ClassRunner.class)
@ContextConfiguration(locations={"file:src/main/webapp/WEB-INF/applicationContext.xml"})

只需要在相应的Test类前面加上此两个注解(第二个注解用来指明Spring的配置文件位置),就可以在Junit Test类使用中Spring提供的依赖注入功能。

下面是我的一个Spring管理下的Junit测试类:

import java.util.List;
import org.junit.Test;
import org.junit.runner.RunWith;
import org.springframework.beans.factory.annotation.Autowired;
import org.springframework.test.context.ContextConfiguration;
import org.springframework.test.context.junit4.SpringJUnit4ClassRunner;

@RunWith(SpringJUnit4ClassRunner.class)
@ContextConfiguration({"file:src/main/webapp/WEB-INF/applicationContext.xml"})
public class SuFriendServiceImplOverRMITest {

	@Autowired
	private SuFriendService suFriendService;

	@Test
	public void getUserFollowerListTest(){
		List list = suFriendService.getUserFollowerList("liug_talk@163.com");
		System.out.println("------"+list);
	}
}

参考链接


Spring Junit 读取WEB-INF下的配置文件