ubuntu 22.04 WARNING: [pool ***] server reached max_children, consider raising it

最近 WordPress 上传图片的时候,偶尔会发生失败,报错 503。以前比较少,最近越来越频繁,于是跟踪了一下服务器的日志,看到如下报错信息:

xxx.xxx.xxx.xxx - - [08/Aug/2023:14:50:36 +0800] "POST /wp-admin/async-upload.php HTTP/2.0" 503 417 "https://www.mobibrw.com/wp-admin/post.php?post=xxxx&action=edit&classic-editor" "Mozilla/5.0 (Macintosh; Intel Mac OS X 10_15_7) AppleWebKit/537.36 (KHTML, like Gecko) Chrome/115.0.0.0 Safari/537.36"

查看 PHP 的日志,却找不到任何有用的日志,只看到如下警告:

起初是百思不得其解,按理说应该有相关报错才对。

后来仔细思考了一下,才想明白,原来是并发数超过最大限制了,默认的并发数量是 5,这个绝对是不够的,并发超过限制是没有任何报错信息的,日志只会给出一个警告。

详细的解决方案如下:

If you encounter such an error in the php logs, then it is time to modify max_children. The php logs are usually located in /var/log/,  and in my case they are in /var/log/php7.4-fpm.log

WARNING: [pool ********] server reached max_children setting (8), consider raising it

Search for the file where the max_children variable is located, in my case the file is www.conf and is located in the folder: /etc/php/7.4/fpm/pool.d/

Change the value pm.max_children = 8 to a larger one, 16 for example

$ sudo nano /etc/php/7.4/fpm/pool.d/www.conf

save the .conf file and restart the web server:

$ sudo systemctl restart apache2

or only the php-fpm service as follows:

$ sudo systemctl restart php7.4-fpm.service

Eventually you can check these logs, who knows, you may not even know you have such a problem!

** As I noticed, for HestiaCP (VestaCP) users max_children can be found in both the /etc/php/7.4/fpm/pool.d/www.conf file and the file /usr/local/hestia/php/etc/php-fpm.conf

** Attention, you must also have enough memory for this, otherwise the results are not as expected!

Check the memory used by each php-fpm service-child with the following command:

$ ps -ef | grep '[f]'pm
root      618    1  0 Dec17 ?        00:00:27 php-fpm: master process (/usr/local/hestia/php/etc/php-fpm.conf)
root     1692    1  0 01:11 ?        00:00:00 php-fpm: master process (/etc/php/7.4/fpm/php-fpm.conf)
matrix    3539 1692 14 01:30 ?        00:00:03 php-fpm: pool mydomain314159265.com
matrix    3542 1692 10 01:30 ?        00:00:01 php-fpm: pool mydomain314159265.com
matrix    3547 1692  0 01:30 ?        00:00:00 php-fpm: pool mydomain314159265.com
matrix    3548 1692 15 01:30 ?        00:00:00 php-fpm: pool mydomain314159265.com

Then, to see the memory required for these processes, we need to add the rss parameter which is “Resident Set Size” or the physical memory. Note: Modify php-fpm7.4 to suit your version of PHP:

$ ps -C php-fpm7.4 -o rss=
81316
136872
138096
121728

These numbers are in Kbytes , so we calculate an average of the displayed values and multiply by max_children, and we find approximately the memory needed only for php, but don’t forget, the server also needs memory for Apache, Nginx, mysql … maybe Varnish, HAproxy, Redish, etc. .. so, check these values carefully!

参考链接


Solved! WARNING: [pool ***] server reached max_children, consider raising it

PHP 7.x连接MySQL 8.x报错“The server requested authentication method unknown to the client [caching_sha2_password]”

PHP 7.x使用如下代码连接MySQL 8.x

<?php
mysqli_connect('localhost:3306','user','password','database') or die('Error connecting to MySQL server.')
?>

结果出现如下错误信息

Warning: mysqli_connect(): The server requested authentication method unknown to the client [caching_sha2_password] in xx.php

原因为 MySQL 支持 caching_sha2_password  / 用户名密码 两种验证方式,但是从 MySQL 8 开始默认使用caching_sha2_password 的验证方式,导致以前版本的客户端不能成功连接。更详细的解释如下:

The server validates the user and returns the connection status. MySQL uses caching_sha2_password and auth_socket plugins for validation.

The caching_sha2_password plugin uses an SHA-2 algorithm with 256-bit password encryption. MySQL 8 prefers this auth method.

Whereas the auth_socket plugin checks if the socket username matches with the MySQL username. If the names don’t match, it checks for the socket username of the mysql.user. If a match is found, the plugin permits the connection.

But to serve the pre 8.0 clients and avoid compatibility errors, it is preferred to revert back the auth method. Older versions of MySQL use mysql_native_password plugin for validation.

解决方案为修改用户默认的认证方式,如下:

ALTER USER 'user'@'localhost' IDENTIFIED WITH mysql_native_password BY 'password';

参考链接


[RESOLVED] MySQL the server requested authentication method unknown to the client

apache日志中的中文如何显示?

 apache日志记录的中文,是内码如下:

\xb6\xd4\xb6\xc0\xc1\xa2\xd1\xa7\xd4\xba\xbf\xc9\xb3\xd6\xd0\xf8\xb7\xa2\xd5\xb9\xce\xca\xcc\xe2

编码后中文是:

对独立学院可持续发展问题

完全看不懂是什么意思,如何解析出里面的中文出来呢?

php参考如下代码:

<?php
  $str="\xb6\xd4\xb6\xc0\xc1\xa2\xd1\xa7\xd4\xba\xbf\xc9\xb3\xd6\xd0\xf8\xb7\xa2\xd5\xb9\xce\xca\xcc\xe2";
  eval("\$str = \"$str\";");
  echo iconv('GB2312','UTF-8',$str."\n");
?>

golang参考如下代码:

import (
    "fmt"
    "log"
    "os"
    "code.google.com/p/mahonia"
)
func main() {
    var use_logfile bool
    use_logfile = true
    f, err := os.OpenFile("testlogfile", os.O_RDWR|os.O_CREATE|os.O_APPEND, 0666)
    if err != nil {
        log.Fatalf("error opening file: %v", err)
    }
    defer f.Close()
    if use_logfile {
        log.SetOutput(f)
    }
    s := "\xb6\xd4\xb6\xc0\xc1\xa2\xd1\xa7\xd4\xba\xbf\xc9\xb3\xd6\xd0\xf8\xb7\xa2\xd5\xb9\xce\xca\xcc\xe2"
    enc := mahonia.NewDecoder("UTF-8")
    x := enc.ConvertString(s)
    gbk := mahonia.NewDecoder("gbk")
    n := gbk.ConvertString(s)
    log.Printf("file:", x, n)
    fmt.Println(x, n)
}

java参考如下代码:

import java.io.UnsupportedEncodingException;
import java.net.URLDecoder;
import java.nio.ByteBuffer;
import java.nio.CharBuffer;
import java.nio.charset.StandardCharsets;


public class HelloWorld {
    private static String unescapeGBK(final String s) {
        final StringBuilder buf = new StringBuilder();
        int i = 0;
        int len = s.length();
        while (i < len) {
            int ch = s.charAt(i);
            if (ch == '\\') {
                // \xXX\xXX : map to unicode(XXXX)
                int c = (char) ((Character.digit(s.charAt(i + 2), 16) << 4)
                        + Character.digit(s.charAt(i + 3), 16));
                c = c << 8;
                c += (char) ((Character.digit(s.charAt(i + 6), 16) << 4)
                        + Character.digit(s.charAt(i + 7), 16));

                buf.append((char) c);
                i += 7;
            } else {
                buf.append((char) ch);
            }
            i++;
        }
        return buf.toString();
    }

    public static void main(String args[]) throws UnsupportedEncodingException {
        // UTF-8
        String coderStr = "\\x22\\xE5\\x93\\x88\\xE5\\x93\\x88\\x22";
        String str = coderStr.replaceAll("\\\\x", "%");
        str = URLDecoder.decode(str, StandardCharsets.UTF_8.toString());
        System.out.println(str);
        // GBK
        coderStr = "\\xb6\\xd4\\xb6\\xc0\\xc1\\xa2\\xd1\\xa7\\xd4\\xba\\xbf\\xc9\\xb3\\xd6\\xd0\\xf8\\xb7\\xa2\\xd5\\xb9\\xce\\xca\\xcc\\xe2";
        str = getApacheChineseGBK(coderStr);
        System.out.println(str);
    }

    public static String getApacheChineseGBK(String str) throws UnsupportedEncodingException {
        str = str.trim().toLowerCase();
        str = unescapeGBK(str);
        final ByteBuffer byteBuffer = ByteBuffer.allocate(str.length() * Character.SIZE / Byte.SIZE);
        final CharBuffer converter = byteBuffer.asCharBuffer();
        converter.append(CharBuffer.wrap(str));
        str = new String(byteBuffer.array(), "GBK");
        return str;
    }
}

参考链接


ubuntu 16.04系统上开启PHP7的OpCache

目前使用的阿里云服务器是通过阿里云ECS ubuntu 14.04.5 LTS升级到ubuntu 16.04.2 LTS升级上来的,升级之后,一直没有开启PHP 7.0OpCache。以前感觉性能还够用,最近发现有些卡顿现象,因此想到开启OpCache

开启命令如下(PHP-FPM模式):

$ sudo apt install php7.0-opcache

$ sudo phpenmod opcache

# PHP-FPM模式的配置文件
$ FILEPATH="/etc/php/7.0/fpm/php.ini"


# Enable the opcache.
$ SEARCH=";opcache.enable=0"
$ REPLACE="opcache.enable=1"
$ sudo sed -i "s:$SEARCH:$REPLACE:" $FILEPATH


# Set the amount of memory we can use for caching.
# The production server has oooooodles of RAM.
$ SEARCH=";opcache.memory_consumption=64"
$ REPLACE="opcache.memory_consumption=256"
$ sudo sed -i "s:$SEARCH:$REPLACE:" $FILEPATH


# increase the number of files to cache
$ SEARCH=";opcache.max_accelerated_files=2000"
$ REPLACE="opcache.max_accelerated_files=1000000"
$ sudo sed -i "s:$SEARCH:$REPLACE:" $FILEPATH


# Don't bother revalidating files for a long time because
# they should never change.
# Obviously you need to undo this in dev.
$ SEARCH=";opcache.validate_timestamps=1"
$ REPLACE="opcache.validate_timestamps=3000"
$ sudo sed -i "s:$SEARCH:$REPLACE:" $FILEPATH

#重启服务
$ sudo service php7.0-fpm restart

网站响应速度有明显的飞跃。

参考链接


PHP版本判断之version_compare()函数

判断当前PHP的版本是否高于某个版本,或者低于某个版本的方法是使用version_compare()函数。

<?php

header('content-type:text/html;charset=utf-8');
/**
 * 判断php的版本是否在7.0.0以上
 */

echo '<pre>';
 
//本人使用的版本为  7.0.18
echo 'PHP的当前版本为 '.PHP_VERSION."\n";

var_dump(version_compare(PHP_VERSION,'5.2.0'));

var_dump(version_compare(PHP_VERSION,'5.2.0','='));

var_dump(version_compare(PHP_VERSION,'5.3.0','ge'));

if(version_compare(PHP_VERSION,'7.0.0','ge')){

	echo '您的PHP版本大于7.0.0,当前版本为 '.PHP_VERSION;

}else{

	echo '您的PHP版本小于7.0.0,当前版本为 '.PHP_VERSION;

}

?>

参考链接


PHP 版本判断 version_compare() 函数

Ubuntu 16.04 LTS下通过PHP7-FPM配置的服务器增大WordPress文件上传大小限制

一般来说你使用的主机会限制你上传文件的大小,在WordPress的媒体文件上传可以看到,大多数都是2MB。如果是图片的话可能会还够用,但是如果是其他文件就不一定够用了。

增大可以上传的文件大小的话,则执行如下命令

$ sudo vim /etc/php/7.0/fpm/php.ini

搜索"upload_max_filesize",把默认的2M修改为需要的大小。
搜索"post_max_size",把默认的8M修改为需要的大小。

重启PHP-FPM服务

$ sudo service php7.0-fpm restart

重新刷新页面,上传文件即可。

Ubuntu 14.04系统上使用Apache2.4.10+PHP5+FastCGI的WordPress网站大量php5-cgi defunct引起网站访问异常缓慢

最近网站访问异常缓慢,网站响应时间明显延迟很多,观察系统的处理器占用,一点都不高,带宽也在合理范围之内,因此分析Apache-2.4.10的错误日志

$ cat /var/log/apache2/error.log

发现大量的出现

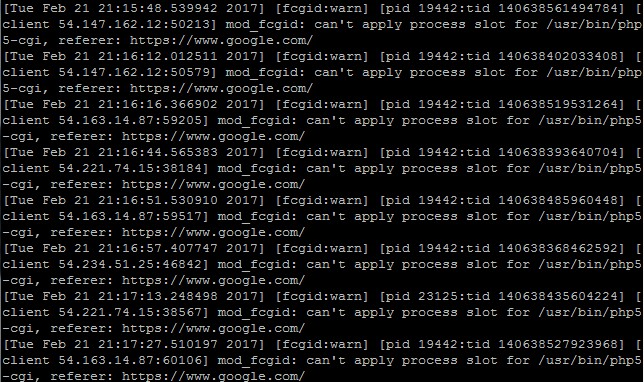
[Tue Feb 21 21:16:12.012511 2017] [fcgid:warn] [pid 19442:tid 140638402033408] [client 54.147.162.12:50579] mod_fcgid: can't apply process slot for /usr/bin/php5-cgi, referer: https://www.google.com/

如下图:

感觉很奇怪,于是看了一下php相关的进程,执行命令

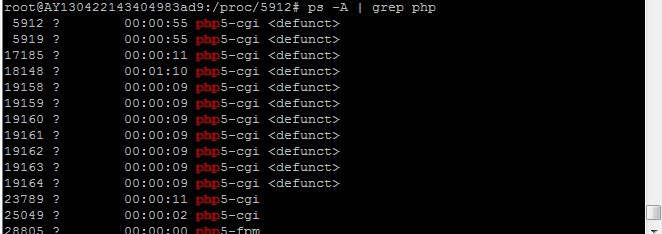
$ ps -A | grep php

执行结果如下图:

发现大量的php5-cgi进程处于defunct状态(僵尸状态),导致达到了进程数量的限制上限,无法继续提供服务。

但是上面的日志,是已经出现问题的时候的日志,既然进程不足了,自然无法提供服务了,继续向上追踪,发现大量的进程崩溃日志

[Mon Feb 20 18:07:12.857016 2017] [core:warn] [pid 15284:tid 139855916136320] AH00045: child process 15291 still did not exit, sending a SIGTERM
[Mon Feb 20 18:07:12.857024 2017] [core:warn] [pid 15284:tid 139855916136320] AH00045: child process 15408 still did not exit, sending a SIGTERM
[Mon Feb 20 18:07:12.857031 2017] [core:warn] [pid 15284:tid 139855916136320] AH00045: child process 17723 still did not exit, sending a SIGTERM
[Mon Feb 20 18:07:14.859108 2017] [core:warn] [pid 15284:tid 139855916136320] AH00045: child process 16387 still did not exit, sending a SIGTERM
[Mon Feb 20 18:07:14.859170 2017] [core:warn] [pid 15284:tid 139855916136320] AH00045: child process 15291 still did not exit, sending a SIGTERM
[Mon Feb 20 18:07:14.859178 2017] [core:warn] [pid 15284:tid 139855916136320] AH00045: child process 15408 still did not exit, sending a SIGTERM
[Mon Feb 20 18:07:14.859185 2017] [core:warn] [pid 15284:tid 139855916136320] AH00045: child process 17723 still did not exit, sending a SIGTERM

感觉很奇怪,最初以为是由于调整Apache-2.4.10服务器,多次在正常运行中重启服务器,导致正在服务的php5-cgi进程变成了僵尸进程。但是重启服务器之后,过了几天后,问题依旧发生了。

于是网上搜索了一下,感觉应该更像是PHP-CGI进程本身存在内存泄漏问题,导致进程长时间执行之后,由于资源开销问题导致进程崩溃。

目前我的服务器上启用的是Apache2Event MPM模块,查看其中的配置文件:

$ cat /etc/apache2/mods-enabled/mpm_event.conf

可以看到里面的内容如下:

# event MPM
# StartServers: initial number of server processes to start
# MinSpareThreads: minimum number of worker threads which are kept spare
# MaxSpareThreads: maximum number of worker threads which are kept spare
# ThreadsPerChild: constant number of worker threads in each server process
# MaxRequestWorkers: maximum number of worker threads
# MaxConnectionsPerChild: maximum number of requests a server process serves
<IfModule mpm_event_module>
	StartServers			 2
	MinSpareThreads		 25
	MaxSpareThreads		 75
	ThreadLimit			 64
	ThreadsPerChild		 25
	MaxRequestWorkers	  150
	MaxConnectionsPerChild   0
</IfModule>

发现,设置MaxConnectionsPerChild参数为0,根据 Apache MPM Common Directives 里面的介绍,这个参数的作用就是一个进程处理多少个请求后就退出。而如果设置了 0 则代表,除非出现了异常,否则进程会一直存在。这样的话,一旦资源泄漏,进程就会各种异常了。因此需要设置一下这个参数,一般这个参数设置为1000-5000左右,根据实际情况自己调整一下参数。注意这个参数的设置是会影响到网站的访问速度的,尤其是当服务器的连接次数到达限制的时候,此时大量的服务器进程都在重启,导致此时的访问要么被重置要么耗时变的非常长。因此,如果没有资源泄漏的话,可以不设置这个限制。

注意一下这个介绍的最后一句话,讲的就是这个参数可以修正资源泄漏问题,如下:

Setting MaxConnectionsPerChild to a non-zero value limits the amount of memory that process can consume by (accidental) memory leakage.

修改参数后,需要重启服务生效。

按照上面的方法实现后,过了一个礼拜后,这个现象再次发生了。

观察了一下Apache2当前已经启用的模块

$ ls /etc/apache2/mods-enabled/

发现,由于是从Apache2.2升级到的Apache2.4,或许是某次的配置,导致fastcgifcgi两个模块同时被启用了。

是不是两个相同功能的模块同时启用导致功能冲突了呢?

先尝试禁用fastcgi(这个模块已经被fcgi替换了).

$ a2dismod fastcgi

$ service apache2 restart

目前看来,问题依旧发生了!!!

查看Apache2中的FastCGI的配置信息

$ vim /etc/apache2/mods-enabled/fcgid.conf

可以看到如下内容

<IfModule mod_fcgid.c>
  AddHandler    fcgid-script .fcgi .php
  FcgidConnectTimeout 120
  DefaultMaxClassProcessCount 10
  MaxRequestLen  157286400
  IPCCommTimeout 300
</IfModule>

其中的AddHandler中的.php引起了注意,因为在日志中出现问题之前一直会出现如下的错误日志:

[Tue Feb 21 01:56:12.876460 2017] [fcgid:warn] [pid 21582:tid 140134271887104] [client 114.82.132.78:2410] mod_fcgid: can't apply process slot for /usr/bin/php5-cgi, referer: http://www.mobibrw.com/plus/90sec.php
[Tue Feb 21 01:56:16.727715 2017] [fcgid:warn] [pid 20546:tid 140134255101696] [client 114.82.132.78:2647] mod_fcgid: can't apply process slot for /usr/bin/php5-cgi, referer: http://www.mobibrw.com/plus/spider.php
[Tue Feb 21 01:56:20.434429 2017] [fcgid:warn] [pid 21582:tid 140134263494400] [client 114.82.132.78:3049] mod_fcgid: can't apply process slot for /usr/bin/php5-cgi, referer: http://www.mobibrw.com/plus/e7xue.php
[Tue Feb 21 01:56:35.130495 2017] [fcgid:warn] [pid 20546:tid 140134297065216] [client 114.82.132.78:3446] mod_fcgid: can't apply process slot for /usr/bin/php5-cgi, referer: http://www.mobibrw.com/plus/x.php
[Tue Feb 21 01:56:38.668792 2017] [fcgid:warn] [pid 20546:tid 140134238316288] [client 114.82.132.78:3985] mod_fcgid: can't apply process slot for /usr/bin/php5-cgi, referer: http://www.mobibrw.com/plus/service.php
[Tue Feb 21 01:56:42.247574 2017] [fcgid:warn] [pid 22275:tid 140134263494400] [client 114.82.132.78:4368] mod_fcgid: can't apply process slot for /usr/bin/php5-cgi, referer: http://www.mobibrw.com/plus/av.php

而这个配置项是从Ubuntu 12.04中手工引入的,我们尝试去掉这个。另外,可以看到

DefaultMaxClassProcessCount 10

也就是FastCGI的最大进程数是被设置成了10,但是,我这边限制PHP-FPM的最大进程数为5,是不是FastCGI的进程数如果大于PHP-FPM能够提供服务的数量的时候,会导致FastCGI进程出现僵尸状态呢? 是不是这个原因导致的呢? 于是修改后的结果如下:

<IfModule mod_fcgid.c>
  AddHandler    fcgid-script .fcgi
  FcgidConnectTimeout 120
  DefaultMaxClassProcessCount 5
  MaxRequestLen  157286400
  IPCCommTimeout 300
</IfModule>

经过这几天的观察,貌似现象不再出现了,这个应该是Apache 2.4版本引入的BUG,以前的配置的Apache 2.2版本上是没有任何问题的,究竟原因是mod_fcgid无法处理.php格式的脚本导致,还是由于mod_fcgid进程数高于php-fpm的进程数导致mod_fcgid进程长时间无法获取到可用的php-fpm连接,导致进程被饿死,这个暂时不详细追究了。

今天在修改配置的时候,由于配置错误,导致PHP-FPM服务无法正常启动,但是整个服务器竟然一直可以正常访问,那么结论就是Apache 2.4在当前的配置下,根本就没有使用PHP-FPM模式进行通信,而是使用标准的FastCGI的方式调度的。
于是网上搜索半天,结合自己的尝试,找到了根本原因:

<Directory /var/www/wordpress>
		#Options Indexes FollowSymLinks MultiViews
		Options FollowSymLinks MultiViews
		AllowOverride All
		FCGIWrapper /usr/bin/php5-cgi .php
		AddHandler fcgid-script .php
		Options ExecCGI SymLinksIfOwnerMatch
		Order allow,deny
		allow from all
</Directory>

上面的配置在Apache 2.2版本上是不影响后面启用的PHP-FPM配置的,对于PHP的请求,最终都是定向到PHP-FPM的。但是相同的配置在Apache 2.4上面,则被定向到了FastCGI上面。因此修改方式如下(至少要高于2.4.10,否则配置无效):

<Directory /var/www/wordpress>
		#Options Indexes FollowSymLinks MultiViews
		Options FollowSymLinks MultiViews
		AllowOverride All
#		Apache 2.2/2.4.9
#		FCGIWrapper /usr/bin/php5-cgi .php
#		AddHandler fcgid-script .php
#		Options ExecCGI SymLinksIfOwnerMatch
#		Apache 2.4.10
		<FilesMatch \.php$>
			SetHandler "proxy:unix:/var/run/php5-fpm.sock|fcgi://localhost"
		</FilesMatch>	
		Order allow,deny
		allow from all
</Directory>

至此,应该才是从根本上解决了服务器上的问题。

开始的时候忽略了一个基础的问题,那就是php5-cgiphp5-fpm进程本身就不应该同时存在,如果服务器使用php5-fpm,那么php5-cgi的进程就不应该被调用,这个问题没有重视,导致了整个问题分析时间冗长,反复。

本质上是服务器的配置错误导致问题。

Ubuntu 14.04使用OpCache提升PHP5.5+程序性能

概述


PHP 5.5以后内建了OpCache,OpCache的加速原理是把编译后的bytecode存储在内存里面, 避免重复编译 PHP 所造成的资源浪费.Ubuntu 14.04默认自带 PHP 5.5.9,已经集成了这个功能。但是默认是不启用的。

启用


修改 php.ini 文件

$ sudo vim /etc/php5/fpm/php.ini
$ sudo vim /etc/php5/cgi/php.ini
$ sudo vim /etc/php5/apache2/php.ini

在文件最后面加入:

; 开关打开
opcache.enable=1
; 可用内存, 酌情而定, 单位 megabytes
opcache.memory_consumption=128
; 对多缓存文件限制, 命中率不到 100% 的话, 可以试着提高这个值
opcache.max_accelerated_files=5000
; Opcache 会在一定时间内去检查文件的修改时间, 这里设置检查的时间周期, 默认为 2, 单位为秒
opcache.revalidate_freq=240

重启服务器

$ sudo service php5-fpm restart
$ sudo service apache2 restart

效果


加速效果极端明显,强烈建议启用这个功能。

Ubuntu 14.04(64位)编译安装PHP7.0.5后编译安装libssh2-php

在使用Ubuntu 14.04(64位)源码编译安装PHP7并配置Apache2支持之后,无法直接通过命令安装libssh2-php,因此需要手工编译安装。

1.安装编译libssh2-php需要的依赖库

$ sudo apt-get install libssh2-1-dev libssh2-1

2.下载libssh2-php的源代码

$ wget https://github.com/Sean-Der/pecl-networking-ssh2/archive/php7.zip

3.解压缩文件

$ unzip php7.zip

4.切换到目录

$ cd pecl-networking-ssh2-php7

5.使用phpize配置插件编译环境

$ /opt/php-7.0.5/bin/phpize

6.配置编译环境

$ ./configure --with-php-config=/opt/php-7.0.5/bin/php-config

7.编译并安装

$ sudo make
$ sudo make install

执行之后,文件被安装到了/opt/php-7.0.5/lib/php/extensions/no-debug-zts-20151012目录下面。

8.配置php.ini加载插件

$ sudo vim /opt/php-7.0.5/etc/php.ini

找到如下内容

;;;;;;;;;;;;;;;;;;;;;;
; Dynamic Extensions ;
;;;;;;;;;;;;;;;;;;;;;;

; If you wish to have an extension loaded automatically, use the following
; syntax:
;
;   extension=modulename.extension
;
; For example, on Windows:
;
;   extension=msql.dll
;
; ... or under UNIX:
;
;   extension=msql.so
;
; ... or with a path:
;
;   extension=/path/to/extension/msql.so
;
; If you only provide the name of the extension, PHP will look for it in its
; default extension directory.
;
; Windows Extensions
; Note that ODBC support is built in, so no dll is needed for it.
; Note that many DLL files are located in the extensions/ (PHP 4) ext/ (PHP 5+)
; extension folders as well as the separate PECL DLL download (PHP 5+).
; Be sure to appropriately set the extension_dir directive.
;
;extension=php_bz2.dll
;extension=php_curl.dll
;extension=php_fileinfo.dll
;extension=php_gd2.dll
;extension=php_gettext.dll
;extension=php_gmp.dll
;extension=php_intl.dll
;extension=php_imap.dll
;extension=php_interbase.dll
;extension=php_ldap.dll
;extension=php_mbstring.dll
;extension=php_exif.dll      ; Must be after mbstring as it depends on it
;extension=php_mysqli.dll
;extension=php_oci8_12c.dll  ; Use with Oracle Database 12c Instant Client
;extension=php_openssl.dll
;extension=php_pdo_firebird.dll
;extension=php_pdo_mysql.dll
;extension=php_pdo_oci.dll
;extension=php_pdo_odbc.dll
;extension=php_pdo_pgsql.dll
;extension=php_pdo_sqlite.dll
;extension=php_pgsql.dll
;extension=php_shmop.dll

; The MIBS data available in the PHP distribution must be installed.
; See http://www.php.net/manual/en/snmp.installation.php
;extension=php_snmp.dll

;extension=php_soap.dll
;extension=php_sockets.dll
;extension=php_sqlite3.dll
;extension=php_tidy.dll
;extension=php_xmlrpc.dll
;extension=php_xsl.dll

在最下面增加

extension=ssh2.so

9.重启Apache2加载动态模块

$ sudo service apache2 restart

Ubuntu 14.04(64位)源码编译安装PHP7并配置Apache2支持

下载PHP7源代码


$ cd ~

$ wget http://cn2.php.net/distributions/php-7.0.5.tar.gz

解压缩到当前目录


$ tar -zxvf php-7.0.5.tar.gz

安装编译需要的依赖


安装libxml2-dev

$ sudo apt-get update

$ sudo apt-get install libxml2-dev

安装gcc

$ sudo apt-get install build-essential

安装依赖的库

$ sudo apt-get install openssl

$ sudo apt-get install libssl-dev

$ sudo apt-get install make

$ sudo apt-get install curl

$ sudo apt-get install libcurl4-gnutls-dev

$ sudo apt-get install libfreetype6-dev

$ sudo apt-get install libjpeg-dev

$ sudo apt-get install libpng-dev

$ sudo apt-get install libmcrypt-dev

$ sudo apt-get install libreadline6 libreadline6-dev

安装apache2-dev,否则无法指定--with-apxs2=/usr/bin/apxs来生成libphp7.so

$ sudo apt-get install apache2-dev

切换到编译目录

$ cd php-7*

配置并编译


配置开启php-fpm支持,开启多线程支持--enable-maintainer-zts,否则无法使用Apache2Event MPM功能。

./configure --prefix=/opt/php-7.0.5 --with-config-file-path=/opt/php-7.0.5/etc --enable-fpm --with-fpm-user=www-data --with-fpm-group=www-data --with-mysql-sock --with-mysqli --with-pdo-mysql --with-iconv-dir --with-freetype-dir --with-jpeg-dir --with-png-dir --with-libxml-dir=/usr --disable-rpath --enable-bcmath --enable-shmop --enable-inline-optimization --with-curl --enable-mbregex --enable-mbstring --enable-ftp --with-gd --enable-gd-native-ttf --enable-sockets --enable-soap --without-pear --with-gettext --disable-fileinfo --enable-maintainer-zts --disable-debug --enable-shared --enable-opcache --enable-pdo --with-iconv --with-mcrypt --with-mhash --with-openssl --enable-xml --with-xmlrpc --with-libxml-dir --enable-pcntl --enable-sysvmsg --enable-sysvsem --enable-sysvshm --with-zlib --enable-zip --with-readline --without-sqlite3 --without-pdo-sqlite --with-libdir=/lib/x86_64-linux-gnu --with-jpeg-dir=/usr/lib --with-apxs2=/usr/bin/apxs --enable-cgi

配置并安装PHP7


$ make && make test

$ make && sudo make install

拷贝PHP7的配置文件


$ cd ~/php-7.0.5

$ cp php.ini-production /opt/php-7.0.5/etc/php.ini

$ cp /opt/php-7.0.5/etc/php-fpm.conf.default /opt/php-7.0.5/etc/php-fpm.conf

$ cp /opt/php-7.0.5/etc/php-fpm.d/www.conf.default /opt/php-7.0.5/etc/php-fpm.d/www.conf

设置PHP7的配置文件php.ini


PHP7已经默认加载opcache.so了,因此不需要声明zend_extension=opcache.so.

######避免PHP信息暴露在http头中
expose_php = Off

######在关闭display_errors后开启PHP错误日志(路径在php-fpm.conf中配置)
log_errors = On

######开启opcache
[opcache]
; Determines if Zend OPCache is enabled
;opcache.enable=0
opcache.enable=1

; Determines if Zend OPCache is enabled for the CLI version of PHP
;opcache.enable_cli=0
opcache.enable_cli=1

启用Apache2PHP7模块


$ sudo a2dismod php5

$ sudo a2enmod php7

$ sudo service apache2 restart

启用Apache2Event模块


$ sudo a2dismod mpm_prefork

$ sudo a2enmod mpm_worker

$ sudo service apache2 restart

参考链接


ubuntu 14.04上源码编译安装php7
How to install PHP 7 as PHP-FPM & FastCGI for ISPConfig 3 on Debian 8 (Jessie)