#pragma once
/*
使用BlowFish进行加解密
*/
//定义全局旧的pbox sbox 都是根据小数来的。
#define N 16
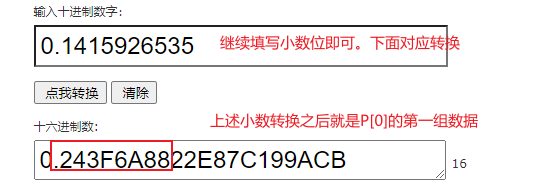
static const unsigned long ORIG_P[16 + 2] = {
0x243F6A88L, 0x85A308D3L, 0x13198A2EL, 0x03707344L,
0xA4093822L, 0x299F31D0L, 0x082EFA98L, 0xEC4E6C89L,
0x452821E6L, 0x38D01377L, 0xBE5466CFL, 0x34E90C6CL,
0xC0AC29B7L, 0xC97C50DDL, 0x3F84D5B5L, 0xB5470917L,
0x9216D5D9L, 0x8979FB1BL
};
static const unsigned long ORIG_S[4][256] = {
{ 0xD1310BA6L, 0x98DFB5ACL, 0x2FFD72DBL, 0xD01ADFB7L,
0xB8E1AFEDL, 0x6A267E96L, 0xBA7C9045L, 0xF12C7F99L,
0x24A19947L, 0xB3916CF7L, 0x0801F2E2L, 0x858EFC16L,
0x636920D8L, 0x71574E69L, 0xA458FEA3L, 0xF4933D7EL,
0x0D95748FL, 0x728EB658L, 0x718BCD58L, 0x82154AEEL,
0x7B54A41DL, 0xC25A59B5L, 0x9C30D539L, 0x2AF26013L,
0xC5D1B023L, 0x286085F0L, 0xCA417918L, 0xB8DB38EFL,
0x8E79DCB0L, 0x603A180EL, 0x6C9E0E8BL, 0xB01E8A3EL,
0xD71577C1L, 0xBD314B27L, 0x78AF2FDAL, 0x55605C60L,
0xE65525F3L, 0xAA55AB94L, 0x57489862L, 0x63E81440L,
0x55CA396AL, 0x2AAB10B6L, 0xB4CC5C34L, 0x1141E8CEL,
0xA15486AFL, 0x7C72E993L, 0xB3EE1411L, 0x636FBC2AL,
0x2BA9C55DL, 0x741831F6L, 0xCE5C3E16L, 0x9B87931EL,
0xAFD6BA33L, 0x6C24CF5CL, 0x7A325381L, 0x28958677L,
0x3B8F4898L, 0x6B4BB9AFL, 0xC4BFE81BL, 0x66282193L,
0x61D809CCL, 0xFB21A991L, 0x487CAC60L, 0x5DEC8032L,
0xEF845D5DL, 0xE98575B1L, 0xDC262302L, 0xEB651B88L,
0x23893E81L, 0xD396ACC5L, 0x0F6D6FF3L, 0x83F44239L,
0x2E0B4482L, 0xA4842004L, 0x69C8F04AL, 0x9E1F9B5EL,
0x21C66842L, 0xF6E96C9AL, 0x670C9C61L, 0xABD388F0L,
0x6A51A0D2L, 0xD8542F68L, 0x960FA728L, 0xAB5133A3L,
0x6EEF0B6CL, 0x137A3BE4L, 0xBA3BF050L, 0x7EFB2A98L,
0xA1F1651DL, 0x39AF0176L, 0x66CA593EL, 0x82430E88L,
0x8CEE8619L, 0x456F9FB4L, 0x7D84A5C3L, 0x3B8B5EBEL,
0xE06F75D8L, 0x85C12073L, 0x401A449FL, 0x56C16AA6L,
0x4ED3AA62L, 0x363F7706L, 0x1BFEDF72L, 0x429B023DL,
0x37D0D724L, 0xD00A1248L, 0xDB0FEAD3L, 0x49F1C09BL,
0x075372C9L, 0x80991B7BL, 0x25D479D8L, 0xF6E8DEF7L,
0xE3FE501AL, 0xB6794C3BL, 0x976CE0BDL, 0x04C006BAL,
0xC1A94FB6L, 0x409F60C4L, 0x5E5C9EC2L, 0x196A2463L,
0x68FB6FAFL, 0x3E6C53B5L, 0x1339B2EBL, 0x3B52EC6FL,
0x6DFC511FL, 0x9B30952CL, 0xCC814544L, 0xAF5EBD09L,
0xBEE3D004L, 0xDE334AFDL, 0x660F2807L, 0x192E4BB3L,
0xC0CBA857L, 0x45C8740FL, 0xD20B5F39L, 0xB9D3FBDBL,
0x5579C0BDL, 0x1A60320AL, 0xD6A100C6L, 0x402C7279L,
0x679F25FEL, 0xFB1FA3CCL, 0x8EA5E9F8L, 0xDB3222F8L,
0x3C7516DFL, 0xFD616B15L, 0x2F501EC8L, 0xAD0552ABL,
0x323DB5FAL, 0xFD238760L, 0x53317B48L, 0x3E00DF82L,
0x9E5C57BBL, 0xCA6F8CA0L, 0x1A87562EL, 0xDF1769DBL,
0xD542A8F6L, 0x287EFFC3L, 0xAC6732C6L, 0x8C4F5573L,
0x695B27B0L, 0xBBCA58C8L, 0xE1FFA35DL, 0xB8F011A0L,
0x10FA3D98L, 0xFD2183B8L, 0x4AFCB56CL, 0x2DD1D35BL,
0x9A53E479L, 0xB6F84565L, 0xD28E49BCL, 0x4BFB9790L,
0xE1DDF2DAL, 0xA4CB7E33L, 0x62FB1341L, 0xCEE4C6E8L,
0xEF20CADAL, 0x36774C01L, 0xD07E9EFEL, 0x2BF11FB4L,
0x95DBDA4DL, 0xAE909198L, 0xEAAD8E71L, 0x6B93D5A0L,
0xD08ED1D0L, 0xAFC725E0L, 0x8E3C5B2FL, 0x8E7594B7L,
0x8FF6E2FBL, 0xF2122B64L, 0x8888B812L, 0x900DF01CL,
0x4FAD5EA0L, 0x688FC31CL, 0xD1CFF191L, 0xB3A8C1ADL,
0x2F2F2218L, 0xBE0E1777L, 0xEA752DFEL, 0x8B021FA1L,
0xE5A0CC0FL, 0xB56F74E8L, 0x18ACF3D6L, 0xCE89E299L,
0xB4A84FE0L, 0xFD13E0B7L, 0x7CC43B81L, 0xD2ADA8D9L,
0x165FA266L, 0x80957705L, 0x93CC7314L, 0x211A1477L,
0xE6AD2065L, 0x77B5FA86L, 0xC75442F5L, 0xFB9D35CFL,
0xEBCDAF0CL, 0x7B3E89A0L, 0xD6411BD3L, 0xAE1E7E49L,
0x00250E2DL, 0x2071B35EL, 0x226800BBL, 0x57B8E0AFL,
0x2464369BL, 0xF009B91EL, 0x5563911DL, 0x59DFA6AAL,
0x78C14389L, 0xD95A537FL, 0x207D5BA2L, 0x02E5B9C5L,
0x83260376L, 0x6295CFA9L, 0x11C81968L, 0x4E734A41L,
0xB3472DCAL, 0x7B14A94AL, 0x1B510052L, 0x9A532915L,
0xD60F573FL, 0xBC9BC6E4L, 0x2B60A476L, 0x81E67400L,
0x08BA6FB5L, 0x571BE91FL, 0xF296EC6BL, 0x2A0DD915L,
0xB6636521L, 0xE7B9F9B6L, 0xFF34052EL, 0xC5855664L,
0x53B02D5DL, 0xA99F8FA1L, 0x08BA4799L, 0x6E85076AL },
{ 0x4B7A70E9L, 0xB5B32944L, 0xDB75092EL, 0xC4192623L,
0xAD6EA6B0L, 0x49A7DF7DL, 0x9CEE60B8L, 0x8FEDB266L,
0xECAA8C71L, 0x699A17FFL, 0x5664526CL, 0xC2B19EE1L,
0x193602A5L, 0x75094C29L, 0xA0591340L, 0xE4183A3EL,
0x3F54989AL, 0x5B429D65L, 0x6B8FE4D6L, 0x99F73FD6L,
0xA1D29C07L, 0xEFE830F5L, 0x4D2D38E6L, 0xF0255DC1L,
0x4CDD2086L, 0x8470EB26L, 0x6382E9C6L, 0x021ECC5EL,
0x09686B3FL, 0x3EBAEFC9L, 0x3C971814L, 0x6B6A70A1L,
0x687F3584L, 0x52A0E286L, 0xB79C5305L, 0xAA500737L,
0x3E07841CL, 0x7FDEAE5CL, 0x8E7D44ECL, 0x5716F2B8L,
0xB03ADA37L, 0xF0500C0DL, 0xF01C1F04L, 0x0200B3FFL,
0xAE0CF51AL, 0x3CB574B2L, 0x25837A58L, 0xDC0921BDL,
0xD19113F9L, 0x7CA92FF6L, 0x94324773L, 0x22F54701L,
0x3AE5E581L, 0x37C2DADCL, 0xC8B57634L, 0x9AF3DDA7L,
0xA9446146L, 0x0FD0030EL, 0xECC8C73EL, 0xA4751E41L,
0xE238CD99L, 0x3BEA0E2FL, 0x3280BBA1L, 0x183EB331L,
0x4E548B38L, 0x4F6DB908L, 0x6F420D03L, 0xF60A04BFL,
0x2CB81290L, 0x24977C79L, 0x5679B072L, 0xBCAF89AFL,
0xDE9A771FL, 0xD9930810L, 0xB38BAE12L, 0xDCCF3F2EL,
0x5512721FL, 0x2E6B7124L, 0x501ADDE6L, 0x9F84CD87L,
0x7A584718L, 0x7408DA17L, 0xBC9F9ABCL, 0xE94B7D8CL,
0xEC7AEC3AL, 0xDB851DFAL, 0x63094366L, 0xC464C3D2L,
0xEF1C1847L, 0x3215D908L, 0xDD433B37L, 0x24C2BA16L,
0x12A14D43L, 0x2A65C451L, 0x50940002L, 0x133AE4DDL,
0x71DFF89EL, 0x10314E55L, 0x81AC77D6L, 0x5F11199BL,
0x043556F1L, 0xD7A3C76BL, 0x3C11183BL, 0x5924A509L,
0xF28FE6EDL, 0x97F1FBFAL, 0x9EBABF2CL, 0x1E153C6EL,
0x86E34570L, 0xEAE96FB1L, 0x860E5E0AL, 0x5A3E2AB3L,
0x771FE71CL, 0x4E3D06FAL, 0x2965DCB9L, 0x99E71D0FL,
0x803E89D6L, 0x5266C825L, 0x2E4CC978L, 0x9C10B36AL,
0xC6150EBAL, 0x94E2EA78L, 0xA5FC3C53L, 0x1E0A2DF4L,
0xF2F74EA7L, 0x361D2B3DL, 0x1939260FL, 0x19C27960L,
0x5223A708L, 0xF71312B6L, 0xEBADFE6EL, 0xEAC31F66L,
0xE3BC4595L, 0xA67BC883L, 0xB17F37D1L, 0x018CFF28L,
0xC332DDEFL, 0xBE6C5AA5L, 0x65582185L, 0x68AB9802L,
0xEECEA50FL, 0xDB2F953BL, 0x2AEF7DADL, 0x5B6E2F84L,
0x1521B628L, 0x29076170L, 0xECDD4775L, 0x619F1510L,
0x13CCA830L, 0xEB61BD96L, 0x0334FE1EL, 0xAA0363CFL,
0xB5735C90L, 0x4C70A239L, 0xD59E9E0BL, 0xCBAADE14L,
0xEECC86BCL, 0x60622CA7L, 0x9CAB5CABL, 0xB2F3846EL,
0x648B1EAFL, 0x19BDF0CAL, 0xA02369B9L, 0x655ABB50L,
0x40685A32L, 0x3C2AB4B3L, 0x319EE9D5L, 0xC021B8F7L,
0x9B540B19L, 0x875FA099L, 0x95F7997EL, 0x623D7DA8L,
0xF837889AL, 0x97E32D77L, 0x11ED935FL, 0x16681281L,
0x0E358829L, 0xC7E61FD6L, 0x96DEDFA1L, 0x7858BA99L,
0x57F584A5L, 0x1B227263L, 0x9B83C3FFL, 0x1AC24696L,
0xCDB30AEBL, 0x532E3054L, 0x8FD948E4L, 0x6DBC3128L,
0x58EBF2EFL, 0x34C6FFEAL, 0xFE28ED61L, 0xEE7C3C73L,
0x5D4A14D9L, 0xE864B7E3L, 0x42105D14L, 0x203E13E0L,
0x45EEE2B6L, 0xA3AAABEAL, 0xDB6C4F15L, 0xFACB4FD0L,
0xC742F442L, 0xEF6ABBB5L, 0x654F3B1DL, 0x41CD2105L,
0xD81E799EL, 0x86854DC7L, 0xE44B476AL, 0x3D816250L,
0xCF62A1F2L, 0x5B8D2646L, 0xFC8883A0L, 0xC1C7B6A3L,
0x7F1524C3L, 0x69CB7492L, 0x47848A0BL, 0x5692B285L,
0x095BBF00L, 0xAD19489DL, 0x1462B174L, 0x23820E00L,
0x58428D2AL, 0x0C55F5EAL, 0x1DADF43EL, 0x233F7061L,
0x3372F092L, 0x8D937E41L, 0xD65FECF1L, 0x6C223BDBL,
0x7CDE3759L, 0xCBEE7460L, 0x4085F2A7L, 0xCE77326EL,
0xA6078084L, 0x19F8509EL, 0xE8EFD855L, 0x61D99735L,
0xA969A7AAL, 0xC50C06C2L, 0x5A04ABFCL, 0x800BCADCL,
0x9E447A2EL, 0xC3453484L, 0xFDD56705L, 0x0E1E9EC9L,
0xDB73DBD3L, 0x105588CDL, 0x675FDA79L, 0xE3674340L,
0xC5C43465L, 0x713E38D8L, 0x3D28F89EL, 0xF16DFF20L,
0x153E21E7L, 0x8FB03D4AL, 0xE6E39F2BL, 0xDB83ADF7L },
{ 0xE93D5A68L, 0x948140F7L, 0xF64C261CL, 0x94692934L,
0x411520F7L, 0x7602D4F7L, 0xBCF46B2EL, 0xD4A20068L,
0xD4082471L, 0x3320F46AL, 0x43B7D4B7L, 0x500061AFL,
0x1E39F62EL, 0x97244546L, 0x14214F74L, 0xBF8B8840L,
0x4D95FC1DL, 0x96B591AFL, 0x70F4DDD3L, 0x66A02F45L,
0xBFBC09ECL, 0x03BD9785L, 0x7FAC6DD0L, 0x31CB8504L,
0x96EB27B3L, 0x55FD3941L, 0xDA2547E6L, 0xABCA0A9AL,
0x28507825L, 0x530429F4L, 0x0A2C86DAL, 0xE9B66DFBL,
0x68DC1462L, 0xD7486900L, 0x680EC0A4L, 0x27A18DEEL,
0x4F3FFEA2L, 0xE887AD8CL, 0xB58CE006L, 0x7AF4D6B6L,
0xAACE1E7CL, 0xD3375FECL, 0xCE78A399L, 0x406B2A42L,
0x20FE9E35L, 0xD9F385B9L, 0xEE39D7ABL, 0x3B124E8BL,
0x1DC9FAF7L, 0x4B6D1856L, 0x26A36631L, 0xEAE397B2L,
0x3A6EFA74L, 0xDD5B4332L, 0x6841E7F7L, 0xCA7820FBL,
0xFB0AF54EL, 0xD8FEB397L, 0x454056ACL, 0xBA489527L,
0x55533A3AL, 0x20838D87L, 0xFE6BA9B7L, 0xD096954BL,
0x55A867BCL, 0xA1159A58L, 0xCCA92963L, 0x99E1DB33L,
0xA62A4A56L, 0x3F3125F9L, 0x5EF47E1CL, 0x9029317CL,
0xFDF8E802L, 0x04272F70L, 0x80BB155CL, 0x05282CE3L,
0x95C11548L, 0xE4C66D22L, 0x48C1133FL, 0xC70F86DCL,
0x07F9C9EEL, 0x41041F0FL, 0x404779A4L, 0x5D886E17L,
0x325F51EBL, 0xD59BC0D1L, 0xF2BCC18FL, 0x41113564L,
0x257B7834L, 0x602A9C60L, 0xDFF8E8A3L, 0x1F636C1BL,
0x0E12B4C2L, 0x02E1329EL, 0xAF664FD1L, 0xCAD18115L,
0x6B2395E0L, 0x333E92E1L, 0x3B240B62L, 0xEEBEB922L,
0x85B2A20EL, 0xE6BA0D99L, 0xDE720C8CL, 0x2DA2F728L,
0xD0127845L, 0x95B794FDL, 0x647D0862L, 0xE7CCF5F0L,
0x5449A36FL, 0x877D48FAL, 0xC39DFD27L, 0xF33E8D1EL,
0x0A476341L, 0x992EFF74L, 0x3A6F6EABL, 0xF4F8FD37L,
0xA812DC60L, 0xA1EBDDF8L, 0x991BE14CL, 0xDB6E6B0DL,
0xC67B5510L, 0x6D672C37L, 0x2765D43BL, 0xDCD0E804L,
0xF1290DC7L, 0xCC00FFA3L, 0xB5390F92L, 0x690FED0BL,
0x667B9FFBL, 0xCEDB7D9CL, 0xA091CF0BL, 0xD9155EA3L,
0xBB132F88L, 0x515BAD24L, 0x7B9479BFL, 0x763BD6EBL,
0x37392EB3L, 0xCC115979L, 0x8026E297L, 0xF42E312DL,
0x6842ADA7L, 0xC66A2B3BL, 0x12754CCCL, 0x782EF11CL,
0x6A124237L, 0xB79251E7L, 0x06A1BBE6L, 0x4BFB6350L,
0x1A6B1018L, 0x11CAEDFAL, 0x3D25BDD8L, 0xE2E1C3C9L,
0x44421659L, 0x0A121386L, 0xD90CEC6EL, 0xD5ABEA2AL,
0x64AF674EL, 0xDA86A85FL, 0xBEBFE988L, 0x64E4C3FEL,
0x9DBC8057L, 0xF0F7C086L, 0x60787BF8L, 0x6003604DL,
0xD1FD8346L, 0xF6381FB0L, 0x7745AE04L, 0xD736FCCCL,
0x83426B33L, 0xF01EAB71L, 0xB0804187L, 0x3C005E5FL,
0x77A057BEL, 0xBDE8AE24L, 0x55464299L, 0xBF582E61L,
0x4E58F48FL, 0xF2DDFDA2L, 0xF474EF38L, 0x8789BDC2L,
0x5366F9C3L, 0xC8B38E74L, 0xB475F255L, 0x46FCD9B9L,
0x7AEB2661L, 0x8B1DDF84L, 0x846A0E79L, 0x915F95E2L,
0x466E598EL, 0x20B45770L, 0x8CD55591L, 0xC902DE4CL,
0xB90BACE1L, 0xBB8205D0L, 0x11A86248L, 0x7574A99EL,
0xB77F19B6L, 0xE0A9DC09L, 0x662D09A1L, 0xC4324633L,
0xE85A1F02L, 0x09F0BE8CL, 0x4A99A025L, 0x1D6EFE10L,
0x1AB93D1DL, 0x0BA5A4DFL, 0xA186F20FL, 0x2868F169L,
0xDCB7DA83L, 0x573906FEL, 0xA1E2CE9BL, 0x4FCD7F52L,
0x50115E01L, 0xA70683FAL, 0xA002B5C4L, 0x0DE6D027L,
0x9AF88C27L, 0x773F8641L, 0xC3604C06L, 0x61A806B5L,
0xF0177A28L, 0xC0F586E0L, 0x006058AAL, 0x30DC7D62L,
0x11E69ED7L, 0x2338EA63L, 0x53C2DD94L, 0xC2C21634L,
0xBBCBEE56L, 0x90BCB6DEL, 0xEBFC7DA1L, 0xCE591D76L,
0x6F05E409L, 0x4B7C0188L, 0x39720A3DL, 0x7C927C24L,
0x86E3725FL, 0x724D9DB9L, 0x1AC15BB4L, 0xD39EB8FCL,
0xED545578L, 0x08FCA5B5L, 0xD83D7CD3L, 0x4DAD0FC4L,
0x1E50EF5EL, 0xB161E6F8L, 0xA28514D9L, 0x6C51133CL,
0x6FD5C7E7L, 0x56E14EC4L, 0x362ABFCEL, 0xDDC6C837L,
0xD79A3234L, 0x92638212L, 0x670EFA8EL, 0x406000E0L },
{ 0x3A39CE37L, 0xD3FAF5CFL, 0xABC27737L, 0x5AC52D1BL,
0x5CB0679EL, 0x4FA33742L, 0xD3822740L, 0x99BC9BBEL,
0xD5118E9DL, 0xBF0F7315L, 0xD62D1C7EL, 0xC700C47BL,
0xB78C1B6BL, 0x21A19045L, 0xB26EB1BEL, 0x6A366EB4L,
0x5748AB2FL, 0xBC946E79L, 0xC6A376D2L, 0x6549C2C8L,
0x530FF8EEL, 0x468DDE7DL, 0xD5730A1DL, 0x4CD04DC6L,
0x2939BBDBL, 0xA9BA4650L, 0xAC9526E8L, 0xBE5EE304L,
0xA1FAD5F0L, 0x6A2D519AL, 0x63EF8CE2L, 0x9A86EE22L,
0xC089C2B8L, 0x43242EF6L, 0xA51E03AAL, 0x9CF2D0A4L,
0x83C061BAL, 0x9BE96A4DL, 0x8FE51550L, 0xBA645BD6L,
0x2826A2F9L, 0xA73A3AE1L, 0x4BA99586L, 0xEF5562E9L,
0xC72FEFD3L, 0xF752F7DAL, 0x3F046F69L, 0x77FA0A59L,
0x80E4A915L, 0x87B08601L, 0x9B09E6ADL, 0x3B3EE593L,
0xE990FD5AL, 0x9E34D797L, 0x2CF0B7D9L, 0x022B8B51L,
0x96D5AC3AL, 0x017DA67DL, 0xD1CF3ED6L, 0x7C7D2D28L,
0x1F9F25CFL, 0xADF2B89BL, 0x5AD6B472L, 0x5A88F54CL,
0xE029AC71L, 0xE019A5E6L, 0x47B0ACFDL, 0xED93FA9BL,
0xE8D3C48DL, 0x283B57CCL, 0xF8D56629L, 0x79132E28L,
0x785F0191L, 0xED756055L, 0xF7960E44L, 0xE3D35E8CL,
0x15056DD4L, 0x88F46DBAL, 0x03A16125L, 0x0564F0BDL,
0xC3EB9E15L, 0x3C9057A2L, 0x97271AECL, 0xA93A072AL,
0x1B3F6D9BL, 0x1E6321F5L, 0xF59C66FBL, 0x26DCF319L,
0x7533D928L, 0xB155FDF5L, 0x03563482L, 0x8ABA3CBBL,
0x28517711L, 0xC20AD9F8L, 0xABCC5167L, 0xCCAD925FL,
0x4DE81751L, 0x3830DC8EL, 0x379D5862L, 0x9320F991L,
0xEA7A90C2L, 0xFB3E7BCEL, 0x5121CE64L, 0x774FBE32L,
0xA8B6E37EL, 0xC3293D46L, 0x48DE5369L, 0x6413E680L,
0xA2AE0810L, 0xDD6DB224L, 0x69852DFDL, 0x09072166L,
0xB39A460AL, 0x6445C0DDL, 0x586CDECFL, 0x1C20C8AEL,
0x5BBEF7DDL, 0x1B588D40L, 0xCCD2017FL, 0x6BB4E3BBL,
0xDDA26A7EL, 0x3A59FF45L, 0x3E350A44L, 0xBCB4CDD5L,
0x72EACEA8L, 0xFA6484BBL, 0x8D6612AEL, 0xBF3C6F47L,
0xD29BE463L, 0x542F5D9EL, 0xAEC2771BL, 0xF64E6370L,
0x740E0D8DL, 0xE75B1357L, 0xF8721671L, 0xAF537D5DL,
0x4040CB08L, 0x4EB4E2CCL, 0x34D2466AL, 0x0115AF84L,
0xE1B00428L, 0x95983A1DL, 0x06B89FB4L, 0xCE6EA048L,
0x6F3F3B82L, 0x3520AB82L, 0x011A1D4BL, 0x277227F8L,
0x611560B1L, 0xE7933FDCL, 0xBB3A792BL, 0x344525BDL,
0xA08839E1L, 0x51CE794BL, 0x2F32C9B7L, 0xA01FBAC9L,
0xE01CC87EL, 0xBCC7D1F6L, 0xCF0111C3L, 0xA1E8AAC7L,
0x1A908749L, 0xD44FBD9AL, 0xD0DADECBL, 0xD50ADA38L,
0x0339C32AL, 0xC6913667L, 0x8DF9317CL, 0xE0B12B4FL,
0xF79E59B7L, 0x43F5BB3AL, 0xF2D519FFL, 0x27D9459CL,
0xBF97222CL, 0x15E6FC2AL, 0x0F91FC71L, 0x9B941525L,
0xFAE59361L, 0xCEB69CEBL, 0xC2A86459L, 0x12BAA8D1L,
0xB6C1075EL, 0xE3056A0CL, 0x10D25065L, 0xCB03A442L,
0xE0EC6E0EL, 0x1698DB3BL, 0x4C98A0BEL, 0x3278E964L,
0x9F1F9532L, 0xE0D392DFL, 0xD3A0342BL, 0x8971F21EL,
0x1B0A7441L, 0x4BA3348CL, 0xC5BE7120L, 0xC37632D8L,
0xDF359F8DL, 0x9B992F2EL, 0xE60B6F47L, 0x0FE3F11DL,
0xE54CDA54L, 0x1EDAD891L, 0xCE6279CFL, 0xCD3E7E6FL,
0x1618B166L, 0xFD2C1D05L, 0x848FD2C5L, 0xF6FB2299L,
0xF523F357L, 0xA6327623L, 0x93A83531L, 0x56CCCD02L,
0xACF08162L, 0x5A75EBB5L, 0x6E163697L, 0x88D273CCL,
0xDE966292L, 0x81B949D0L, 0x4C50901BL, 0x71C65614L,
0xE6C6C7BDL, 0x327A140AL, 0x45E1D006L, 0xC3F27B9AL,
0xC9AA53FDL, 0x62A80F00L, 0xBB25BFE2L, 0x35BDD2F6L,
0x71126905L, 0xB2040222L, 0xB6CBCF7CL, 0xCD769C2BL,
0x53113EC0L, 0x1640E3D3L, 0x38ABBD60L, 0x2547ADF0L,
0xBA38209CL, 0xF746CE76L, 0x77AFA1C5L, 0x20756060L,
0x85CBFE4EL, 0x8AE88DD8L, 0x7AAAF9B0L, 0x4CF9AA7EL,
0x1948C25CL, 0x02FB8A8CL, 0x01C36AE4L, 0xD6EBE1F9L,
0x90D4F869L, 0xA65CDEA0L, 0x3F09252DL, 0xC208E69FL,
0xB74E6132L, 0xCE77E25BL, 0x578FDFE3L, 0x3AC372E6L }
};
#define N 16
//定义初始化需要用到的加密结构
typedef struct _BLOWFISH_CTX
{
//定义初始化的pbox 以及 sbox 在程序中进行初始化
unsigned int pbox[N + 2]; //总共18
unsigned int sbox[4][256];
}BLOWFISH_CTX,*PBLOWFISH_CTX;
/*
初始化函数 此函数功能如下
1.接受key 与 keylen参数(当然keylen)可以自己计算
2.初始化sbox 将全局的sbox的内容复制到CTX中的sbox中
3.初始化pbox pbox的初始化方法如下
1.迭代18论。然后每一轮都设置CTX的pbox
2.CTX.pbox需要使用全局pbox ^ data
3.data是一个四字节整数。其中存储的就是key的四个字节。
key = "12345678abc"
每一轮中 data = "1234"
data = "5678"
data = "abc1" //注意这里当超出keylen的时候。 data获取的key要从0开始
。。。。
*/
bool BlowFishInit(BLOWFISH_CTX* blowCtx, unsigned char*key, unsigned int keylen);
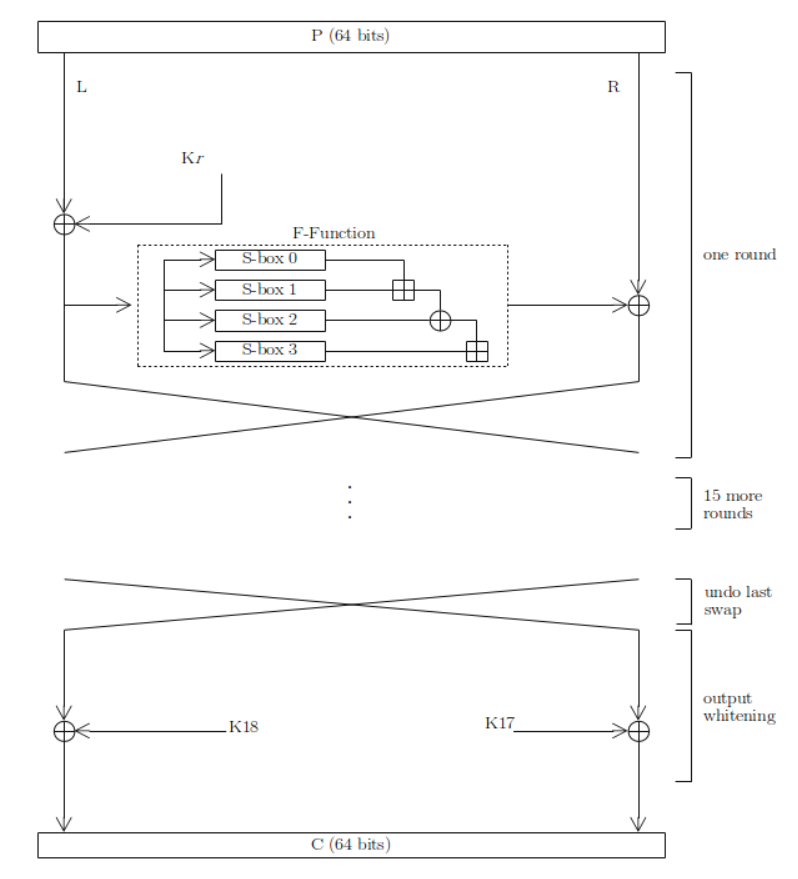
/*
F函数
F函数是将一个32位数分别进行拆分。 拆分为四组。 每一组都作为sbox的索引值
然后进行下列运算
((s1[a] + s2[b]) ^ s3[c]) + s4[d]
在编程中sbox是数组是从零开始。 所以s1 对应s[0] s2对应s[1]
在编程中总结下公式:
temap = s[0][a] + s[1][b]
teamp = temp ^ s[2][c]'
temp = temp + s[3][d]
简单的记住就是 ((a+b) ^ c)+d;
当然每个都对应下标为 0 1 2 3 s[0][a] s[1][b] s[2][c] s[3][d]
最后返回结果值 return temp
*/
static unsigned long F(BLOWFISH_CTX* ctx, unsigned long x);
//signed int F(PBLOWFISH_CTX blowCtx,unsigned int Data);
/*
加密函数:
首次用在初始化中是对一个64位0进行加密。
一次加密八个字节
核心思想为 加密左边与右边数据
左边数据直接 ^ PBOX
右边数据 = 右边数据 ^ f(左边数据)
然后进行交换。
以上是16轮的交换
剩下一轮则是
左边 = 左边^PBOX[N+1]
右边 = 右边^pbox[N]
最后设置相关数值
*/
void BlowFish_Encry(PBLOWFISH_CTX blowCtx, unsigned int* left, unsigned int* right);
/*
跟加密一样。只不过结果相反步骤如下:
首先遍历从最后一轮开始逐次递减
最后一轮数据 右边= 右边^PBOX[1] 左边数据 = 左边数据 ^pbox[0]
*/
void BlowFish_Decrypt(PBLOWFISH_CTX blowCtx, unsigned int* left, unsigned int* right);