到了Vue 3,当我们看完组合式 API相关文档,蠢蠢欲动立马上手把业务代码挪到setup内时,竟发现无法在setup()内部通过 this 获取当前组件实例了(this 是 undefined)!
其实想要变相获取“this”可以用 getCurrentInstance ,比如像这样访问全局属性:
|
1 2 3 4 5 6 7 8 9 10 11 12 13 14 15 16 |
import { getCurrentInstance } from 'vue' const MyComponent = { setup() { const user = ref('aizawasayo') const internalInstance = getCurrentInstance() console.log(this) // undefined // 1. 访问 globalProperties console.log(internalInstance.appContext.config.globalProperties) // 2. 当前组件实例真正内容 console.log(internalInstance.ctx, internalInstance.proxy) return { user } } } |
真正属于组件的内容是ctx和proxy,proxy就是对ctx包装了一层 Proxy。目前看来属实没用,就不展开来说了。
getCurrentInstance 只能在 setup 或生命周期钩子中调用。不仅使用起来麻烦,且只适用于开发环境。官方都告知我们日常开发中不要用:

貌似到头来this的问题还是无解。Vue 3 Composition API 的设计初衷也是为了减少对组件实例的依赖,避免this指向的困扰。包括一些全局方法也可以提取到 composables 组合函数中,无需再通过当前组件的原型链获得。我们动不动就通过this获取组件实例的思想该转变了。
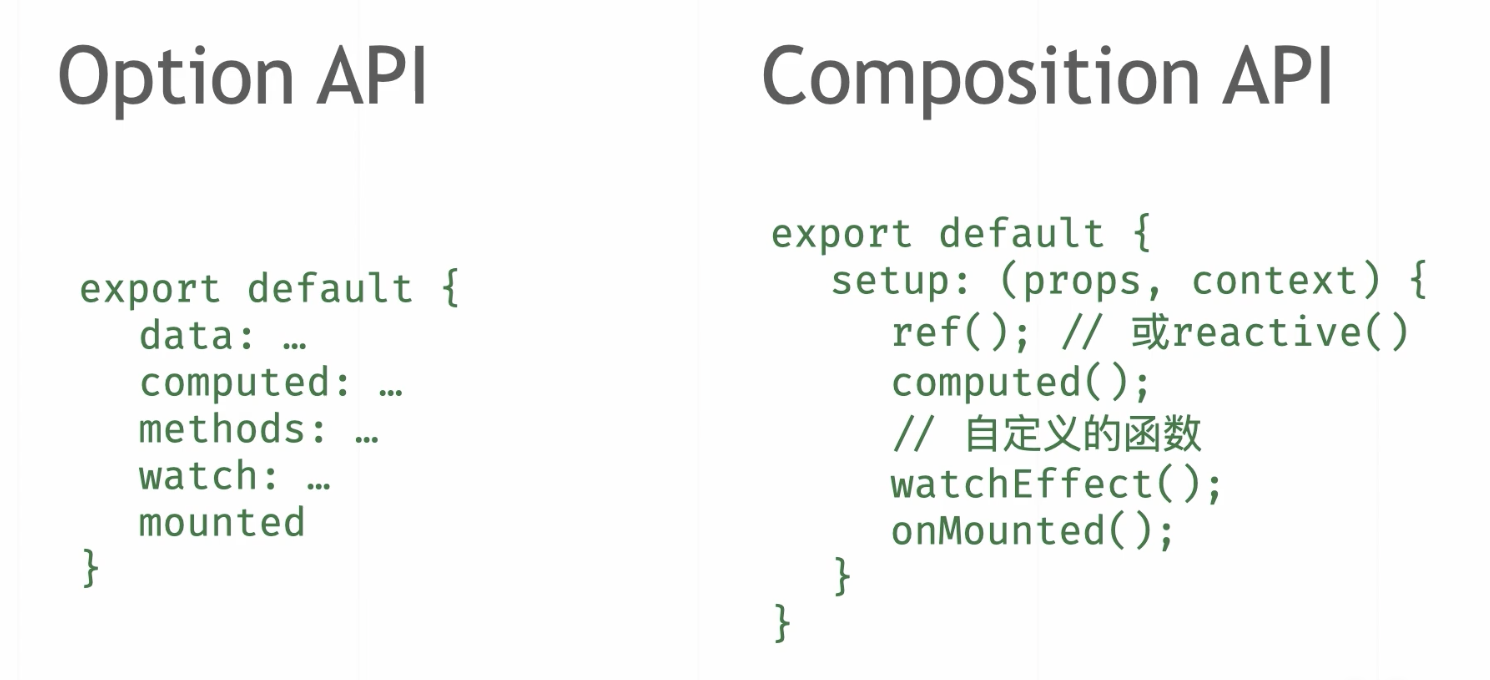
怎么个直接使用法?我们先看一眼简易版 选项式 API 和 组合式 API 的对比。再用例子来捋:
1. 读写数据
Vue 2的做法,或者说Option API更准确 (后面就简写成Vue 2)
data中定义,this.xxx获取
<template>模版中不需要用this
|
1 2 3 4 5 6 7 8 9 10 11 12 13 14 15 16 17 18 19 20 21 22 23 24 25 26 27 |
<script> import { getUsers } from '@/api/user' export default { name: 'User', data: { return { listLoading: false, list: [], total: 0, queryInfo: { query: '', page: 1, pageSize: 10 }, emptyText: '没有相关数据', } }, mounted() { this.listLoading = true getUsers(this.queryInfo).then(response => { this.list = response.data.list this.total = response.data.total this.listLoading = false }) } } </script> |
Vue 3 的 Composition API (后面就简写成 Vue 3)
用ref reactive定义。
通过ref方法定义的属性在 setup 函数内需要通过.value去访问它的值 (template 模版内不用), reactive则不用。我们可以简单地把 ref(obj) 理解为 reactive({ value: obj })。
详细请看 ➡️ 【Vue 3 之:弄清 ref reactive toRef toRefs】
如何选择 ref 和 reactive?建议:
- 基础类型值(
String、Number、Boolean等) 或单值对象(类似{ count: 3 }这样只有一个属性值的对象) 使用ref - 引用类型值(
Object、Array)使用reactive - 对于 ref 对象可以使用 unref 语法糖来免去
.value访问的困扰
|
1 2 3 4 5 6 7 8 9 10 11 12 13 14 15 16 17 18 19 20 21 22 23 24 25 26 27 28 29 30 31 32 33 34 |
<script> import { ref, reactive, onMounted } from 'vue' export default { name: 'User', setup() { const listLoading = ref(false) const list = ref([]), const total = ref(0), const queryInfo = reactive({ query: '', page: 1, pageSize: 10 }) const emptyText = ref('没有相关数据') onMounted(() => { listLoading.value = true getUsers(queryInfo).then(response => { list.value = response.data.list total.value = response.data.total listLoading.value = false }) }) return { listLoading, list, total, queryInfo, emptyText } } } </script> |
2. 定义/调用方法
Vue 2:methods
继续上面的例子,我们把请求列表数据的操作提取成一个方法。(略去重复的代码)
|
1 2 3 4 5 6 7 8 9 10 11 12 13 14 15 16 17 18 19 20 21 22 23 |
<!--模版中调用 methods 方法--> <template> <button @click="show('🐸')">触发 show</button> </template> <script> export default { methods: { async getList(params) { // 1.定义 this.listLoading = true const response = await getUsers(params) this.list = response.data.list this.total = response.data.total this.listLoading = false }, show(msg){ console.log('helo', msg) } }, mounted() { this.getList(this.queryInfo) // 2. 使用 } } </script> |
Vue 3
|
1 2 3 4 5 6 7 8 9 10 11 12 13 14 15 16 17 18 |
<script> import { onMounted } from 'vue' export default { setup() { const getList = async (params) => { // 1.定义 listLoading.value = true const response = await getUsers(params) list.value = response.data.list total.value = response.data.total listLoading.value = false } onMounted(() => { getList(queryInfo) // 2. 使用 }) } } </script> |
3. 获取模版DOM元素/或组件实例的引用
Vue 2
直接整上 element-plus Form 表单 的的例子,<el-form>是我们写的DemoForm组件的一个子组件,通过为它添加一个refattribute,就能使用使用this.$refs[ref值]直接访问子组件以及它的所有属性/方法了。
这边只放相对实际的场景用例,给 DOM 元素添加 ref 引用的例子看这里:【模板引用】。
|
1 2 3 4 5 6 7 8 9 10 11 12 13 14 15 16 17 18 19 20 21 22 23 24 25 26 27 28 29 30 31 32 33 34 35 36 37 38 39 40 41 42 |
<template> <el-form :model="formData" ref="formRef"> <el-form-item label="年龄" prop="age" :rules="formRules"> <el-input type="age" v-model.number="formData.age"></el-input> </el-form-item> <el-form-item> <el-button type="primary" @click="submitForm">提交</el-button> <el-button @click="resetForm">重置</el-button> </el-form-item> </el-form> </template> <script> export default { name: 'DemoForm', data() { return { formData: { age: '', }, formRules: [ { required: true, message: '年龄不能为空' }, { type: 'number', message: '年龄必须为数字值' }, ], } }, methods: { submitForm() { this.$refs.formRef.validate(valid => { if (valid) { alert('submit!') } else { console.log('error submit!!') return false } }) }, resetForm() { this.$refs.formRef.resetFields() }, }, } </script> |
Vue 3
我们来修改成 Composition API 版本:
别忘了 ref 创建的变量要用.value获取值
详细文档请阅:【在组合式 API 中使用 template refs】
|
1 2 3 4 5 6 7 8 9 10 11 12 13 14 15 16 17 18 19 20 21 22 23 24 25 26 27 28 29 30 31 32 33 34 35 36 37 38 39 40 41 42 43 44 45 46 47 48 49 50 51 |
<template> <el-form :model="formData" ref="formRef"> <el-form-item label="年龄" prop="age" :rules="formRules"> <el-input type="age" v-model.number="formData.age"></el-input> </el-form-item> <el-form-item> <el-button type="primary" @click="submitForm">提交</el-button> <el-button @click="resetForm">重置</el-button> </el-form-item> </el-form> </template> <script> import { reactive, ref } from '@vue/reactivity' export default { setup() { const formRef = ref(null) // 1.用 ref 创建一个空引用 const formData = reactive({ age: '', }) const formRules = [ { required: true, message: '年龄不能为空' }, { type: 'number', message: '年龄必须为数字值' }, ] onMounted(() => { // 2.组件实例将在初始渲染后分配给 ref console.log(formRef.value) }) const submitForm = () => { // 别忘了 ref 创建的变量要用`.value`获取值 formRef.value.validate(valid => { if (valid) { alert('submit!') } else { console.log('error submit!!') return false } }) } const resetForm = () => { formRef.value.resetFields() } return { formRef, formData, formRules, submitForm, resetForm, } }, } </script> |
4. 父组件向子组件传值
文档:Props
使用 DOM 模板时,camelCase (驼峰命名法) 的 props 需要使用等价的 kebab-case (短横线分隔命名) 命名。
说明:第 4-8 点 都会结合同一个 Tabs 标签页的例子,循序渐进梳理这几个属性或方法。依然用了element-plus 的组件(
Tabs和TabPane)。

Vue 2
父组件:📃src/views/design/indexV2.vue
|
1 2 3 4 5 6 7 8 9 10 11 12 13 14 15 16 17 18 19 20 21 22 23 24 25 26 27 28 |
// src/views/design/indexV2.vue <template> <div style="padding: 15px"> <!-- 可以动态赋予一个变量的值 --> <!-- 也可以不用`:`传入一个静态的值 --> <design-tabs :tab-options="tabOptions" :active-tab="activeName" ></design-tabs> </div> </template> <script> import DesignTabs from './DesignTabsV2.vue' export default { name: 'DesignV2', components: { DesignTabs }, data() { return { tabOptions: [ { label: '衣服', key: 'clothingDesign', icon: 'cherry' }, { label: '帽子', key: 'hatDesign', icon: 'cold-drink' }, { label: '图案', key: 'patternDesign', icon: 'lollipop' }, ], activeName: 'clothingDesign', } }, } </script> |
子组件 DesignTabs:📃src/views/design/components/DesignTabsV2.vue
|
1 2 3 4 5 6 7 8 9 10 11 12 13 14 15 16 17 18 19 20 21 22 23 24 25 26 27 28 29 30 31 32 33 34 35 36 |
// src/views/design/components/DesignTabsV2.vue <template> <el-tabs v-model="activeName"> <el-tab-pane v-for="item in tabOptions" :label="item.label" :name="item.key" > <template #label> <span> <i :class="`el-icon-${item.icon}`" /> {{ item.label }} </span> </template> <template #default> 假设这是一个渲染<strong style="color: #409eff">{{ item.label }}</strong >列表的子组件 </template> </el-tab-pane> </el-tabs> </template> <script> export default { name: 'DesignTabsV2', // 表示接收的 props // 如果定义成对象而不是数组,可以设置 prop 类型、默认值、是否必须 props: ['tabOptions', 'activeTab'], data() { return { // 如果 prop 用来传递一个初始值 // 子组件希望将其作为一个本地的数据来使用: activeName: this.activeTab, } } } </script> |
Vue 3
转化成 Composition API 后的子组件:(一贯省略重复代码)
📃src/views/design/components/DesignTabsV3.vue
|
1 2 3 4 5 6 7 8 9 10 11 12 13 14 15 16 17 18 19 20 21 |
// src/views/design/components/DesignTabsV3.vue <script> import { ref, toRefs } from 'vue' export default { name: 'DesignTabsV3', props: ['tabOptions', 'activeTab'], setup(props) { const { tabOptions, activeTab } = toRefs(props) const activeName = ref(activeTab) const handleClick = (tab, event) => { console.log(tab, event) } return { tabOptions, activeTab, activeName, handleClick, } }, } </script> |
5. 计算属性computed
比如我们现在希望在点击 tab 标签的时候能获得 tab 的序号(index):
Vue 2
组件 DesignTabs:📃src/views/design/components/DesignTabsV2.vue
|
1 2 3 4 5 6 7 8 9 10 11 12 13 14 15 16 |
// src/views/design/components/DesignTabsV2.vue export default { name: 'DesignTabsV2', computed: { tabIndex() { return this.tabOptions.findIndex(item => item.key === this.activeName) }, }, methods: { handleClick(tab, event) { console.log(this.tabIndex) // tab 对应的 index console.log(tab.index, tab.props) // 这样获得的`index`是字符串,props 可以获得传入`tab-pane`的属性 }, }, } |
Vue 3
这里就比较不一样了,props 的值是不允许在子组件直接修改的。子组件的activeName状态初始值为传入的activeTab,如果activeTab和tabOptions一样通过 toRefs 或 toRef 包装,那么activeName的修改是和activeTab深度响应的,这样会报错;
如果要同步修改父组件的值,可以通过emit事件(后面会说)
组件 DesignTabs:📃src/views/design/components/DesignTabsV3.vue
|
1 2 3 4 5 6 7 8 9 10 11 12 13 14 15 16 17 18 19 20 21 22 23 24 25 26 |
// src/views/design/components/DesignTabsV3.vue import { ref, toRefs, computed } from 'vue' export default { name: 'DesignTabsV3', setup(props) { const { tabOptions } = toRefs(props) // 切记 props 只读,不允许在子组件直接修改 const activeName = ref(props.activeTab) // 将其赋为组件状态的初始值,直接 props.xx // const { tabOptions, activeTab } = toRefs(props) // const activeName = ref(activeTab) // 这样达咩 const tabIndex = computed(() => tabOptions.value.findIndex(item => { return item.key === activeName.value }) ) const handleClick = (tab, event) => { console.log(tabIndex.value) } return { tabOptions, activeName, handleClick, } } } |
这里想额外提一嘴computed可以包在reactive内使用,在组件数据比较简单的情况下甚至可以直接用reactive包起组件全部数据,就好像 Option Api 的 data 选项那样。这样做的目的是在setup()访问不用再带上.value。
但这同时会带来一个问题,在模版需要使用state.xx去渲染,而且如果我们 return 的时候把state解构,包含的状态会失去响应性,那就得不偿失了。需要用toRefs包裹再传递,即可维持其响应性。
|
1 2 3 4 5 6 7 8 9 10 11 12 13 14 15 16 17 18 19 20 21 |
// src/views/design/components/DesignTabsV3.vue import { reactive, computed, toRefs } from 'vue' export default { name: 'DesignTabsV3', setup(props) { const state = reactive({ tabOps: props.tabOptions activeName: props.activeTab tabIndex: computed(() => tabOptions.findIndex(item => { return item.key === state.activeName }) }) return { // ...state // 这样会失去属性的响应式 ...toRefs(state) } // 甚至可以直接这样: return toRefs(state) } } |
6. 侦听器watch
获取这个tabIndex有什么用呢,目的是在当前标签变化时根据index刷新对应TabPane的子组件的数据。但是如果在标签点击事件触发数据刷新也不合适,因为我们不希望重复点击相同tab时也去刷新。那么这个时候watch或者watchEffect就登场了。
Vue 2
组件 DesignTabs:📃src/views/design/components/DesignTabsV2.vue
|
1 2 3 4 5 6 7 8 9 10 11 12 13 14 15 16 17 18 19 20 21 22 23 24 25 26 27 28 29 30 31 32 33 34 35 36 37 38 39 |
// src/views/design/components/DesignTabsV2.vue <template> <!--省略部分 ...--> <template #default> 这是一个渲染<strong style="color: #409eff">{{ item.label }}</strong >列表的子组件 <!--现在我们加上了 DesignList 组件--> <design-list :ref="'designList' + i" :type="item.key" /> </template> <!--省略部分...--> </template> <script lang="jsx"> import { defineComponent, toRef } from 'vue' // DesignList 组件,这里图方便混合组合式和选项式 API 写了 const DesignList = defineComponent({ name: 'DesignList', props: ['type'], setup(props) { const key = toRef(props, 'type') return () => <div>{key.value}</div> }, methods: { fetchData() { console.log(`重新请求${this.type}数据`) }, }, }) export default { name: 'DesignTabsV2', watch: { activeName(val) { console.log(`${val}`) // 触发子组件DesignList的数据请求 this.$refs[`designList${this.tabIndex}`].fetchData() }, }, } |
Vue 3
这个写法可能不是很直观,可以看下 ➡️ 组合式 API 模板引用在 v-for 中的用法
组件 DesignTabs:📃src/views/design/components/DesignTabsV3.vue
|
1 2 3 4 5 6 7 8 9 10 11 12 13 14 15 16 17 18 19 20 21 22 23 24 25 26 27 28 29 30 31 |
// src/views/design/components/DesignTabsV3.vue <template> <!--省略部分 ...--> <!--别忘了这是v-for遍历生成的组件--> <design-list :ref="el => { if (el) designList[i] = el }" :type="item.key" :key="item.key + i" /> <!--省略部分 ...--> </template> <script> import { ref, toRefs, computed, watch, defineComponent, toRef, onBeforeUpdate } from 'vue' // DesignList 组件同上面代码👆 export default { name: 'DesignTabsV3', components: { DesignList }, setup(props) { const designList = ref([]) // 确保在每次更新之前重置ref onBeforeUpdate(() => { designList.value = [] }) watch(activeName, val => { console.log(`${val}`) designList.value[tabIndex.value].fetchData() }) }, } </script> |
watch 和 watchEffect 的功能是等效的,都是侦听其依赖,并在依赖值变更时重新运行定义的函数。两者区别:
watch:
- 必须在第一个参数明确指定跟踪的依赖;
侦听器数据源只能是getter/effect函数、ref、reactive对象,或者包含这些类型(的数据)的数组。
换句话说,只要侦听数据不是ref、reactive对象,就必须传入一个箭头函数。
打个比方,若要侦听reactive对象的某个属性(例:const state = reactive({ count: 0 })的count),便不能像侦听单个ref或整个reactive对象那样直接传一个变量,而是必须在第一个参数传入一个回调函数,如() => state.count; - 第二个参数是依赖值变更时执行的回调,函数内能访问被侦听状态的当前值和前一个值;
- 组件初始化时不会执行回调。如果需要可在第三个参数(
Object)中设置immediate: true; - 如果要对多层嵌套状态深度侦听,在第三个参数中设置
deep: true
watchEffect:
- 无需手动传入依赖项;
- 只有一个参数,即侦听数据变更的回调函数,会自动跟踪所有函数中用到的变量;
- 组件初始化时即会执行一次。
7. 子组件向父组件通信(触发父组件方法)
Vue 2
父组件:📃src/views/design/indexV2.vue
|
1 2 3 4 5 6 7 8 9 10 11 12 13 14 15 16 17 18 19 20 |
// src/views/design/indexV2.vue <template> <div style="padding: 15px"> <design-tabs :tab-options="tabOptions" :active-tab="activeName" :tab-change="handleTabChange" ></design-tabs> </div> </template> <script> export default { name: 'DesignV2', methods: { handleTabChange(tab) { this.activeName = tab }, } } </script> |
子组件 DesignTabs:📃src/views/design/components/DesignTabsV2.vue
|
1 2 3 4 5 6 7 8 9 |
// src/views/design/components/DesignTabsV2.vue export defalut { name: 'DesignTabsV2', watch: { activeName(val) { this.$emit('tabChange', val) }, }, } |
Vue 3
子组件 DesignTabs:📃src/views/design/components/DesignTabsV3.vue
|
1 2 3 4 5 6 7 8 9 10 |
// src/views/design/components/DesignTabsV3.vue export default { name: 'DesignTabsV3', emits: ['tabChange'], setup(props, context) { watch(activeName, val => { context.emit('tabChange', val) }) } } |
8. 使用 Vue Router
Vue 2
📃src/views/design/components/DesignTabsV2.vue
|
1 2 3 4 5 6 7 8 9 |
// src/views/design/components/DesignTabsV2.vue export defalut { name: 'DesignTabsV2', watch: { activeName(val) { this.$router.push(`${this.$route.path}?tab=${val}`) }, }, } |
Vue 3
📃src/views/design/components/DesignTabsV3.vue
|
1 2 3 4 5 6 7 8 9 10 11 12 13 |
// src/views/design/components/DesignTabsV3.vue import { useRouter, useRoute } from 'vue-router' export default { name: 'DesignTabsV3', setup() { const router = useRouter() const route = useRoute() watch(activeName, val => { router.push(`${route.path}?tab=${val}`) }) }, } |
9. 获取 Vuex 对象
Vue 2
|
1 2 3 4 5 6 |
export default { mounted() { console.log(this.$store.state.name) this.$store.commit('show') } } |
Vue 3
|
1 2 3 4 5 6 7 8 9 10 11 12 13 14 |
<script> import { onMounted } from 'vue' import { useStore } from 'vuex' export default { setup(props) { const store = useStore() onMounted(() => { console.log(store.name) store.commit('show') }) } } </script> |