前言
一个优秀的富文本,应该包含优秀的排版算法、丰富的功能和渲染的高性能。在上一篇中,我们实现了可扩展的、基础的富文本编辑器。那么在本文中,让我们对富文本进行更多功能的扩展。
注:
— 为了在阅读本文时有更好的体验,请先阅读本专栏第一篇,前文涉及到的知识点,本文不再赘述。(摸鱼的朋友请忽略)
— 完整代码太多, 文章只分析核心代码,需要源码请到 代码仓库
文本与图片混排
在有关富文本的业务需求中,或其他文章渲染中,图文混排的功能是十分重要的。在Flutter中,为了解决这个图文混排的问题,有一个很方便的组件:WidgetSpan。而在本专栏的第一篇的文本基础知识中,已经分析了TextSpan在文本渲染过程中的作用。那么WidgetSpan是如何被渲染的呢,Flutter又是如何将TextSpan与WidgetSpan混合渲染在一起的呢?
—— 效果图完整代码在仓库demo/image_text

因为Flutter提供了WidgetSpan,所以效果图中的布局十分简单:
|
1 2 3 4 5 6 7 8 9 10 11 12 13 14 15 16 17 18 19 |
Widget _widgetSpan() { return Text.rich(TextSpan( children: <InlineSpan>[ const TextSpan(text: 'Hello'), WidgetSpan( child: ... //显示本地图片 Image.file( _image!, width: width, height: height, ), ... ), const TextSpan(text: 'Taxze!'), ], )); } |
在之前的文章中,我们已经知道RichText实际上是需要一个InlineSpan,而TextSpan和WidgetSpan(中间还有个PlaceholderSpan)都是InlineSpan的子类实现。RichText最后会将InlineSpan传入RenderParagraph中。那么这个InlineSpan是一个什么样的呢?
InlineSpan树的结构
现在将目光先移到Text()和Text.rich()的构造函数上,我们可以看到,在Text()组件中,它的构造函数只有一个必要参数:data,且textSpan = null,而在Text.rich()的构造函数中,也只有一个必要参数:textSpan。
|
1 2 3 4 5 6 7 8 9 10 11 |
const Text( String this.data, { super.key, ... }) : textSpan = null; const Text.rich( InlineSpan this.textSpan, { super.key, ... }) : data = null; |
然后将目光移到build上,在其主要逻辑中,我们可以发现,RichText在构造时传入的text是一个TextSpan,当采用data作为必要参数传入时,text参数才会有值,当采用textSpan作为参数传入时,children才不会为null。
|
1 2 3 4 5 6 7 8 9 10 11 12 13 |
@override Widget build(BuildContext context) { Widget result = RichText( ... text: TextSpan( style: effectiveTextStyle, text: data, children: textSpan != null ? <InlineSpan>[textSpan!] : null, ), ); ... return result; } |
经过上面的分析之后,我们可以将树的结构总结为两张图:
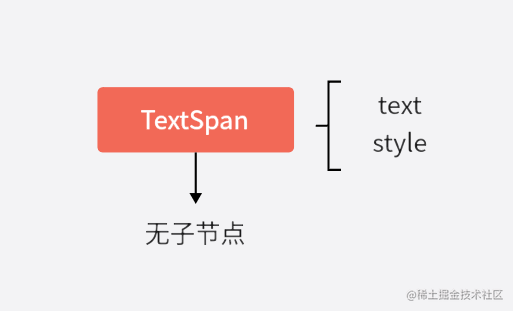
- 当采用
data作为必要参数传入时,树中只会存在一个根节点
- 当采用
textSpan作为参数传入时,树中会存在多个子树
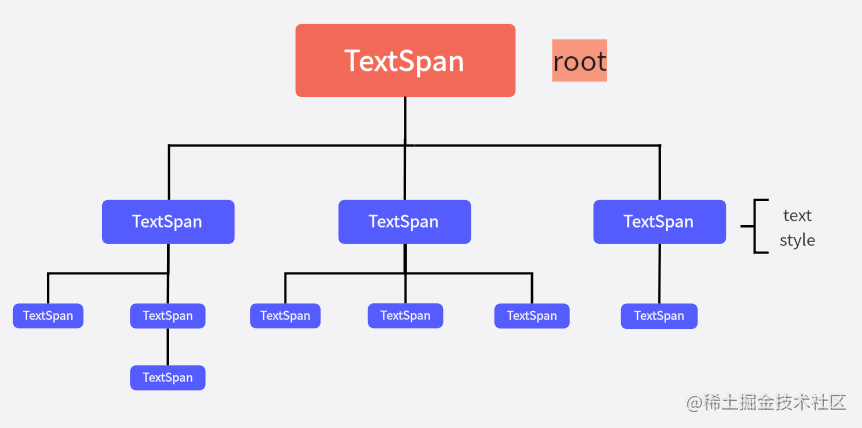
树中的每一个TextSpan都包含text和style,其中的style是文本样式,如果没有设置某一个节点的样式,那么它会继承父节点中的样式。若根节点也没有自定义样式,那么就会采用默认的样式值。
WidgetSpan混入InlineSpan树结构
将目光移到RichText的createRenderObject方法上,可以看到RichText创建的渲染对象为RenderParagraph,并且将InlineSpan传入。
|
1 2 3 4 5 6 7 |
@override RenderParagraph createRenderObject(BuildContext context) { return RenderParagraph( text, //InlineSpan ... ); } |
再将目光移到RenderParagraph的performLayout函数上,它是RenderParagraph的重要逻辑,用于计算RenderParagraph的尺寸和child的绘制位置。
|
1 2 3 4 5 6 7 8 9 10 11 12 |
@override void performLayout() { final BoxConstraints constraints = this.constraints; _placeholderDimensions = _layoutChildren(constraints); _layoutTextWithConstraints(constraints); _setParentData(); final Size textSize = _textPainter.size; final bool textDidExceedMaxLines = _textPainter.didExceedMaxLines; size = constraints.constrain(textSize); ... } |
但是,这里计算的child不是TextSpan,而是PlaceholderSpan。通过_extractPlaceholderSpans挑选出所有的PlaceholderSpan,visitChildren是InlineSpan中的方法,通过该方法能遍历InlineSpan树。
|
1 2 3 4 5 6 7 8 9 10 11 |
late List<PlaceholderSpan> _placeholderSpans; void _extractPlaceholderSpans(InlineSpan span) { _placeholderSpans = <PlaceholderSpan>[]; span.visitChildren((InlineSpan span) { //判断是否为PlaceholderSpan if (span is PlaceholderSpan) { _placeholderSpans.add(span); } return true; }); } |
到这里,对于InlineSpan树的结构已经清晰了,在树中,除了TextSpan,还存在着PlaceholderSpan类型的节点,而WidgetSpan又是继承于PlaceholderSpan的。

不过,PlaceholderSpan只是一个占位节点,RenderParagraph并不会对其进行绘制,RenderParagraph只负责确定它的大小和需要绘制的位置。RenderParagraph只需在布局的时候,将这个绘制的区域预留给WidgetSpan,这样绘制时就不会改变树的结构。
计算WidgetSpan的绘制区域
performLayout是RenderParagraph的布局函数,performLayout内部主要调用了三个函数:
|
1 2 3 4 |
final BoxConstraints constraints = this.constraints; _placeholderDimensions = _layoutChildren(constraints); _layoutTextWithConstraints(constraints); _setParentData(); |
-
_layoutChildren函数主要是用于计算确认PlaceholderSpan占位节点的大小。1234567891011121314151617181920List<PlaceholderDimensions> _layoutChildren(BoxConstraints constraints, {bool dry = false}) {final List<PlaceholderDimensions> placeholderDimensions = List<PlaceholderDimensions>.filled(childCount, PlaceholderDimensions.empty);while (child != null) {if (!dry) {...childSize = child.size;} else {childSize = child.getDryLayout(boxConstraints);}placeholderDimensions[childIndex] = PlaceholderDimensions(size: childSize,alignment: _placeholderSpans[childIndex].alignment,baseline: _placeholderSpans[childIndex].baseline,baselineOffset: baselineOffset,);child = childAfter(child);childIndex += 1;}return placeholderDimensions;} -
_setParentData此函数用于将父节点的设置给子节点,具体的计算(尺寸计算、偏移计算)都在_layoutTextWithConstraints函数中完成。12345678910111213void _setParentData() {...while (child != null && childIndex < _textPainter.inlinePlaceholderBoxes!.length) {final TextParentData textParentData = child.parentData! as TextParentData;textParentData.offset = Offset(_textPainter.inlinePlaceholderBoxes![childIndex].left,_textPainter.inlinePlaceholderBoxes![childIndex].top,);textParentData.scale = _textPainter.inlinePlaceholderScales![childIndex];child = childAfter(child);childIndex += 1;}} -
_layoutTextWithConstraints此函数包含主要的布局逻辑。其中的_textPainter是RichText将text传入RenderParagraph时,RenderParagraph将text保存在_textPainter中。setPlaceholderDimensions方法用于设置InlineSpan树中每个占位符的尺寸。1234void _layoutTextWithConstraints(BoxConstraints constraints) {_textPainter.setPlaceholderDimensions(_placeholderDimensions);_layoutText(minWidth: constraints.minWidth, maxWidth: constraints.maxWidth);}在
setPlaceholderDimensions将各占位节点尺寸设置完成之后,会调用_layoutText来进行 布局。12345678910void _layoutText({ double minWidth = 0.0, double maxWidth = double.infinity }) {final bool widthMatters = softWrap || overflow == TextOverflow.ellipsis;//_textPainter包含节点的尺寸。_textPainter.layout(minWidth: minWidth,maxWidth: widthMatters ?maxWidth :double.infinity,);}调用
layout方法,就代表着进入了TextPainter,开始创建ParagraphBuilder,然后进入引擎层开始绘制。
到这里,我们已经了解了图文混排中的图,是如何被混入文本一起渲染的了。下面让我们开始探索,如何将文本与图片放在一起编辑。
文本与图片混合编辑
要想将文本与图片混合编辑,就要在构建InlineSpan树时,在Image()外嵌套一层WidgetSpan,并将其混入InlineSpan树。而其中较为复杂的是对TextRange的位置改变的计算(添加图片、删除图片)。接下让我们一起探索,文本与图片混合编辑的秘密。

输入为图像时的Style处理
若用户操作为插入图片,则该操作不存入Style,若为文本的插入,根据TextRange,判断所需要的Style。
|
1 2 3 4 5 6 7 8 9 10 11 12 13 14 15 16 |
List<TextStyle> getReplacementsAtSelection(TextSelection selection) { // 只有[left replacement]才会被记录 final List<TextStyle> stylesAtSelection = <TextStyle>[]; for (final TextEditingInlineSpanReplacement replacement in replacements!) { if (replacement.isWidget == true) { //若为非编辑文本操作,则暂不处理。 } else { ... ///保存style stylesAtSelection .add(replacement.generator('', replacement.range).style!); ... } return stylesAtSelection; } |
构建InlineSpan树
-
定义行为添加函数,将用户行为通过该函数保存。
12345678void applyReplacement(TextEditingInlineSpanReplacement replacement) {if (replacements == null) {replacements = [];replacements!.add(replacement);} else {replacements!.add(replacement);}} -
将用户行为映射到生成的
InlineSpan1234567891011121314151617181920212223242526static void _addToMappingWithOverlaps(InlineSpanGenerator generator,TextRange matchedRange,Map<TextRange, InlineSpan> rangeSpanMapping,String text,//非文本编辑行为{bool? isWidget}) {// 在某些情况下,应该允许重叠。// 例如在两个TextSpan匹配相同的替换范围的情况下,// 尝试合并到一个TextStyle的风格,并建立一个新的TextSpan。bool overlap = false;List<TextRange> overlapRanges = <TextRange>[];//遍历索引for (final TextRange range in rangeSpanMapping.keys) {if (math.max(matchedRange.start, range.start) <=math.min(matchedRange.end, range.end)) {overlap = true;overlapRanges.add(range);}}...//更新TextRanges到InlineSpan的映射。rangeSpanMapping[uniqueRange] =TextSpan(text: uniqueRange.textInside(text), style: mergedStyles);...} -
构建InlineSpan树
12345678@overrideTextSpan buildTextSpan({required BuildContext context,TextStyle? style,required bool withComposing,}) {//该函数其他逻辑在上一篇文章中已分析}
通过image_picker插件,实现插入图片
|
1 2 3 4 5 6 7 8 9 10 11 12 13 14 15 16 17 18 19 20 21 22 23 24 25 26 27 28 29 30 31 32 33 34 35 36 37 |
getImage(BuildContext context) async { //获取Editable的controller final ReplacementTextEditingController controller = _data.replacementsController; //定义当前行为TextRange final TextRange replacementRange = TextRange( start: controller.selection.start, end: controller.selection.end, ); File? image; //默认尺寸 double width = 100.0; double height = 100.0; //从相册获取图片 var getImage = await ImagePicker().pickImage(source: ImageSource.gallery); image = File(getImage!.path); //调用applyReplacement函数,保存用户行为 controller.applyReplacement( TextEditingInlineSpanReplacement( replacementRange, (string, range) => WidgetSpan( child: GestureDetector( onTap: () { ... }, child: Image.file( image!, width: width, height: height, ), )), true, isWidget: true), ); _data = _data.copyWith(replacementsController: controller); setState(() {}); } |
尾述
在这篇文章中,我们实现了将文本与图片混合编辑的功能,其他需要插入的模块也能举一反三实现,例如插入视频。本专栏实现的富文本编辑器对于真实的复杂需求也只是一个小玩意,也有着较多的缺陷,依靠我一个人的力量也是很难实现标题中说的《高性能、多功能的富文本编辑器》,本专栏旨在于引领大家走入Flutter富文本编辑器的世界,而不单单只是学会使用已有的插件,却不了解其中的实现原理,当然这是一个超级大坑🤣。例如文本与图片的排版问题...这些缺陷都需要很多的时间一点点处理解决,也希望在将来能有更多的朋友与我一起探索文本的世界。而在后续的系列文章中,将会把富文本更加的完善,完成一个笔记的Demo,也会有对富文本性能的优化与分析。希望这篇文章能对你有所帮助,有问题欢迎在评论区留言讨论~