如果客户端工具是TortoiseSVN,直接在工作副本上右键,选择TortoiseSVN->relocation(重新定位),再输入新的URL。

作者: 默默
码农
如何查看RedHat Enterprise Linux Server的详细版本号
|
1 2 3 |
$ cat /etc/redhat-release Redhat Enterprise Linux Server release 7.2 (Paladin) |
Android Studio编译出的APK中一直包含android:debuggable="true"
最近遇到一个比较奇葩的事情,就是编译出来的APK的AndroidManifest.xml中的application标签中一直包含android:debuggable="true"。不管是release版本,还是debug版本,不管如何设置,最终生成的文件中的调试选项一直是处于开启状态。
一时间竟然有些无从下手的感觉。首先确认我们自己的配置文件是没有问题的,那么这个现象一定是引入了某个aar中引入的AndroidManifest.xml中存在这个android:debuggable="true",导致Android Studio在最终合并AndroidManifest.xml文件的时候,把这个选项给合并进来了。
那么我们既然已经知道引入的地方,因此就只需要针对这种情况进行剖析即可了。
执行gradlew build之后,我们在app\build\intermediates\exploded-aar目录下面可以找到我们引入的全部的依赖的aar。我们只需要逐个分析引入的aar包的AndroidManifest.xml文件即可。
那么比较奇葩,是奇葩在哪里呢? 正常情况下,我们引入一个aar包,需要在build.gradle中声明如下:
|
1 |
compile 'com.taobao.android:new-cache:2.3.0.73@aar' |
但是我们从真正的配置选项中看到的却是
|
1 |
compile 'com.taobao.android:new-cache:2.3.0.73' |
按照一般的理解,我们如果没有设置@aar,那么Android Studio应该去下载对应的jar包才对。但是我们从实际的编译过程中看到,Android Studio在没有指定@aar的情况下,依旧默认去服务器上先尝试下载对应的aar,只有当aar找不到的时候才会去下载对应的jar包。而恰好,我们服务器上面两者都是存在的。于是出现了乌龙事件,本来只是需要下载jar包,结果却引入了一个莫名的aar包。而这个aar的开发同学又没有考虑到这种情况,以为用户只会用他提供的jar包。
解决方法还是比较简单的,就是明确告知Android Studio,我们需要的是jar包,也就是增加@jar。如下:
|
1 |
compile 'com.taobao.android:new-cache:2.3.0.73@jar' |
相关参考链接
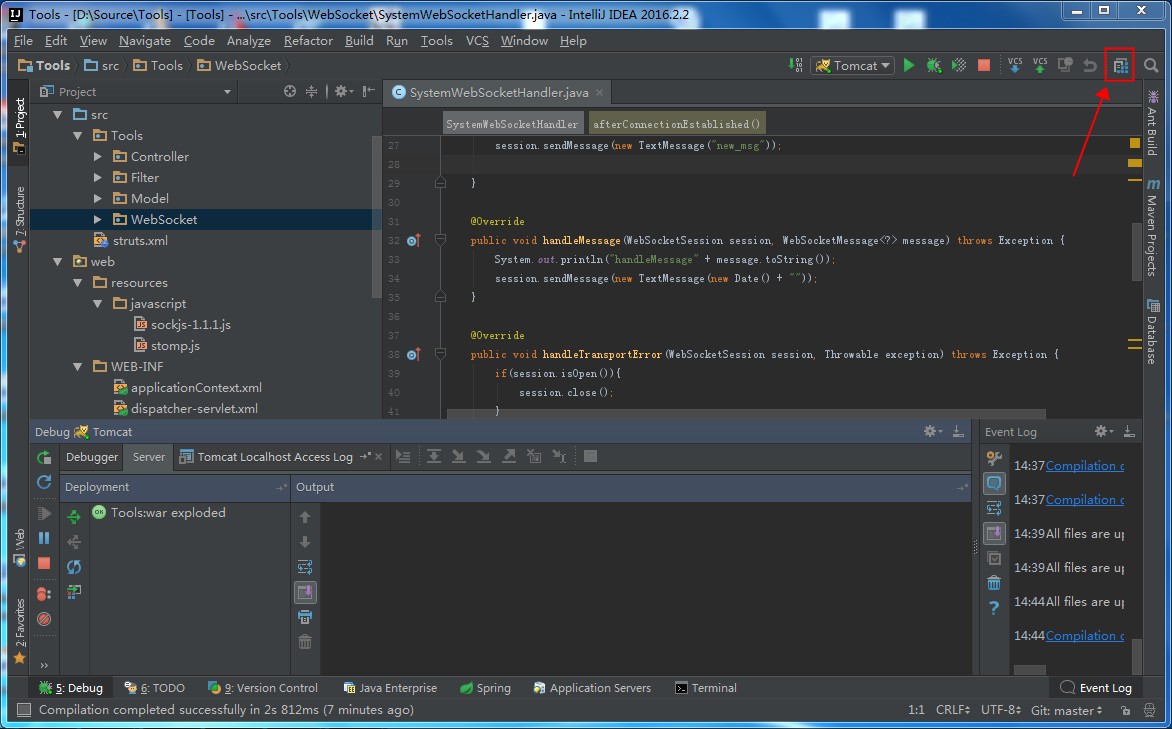
IntelliJ IDEA 2016.2使用Spring 4.3.1.RELEASE,sockjs-1.1.1,stomp-1.2搭建基于Tomcat-7.0.68的WebSocket应用
接着上文IntelliJ IDEA 2016.2使用Spring 4.3.1.RELEASE搭建基于Tomcat-7.0.68的WebSocket应用
上文的最后我们说到,WebSocket是需要定时心跳的,否则会在一段时间后自动断开连接,而更重要的是,不是所有的浏览器都支持WebSocket,早期的IE 10之前的版本就是不支持的,而这一部分的设备其实是不算少的,而sockjs的出现,恰恰好来解决了这个问题。对于不支持WebSocket的浏览器,sockjs使用了多种方式来兼容这种情况,包括使用长轮询等方式,Spring更是内建支持这种方式。
下面我们看如何在上篇文章的基础上,增加对于sockjs的支持。
首先是STOMP的文档官网地址 http://stomp.github.io/
代码的地址为https://github.com/jmesnil/stomp-websocket,项目下面的lib/stomp.js就是我们想要的文件。也可以本站下载stomp.js.zip
接下来sockjs的代码地址https://github.com/sockjs/sockjs-client,项目下面的dist/sockjs-1.1.1.js就是我们想要的文件。也可以本站下载sockjs-1.1.1.js.zip
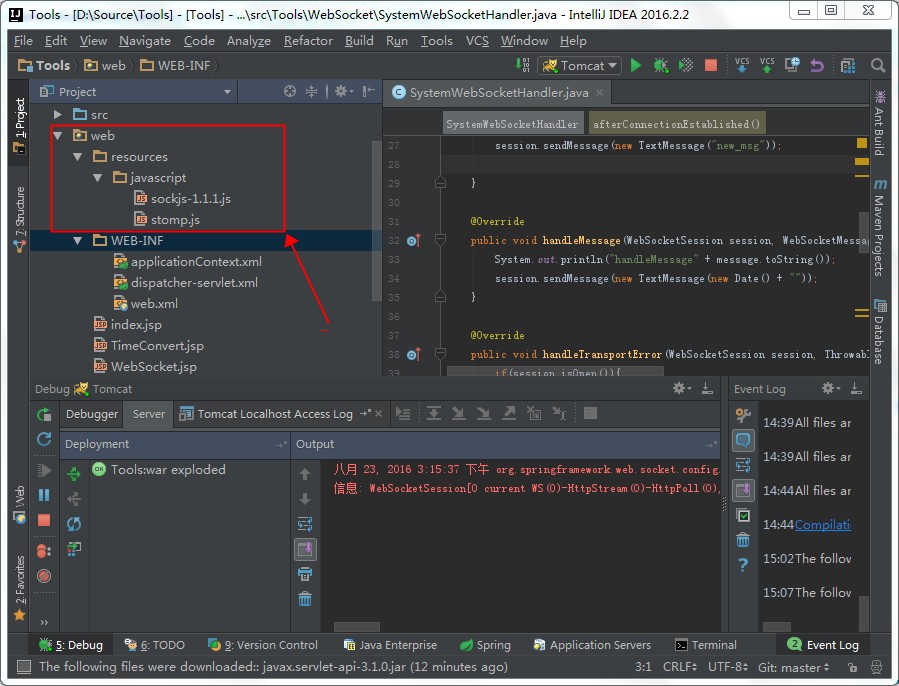
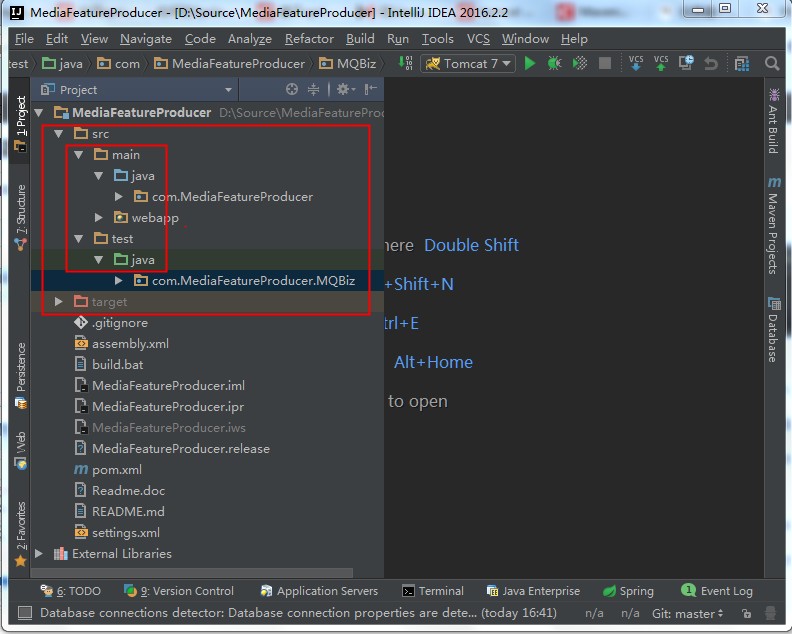
接下来我们把下载到的文件放到我们工程目录下面的web->resources->javascript目录下面,如下图:
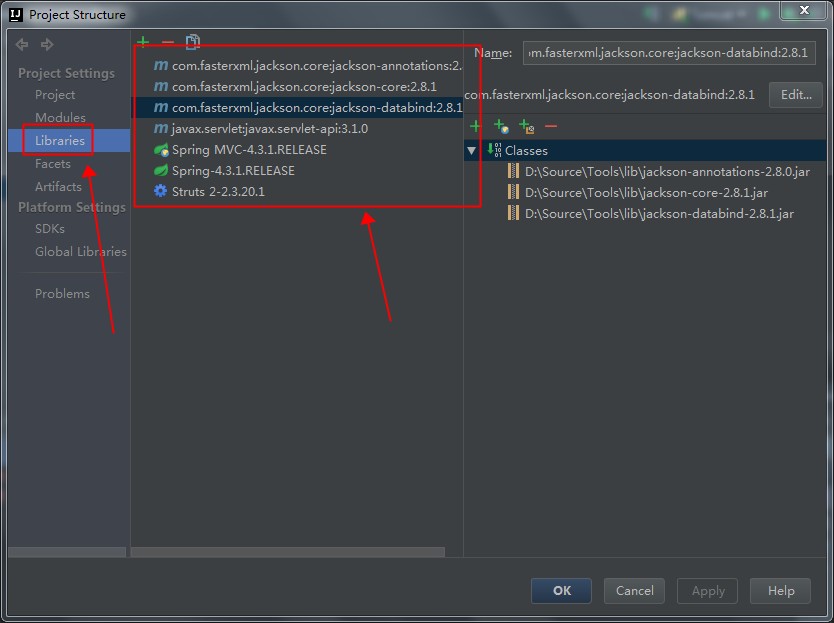
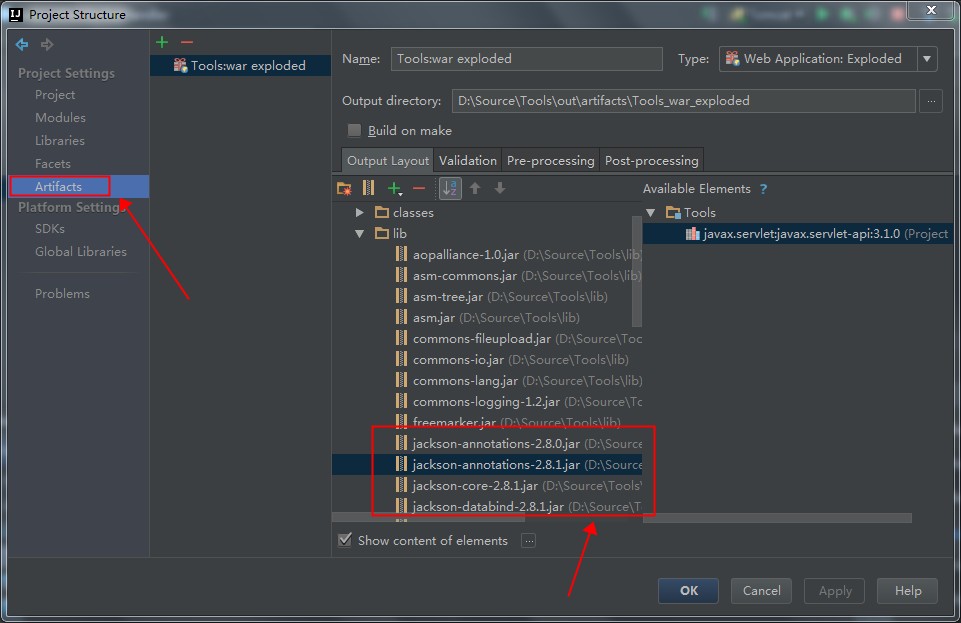
接下来,添加我们需要的com.fasterxml.jackson.core:jackson-annotations:2.8.1,com.fasterxml.jackson.core:jackson-core:2.8.1,com.fasterxml.jackson.core:jackson-databind:2.8.1这三个jar包,增加的方式参照上一篇中对于javax.servlet:javax.servlet-api:3.1.0的操作方法。与上一篇的操作不同的是,这次添加的三个jar包,都要放到编译完成后的War包中。最后的结果如下图:
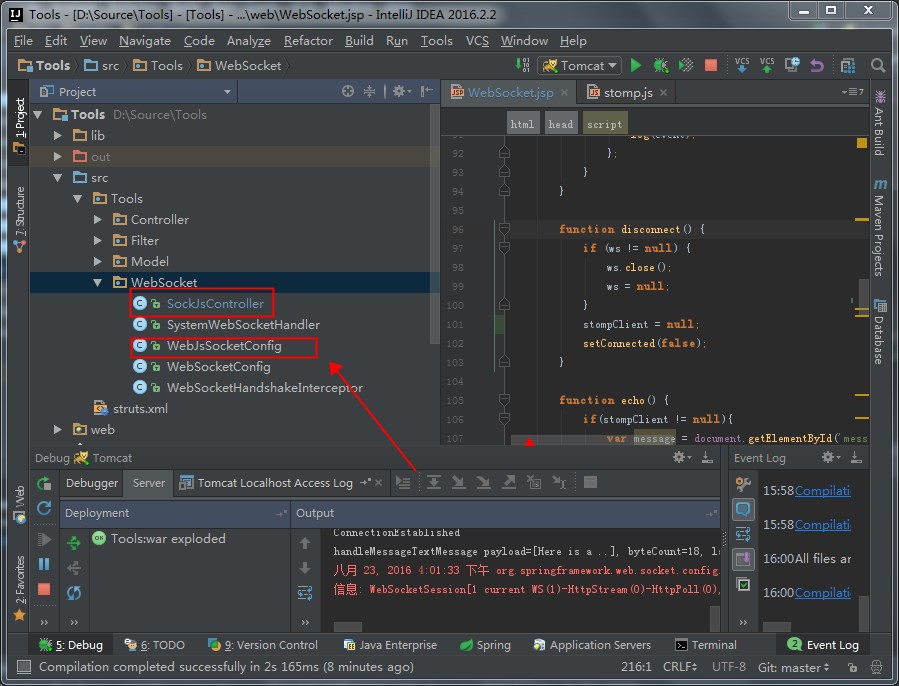
下面,我们开始进行代码的操作,我们在上篇文章中的src->Tools->WebSocket中新增两个源代码文件SockJsController.java,WebJsSocketConfig.java.如下图:
其中的代码如下:
SockJsController.java
|
1 2 3 4 5 6 7 8 9 10 11 12 13 14 15 |
package Tools.WebSocket; import org.springframework.messaging.handler.annotation.MessageMapping; import org.springframework.messaging.handler.annotation.SendTo; import org.springframework.stereotype.Controller; @Controller public class SockJsController { @MessageMapping("/hello") @SendTo("/hello/subscribe") /*貌似这个名字可以随意的,主要用在stomp.subscribe时候的名字*/ public String Hello(String message) throws Exception { return new String("Hello"); } } |
WebJsSocketConfig.java
|
1 2 3 4 5 6 7 8 9 10 11 12 13 14 15 16 17 18 19 20 21 22 |
package Tools.WebSocket; import org.springframework.context.annotation.Configuration; import org.springframework.messaging.simp.config.MessageBrokerRegistry; import org.springframework.web.socket.config.annotation.AbstractWebSocketMessageBrokerConfigurer; import org.springframework.web.socket.config.annotation.EnableWebSocketMessageBroker; import org.springframework.web.socket.config.annotation.StompEndpointRegistry; @Configuration @EnableWebSocketMessageBroker public class WebJsSocketConfig extends AbstractWebSocketMessageBrokerConfigurer { @Override public void configureMessageBroker(MessageBrokerRegistry config) { config.setApplicationDestinationPrefixes("/webSocketServer"); } @Override public void registerStompEndpoints(StompEndpointRegistry registry) { registry.addEndpoint("/hello").setAllowedOrigins("*").withSockJS(); } } |
然后修改WebSocket.jsp
|
1 2 3 4 5 6 7 8 9 10 11 12 13 14 15 16 17 18 19 20 21 22 23 24 25 26 27 28 29 30 31 32 33 34 35 36 37 38 39 40 41 42 43 44 45 46 47 48 49 50 51 52 53 54 55 56 57 58 59 60 61 62 63 64 65 66 67 68 69 70 71 72 73 74 75 76 77 78 79 80 81 82 83 84 85 86 87 88 89 90 91 92 93 94 95 96 97 98 99 100 101 102 103 104 105 106 107 108 109 110 111 112 113 114 115 116 117 118 119 120 121 122 123 124 125 126 127 128 129 130 131 132 133 134 135 136 137 138 139 140 141 142 143 144 145 146 147 148 149 150 151 152 153 154 155 156 157 158 159 160 161 162 163 164 165 166 167 168 169 170 171 172 173 174 175 176 177 178 179 180 181 182 183 184 185 186 |
<%@ page contentType="text/html;charset=UTF-8" language="java" %> <!DOCTYPE html PUBLIC "-//W3C//DTD HTML 4.01 Transitional//EN" "http://www.w3.org/TR/html4/loose.dtd"> <html> <head> <meta http-equiv="Content-Type" content="text/html; charset=UTF-8"> <title>WebSocket/SockJS Echo Sample (Adapted from Tomcat's echo sample)</title> <style type="text/css"> #connect-container { float: left; width: 400px } #connect-container div { padding: 5px; } #console-container { float: left; margin-left: 15px; width: 400px; } #console { border: 1px solid #CCCCCC; border-right-color: #999999; border-bottom-color: #999999; height: 170px; overflow-y: scroll; padding: 5px; width: 100%; } #console p { padding: 0; margin: 0; } </style> <script src="./resources/javascript/sockjs-1.1.1.js"></script> <script src="./resources/javascript/stomp.js"></script> <script type="text/javascript"> var ws = null; var url = null; var transports = []; var stompClient = null; function setConnected(connected) { document.getElementById('connect').disabled = connected; document.getElementById('disconnect').disabled = !connected; document.getElementById('echo').disabled = !connected; } function connect() { if (!url) { alert('Select whether to use W3C WebSocket or SockJS'); return; } ws = (url.indexOf('sockjs') != -1) ? new SockJS(url,undefined, {transports: transports}) : new WebSocket(url); if((url.indexOf('sockjs') != -1)) { stompClient = Stomp.over(ws); stompClient.connect({}, function(frame) { setConnected(true); log('Connected: ' + frame); stompClient.subscribe('/hello/subscribe', function(message){ log(message.body); }); }); }else { ws.onopen = function () { setConnected(true); log('Info: connection opened.'); }; ws.onmessage = function (event) { log('Received: ' + event.data); }; ws.onclose = function (event) { setConnected(false); log('Info: connection closed.'); log(event); }; } } function disconnect() { if (ws != null) { ws.close(); ws = null; } stompClient = null; setConnected(false); } function echo() { if(stompClient != null){ var message = document.getElementById('message').value; stompClient.send("/webSocketServer/hello", {}, message); log('Sent: ' + message); }else { if (ws != null) { var message = document.getElementById('message').value; log('Sent: ' + message); ws.send(message); } else { alert('connection not established, please connect.'); } } } function updateUrl(urlPath) { if (urlPath.indexOf('sockjs') != -1) { url = urlPath; document.getElementById('sockJsTransportSelect').style.visibility = 'visible'; } else { if (window.location.protocol == 'http:') { url = 'ws://' + window.location.host + urlPath; } else { url = 'wss://' + window.location.host + urlPath; } document.getElementById('sockJsTransportSelect').style.visibility = 'hidden'; } } function updateTransport(transport) { transports = (transport == 'all') ? [] : [transport]; } function log(message) { var console = document.getElementById('console'); var p = document.createElement('p'); p.style.wordWrap = 'break-word'; p.appendChild(document.createTextNode(message)); console.appendChild(p); while (console.childNodes.length > 25) { console.removeChild(console.firstChild); } console.scrollTop = console.scrollHeight; } </script> </head> <body> <noscript><h2 style="color: #ff0000">Seems your browser doesn't support Javascript! Websockets rely on Javascript being enabled. Please enable Javascript and reload this page!</h2></noscript> <div> <div id="connect-container"> <input id="radio1" type="radio" name="group1" onclick="updateUrl('/webSocketServer');"> <label for="radio1">W3C WebSocket</label> <br> <input id="radio2" type="radio" name="group1" onclick="updateUrl('/webSocketServer/sockjs/hello');"> <label for="radio2">SockJS</label> <div id="sockJsTransportSelect" style="visibility:hidden;"> <span>SockJS transport:</span> <select onchange="updateTransport(this.value)"> <option value="all">all</option> <option value="websocket">websocket</option> <option value="xhr-polling">xhr-polling</option> <option value="jsonp-polling">jsonp-polling</option> <option value="xhr-streaming">xhr-streaming</option> <option value="iframe-eventsource">iframe-eventsource</option> <option value="iframe-htmlfile">iframe-htmlfile</option> </select> </div> <div> <button id="connect" onclick="connect();">Connect</button> <button id="disconnect" disabled="disabled" onclick="disconnect();">Disconnect</button> </div> <div> <textarea id="message" style="width: 350px">Here is a message!</textarea> </div> <div> <button id="echo" onclick="echo();" disabled="disabled">Echo message</button> </div> </div> <div id="console-container"> <div id="console"></div> </div> </div> </body> </html> |
最后,我们修改web->WEB-INF->web.xml,在其中增加
|
1 2 3 4 |
<servlet-mapping> <servlet-name>dispatcher</servlet-name> <url-pattern>/webSocketServer/sockjs/*</url-pattern> </servlet-mapping> |
修改后的最终结果如下:
|
1 2 3 4 5 6 7 8 9 10 11 12 13 14 15 16 17 18 19 20 21 22 23 24 25 26 27 28 29 30 31 32 33 34 35 36 37 38 39 40 |
<?xml version="1.0" encoding="UTF-8"?> <web-app xmlns="http://xmlns.jcp.org/xml/ns/javaee" xmlns:xsi="http://www.w3.org/2001/XMLSchema-instance" xsi:schemaLocation="http://xmlns.jcp.org/xml/ns/javaee http://xmlns.jcp.org/xml/ns/javaee/web-app_3_1.xsd" version="3.1"> <context-param> <param-name>contextConfigLocation</param-name> <param-value>/WEB-INF/applicationContext.xml</param-value> </context-param> <filter> <filter-name>struts2</filter-name> <filter-class>Tools.Filter.StrutsPrepareAndExecuteFilterEx</filter-class> <async-supported>true</async-supported> </filter> <filter-mapping> <filter-name>struts2</filter-name> <url-pattern>/*</url-pattern> </filter-mapping> <listener> <listener-class>org.springframework.web.context.ContextLoaderListener</listener-class> </listener> <servlet> <servlet-name>dispatcher</servlet-name> <servlet-class>org.springframework.web.servlet.DispatcherServlet</servlet-class> <load-on-startup>1</load-on-startup> <async-supported>true</async-supported> </servlet> <servlet-mapping> <servlet-name>dispatcher</servlet-name> <url-pattern>*.form</url-pattern> </servlet-mapping> <servlet-mapping> <servlet-name>dispatcher</servlet-name> <url-pattern>/webSocketServer/*</url-pattern> </servlet-mapping> <servlet-mapping> <servlet-name>dispatcher</servlet-name> <url-pattern>/webSocketServer/sockjs/*</url-pattern> </servlet-mapping> </web-app> |
参考链接
Android Studio 2.1.3配置Robolectric-3.0,Powermock-1.6.5单元测试环境
Android Studio提供了比较方便的单元测试,但是由于Android系统的限制(Classloader是Google自己实现的,Powermock无法修改底层的bytecode),目前Powermock还没办法直接在设备上执行测试,但是我们代码中难免存在一些静态对象,需要测试的时候,只能求助于Powermock与Robolectric的组合。
具体的配置如下:
1.首先在需要测试的项目的build.gradle中声明需要使用Powermock与Robolectric。
|
1 2 3 4 5 6 7 |
testCompile 'junit:junit:4.12' testCompile 'org.powermock:powermock-api-mockito:1.6.5' testCompile 'org.powermock:powermock-module-junit4-rule:1.6.5' testCompile 'org.powermock:powermock-module-junit4:1.6.5' testCompile "org.powermock:powermock-classloading-xstream:1.6.5" /*不可使用3.1.x版本,3.1.x版本无法与PowerMock配合测试,运行时候直接报错*/ testCompile 'org.robolectric:robolectric:3.0' |
2.定义测试基类,在基类中声明一些必备的设置
AbsRobolectricPowerMockTest.java
|
1 2 3 4 5 6 7 8 9 10 11 12 13 14 15 16 17 18 19 20 21 22 23 |
import android.os.Build; import org.junit.Rule; import org.junit.runner.RunWith; import org.powermock.core.classloader.annotations.PowerMockIgnore; import org.powermock.modules.junit4.PowerMockRunner; import org.powermock.modules.junit4.PowerMockRunnerDelegate; import org.powermock.modules.junit4.rule.PowerMockRule; import org.robolectric.RobolectricGradleTestRunner; import org.robolectric.annotation.Config; /** * Created by longsky.wq on 2016/8/22. */ @PowerMockRunnerDelegate(RobolectricGradleTestRunner.class) @RunWith(PowerMockRunner.class) @Config(constants = BuildConfig.class, sdk = Build.VERSION_CODES.JELLY_BEAN_MR1) @PowerMockIgnore({"org.mockito.*", "org.robolectric.*", "android.*","javax.crypto.","java.security.*"}) abstract public class AbsRobolectricPowerMockTest { @Rule public PowerMockRule rule = new PowerMockRule(); } |
3.定义真正的测试子类
DeckardActivityTest.java
|
1 2 3 4 5 6 7 8 9 10 11 12 13 14 15 16 17 18 19 20 21 |
import org.junit.Test; import org.junit.Assert; import org.mockito.Mockito; import org.powermock.api.mockito.PowerMockito; import org.powermock.core.classloader.annotations.PrepareForTest; import static junit.framework.Assert.assertTrue; @PrepareForTest(Static.class) public class DeckardActivityTest extends AbsRobolectricPowerMockTest { @Test public void testStaticMocking() { /*如果如下断言失败,说明Robolectric环境没有初始化成功,说明配置存在问题*/ Assert.assertNotNull(RuntimeEnvironment.application); PowerMockito.mockStatic(Static.class); Mockito.when(Static.staticMethod()).thenReturn("hello mock"); assertTrue(Static.staticMethod().equals("hello mock")); } } |
注意,参考链接中的内容不可完全相信,按照参考链接中的配置(Robolectric-3.1.2+PowerMock-1.6.5),一般会遇到如下问题(看上去很怪异,其实是由于不同的classloader同时加载了相同的类,导致尽管类名是相同的,但是依旧无法进行类型转换):
|
1 2 3 4 5 6 7 8 9 10 11 12 13 14 15 16 17 18 19 20 21 22 23 24 25 26 27 28 29 30 31 32 33 34 35 36 37 38 39 40 41 42 43 44 45 46 47 48 49 50 51 52 53 54 55 56 57 58 59 60 61 62 63 64 65 66 67 68 69 70 71 72 73 74 75 76 77 78 79 80 81 82 83 84 85 86 87 88 89 90 91 92 93 94 95 96 97 98 99 100 101 102 103 104 105 106 107 108 109 110 111 112 113 114 115 116 117 118 119 120 121 122 123 124 125 126 127 128 129 130 131 132 133 134 135 136 137 138 139 |
com.thoughtworks.xstream.converters.ConversionException: Could not call org.apache.tools.ant.Project$AntRefTable.readObject() : Cannot convert type org.apache.tools.ant.Project to type org.apache.tools.ant.Project ---- Debugging information ---- class : org.apache.tools.ant.types.FileSet required-type : org.apache.tools.ant.types.FileSet converter-type : com.thoughtworks.xstream.converters.reflection.ReflectionConverter path : /org.powermock.modules.junit4.rule.PowerMockStatement$1/outer-class/fNext/this$1/outer-class/dependencyResolver/dependencyResolver/project/references/hashtable/org.apache.tools.ant.types.FileSet/project line number : 167 ------------------------------- message : Could not call org.apache.tools.ant.Project$AntRefTable.readObject() cause-exception : com.thoughtworks.xstream.converters.ConversionException cause-message : Cannot convert type org.apache.tools.ant.Project to type org.apache.tools.ant.Project class : org.apache.tools.ant.Project$AntRefTable required-type : org.apache.tools.ant.types.FileSet converter-type : com.thoughtworks.xstream.converters.reflection.SerializableConverter path : /org.powermock.modules.junit4.rule.PowerMockStatement$1/outer-class/fNext/this$1/outer-class/dependencyResolver/dependencyResolver/project/references/hashtable/org.apache.tools.ant.types.FileSet/project line number : 167 class[1] : org.apache.tools.ant.Project converter-type[1] : com.thoughtworks.xstream.converters.reflection.ReflectionConverter class[2] : org.robolectric.internal.dependency.MavenDependencyResolver class[3] : org.robolectric.internal.dependency.CachedDependencyResolver class[4] : org.robolectric.RobolectricGradleTestRunner class[5] : org.robolectric.RobolectricTestRunner$HelperTestRunner class[6] : org.robolectric.RobolectricTestRunner$HelperTestRunner$1 class[7] : org.powermock.modules.junit4.rule.PowerMockStatement class[8] : org.powermock.modules.junit4.rule.PowerMockStatement$1 version : not available ------------------------------- at com.thoughtworks.xstream.core.util.SerializationMembers.callReadObject(SerializationMembers.java:133) at com.thoughtworks.xstream.converters.reflection.SerializableConverter.doUnmarshal(SerializableConverter.java:455) at com.thoughtworks.xstream.converters.reflection.AbstractReflectionConverter.unmarshal(AbstractReflectionConverter.java:263) at com.thoughtworks.xstream.core.TreeUnmarshaller.convert(TreeUnmarshaller.java:72) at com.thoughtworks.xstream.core.AbstractReferenceUnmarshaller.convert(AbstractReferenceUnmarshaller.java:65) at com.thoughtworks.xstream.core.TreeUnmarshaller.convertAnother(TreeUnmarshaller.java:66) at com.thoughtworks.xstream.converters.reflection.AbstractReflectionConverter.unmarshallField(AbstractReflectionConverter.java:480) at com.thoughtworks.xstream.converters.reflection.AbstractReflectionConverter.doUnmarshal(AbstractReflectionConverter.java:412) at com.thoughtworks.xstream.converters.reflection.AbstractReflectionConverter.unmarshal(AbstractReflectionConverter.java:263) at com.thoughtworks.xstream.core.TreeUnmarshaller.convert(TreeUnmarshaller.java:72) at com.thoughtworks.xstream.core.AbstractReferenceUnmarshaller.convert(AbstractReferenceUnmarshaller.java:65) at com.thoughtworks.xstream.core.TreeUnmarshaller.convertAnother(TreeUnmarshaller.java:66) at com.thoughtworks.xstream.converters.reflection.AbstractReflectionConverter.unmarshallField(AbstractReflectionConverter.java:480) at com.thoughtworks.xstream.converters.reflection.AbstractReflectionConverter.doUnmarshal(AbstractReflectionConverter.java:412) at com.thoughtworks.xstream.converters.reflection.AbstractReflectionConverter.unmarshal(AbstractReflectionConverter.java:263) at com.thoughtworks.xstream.core.TreeUnmarshaller.convert(TreeUnmarshaller.java:72) at com.thoughtworks.xstream.core.AbstractReferenceUnmarshaller.convert(AbstractReferenceUnmarshaller.java:65) at com.thoughtworks.xstream.core.TreeUnmarshaller.convertAnother(TreeUnmarshaller.java:66) at com.thoughtworks.xstream.converters.reflection.AbstractReflectionConverter.unmarshallField(AbstractReflectionConverter.java:480) at com.thoughtworks.xstream.converters.reflection.AbstractReflectionConverter.doUnmarshal(AbstractReflectionConverter.java:412) at com.thoughtworks.xstream.converters.reflection.AbstractReflectionConverter.unmarshal(AbstractReflectionConverter.java:263) at com.thoughtworks.xstream.core.TreeUnmarshaller.convert(TreeUnmarshaller.java:72) at com.thoughtworks.xstream.core.AbstractReferenceUnmarshaller.convert(AbstractReferenceUnmarshaller.java:65) at com.thoughtworks.xstream.core.TreeUnmarshaller.convertAnother(TreeUnmarshaller.java:66) at com.thoughtworks.xstream.converters.reflection.AbstractReflectionConverter.unmarshallField(AbstractReflectionConverter.java:480) at com.thoughtworks.xstream.converters.reflection.AbstractReflectionConverter.doUnmarshal(AbstractReflectionConverter.java:412) at com.thoughtworks.xstream.converters.reflection.AbstractReflectionConverter.unmarshal(AbstractReflectionConverter.java:263) at com.thoughtworks.xstream.core.TreeUnmarshaller.convert(TreeUnmarshaller.java:72) at com.thoughtworks.xstream.core.AbstractReferenceUnmarshaller.convert(AbstractReferenceUnmarshaller.java:65) at com.thoughtworks.xstream.core.TreeUnmarshaller.convertAnother(TreeUnmarshaller.java:66) at com.thoughtworks.xstream.converters.reflection.AbstractReflectionConverter.unmarshallField(AbstractReflectionConverter.java:480) at com.thoughtworks.xstream.converters.reflection.AbstractReflectionConverter.doUnmarshal(AbstractReflectionConverter.java:412) at com.thoughtworks.xstream.converters.reflection.AbstractReflectionConverter.unmarshal(AbstractReflectionConverter.java:263) at com.thoughtworks.xstream.core.TreeUnmarshaller.convert(TreeUnmarshaller.java:72) at com.thoughtworks.xstream.core.AbstractReferenceUnmarshaller.convert(AbstractReferenceUnmarshaller.java:65) at com.thoughtworks.xstream.core.TreeUnmarshaller.convertAnother(TreeUnmarshaller.java:66) at com.thoughtworks.xstream.converters.reflection.AbstractReflectionConverter.unmarshallField(AbstractReflectionConverter.java:480) at com.thoughtworks.xstream.converters.reflection.AbstractReflectionConverter.doUnmarshal(AbstractReflectionConverter.java:412) at com.thoughtworks.xstream.converters.reflection.AbstractReflectionConverter.unmarshal(AbstractReflectionConverter.java:263) at com.thoughtworks.xstream.core.TreeUnmarshaller.convert(TreeUnmarshaller.java:72) at com.thoughtworks.xstream.core.AbstractReferenceUnmarshaller.convert(AbstractReferenceUnmarshaller.java:65) at com.thoughtworks.xstream.core.TreeUnmarshaller.convertAnother(TreeUnmarshaller.java:66) at com.thoughtworks.xstream.converters.reflection.AbstractReflectionConverter.unmarshallField(AbstractReflectionConverter.java:480) at com.thoughtworks.xstream.converters.reflection.AbstractReflectionConverter.doUnmarshal(AbstractReflectionConverter.java:412) at com.thoughtworks.xstream.converters.reflection.AbstractReflectionConverter.unmarshal(AbstractReflectionConverter.java:263) at com.thoughtworks.xstream.core.TreeUnmarshaller.convert(TreeUnmarshaller.java:72) at com.thoughtworks.xstream.core.AbstractReferenceUnmarshaller.convert(AbstractReferenceUnmarshaller.java:65) at com.thoughtworks.xstream.core.TreeUnmarshaller.convertAnother(TreeUnmarshaller.java:66) at com.thoughtworks.xstream.converters.reflection.AbstractReflectionConverter.unmarshallField(AbstractReflectionConverter.java:480) at com.thoughtworks.xstream.converters.reflection.AbstractReflectionConverter.doUnmarshal(AbstractReflectionConverter.java:412) at com.thoughtworks.xstream.converters.reflection.AbstractReflectionConverter.unmarshal(AbstractReflectionConverter.java:263) at com.thoughtworks.xstream.core.TreeUnmarshaller.convert(TreeUnmarshaller.java:72) at com.thoughtworks.xstream.core.AbstractReferenceUnmarshaller.convert(AbstractReferenceUnmarshaller.java:65) at com.thoughtworks.xstream.core.TreeUnmarshaller.convertAnother(TreeUnmarshaller.java:66) at com.thoughtworks.xstream.core.TreeUnmarshaller.convertAnother(TreeUnmarshaller.java:50) at com.thoughtworks.xstream.core.TreeUnmarshaller.start(TreeUnmarshaller.java:134) at com.thoughtworks.xstream.core.AbstractTreeMarshallingStrategy.unmarshal(AbstractTreeMarshallingStrategy.java:32) at com.thoughtworks.xstream.XStream.unmarshal(XStream.java:1206) at com.thoughtworks.xstream.XStream.unmarshal(XStream.java:1190) at com.thoughtworks.xstream.XStream.fromXML(XStream.java:1061) at com.thoughtworks.xstream.XStream.fromXML(XStream.java:1052) at org.powermock.classloading.DeepCloner.clone(DeepCloner.java:54) at org.powermock.classloading.AbstractClassloaderExecutor.executeWithClassLoader(AbstractClassloaderExecutor.java:56) at org.powermock.classloading.SingleClassloaderExecutor.execute(SingleClassloaderExecutor.java:67) at org.powermock.classloading.AbstractClassloaderExecutor.execute(AbstractClassloaderExecutor.java:43) at org.powermock.modules.junit4.rule.PowerMockStatement.evaluate(PowerMockRule.java:75) at org.robolectric.RobolectricTestRunner$2.evaluate(RobolectricTestRunner.java:250) at org.robolectric.RobolectricTestRunner.runChild(RobolectricTestRunner.java:176) at org.robolectric.RobolectricTestRunner.runChild(RobolectricTestRunner.java:49) at org.junit.runners.ParentRunner$3.run(ParentRunner.java:290) at org.junit.runners.ParentRunner$1.schedule(ParentRunner.java:71) at org.junit.runners.ParentRunner.runChildren(ParentRunner.java:288) at org.junit.runners.ParentRunner.access$000(ParentRunner.java:58) at org.junit.runners.ParentRunner$2.evaluate(ParentRunner.java:268) at org.robolectric.RobolectricTestRunner$1.evaluate(RobolectricTestRunner.java:142) at org.junit.runners.ParentRunner.run(ParentRunner.java:363) at org.powermock.modules.junit4.internal.impl.DelegatingPowerMockRunner$2.call(DelegatingPowerMockRunner.java:148) at org.powermock.modules.junit4.internal.impl.DelegatingPowerMockRunner$2.call(DelegatingPowerMockRunner.java:140) at org.powermock.modules.junit4.internal.impl.DelegatingPowerMockRunner.withContextClassLoader(DelegatingPowerMockRunner.java:131) at org.powermock.modules.junit4.internal.impl.DelegatingPowerMockRunner.run(DelegatingPowerMockRunner.java:140) at org.powermock.modules.junit4.common.internal.impl.JUnit4TestSuiteChunkerImpl.run(JUnit4TestSuiteChunkerImpl.java:121) at org.powermock.modules.junit4.common.internal.impl.AbstractCommonPowerMockRunner.run(AbstractCommonPowerMockRunner.java:53) at org.powermock.modules.junit4.PowerMockRunner.run(PowerMockRunner.java:59) at org.junit.runner.JUnitCore.run(JUnitCore.java:137) at com.intellij.junit4.JUnit4IdeaTestRunner.startRunnerWithArgs(JUnit4IdeaTestRunner.java:69) at com.intellij.rt.execution.junit.JUnitStarter.prepareStreamsAndStart(JUnitStarter.java:234) at com.intellij.rt.execution.junit.JUnitStarter.main(JUnitStarter.java:74) Caused by: com.thoughtworks.xstream.converters.ConversionException: Cannot convert type org.apache.tools.ant.Project to type org.apache.tools.ant.Project ---- Debugging information ---- class : org.apache.tools.ant.types.FileSet required-type : org.apache.tools.ant.types.FileSet converter-type : com.thoughtworks.xstream.converters.reflection.ReflectionConverter path : /org.powermock.modules.junit4.rule.PowerMockStatement$1/outer-class/fNext/this$1/outer-class/dependencyResolver/dependencyResolver/project/references/hashtable/org.apache.tools.ant.types.FileSet/project line number : 167 ------------------------------- at com.thoughtworks.xstream.converters.reflection.AbstractReflectionConverter.doUnmarshal(AbstractReflectionConverter.java:439) at com.thoughtworks.xstream.converters.reflection.AbstractReflectionConverter.unmarshal(AbstractReflectionConverter.java:263) at com.thoughtworks.xstream.core.TreeUnmarshaller.convert(TreeUnmarshaller.java:72) at com.thoughtworks.xstream.core.AbstractReferenceUnmarshaller.convert(AbstractReferenceUnmarshaller.java:65) at com.thoughtworks.xstream.core.TreeUnmarshaller.convertAnother(TreeUnmarshaller.java:66) at com.thoughtworks.xstream.core.TreeUnmarshaller.convertAnother(TreeUnmarshaller.java:50) at com.thoughtworks.xstream.converters.reflection.SerializableConverter$2.readFromStream(SerializableConverter.java:337) at com.thoughtworks.xstream.core.util.CustomObjectInputStream.readObjectOverride(CustomObjectInputStream.java:120) at java.io.ObjectInputStream.readObject(ObjectInputStream.java:364) at java.util.Hashtable.readObject(Hashtable.java:996) at sun.reflect.NativeMethodAccessorImpl.invoke0(Native Method) at sun.reflect.NativeMethodAccessorImpl.invoke(NativeMethodAccessorImpl.java:57) at sun.reflect.DelegatingMethodAccessorImpl.invoke(DelegatingMethodAccessorImpl.java:43) at java.lang.reflect.Method.invoke(Method.java:606) at com.thoughtworks.xstream.core.util.SerializationMembers.callReadObject(SerializationMembers.java:125) ... 86 more |
参考链接
Gradle本站镜像
使用Android Studio开发,最痛苦的其中一项是Maven下载数据缓慢,目前已经可以根据在Ubuntu 14.04 系统中的Apache Tomcat上部署Apache Archiva 2.2.1来使用本站的代理服务器的方式进行提速了。另一个痛苦的事情就是下载Gradle工具包的速度异常缓慢了,不仅慢,而且还容易失败。
目前本网站已经提供了Gradle工具包的下载代理,具体的操作就是把services.gradle.org进行域名污染,指向本站的IP地址121.199.27.227。
Windows下的解决方法为修改C:\Windows\System32\drivers\etc下的hosts文件,里面增加如下内容:
|
1 2 3 4 5 6 7 8 9 10 11 12 13 14 15 16 17 18 19 20 21 22 |
# Copyright (c) 1993-2009 Microsoft Corp. # # This is a sample HOSTS file used by Microsoft TCP/IP for Windows. # # This file contains the mappings of IP addresses to host names. Each # entry should be kept on an individual line. The IP address should # be placed in the first column followed by the corresponding host name. # The IP address and the host name should be separated by at least one # space. # # Additionally, comments (such as these) may be inserted on individual # lines or following the machine name denoted by a '#' symbol. # # For example: # # 102.54.94.97 rhino.acme.com # source server # 38.25.63.10 x.acme.com # x client host # localhost name resolution is handled within DNS itself. # 127.0.0.1 localhost # ::1 localhost 121.199.27.227 services.gradle.org |
接着修改Android Studio项目下的gradle\wrapper\gradle-wrapper.properties文件,把其中的
|
1 2 3 4 5 6 |
#Tue Aug 16 10:46:15 CST 2016 distributionBase=GRADLE_USER_HOME distributionPath=wrapper/dists zipStoreBase=GRADLE_USER_HOME zipStorePath=wrapper/dists distributionUrl=https\://services.gradle.org/distributions/gradle-2.14.1-all.zip |
修改为:
|
1 2 3 4 5 6 |
#Tue Aug 16 10:46:15 CST 2016 distributionBase=GRADLE_USER_HOME distributionPath=wrapper/dists zipStoreBase=GRADLE_USER_HOME zipStorePath=wrapper/dists distributionUrl=http\://services.gradle.org/distributions/gradle-2.14.1-all.zip |
注意,上面的修改其实主要是把HTTPS修改成了HTTP,原因在于HTTPS无法进行域名污染。
当然,另外一个比较简单的修改方式为,只要修改distributionUrl为本站地址,更加省事:
|
1 2 3 4 5 6 |
#Tue Aug 16 10:46:15 CST 2016 distributionBase=GRADLE_USER_HOME distributionPath=wrapper/dists zipStoreBase=GRADLE_USER_HOME zipStorePath=wrapper/dists distributionUrl=https\://www.mobibrw.com/distributions/gradle-2.14.1-all.zip |
目前本站提供的Gradle工具包版本如下:
|
1 2 3 4 5 6 7 8 9 10 |
gradle-2.10-all.zip.sha256 gradle-2.10-all.zip gradle-2.14.1-all.zip.sha256 gradle-2.14.1-all.zip gradle-6.6-all.zip.sha256 gradle-6.6-all.zip gradle-8.2.1-all.zip |
当前更建议大家使用 腾讯的国内镜像 https://mirrors.cloud.tencent.com/gradle/
参考链接
使用junit测试IntelliJ IDEA 2016.2建立的maven项目
在maven project项目中引入junit插件并不困难,只需要在pom.xml中配置好依赖包即可(IDE环境下,依赖项会自动生成)。另外,test类文件需要按照/src/main/java/的文件结构(main改为test)。
pom.xml
|
1 2 3 4 5 6 7 8 9 10 11 12 13 14 15 16 17 18 19 20 21 22 23 24 25 |
<?xml version="1.0" encoding="UTF-8"?> <project xmlns="http://maven.apache.org/POM/4.0.0" xmlns:xsi="http://www.w3.org/2001/XMLSchema-instance" xsi:schemaLocation="http://maven.apache.org/POM/4.0.0 http://maven.apache.org/xsd/maven-4.0.0.xsd"> <modelVersion>4.0.0</modelVersion> <groupId>com.test</groupId> <artifactId>test</artifactId> <version>0.0.1-SNAPSHOT</version> <packaging>war</packaging> <properties> <!--junit 的版本--> <junit.version>4.12</junit.version> </properties> <dependencies> <!-- 单元测试 --> <dependency> <groupId>junit</groupId> <artifactId>junit</artifactId> <version>${junit.version}</version> <scope>test</scope> </dependency> </dependencies> </project> |
如下图:
Ubuntu 16.04下Tomcat 7.0.68启动服务时候报告“java.lang.NoSuchMethodError: java.util.concurrent.ConcurrentHashMap.keySet()Ljava/util/concurrent/ConcurrentHashMap$KeySetView;”
在使用Ubuntu16.04 安装openjdk-7-jdk介绍的方式切换Java到1.7版本后,在进行代码调试的时候,Tomcat 7.0.68报告如下错误:
|
1 2 3 4 5 6 7 8 9 10 11 12 13 14 15 16 17 18 19 20 21 22 23 24 25 26 27 28 29 30 31 32 33 34 35 36 37 38 39 40 41 42 43 44 45 46 47 48 49 50 51 52 53 54 55 56 |
java.lang.NoSuchMethodError: java.util.concurrent.ConcurrentHashMap.keySet()Ljava/util/concurrent/ConcurrentHashMap$KeySetView; at org.apache.catalina.core.ApplicationContext.getInitParameterNames(ApplicationContext.java:368) at org.apache.catalina.core.ApplicationContextFacade.getInitParameterNames(ApplicationContextFacade.java:367) at org.springframework.web.context.support.WebApplicationContextUtils.registerEnvironmentBeans(WebApplicationContextUtils.java:229) at org.springframework.web.context.support.AbstractRefreshableWebApplicationContext.postProcessBeanFactory(AbstractRefreshableWebApplicationContext.java:165) at org.springframework.context.support.AbstractApplicationContext.refresh(AbstractApplicationContext.java:520) at org.springframework.web.context.ContextLoader.configureAndRefreshWebApplicationContext(ContextLoader.java:444) at org.springframework.web.context.ContextLoader.initWebApplicationContext(ContextLoader.java:326) at org.springframework.web.context.ContextLoaderListener.contextInitialized(ContextLoaderListener.java:107) at org.apache.catalina.core.StandardContext.listenerStart(StandardContext.java:5068) at org.apache.catalina.core.StandardContext.startInternal(StandardContext.java:5584) at org.apache.catalina.util.LifecycleBase.start(LifecycleBase.java:147) at org.apache.catalina.core.ContainerBase.addChildInternal(ContainerBase.java:899) at org.apache.catalina.core.ContainerBase.addChild(ContainerBase.java:875) at org.apache.catalina.core.StandardHost.addChild(StandardHost.java:652) at org.apache.catalina.startup.HostConfig.manageApp(HostConfig.java:1859) at sun.reflect.NativeMethodAccessorImpl.invoke0(Native Method) at sun.reflect.NativeMethodAccessorImpl.invoke(NativeMethodAccessorImpl.java:57) at sun.reflect.DelegatingMethodAccessorImpl.invoke(DelegatingMethodAccessorImpl.java:43) at java.lang.reflect.Method.invoke(Method.java:606) at org.apache.tomcat.util.modeler.BaseModelMBean.invoke(BaseModelMBean.java:301) at com.sun.jmx.interceptor.DefaultMBeanServerInterceptor.invoke(DefaultMBeanServerInterceptor.java:819) at com.sun.jmx.mbeanserver.JmxMBeanServer.invoke(JmxMBeanServer.java:801) at org.apache.catalina.mbeans.MBeanFactory.createStandardContext(MBeanFactory.java:618) at org.apache.catalina.mbeans.MBeanFactory.createStandardContext(MBeanFactory.java:565) at sun.reflect.NativeMethodAccessorImpl.invoke0(Native Method) at sun.reflect.NativeMethodAccessorImpl.invoke(NativeMethodAccessorImpl.java:57) at sun.reflect.DelegatingMethodAccessorImpl.invoke(DelegatingMethodAccessorImpl.java:43) at java.lang.reflect.Method.invoke(Method.java:606) at org.apache.tomcat.util.modeler.BaseModelMBean.invoke(BaseModelMBean.java:301) at com.sun.jmx.interceptor.DefaultMBeanServerInterceptor.invoke(DefaultMBeanServerInterceptor.java:819) at com.sun.jmx.mbeanserver.JmxMBeanServer.invoke(JmxMBeanServer.java:801) at javax.management.remote.rmi.RMIConnectionImpl.doOperation(RMIConnectionImpl.java:1487) at javax.management.remote.rmi.RMIConnectionImpl.access$300(RMIConnectionImpl.java:97) at javax.management.remote.rmi.RMIConnectionImpl$PrivilegedOperation.run(RMIConnectionImpl.java:1328) at javax.management.remote.rmi.RMIConnectionImpl.doPrivilegedOperation(RMIConnectionImpl.java:1420) at javax.management.remote.rmi.RMIConnectionImpl.invoke(RMIConnectionImpl.java:848) at sun.reflect.NativeMethodAccessorImpl.invoke0(Native Method) at sun.reflect.NativeMethodAccessorImpl.invoke(NativeMethodAccessorImpl.java:57) at sun.reflect.DelegatingMethodAccessorImpl.invoke(DelegatingMethodAccessorImpl.java:43) at java.lang.reflect.Method.invoke(Method.java:606) at sun.rmi.server.UnicastServerRef.dispatch(UnicastServerRef.java:322) at sun.rmi.transport.Transport$2.run(Transport.java:202) at sun.rmi.transport.Transport$2.run(Transport.java:199) at java.security.AccessController.doPrivileged(Native Method) at sun.rmi.transport.Transport.serviceCall(Transport.java:198) at sun.rmi.transport.tcp.TCPTransport.handleMessages(TCPTransport.java:567) at sun.rmi.transport.tcp.TCPTransport$ConnectionHandler.run0(TCPTransport.java:828) at sun.rmi.transport.tcp.TCPTransport$ConnectionHandler.access$400(TCPTransport.java:619) at sun.rmi.transport.tcp.TCPTransport$ConnectionHandler$1.run(TCPTransport.java:684) at sun.rmi.transport.tcp.TCPTransport$ConnectionHandler$1.run(TCPTransport.java:681) at java.security.AccessController.doPrivileged(Native Method) at sun.rmi.transport.tcp.TCPTransport$ConnectionHandler.run(TCPTransport.java:681) at java.util.concurrent.ThreadPoolExecutor.runWorker(ThreadPoolExecutor.java:1145) at java.util.concurrent.ThreadPoolExecutor$Worker.run(ThreadPoolExecutor.java:615) at java.lang.Thread.run(Thread.java:745) |
这说明Ubuntu 16.04下的Tomcat是在Java 8环境下面编译的,尽管我们已经切换到Java 7下面了,但是Tomcat并不能很好的执行我们的Java 7代码。这个时候的解决方法就是,编译代码的时候指定Java 7,但是在Tomcat执行的时候,指定使用Java 8来运行。
参考链接
IntelliJ IDEA 2016.2使用Spring 4.3.1.RELEASE搭建基于Tomcat-7.0.68的WebSocket应用
先参照 IntelliJ IDEA 2016.1建立Strut2工程并使用Tomcat调试建立新的工程,一步一步操作,包括最后引用Spring框架部分。
经过上面的操作,Spring-WebSocket的包应该已经被默认引入了,如下图所示:
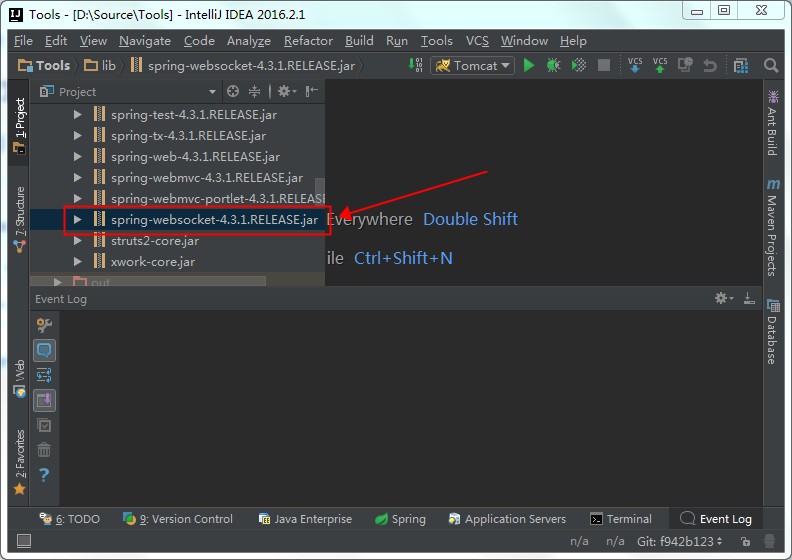
这就意味着我们已经不需要再进行过多的额外配置了。
接下来,我们在src->Tools下面新建一个WebSocket的目录,里面创建三个Java文件。如下图:
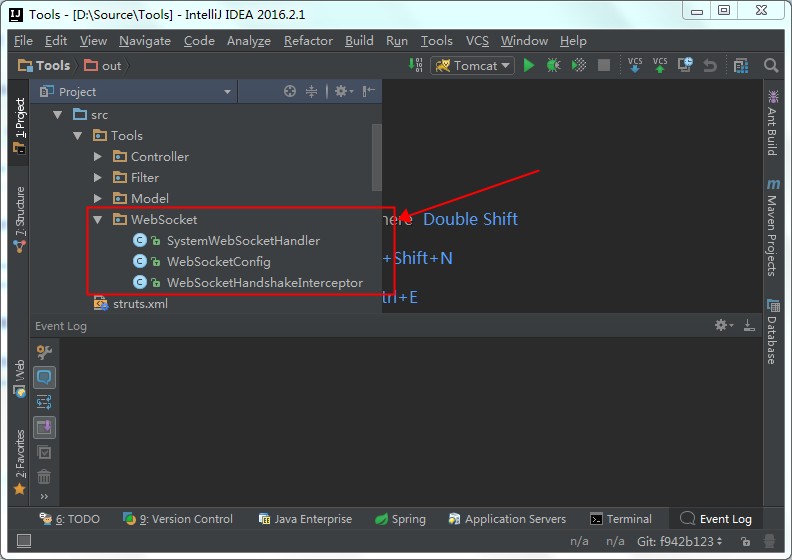
每个文件中的代码如下:
SystemWebSocketHandler.java
|
1 2 3 4 5 6 7 8 9 10 11 12 13 14 15 16 17 18 19 20 21 22 23 24 25 26 27 28 29 30 31 32 33 34 35 36 37 38 39 40 41 42 43 44 45 46 47 48 49 50 51 52 53 54 55 56 57 58 59 60 61 62 63 64 65 66 67 68 |
package Tools.WebSocket; import java.io.IOException; import java.util.ArrayList; import java.util.Date; import org.springframework.web.socket.CloseStatus; import org.springframework.web.socket.TextMessage; import org.springframework.web.socket.WebSocketMessage; import org.springframework.web.socket.WebSocketSession; import org.springframework.web.socket.handler.TextWebSocketHandler; public class SystemWebSocketHandler extends TextWebSocketHandler { private static final ArrayList<WebSocketSession> users = new ArrayList<>(); @Override public void afterConnectionEstablished(WebSocketSession session) throws Exception { System.out.println("ConnectionEstablished"); users.add(session); session.sendMessage(new TextMessage("connect")); session.sendMessage(new TextMessage("new_msg")); } @Override public void handleMessage(WebSocketSession session, WebSocketMessage<?> message) throws Exception { System.out.println("handleMessage" + message.toString()); session.sendMessage(new TextMessage(new Date() + "")); } @Override public void handleTransportError(WebSocketSession session, Throwable exception) throws Exception { if(session.isOpen()){ session.close(); } users.remove(session); } @Override public void afterConnectionClosed(WebSocketSession session, CloseStatus closeStatus) throws Exception { users.remove(session); } @Override public boolean supportsPartialMessages() { return false; } /** * 给所有在线用户发送消息 * * @param message */ public void sendMessageToUsers(TextMessage message) { for (WebSocketSession user : users) { try { if (user.isOpen()) { user.sendMessage(message); } } catch (IOException e) { e.printStackTrace(); } } } } |
WebSocketConfig.java
|
1 2 3 4 5 6 7 8 9 10 11 12 13 14 15 16 17 18 19 20 21 22 23 24 25 26 27 |
package Tools.WebSocket; import org.springframework.context.annotation.Bean; import org.springframework.context.annotation.Configuration; import org.springframework.web.servlet.config.annotation.DefaultServletHandlerConfigurer; import org.springframework.web.servlet.config.annotation.EnableWebMvc; import org.springframework.web.servlet.config.annotation.WebMvcConfigurerAdapter; import org.springframework.web.socket.WebSocketHandler; import org.springframework.web.socket.config.annotation.EnableWebSocket; import org.springframework.web.socket.config.annotation.WebSocketConfigurer; import org.springframework.web.socket.config.annotation.WebSocketHandlerRegistry; @Configuration @EnableWebMvc @EnableWebSocket public class WebSocketConfig extends WebMvcConfigurerAdapter implements WebSocketConfigurer { @Override public void registerWebSocketHandlers(WebSocketHandlerRegistry registry) { registry.addHandler(systemWebSocketHandler(), "/webSocketServer").addInterceptors(new WebSocketHandshakeInterceptor()); } @Bean public WebSocketHandler systemWebSocketHandler() { return new SystemWebSocketHandler(); } } |
WebSocketHandshakeInterceptor.java
|
1 2 3 4 5 6 7 8 9 10 11 12 13 14 15 16 17 18 19 20 21 |
package Tools.WebSocket; import org.springframework.http.server.ServerHttpRequest; import org.springframework.http.server.ServerHttpResponse; import org.springframework.web.socket.WebSocketHandler; import org.springframework.web.socket.server.HandshakeInterceptor; import java.util.Map; public class WebSocketHandshakeInterceptor implements HandshakeInterceptor { @Override public boolean beforeHandshake(ServerHttpRequest serverHttpRequest, ServerHttpResponse serverHttpResponse, WebSocketHandler webSocketHandler, Map<String, Object> map) throws Exception { System.out.println("beforeHandshake"); return true; } @Override public void afterHandshake(ServerHttpRequest serverHttpRequest, ServerHttpResponse serverHttpResponse, WebSocketHandler webSocketHandler, Exception e) { System.out.println("afterHandshake"); } } |
由于我们使用了Struts2导致我们的网络请求优先被Struts2的拦截器拦截,而Struts2又处理不了websocket请求,结果直接返回了404错误。因此我们需要替换掉默认的在web.xml中定义的Struts2的拦截器,要求Struts2不处理websocket请求。
我们在src->Tools下面新建一个Filter的目录,下面创建一个名为StrutsPrepareAndExecuteFilterEx.java的源代码文件,如下图:
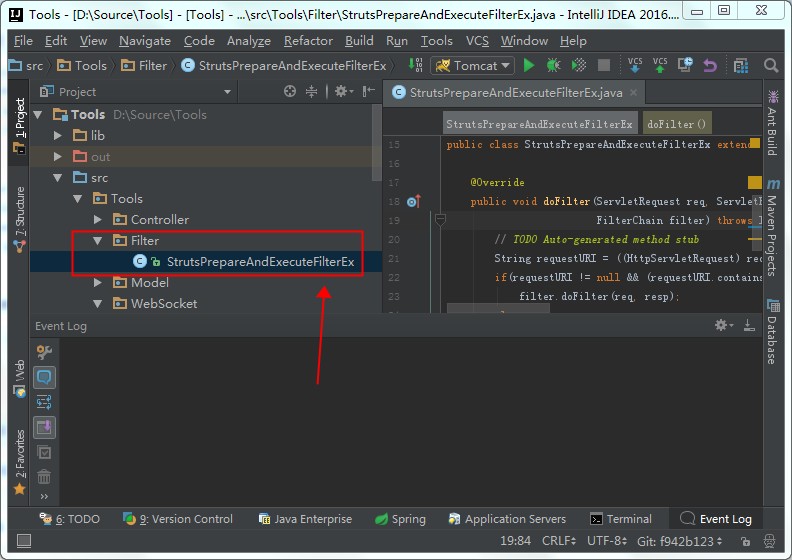
具体的代码如下:
StrutsPrepareAndExecuteFilterEx.java
|
1 2 3 4 5 6 7 8 9 10 11 12 13 14 15 16 17 18 19 20 21 22 23 24 |
package Tools.Filter; import org.apache.struts2.dispatcher.ng.filter.StrutsPrepareAndExecuteFilter; import javax.servlet.FilterChain; import javax.servlet.ServletException; import javax.servlet.ServletRequest; import javax.servlet.ServletResponse; import javax.servlet.http.HttpServletRequest; import java.io.IOException; public class StrutsPrepareAndExecuteFilterEx extends StrutsPrepareAndExecuteFilter { @Override public void doFilter(ServletRequest req, ServletResponse resp, FilterChain filter) throws IOException, ServletException { String requestURI = ((HttpServletRequest) req).getRequestURI(); if(requestURI != null && (requestURI.contains("/webSocketServer")) || requestURI.startsWith("ws://") || requestURI.contains("/mspjapi")) filter.doFilter(req, resp); else super.doFilter(req, resp, filter); } } |
这时候的代码是无法编译通过的,原因是依赖的javax的Jar包不存在。此时,我们需要手工引入javax.servlet:javax.servlet-api:3.1.0这个Jar包。如下图:


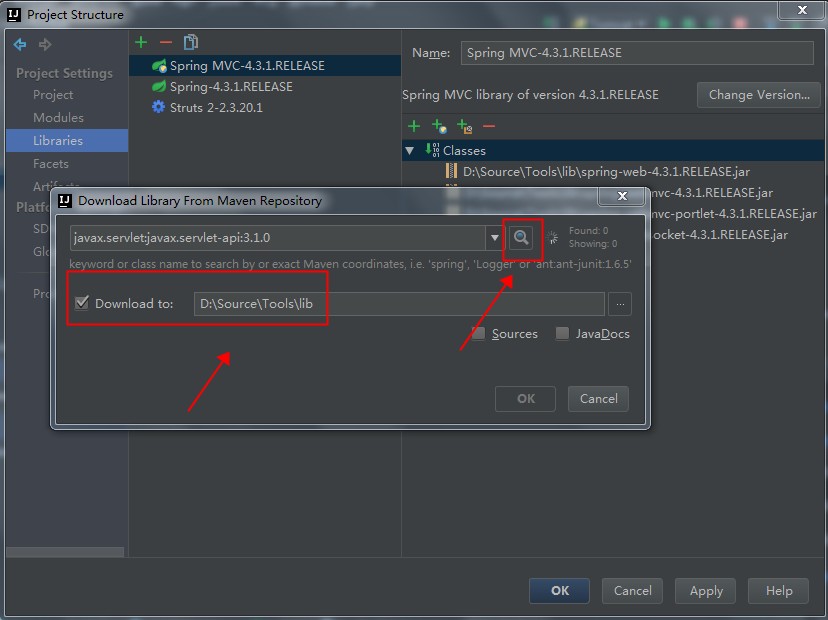
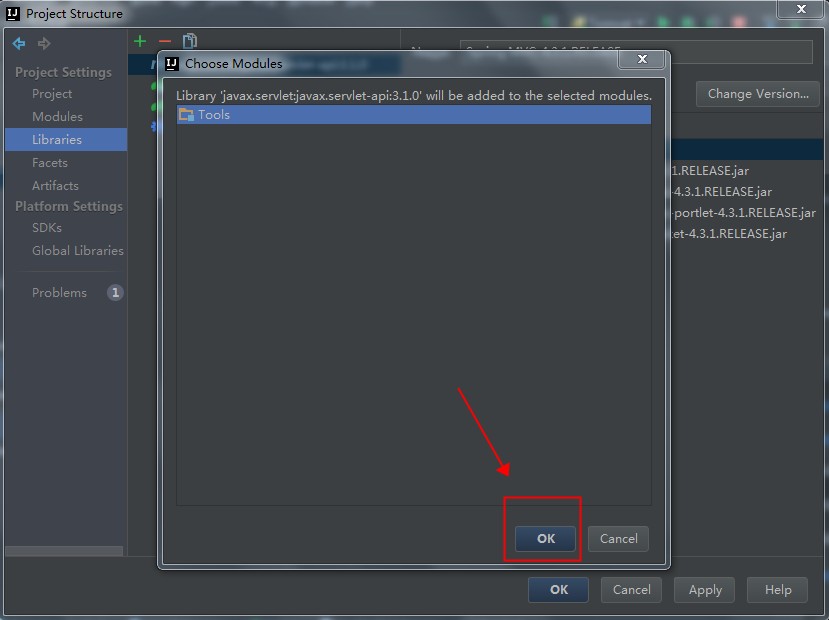

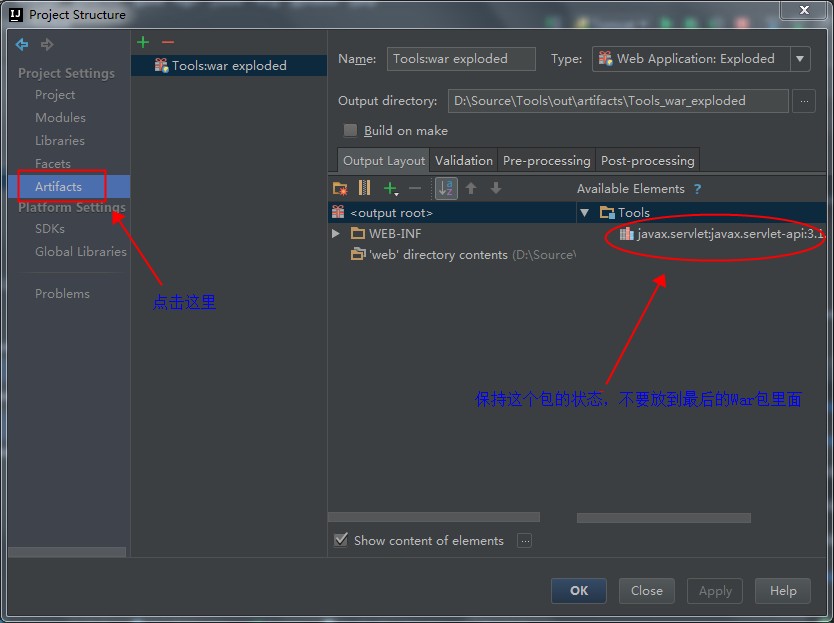
还要注意,刚刚添加进入的javax.servlet:javax.servlet-api:3.1.0这个Jar包,我们只在编译期间使用,在运行时候,使用Tomcat自己实现的那个同名Jar包。也就是这个包是个Provided,而不是Compile关系,具体如下图:
接下来,修改web.xml指定Struts2的拦截器为我们定义的拦截器
|
1 2 3 4 5 6 7 8 |
<filter> <filter-name>struts2</filter-name> <filter-class>org.apache.struts2.dispatcher.ng.filter.StrutsPrepareAndExecuteFilter</filter-class> </filter> <filter-mapping> <filter-name>struts2</filter-name> <url-pattern>/*</url-pattern> </filter-mapping> |
修改为
|
1 2 3 4 5 6 7 8 |
<filter> <filter-name>struts2</filter-name> <filter-class>Tools.Filter.StrutsPrepareAndExecuteFilterEx</filter-class> </filter> <filter-mapping> <filter-name>struts2</filter-name> <url-pattern>/*</url-pattern> </filter-mapping> |
经过上面的修改后,依旧是没办法进行网络访问的,原因是web.xml中的Spring拦截器并没有拦截WebSocket的数据请求。
|
1 2 3 4 5 6 7 8 9 10 |
<servlet> <servlet-name>dispatcher</servlet-name> <servlet-class>org.springframework.web.servlet.DispatcherServlet</servlet-class> <load-on-startup>1</load-on-startup> <async-supported>true</async-supported> </servlet> <servlet-mapping> <servlet-name>dispatcher</servlet-name> <url-pattern>*.form</url-pattern> </servlet-mapping> |
修改为
|
1 2 3 4 5 6 7 8 9 10 11 12 13 14 |
<servlet> <servlet-name>dispatcher</servlet-name> <servlet-class>org.springframework.web.servlet.DispatcherServlet</servlet-class> <load-on-startup>1</load-on-startup> <async-supported>true</async-supported> </servlet> <servlet-mapping> <servlet-name>dispatcher</servlet-name> <url-pattern>*.form</url-pattern> </servlet-mapping> <servlet-mapping> <servlet-name>dispatcher</servlet-name> <url-pattern>/webSocketServer/*</url-pattern> </servlet-mapping> |
注意增加的
|
1 |
<async-supported>true</async-supported> |
下一步,配置Spring的配置文件web->WEB-INF->dispatcher-servlet.xml增加配置信息类的扫描目录包含我们刚刚创建的src->Tools->WebSocket的目录(缺少这一步会导致我们通过注解实现的配置信息类没有被自动加载,导致无法访问),修改后的内容如下:
|
1 2 3 4 5 6 7 8 |
<?xml version="1.0" encoding="UTF-8"?> <beans xmlns="http://www.springframework.org/schema/beans" xmlns:xsi="http://www.w3.org/2001/XMLSchema-instance" xmlns:context="http://www.springframework.org/schema/context" xsi:schemaLocation="http://www.springframework.org/schema/beans http://www.springframework.org/schema/beans/spring-beans.xsd http://www.springframework.org/schema/context http://www.springframework.org/schema/context/spring-context.xsd"> <!-- Scan for spring annotated components --> <context:component-scan base-package="Tools.WebSocket"/> </beans> |
最后,调用的页面的代码
WebSocket.jsp
|
1 2 3 4 5 6 7 8 9 10 11 12 13 14 15 16 17 18 19 20 21 22 23 24 25 26 27 28 29 30 31 32 33 34 35 36 37 38 39 40 41 42 43 44 45 46 47 48 49 50 51 52 53 54 55 56 57 58 59 60 61 62 63 64 65 66 67 68 69 70 71 |
<%@ page contentType="text/html;charset=UTF-8" language="java" %> <!DOCTYPE html PUBLIC "-//W3C//DTD HTML 4.01 Transitional//EN" "http://www.w3.org/TR/html4/loose.dtd"> <html> <head> <meta http-equiv="Content-Type" content="text/html; charset=UTF-8"> <title>WebSocket</title> <style type="text/css"> #console-container { margin-left: 15px; margin-right: 15px; padding: 5px; width: 95%; } #console { border: 1px solid #CCCCCC; border-right-color: #999999; border-bottom-color: #999999; height: 300px; overflow-y: scroll; padding: 5px; width: 100%; } #console p { padding: 0; margin: 0; } </style> <script type="text/javascript"> var url = 'ws://' + window.location.host + '/webSocketServer'; var ws = new WebSocket(url); ws.onopen = function () { log('Info: connection opened.'); }; ws.onmessage = function (event) { log('Received: ' + event.data); }; ws.onclose = function (event) { log('Info: connection closed.'); log(event); }; function log(message) { var console = document.getElementById('console'); var p = document.createElement('p'); p.style.wordWrap = 'break-word'; p.appendChild(document.createTextNode(message)); console.appendChild(p); while (console.childNodes.length > 1000) { console.removeChild(console.firstChild); } console.scrollTop = console.scrollHeight; } </script> </head> <body> <div> <div id="console-container"> <div id="console"></div> </div> </div> </body> </html> |
最后的客户端显示效果如下图所示:
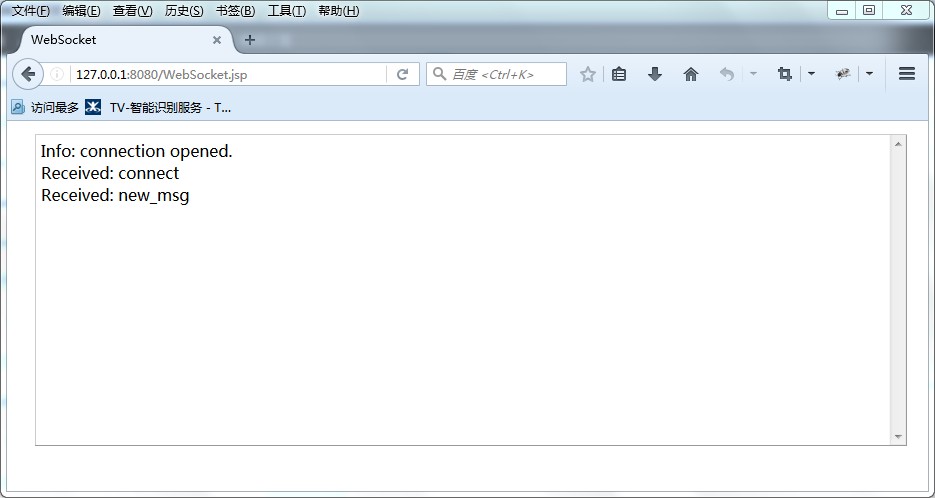
注意:如此创建的WebSocket是会在两三分钟后主动断开连接的,原因在于WebSocket需要周期性的发送心跳报文来维持连接。后续我们会尝试使用sockjs来实现自动发送心跳的逻辑。
具体的sockjs的接入方法,参考IntelliJ IDEA 2016.2使用Spring 4.3.1.RELEASE,sockjs-1.1.1,stomp-1.2搭建基于Tomcat-7.0.68的WebSocket应用
Ubuntu16.04 安装openjdk-7-jdk
Ubuntu16.04的安装源已经默认没有openjdk7了,所以要自己手动添加仓库,如下:
# 1. oracle openjdk ppa source
|
1 2 3 |
$sudo add-apt-repository ppa:openjdk-r/ppa $sudo apt-get update $sudo apt-get install openjdk-7-jdk // OpenJdk 7安装: |
# 2. oracle java jdk ppa source
|
1 2 |
$ sudo add-apt-repository ppa:webupd8team/java $ sudo apt-get update |
JDK6 :
|
1 |
$ sudo apt-get install oracle-java6-installer |
JDK 7:
|
1 |
$ sudo apt-get install oracle-java7-installer |
JDK 8:
|
1 |
$ sudo apt-get install oracle-java8-installer |
如果安装成功之后还是不能用可能不有多个版本,选的不对
|
1 2 |
$ sudo update-alternatives --config java $ sudo update-alternatives --config javac |
选出正确的版本