看到一篇很好的文章,浏览器的工作原理,http://www.html5rocks.com/zh/tutorials/internals/howbrowserswork/
看一遍,把要点梳理一下。
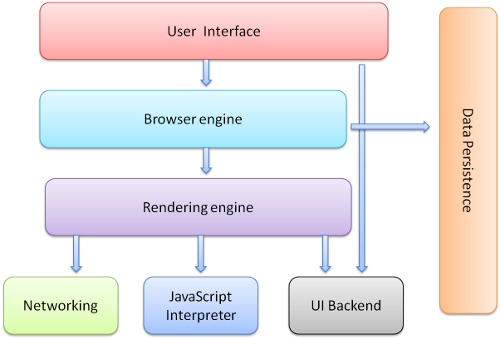
1.浏览器的结构
1)UI 主界面、地址栏、前进后退等
2)Browser engine,adapter层。
3)render engine,如果adapter层发来html的请求,render会解析html和css,并将结果最终渲染到屏幕上。
4)network,底层网络模块,与平台无关,负责所有网络接口。
5)JavaScript解释器,负责解析和执行JS
6)UI后端,绘制基本的窗口小控件,和平台无关,在底层使用操作系统的绘制方法。
7)数据存储,如cookie和indexdb等
Render Engine,渲染引擎
渲染引擎是web的核心,因为web中一般不做复杂的计算等操作。页面需要及时响应用户操作,流畅的渲染。那么来看一下渲染的基本流程

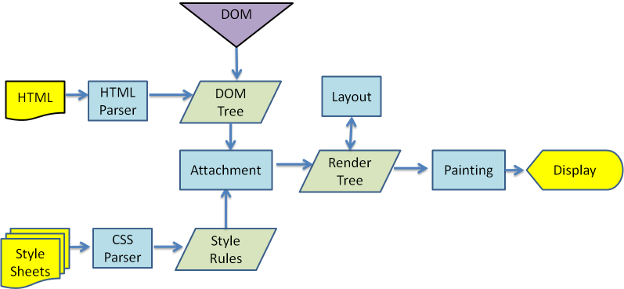
1.解析HTML,生成DOM-TREE,解析CSS,生成CSSOM,合成RenderTree,就是包含一堆矩形的树,树结构代表了显示顺序。
2.layout,计算位置
3.paint
下图是webkit的渲染过程
解析过程
上面的流程中,HTML Parser CSS Parser都涉及到了一个解析的过程,什么是解析?
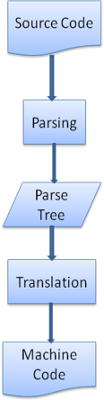
解析就是把文档转化成代码能理解的结构,生成结果被称为解析树或语法树。
解析基于确定的语法规则,即与上下文无关的语法。
解析可以分为两个过程:词法分析和语法分析。
解析把两个过程交给两个组件,词法分析器和解析器。
词法分析器负责把输入内容分成一个个标记。
解析器负责把标记构建成解析树。解析器的解析是一个迭代过程,即向词法分析器请求一个新标记,如果匹配语法规则,则把对应该标记的节点添加到解析树中,如果不匹配,则把这个标记缓存,继续请求标记,直到找到一个匹配的语法规则。
解析树往往还不是最终产品,这个时候需要使用编译器把解析树转成机器代码。
一般的解析可以去看龙书,Html语言不适用于常规解析器,因为HTML不是一种上下文无关的语言,这源于HTML有一定的容错能力。CSS和JavaScript可以。
HTML有自定义的解析器,采用DTD格式定义。
解析算法分为两个步骤,标记化和构建树:
标记化算法使用状态机驱动,该算法比较复杂,通过一个例子叙述:
|
|
<span class="tag"><html></span> <span class="tag"><body></span><span class="pln"> Hello world </span><span class="tag"></body></span> <span class="tag"></html></span> |
1.初始状态为 数据状态,
2.遇到<时,更改为标记打开状态,
3.之后读取一个a-z字符,进入标记名状态
4.直到遇到>,进入数据状态
5.数据状态下去读Hello world,直到<,进入标记打开状态
6.标记打开状态下遇到/号,创建 end tag token并进入标记名状态
7.读取a-z字符直到>,回到数据状态。
解析器创建时,会创建Document对象。在解析器工作的时候,已Document为根节点的DOM树不断更新,解析器生成的元素不仅仅会加入DOM树,还会放到堆栈中去,堆栈用来纠正嵌套错误和未关闭的标记。
树构建过程
树构建阶段的输入是一个来自标记化阶段的标记序列。第一个模式是“initial mode”。接收 HTML 标记后转为“before html”模式,并在这个模式下重新处理此标记。这样会创建一个 HTMLHtmlElement 元素,并将其附加到 Document 根对象上。
然后状态将改为“before head”。此时我们接收“body”标记。即使我们的示例中没有“head”标记,系统也会隐式创建一个 HTMLHeadElement,并将其添加到树中。
现在我们进入了“in head”模式,然后转入“after head”模式。系统对 body 标记进行重新处理,创建并插入 HTMLBodyElement,同时模式转变为“in body”。
现在,接收由“Hello world”字符串生成的一系列字符标记。接收第一个字符时会创建并插入“Text”节点,而其他字符也将附加到该节点。
接收 body 结束标记会触发“after body”模式。现在我们将接收 HTML 结束标记,然后进入“after after body”模式。接收到文件结束标记后,解析过程就此结束。
树构建过程
解析过程结束后,浏览器将文档注为交互状态,开始加载 defferd模式下的脚本。然后文档状态成为完成,随之触发加载事件。
容错
浏览器底层有大量的代码来对诸如 无效tag,结束符错误等容错。
来看看webkit的容错说明
解析器对标记化输入内容进行解析,以构建文档树。如果文档的格式正确,就直接进行解析。
遗憾的是,我们不得不处理很多格式错误的 HTML 文档,所以解析器必须具备一定的容错性。
我们至少要能够处理以下错误情况:
- 明显不能在某些外部标记中添加的元素。在此情况下,我们应该关闭所有标记,直到出现禁止添加的元素,然后再加入该元素。
- 我们不能直接添加的元素。这很可能是网页作者忘记添加了其中的一些标记(或者其中的标记是可选的)。这些标签可能包括:HTML HEAD BODY TBODY TR TD LI(还有遗漏的吗?)。
- 向 inline 元素内添加 block 元素。关闭所有 inline 元素,直到出现下一个较高级的 block 元素。
- 如果这样仍然无效,可关闭所有元素,直到可以添加元素为止,或者忽略该标记。
- 示例网站 www.liceo.edu.mx 嵌套了约 1500 个标记,全都来自一堆 <b> 标记。我们只允许最多 20 层同类型标记的嵌套,如果再嵌套更多,就会全部忽略。
- 支持格式非常糟糕的 HTML 代码。我们从不关闭 body 标记,因为一些愚蠢的网页会在实际文档结束之前就关闭。我们通过调用 end() 来执行关闭操作。
CSS解析是遵循一般的解析规则的,这里不赘述。
脚本和文档处理的顺序
当遇到一个script标签时,会立即停止文档的解析,进行js解析。
如果script标签带有defer标记,则会在文档解析完成后再解析。
h5增加了一个标记,将script标记为异步,则会开线程去解析它。
预解析
这是一项优化。在执行脚本的时候,其他线程回去解析剩下的文档部分,找出并加载需要下载的网络资源。预解析器不会动DOM树,只是寻找需要下载的资源。
样式表
理论上CSS和HTML不是一个解析器,但有些JS会请求CSS,所以浏览器在解析CSS的时候会禁止有交互的脚本。
Render-Tree
在DOM-Tree构建的时候,同时也在生成一个Render-Tree。Render-Tree是DOM-Tree的子集,它不包含那些display:none的元素,以及head等。
一般情况下DOM-Tree和Render-Tree的位置是对应的,但不包括absolute和float等非文档流内容,它们位于其他位置,原位置放一个占位符。
样式计算
样式计算是个复杂而庞大的工程,如 匹配规则为 div div div div,这样的匹配会很耗时,而且找了很久可能找到一个三层的。
浏览器为了样式计算进行了很多工作
共享样式数据
规则树
结构划分
使用规则树计算样式上下文
对规则进行处理以简化匹配
以正确的层叠顺序应用规则
样式表层叠顺序
特异性
特异性这里详细记一下
某个样式的属性声明可能会出现在多个样式表中,同一个样式表中也可能出现多次,那么他们的重要性为(优先级从低到高):
1.浏览器声明
2.用户普通声明
3.作者普通声明
4.作者重要声明
5.用户重要声明
同样顺序的声明,按照特异性排序
特异性是 a-b-c-d
a:声明来自style,标记为1,否则为0
b:选择器中ID属性的个数
c:选择器中class属性和伪类的个数
d:选择器中元素名称和伪类的个数
规则排序
渐进式处理
这里不详细叙述。
布局-layout
layout是一个比较重的环节,不仅仅是layout消耗时间,而是layout后一定会引发paint。
HTML采用流式布局,意味着可以遍历一次就计算出来所有位置,从左到右,从上到下。有些特殊的如 表格需要多次遍历。
每一个节点都有一个layout/reflow方法,是一个递归过程。
Dirty位系统
为了避免细小改动都要进程整体布局,浏览器采用了Dirty位的设计。如果某个节点发生了改变,则将其与子代标注为dirty。还有一种标记,children are dirty,表示节点至少有一个子代需要重新布局。
布局分全局和增量两种
全局指必须重新布局,增量是只布局dirty节点(可能还需要布局其他元素)。全局布局是同步的,增量布局一般是异步的。
布局优化,如果只是位置改变或者缩放等,可以直接从缓存取原大小。某些子树修改,不必全局重新layout,如input,不会每输入一次就来一次全局更新。
Paint
paint的内容比较少,只是调用节点的paint方法。paint也有全局绘制和增量绘制两种。
优化
webkit在paint时会缓存之前的矩形,只绘制新旧矩形的差异部分。而当元素有了变化,浏览器会尽量做最小的改动。
线程
Render engin是单线程。
loop
主线程是一个loop,事件循环。
CSS模型
可视化模型,指画布
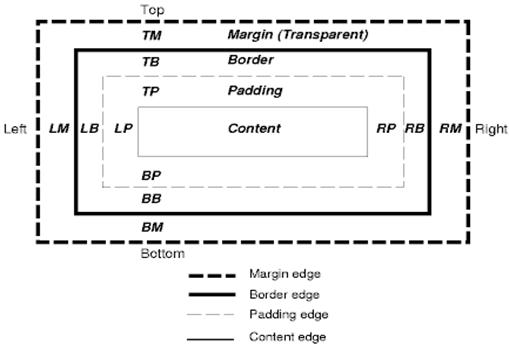
框模型,由框大小,padding,margin,border组成,display指定
position
普通 浮动 绝对
display:block 普通的矩形,拥有自己的区域
display:inline 没有自己的区域,位于容器block中
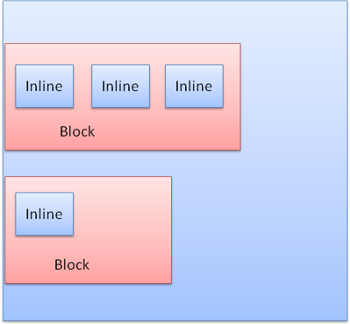
block是垂直的,inline是水平的
分层
z-index表示了框的第三个维度