查看So文件中的字符串信息(最常见是版本号)
1 |
$ strings libc.so | grep Version |
Linux是一套免费使用和自由传播的类Unix操作系统,是一个基于POSIX和UNIX的多用户、多任务、支持多线程和多CPU的操作系统。它能运行主要的UNIX工具软件、应用程序和网络协议。它支持32位和64位硬件。Linux继承了Unix以网络为核心的设计思想,是一个性能稳定的多用户网络操作系统。它主要用于基于Intel x86系列CPU的计算机上。这个系统是由全世界各地的成千上万的程序员设计和实现的。其目的是建立不受任何商品化软件的版权制约的、全世界都能自由使用的Unix兼容产品。
查看So文件中的字符串信息(最常见是版本号)
1 |
$ strings libc.so | grep Version |
使用cp -r -f
强制覆盖拷贝命令时,每一个文件都需要认为的键入“Y”进行确认,甚是烦扰,难道要我点击一万下不成?
cp
命令被设置了别名
alias cp='cp -i'
所以在每次执行cp
命令是都会按照这个设置进行人为的确认(-i
参数的含义)。
一.使用unalias cp
命令 解除对cp
的别名(仅本次终端连接会话临时取消),我们先输入alias
命令,查看系统内部已经设置的别名:
1 2 3 4 5 6 7 8 9 10 11 |
[root@localhost ~]# alias alias cp='cp -i' alias egrep='egrep --color=auto' alias fgrep='fgrep --color=auto' alias grep='grep --color=auto' alias l='ls -CF' alias la='ls -A' alias ll='ls -alF' alias ls='ls --color=auto' alias mv='mv -i' alias rm='rm -i' |
输入unalias cp
命令,取消cp
命令的别名.
1 |
[root@localhost ~]# unalias cp |
二.直接输入\cp
命令,作用也是取消cp
的别名
1 2 |
[root@localhost ~]# \cp filename new/filename [root@localhost ~]# |
三.使用管道的方式,自动输入yes
1 |
[root@localhost ~]# yes | cp filename new/filename |
eventfd
在内核版本,2.6.22以后有效。查看内核版本可以用命令 uname -r
。
1 2 |
#include<sys/eventfd.h> int eventfd(unsigned int initval,int flags); |
uint64_t
)。initval
)初始化这个计数器。调用这个函数就会返回一个新的文件描述符(event object)。2.6.27版本开始可以按位设置第二个参数(flags
)。EFD_NONBLOCK
, 功能同open(2)
的O_NONBLOCK
,设置对象为非阻塞状态,如果没有设置这个状态的话,read(2)
读eventfd
,并且计数器的值为0 就一直堵塞在read
调用当中,要是设置了这个标志, 就会返回一个 EAGAIN 错误(errno = EAGAIN
)。效果也如同 额外调用select(2)
达到的效果。EFD_CLOEXEC
这个标识被设置的话,调用exec后子进程得不到这个句柄,而不影响fork
产生的子进程,更多的是安全方面的考虑。EFD_SEMAPHORE
,这个标识(since Linux 2.6.30)开始,但是在Android的NDK中是没有这个定义的,因此不建议在Android中使用。他的功能完全可以用默认参数替换,而且更高效,因为如果是信号量模式,每次调用,只会减少1,导致重复进入内核,性能实际上是有影响的。
如果是2.6.26或之前版本的内核,flags 必须设置为0。
创建这个对象后,可以对其做如下操作。
write
将缓冲区写入的8字节整形值加到内核计数器上。
read
读取8字节值, 并把计数器重设为0. 如果调用read
的时候计数器为0, 要是eventfd
是阻塞的, read
就一直阻塞在这里,否则就得到 一个EAGAIN
错误。
如果buffer的长度小于8那么read
会失败, 错误代码被设置成 EINVAL
。
poll
select
epoll
close
当不需要eventfd
的时候可以调用close
关闭, 当这个对象的所有句柄都被关闭的时候,内核会释放资源。 为什么不是close
就直接释放呢, 如果调用fork
创建
进程的时候会复制这个句柄到新的进程,并继承所有的状态。
1 2 3 4 5 6 7 8 9 10 11 12 13 14 15 16 17 18 19 20 21 22 23 24 25 26 27 28 29 30 31 32 33 34 35 36 37 38 39 40 41 42 43 |
#include <sys/eventfd.h> #include <unistd.h> #include <stdlib.h> #include <stdio.h> #include <stdint.h> /* Definition of uint64_t */ #define handle_error(msg) \ do { perror(msg); exit(EXIT_FAILURE); } while (0) int main(int argc, char *argv[]) { uint64_t u; int efd = eventfd(10, 0); if (efd == -1) handle_error("eventfd"); int ret = fork(); if(ret == 0) { for (int j = 1; j < argc; j++) { printf("Child writing %s to efd\n", argv[j]); u = atoll(argv[j]); ssize_t s = write(efd, &u, sizeof(uint64_t)); if (s != sizeof(uint64_t)) handle_error("write"); } printf("Child completed write loop\n"); exit(EXIT_SUCCESS); } else { sleep(2); ssize_t s = read(efd, &u, sizeof(uint64_t)); if (s != sizeof(uint64_t)) handle_error("read"); printf("Parent read %llu from efd\n",(unsigned long long)u); exit(EXIT_SUCCESS); } } |
运行结果:
比较简单,不做过解释。子进程写入命令行中传入的参数,父进程读取其中计数器的值。
运行结果:
1 2 3 4 5 6 |
./eventfd 10 20 30 Child writing 10 to efd Child writing 20 to efd Child writing 30 to efd Child completed write loop Parent read 70 from efd |
命令行传入的是10、20、30其和应为60,为啥读取的是70呢?请看15行调用eventfd时第一个参数是10,这个参数是创建eventfd时初始化计数器的值。
参考链接:Linux中eventfd函数调用解析
1 2 |
$DIR='./' $find $DIR -type f -print0 | xargs -0 md5sum > ./md5.txt |
1 |
$ expect backup.sh |
hostback.sh
1 2 3 4 5 6 7 8 9 10 11 12 13 14 15 16 17 18 19 20 21 22 23 24 25 26 27 28 29 30 31 32 33 34 35 36 37 38 39 40 41 42 43 44 45 46 47 48 49 50 51 52 53 54 55 |
#!/bin/sh LogFile=~/backup/backup-`date +%Y%m%d`.log #指定日志的名字 BakDir=~/backup #备份文件存放的路径 MD5File=~/backup/md5-`date +%Y%m%d`.txt Sha1File=~/backup/sha1-`date +%Y%m%d`.txt #create backup directory if [ -d $BakDir ] then cd $BakDir touch $LogFile else mkdir -p $BakDir cd $BakDir touch $LogFile fi #backup wordpress datadump=`which mysqldump` wordpressdb="wordpress" #wordpress数据库的名字 wordpresspath=/var/www #wordpress程序文件的位置 mysqluser="root" #数据库的用户名 userpass="password" #用户密码 backupwordpress_tar_gz=$wordpressdb.`date +%Y%m%d`.tar.gz backupwordpress_sql=$wordpressdb.`date +%Y%m%d`.sql if $datadump -u $mysqluser --password=$userpass -h localhost --opt $wordpressdb > $backupwordpress_sql 2>&1 then echo " backup $wordpressdb success" >> $LogFile else echo " backup $wordpressdb error" >> $LogFile exit 1 fi #检验文件尾部是否存在 “-- Dump completed on”,如果存在不存在,则说明备份出错了。 if [ 0 -eq "$(sed '/^$/!h;$!d;g' $backupwordpress_sql | grep -c "Dump completed on")" ]; then echo " backup $wordpressdb error" >> $LogFile exit 1 fi #使用h参数的目的在于把软连接指向的实际内容打包进入,而不是仅仅打包一个软连接 if tar czpfh $backupwordpress_tar_gz $wordpresspath $backupwordpress_sql >/dev/null 2>&1 then echo " backup wordpress success" >> $LogFile rm -f $wordpressdb.`date +%Y%m%d`.sql else echo " backup wordperss error" >> $LogFile exit 1 fi md5sum $backupwordpress_tar_gz >> $MD5File sha1sum $backupwordpress_tar_gz >> $Sha1File |
backup.sh
1 2 3 4 5 6 7 8 9 10 11 12 13 14 15 16 17 18 19 20 21 22 23 24 25 26 27 28 29 30 31 32 33 34 35 36 37 38 39 40 41 42 43 44 45 46 47 48 49 50 51 52 53 54 55 56 57 58 59 60 61 62 63 64 65 66 67 68 69 70 71 72 73 74 75 76 77 78 79 80 81 82 83 84 85 86 87 88 89 90 91 92 93 94 95 96 97 98 99 100 101 102 103 104 105 106 107 108 109 110 111 112 113 114 115 116 |
#!/usr/bin/expect -f #开启内部动作调试输出,观察是否正确执行 1 代表打开调试,0代表关闭调试 exp_internal 0 set HostAddr "www.mobibrw.com" set HostPort 22 set UserName "user" set BackupShell "hostback.sh" set Password "password" set BakDir "backup" set timeout -1 #由于通过FTP传输的文件格式可能\n被替换为\r\n 的情况,因此需要执行一下 dos2unix 转化到 \n spawn dos2unix $BackupShell expect eof spawn ssh $HostAddr -p $HostPort -l $UserName rm -rf ~/$BackupShell expect -re ".*assword:" send "$Password\r" expect eof spawn scp $BackupShell $UserName@$HostAddr:~/$BackupShell expect -re ".*assword:" send "$Password\r" expect eof spawn ssh $HostAddr -p $HostPort -l $UserName chmod +x ~/$BackupShell expect -re ".*assword:" send "$Password\r" expect eof #解决在群晖NAS系统上TCP超时问题,增加心跳保持参数 #同时注意,远端语言有可能不是英文,因此需要增加LC_ALL=C强制切换到英文,否则后续匹配可能无法完成 spawn ssh $HostAddr -o TCPKeepAlive=yes -o ServerAliveInterval=30 -p $HostPort -l $UserName "LC_ALL=C sudo -E bash ~/$BackupShell" expect -re ".*assword:" send "$Password\r" expect eof spawn scp -r $UserName@$HostAddr:~/$BakDir ./ expect -re ".*assword:" send "$Password\r" expect eof #backup-20151227.log\nbash: warning: setlocale: LC_ALL: cannot change locale (zh_CN.utf8) 这种情况要注意 proc getFilterFile { host port user bakdir password filter regx} { spawn ssh $host -p $port -l $user ls ~/$bakdir | grep $filter expect -re ".*assword:" send "$password\r" expect -re "$regx" expect eof return [string trimright $expect_out(0,string)] } cd ./$BakDir #校验MD5,SHA1 set MD5File [getFilterFile $HostAddr $HostPort $UserName $BakDir $Password "md5" "md5(.*).txt"] puts stdout $MD5File #修改语言环境,否则md5sum,sha1sum返回的结果中可能不会出现"OK",而是会出现“确定” #“失败” if {[info exists ::env(LANG)]==1} { set ORG_LANG "$env(LANG)" puts stdout "$env(LANG)" set env(LANG) "C" puts stdout "$env(LANG)" } if {[info exists ::env(LC_ALL)]==1} { set ORG_LC_ALL "$env(LC_ALL)" puts stdout "$env(LC_ALL)" set env(LC_ALL) "C" puts stdout "$env(LC_ALL)" } spawn md5sum -c $MD5File expect -re ".*OK" expect eof set Sha1File [getFilterFile $HostAddr $HostPort $UserName $BakDir $Password "sha1" "sha1(.*).txt"] puts stdout $Sha1File spawn sha1sum -c $Sha1File expect -re ".*OK" expect eof #还原语言设置 if {[info exists ::env(LANG)]==1} { puts stdout "$env(LANG)" set env(LANG) "$ORG_LANG" puts stdout "$env(LANG)" } if {[info exists ::env(LC_ALL)]==1} { puts stdout "$env(LC_ALL)" set env(LC_ALL) "$ORG_LC_ALL" puts stdout "$env(LC_ALL)" } #打印本次的备份日志出来 set LogFile [getFilterFile $HostAddr $HostPort $UserName $BakDir $Password "backup" "backup(.*).log"] puts stdout $LogFile set f [ open $LogFile r] while { [ gets $f line ] >= 0 } { puts stdout $line;} #删除远端的备份脚本 spawn ssh $HostAddr -p $HostPort -l $UserName sudo rm -rf ~/$BackupShell expect -re ".*assword:" send "$Password\r" expect eof #删除远端的备份目录 spawn ssh $HostAddr -p $HostPort -l $UserName sudo rm -rf ~/$BakDir expect -re ".*assword:" send "$Password\r" expect eof |
在安装Ubuntu 15.04的时候,由于机器使用的是SSD硬盘,因此在建立HOME分区的时候选择了使用Btrfs格式作为分区格式。一直都是使用正常,直到今天,在向HOME分区拷贝一个16GB的文件的时候提示 “拼接文件出错:设备上没有空间” (英文系统可能会提示 “No space left on device”)。
使用"df"命令查询分区,发现所有分区都是足够的。如下图所示,空间足够使用,尤其是HOME分区,足足有40GB的空间。
维基百科搜索“btrfs”,简介中标明,最大文件尺寸 16 EiB,显然,16GB的文件,是不会超过这个限制的。
同样是维基百科,btrfs条目,标明 最大文件数量 2^64,显然,120GB的一个硬盘,即使是全部是一个字节的小文件,也达不到这个数字的。
使用"df -i"命令查询Inode信息,发现好奇怪的现象,home所在的分区信息中Inode信息,不管是已经你使用的,还是可以使用的,还是总数,都是 0. 为什么呢?
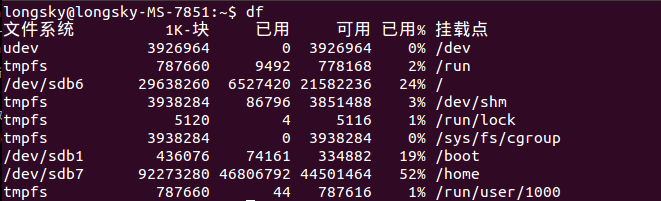
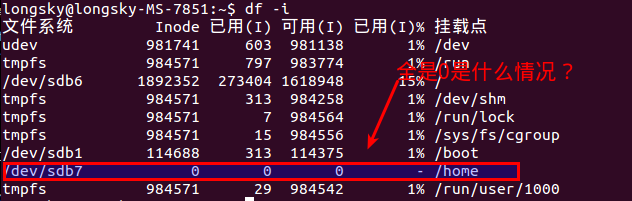
后来才知道,btrfs格式是不能使用df命令的,btrfs有自己的单独的命令查询.
1 |
$btrfs fi df /home |
仔细观察一下输出结果,好奇怪,使用df 命令,我们查询到分区的大小在90GB左右,但是这里显示的文件的大小仅仅是43GB,而且已经使用了42.50GB,按照这个显示,自然是空间不足了,那么,我们的空间去了哪里?
这个问题的产生,本质上是btrfs设计导致的,原因归咎于btrfs所采用的COW技术,这项技术需要一个比较大的保留存储空间,但是当空间不足的时候,本应减少保留空间,而显然,默认情况下,没有正确处理这种情况。这个问题在3.18版本之后得到比较好的解决。
对于 btrfs 3.18之前的版本来说,执行如下命令即可.
1 |
$btrfs balance start -v -dusage=0 /home |
从3.18版本开始,这个命令是当空间不足出现的时候,默认执行的,很遗憾,15.04的btrfs版本号是3.17.
显示btfs文件系统信息
1 2 3 4 5 6 |
$sudo btrfs fi show Label: none uuid: 6fb44e01-f148-41c7-8448-17b58089f908 Total devices 1 FS bytes used 43.42GiB devid 1 size 88.00GiB used 46.06GiB path /dev/sdb7 Btrfs v3.17 |
btrfs磁盘文件检查(需要重启进入修复模式中执行)
1 |
sudo btrfs check --repair /dev/sda7 |
Btrfs Problem_FAQ
Ubuntu thinks btrfs disk is full but its not
由于国外网站经常打不开,因此内容直接复制到这里 原文链接
Btrfs is different from traditional filesystems. It is not just a layer that translates filenames into offsets on a block device, it is more of a layer that combines a traditional filesystem with LVM and RAID. And like LVM, it has the concept of allocating space on the underlying device, but not actually using it for files.
A traditional filesystem is divided into files and free space. It is easy to calculate how much space is used or free:
1 2 |
|--------files--------| | |------------------------drive partition-------------------------------| |
Btrfs combines LVM, RAID and a filesystem. The drive is divided into subvolumes, each dynamically sized and replicated:
1 2 3 |
|--files--| |--files--| |files| | | |----@raid1----|------@raid1-------|-----@home-----|metadata| | |------------------------drive partition-------------------------------| |
The diagram shows the partition being divided into two subvolumes and metadata. One of the subvolumes is duplicated (RAID1), so there are two copies of every file on the device. Now we not only have the concept of how much space is free at the filesystem layer, but also how much space is free at the block layer (drive partition) below it. Space is also taken up by metadata.
When considering free space in Btrfs, we have to clarify which free space we are talking about - the block layer, or the file layer? At the block layer, data is allocated in 1GB chunks, so the values are quite coarse, and might not bear any relation to the amount of space that the user can actually use. At the file layer, it is impossible to report the amount of free space because the amount of space depends on how it is used. In the above example, a file stored on the replicated subvolume @raid1 will take up twice as much space as the same file stored on the @homesubvolume. Snapshots only store copies of files that have been subsequently modified. There is no longer a 1-1 mapping between a file as the user sees it, and a file as stored on the drive.
You can check the free space at the block layer with btrfs filesystem show /
and the free space at the subvolume layer with btrfs filesystem df /
1 2 3 |
# df -h Filesystem Size Used Avail Use% Mounted on /dev/mapper/sda4_crypt 38G 12G 13M 100% / |
For this mounted subvolume, df reports a drive of total size 38G, with 12G used, and 13M free. 100% of the available space has been used. Remember that the total size 38G is divided between different subvolumes and metadata - it is not exclusive to this subvolume.
1 2 3 4 5 6 |
# btrfs filesystem df / Data, single: total=9.47GiB, used=9.46GiB System, DUP: total=8.00MiB, used=16.00KiB System, single: total=4.00MiB, used=0.00 Metadata, DUP: total=13.88GiB, used=1.13GiB Metadata, single: total=8.00MiB, used=0.00 |
Each line shows the total space and the used space for a different data type and replication type. The values shown are data stored rather than raw bytes on the drive, so if you're using RAID-1 or RAID-10 subvolumes, the amount of raw storage used is double the values you can see here.
The first column shows the type of item being stored (Data, System, Metadata). The second column shows whether a single copy of each item is stored (single), or whether two copies of each item are stored (DUP). Two copies are used for sensitive data, so there is a backup if one copy is corrupted. For DUP lines, the used value has to be doubled to get the amount of space used on the actual drive (because btrfs fs df reports data stored, not drive space used). The third and fourth columns show the total and used space. There is no free column, since the amount of "free space" is dependent on how it is used.
The thing that stands out about this drive is that you have 9.47GiB of space allocated for ordinary files of which you have used 9.46GiB - this is why you are getting No space left on device errors. You have 13.88GiB of space allocated for duplicated metadata, of which you have used 1.13GiB. Since this metadata is DUP duplicated, it means that 27.76GiB of space has been allocated on the actual drive, of which you have used 2.26GiB. Hence 25.5GiB of the drive is not being used, but at the same time is not available for files to be stored in. This is the "Btrfs huge metadata allocated"problem. To try and correct this, run btrfs balance start -m /
. The -m parameter tells btrfs to only re-balance metadata.
A similar problem is running out of metadata space. If the output had shown that the metadata were actually full (used value close to total), then the solution would be to try and free up almost empty (<5% used) data blocks using the command btrfs balance start -dusage=5 /
. These free blocks could then be reused to store metadata.
For more details see the Btrfs FAQs:
If you have historical snapshots, the quickest way to get space back so that you can look at the filesystem and apply better fixes and cleanups is to drop the oldest historical snapshots.
Two things to note:
Note that even in the cases described below, you may have to clear one snapshot or more to make space before btrfs balance can run. As a corollary, btrfs can get in states where it's hard to get it out of the 'no space' state it's in. As a result, even if you don't need snapshot, keeping at least one around to free up space should you hit that mis-feature/bug, can be handy
Look at filesystem show output:
1 2 3 4 |
legolas:~# btrfs fi show Label: btrfs_pool1 uuid: 4850ee22-bf32-4131-a841-02abdb4a5ba6 Total devices 1 FS bytes used 441.69GiB devid 1 size 865.01GiB used 751.04GiB path /dev/mapper/cryptroot |
Only about 50% of the space is used (441 out of 865GB), but the device is 88% full (751 out of 865MB). Unfortunately it's not uncommon for a btrfs device to fill up due to the fact that it does not rebalance chunks (3.18+ has started freeing empty chunks, which is a step in the right direction).
In the case above, because the filesystem is only 55% full, I can ask balance to rewrite all chunks that have less than 55% space used. Rebalancing those blocks actually means taking the data in those blocks, and putting it in fuller blocks so that you end up being able to free the less used blocks.
This means the bigger the -dusage value, the more work balance will have to do (ie taking fuller and fuller blocks and trying to free them up by putting their data elsewhere). Also, if your FS is 55% full, using -dusage=55 is ok, but there isn't a 1 to 1 correlation and you'll likely be ok with a smaller dusage number, so start small and ramp up as needed.
1 |
legolas:~# btrfs balance start -dusage=55 /mnt/btrfs_pool1 |
# Follow the progress along with: legolas:~# while :; do btrfs balance status -v /mnt/btrfs_pool1; sleep 60; done Balance on '/mnt/btrfs_pool1' is running 10 out of about 315 chunks balanced (22 considered), 97% left Dumping filters: flags 0x1, state 0x1, force is off DATA (flags 0x2): balancing, usage=55 Balance on '/mnt/btrfs_pool1' is running 16 out of about 315 chunks balanced (28 considered), 95% left Dumping filters: flags 0x1, state 0x1, force is off DATA (flags 0x2): balancing, usage=55 (...)
When it's over, the filesystem now looks like this (note devid used is now 513GB instead of 751GB):
1 2 3 4 |
legolas:~# btrfs fi show Label: btrfs_pool1 uuid: 4850ee22-bf32-4131-a841-02abdb4a5ba6 Total devices 1 FS bytes used 441.64GiB devid 1 size 865.01GiB used 513.04GiB path /dev/mapper/cryptroot |
Before you ask, yes, btrfs should do this for you on its own, but currently doesn't as of 3.14.
Unfortunately btrfs has another failure case where the metadata space can fill up. When this happens, even though you have data space left, no new files will be writeable.
In the example below, you can see Metadata DUP 9.5GB out of 10GB. Btrfs keeps 0.5GB for itself, so in the case above, metadata is full and prevents new writes.
One suggested way is to force a full rebalance, and in the example below you can see metadata goes back down to 7.39GB after it's done. Yes, there again, it would be nice if btrfs did this on its own. It will one day (some if it is now in 3.18).
Sometimes, just using -dusage=0 is enough to rebalance metadata (this is now done automatically in 3.18 and above), but if it's not enough, you'll have to increase the number.
1 2 3 4 5 6 |
legolas:/mnt/btrfs_pool2# btrfs fi df . Data, single: total=800.42GiB, used=636.91GiB System, DUP: total=8.00MiB, used=92.00KiB System, single: total=4.00MiB, used=0.00 Metadata, DUP: total=10.00GiB, used=9.50GiB Metadata, single: total=8.00MiB, used=0.00 |
1 2 3 |
legolas:/mnt/btrfs_pool2# btrfs balance start -v -dusage=0 /mnt/btrfs_pool2 Dumping filters: flags 0x1, state 0x0, force is off DATA (flags 0x2): balancing, usage=0 Done, had to relocate 91 out of 823 chunks |
1 2 3 4 5 6 |
legolas:/mnt/btrfs_pool2# btrfs fi df . Data, single: total=709.01GiB, used=603.85GiB System, DUP: total=8.00MiB, used=88.00KiB System, single: total=4.00MiB, used=0.00 Metadata, DUP: total=10.00GiB, used=7.39GiB Metadata, single: total=8.00MiB, used=0.00 |
One trick to get around this is to add a device (even a USB key will do) to your btrfs filesystem. This should allow balance to start, and then you can remove the device with btrfs device delete when the balance is finished.
It's also been said on the list that kernel 3.14 can fix some balancing issues that older kernels can't, so give that a shot if your kernel is old.
Note, it's even possible for a filesystem to be full in a way that you cannot even delete snapshots to free space. This shows how you would work around it:
1 2 3 4 |
root@polgara:/mnt/btrfs_pool2# btrfs fi df . Data, single: total=159.67GiB, used=80.33GiB System, single: total=4.00MiB, used=24.00KiB Metadata, single: total=8.01GiB, used=7.51GiB |
<<<< BAD
1 2 3 |
root@polgara:/mnt/btrfs_pool2# btrfs balance start -v -dusage=0 /mnt/btrfs_pool2 Dumping filters: flags 0x1, state 0x0, force is off DATA (flags 0x2): balancing, usage=0 Done, had to relocate 0 out of 170 chunks |
1 2 3 4 |
root@polgara:/mnt/btrfs_pool2# btrfs balance start -v -dusage=1 /mnt/btrfs_pool2 Dumping filters: flags 0x1, state 0x0, force is off DATA (flags 0x2): balancing, usage=1 ERROR: error during balancing '/mnt/btrfs_pool2' - No space left on device There may be more info in syslog - try dmesg | tail |
1 2 3 4 |
root@polgara:/mnt/btrfs_pool2# dd if=/dev/zero of=/var/tmp/btrfs bs=1G count=5 5+0 records in 5+0 records out 5368709120 bytes (5.4 GB) copied, 7.68099 s, 699 MB/s |
1 2 |
root@polgara:/mnt/btrfs_pool2# losetup -v -f /var/tmp/btrfs Loop device is /dev/loop0 |
1 2 |
root@polgara:/mnt/btrfs_pool2# btrfs device add /dev/loop0 . Performing full device TRIM (5.00GiB) ... |
1 2 |
root@polgara:/mnt/btrfs_pool2# btrfs subvolume delete space2_daily_20140603_00:05:01 Delete subvolume '/mnt/btrfs_pool2/space2_daily_20140603_00:05:01' |
1 2 3 4 5 6 7 |
root@polgara:/mnt/btrfs_pool2# for i in *daily*; do btrfs subvolume delete $i; done Delete subvolume '/mnt/btrfs_pool2/space2_daily_20140604_00:05:01' Delete subvolume '/mnt/btrfs_pool2/space2_daily_20140605_00:05:01' Delete subvolume '/mnt/btrfs_pool2/space2_daily_20140606_00:05:01' Delete subvolume '/mnt/btrfs_pool2/space2_daily_20140607_00:05:01' Delete subvolume '/mnt/btrfs_pool2/space2_daily_20140608_00:05:01' Delete subvolume '/mnt/btrfs_pool2/space2_daily_20140609_00:05:01' |
1 |
root@polgara:/mnt/btrfs_pool2# btrfs device delete /dev/loop0 |
1 2 3 |
root@polgara:/mnt/btrfs_pool2# btrfs balance start -v -dusage=1 /mnt/btrfs_pool2 Dumping filters: flags 0x1, state 0x0, force is off DATA (flags 0x2): balancing, usage=1 Done, had to relocate 5 out of 169 chunks |
1 2 3 4 |
root@polgara:/mnt/btrfs_pool2# btrfs fi df . Data, single: total=154.01GiB, used=80.06GiB System, single: total=4.00MiB, used=28.00KiB Metadata, single: total=8.01GiB, used=4.88GiB |
<<< GOOD
For more info, please read:
1.只查看导出函数
1 |
$objdump -tT 7z.so |
2.查看更详细的二进制信息
1 |
$readelf -a 7z.so |
注意,使用readelf读取函数列表的时候,如果函数名比较长,可能会在显示的时候被截断,如果只查看导出函数,建议使用 objdump命令。
3.查看链接的库
1 |
$ldd 7z.so |