Linux基础:分析 Ubuntu 磁盘使用情况

在这篇文章中,我将指导你们如何在 Ubuntu 中对磁盘使用情况进行分析。为了确保系统的健康,运行的流畅,时常关心机器的硬盘,适当的运行一些分析是非常重要的,当然,运行这些分析是很容易的。为了完成分析,我们将使用一款非常棒的图形工具,名叫Baobab

在 下一步操作之前,我可以告诉你们,它的使用非常简单,功能齐全,我确定它能够满足你的需求。Baobab 是 gnome-utils 的一部分,但是自从Gnome3.4版本后,已经作为独立应用。通过使用这个磁盘分析工具,你可以轻松扫描文件夹,文件系统,不单是本地,远程目录一样可 以轻松分析。

只需轻轻点击,便可以搞定一切!想要停止扫描?简单,在 baobab 用户界面的顶部,轻点 Stop scanning 按钮,完成。

我喜欢这个工具的简单性并且可以图形化表示数据,像饼状图和树形图。那么,现在你们在自己的机子上安装使用如何呢?

据我所知,ubuntu已经默认安装,如果没有,打开一个新终端(CTRL+ALT+T),然后运行下列命令来安装它。

安装完毕后,会分类至应用程序, 系统工具, 磁盘分析器,或者,直接使用下列命令,在终端中运行baobab。

下列图片显示了当它在你的机器运行时的界面。baobab1 
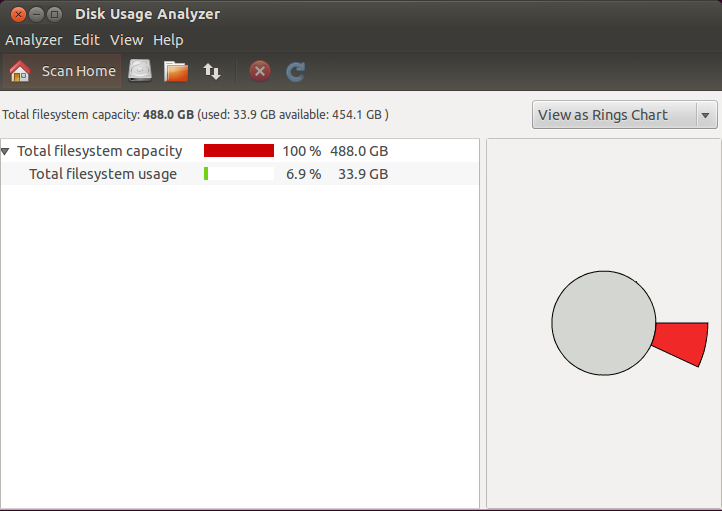
如需扫描 Home 目录,点击 Scan Home 或者 Analyzer->Scan Home Folder 选项。完成扫描后,工具会做很多分析,耐心等待分析结果吧!

baobab2

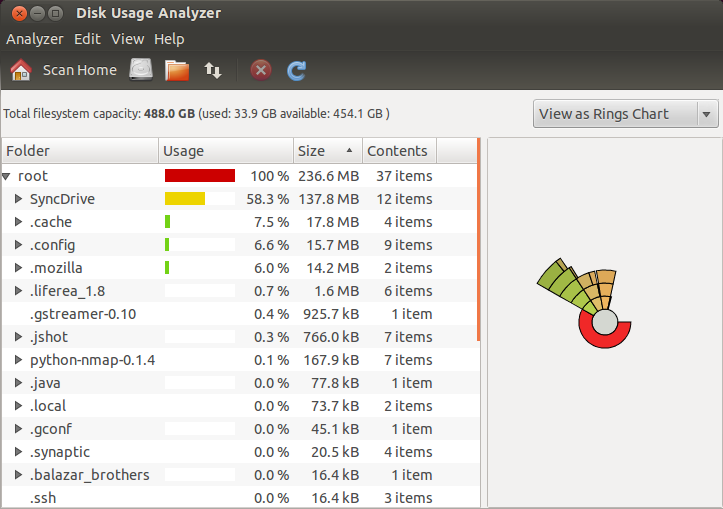
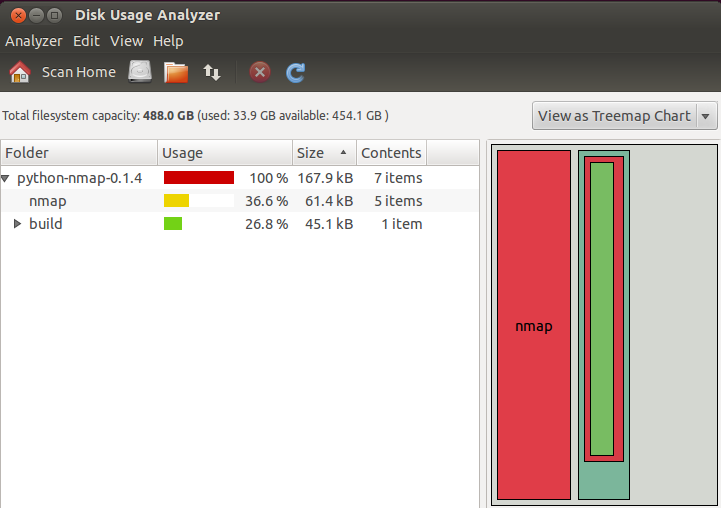
正如上图所见,baobab 扫描结果提供给我们很多信息,包括 Home 目录中每一个文件夹的使用情况、大小,以及所拥有文件数。右边有一个饼状示意图。如果你喜欢,选择上方的 View as Treemap Chart,你可以轻松地把它换成树状图。

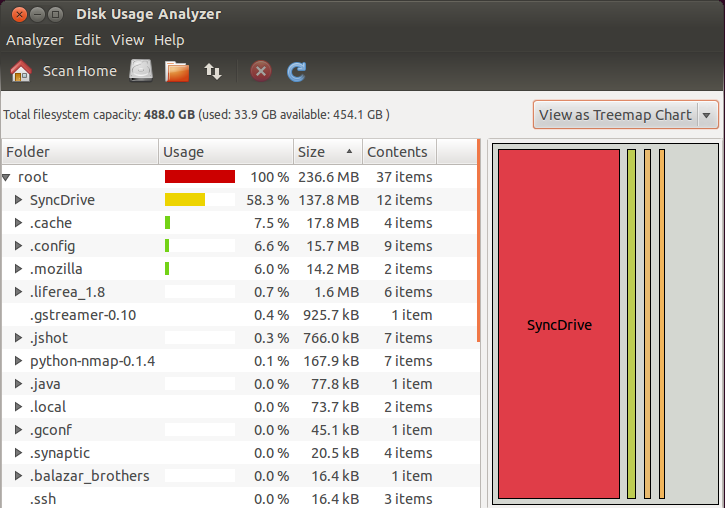
下图显示的是,选择树状图代替默认的饼状图的界面。

baobab3

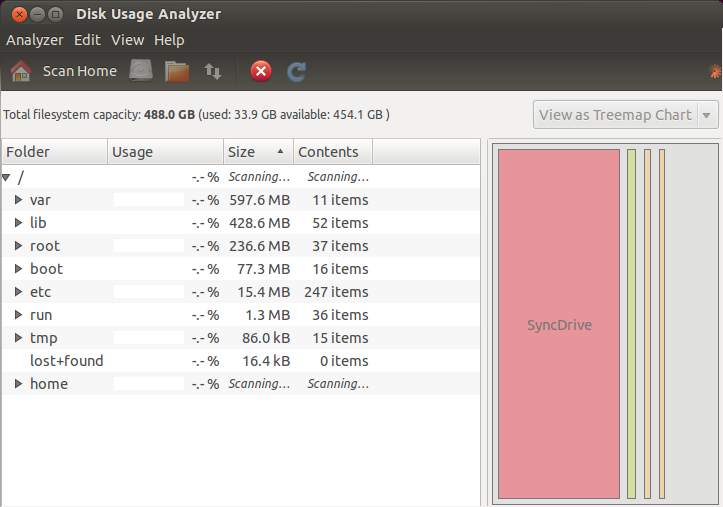
如需扫描文件系统,选择 Analyzer->Scan Filesystem ,如果你懒得去点击这些,有一个简单方法,快捷键CTRL+F

选择你喜欢的方式,两个方法都会起效并做同样的扫描。快捷键的确易用省时,但是如果不是天天用这个工具,也很难同时记住所有快捷键。

baobab4

如何扫描文件夹?简单!Analyzer-> Scan A Folder -> 选择你想要扫描的文件夹,快捷键是 CTRL+O 。是不是非常简单?是的!看见 Scan a Folder 按钮了吗?点击它扫描就开始了!

下图显示了扫描完 python-nmap-0.1.4 后的结果。我用简单的方法得到了有用的信息列表。

baobab5

你已经学会了如何扫描 Home 目录、文件系统和指定文件夹。有一个重要的功能,我还没有告诉你,但我确定你一定可以自己学会。是不是有远程文件夹需要扫描?好好发挥一下脑力吧!

引用 http://www.lupaworld.com/article-238081-1.html

Passthru中为什么要不直接把Packet发送或接收,而另外再建一个MyPacket用来发

NDIS4.0及5.0中的中间层驱动必须分配新的包描述符,即使不对包做任何修改(如同Passthru那样)。NDIS5.1支持Packet stack方式

看DDK的说明:
NDIS 4.0 and 5.0 intermediate drivers must allocate a new NDIS_PACKET to encapsulate data that they pass on. These intermediate drivers must also copy any out-of-band (OOB) data to the new packet. Even if the intermediate driver does nothing other than simply pass on incoming packets — for example, if it simply counts the packets — it must allocate a fresh packet descriptor and manage some or all of a new packet structure.

NDIS 5.1 intermediate drivers that support packet stacking avoid this extra data handling in most common cases. Each NDIS_PACKET allocated includes "stacks", where each stack is defined as:

typedef struct _NDIS_PACKET_STACK
{
ULONG_PTR IMReserved[2];
ULONG_PTR NdisReserved[4];
} NDIS_PACKET_STACK, *PNDIS_PACKET_STACK;

NDIS 5.1 intermediate drivers call the NdisIMGetCurrentPacketStack function to access the IMReserved member in the NDIS_PACKET_STACK structure. This member can be used by an NDIS 5.1 intermediate driver to store its context information, if any, for the packet. NDIS 4.0 and 5.0 intermediate drivers use the ProtocolReserved and MiniportReserved members, for sent and received packets, in the NDIS_PACKET structure. If a call to NdisIMGetCurrentPacketStack indicates *StacksRemaining is FALSE, the NDIS 5.1 intermediate driver must revert to the NDIS 5.0 packet handling model.

Every NDIS 4.0 and 5.0 intermediate driver must allocate new packet descriptors to replace those of the overlying driver. If an intermediate driver converts the packet from one format to another, it also can allocate buffer descriptors to map intermediate-allocated buffers into which the converted data is copied. If there is OOB data associated with the packet descriptor being copied, this data can be copied to the new OOB block associated with the intermediate-allocated packet descriptor, using the macro NDIS_OOB_DATA_FROM_PACKET, to obtain a pointer to the OOB data area and, then, calling NdisMoveMemory to move the contents into the OOB area associated with the new packet descriptor. Alternatively, such an intermediate driver can use the NDIS_GET_PACKET_XXX and NDIS_SET_PACKET_XXX macros to read specific items from the OOB data associated with the old packet descriptor and to write the OOB data for the new packet descriptor.

删除右键菜单中的Git

安装完Git之后,会发现在系统(此指windows)的右键菜单中会多出Git的三个选项:Git Init Here 、Git Gui 和Git Bash。

如果你用不着上述三个命令,而且也跟我一样觉着很长的右键菜单觉着不爽,那你可以按照以下的方法移除右键菜单的Git命令

1.找到你Git的安装路径,如:D:\Program\Git,在这个路径中找到“git-cheetah”文件夹

2. cd D:\Program\Git\git-cheetah

3. regsvr32 /u git_shell_ext.dll

对于 64位系统,执行

regsvr32 /u git_shell_ext64.dll