简介
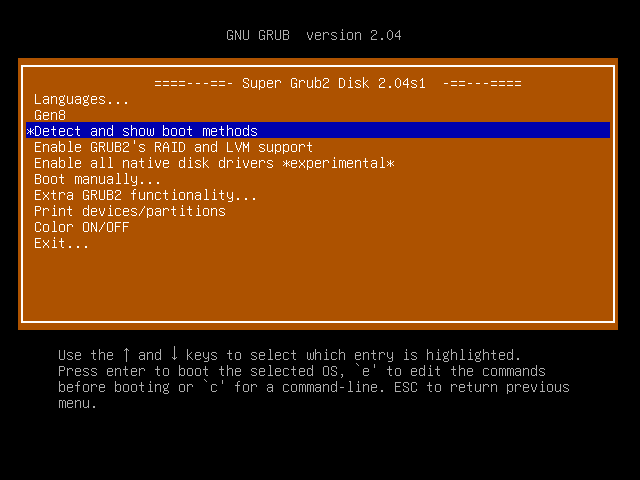
MicroServer Gen8属于HPE(Hewlett Packard Enterprise,惠普企业级产品)而不是HP,MicroServer Gen8的支持页面(如驱动下载)在HPE,官网首页是http://www.hpe.com,不是http://www.hp.com。
HPE大约从2015年起变更了服务支持策略,普通驱动可以无限制下载,但是BIOS、SPP更新等可能需要用主机序列号注册、且在主机质保期内方能下载,超期就只能等待别人搬运分享了。
MicroServer Gen8在AHCI模式时,五个SATA和普通主板的功能一样,唯一不同的是MS G8的BIOS不能选择用哪个硬盘启动。
它会尝试从SATA1引导,如果SATA1没有连接硬盘,则尝试从SATA2引导,以此类推。
可是SATA1~4是硬盘笼子;通常人们都是将4个3.5寸仓库盘放到笼子里面;然后通过SATA5连接一个2.5寸硬盘(放置在9.5mm光驱位置)做系统盘。当五个硬盘都连接时,BIOS仅尝试从SATA1引导,结果出现引导失败。
解决方法就是通过安装一个U盘或MicroSD卡,从而间接引导SATA5接口上的系统盘。
网上给出的方法都是引导Windows系统的,而我们安装的如果是Linux系统的话,则无法简单的使用这些方法来引导系统的。
自己探索了一下,通过使用Rufus来使用并且修改Super GRUB2 Disk的方式来启动Debian的方法。
解决方法
1.安装Debian Linux系统
只插上光驱位置上的硬盘,然后安装Debian Linux系统,只有这样,才能正常安装系统,否则会出现无法安装到正确的磁盘上面。
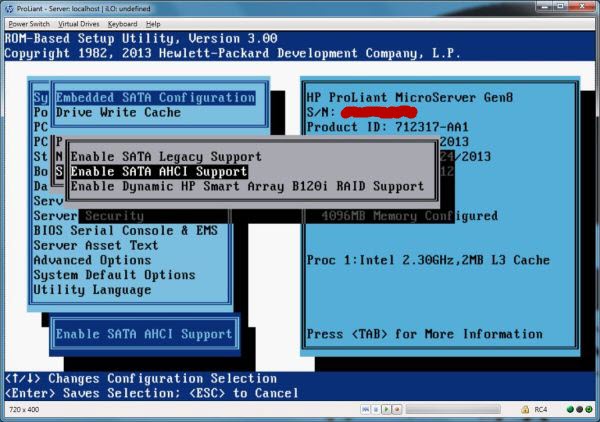
2.开启SATA AHCI模式
通过 Intelligent Provisioning安装根本就找不到 tf卡(在 bios中可以把默认的 Dynamic HP Smart Array改成 SATA AHCI模式后就可以顺利安装了,但这样 raid功能也没了)
3.下载必须的软件
下载Super GRUB2 Disk最新的镜像文件,官网为http://www.supergrubdisk.org/,一定要下载hybrid版本。
下载Rufus最新的版本,官网地址为https://rufus.akeo.ie/
也可以在本网站下载我使用的版本Super GRUB2 Disk,rufus-3.10
4.安装Super GRUB2 Disk到SD卡
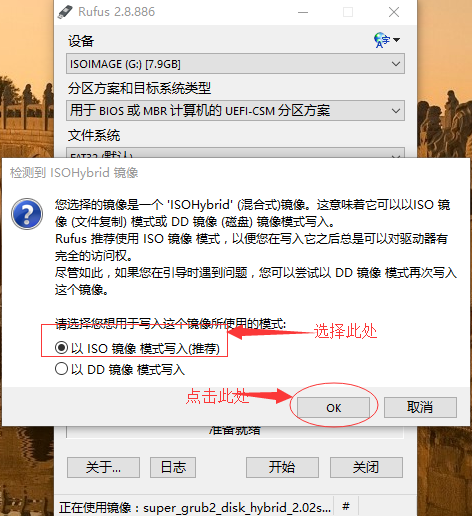
按照下图的步骤处理:
如果使用2.8.x版本,参考下图(注意,如果使用最新的2.0.4版本的Super GRUB2 Disk,只能使用3.11.x版本的Rufus)
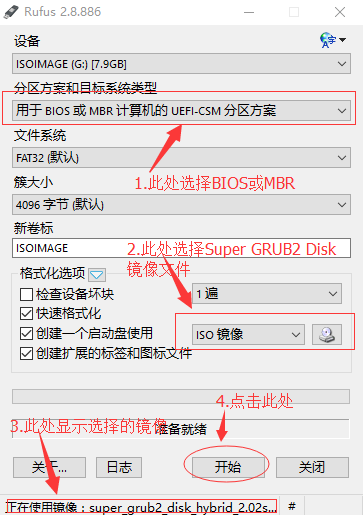
只有如下选项才能保证可以在Windows中可以正常访问修改Super GRUB2 Disk已经安装到SD卡上的内容。
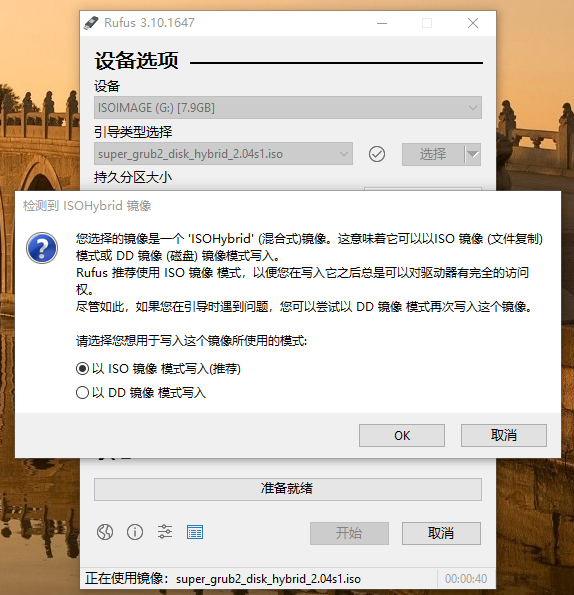
如果使用3.10.x版本(已知Rufus 3.11.1678写入的数据无法引导系统,只能使用3.10.x版本),参考下图
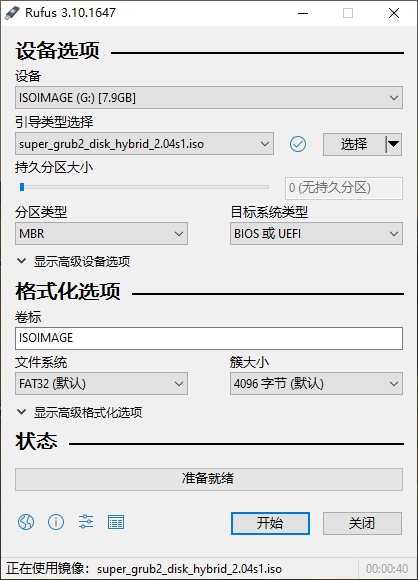
只有如下选项才能保证可以在Windows中可以正常访问修改Super GRUB2 Disk已经安装到SD卡上的内容。
5.增加Gen8的启动配置文件
在刻录好的SD卡的\boot\grub(Super GRUB2 Disk 2.02)或者\boot\grub\sgd(Super GRUB2 Disk 2.04)目录下创建一个名为Gen8.cfg的配置文件,内容如下:
|
1 2 3 4 5 6 7 8 9 10 11 12 13 14 15 |
# Super Grub Disk - Gen8.cfg set option_title=$"Gen8" function run_option { echo "Starting Gen8 ..." # for uuid #search --set=root --fs-uuid 763A-9CB6 # for file search --set=root --file /boot/grub/grubenv # debian 12.5 for file #search --set=root --file /boot/grub/unicode.pf2 set prefix=(${root})/boot/grub normal } |
一般建议是通过指定磁盘的uuid的方法来启动系统,如果能够确定系统磁盘上存在一个唯一的文件,也可以通过简单的指定文件的方法来让GRUB2来搜索的方式找到启动磁盘。
对于 Super GRUB2 Disk 2.02
修改\boot\grub\main.cfg,在
process_main_option "${prefix}/language_select.cfg"
这行代码下面增加
process_enable "${prefix}/Gen8.cfg" rootmenu
对于 Super GRUB2 Disk 2.04
修改\boot\grub\sgd\main.cfg,在
process_main_option "${sg2d_directory}/language_select.cfg"
这行代码下面增加
process_enable "${sg2d_directory}/Gen8.cfg" rootmenu
并且打开被注释掉的set timeout=10项目,让系统自动启动,否则需要手工点击一下回车。
修改后的内容如下:
|
1 2 3 4 5 6 7 8 9 10 11 12 13 14 15 16 17 18 19 20 21 22 23 24 25 26 27 28 29 30 31 32 33 34 35 36 37 38 39 40 41 42 43 44 45 46 47 48 49 50 51 52 53 54 55 56 57 58 59 60 61 62 63 64 65 66 67 68 69 70 71 72 73 74 75 76 77 78 79 80 81 82 83 84 85 86 87 88 89 90 91 92 93 94 95 96 97 98 99 100 101 102 103 104 105 106 107 108 109 110 111 112 113 114 115 116 117 118 119 120 121 122 123 124 125 126 127 128 129 130 131 132 133 134 135 136 137 138 139 140 141 142 143 144 145 146 147 148 149 150 151 152 153 154 155 156 157 158 159 160 161 162 163 164 165 166 167 168 169 170 171 172 173 174 175 176 177 178 179 180 181 182 183 184 185 186 187 188 189 190 191 192 193 194 195 196 197 198 199 200 201 202 203 204 205 206 207 208 209 210 211 212 213 214 215 216 217 218 219 220 221 222 223 224 225 226 227 228 229 230 231 232 233 234 235 236 237 238 239 240 241 242 243 244 245 246 247 248 249 250 251 252 253 254 255 256 257 258 259 260 261 262 263 264 265 266 267 268 269 270 |
# Super Grub Disk Main Configuration file # Copyright (C) 2009,2010,2011,2012,2013,2014,2015 Adrian Gibanel Lopez. # # Super Grub Disk is free software: you can redistribute it and/or modify # it under the terms of the GNU General Public License as published by # the Free Software Foundation, either version 3 of the License, or # (at your option) any later version. # # Super Grub Disk is distributed in the hope that it will be useful, # but WITHOUT ANY WARRANTY; without even the implied warranty of # MERCHANTABILITY or FITNESS FOR A PARTICULAR PURPOSE. See the # GNU General Public License for more details. # # You should have received a copy of the GNU General Public License # along with Super Grub Disk. If not, see <http://www.gnu.org/licenses/>. # Configure gfxterm, but allow it to be disabled by holding shift during boot. # gfxterm is required to display non-ASCII translations. loadfont "$prefix/unifont.pf2" if keystatus --shift; then disable_gfxterm=true # export disable_gfxterm is needed so that the setting will persist even after # a "configfile /boot/grub/main.cfg" (which is what language_select.cfg does after # you select a new language) export disable_gfxterm # The following strings are intentionally not made translateable. echo "It has been detected that the shift key was held down. Because of this SG2D" echo "will use VGA text mode rather than gfxterm. This will cause display problems" echo "when using some non-English translations." echo echo "Press escape to continue to the main menu" sleep --interruptible 9999 fi if [ "$disable_gfxterm" != true ]; then insmod all_video gfxmode=640x480 if terminal_output --append gfxterm then terminal_output --remove console fi fi # Export the variables so that they persist when loading a new menu. export menu_color_normal export menu_color_highlight export menu_color_background export bwcolor function set_sgd_colors { if [ "$bwcolor" = "yes" ]; then menu_color_normal=white/black menu_color_highlight=black/white menu_color_background=black/white else menu_color_normal=white/brown menu_color_highlight=white/blue menu_color_background=yellow/cyan fi } set_sgd_colors # Set secondary_locale_dir to the directory containing SG2D specific mo files. # This makes grub aware of translations for SG2D specific strings. secondary_locale_dir="${prefix}/sgd_locale/" insmod part_acorn insmod part_amiga insmod part_apple insmod part_bsd insmod part_gpt insmod part_msdos insmod part_sun insmod part_sunpc function process_main_option { set option_cfg="$1" source "${option_cfg}" menuentry "${option_title}" "${option_cfg}" { set chosen="" export chosen set sourced_cfgs="${2}" export sourced_cfgs configfile "${prefix}/processoption.cfg" } } function process_option { set option_cfg="$1" source "${option_cfg}" menuentry "${finaloption_tab_str}${option_title}" "${option_cfg}" { set chosen="" export chosen set sourced_cfgs="${2}" export sourced_cfgs configfile "${prefix}/processoption.cfg" } } function process_enable { set option_cfg="$1" set forced_prefix="$2" if [ "$forced_prefix" = "rootmenu" ]; then menu_prefix_str="" else menu_prefix_str="${finaloption_tab_str}" fi source "${option_cfg}" menuentry "${menu_prefix_str}${option_title}" "${option_cfg}" { set chosen="" export chosen set sourced_cfgs="${2}" export sourced_cfgs configfile "${prefix}/processenable.cfg" } } function submenu_title { menuentry "${secondoption_prefixtab_str}${chosen}${secondoption_postfixtab_str}" { sleep 1s } } # Timeout for menu set timeout=10 # Set default boot entry as Entry number 2 (counting from 0) set default=2 # Init Super Grub2 Disk variables insmod regexp regexp -s "sg2d_dev_name" '^\((.*)\).*$' "$prefix" rmmod regexp export sg2d_dev_name # Get the version number for this Super GRUB2 Disk release source "${prefix}/version.cfg" # Get design variables source "${prefix}/design.cfg" menuentry " ====---==- Super Grub2 Disk $sgrub_version -==---==== " { # Set pager=1 so ls output doesn't scroll past the top of the screen # but restore $pager to its previous value when finished set oldpager="${pager}" set pager=1 cat /boot/grub/AUTHORS cat /boot/grub/COPYING set pager="${oldpager}" unset oldpager echo $"Press escape to return to the main menu" sleep --interruptible 9999 } process_main_option "${prefix}/language_select.cfg" process_enable "${prefix}/gen8.cfg" rootmenu # Everything menuentry $"Detect and show boot methods" { configfile "${prefix}/everything.cfg" } process_enable "${prefix}/enableraidlvm.cfg" rootmenu process_enable "${prefix}/enablenative.cfg" rootmenu submenu $"Boot manually""${three_dots_str}" { submenu_title process_option "${prefix}/osdetect.cfg" process_option "${prefix}/cfgextract.cfg" process_option "${prefix}/cfgdetect.cfg" process_option "${prefix}/menulstdetect.cfg" process_option "${prefix}/grubdetect.cfg" process_option "${prefix}/diskpartchainboot.cfg" process_option "${prefix}/autoiso.cfg" source "${prefix}/return.cfg" } submenu $"Extra GRUB2 functionality""${three_dots_str}" { submenu_title process_enable "${prefix}/enablelvm.cfg" process_enable "${prefix}/enableraid.cfg" process_enable "${prefix}/enableencrypted.cfg" process_enable "${prefix}/enablenative.cfg" process_enable "${prefix}/enableserial.cfg" process_enable "${prefix}/searchfloppy.cfg" process_enable "${prefix}/searchcdrom.cfg" process_enable "${prefix}/searchsgd.cfg" source "${prefix}/return.cfg" } menuentry $"Print devices/partitions" { # Set pager=1 so ls output doesn't scroll past the top of the screen # but restore $pager to its previous value when finished set oldpager="${pager}" set pager=1 ls -l set pager="${oldpager}" unset oldpager echo $"Press escape to return to the main menu" sleep --interruptible 9999 } menuentry $"Color ON/OFF" { if [ "$bwcolor" = 'yes' ]; then bwcolor=no else bwcolor=yes fi set_sgd_colors } submenu $"Exit""${three_dots_str}" { submenu_title process_option "${prefix}/halt.cfg" process_option "${prefix}/reboot.cfg" source "${prefix}/return.cfg" } # If it exists, source $prefix/sgd_custom.cfg. This follows the same idea as # grub-mkconfig generated grub.cfg files sourcing $prefix/custom.cfg, though # it's less needed here since one could add custom code to this file directly # whereas their distro might automatically overwrite /boot/grub/grub.cfg on # kernel upgrades. The main motivation for adding this was the vmtest script # which I use heavily during Super GRUB2 Disk development, but this feature # might also be useful to others. if [ -e "$prefix/sgd_custom.cfg" ]; then source "$prefix/sgd_custom.cfg" fi |
6.插上SD卡,断电,然后冷重启
7.常见问题
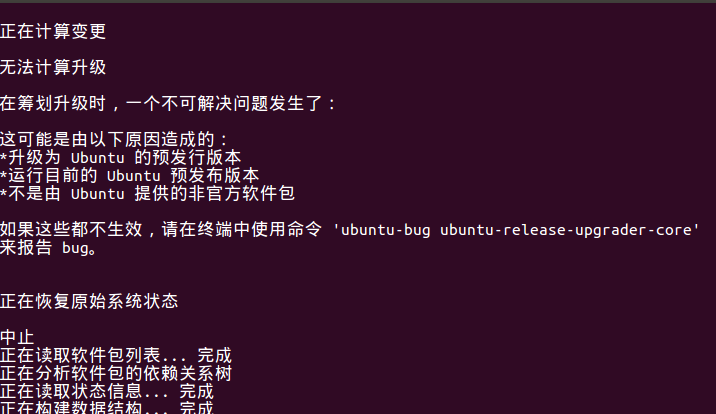
注意:如果安装升级的是ubuntu 20.04.1,系统启动的时候,会出现error: symbol 'grub_calloc' not found。
如下图:

但是奇怪的是,如果在系统启动的时候选择Detect and show boot methods,显示出的任何菜单,都可以正常启动系统,如下:
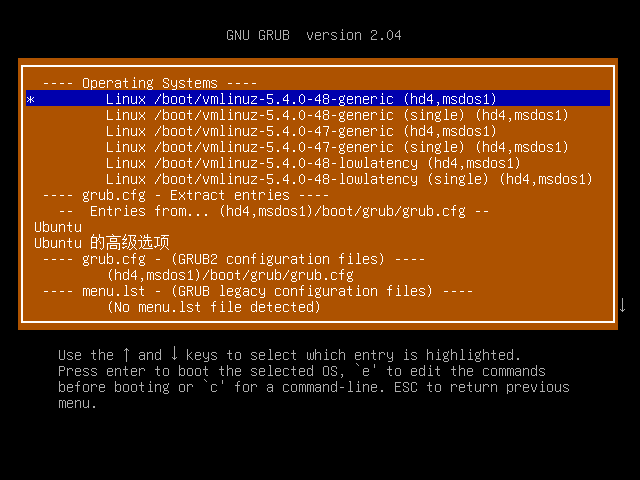
这个问题是因为ubuntu 20.04.1系统使用的是新版本的grub2引导系统,启动配置信息需要进行调整,修改我们创建的\boot\grub\Gen8.cfg(Super GRUB2 Disk 2.02)或者\boot\grub\sgd\Gen8.cfg(Super GRUB2 Disk 2.04),内容调整为如下:
|
1 2 3 4 5 6 7 8 9 10 11 12 13 14 15 |
# Super Grub Disk - Gen8.cfg set option_title=$"Gen8" function run_option { echo "Starting Gen8 ..." #for uuid #search --set=root --fs-uuid 763A-9CB6 #for file insmod xfs search --set=root --file /boot/grub/grubenv # debian 12.5 for file #search --set=root --file /boot/grub/unicode.pf2 configfile /boot/grub/grub.cfg } |