编译项目,遇到了这个问题
查了很多地方,解决方案是:
1.右键项目,属性,最顶端,配置为x64或者x86(如果没有该选项就新建)
2.链接器-高级,目标计算机选为一致的
运行还是会报这个错误
最后发现
3.链接器-命令行
最底部有一条指令,修改为一致的机型就可以了
编译项目,遇到了这个问题
查了很多地方,解决方案是:
1.右键项目,属性,最顶端,配置为x64或者x86(如果没有该选项就新建)
2.链接器-高级,目标计算机选为一致的
运行还是会报这个错误
最后发现
3.链接器-命令行
最底部有一条指令,修改为一致的机型就可以了
用到了数据库,花了好长时间才搞定,把遇到的问题记录一下,sqlite语法:
select,最简单的语句
select * from table where condition
add
add中有两个需求
1.没有表的时候创建表
create table if not exists
2.如果存在则更新,不存在就插入
insert or replace into table ()values()
这里需要配合 primary key,用unique会报错
3.update
update table set x = x where condition
多次遇到 near syntax error,这些肯定是语法拼写错误,请仔细检查。
1.确保WDMyCloud是最新的版本,应该是WDMyCloud v04.04.01-112以后,并且确保Apache2的版本号是2.4.9版本。
|
1 2 3 |
WDMyCloud:~# apache2 -v Server version: Apache/2.4.9 (Debian) Server built: May 3 2014 13:50:30 |
2.安装Subversion Server
|
1 2 |
$sudo apt-get install subversion $sudo apt-get install libapache2-svn |
3.配置并启用Apache dav_svn模块
|
1 2 |
$sudo a2enmod dav_svn $sudo vim /etc/apache2/mods-enabled/dav_svn.conf |
在文件的尾部增加如下内容:
|
1 2 3 4 5 6 7 8 |
<Location /svn> DAV svn SVNPath /WDMyCloud/Repositories/ AuthType Basic AuthName "Subversion Repository" AuthUserFile /etc/apache2/dav_svn.passwd Require valid-user </Location> |
4.创建Subversion用户
|
1 |
$sudo htpasswd -cm /etc/apache2/dav_svn.passwd svn_user |
5.重启 Apache2
|
1 |
$sudo service apache2 restart |
6.网络访问“http://wd-mycloud/svn”。
7.检出项目 “svn co http://wd-mycloud/svn/project project”
interpolator可以翻译成插值器。
Android中interpolator最底层的接口如下:
|
1 2 3 4 5 6 7 8 9 10 11 12 13 14 15 16 17 18 19 20 21 22 23 24 25 26 27 28 |
package android.animation; /** * 时间插值器定义了一个动画的变化率。 * 这让动画让非线性的移动轨迹,例如加速和减速。 * <hr/> * A time interpolator defines the rate of change of an animation. This allows animations * to have non-linear motion, such as acceleration and deceleration. */ public interface TimeInterpolator { /** * 将动画已经消耗的时间的分数映射到一个表示插值的分数。 * 然后将插值与动画的变化值相乘来推导出当前已经过去的动画时间的动画变化量。 * <hr/> * Maps a value representing the elapsed fraction of an animation to a value that represents * the interpolated fraction. This interpolated value is then multiplied by the change in * value of an animation to derive the animated value at the current elapsed animation time. * * @param input 一个0到1.0表示动画当前点的值,0表示开头。1表示结尾<br/> A value between 0 and 1.0 indicating our current point * in the animation where 0 represents the start and 1.0 represents * the end * @return 插值。它的值可以大于1来超出目标值,也小于0来空破底线。<br/>The interpolation value. This value can be more than 1.0 for * interpolators which overshoot their targets, or less than 0 for * interpolators that undershoot their targets. */ float getInterpolation(float input); } |
TimeInterpolator是在Android API11时加入的,之前类就叫Interpolator。
现在Interpolatro继承了它。
|
1 2 3 4 5 6 7 8 9 10 11 12 13 14 15 16 17 18 19 |
package android.view.animation; import android.animation.TimeInterpolator; /** * * 一个定义动画变化率的插值器。 * 它允许对基本的(如透明,缩放,平移,旋转)进行加速,减速,重复等动画效果 * <hr/> * An interpolator defines the rate of change of an animation. This allows * the basic animation effects (alpha, scale, translate, rotate) to be * accelerated, decelerated, repeated, etc. */ public interface Interpolator extends TimeInterpolator { // A new interface, TimeInterpolator, was introduced for the new android.animation // package. This older Interpolator interface extends TimeInterpolator so that users of // the new Animator-based animations can use either the old Interpolator implementations or // new classes that implement TimeInterpolator directly. } |
注意下面的图,对应你脑海中的插值的大小应该是斜率。
源代码如下:
|
1 2 3 4 5 6 7 8 9 10 11 12 13 14 15 16 17 18 19 20 21 22 23 24 25 26 27 28 29 30 31 32 33 34 35 36 37 38 39 40 41 42 43 44 45 46 47 48 49 50 51 52 53 54 55 56 57 58 |
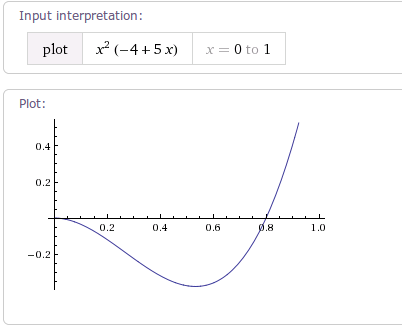
package android.view.animation; import android.content.Context; import android.content.res.TypedArray; import android.util.AttributeSet; /** * * 一个开始很慢然后不断加速的插值器。 * <hr/> * An interpolator where the rate of change starts out slowly and * and then accelerates. * */ public class AccelerateInterpolator implements Interpolator { private final float mFactor; private final double mDoubleFactor; public AccelerateInterpolator() { mFactor = 1.0f; mDoubleFactor = 2.0; } /** * Constructor * * @param factor * 动画的快慢度。将factor设置为1.0f会产生一条y=x^2的抛物线。 增加factor到1.0f之后为加大这种渐入效果(也就是说它开头更加慢,结尾更加快) * <br/>Degree to which the animation should be eased. Seting * factor to 1.0f produces a y=x^2 parabola(抛物线). Increasing factor above * 1.0f exaggerates the ease-in effect (i.e., it starts even * slower and ends evens faster) */ public AccelerateInterpolator(float factor) { mFactor = factor; mDoubleFactor = 2 * mFactor; } public AccelerateInterpolator(Context context, AttributeSet attrs) { TypedArray a = context.obtainStyledAttributes(attrs, com.android.internal.R.styleable.AccelerateInterpolator); mFactor = a.getFloat(com.android.internal.R.styleable.AccelerateInterpolator_factor, 1.0f); mDoubleFactor = 2 * mFactor; a.recycle(); } @Override public float getInterpolation(float input) { if (mFactor == 1.0f) { return input * input; } else { return (float)Math.pow(input, mDoubleFactor); } } } |
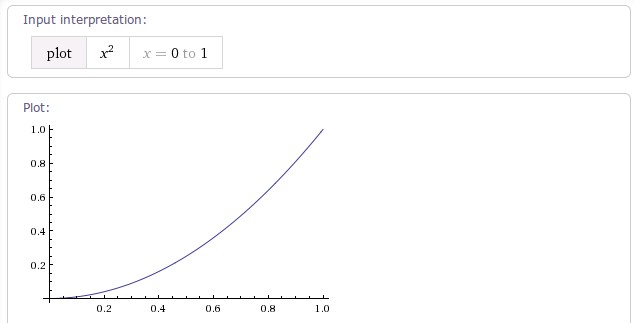
加速的快慢度由参数fractor决定。
当fractor值为1.0f时,动画加速轨迹相当于一条y=x^2的抛物线。如下图:
当fractor不为1时,轨迹曲线是y=x^(2*fractor)(0<x<=1)的曲线。
示例:当fractor为4时,插值器的加速轨迹曲线如下图:
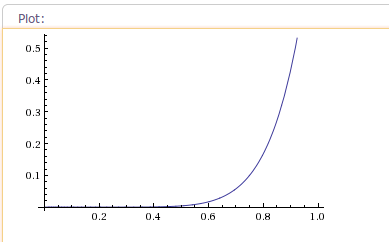
如果你在使用AccelerateInterpolator时,想要那种一开始很慢,然后突然就很快的加速的动画效果的话。
就将fractor设置大点。
你可以到这里调试下你想要的抛物线效果:http://www.wolframalpha.com/input/?i=x%5E%282*3%29%280%3Cx%3C%3D1%29
Android提供的一个不同factor的加速插值器:
(1)accelerate_cubic, factor为1.5
源代码如下:
|
1 2 3 4 5 6 7 8 9 10 11 12 13 14 15 16 17 18 19 20 21 22 23 24 25 26 27 28 29 30 31 32 33 34 35 36 37 38 39 40 41 42 43 44 45 46 47 48 49 50 51 52 53 54 |
package android.view.animation; import android.content.Context; import android.content.res.TypedArray; import android.util.AttributeSet; /** * 一个开始比较快然后减速的插值器 * <hr/> * An interpolator where the rate of change starts out quickly and * and then decelerates. * */ public class DecelerateInterpolator implements Interpolator { public DecelerateInterpolator() { } /** * Constructor * * @param factor * 动画的快慢度。将factor值设置为1.0f时将产生一条从上向下的y=x^2抛物线。 * 增加factor到1.0f以上将使渐入的效果增强(也就是说,开头更快,结尾更慢) * <br/> * Degree to which the animation should be eased. Setting factor to 1.0f produces * an upside-down y=x^2 parabola. Increasing factor above 1.0f makes exaggerates the * ease-out effect (i.e., it starts even faster and ends evens slower) */ public DecelerateInterpolator(float factor) { mFactor = factor; } public DecelerateInterpolator(Context context, AttributeSet attrs) { TypedArray a = context.obtainStyledAttributes(attrs, com.android.internal.R.styleable.DecelerateInterpolator); mFactor = a.getFloat(com.android.internal.R.styleable.DecelerateInterpolator_factor, 1.0f); a.recycle(); } @Override public float getInterpolation(float input) { float result; if (mFactor == 1.0f) { result = (1.0f - ((1.0f - input) * (1.0f - input))); } else { result = (float)(1.0f - Math.pow((1.0f - input), 2 * mFactor)); } return result; } private float mFactor = 1.0f; } |
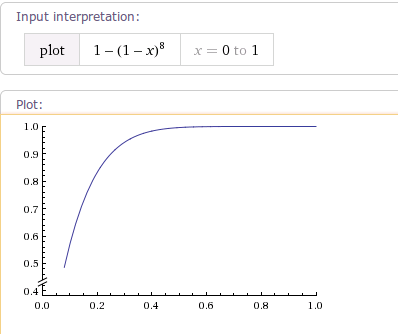
根据getInterpolationa(float input);方法可以知道。
当fractor为1.0f。它减速的轨迹曲线为1-(1-x)^2。如下图:

当fractor增大到4时,曲线轨迹如下图:
源代码如下:
|
1 2 3 4 5 6 7 8 9 10 11 12 13 14 15 16 17 18 19 20 21 22 23 24 25 |
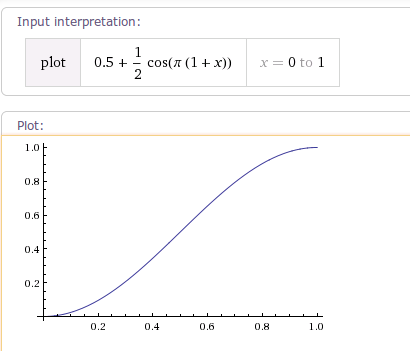
package android.view.animation; import android.content.Context; import android.util.AttributeSet; /** * 一个变化率开始慢从中间后开始变快。 * <hr/> * An interpolator where the rate of change starts and ends slowly but * accelerates through the middle. * */ public class AccelerateDecelerateInterpolator implements Interpolator { public AccelerateDecelerateInterpolator() { } @SuppressWarnings({"UnusedDeclaration"}) public AccelerateDecelerateInterpolator(Context context, AttributeSet attrs) { } @Override public float getInterpolation(float input) { return (float)(Math.cos((input + 1) * Math.PI) / 2.0f) + 0.5f; } } |
根据getInterpolation()方法可以得出其变化曲线如下:
这可是最简单的插值器:
|
1 2 3 4 5 6 7 8 9 10 11 12 13 14 15 16 |
/** * An interpolator where the rate of change is constant * */ public class LinearInterpolator implements Interpolator { public LinearInterpolator() { } public LinearInterpolator(Context context, AttributeSet attrs) { } public float getInterpolation(float input) { return input; } } |
源代码如下:
|
1 2 3 4 5 6 7 8 9 10 11 12 13 14 15 16 17 18 19 20 21 22 23 24 25 26 27 28 29 30 31 32 33 34 35 36 |
package android.view.animation; import android.content.Context; import android.util.AttributeSet; /** * 这个插值器的插值在后面呈弹跳状态。 * An interpolator where the change bounces at the end. */ public class BounceInterpolator implements Interpolator { public BounceInterpolator() { } @SuppressWarnings({"UnusedDeclaration"}) public BounceInterpolator(Context context, AttributeSet attrs) { } private static float bounce(float t) { return t * t * 8.0f; } @Override public float getInterpolation(float t) { // _b(t) = t * t * 8 // bs(t) = _b(t) for t < 0.3535 // bs(t) = _b(t - 0.54719) + 0.7 for t < 0.7408 // bs(t) = _b(t - 0.8526) + 0.9 for t < 0.9644 // bs(t) = _b(t - 1.0435) + 0.95 for t <= 1.0 // b(t) = bs(t * 1.1226) t *= 1.1226f; if (t < 0.3535f) return bounce(t); else if (t < 0.7408f) return bounce(t - 0.54719f) + 0.7f; else if (t < 0.9644f) return bounce(t - 0.8526f) + 0.9f; else return bounce(t - 1.0435f) + 0.95f; } } |
根据getInterpolation()得到以下插值曲线图:
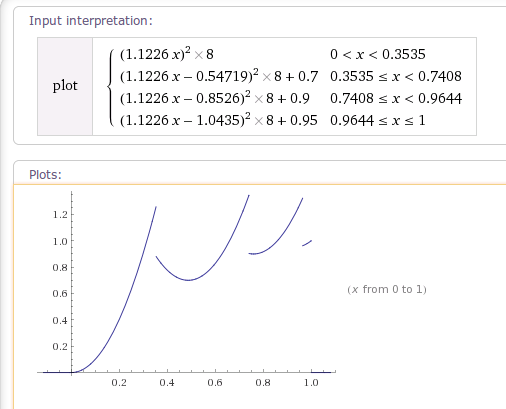
这个插值器的值变化过程,可以想像成荡秋千时的一个段过程。(此时秋千已经在比较上面的位置了,一放手就可以荡下来)。你开始用力推向更上面,然后秋千终将荡回下面。
tension值就好比推力的大小。
源代码如下:
|
1 2 3 4 5 6 7 8 9 10 11 12 13 14 15 16 17 18 19 20 21 22 23 24 25 26 27 28 29 30 31 32 33 34 35 36 37 38 39 40 41 42 43 44 45 46 |
package android.view.animation; import android.content.Context; import android.content.res.TypedArray; import android.util.AttributeSet; /** * 一个开始向后荡,然后向前荡的插值器。 * <hr/> * An interpolator where the change starts backward then flings forward. */ public class AnticipateInterpolator implements Interpolator { private final float mTension; public AnticipateInterpolator() { mTension = 2.0f; } /** * @param tension * 绷紧程度,当绷紧程序为0.0f时,也就没有了反向作用力。插值器将退化成一个y=x^3的加速插值器。 * <br/> * Amount of anticipation. When tension equals 0.0f, there is * no anticipation and the interpolator becomes a simple * acceleration interpolator. */ public AnticipateInterpolator(float tension) { mTension = tension; } public AnticipateInterpolator(Context context, AttributeSet attrs) { TypedArray a = context.obtainStyledAttributes(attrs, com.android.internal.R.styleable.AnticipateInterpolator); mTension = a.getFloat(com.android.internal.R.styleable.AnticipateInterpolator_tension, 2.0f); a.recycle(); } @Override public float getInterpolation(float t) { // a(t) = t * t * ((tension + 1) * t - tension) return t * t * (((mTension + 1) * t) - mTension); } } |
根据getInterpolation()方法。
当tension为默认值2.0f时,曲线图如下:

当tension值为4.0f时,曲线图如下:
源代码如下:
|
1 2 3 4 5 6 7 8 9 10 11 12 13 14 15 16 17 18 19 20 21 22 23 24 25 26 27 28 29 30 31 32 33 34 35 36 37 38 39 40 41 42 43 44 45 46 47 48 49 50 51 52 53 54 55 56 57 58 59 60 61 62 63 64 65 66 67 68 69 70 71 72 73 74 |
package android.view.animation; import android.content.Context; import android.content.res.TypedArray; import android.util.AttributeSet; /** * 一个插值器它开始向上推,然后向下荡,荡过最低线。然后再回到最低线。 * <hr/> * An interpolator where the change starts backward then flings forward and overshoots * the target value and finally goes back to the final value. */ public class AnticipateOvershootInterpolator implements Interpolator { private final float mTension; public AnticipateOvershootInterpolator() { mTension = 2.0f * 1.5f; } /** * @param tension * anticipation/overshoot的比值。当和tension值为0.0f时, * 也就没有anticipation/overshoot的比值了,插值器退化为一个加速/减速插值器。 * <br/> * Amount of anticipation/overshoot. When tension equals 0.0f, * there is no anticipation/overshoot and the interpolator becomes * a simple acceleration/deceleration interpolator. */ public AnticipateOvershootInterpolator(float tension) { mTension = tension * 1.5f; } /** * @param tension Amount of anticipation/overshoot. When tension equals 0.0f, * there is no anticipation/overshoot and the interpolator becomes * a simple acceleration/deceleration interpolator. * @param extraTension * 乘以tension的值。例如,在上面构造函数中extraTension的值为1.5f * <br/> * Amount by which to multiply the tension. For instance, * to get the same overshoot as an OvershootInterpolator with * a tension of 2.0f, you would use an extraTension of 1.5f. */ public AnticipateOvershootInterpolator(float tension, float extraTension) { mTension = tension * extraTension; } public AnticipateOvershootInterpolator(Context context, AttributeSet attrs) { TypedArray a = context.obtainStyledAttributes(attrs, AnticipateOvershootInterpolator); mTension = a.getFloat(AnticipateOvershootInterpolator_tension, 2.0f) * a.getFloat(AnticipateOvershootInterpolator_extraTension, 1.5f); a.recycle(); } private static float a(float t, float s) { return t * t * (((s + 1) * t) - s); } private static float o(float t, float s) { return t * t * (((s + 1) * t) + s); } @Override public float getInterpolation(float t) { // a(t, s) = t * t * ((s + 1) * t - s) // o(t, s) = t * t * ((s + 1) * t + s) // f(t) = 0.5 * a(t * 2, tension * extraTension), when t < 0.5 // f(t) = 0.5 * (o(t * 2 - 2, tension * extraTension) + 2), when t <= 1.0 if (t < 0.5f) return 0.5f * a(t * 2.0f, mTension); else return 0.5f * (o((t * 2.0f) - 2.0f, mTension) + 2.0f); } } |
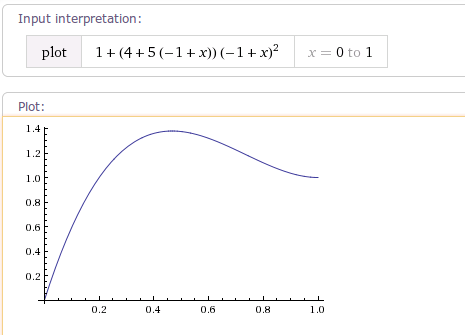
根据getInterpolation()方法,
可以得到当tension为默认值时,曲线图为:
|
1 |
plot Piecewise[{{0.5((2x)*(2x)*((2+1)*2x-2)), 0<x<0.5}, {0.5*(((2x-2)*(2x-2)*((2+1)*(2x-2)+2))+2),0.5<=x<=1}}] |

源代码:
|
1 2 3 4 5 6 7 8 9 10 11 12 13 14 15 16 17 18 19 20 21 22 23 24 25 26 27 28 29 30 31 32 33 34 35 36 37 38 39 |
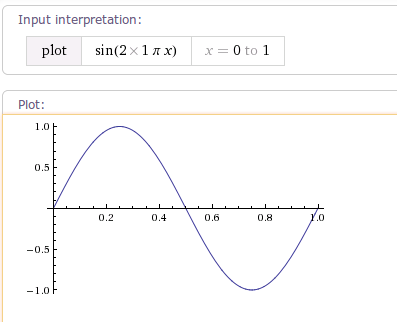
package android.view.animation; import android.content.Context; import android.content.res.TypedArray; import android.util.AttributeSet; /** * * 以指定的周期重复动画。变化率曲线为正弦。 * <hr/> * Repeats the animation for a specified number of cycles(周期). The * rate of change follows a sinusoidal(正弦) pattern. * */ public class CycleInterpolator implements Interpolator { /** * * @param cycles 要重复的周期数 */ public CycleInterpolator(float cycles) { mCycles = cycles; } public CycleInterpolator(Context context, AttributeSet attrs) { TypedArray a = context.obtainStyledAttributes(attrs, com.android.internal.R.styleable.CycleInterpolator); mCycles = a.getFloat(com.android.internal.R.styleable.CycleInterpolator_cycles, 1.0f); a.recycle(); } @Override public float getInterpolation(float input) { return (float)(Math.sin(2 * mCycles * Math.PI * input)); } private float mCycles; } |
当cycle时为1时,即变化一周时,曲线图如下:
源代码:
|
1 2 3 4 5 6 7 8 9 10 11 12 13 14 15 16 17 18 19 20 21 22 23 24 25 26 27 28 29 30 31 32 33 34 35 36 37 38 39 40 41 42 43 44 45 |
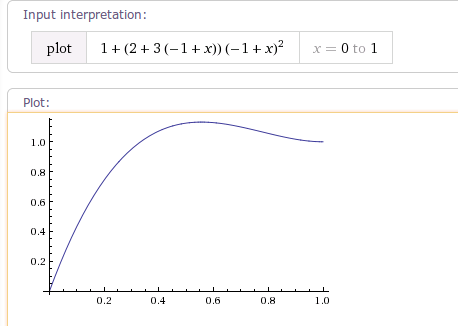
package android.view.animation; import android.content.Context; import android.content.res.TypedArray; import android.util.AttributeSet; /** * An interpolator where the change flings forward and overshoots the last value * then comes back. */ public class OvershootInterpolator implements Interpolator { private final float mTension; public OvershootInterpolator() { mTension = 2.0f; } /** * @param tension Amount of overshoot. When tension equals 0.0f, there is * no overshoot and the interpolator becomes a simple * deceleration interpolator. */ public OvershootInterpolator(float tension) { mTension = tension; } public OvershootInterpolator(Context context, AttributeSet attrs) { TypedArray a = context.obtainStyledAttributes(attrs, com.android.internal.R.styleable.OvershootInterpolator); mTension = a.getFloat(com.android.internal.R.styleable.OvershootInterpolator_tension, 2.0f); a.recycle(); } @Override public float getInterpolation(float t) { // _o(t) = t * t * ((tension + 1) * t + tension) // o(t) = _o(t - 1) + 1 t -= 1.0f; return (t * t * (((mTension + 1) * t) + mTension)) + 1.0f; //plot {(x-1)(x-1)((tension+1)(x-1)+tension)+1,(0<x<=1)} } } |
当tension为默认值2时,曲线图如下:
当tension的值为4时,曲线图如下:
通过学习了解Android自带的这些Interpolator,我们可以很好的根据自己的使用场景使用这些Interpolator了。也可以很容易的写出我们自己的Interpolator。
“映像劫持”,也被称为“IFEO”(Image File Execution Options),在Windows NT架构的系统里,IFEO的本意是为一些在默认系统环境中运行时可能引发错误的程序执行体提供特殊的环境设定。当一个可执行程序位于IFEO的控制中时,它的内存分配则根据该程序的参数来设定,而Windows NT架构的系统能通过这个注册表项使用与可执行程序文件名匹配的项目作为程序载入时的控制依据,最终得以设定一个程序的堆管理机制和一些辅助机制等。出于简化原因,IFEO使用忽略路径的方式来匹配它所要控制的程序文件名,所以程序无论放在哪个路径,只要名字没有变化,它就可以正常运行。
注册表位置:
|
1 |
HKEY_LOCAL_MACHINE\SOFTWARE\Microsoft\Windows NT\CurrentVersion\Image File ExecutionOptions |
它是IFEO里第一个被处理的参数,系统如果发现某个程序文件在IFEO列表中,它就会首先来读取Debugger参数,如果该参数不为空,系统则会把Debugger参数里指定的程序文件名作为用户试图启动的程序执行请求来处理,而仅仅把用户试图启动的程序作为Debugger参数里指定的程序文件名的参数发送过去。
1. 在管理员状态下执行regedit.exe,定位到以下注册表项:
|
1 |
HKEY_LOCAL_MACHINE\SOFTWARE\Microsoft\Windows NT\CurrentVersion\Image File ExecutionOptions |
2. 在Image File Execution Options下建立一个子键,名为XLUEOPS.exe,不区分大小写。现在确保位于HKEY_LOCAL_MACHINE\SOFTWARE\Microsoft\Windows NT\CurrentVersion\Image File ExecutionOptions\XLUEOPS.exe\,下,建立一个字符串值类型的注册表项,名为Debugger,值为指定的调试器。
3. 再次运行XLUEOPS.exe查看运行情况,可以发现调试器已经启动了。
近日微软为Win10用户推送了编号为KB3122947的更新补丁,主要用于解决Win10系统升级后部分隐私设置选项被恢复默认的问题。不过从国内外很多网友的反馈来看,很多用户在安装时出现错误。当补丁下载完成准备安装时出现了0x80070643错误,如果你也遇到了这个问题可参考下面的方法来解决。
当出现该错误时,系统其实已经下载好更新程序,此时你可以使用DISM命令行工具手动部署该更新。
1.首先按Win+X或者右键单击开始按钮,打开“命令提示符(管理员)”;
2.输入下面的命令(复制粘贴)回车即可:
|
1 |
dism /online /add-package /packagepath:C:\Windows\SoftwareDistribution\Download\c4a1b8896ce9fbfea96c1ee6890d52a5\windows10.0-kb3122947-x64.cab |
注意:以上命令以64位版本为例,参数packagepath后面的字符串为补丁下载路径。如果你使用的是32位Windows10系统可以打开Download文件夹,通过更新时间来确定文件路径。
参考链接:
最近在一个项目中,服务器使用 json 作为返回信息的格式,为了加快开发速度,我使用 Gson 代替 Java 语言中自带的 JSONObject 来解析 json 格式。
当我正在享受 Gson 给我带来的便利的时候,我遇到问题了。
因为 Gson 在转化 json 字符串到对象的时候,要求类的成员变量的名称必须和 json 中的 key 值相同。但是郁闷的是,在封装一个接口的时候发现,json 字符串中的 key 为 Java 的关键字。
|
1 2 3 4 5 |
{ ... "new": false ... } |
按照 Gson 的约定,就必须编写一个变量名为new的类,但是结果可想而知,编译不通过。
|
1 2 3 |
public class BoxSubject { private boolean new; } |
幸好,Google 已经为我们想好了解决办法,只要对该变量添加Field Naming Support就可以了。
|
1 2 3 4 |
public class BoxSubject { @SerializedName("new") private boolean new; } |
到此,就完美地解决了我们遇到的问题。
就
需要在当前主题的 functions.php 中添加自定义代码,才能实现在文章中自定义 CSS 样式表,插件内容如下:
|
1 2 3 4 5 6 7 8 9 10 11 12 13 14 15 16 17 18 19 20 21 22 23 24 25 26 27 28 29 30 31 32 33 34 35 36 37 38 39 40 41 42 43 |
/* 为特定文章添加特定css最简单的方式. */ /*添加自定义CSS的meta box*/ add_action('admin_menu', 'cwp_add_my_custom_css_meta_box'); /*保存自定义CSS的内容*/ add_action('save_post', 'cwp_save_my_custom_css'); /*将自定义CSS添加到特定文章(适用于Wordpress中文章、页面、自定义文章类型等)的头部*/ add_action('wp_head','cwp_insert_my_custom_css'); function cwp_add_my_custom_css_meta_box() { add_meta_box('my_custom_css', '自定义CSS', 'cwp_output_my_custom_css_input_fields', 'post', 'normal', 'high'); add_meta_box('my_custom_css', '自定义CSS', 'cwp_output_my_custom_css_input_fields', 'page', 'normal', 'high'); } function cwp_output_my_custom_css_input_fields() { global $post; echo '<input type="hidden" name="my_custom_css_noncename" id="my_custom_css_noncename" value="'.wp_create_nonce('custom-css').'" />'; echo '<textarea name="my_custom_css" id="my_custom_css" rows="5" cols="30" style="width:100%;">'.get_post_meta($post->ID,'_my_custom_css',true).'</textarea>'; } function cwp_save_my_custom_css($post_id) { if (!wp_verify_nonce($_POST['my_custom_css_noncename'], 'custom-css')) return $post_id; if (defined('DOING_AUTOSAVE') && DOING_AUTOSAVE) return $post_id; $my_custom_css = $_POST['my_custom_css']; update_post_meta($post_id, '_my_custom_css', $my_custom_css); } function cwp_insert_my_custom_css() { if (is_page() || is_single()) { if (have_posts()) : while (have_posts()) : the_post(); echo '<style type="text/css">'.get_post_meta(get_the_ID(), '_my_custom_css', true).'</style>'; endwhile; endif; rewind_posts(); } } |
添加完成之后,会在文章编辑页面的最下面,出现 CSS 编辑窗口,之后在这个窗口中添加 CSS 会被自动保存。
链入外部样式表是把样式表保存为一个样式表文件,然后在页面中link标记链接到这个样式表文件,这个标记必须放到页面的区内,如下:
|
1 2 3 |
<head> <link rel="stylesheet" type="text/css" href="mystyle.css"> </head> |
上面这个例子表示浏览器从mystyle.css文件中以文档格式读出定义的样式表。rel="stylesheet"是指在页面中使用这个外部的样式表。 type="text/css"是指文件的类型是样式表文本。href="mystyle.css"是文件所在的位置。
一个外部样式表文件可以应用于多个页面。当你改变这个样式表文件时,所有页面的样式都随之而改变。在制作大量相同样式页面的网站时,非常有用,不仅减少了重复的工作量,而且有利于以后的修改、编辑,浏览时也减少了重复下载代码。
样式表文件可以用任何文本编辑器(例如:记事本)打开并编辑,一般样式表文件扩展名为.css。内容是定义的样式表,不包含HTML标记,mystyle.css这个文件的内容如下:
|
1 2 3 |
hr {color: sienna} p {margin-left: 20px} body {background-image: url("images/back40.gif")} |
(定义水平线的颜色为土黄;段落左边的空白边距为20象素;页面的背景图片为images目录下的back40.gif文件)
内部样式表是把样式表放到页面head区里,这些定义的样式就应用到页面中了,样式表是用style标记插入的,从下例中可以看出style标记的用法:
|
1 2 3 4 5 6 7 |
<head> <style type="text/css"> hr {color: sienna} p {margin-left: 20px} body {background-image: url("images/back40.gif")} </style> </head> |
注意:有些低版本的浏览器不能识别style标记,这意味着低版本的浏览器会忽略style标记里的内容,并把style标记里的内容以文本直接显示到页面上。为了避免这样的情况发生,我们用加HTML注释的方式(<!--注释-->)隐藏内容而不让它显示:
|
1 2 3 4 5 |
<head> <style type="text/css"> <!-- hr {color: sienna} p {margin-left: 20px} body {background-image: url("images/back40.gif")} --> </style> </head> |
导入外部样式表是指在内部样式表的style里导入一个外部样式表,导入时用@import,看下面这个实例:
|
1 2 3 4 5 |
<head> <style type=”text/css”> <!-- @import “mystyle.css” 其他样式表的声明 --> </style> </head> |
例中@import "mystyle.css"表示导入mystyle.css样式表,注意使用时外部样式表的路径。方法和链入样式表的方法很相似,但导入外部样式表输入方式更有优势。实质上它相当于存在内部样式表中的。 注意:导入外部样式表必须在样式表的开始部分,在其他内部样式表上面。
内嵌样式是混合在HTML标记里使用的,用这种方法,可以很简单的对某个元素单独定义样式。内嵌样式的使用是直接将在HTML标记里加入style参数。而style参数的内容就是CSS的属性和值,如下例:
|
1 |
<div style="color: sienna; margin-left: 20px">这是一个段落</div> |
(这个段落颜色为土黄色,左边距为20象素) 在style参数后面的引号里的内容相当于在样式表大括号里的内容。 注意:style参数可以应用于任意BODY内的元素(包括BODY本身),除了BASEFONT、PARAM和SCRIPT。
上一章里我们已经提到样式表的层叠顺序,这里我们讨论插入样式表的这几种方法的叠加,如果在同一个选择器上使用几个不同的样式表时,这个属性值将会叠加几个样式表,遇到冲突的地方会以最后定义的为准。例如,我们首先链入一个外部样式表,其中定义了h3选择符的color 、text-alig和font-size属性:
|
1 |
h3 { color: red; text-align: left; font-size: 8pt } |
(标题3的文字颜色为红色;向左对齐;文字尺寸为8号字) 然后在内部样式表里也定义了h3选择符的text-align和font-size属性:
|
1 |
h3 { text-align: right; font-size: 20pt } |
(标题3文字向右对齐;尺寸为20号字) 那么这个页面叠加后的样式就是:
|
1 |
color: red; text-align: right; font-size: 20pt |
(文字颜色为红色;向右对齐;尺寸为20号字) 字体颜色从外部样式表里保留下来,而对齐方式和字体尺寸都有定义时,按照后定义的优先而依照内部样式表。 注意:依照后定义的优先,所以优先级最高的是内嵌样式,内部样式表高于导入外部样式表,链入的外部样式表和内部样式表之间是最后定义的优先级高。
之前写css,一直是把position:absolute当做android的FrameLayout用的,其他类似。
后来看了下面的文章,满面羞愧。
这些基础的东西,还是要了解透彻的,一直不求甚解的搞下去,自己都不知道做的什么,为什么会出现这种错误,希望能从下面的内容中,总结出一个类似于Androidlayout的规则。
关于position看下面的文章就够了
http://blog.csdn.net/chen_zw/article/details/8741365
css属性大全
http://css.doyoe.com/
这里主要记一下看完自己的理解:
文档流
首先需要了解什么是文档流,可以理解为方块布局,从上到下,从左到右的布局方式就是文档流。
1.margin和padding是占用文档流的,也就是说,layout函数一定是这么写的
element.margin + elment.width/height +element.padding = dom真正占用的空间。
position:static很容易理解,完全遵循文档流。
position:relative 有点特殊,本身遵循文档流,但可以在文档流中使用top left bottom right设置偏移,偏移不遵循文档流。需要注意的是,后面的dom会按照relative元素不偏移来排列。layout函数中完全可以把relative按照static先处理,最后在当前位置进行偏移。
注:relative static无父辈时以body为参考;
position:absolute 脱离文档流,使用top left bottom right设置偏移,偏移参照为父辈最近的非static元素(之前一直认为absolute参照window,深刻检讨)。
注:absolute无父辈时以html为参考。
1、body默认有9个px的margin
2、absolute的元素没有设置top、left时,默认是文档流的位置,会造成设置了absolute,看起来没有效果的现象。
position:fixed fixed以window为参考(即不管你怎么scroll,位置都不会变),设置偏移。
float:absolute会屏蔽掉float,其他的可以共存。
float不遵循文档流。
clear:clear是配合float使用的。意思是把dom的哪边给清除掉。
如clear:both,意思是两边都不许浮动。
如果我来写 html的layout,
1.dom tree static,relative的按照文档流布局,relative单独处理下偏移,完全不影响文档流。
fixed很简单粗暴。
2.处理absolute float
absolute屏蔽float
absolute需要寻找父辈非static元素直到html,比较蛋疼。这个webkit在渲染的时候会把absolute的元素单独出来一层。
float是浮动排版,按文档流布局就差不多。
当然,css3还有更多的排版方式,上面几种已经基本够用,如果还要学习的话就是box了。