grunt是node环境下一个压缩、合并 js、css代码的工具,还可以做一下代码美化等。体验了一下压缩合并,还是不错的,大概流程如下:
在工程下建一个grunt目录,写两个文件 package.json-工程依赖Gruntfile.js-压缩任务
package.jsn:
|
|
{ "name": "xxx", "version": "v0.1.0", "devDependencies": { "grunt": "^0.4.5", "grunt-contrib-concat": "~0.5.1", "grunt-contrib-cssmin": "~0.12.3", "grunt-contrib-jshint": "~0.10.0", "grunt-contrib-nodeunit": "~0.4.1", "grunt-contrib-uglify": "~0.5.0", "grunt-htmlhint": "~0.9.2" } } |
Gruntfile.js:
1 2 3 4 5 6 7 8 9 10 11 12 13 14 15 16 17 18 19 20 21 22 23 24 25 26 27 28 29 30 31 32 33 34 35 36 37 38 39 40 41 42 43 44 45 46 47 48 49 50 51 52 53 54 55 |
module.exports = function(grunt) { // 配置参数 grunt.initConfig({ pkg:grunt.file.readJSON('package.json'), // 代码合并 concat:{ options:{ separator: ";", stripBanners: true }, dist:{ src:[ "../focusManager/base.js", "../focusManager/tween.js", "../focusManager/widget.js", "../focusManager/yunos.js" ], dest: "dest/focusManager.js" } }, // 代码压缩 uglify:{ options:{ }, dist:{ files:{ "dest/focusManager-min.js" : "dest/focusManager.js" } } }, // css压缩 cssmin: { options: { keepSpecialComments: 0 }, compress:{ files:{ "dest/default.css": [ "../focusManager/base.css", "../focusManager/reset.css" ] } } } }); // 载入concat、uglify、cssmin插件,进行压缩 grunt.loadNpmTasks('grunt-contrib-concat'); grunt.loadNpmTasks('grunt-contrib-uglify'); grunt.loadNpmTasks('grunt-contrib-cssmin'); // 注册任务 grunt.registerTask('default', ['concat', 'uglify', 'cssmin']); }; |
这个Gruntfile很容易理解,想要压缩的文件以及目标文件写好就行,还有另一种自动化的写法,后面再说。
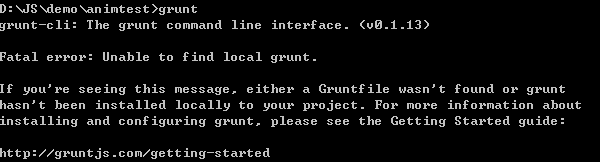
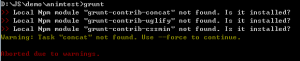
之后运行命令,grunt

出现了一个错误,网上解释
Note that installing grunt-cli does not install the grunt task runner! The job of the grunt CLI is simple: run the version of grunt which has been installed next to a Gruntfile. This allows multiple versions of grunt to be installed on the same machine simultaneously.
So in your project folder, you will need to install (preferably) the latest grunt version:
也就是说,之前装的grunt-cli只是grunt的运行环境,在工程目录下,还需要装一下grunt,运行一下命令:
|
|
$npm install grunt --save-dev Option --save-dev will add grunt as a dev-dependency to your package.json. This makes it easy to reinstall dependencies. |
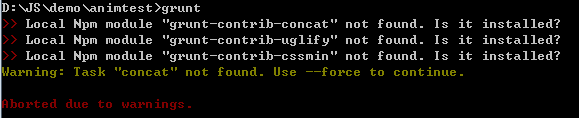
之后再次运行grunt命令,又出现错误:
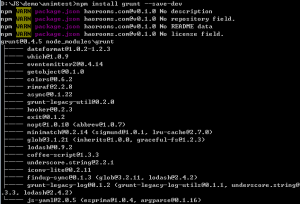
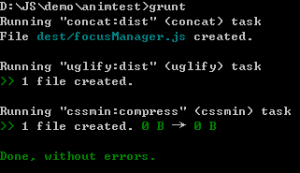
好吧,没有装这三个插件?原来是grunt一样,也要在工程下装,分别运行 npm install装一下,运行,成功:
工程复杂之后,肯定不会一个一个手动填文件,grunt也可以通过逻辑自动压缩js css文件,Gruntfile.js写法:
1 2 3 4 5 6 7 8 9 10 11 12 13 14 15 16 17 18 19 20 21 22 23 24 25 26 27 28 29 30 31 32 33 34 35 36 37 38 39 40 41 42 43 44 45 46 47 48 49 50 51 52 53 54 55 56 57 58 59 60 61 62 63 64 65 66 67 68 69 70 71 72 73 74 75 |
module.exports = function(grunt) { // 任务配置 grunt.initConfig({ pkg: grunt.file.readJSON('package.json'), // 压缩JS uglify: { // 文件头部输出信息 options: { banner: '/*! <%= pkg.name %> <%= grunt.template.today("yyyy-mm-dd") %> */\n' }, my_target: { files: [ { expand: true, // 相对路径 cwd: '../focusManager', src: ['*.js', '**/*.js'], // src:['**/*.js', '!**/*.min.js'] 多个src的写法以及不包括哪些js dest: 'dest/js/', rename: function (dest, src) { var folder = src.substring(0, src.lastIndexOf('/')); var filename = src.substring(src.lastIndexOf('/'), src.length); filename = filename.substring(0, filename.lastIndexOf('.')); var resultname = dest + folder + filename + '-min.js'; grunt.log.writeln("正在处理文件:" + src + " 处理后文件:" + resultname); return resultname; } } ] } }, // 压缩css cssmin: { // 文件头部输出信息 options: { banner: '/*! <%= pkg.name %> <%= grunt.template.today("yyyy-mm-dd") %> */\n', // 美化代码 beautify: { // 防止乱码 ascii_only: true } }, my_target: { files: [ { expand: true, // 相对路径 cwd: '../focusManager', src: '*.css', // src:['**/*.js', '!**/*.min.js'] 多个src的写法以及不包括哪些js dest: 'dest/css/', rename: function (dest, src) { var folder = src.substring(0, src.lastIndexOf('/')); var filename = src.substring(src.lastIndexOf('/'), src.length); filename = filename.substring(0, filename.lastIndexOf('.')); var resultname = dest + folder + filename + '-min.css'; grunt.log.writeln("正在处理文件:" + src + " 处理后文件:" + resultname); return resultname; } } ] } } }); // 加载模块 grunt.loadNpmTasks('grunt-contrib-uglify'); grunt.loadNpmTasks('grunt-contrib-cssmin'); grunt.registerTask('default', ['uglify', 'cssmin']); }; |
逻辑也很简单,就是把src里面的文件,压缩,生成文件会经过rename函数处理。
这里面需要注意的地方有
|
|
src: ['*.js', '**/*.js'], |
如果只写一个*.js,是不会递归cwd目录下的所有文件的,要递归几级写到数组中就可以了,如果不想添加什么文件,加!符号-‘!*.min.js’。
当然,这次也没有一帆风顺,运行的时候遇到错误:
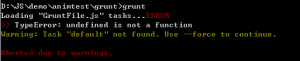
报错在 最后一句,
|
|
grunt.registerTask('default', ['uglify', 'cssmin']); |
查了半天也没找到这里有什么错误,网上搜了一下,大多数是 中括号里的uglify没有引号,跟我的情况也不一样。后来仔细检查了一下代码,发现了两处拼写错误,改了后就运行通过了,也就是说,其他错误都会报到最后一句。
做了一个小小的试验,写一个空模块
|
|
(function(){ // for test })(); |
压缩后是这样的:
对,什么都没了。
最近有新的需求,压缩不同版本的文件,就需要开多个contact uglify任务,琢磨了一会,搞出来了,同时对grunt有了进一步的认识。
配置多任务是这么写的
1 2 3 4 5 6 7 8 9 10 11 12 13 14 15 16 17 18 19 20 21 22 23 24 25 26 27 28 29 30 31 32 33 34 35 36 37 38 39 40 41 42 43 44 45 46 47 48 49 50 51 52 53 54 55 56 57 58 59 60 61 62 63 64 65 66 67 68 69 70 71 72 73 74 75 76 77 78 79 |
module.exports = function(grunt) { // 配置参数 grunt.initConfig({ pkg:grunt.file.readJSON('package.json'), // 代码合并 concat:{ options:{ separator: ";", stripBanners: true }, 123456: { src:[ "../../system/123.js", "../../system/456.js", "../../system/network/789.js" ], dest: "out/123456789.js" }, all: { src:[ "../../system/blitz.js", "../../system/base.js", "../../system/**/*.js", ], dest: "out/test_all.js" } }, uglify:{ 123456: { files: [ { "out/123456789.min.js" : "out/123456789.js" } ] }, all: { files: [ { "out/test_all.min.js" : "out/test_all.js" } ] }, every: { // 文件头部输出信息 //options: { // banner: '/*! <%= pkg.name %> <%= grunt.template.today("yyyy-mm-dd") %> */\n' //}, files: [ { expand: true, // 相对路径 cwd: '../../system', // 这里写三层,如果还有更多的再说 src: ['*.js', '**/*.js', '**/**/*.js'], // src:['**/*.js', '!**/*.min.js'] 多个src的写法以及不包括哪些js dest: './out/all/', rename: function (dest, src) { var folder = src.substring(0, src.lastIndexOf('/')); var filename = src.substring(src.lastIndexOf('/'), src.length); filename = filename.substring(0, filename.lastIndexOf('.')); var resultname = dest + folder + filename + '.min.js'; grunt.log.writeln("正在处理文件:" + src + " 处理后文件:" + resultname); return resultname; } } ] } } }); // 载入concat、uglify、cssmin插件,进行压缩 grunt.loadNpmTasks('grunt-contrib-concat'); grunt.loadNpmTasks('grunt-contrib-uglify'); //grunt.loadNpmTasks('grunt-contrib-cssmin'); // 注册任务 grunt.registerTask('default', ['concat', 'uglify']); }; |
r简单看一下配置文件
contact
首先配置了option,option中配置了不同文件中间增加;分隔符。
这个是contact所有任务的全局配置
后面又写了三个合并任务,分别配置下src和dest就可以了。
合并顺序就是 src中配置的顺序,*.js则按照字母排序。
uglify
uglify中配置了三个压缩任务,
压缩contact的文件
压缩所有文件并生成.min.js
最后运行
|
|
grunt.registerTask('default', ['concat', 'uglify']); |
会自动加载contact和uglify中的所有任务。
来源于http://www.haorooms.com/post/qd_grunt_cssjs。