Windows Platform Design Notes
Design Information for the Microsoft® Windows® Family of Operating Systems
Debugging NDIS Drivers
Abstract
This paper provides information about debugging Network Driver Interface Specification (NDIS) drivers for the Microsoft® Windows® family of operating systems. It provides guidelines for the NDIS driver developer to identify commonly encountered issues in network drivers and specifies best practices that will help the driver developer avoid network driver issues in the first place. This paper also provides information on how to use Ndiskd.dll, the NDIS kernel debugger extension, to gather information about the state of NDIS and the NDIS drivers.
Contents
Introduction. 3
NDIS Overview.. 3
Using Ndiskd.dll to Debug NDIS Drivers. 4
Debugger Extensions. 6
NDIS Tracing. 9
NDIS Bug Checks. 10
PnP Overview.. 11
Debugging a Miniport Initialization Problem.. 12
Debugging the Failure of a Miniport to Halt13
Debugging Power Management Issues. 14
Debugging Interrupt Storms. 15
MiniportReset Overview.. 16
Best Practices for Developing Miniport Drivers. 16
Tools – Using NDISTest and Driver Verifier16
Using Debug Messages. 16
Tracking Spin Locks. 16
Best Practices for Developing Intermediate Drivers. 17
Common Intermediate Driver Issues. 17
Best Practices for Developing Protocol Drivers. 18
Call to Action and Resources. 18
This is a preliminary document and may be changed substantially prior to final commercial release of the software described herein.
The information contained in this document represents the current view of Microsoft Corporation on the issues discussed as of the date of publication. Because Microsoft must respond to changing market conditions, it should not be interpreted to be a commitment on the part of Microsoft, and Microsoft cannot guarantee the accuracy of any information presented after the date of publication.
This White Paper is for informational purposes only. MICROSOFT MAKES NO WARRANTIES, EXPRESS, IMPLIED OR STATUTORY, AS TO THE INFORMATION IN THIS DOCUMENT.
Complying with all applicable copyright laws is the responsibility of the user. Without limiting the rights under copyright, no part of this document may be reproduced, stored in or introduced into a retrieval system, or transmitted in any form or by any means (electronic, mechanical, photocopying, recording, or otherwise), or for any purpose, without the express written permission of Microsoft Corporation.
Microsoft may have patents, patent applications, trademarks, copyrights, or other intellectual property rights covering subject matter in this document. Except as expressly provided in any written license agreement from Microsoft, the furnishing of this document does not give you any license to these patents, trademarks, copyrights, or other intellectual property.
Unless otherwise noted, the example companies, organizations, products, domain names, e-mail addresses, logos, people, places and events depicted herein are fictitious, and no association with any real company, organization, product, domain name, e-mail address, logo, person, place or event is intended or should be inferred.
® 2003 Microsoft Corporation. All rights reserved.
Microsoft, Windows, and Windows Server are either registered trademarks or trademarks of Microsoft Corporation in the United States and/or other countries.
The names of actual companies and products mentioned herein may be the trademarks of their respective owners.
Introduction
This paper provides information about debugging NDIS drivers for the Microsoft® Windows® family of operating systems. It also provides coding practices that driver developers can use to avoid common problems encountered by NDIS drivers such as initialization failures in NDIS miniports, NDIS Intermediate drivers whose miniports do not get halted, and other common issues reported to the NDIS team at Microsoft. The paper discusses:
- Ndiskd.dll—NDIS kernel debugger extensions
- NDIS tracing
- PnP overview
- Power Management overview
- NDIS intermediate drivers
- NDIS protocol drivers
Note: The information presented in this paper is applicable to Microsoft Windows Server™ 2003 driver development. Most of the information also applies to Microsoft Windows XP and Microsoft Windows 2000.
NDIS Overview
This paper assumes that you are familiar with the basic NDIS model. In addition to the miniports and protocols that have been discussed in the Microsoft Windows Driver Development Kit (DDK), this paper introduces the MOpen structure that represents a binding between a protocol and a miniport. The model, including the MOpen structure, appears in figure 1.
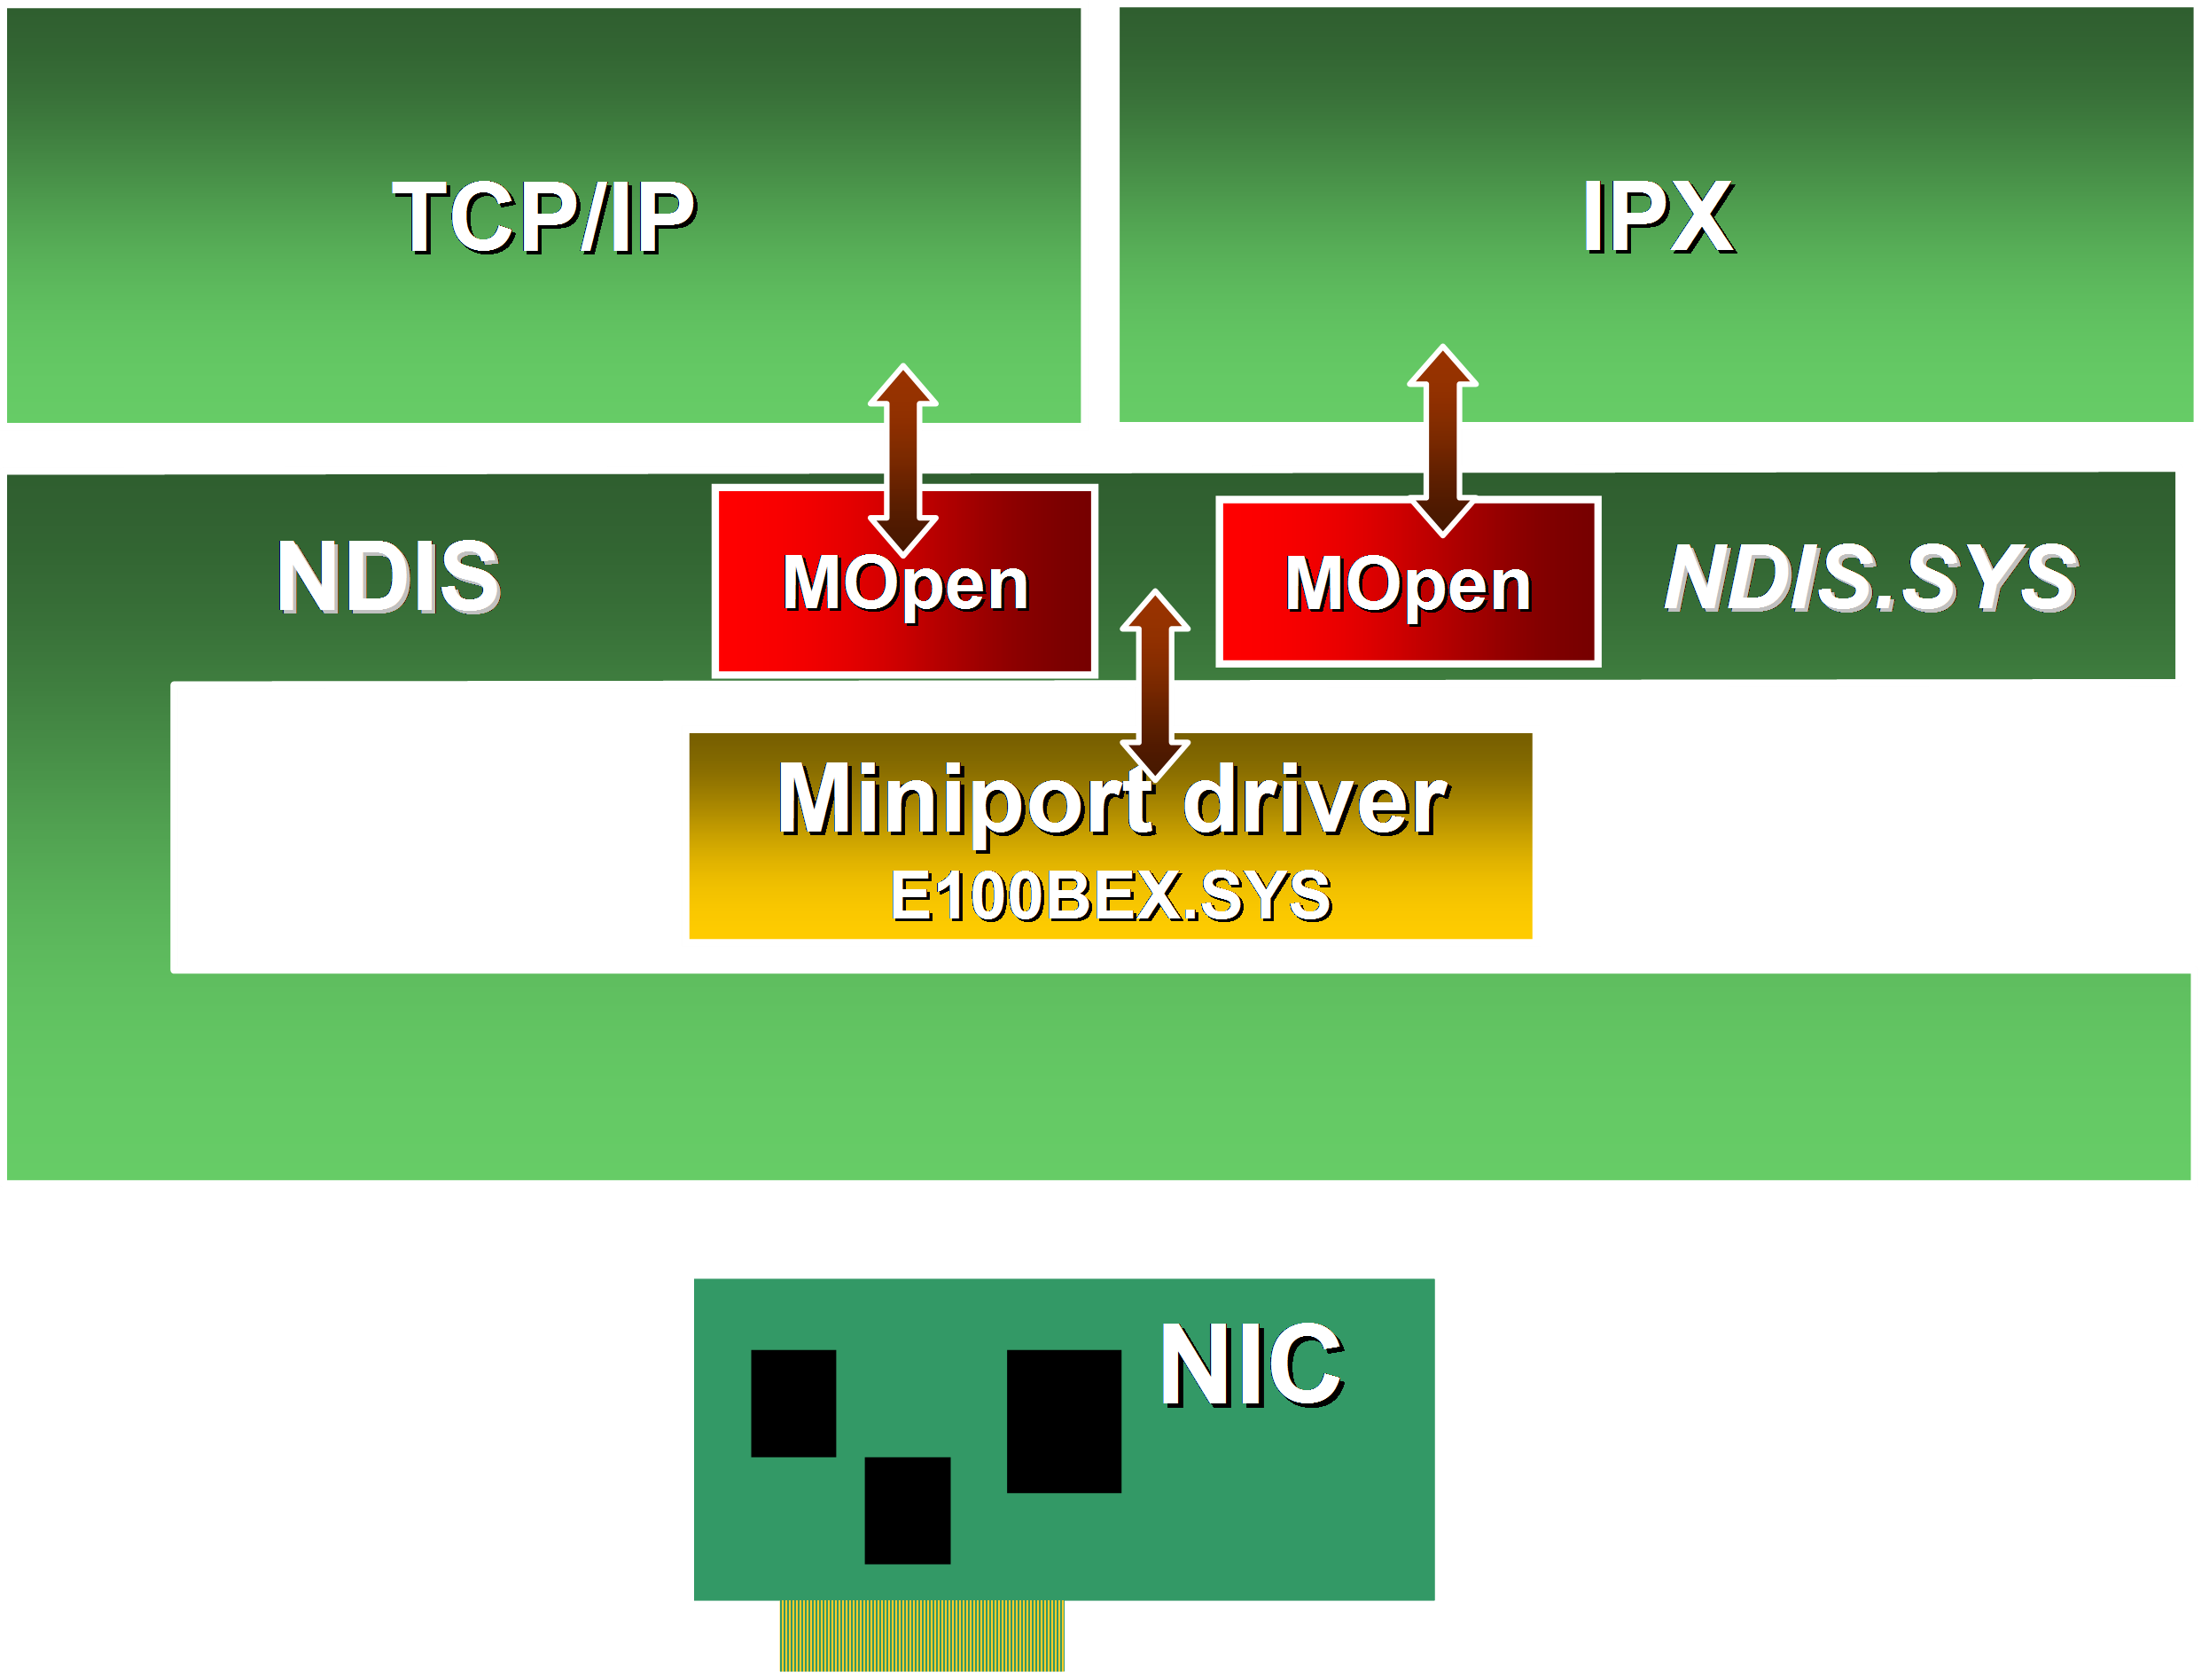 Figure 1: NDIS diagram including the MOpen structure
Using Ndiskd.dll to Debug NDIS Drivers
Developers and testers at Microsoft Corporation use Ndiskd.dll to quickly analyze potential network driver issues. Ndiskd.dll is a part of the Microsoft Debugging Tools package for kernel-mode debugging. Ndiskd.dll runs on both WinDBG.exe and Kd.exe, and it provides basic and detailed information about a miniport driver and the protocol drivers that are bound to it.
The most commonly used Ndiskd.dll commands are !miniports and !miniport <MiniportAdapterHandle>. Use the !miniports command to print all of the NDIS miniports that are present in the system. Use the !miniport <MiniportAdapterHandle> command to print detailed information about a miniport adapter, including the protocols it is bound to and the miniport’s PnP and power management states.
The following example shows how to get detailed information about a particular protocol that is bound to the Sample Ethernet Driver miniport. The Sample Ethernet Driver is a real NDIS miniport driver that has been given a fictitious name.
|
|
0: kd> !miniports NDIS Driver Verifier level: 0 NDIS Failed allocations : 0 Miniport Driver Block: 80d883c0, Version 0.0 Miniport: 80dbb130 1394 Net Adapter Miniport Driver Block: 80dc7c30, Version 4.25 Miniport: 80dc76f0Sample Ethernet Driver |
To print detailed information about the Sample Ethernet Driver, use the !miniportcommand. The pointer in bold in the preceding example is the argument to !miniport.
1 2 3 4 5 6 7 8 9 10 11 12 13 14 15 16 17 18 19 20 21 22 23 24 25 26 27 28 29 30 31 32 33 34 35 36 37 38 39 40 41 42 43 44 45 46 47 48 49 50 51 |
0: kd> !miniport 80dc76f0 Miniport 80e16130 : Sample Ethernet Driver AdapterContext : 80cd52c0 Flags : 2c412048 BUS_MASTER, SG_LIST, IGNORE_TOKEN_RING_ERRORS RESOURCES_AVAILABLE, SUPPORTS_MEDIA_SENSE, DOES_NOT_DO_LOOPBACK, MEDIA_CONNECTED, PnPFlags : 00210000 RECEIVED_START, HARDWARE_DEVICE, InternalResetCount : 0000 MiniportResetCount : 0000 References : 3 UserModeOpenReferences: 0 PnPDeviceState : PNP_DEVICE_STARTED CurrentDevicePowerState : PowerDeviceD0 Bus PM capabilities DeviceD1: 1 DeviceD2: 1 WakeFromD0: 0 WakeFromD1: 1 WakeFromD2: 1 WakeFromD3: 1 SystemState DeviceState PowerSystemUnspecified PowerDeviceUnspecified S0 D0 S1 PowerDeviceUnspecified S2 PowerDeviceUnspecified S3 D3 S4 D3 S5 D3 SystemWake: PowerSystemUnspecified DeviceWake: PowerDeviceUnspecified Current PnP and PM Settings: : 00000030 DISABLE_WAKE_UP, DISABLE_WAKE_ON_RECONNECT, Allocated Resources: IO Port: 0000ec00, Length: 80 Memory: fe004000, Length: 80 Interrupt Level: 44, Vector: 44 Translated Allocated Resources: IO Port: 0000ec00, Length: 80 Memory: fe004000, Length: 80 Interrupt Level: 9, Vector: 1a3 MediaType : 802.3 DeviceObject : 80e16030, PhysDO : 80e939a0 Next DO: 80e939a0 MapRegisters : 00000000 FirstPendingPkt: 00000000 DriverVerifyFlags : 00000000 Miniport Interrupt : 80cd5530 Miniport Open Block Queue: 80d066b0: Protocol 80ceb978 = TCPIP, ProtocolBindingContext 80d21a50 80db44c0: Protocol ffb54478 = NDISUIO, ProtocolBindingContext 80ceff58 |
Use the !mopen command to print detailed information about an Mopen structure, or binding, between the Sample Ethernet Driver and a protocol. Use the pointers in bold from the preceding example as arguments for the !mopen command.
|
|
0: kd> !mopen 80db44c0 Miniport Open Block 80db44c0 Protocol ffb54478 = NDISUIO, ProtocolContext 80ceff58 Miniport 80dc76f0 = Sample Ethernet Driver MiniportAdapterContext: 80cd52c0 Flags : 00000000 References : 1 0: kd> !mopen 80d066b0 Miniport Open Block 80d066b0 Protocol 80ceb978= TCPIP, ProtocolContext 80d21a50 Miniport 80dc76f0 = Sample Ethernet Driver MiniportAdapterContext: 80cd52c0 Flags : 00000000 References : 1 |
To print information about the protocol structures use the !protocol command. Use the pointer in bold from the preceding example as the argument to the !protocol command.
|
|
0: kd> !protocol ffb54478 Protocol ffb54478 : NDISUIO RootDeviceName is \DEVICE\{9C358E9A-BC5E-4A71-A8B6-993A0D3B404D} RefCount 2 Open 80db44c0 - Miniport: 80dc76f0 Sample Ethernet Driver BindAdapterHandler fb1a6e56, UnbindAdapterHandler fb1a6a30 PnPEventHandler fb1a67c2, UnloadHandler 00000000 OpenAdapterComplete fb1a6224, CloseAdapterComplete fb1a6242 SendCompleteHandler fb1a78c0, TransferDataComplete fb1a75d2 ReceiveHandler fb1a770c, ReceivePacketHandler fb1a7636 ReceiveComplete fb1a6514, StatusHandler fb1a64c4 StatusComplete fb1a6514 AssociatedMiniDriver 00000000 Flags : 00000000 |
The preceding example shows how to use the list of miniport drivers in the system to get detailed information about the protocols that are bound to a miniport adapter. The example printed four sets of information:
- Detailed information about each NDIS miniport adapter in the system.
- Specific information about the Sample Ethernet Driver.
- Detailed information about each of the Mopen structures, or bindings, on the Sample Ethernet Driver miniport.
- Detailed information about the NdisUio protocol.
Note: For detailed information about Ndiskd.dll, see the Help file provided with the Microsoft Debugging Tools, and the Microsoft Windows Driver Development Kit (DDK).
Debugger Extensions
Three useful debugger extensions exist that are not well known:
- !pkt
- !findpacket -p
- !stacks
Ndiskd.dll includes the !pkt and !findpacket commands. The !stacks command is part of the Microsoft Debugging Tools package and is not included in Ndiskd.dll.
!pkt Command
The !pkt command prints out detailed information about an NDIS_PACKET structure. You can specify a verbosity level to control the amount of information that the debugger prints, as shown in the following code.
|
|
kd> !ndiskd.pkt 817b03f8 5 Usage: pkt <pointer to packet> <verbosity> 1-Packet Private, 2-Packet Extension 3-Ndis Reference, 4-Buffer List |
To print every NDIS_BUFFER structure in an NDIS_PACKET structure, use a verbosity level of 4:
1 2 3 4 5 6 7 8 9 10 11 12 13 14 15 16 17 18 19 20 21 22 23 24 25 26 27 28 29 30 31 32 33 34 35 36 37 38 39 40 41 42 43 44 45 46 47 48 49 50 51 |
kd> !ndiskd.pkt 817b03f8 4 NDIS_PACKET at 817b03f8 NDIS_BUFFER at 816bb104 Next 816bc054 Size 20 MdlFlags 4 Process 00000000 MappedSystemVa 816bb124 Start VA 816bb000 ByteCount e ByteOffset 124 NDIS_BUFFER at 816bc054 Next 816480d0 Size 20 MdlFlags 4 Process 00000000 MappedSystemVa 816bc074 Start VA 816bc000 ByteCount 14 ByteOffset 74 NDIS_BUFFER at 816480d0 Next 00000000 Size 20 MdlFlags 1004 Process 00000000 MappedSystemVa 81648110 Start VA 81648000 ByteCount 14 ByteOffset 110 MacReserved[]: 00000000 00000000 00000000 00000000 0. TcpIpChecksumPacketInfo = 00000000 1. IpSecPacketInfo = 00000000 2. TcpLargeSendPacketInfo = 00000000 3. ClassificationHandlePacketInfo = 00000000 4. NdisReserved = 00000000 5. ScatterGatherListPacketInfo = 00000000 6. Ieee8021pPriority = 00000000 7. OriginalPacketInfo = 817b03f8 8. PacketCancelId = 00000000 9. MaxPerPacketInfo = 00000000 Packet.Private PhysicalCount 00000001 Total Length 00000028 Head 816bb104 Tail 816480d0 Pool 817b36a0 Count 00000001 Flags 00000002 ValidCounts 00 NdisPacketFlags 00000080 NdisPacketOobOffset 006c Private.Flags : 00000002 Private.NdisPacketFlags: 80 fPACKET_ALLOCATED_BY_NDIS, |
The preceding example prints every NDIS_BUFFER structure in a particular NDIS_PACKET structure, as well as the Out-Of-Band(OOB) information in the NDIS_PACKET structure.
!findpacket p Command
The !findpacket -p command finds all the packets that are allocated from a particular packet pool and that are currently in use by the miniport driver. Intermediate (IM) driver developers can use the findpacket -p command to list all of the packets that are allocated by the IM driver and indicated up to the protocols.
The following example shows how to locate all of the packets that are currently allocated in a packet pool. You need to pass the packet pool’s PoolHandle, that was returned to the NDIS driver when it called the NdisAllocatePacketPoolEx function, as the argument to the !findpacket -p command, as shown below.
1 2 3 4 5 6 7 8 9 10 11 12 13 14 15 16 17 18 19 20 21 |
kd> !ndiskd.findpacket p 816d4e68 Searching Free block <0x816d0000> Packet at 0x816d0058 Packet at 0x816d0120 Packet at 0x816d01e8 Packet at 0x816d02b0 Packet at 0x816d0378 Packet at 0x816d0440 Packet at 0x816d0508 Packet at 0x816d05d0 Packet at 0x816d0698 Packet at 0x816d0760 Packet at 0x816d0828 Packet at 0x816d08f0 Packet at 0x816d09b8 Packet at 0x816d0a80 Packet at 0x816d0b48 Packet at 0x816d0c10 Packet at 0x816d0cd8 Packet at 0x816d0da0 Packet at 0x816d0e68 |
!stacks Command
Use the !stacks command to find hung threads and to debug other difficult problems. This extension is present in the Debugger package but is not a part of ndiskd.dll.
You can specify a character string as an argument to the !stacks command. The debugger prints all the threads that contain the character string in their stacks. For example, the command !stacks 2 ndis! causes the debugger to print every thread that contains the “ndis!” string in its stack.
The threads printed by the debugger can provide important clues that will help you solve the problem you are investigating. For example, the output in the following code was taken from an IM driver that was not completing any requests to send packets. When the miniport adapter was disabled, the underlying miniport adapter was never halted as TCP/IP waited for the IM driver to complete the sends. The output, which is the result of the !stacks 2 ndis! command, contains two threads: one that shows TCP/IP waiting for outstanding sends to complete, and another that is an NDIS thread reserved for system use.
1 2 3 4 5 6 7 8 9 10 11 12 13 14 15 16 17 18 19 20 21 22 23 24 25 26 27 28 29 30 31 32 33 34 35 36 37 38 39 40 41 42 43 44 45 46 47 48 49 |
0: kd> !stacks 2 ndis! Proc.Thread .Thread Ticks ThreadState Blocker [80e76648 System] 4.00003c 80e738a0 0001f02 Blocked nt!KiSwapContext+0x26 nt!KiSwapThread+0x280 nt!KeWaitForSingleObject+0x249 tcpip!TCPCleanup+0xcc tcpip!TCPDispatch+0x91 nt!IofCallDriver+0x3f nt!IopCloseFile+0x27c nt!ObpDecrementHandleCount+0x121 nt!ObpCloseHandleTableEntry+0x12f nt!ObpCloseHandle+0x80 nt!NtClose+0x17 nt!_KiSystemService+0xd0 nt!ZwClose+0x11 netbt!DelayedNbtCloseFileHandles+0x4b netbt!CloseAddressesWi…+0x10b netbt!NbtNewDhcpAddress+0x69 netbt!TdiAddressDeletion+0x82 TDI!TdiNotifyPnpClientList+0xd7 TDI!TdiExecuteRequest+0x25b TDI!TdiHandleSerializedRequest+0x1c2 TDI!TdiDeregisterNetAddress+0xb tcpip!NotifyAddrChange+0x109 tcpip!IPpSetNTEAddr+0xde tcpip!IPDelNTE+0x39 tcpip!IPDelInterface+0xdf tcpip!ARPUnbindAdapter+0x70 NDIS!ndisUnbindProtocol+0x151 NDIS!ndisCloseMiniportBindings+0x201 NDIS!ndisPnPRemoveDevice+0x128 NDIS!NdisIMDeInit…DeviceInst…+0x40 passthru+0x2dc3 NDIS!ndisUnbindProtocol+0x151 NDIS!ndisCloseMiniportBindings+0x201 NDIS!ndisPnPRemoveDevice+0x128 NDIS!ndisPnPDispatch+0x15b nt!IofCallDriver+0x3f nt!IopSynchronousCall+0xc0 nt!IopRemoveDevice+0x89 nt!IopRemoveLockedDeviceNode+0x15e nt!IopDeleteLockedDeviceNode+0x32 4.00007c 80e04da0 0000129 Blocked nt!KiSwapContext+0x26 nt!KiSwapThread+0x280 nt!KeRemoveQueue+0x29b NDIS!ndisWorkerThread+0x2e nt!PspSystemThreadStartup+0x2e nt!KiThreadStartup+0x16 |
The preceding example shows the benefit of running the !stacks 2 ndis! command, which provides useful clues about the current state of the computer. In the example, you can see that TCP/IP is waiting for an event. It is reasonable to assume that it is waiting for outstanding sends. Later in this paper, you will see how this assumption can be verified.
The second thread printed in the preceding example is reserved for system use.
Use the !stacks 2 <miniport driver name> command to print all the threads with the miniport driver’s name in their stacks.
NDIS Tracing
NDIS has debug messages built into its checked version. By default, these are not printed in the debugger and need to be turned on. Use NDIS tracing to analyze problems that are not in the data path, such as PnP and power-management problems. NDIS tracing works on both free and checked builds of the operating system.
The following example demonstrates how to turn on the NDIS tracing feature in the REQUEST code path at the INFO level within NDIS. There are four levels of debug messages available to the developer: Info, Warn, Err and Fatal. The Info level is the most verbose, and the Fatal level is the least verbose. (The Log level has not been implemented.)
1 2 3 4 5 6 7 8 9 10 11 12 13 14 15 16 17 18 19 20 21 22 23 24 25 26 |
0: kd> !ndiskd.dbglevel Current setting:FATAL Available settings: INFO LOG WARN ERR 0: kd> !ndiskd.dbglevel INFO 0: kd> !ndiskd.dbgsystems Current settings: Available settings: INIT CONFIG SEND RECV PROTOCOL BIND BUS_QUERY REGISTRY MEMORY FILTER REQUEST WORK_ITEM PNP PM OPEN LOCKS RESET WMI NDIS_CO REFERENCE 0: kd> !ndiskd.dbgsystems REQUEST BIND Arg = REQUEST Arg = BIND 0: kd> g ***NDIS*** (c, 56) ==>ndisMRequest ***NDIS*** (c, 89) ndisMRequest: Queueing request 0xfc8fbc68 ***NDIS*** (c, 392) ==>ndisMDoRequests ***NDIS*** (c, 419) ndisMDoRequests: Processing Request 0xfc8fbc68, Oid 0xff00c913 ***NDIS*** (c, 2473) ==>ndisMSyncQueryInformationComplete ***NDIS*** (c, 2503) ndisMSyncQueryInformaitonComplete: Request 0xfc8fbc68, Oid 0xff00c913 |
The Dbglevel and Dbgsystems settings are toggle settings. To turn off the debug print feature for the REQUEST and BIND code paths, you must re-enter the previous command, as shown here:
|
|
0: kd> !ndiskd.dbgsystems REQUEST BIND Arg = REQUEST Arg = BIND 0: kd> !ndiskd.dbgsystems Current settings: Available settings: INIT CONFIG SEND RECV PROTOCOL BIND BUS_QUERY REGISTRY MEMORY FILTER REQUEST WORK_ITEM PNP PM OPEN LOCKS RESET WMI NDIS_CO REFERENCE |
The preceding example shows how you can set and reset the verbosity and component values, which control the level of debugging information that NDIS prints in the debugger.
NDIS Bug Checks
The system performs a bug check when it detects an error caused by an NDIS miniport driver. The bug check is performed as soon as an error is detected. If the system did not stop, these errors would appear later, making it difficult to pinpoint the cause of the problem at that stage.
The bug checks that are caused by an NDIS miniport driver use a special bug check code. On Windows XP and Windows 2000, the bug check code is BUGCODE_ID_DRIVER. On Windows Server 2003, the bug check code is BUGCODE_NDIS_DRIVER. If a debugger is connected to the system being tested, a sentence describing the bug check is printed in the debugger. The !analyze –v command provides detailed information on the bug check.
Examples of NDIS miniport driver problems that cause the system to perform a bug check include the following:
- Before the ownership of a receive packet, that the miniport driver indicated by calling the NdisMIndicateReceivePacket function, is transferred back to the miniport driver, the driver indicates the packet in another call to NdisMIndicateReceivePacket.
- The miniport driver frees shared memory that it has not allocated.
- The miniport driver unloads without deregistering an interrupt that it previously registered.
Note: For more information about bug check codes, see the Debugger.chm help file in the Microsoft Debugging Tools package.
PnP Overview
NDIS implements the following Plug and Play (PnP) functionality on behalf of the miniport:
- NDIS intercepts all the PnP driver and device IRPs that are sent to the miniport driver.
- NDIS and the driver together comprise the functional device object (FDO) of the miniport adapter.
- NDIS implements the AddDevice routine on behalf of the minport driver. In response to the StartDevice IRP, NDIS calls the MiniportInitialize function handler of the miniport driver.
- NDIS propagates the Remove/Stop IRP to the miniport driver’s MiniportHalt function. Before calling this function, NDIS unbinds all the protocols bound to that miniport.
The !ndiskd.miniport command prints information that is useful for debugging PnP problems, as shown in the following example.
1 2 3 4 5 6 7 8 9 10 11 12 13 14 15 16 17 18 19 20 21 22 23 24 25 26 27 28 29 30 31 32 33 34 35 36 37 38 39 40 41 42 43 44 45 46 47 48 49 50 51 |
0: kd> !miniport 80dc76f0 Miniport 80e16130 : Sample Ethernet Driver AdapterContext : 80cd52c0 Flags : 2c412048 BUS_MASTER, SG_LIST, IGNORE_TOKEN_RING_ERRORS RESOURCES_AVAILABLE, SUPPORTS_MEDIA_SENSE, DOES_NOT_DO_LOOPBACK, MEDIA_CONNECTED, PnPFlags : 00210000 RECEIVED_START, HARDWARE_DEVICE, InternalResetCount : 0000 MiniportResetCount : 0000 References : 3 UserModeOpenReferences: 0 PnPDeviceState : PNP_DEVICE_STARTED CurrentDevicePowerState : PowerDeviceD0 Bus PM capabilities DeviceD1: 1 DeviceD2: 1 WakeFromD0: 0 WakeFromD1: 1 WakeFromD2: 1 WakeFromD3: 1 SystemState DeviceState PowerSystemUnspecified PowerDeviceUnspecified S0 D0 S1 PowerDeviceUnspecified S2 PowerDeviceUnspecified S3 D3 S4 D3 S5 D3 SystemWake: PowerSystemUnspecified DeviceWake: PowerDeviceUnspecified Current PnP and PM Settings: : 00000030 DISABLE_WAKE_UP, DISABLE_WAKE_ON_RECONNECT, Allocated Resources: IO Port: 0000ec00, Length: 80 Memory: fe004000, Length: 80 Interrupt Level: 44, Vector: 44 Translated Allocated Resources: IO Port: 0000ec00, Length: 80 Memory: fe004000, Length: 80 Interrupt Level: 9, Vector: 1a3 MediaType : 802.3 DeviceObject : 80e16030, PhysDO : 80e939a0 Next DO: 80e939a0 MapRegisters : 00000000 FirstPendingPkt: 00000000 DriverVerifyFlags : 00000000 Miniport Interrupt : 80cd5530 Miniport Open Block Queue: ffb31d18: Protocol ffb57cf8 = NDISUIO, ProtocolBindingContext ffb323e8 ffbad958: Protocol 80e15998 = TCPIP, ProtocolBindingContext ffbadc00 |
The !miniport extension prints a lot of useful information. The items that the previous example prints include the following:
- The PnP state of the miniport adapter.
- The physical device object (PDO) and the FDO of the miniport adapter.
- The protocols that are bound to the miniport adapter.
- The hardware resources that are assigned to the miniport adapter.
Debugging a Miniport Initialization Problem
Miniport adapters can fail to initialize for a variety of reasons. If the problem is reproducible, the best way to proceed is to turn on NDIS tracing and reproduce the problem. The debug messages printed in the debugger makes it easy to identify the point of failure.
To debug a miniport initialization problem:
- Turn on NDIS tracing.
- Look for the statement specifying the failure code that the MiniportInitialize function handler returns.
- Using the failure code as a starting point, find the last NDIS function that the miniport called before it entered the failure code path.
- Inspect the source code of the miniport driver to find the cause of the fault.
The following example contains the debugging messages that are printed during the initialization of a miniport adapter.
1 2 3 4 5 6 7 8 9 10 11 12 13 14 15 16 17 18 19 20 21 22 23 |
<==ndisAddDevice: Miniport 81AF6338 ndisPnPAddDevice returning 0 ==>ndisPnPStartDevice: DeviceObject ndisPnPStartDevice: Miniport 81AF6338, Sample Ethernet Driver … ==NdisMQueryAdapterResources: Miniport 81AF6338, Status 0 ==>NdisMRegisterIoPortRange: Miniport 81AF6338 ==>ndisTranslateResources: Miniport 81AF6338 translating resource type: 1, value: 1800 ndisTranslateResources translated 1800 to 1800 <==ndisTranslateResources: Miniport 81AF6338, Status 0 <==NdisMRegisterIoPortRange: Miniport 81AF6338, Status 0 ==>NdisWriteErrorLogEntry <==NdisWriteErrorLogEntry ==>NdisMDeregisterIoPortRange: Miniport 81AF6338 <==NdisMDeregisterIoPortRange: Miniport 81AF6338 ndisMInitializeAdapter: Miniport 81AF6338, InitializeHandler returned c0000001 ==>NdisMDeregisterAdapterShutdownHandler: Miniport 81AF6338 <==NdisMDeregisterAdapterShutdownHandler: Miniport 81AF6338 ***NDIS*** (b, 1791) INIT FAILURE: Dequeueing the miniport from the driver block. ==>ndisDeQueueMiniportOnDriver, Miniport 81AF6338, MiniBlock 81BB7588 <==ndisDeQueueMiniportOnDriver: Miniport 81AF6338, MiniBlock 81BB7588 ***NDIS*** (b, 1822) INIT FAILURE: Dereferencing the miniport block. |
The preceding example shows a miniport adapter failing its initialization routine. In the beginning of the example, NDIS gets called at its AddDevice routine for the miniport, followed by a StartDevice IRP. As part of the IRP, NDIS calls the MiniportInitialize function handler, which fails because of an error that occurred after it successfully called the NdisMRegisterIoPortRange function. You can use this information as the starting point for debugging the initialization problem. NDIS debug messages also tell you if the NDIS API failed and possibly why it failed.
Debugging the Failure of a Miniport to Halt
If NDIS does not call a miniport driver’s MiniportHalt function when the miniport adapter is disabled through the user interface or an automated test, it is usually because an operation that the miniport driver must complete before being halted has not completed. For example, NDIS will not halt a miniport adapter until the driver finishes sending all the packets that were sent to it for transmission.
To debug the failure of a miniport to halt:
- Run the !stacks 2 ndis! command in the debugger to print all the threads that contain the “ndis!” string in their stacks.
- Inspect the threads to see if they offer any clues. For example, a thread that shows TCP/IP waiting implies that the protocol is waiting for the miniport driver to complete send operations.
- To find the number of outstanding requests to send packets in the miniport, print all of the Mopen structureson the miniport as explained earlier in this paper. If the miniport driver is not completing packets back to the protocol, the Referencesvalue never returns to one. Calling the NdisCloseAdapter function also decreases this value by one.
- Investigate the miniport driver to see why the miniport is not completing the packets. The miniport driver calls the NdisMSendComplete function to complete such send operations.
The following example shows an MOpen structure between the NDISUIO protocol and the Sample Ethernet Driver miniport.
|
|
0: kd> !mopen ffaefd70 Miniport Open Block ffaefd70 Protocol ffae6ad8 = NDISUIO, ProtocolContext ffaeb2e8 Miniport 80d74698 = Sample Ethernet Driver MiniportAdapterContext: 80ccb008 Flags : 00218010 OPEN_PROCESSING, OPEN_CLOSING, OPEN_UNBINDING OPEN_DONT_FREE, References : 43 |
The preceding example shows an Mopen structure between the NDISUIO protocol and the Sample Ethernet Driver. NDIS has called the protocol’s ProtocolUnbindAdapter handler.The protocol has called the NdisCloseAdapter function. NDIS will not call the protocol’s CloseAdapterComplete handler until the number of references reaches zero. The references are caused by outstanding send commands in the miniport.
Debugging Power Management Issues
As the device power policy owner of the miniport, NDIS is responsible for querying the bus driver, the miniport driver, and the system settings before deciding on the power management policy for the miniport adapter.
To find the values returned by the bus driver and the miniport driver, turn on NDIS tracing or look at the output of the !miniport command:
1 2 3 4 5 6 7 8 9 10 11 12 13 14 15 16 17 18 19 20 21 22 23 24 25 26 27 28 29 30 31 32 33 34 35 36 37 38 39 40 41 42 43 44 45 46 47 48 49 50 51 |
0: kd> !miniport 80dc76f0 Miniport 80e16130 : Sample Ethernet Driver AdapterContext : 80cd52c0 Flags : 2c412048 BUS_MASTER, SG_LIST, IGNORE_TOKEN_RING_ERRORS RESOURCES_AVAILABLE, SUPPORTS_MEDIA_SENSE, DOES_NOT_DO_LOOPBACK, MEDIA_CONNECTED, PnPFlags : 00210000 RECEIVED_START, HARDWARE_DEVICE, InternalResetCount : 0000 MiniportResetCount : 0000 References : 3 UserModeOpenReferences: 0 PnPDeviceState : PNP_DEVICE_STARTED CurrentDevicePowerState : PowerDeviceD0 Bus PM capabilities DeviceD1: 1 DeviceD2: 1 WakeFromD0: 0 WakeFromD1: 1 WakeFromD2: 1 WakeFromD3: 1 SystemState DeviceState PowerSystemUnspecified PowerDeviceUnspecified S0 D0 S1 PowerDeviceUnspecified S2 PowerDeviceUnspecified S3 D3 S4 D3 S5 D3 SystemWake: PowerSystemUnspecified DeviceWake: PowerDeviceUnspecified Current PnP and PM Settings: : 00000030 DISABLE_WAKE_UP, DISABLE_WAKE_ON_RECONNECT, Allocated Resources: IO Port: 0000ec00, Length: 80 Memory: fe004000, Length: 80 Interrupt Level: 44, Vector: 44 Translated Allocated Resources: IO Port: 0000ec00, Length: 80 Memory: fe004000, Length: 80 Interrupt Level: 9, Vector: 1a3 MediaType : 802.3 DeviceObject : 80e16030, PhysDO : 80e939a0 Next DO: 80e939a0 MapRegisters : 00000000 FirstPendingPkt: 00000000 DriverVerifyFlags : 00000000 Miniport Interrupt : 80cd5530 Miniport Open Block Queue: ffb31d18: Protocol ffb57cf8 = NDISUIO, ProtocolBindingContext ffb323e8 ffbad958: Protocol 80e15998 = TCPIP, ProtocolBindingContext ffbadc00 |
In the preceding example, NDIS sets the DISABLE_WAKE_UP flag, because the user has not enabled Wake-On-LAN (WOL) for this miniport adapter. To debug a WOL problem, you need to inspect the power management values returned by the system, the bus driver, and the miniport to determine which of the three entities is disabling WOL. These values are all displayed in the output of the !miniport command.
Debugging Interrupt Storms
Interrupt storms occur when either a miniport driver fails to disable device interrupts or the device continues to assert an interrupt after that interrupt has been disabled. In either case, the computer is not usable until the device stops asserting interrupts.
To diagnose an interrupt storm problem:
- Set a breakpoint on the MiniportISR function.
- If MiniportISR returns TRUE, set a breakpoint on the MiniportDpc function. MiniportISR should not return TRUE until the MiniportDpc functionenables interrupts.
- Investigate why the device is asserting an interrupt before the DPC has completed.
MiniportReset Overview
When a miniport driver calls the NdisMResetComplete function, NDIS completes all outstanding requests on behalf of the driver. If that driver is a serialized driver, NDIS also returns all the send packets that NDIS has queued for the driver to the appropriate protocol drivers.
Best Practices for Developing Miniport Drivers
The following practices are followed by developers at Microsoft Corporation when developing NDIS drivers:
- Running tools such as NDISTest and Driver Verifier.
- Using debug messages.
- Tracking Spin Locks.
Tools – Using NDISTest and Driver Verifier
NDISTest and Verifier.exe are good tools to use when developing NDIS drivers. NDISTest aids and verifies the completeness of a miniport driver. You should use it on both miniports and IM drivers. NDISTest cannot test protocols. Use Driver Verifier to ensure that common errors are easily found and rectified early in the development cycle.
Use Driver Verifier from the beginning of the development effort. Use NDISTest to test the functional completeness and robustness of the driver. You can run an individual test from the test suite to test specific features of the NDIS driver.
Using Debug Messages
The __LINE__ compiler directive is a useful tool. The compiler replaces each __LINE__ directive with the actual line number in the file, which is useful for logging or printing debugging messages.
Tracking Spin Locks
You can enhance a deserialized driver to track the acquisition and release of spin locks by recording each file and line number that acquired a spin lock. This record is cleared just before releasing the spin lock.
At the beginning of each .c file, include a #define statement that uniquely identifies the file, as shown in the following code. Be sure that the defined value is larger than the number of lines that a file could contain, because the line number and the file number will be combined into a single unsigned integer.
|
|
#define DRIVER_FILE 0x0010000 |
Define the following structures and macros in a header file of the driver:
|
|
typedef struct _SAMPLE_DRIVER_LOCK{ NDIS_SPIN_LOCK SpinLock; ULONG Location; } SAMPLE_DRIVER_LOCK, *PSAMPLE_DRIVER_LOCK; #define MiniportAcquireLock(_Lock) \ NdisAcquireSpinLock (&((_Lock)->NdisSpinLock));\ (_Lock)->Location = (DRIVER_FILE + __LINE__); #define MiniportReleaseSpinLock(_Lock) \ (_Lock)->Location = 0;\ NdisReleaseSpinLock(&((_Lock)->NdisSpinLock)); \ |
The preceding structure and two macros enable you to quickly find the line of code that last acquired the spin lock. To verify that no spin-lock issues exist in the code, run Driver Verifier with the Deadlock Detection option turned on. Each acquisition of a spin lock will be tested to make sure that it occurred in the right order with respect to all the other spin locks in your driver.
Best Practices for Developing Intermediate Drivers
An NDIS IM driver is complex, because any of the entry points in the driver’s protocol module or miniport module can be called regardless of the state of the other module.
The IM driver must ensure that a notification, such as a send or receive command to one of its modules, does not result in an incorrect action from its other module. For example, when NDIS requests that an IM driver’s miniport module should send a packet, the driver must then determine whether the protocol module can propagate the packet down or if the packet needs to fail.
You should maintain a reference count on all outstanding actions that the IM driver will be called back for—actions such as send commands and requests that the driver initiates to the miniport below it. This reference count should be synchronized with the unbind code in the protocol. The IM miniport should also maintain a reference count of the number of outstanding receive commands that the IM driver has indicated. This count must be synchronized with the PnP code path in the IM miniport driver, to ensure that no receive commands occur after the IM miniport adapter has been halted.
Common Intermediate Driver Issues
When developing an IM driver, you might encounter the problem of TCP/IP not sending packets to the IM driver for transmission. Common causes of this problem include the following:
- The IM driver is reporting an invalid 802.3 physical (MAC) address.
- The IM driver is indicating corrupted packets to TCP/IP.
- The IM driver’s MiniportTransferData function handler is returning corrupted packets.
You should run NDISTest on the IM driver to solve such problems.
Another problem is that outstanding send and request commands in the IM miniport module can prevent NDIS from calling an IM driver’s MiniportHalt routine after the driver has called the NdisIMDeInitializeDeviceInstance function. In this situation, the IM driver could have passed such a packet to the miniport adapter below it, or queued the packet internally. The Mopen structure can determine whether any packets were passed to the underlying miniport.
Best Practices for Developing Protocol Drivers
The problems that commonly occur with protocol drivers are similar to those that occur with IM drivers. As described earlier, it is important to synchronize the protocol driver’s PnP code path with the driver’s send code path.
Use the appropriate I/O Control (IOCTL) codes when designing the protocol driver’s IOCTL interface. IOCTLs should specify the METHOD_BUFFERED option as documented in the DDK and have the appropriate read or write privilege set in the IOCTL code. If an IOCTL is going be used only when an Administrator is logged on, the protocol driver should create a device object by calling the IoCreateDeviceSecure routine.
Call to Action and Resources
Call to Action:
- For driver developers:
- Run NDISTest and Verifier on NDIS drivers during development. These tools verify functional completeness and find common errors in a reproducible manner.
- Build kernel debugger extensions to quickly extract useful information from the driver’s data structures.
- Build diagnostic information into your NDIS driver to quickly identify issues.
- Post questions on the public Microsoft device driver newsgroup. It is an excellent forum for both novice and expert developers.
For questions about debugging and developing NDIS drivers, post questions on the public Microsoft device driver newsgroup.
For specific questions about this paper, send e-mail to ndis6fb@microsoft.com.
Resources:
Microsoft Hardware and Driver Developer Information
http://www.microsoft.com/hwdev/
Microsoft Windows Driver Development Kit (DDK)
http://www.microsoft.com/ddk/
Microsoft Debugging Tools
http://www.microsoft.com/ddk/debugging/default.asp
Microsoft’s public device driver newsgroup
microsoft.public.development.device.drivers