ThinkCenter M820z用户指南和硬件维护手册(拆机指南)
Android之FileProvider详解
简介
Android 7.0 之前,文件的 Uri 以 file:// 形式提供给其他 app 访问。
Android 7.0 之后,分享文件的 Uri 发生了变化。为了安全起见,file:// 形式的Uri 不能正常访问。官方提供了 FileProvider,FileProvider生成的Uri会以content://的形式分享给其他app使用。
content形式的Uri可以让其他app临时获得读取(Read)和写入(Write)权限,只要我们在创建 Intent 时,使用 Intent.setFlags() 添加权限。只要接收Uri的app在接收的Activity任务栈中处于活动状态,添加的权限就会一直有效,直到app被任务栈移除。
目的
在7.0 以前,为了访问 file:// 形式的 Uri,我们必须修改文件的权限。修改后的权限对所有 app 都是有效的,这样的行为是不安全的。content://形式的Uri让Android的文件系统更安全,对于分享的文件,接收方 app 只拥有临时的权限,减少了我们app内部的文件被其他 app 恶意操作的行为。
使用
创建FileProvider
在manifest文件<application>标签中添加pvodier标签,配置如下。
|
1 2 3 4 5 6 7 8 9 10 11 12 13 14 15 16 17 |
<manifest> ... <application> <activity> ..... </activity> <provider android:name="androidx.core.content.FileProvider" android:authorities="com.example.app.fileprovider" android:exported="false" android:grantUriPermissions="true"> <meta-data android:name="android.support.FILE_PROVIDER_PATHS" android:resource="@xml/file_paths" /> </provider> </application> </manifest> |
android:name指定Provider所在的位置。官方自带的FileProvider已经相当完善,所以我们不需要像Service、Broadcast一样自定义,直接使用自带的就行,直接输入privoder会自动出现提示。

android:authorities相当于一个用于认证的暗号,在分享文件生成Uri时,会通过它的值生成对应的Uri。值是一个域名,一般格式为<包名>.fileprovider。
android:exported设置为false,FileProvider不需要公开。
android:grantUriPermissions设置为true,这样就能授权接收端的app临时访问权限了。
设置共享目录
在res/xml中创建一个资源文件(如果xml目录不存在,先创建),名字随便(一般叫file_paths.xml)。
|
1 2 3 4 5 |
<?xml version="1.0" encoding="utf-8"?> <paths xmlns:android="http://schemas.android.com/apk/res/android"> <files-path name="my_logs" path="logs/"/> ... </paths> |
<paths>必须有1个或多个子标签,每个子标签代表要请求的私有文件目录。不同的子标签代表不同的目录类型。
在<provider>标签中添加<meta-data>子标签。
|
1 2 3 4 5 6 7 8 9 |
<provider android:name="androidx.core.content.FileProvider" android:authorities="com.example.app.fileprovider" android:exported="false" android:grantUriPermissions="true"> <meta-data android:name="android.support.FILE_PROVIDER_PATHS" android:resource="@xml/file_paths" /> </provider> |
设置<meta-data>的属性android:name值为android.support.FILE_PROVIDER_PATHS,属性android:resouce的值为刚才我们创建的path文件名。
配置paths
<paths>的每个子标签必须有path属性,代表content Uris的路径。name不需要和path保持一样,只是一个名称。
子标签有以下几种。
files-path
|
1 |
<files-path name="my_files" path="path" /> |
代表内部存储的files目录,与Context.getFilesDir()获取的路径对应。
最终生成的Uri格式为:authorities/pathname/filename
示例:
|
1 |
content://com.example.app.fileprovider/my_files/filexxx.jpg |
cache-path
|
1 |
<cache-path name="name" path="path" /> |
代表内部存储的cache目录,与Context.getCacheDir()获取的路径对应。
external-path
|
1 |
<external-path name="name" path="path" /> |
代表外部存储(sdcard)的cache目录,与Environment.getExternalStorageDirectory()获取的路径对应。
external-files-path
|
1 |
<external-files-path name="name" path="path" /> |
代表app的外部存储的根目录,与Context#getExternalFilesDir(String) Context.getExternalFilesDir(null)获取的路径对应。
external-cache-path
|
1 |
<external-cache-path name="name" path="path" /> |
代表app外部缓存区域的根目录,与Context.getExternalCacheDir()获取的路径对应。
external-media-path
|
1 |
<external-media-path name="name" path="path" /> |
代表app外部存储媒体区域的根目录,与Context.getExternalMediaDirs()获取的路径对应。
注意: 这个目录只在API 21(也就是Android 5.0)以上的系统上才存在。
生成Content Uri文件
为了让其他app使用Content Uri,我们的app必须提前生成Uri。
|
1 2 3 4 |
File filePath = new File(Context.getFilesDir(), "my_log"); File newFile = new File(filePath, "my_log.log"); // 生成Uri Uri contentUri = FileProvider.getUriForFile(getContext(), "com.example.app.fileprovider", newFile); |
这里注意获取目录,在配置paths时我们讲了,paths的子标签必须和获取目录的代码保持对应。这里我们用的是Context.getFilesDir(),所以paths文件中必须包含files-path子标签,不然别的app获取uri时会出现异常。
最终生成Uri是使用的FileProvider.getUriForFile()。第一个参数就是provider中设置的authorities属性值。
授权临时权限
分享一般只有这读取和写入2种权限,根据需要传入Intent.addFlags()中。
|
1 2 3 |
// 这里用的是发送文件。 Intent intent = new Intent(Intent.ACTION_SEND); intent.addFlags(Intent.FLAG_GRANT_READ_URI_PERMISSION | Intent.FLAG_GRANT_WRITE_URI_PERMISSION); |
Uri传入Intent
有好几种传入的方式,根据不同的场景使用不同的方式。
为邮箱app分享附件文件
|
1 |
intent.putExtra(Intent.EXTRA_STREAM, contentUri); |
其他分享
使用Intent.setDate或Intent.setClipData()。
|
1 |
intent.setClipDataClipData.newRawUri("", contentUri); |
最后使用startActivity(intent)启动分享操作。
参考链接
解决mysql导入数据文件过慢的问题
目前遇到一个问题,mysql 使用 source 命令导入 *.sql 数据文件时,运行的很慢,大概一秒钟插入一两百条左右的样子,对于大的文件来说这个太慢了。
1.登入mysql
|
1 |
$ mysql -uroot -p*** |
2.查看mysql中对于参数 innodb_flush_log_at_trx_commit 的配置
|
1 |
show global variables where variable_name = 'innodb_flush_log_at_trx_commit'; |
3.修改
|
1 |
SET GLOBAL innodb_flush_log_at_trx_commit = 0; |
修改完成后在次执行相同的文件,200M大约200w+条的数据在1分钟左右。
对于该参数的不同值的说明:
1.innodb_flush_log_at_trx_commit参数为 0
binlog_group_flush && thd_flush_log_at_trx_commit(NULL) == 0 条件成立,因此直接return了,那么这种情况下log_buffer_flush_to_disk函数不会调用,因此不会做redo刷盘。依赖master线程。
2.innodb_flush_log_at_trx_commit参数为 1
!binlog_group_flush || thd_flush_log_at_trx_commit(NULL) == 1 返回为1即为True,因此调用log_buffer_flush_to_disk(True),因此需要做redo刷盘,也要做sync。
3.innodb_flush_log_at_trx_commit参数为 2
!binlog_group_flush || thd_flush_log_at_trx_commit(NULL) == 1 返回为0即为Flase,因此调用log_buffer_flush_to_disk(Flase),因此需要做redo刷盘,不做sync。依赖OS的刷盘机制。
参考例子如下:
|
1 2 3 4 5 6 7 8 9 10 11 12 13 14 15 16 17 18 19 20 21 22 |
mysql -u root -p -h 127.0.0.1 mysql> use test; Database changed mysql> set global innodb_flush_log_at_trx_commit=0; Query OK, 0 rows affected (0.03 sec) mysql> set global sync_binlog=0; Query OK, 0 rows affected (0.03 sec) mysql> set global max_allowed_packet=1024*1024*512; Query OK, 0 rows affected (0.00 sec) mysql> set global bulk_insert_buffer_size=512*1024*1024; Query OK, 0 rows affected (0.00 sec) mysql> set global innodb_buffer_pool_size=512*1024*1024; Query OK, 0 rows affected, 1 warning (0.09 sec) mysql> source /root/test.sql |
实际测试结果感觉还是不够快。
参考链接
Unable to find a target named `RunnerTests` in project `Runner.xcodeproj`, did find `Runner`
Flutter 2.x 升级到 3.10.1 版本之后,原来正常编译的项目,iOS环境下(Xcode Version 13.2.1 (13C100)),编译报错:
|
1 2 3 4 5 |
$ ios % pod install Analyzing dependencies [!] Unable to find a target named `RunnerTests` in project `Runner.xcodeproj`, did find `Runner`. [!] Automatically assigning platform `iOS` with version `11.0` on target `Runner` because no platform was specified. Please specify a platform for this target in your Podfile. See `https://guides.cocoapods.org/syntax/podfile.html#platform`. |
继续阅读Unable to find a target named `RunnerTests` in project `Runner.xcodeproj`, did find `Runner`
Thymeleaf调用Spring的Bean的函数
问题见:https://stackoverflow.com/questions/53803497
为什么按照官网上的写法调用@Bean报错:EL1057E: No bean resolver registered in the context to resolve access to bean
有时候我们希望自己去通过thymeleaf进行解析文本,调用自定义的函数。比如
|
1 2 3 |
Context context = new Context(); context.setVariables(dataMap); templateEngine.process(templateName, context); |
如果我们在模板里使用了 ${@beanName.method()},此时会报错:
|
1 |
EL1057E: No bean resolver registered in the context to resolve access to bean |
但是如果我们是通过模板进行MVC页面渲染就不会报错,其实原因就是因为此时的context里缺少了spring的Beans的信息,通过spring mvc渲染时,框架会加入这些信息。那么手动渲染时我们也添加Beans的信息就可以了。
|
1 2 3 4 5 6 |
Context context = new Context(); context.setVariables(dataMap); ThymeleafEvaluationContext tec = new ThymeleafEvaluationContext(applicationContext, null); dataMap.put(ThymeleafEvaluationContext.THYMELEAF_EVALUATION_CONTEXT_CONTEXT_VARIABLE_NAME, tec); templateEngine.process(templateName, context); |
此时在进行渲染就正常了。
如果想更接近 Spring MVC 解析逻辑的,参考如代码:
|
1 2 3 4 5 6 7 8 9 10 11 |
@RequestMapping(value = "/uploadApk", produces = "text/javascript") @ResponseBody public String fragUploadApk(@NonNull final HttpServletRequest request, @NonNull final HttpServletResponse response) { final WebContext context = new WebContext(request, response, request.getServletContext(), request.getLocale()); # 此处使用 Spring MVC 默认的 FormattingConversionService.class 完成对数据的格式化(Springboot 2.7.11) final FormattingConversionService conversionService = applicationContext.getBean(FormattingConversionService.class); final ThymeleafEvaluationContext thymeleafEvaluationContext = new ThymeleafEvaluationContext(requireApplicationContext(), conversionService); context.setVariable(ThymeleafEvaluationContext.THYMELEAF_EVALUATION_CONTEXT_CONTEXT_VARIABLE_NAME, thymeleafEvaluationContext); templateEngine.process(templateName, context); } |
参考链接
vue3的provide和inject
浅析
provide 和 inject 主要为高阶插件/组件库提供用例。并不推荐直接用于应用程序代码中。
定义说明:这对选项是一起使用的。以允许一个祖先组件向其所有子孙后代注入一个依赖,不论组件层次有多深,并在起上下游关系成立的时间里始终生效。
通俗的说就是:组件得引入层次过多,我们的子孙组件想要获取祖先组件得资源,那么怎么办呢,总不能一直取父级往上吧,而且这样代码结构容易混乱。这个就是这对选项要干的事情。
provide:是一个对象,或者是一个返回对象的函数。里面呢就包含要给子孙后代的东西,也就是属性和属性值。
inject:一个字符串数组,或者是一个对象。属性值可以是一个对象,包含from和default默认值。
一句话介绍:provide可以向所有子孙组件提供数据以及提供修改数据的方法,子孙组件用inject使用数据。
在组合式API中的用法
基本用法
似乎,组合式API的provide没有提供批量方法, 只能每个变量写一句。
顶级组件:
|
1 2 3 4 5 6 7 8 9 10 11 |
<template> <div> <son /> </div> </template> <script setup> import son from "./son.vue"; import { provide } from "vue"; provide("abc", "123"); </script> |
子组件:
|
1 2 3 4 5 6 7 8 9 |
<template> <div> <grandson /> </div> </template> <script setup> import grandson from "./grandson.vue"; </script> |
孙组件:
|
1 2 3 4 5 6 7 8 9 |
<template> <div>我是孙子</div> </template> <script setup> import { inject } from "vue"; const abc = inject("abc"); console.log(abc); </script> |
官方说:
inject() can only be used inside setup() or functional components.
这个意思是说,inject()只能放在setup()生命周期里运行,不能放在别的周期里运行,也不能放在事件周期里运行。所以你可以先在setup()周期取值。
例一:这是允许的,因为console.log是setup()生命周期里的同步代码
|
1 2 3 4 |
function xx() { console.log(inject("abc")) } xx() |
例三:让例一的xx函数作为鼠标事件回调,也是禁止的,原因也一样。
例四:放在Promise.then()也是禁止的,比如:
|
1 2 3 |
Promise.resolve().then(() => { console.log(inject("abc")) }) |
一级组件修改数据,孙子组件监听变更
provide的变量必须是响应式变量,孙子组件监听的变量也必须是响应式变量。
一级组件:
|
1 2 3 4 5 6 7 8 9 10 11 12 13 |
<template> <div> <son /> <button @click="abc = '456'">{{ abc }}</button> </div> </template> <script setup> import son from "./son.vue"; import { provide } from "vue"; ref: abc = "123"; provide("abc", $abc); </script> |
孙子组件:
|
1 2 3 4 5 6 7 8 9 10 11 |
<template> <div>我是孙子 - {{abc}}</div> </template> <script setup> import { inject, watch } from "vue"; ref: abc = inject("abc"); watch($abc, () => { console.log(abc + '变了'); }); </script> |
孙子组件修改数据,一级组件监听变更
一级组件除了提供数据,还要提供一个修改数据的方法,孙子组件要接收并使用这个方法,这样修改的就是一级组件的数据,修改之后又会影响孙子组件的数据。
一级组件:
|
1 2 3 4 5 6 7 8 9 10 11 12 13 14 15 16 17 |
<template> <div> <son /> <button @click="abc = '456'">{{ abc }}</button> </div> </template> <script setup> import son from "./son.vue"; import { provide } from "vue"; ref: abc = "123"; function updateAbc(val) { abc = val; } provide("abc", $abc); provide("updateAbc", updateAbc); </script> |
孙子组件:
|
1 2 3 4 5 6 7 8 9 10 11 12 |
<template> <div @click="updateAbc('789')">我是孙子 - {{abc}}</div> </template> <script setup> import { inject, watch } from "vue"; ref: abc = inject("abc"); const updateAbc = inject('updateAbc'); watch($abc, () => { console.log(abc + '变了'); }); </script> |
禁止孙子组件修改一级组件的数据
禁止的话,一级组件传递的变量必须是只读的,可以是readonly,也可以是shallowRef。这样孙子组件修改数据的话,一级组件不会有反应。
一级组件:
|
1 2 3 4 5 6 7 8 9 10 11 12 13 14 15 16 17 |
<template> <div> <son /> <button @click="abc = '456'">{{ abc }}</button> </div> </template> <script setup> import son from "./son.vue"; import { shallowRef, provide } from "vue"; let abc = shallowRef("123"); function updateAbc(val) { abc = val; } provide("abc", abc); provide("updateAbc", updateAbc); </script> |
在配置项式API中的用法
跟Vue 2差不多,简单说一下。
provide
provide语法比在组合式API里要灵活,毕竟可以用对象。比如:
|
1 2 3 |
provide: { user: 'John Doe', }, |
如果要把data里的数据provide,说白了就是打算用this,provide要写成函数:
|
1 2 3 4 5 6 |
provide() { return { user: this.user, updateUser: this.updateUser } }, |
如果要提供计算属性,也是一样的道理,不过,如果不打算用配置项式计算属性,而是想用vue的computed方法
可以写成:
|
1 2 3 4 5 6 |
provide() { return { userLength: computed(() => this.user.length), updateUser: this.updateUser } }, |
inject
inject的用法更简单,比如inject: ['user', 'updateUser']。
双向修改而且响应 想要双向修改而且响应,就必须借助reactive或者ref家族方法和computed方法。provide的数据必须是computed返回的数据,才能保证数据有变化时刷新孙子组件的数据。孙子组件要用computed + unref来解包装且计算属性,才能得到真正需要的数据。
可以看到,由于孙子组件的inject和computed的属性不能重名,所以我造出一个abcabc变量名,这就比较麻烦了。我们再看组合式API,就没有abcabc这种中间变量,原因是ref: abc = inject("abc");让接收和加响应式一气呵成,这也是组合式API的优势之一。
一级组件:
|
1 2 3 4 5 6 7 8 9 10 11 12 13 14 15 16 17 18 19 20 21 22 23 24 25 26 27 28 29 30 31 32 |
<template> <div> <son /> <button @click="abc = '456'">{{ abc }}</button> </div> </template> <script> import son from "./son.vue"; import { ref, shallowRef, computed, provide } from "vue"; export default { components: { son, }, data() { return { abc: 123, } }, provide() { return { abcabc: computed(() => this.abc), updateAbc: this.updateAbc } }, methods: { updateAbc(val) { this.abc = val; } } } </script> |
孙子组件:
|
1 2 3 4 5 6 7 8 9 10 11 12 13 14 15 16 |
<template> <div @click="updateAbc('789')">我是孙子 - {{ abc }}</div> </template> <script> import { unref } from "vue"; export default { inject: ["abcabc", "updateAbc"], computed: { abc() { return unref(this.abcabc); }, }, }; </script> |
参考链接
iOS开发:报错The sandbox is not in sync with the Podfile.lock …的解决方法
问题
具体在Xcode中的报错提示如下所示:
|
1 2 3 |
Showing Recent Messages diff: /Users/admin/Documents/WorkSpace/Flutter/portal/ios/Pods/Manifest.lock: No such file or directory error:The sandbox is not in sync with the Podfile.lock. Run 'pod install' or update your CocoaPods installation. |
继续阅读iOS开发:报错The sandbox is not in sync with the Podfile.lock …的解决方法
vue3 -- @vue/compiler-sfc 单文件转换工具
@vue/compiler-sfc
"version": "3.2.37"
SFC是vue中重要的一环,也是vue3中对于静态节点进行缓存提升的重要位置
SFC -- single file Component 单文件组件,以 .vue 进行结尾,这个文件浏览器也不会识别,最终也是要被转换成js代码
SFC中包含三块,template、script、style等三块代码,分别表示模版、脚本、样式三块
@vue/compiler-sfc的作用就是把单文件组件编译成为js代码
parse
下面就看一看具体的使用
新建一个Foo.vue组件
|
1 2 3 4 5 6 7 8 9 10 11 12 13 14 15 16 17 18 19 |
<template> <input type="text" v-model="name"> </template> <script lang='ts'> import { defineComponent, ref } from 'vue' export default defineComponent({ name: 'foo', setup() { return { name: ref('jack') } } }) </script> <style lang="scss"> input { color: #333; } </style> |
组件同时包括template、script、style三块
新建一个nodejs脚本
|
1 2 3 4 5 6 7 8 9 10 |
const { parse } = require("@vue/compiler-sfc") const fs = require("fs") fs.readFile("./foo.vue", (err, data) => { let parsed = parse(data.toString(), { filename: 'foo.vue' }) console.log('parsed', parsed); }) |
用fs读取到文件的内容后,使用parse解析, 最终会返回一个对象
|
1 2 3 4 5 6 7 8 9 10 11 12 13 14 15 16 17 18 19 20 21 22 23 24 25 26 27 28 29 30 31 32 33 34 35 36 37 38 39 40 41 42 43 44 45 46 47 48 49 50 51 52 53 54 55 56 |
{ descriptor: { filename: 'foo.vue', source: '<template>\n' + ' <input type="text" v-model="name">\n' + '</template>\n' + "<script lang='ts'>\n" + "import { defineComponent, ref } from 'vue'\n" + 'export default defineComponent({\n' + " name: 'foo',\n" + ' setup() {\n' + ' return {\n' + " name: ref('jack')\n" + ' }\n' + ' }\n' + '})\n' + '</script>\n' + '<style lang="scss">\n' + 'input {\n' + ' color: #333;\n' + '}\n' + '</style>\n', template: { type: 'template', content: '\n <input type="text" v-model="name">\n', loc: [Object], attrs: {}, ast: [Object], map: [Object] }, script: { type: 'script', content: '\n' + "import { defineComponent, ref } from 'vue'\n" + 'export default defineComponent({\n' + " name: 'foo',\n" + ' setup() {\n' + ' return {\n' + " name: ref('jack')\n" + ' }\n' + ' }\n' + '})\n', loc: [Object], attrs: [Object], lang: 'ts', map: [Object] }, scriptSetup: null, styles: [ [Object] ], customBlocks: [], cssVars: [], slotted: false, shouldForceReload: [Function: shouldForceReload] }, errors: [] } |
setup脚本改造foo.vue
|
1 2 3 4 5 6 7 8 9 10 11 12 13 |
<template> <input type="text" v-model="name"> </template> <script lang='ts' setup> import { ref } from 'vue' const name = ref('jack'); </script> <style lang="scss"> input { color: #333; } </style> |
setup语法编译后的结果
|
1 2 3 4 5 6 7 8 9 10 11 12 13 14 15 16 17 18 19 20 21 22 23 24 25 26 27 28 29 30 31 32 33 34 35 36 37 38 39 40 41 |
{ descriptor: { filename: 'foo.vue', source: '<template>\n' + ' <input type="text" v-model="name">\n' + '</template>\n' + "<script lang='ts' setup>\n" + "import { ref } from 'vue'\n" + '\n' + "const name = ref('jack');\n" + '</script>\n' + '<style lang="scss">\n' + 'input {\n' + ' color: #333;\n' + '}\n' + '</style>\n', template: { type: 'template', content: '\n <input type="text" v-model="name">\n', loc: [Object], attrs: {}, ast: [Object], map: [Object] }, script: null, scriptSetup: { type: 'script', content: "\nimport { ref } from 'vue'\n\nconst name = ref('jack');\n", loc: [Object], attrs: [Object], lang: 'ts', setup: true }, styles: [ [Object] ], customBlocks: [], cssVars: [], slotted: false, shouldForceReload: [Function: shouldForceReload] }, errors: [] } |
唯一的不同就是编译后的结果从原来的script上迁移到scriptSetup上
compileTemplate
拿到之前parse后的结果后,需要对template进行进一步的转换,把template结果进一步编译成对应的js vnode函数
|
1 2 3 4 5 6 |
let compileredTemplate = compileTemplate({ id: '123', filename: 'foo.vue', source: parsed.descriptor.template.content }) console.log('parsed', compileredTemplate); |
其中code的值就是最终模版编译的结果
|
1 2 3 4 5 6 7 8 9 10 11 12 13 14 15 16 17 18 19 20 21 22 23 24 25 26 27 28 29 30 31 32 33 34 35 36 37 38 39 40 41 42 43 44 45 46 47 48 49 50 51 52 53 54 55 56 57 58 |
{ code: 'import { vModelText as _vModelText, withDirectives as _withDirectives, openBlock as _openBlock, createElementBlock as _createElementBlock } from "vue"\n' + '\n' + 'export function render(_ctx, _cache) {\n' + ' return _withDirectives((_openBlock(), _createElementBlock("input", {\n' + ' type: "text",\n' + ' "onUpdate:modelValue": _cache[0] || (_cache[0] = $event => ((_ctx.name) = $event))\n' + ' }, null, 512 /* NEED_PATCH */)), [\n' + ' [_vModelText, _ctx.name]\n' + ' ])\n' + '}', ast: { type: 0, children: [ [Object] ], helpers: [ Symbol(vModelText), Symbol(withDirectives), Symbol(openBlock), Symbol(createElementBlock) ], components: [], directives: [], hoists: [], imports: [], cached: 1, temps: 0, codegenNode: { type: 13, tag: '"input"', props: [Object], children: undefined, patchFlag: '512 /* NEED_PATCH */', dynamicProps: undefined, directives: [Object], isBlock: true, disableTracking: false, isComponent: false, loc: [Object] }, loc: { start: [Object], end: [Object], source: '\n <input type="text" v-model="name">\n' }, filters: [] }, preamble: '', source: '\n <input type="text" v-model="name">\n', errors: [], tips: [], map: { version: 3, sources: [ 'foo.vue' ], names: [ 'name' ], mappings: ';;;wCACI,oBAAkC;IAA3B,IAAI,EAAC,MAAM;IADtB,6DACgCA,SAAI;;kBAAJA,SAAI', sourcesContent: [ '\n <input type="text" v-model="name">\n' ] } } |
我们把结果单独拿出来看下
|
1 2 3 4 5 6 7 8 9 10 |
import { vModelText as _vModelText, withDirectives as _withDirectives, openBlock as _openBlock, createElementBlock as _createElementBlock } from "vue" export function render(_ctx, _cache) { return _withDirectives((_openBlock(), _createElementBlock("input", { type: "text", "onUpdate:modelValue": _cache[0] || (_cache[0] = $event => ((_ctx.name) = $event)) }, null, 512 /* NEED_PATCH */)), [ [_vModelText, _ctx.name] ]) } |
最终返回了一个render函数,这里也就符合预期,vue组件中如果使用js的方式写,可以写一个render函数去渲染组件
compilerScript
根据parsed的结果来解析脚本部分,compileScript接收2个参数,第一个就是之前parse的结果, 然后再传入相应的option
|
1 2 3 4 |
let compileredScript = compileScript(parsed.descriptor, { id: '123' }) console.log('parsed', compileredScript); |
编译后的结果,content就是最终编译出的代码
|
1 2 3 4 5 6 7 8 9 10 11 12 13 14 15 16 17 18 19 20 21 22 23 24 25 26 27 28 29 30 31 32 33 34 35 36 37 38 39 40 41 42 43 44 45 46 47 48 49 50 51 52 53 54 55 56 57 58 59 60 61 62 63 64 65 66 67 68 69 70 71 72 73 74 75 76 77 78 79 |
{ type: 'script', content: "import { defineComponent as _defineComponent } from 'vue'\n" + "import { ref } from 'vue'\n" + '\n' + '\n' + 'export default /*#__PURE__*/_defineComponent({\n' + ' setup(__props, { expose }) {\n' + ' expose();\n' + '\n' + "const name = ref('jack');\n" + '\n' + 'const __returned__ = { name }\n' + "Object.defineProperty(__returned__, '__isScriptSetup', { enumerable: false, value: true })\n" + 'return __returned__\n' + '}\n' + '\n' + '})', loc: { source: "\nimport { ref } from 'vue'\n\nconst name = ref('jack');\n", start: { column: 25, line: 4, offset: 86 }, end: { column: 1, line: 8, offset: 140 } }, attrs: { lang: 'ts', setup: true }, lang: 'ts', setup: true, bindings: { ref: 'setup-const', name: 'setup-ref' }, imports: [Object: null prototype] { ref: { isType: false, imported: 'ref', source: 'vue', isFromSetup: true, isUsedInTemplate: false } }, map: SourceMap { version: 3, file: null, sources: [ 'foo.vue' ], sourcesContent: [ '<template>\n' + ' <input type="text" v-model="name">\n' + '</template>\n' + "<script lang='ts' setup>\n" + "import { ref } from 'vue'\n" + '\n' + "const name = ref('jack');\n" + '</script>\n' + '<style lang="scss">\n' + 'input {\n' + ' color: #333;\n' + '}\n' + '</style>\n' ], names: [], mappings: ';AAIA,CAAC,CAAC,CAAC,CAAC,CAAC,CAAC,CAAC,CAAC,CAAC,CAAC,CAAC,CAAC,CAAC,CAAC,CAAC,CAAC,CAAC,CAAC,CAAC,CAAC,CAAC,CAAC,CAAC,CAAC,CAAC;AACzB;;;;;AAFwB;AAGxB,CAAC,CAAC,CAAC,CAAC,CAAC,CAAC,CAAC,CAAC,CAAC,CAAC,CAAC,CAAC,CAAC,CAAC,CAAC,CAAC,CAAC,CAAC,CAAC,CAAC,CAAC,CAAC,CAAC,CAAC,CAAC;;;;;;;' }, scriptAst: undefined, scriptSetupAst: [ Node { type: 'ImportDeclaration', start: 1, end: 26, loc: [SourceLocation], importKind: 'value', specifiers: [Array], source: [Node] }, Node { type: 'VariableDeclaration', start: 28, end: 53, loc: [SourceLocation], declarations: [Array], kind: 'const' } ] } |
content格式化之后的结果, 所以说setup只是语法糖,最终还是以defineComponent去包裹一个对象进行返回的形式
|
1 2 3 4 5 6 7 8 9 10 11 12 13 14 15 16 |
import { defineComponent as _defineComponent } from 'vue' import { ref } from 'vue' export default /*#__PURE__*/_defineComponent({ setup(__props, { expose }) { expose(); const name = ref('jack'); const __returned__ = { name } Object.defineProperty(__returned__, '__isScriptSetup', { enumerable: false, value: true }) return __returned__ } }) |
compileStyle
compileStyle 即解析SFC style模块的入口函数
由于sfc中style块是可以写多个的,所以parse最终的结果styles其实是个数组
由变量签名也可以看出
|
1 2 3 4 5 |
export interface SFCDescriptor { // .... styles: SFCStyleBlock[] } |
这里我们取第一个块打印出来看一下,实际情况下应该是去循环的
|
1 2 3 4 5 6 |
let compileredStyle = compileStyle({ source: parsed.descriptor.styles[0].content, scoped: true, id: 'data-v-123' }) console.log('parsed', compileredStyle); |
编译结果
其中code即是最终的css结果
|
1 2 3 4 5 6 7 8 9 10 11 12 13 14 15 16 17 18 19 20 21 22 23 24 25 26 27 28 29 30 31 32 33 34 35 36 37 38 39 40 41 42 43 44 45 46 47 48 49 50 51 52 53 54 55 56 |
{ code: '\ninput[data-v-123] {\n color: #333;\n}\n', map: undefined, errors: [], rawResult: LazyResult { stringified: true, processed: true, result: Result { processor: [Processor], messages: [], root: [Root], opts: [Object], css: '\ninput[data-v-123] {\n color: #333;\n}\n', map: undefined, lastPlugin: [Object] }, helpers: { plugin: [Function: plugin], stringify: [Function], parse: [Function], fromJSON: [Function], list: [Object], comment: [Function (anonymous)], atRule: [Function (anonymous)], decl: [Function (anonymous)], rule: [Function (anonymous)], root: [Function (anonymous)], document: [Function (anonymous)], CssSyntaxError: [Function], Declaration: [Function], Container: [Function], Processor: [Function], Document: [Function], Comment: [Function], Warning: [Function], AtRule: [Function], Result: [Function], Input: [Function], Rule: [Function], Root: [Function], Node: [Function], default: [Function], result: [Result], postcss: [Function] }, plugins: [ [Object], [Object], [Object] ], listeners: { Declaration: [Array], Rule: [Array], AtRule: [Array], OnceExit: [Array] }, hasListener: true }, dependencies: Set(0) {} } |
参考链接
Android-Bitmap回收/复用机制
包括 recycle() 方法 bitmap 回收时机。
Android 系统版本的内存分配策略也有所不同,这是我们需要了解的:
| 系统版本 | Bitmap 内存分配策略 |
|---|---|
| Android 3.0 之前 |
Bitmap 对象存放在 Java Heap,而像素数据是存放在 native 内存中。 缺点:如果不手动调用 bitmap.recycle(),Bitmap native 内存的回收完全依赖 finalize() 回调,但是回调时机是不可控的 |
| Android 3.0~7.0 |
Bitmap 对象和像素数据统一放到 Java Heap,即使不调用 bitmap.recycle(),Bitmap 像素也会随着对象一起被回收。 缺点: 1、Bitmap 全部放在 Java Heap,Bitmap 是内存消耗的大户,而 Max Heap 一般限制为 256、512MB,Bitmap 过大过多容易导致 OOM。 2、容易引起大量 GC,没有充分利用系统的可用内存 |
| Android 8.0 及以后 |
1、使用了能够辅助回收 native 内存的 NativeAllocationRegistry 实现将像素数据放到 native 内存,并且可以和 Bitmap 对象一起快速释放,在 GC 的时候还可以考虑到这些 Bitmap 内存以防止被滥用。 2、新增硬件位图 Hardware Bitmap 解决图片内存占用过多和图像绘制效率过慢问题 |
手动调用recycle()
2.3 及以下版本,保存在 jvm + native 中,手动调用 recycle() 。
7.0 和 8.0 不需要调用 recycle(),下面是该版本下代码。
|
1 2 3 4 5 6 7 8 9 10 11 12 13 14 15 16 17 18 19 20 21 22 |
/** * Free the native object associated with this bitmap, and clear the * reference to the pixel data. This will not free the pixel data synchronously; * it simply allows it to be garbage collected if there are no other references. * The bitmap is marked as "dead", meaning it will throw an exception if * getPixels() or setPixels() is called, and will draw nothing. This operation * cannot be reversed, so it should only be called if you are sure there are no * further uses for the bitmap. This is an advanced call, and normally need * not be called, since the normal GC process will free up this memory when * there are no more references to this bitmap. */ //释放与此位图关联的本机对象,并清除对像素数据的引用。 这不会同步释放像素数据; //这是一个高级调用,通常不需要调用,因为当没有更多对此位图的引用时,正常的 GC 过程将释放此内存。 public void recycle() { if (!mRecycled) { nativeRecycle(mNativePtr); mNinePatchChunk = null; mRecycled = true; } } private static native void nativeRecycle(long nativeBitmap); |
7.0 跟 8.0 nativeRecycle 实现不同。
8.0 版本 Bitmap
|
1 2 3 4 5 6 7 8 9 10 11 12 13 14 15 16 |
static jboolean Bitmap_recycle(JNIEnv* env, jobject, jlong bitmapHandle) { LocalScopedBitmap bitmap(bitmapHandle); bitmap->freePixels(); return JNI_TRUE; } void freePixels() { mInfo = mBitmap->info(); mHasHardwareMipMap = mBitmap->hasHardwareMipMap(); mAllocationSize = mBitmap->getAllocationByteCount(); mRowBytes = mBitmap->rowBytes(); mGenerationId = mBitmap->getGenerationID(); mIsHardware = mBitmap->isHardware(); //清空数据 mBitmap.reset(); } |
7.0 版本 Bitmap
|
1 2 3 4 5 6 7 8 9 10 11 12 13 14 15 16 17 18 19 20 21 22 23 24 25 26 27 28 29 30 31 32 33 34 35 36 37 38 39 40 41 42 |
static jboolean Bitmap_recycle(JNIEnv *env, jobject, jlong bitmapHandle) { LocalScopedBitmap bitmap(bitmapHandle); bitmap->freePixels(); return JNI_TRUE; } //析构函数 Bitmap::~Bitmap() { doFreePixels(); } void Bitmap::doFreePixels() { switch (mPixelStorageType) { //Invalid表示图片已经失效了,一般图片free掉之后就会是这种状态 case PixelStorageType::Invalid: break; //外部存储 case PixelStorageType::External: mPixelStorage.external.freeFunc(mPixelStorage.external.address, mPixelStorage.external.context); break; //匿名共享内存,Fresco 低版本内存优化,通过 BitmapFactory.Options.inPurgeable = true //使得 bitmap 通过匿名共享内存方式保存 case PixelStorageType::Ashmem: munmap(mPixelStorage.ashmem.address, mPixelStorage.ashmem.size); close(mPixelStorage.ashmem.fd); break; //java内存,主要看这种 case PixelStorageType::Java: JNIEnv* env = jniEnv(); LOG_ALWAYS_FATAL_IF(mPixelStorage.java.jstrongRef, "Deleting a bitmap wrapper while there are outstanding strong " "references! mPinnedRefCount = %d", mPinnedRefCount); //DeleteWeakGlobalRef 该函数删除一个弱全局引用,添加待删除的弱全局引用给 jvm env->DeleteWeakGlobalRef(mPixelStorage.java.jweakRef); break; } if (android::uirenderer::Caches::hasInstance()) { android::uirenderer::Caches::getInstance().textureCache.releaseTexture( mPixelRef->getStableID()); } } |
-
在 8.0 中,手动调用 recycle() 方法,像素数据会立即释放;
-
在 7.0 版本中,调用 recycle() 方法像素数据不会立即释放,而是通过 DeleteWeakGlobalRef 交由 Jvm GC 处理。Java 层主动调用 recycle() 或者在 Bitmap 析构函数 freePixels() ,移除 Global 对象引用,这个对象是 Heap 内存一堆像素的空间。GC 时释放掉。二是 JNI 不再持有 Global Reference,并 native 函数执行后释放掉,但 Java 层的 Bitmap 对象还在,只是它的 mBuffer 和 mNativePtr 是无效地址,没有像素 Heap 的 Bitmap 也就几乎不消耗内存。Java 层 Bitmap 对象什么时候释放,生命周期结束自然会 free 掉。
回收机制
7.0 通过 java 层 BitmapFinalizer.finalize 实现,8.0 通过 native 层 NativeAllocationRegistry 实现。
7.0 及以下,保存在 jvm 虚拟机中,回收机制通过 BitmapFinalizer. finalize 实现。跟 BitmapFinalizer 而不跟 Bitmap 关联的原因是重写 finalize 方法的对象会被延迟回收,经过两次 gc 才会被回收。原因是重写 finalize 的对象在创建时会创建 FinalizerReference 并引用 Object,并将FR 关联到 ReferenceQueue 中,当第一次执行 gc 时候,会把 FR 放在 queue 中,其中有个守护线程持续读取 queue 中的数据,并执行 finalize 方法。
|
1 2 3 4 5 6 7 8 9 10 11 12 13 14 15 16 17 18 19 20 21 22 23 24 25 26 27 28 29 30 31 32 33 34 35 36 37 38 39 40 41 42 43 44 45 46 47 48 49 50 51 52 53 54 |
Bitmap(long nativeBitmap, byte[] buffer, int width, int height, int density, boolean isMutable, boolean requestPremultiplied, byte[] ninePatchChunk, NinePatchInsetStruct ninePatchInsets) { if (nativeBitmap == 0) { throw new RuntimeException("internal error: native bitmap is 0"); } ... mNativePtr = nativeBitmap; // 这个对象对象来回收 mFinalizer = new BitmapFinalizer(nativeBitmap); int nativeAllocationByteCount = (buffer == null ? getByteCount() : 0); mFinalizer.setNativeAllocationByteCount(nativeAllocationByteCount); } private static class BitmapFinalizer { private long mNativeBitmap; // Native memory allocated for the duration of the Bitmap, // if pixel data allocated into native memory, instead of java byte[] private int mNativeAllocationByteCount; BitmapFinalizer(long nativeBitmap) { mNativeBitmap = nativeBitmap; } public void setNativeAllocationByteCount(int nativeByteCount) { if (mNativeAllocationByteCount != 0) { //注销 native 内存 VMRuntime.getRuntime().registerNativeFree(mNativeAllocationByteCount); } mNativeAllocationByteCount = nativeByteCount; if (mNativeAllocationByteCount != 0) { VMRuntime.getRuntime().registerNativeAllocation(mNativeAllocationByteCount); } } @Override public void finalize() { try { super.finalize(); } catch (Throwable t) { // Ignore } finally { // finalize 这里是 GC 回收该对象时会调用 setNativeAllocationByteCount(0); //本地析构函数,释放资源 nativeDestructor(mNativeBitmap); mNativeBitmap = 0; } } } private static native void nativeDestructor(long nativeBitmap); |
8.0 以上,保存在 jvm + native 中,NativeAllocationRegistry 中把 native 的文件描述符(句柄)跟 Cleaner 关联,Cleaner 其实是个虚应用,会在没有强应用关联的时候进行内存回收。
|
1 2 3 4 5 6 7 8 9 10 11 12 13 14 |
// called from JNI Bitmap(long nativeBitmap, int width, int height, int density, boolean isMutable, boolean requestPremultiplied, byte[] ninePatchChunk, NinePatch.InsetStruct ninePatchInsets) { ... mNativePtr = nativeBitmap; long nativeSize = NATIVE_ALLOCATION_SIZE + getAllocationByteCount(); //nativeGetNativeFinalizer() 方法传入 NativeAllocationRegistry NativeAllocationRegistry registry = new NativeAllocationRegistry( Bitmap.class.getClassLoader(), nativeGetNativeFinalizer(), nativeSize); //注册 Java 层对象引用与 native 层对象的地址 registry.registerNativeAllocation(this, nativeBitmap); } |
下面是 NativeAllocationRegistry.java 代码
|
1 2 3 4 5 6 7 8 9 10 11 12 13 14 15 16 17 18 19 20 21 22 23 24 25 26 27 28 29 30 31 32 33 34 35 36 37 38 39 40 41 42 43 44 45 46 47 48 49 50 51 52 53 54 55 56 57 58 59 60 |
public class NativeAllocationRegistry { private final ClassLoader classLoader; private final long freeFunction; private final long size; public NativeAllocationRegistry(ClassLoader classLoader, long freeFunction, long size) { ... //外部传入的 nativeGetNativeFinalizer ,有用 this.freeFunction = freeFunction; this.size = size; } public Runnable registerNativeAllocation(Object referent, long nativePtr) { ... try { //注册 native 内存 registerNativeAllocation(this.size); } catch (OutOfMemoryError oome) { applyFreeFunction(freeFunction, nativePtr); throw oome; } // Cleaner 绑定 Java 对象与回收函数 Cleaner cleaner = Cleaner.create(referent, new CleanerThunk(nativePtr)); return new CleanerRunner(cleaner); } private class CleanerThunk implements Runnable { private long nativePtr; public CleanerThunk(long nativePtr) { this.nativePtr = nativePtr; } public void run() { if (nativePtr != 0) { //freeFunction 即为 nativeGetNativeFinalizer() 方法 applyFreeFunction(freeFunction, nativePtr); } registerNativeFree(size); } } private static class CleanerRunner implements Runnable { private final Cleaner cleaner; public CleanerRunner(Cleaner cleaner) { this.cleaner = cleaner; } public void run() { cleaner.clean(); } } public static native void applyFreeFunction(long freeFunction, long nativePtr); } |
NativeAllocationRegistry 内部是利用了 sun.misc.Cleaner.java 机制,简单来说:使用虚引用得知对象被GC的时机,在GC前执行额外的回收工作。
nativeGetNativeFinalizer()
|
1 2 3 4 5 6 7 8 9 10 11 12 |
// Bitmap.java private static native long nativeGetNativeFinalizer(); // Bitmap.cpp static jlong Bitmap_getNativeFinalizer(JNIEnv*, jobject) { // 转为long return static_cast<jlong>(reinterpret_cast<uintptr_t>(&Bitmap_destruct)); } static void Bitmap_destruct(BitmapWrapper* bitmap) { delete bitmap; } |
nativeGetNativeFinalizer 是一个 native 函数,返回值是一个 long,这个值其实相当于 Bitmap_destruct() 函数的直接地址,Bitmap_destruct() 就是用来回收 native 层内存的。
故 NativeAllocationRegistry 利用虚引用感知 Java 对象被回收的时机,来回收 native 层内存;在 Android 8.0 (API 27) 之前,Android 通常使用Object#finalize() 调用时机来回收 native 层内存
Tips:Fresco 在 Android 4.4 及以下版本对 bitmap 内存做了优化,通过设置 BitmapFactory.Options.inPurgeable = true 使得 bitmap 保存在匿名共享内存中,减少了 Jvm 虚拟机内存占用。
Spring Boot启动报错-"类文件具有错误的版本 61.0, 应为 52.0"
项目使用的 Spring Boot 升级到 3.0.5 版本
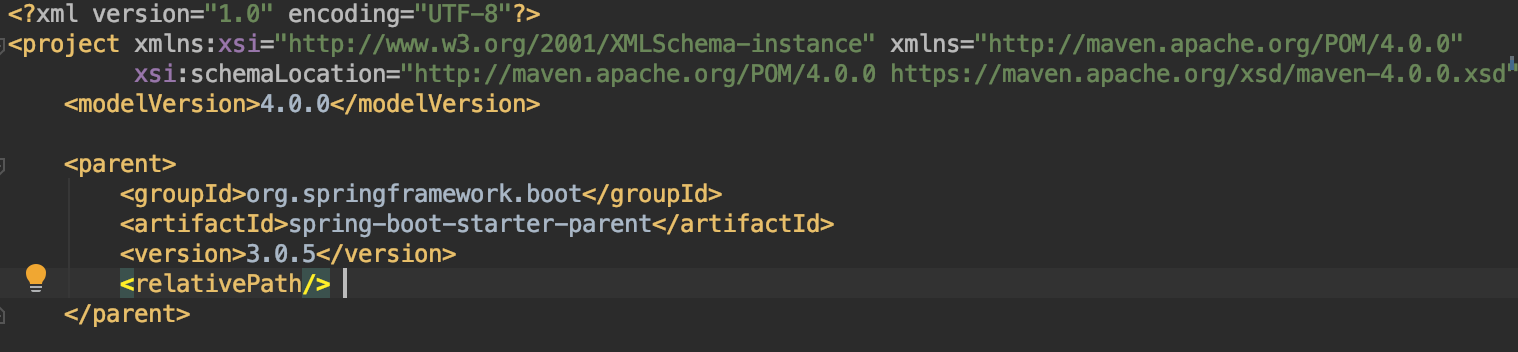
编译的时候报错如下:
|
1 2 3 4 |
Error:(5, 32) java: 无法访问org.springframework.lang.NonNull 错误的类文件: /Users/xxxx/.m2/repository/org/springframework/spring-core/6.0.7/spring-core-6.0.7.jar(org/springframework/lang/NonNull.class) 类文件具有错误的版本 61.0, 应为 52.0 请删除该文件或确保该文件位于正确的类路径子目录中。 |
或者:
|
1 2 3 4 5 6 7 8 9 10 11 12 13 14 |
OpenJDK 64-Bit Server VM warning: Options -Xverify:none and -noverify were deprecated in JDK 13 and will likely be removed in a future release. Connected to the target VM, address: '127.0.0.1:54101', transport: 'socket' Exception in thread "main" java.lang.UnsupportedClassVersionError: org/springframework/boot/SpringApplication has been compiled by a more recent version of the Java Runtime (class file version 61.0), this version of the Java Runtime only recognizes class file versions up to 58.0 at java.base/java.lang.ClassLoader.defineClass1(Native Method) at java.base/java.lang.ClassLoader.defineClass(ClassLoader.java:1017) at java.base/java.security.SecureClassLoader.defineClass(SecureClassLoader.java:151) at java.base/jdk.internal.loader.BuiltinClassLoader.defineClass(BuiltinClassLoader.java:821) at java.base/jdk.internal.loader.BuiltinClassLoader.findClassOnClassPathOrNull(BuiltinClassLoader.java:719) at java.base/jdk.internal.loader.BuiltinClassLoader.loadClassOrNull(BuiltinClassLoader.java:642) at java.base/jdk.internal.loader.BuiltinClassLoader.loadClass(BuiltinClassLoader.java:600) at java.base/jdk.internal.loader.ClassLoaders$AppClassLoader.loadClass(ClassLoaders.java:178) at java.base/java.lang.ClassLoader.loadClass(ClassLoader.java:522) at com.xxx.xxx.xxx.MainServiceApplication.main(MainServiceApplication.java:12) Disconnected from the target VM, address: '127.0.0.1:54101', transport: 'socket' |
原因
SpringBoot 使用了 3.0 或者 3.0 以上,因为 Spring 官方发布从 Spring 6 以及 SprinBoot 3.0 开始最低支持 JDK17,所以仅需将 SpringBoot 版本降低为 3.0 以下即可。