VirtualBox 6.0 下已经支持 准虚拟化网络(virtio-net) 驱动,这个可以提供更高的网络性能。
继续阅读VirtualBox 6.0中Windows XP系统配置virtio驱动
ubuntu 16.04/18.04/20.04/21.10配置远程桌面访问
远程桌面在 Linux 中一般使用 VNC ,下面我们总结一下 ubuntu 16.04/18.04 下的配置总结:
|
1 2 3 4 5 6 7 8 9 10 11 12 13 14 15 16 17 18 19 20 21 22 23 24 25 26 27 |
$ sudo apt-get update # ubuntu 18.04/20.04 默认使用gdm3,导致VNC工作异常,需要切换到 lightdm # ubuntu 16.04 默认使用 lightdm 因此一般不需要调整 $ sudo apt install lightdm # 配置切换到 lightdm $ sudo dpkg-reconfigure gdm3 $ sudo apt install xserver-xorg-video-dummy # 如果从 gdm3 切换到 lightdm 需要重启系统,否则不能正常工作 $ sudo reboot $ sudo apt-get install x11vnc # ubuntu 20.04 # sudo apt-get install net-tools # 设置登录密码,如果不设置密码,会导致任意人都可以登录 $ sudo x11vnc -storepasswd /etc/x11vnc.pass # 需要手工设置一下权限,默认设置的权限可能会导致其他用户无法正常读取 $ sudo chmod 755 /etc/x11vnc.pass # '-rfbport' 参数指定监听端口,'-forever' 参数指定客户端断开后不要停止服务而是继续等待下一次的连接请求 '-rfbauth' 参数指定验证密码的存储文件 $ sudo x11vnc -auth guess -rfbauth /etc/x11vnc.pass -rfbport 5900 -forever -display :0 |
设置开机启动
|
1 2 3 |
$ sudo apt-get install vim $ sudo vim /etc/systemd/system/x11vnc.service |
里面内容如下:
|
1 2 3 4 5 6 7 8 9 10 11 12 13 14 |
[Unit] Description=x11vnc (Remote access) After=network-online.target [Service] Type=simple ExecStart=/usr/bin/x11vnc -auth guess -rfbauth /etc/x11vnc.pass -rfbport 5900 -forever -display :0 ExecStop=/bin/kill -TERM $MAINPID ExecReload=/bin/kill -HUP $MAINPID KillMode=control-group Restart=on-failure [Install] WantedBy=graphical.target |
配置 systemd 启用服务
|
1 2 3 4 5 |
$ sudo systemctl daemon-reload $ sudo systemctl enable x11vnc $ sudo systemctl start x11vnc |
如果登录之后,只出现一个桌面背景,没有任何菜单,如下:

参考 Intel NUC(NUC6i3SYH)在不接显示器的情况下VNC不显示桌面(Ubuntu 18.04) 解决,网上搜索相关问题的时候可以使用关键词 HEADLESS X11 查找解决方案,其实就是不插入显示器的情况下,如何强制显卡渲染。
如果系统是 ubuntu 21.10 版本,则需要编辑
|
1 2 3 |
# ubuntu 21.10 版本配置文件 $ sudo vim /etc/X11/xorg.conf |
然后在文件尾部,增加如下配置:
|
1 2 3 4 5 6 7 8 9 10 11 12 13 14 15 16 17 18 19 20 21 |
Section "Device" Identifier "Configured Video Device" Driver "dummy" EndSection Section "Monitor" Identifier "Configured Monitor" HorizSync 31.5-48.5 VertRefresh 50-70 EndSection Section "Screen" Identifier "Default Screen" Monitor "Configured Monitor" Device "Configured Video Device" DefaultDepth 24 SubSection "Display" Depth 24 Modes "1920x1080" EndSubSection EndSection |
完成后,重启系统。
注意:如果系统上使用 nvidia 显卡,需要首先通过 nvidia-xconfig 生成默认配置,如果没有默认配置,会导致 nvidia-smi 找不到显卡,一些使用显卡的计算任务或者机器学习框架会出现问题。
参考命令如下:
|
1 |
$ sudo nvidia-xconfig -a --virtual=1920x1200 |
可能会生成类似如下配置内容:
|
1 2 3 4 5 6 7 8 9 10 11 12 13 14 15 16 17 18 19 20 21 22 23 24 25 26 27 28 29 30 31 32 33 34 35 36 37 38 39 40 41 42 43 44 45 46 47 48 49 50 |
# nvidia-xconfig: X configuration file generated by nvidia-xconfig # nvidia-xconfig: version 495.44 Section "ServerLayout" Identifier "Default Layout" Screen 0 "Screen0" InputDevice "Keyboard0" "CoreKeyboard" InputDevice "Mouse0" "CorePointer" EndSection Section "InputDevice" # generated from default Identifier "Keyboard0" Driver "kbd" EndSection Section "InputDevice" # generated from default Identifier "Mouse0" Driver "mouse" Option "Protocol" "auto" Option "Device" "/dev/psaux" Option "Emulate3Buttons" "no" Option "ZAxisMapping" "4 5" EndSection Section "Monitor" Identifier "Monitor0" VendorName "Unknown" ModelName "Unknown" Option "DPMS" EndSection Section "Device" Identifier "Device0" Driver "nvidia" VendorName "NVIDIA Corporation" BoardName "NVIDIA GeForce RTX 3060" EndSection Section "Screen" Identifier "Screen0" Device "Device0" Monitor "Monitor0" DefaultDepth 24 SubSection "Display" Virtual 1920 1200 Depth 24 EndSubSection EndSection |
然后在配置文件的尾部增加
|
1 2 3 4 5 6 7 8 9 10 11 12 13 14 15 16 17 18 19 20 21 22 |
Section "Device" Identifier "Configured Video Device" Driver "dummy" EndSection Section "Monitor" Identifier "Configured Monitor" HorizSync 31.5-48.5 VertRefresh 50-70 EndSection Section "Screen" Identifier "Default Screen" Monitor "Configured Monitor" Device "Configured Video Device" DefaultDepth 24 SubSection "Display" Depth 24 Virtual 1920 1200 Modes "1920x1200" EndSubSection EndSection |
最后修改 Section "ServerLayout" 字段里的 Screen 0 为新增的屏幕(Section "Screen" 字段中的 Identifier定义的名字)。
修改参考如下:
|
1 2 3 4 5 6 |
Section "ServerLayout" Identifier "Default Layout" Screen 0 "Default Screen" InputDevice "Keyboard0" "CoreKeyboard" InputDevice "Mouse0" "CorePointer" EndSection |
修改后的完整内如如下:
|
1 2 3 4 5 6 7 8 9 10 11 12 13 14 15 16 17 18 19 20 21 22 23 24 25 26 27 28 29 30 31 32 33 34 35 36 37 38 39 40 41 42 43 44 45 46 47 48 49 50 51 52 53 54 55 56 57 58 59 60 61 62 63 64 65 66 67 68 69 70 71 72 73 |
# nvidia-xconfig: X configuration file generated by nvidia-xconfig # nvidia-xconfig: version 495.44 Section "ServerLayout" Identifier "Default Layout" Screen 0 "Default Screen" InputDevice "Keyboard0" "CoreKeyboard" InputDevice "Mouse0" "CorePointer" EndSection Section "InputDevice" # generated from default Identifier "Keyboard0" Driver "kbd" EndSection Section "InputDevice" # generated from default Identifier "Mouse0" Driver "mouse" Option "Protocol" "auto" Option "Device" "/dev/psaux" Option "Emulate3Buttons" "no" Option "ZAxisMapping" "4 5" EndSection Section "Monitor" Identifier "Monitor0" VendorName "Unknown" ModelName "Unknown" Option "DPMS" EndSection Section "Device" Identifier "Device0" Driver "nvidia" VendorName "NVIDIA Corporation" BoardName "NVIDIA GeForce RTX 3060" EndSection Section "Screen" Identifier "Screen0" Device "Device0" Monitor "Monitor0" DefaultDepth 24 SubSection "Display" Virtual 1920 1200 Depth 24 EndSubSection EndSection Section "Device" Identifier "Configured Video Device" Driver "dummy" EndSection Section "Monitor" Identifier "Configured Monitor" HorizSync 31.5-48.5 VertRefresh 50-70 EndSection Section "Screen" Identifier "Default Screen" Monitor "Configured Monitor" Device "Configured Video Device" DefaultDepth 24 SubSection "Display" Depth 24 Virtual 1920 1200 Modes "1920x1200" EndSubSection EndSection |
尽管经过上面的设置,可以正确使用 VNC ,但是更推荐使用 RDP 协议,功能更丰富,性能更高,安全性更好。参考 VNC 还是 RDP? 云上的远程桌面究竟该如何选。
参考链接
Chrome浏览器出现“由贵单位管理”原因及解决去除方法
最近有很多 Chrome 浏览器用户突然发现设置选项提示“由贵单位管理”,并且还可能在操作中心里弹出这个通知,或者在“下载”页面中出现“您的浏览器由所属组织管理”,或者在“关于 Google Chrome(G)”页面中出现“您的浏览器受管理”。
如果是企业用户遇到这个通知可能还能理解但不少个人用户也遇到这种情况,使用的并非谷歌浏览器企业版。
macOS上使用Openconnect代替Cisco Anyconnect
OpenConnect 是一个 Cisco Anyconnect 的替代品,具有开源、易获取、可靠等优点。而官方版本的 Cisco Anyconnect 配置较为繁琐,需要在管理界面同时部署多平台客户端才能支持多平台。相比之下 OpenConnect 在这点就具有优势,可以在官方版本无法跨平台时替代使用。
命令行模式:
|
1 2 3 4 |
$ brew install openconnect # 用法示例如下 $url 服务器的域名 $username用户名认证时候的用户名 $ sudo openconnect $url --protocol=anyconnect --user $username |
GUI 界面模式:
|
1 |
$ brew cask install openconnect-gui |
使用起来是非常简单的。
注意:对于OS X EI Caption来说(Mac mini(Early 2009)已经不能升级系统了),由于openconnect-gui需要QT 5.8以上的版本,而HomeBrew已经不支持这个版本的系统,因此,安装的openconnect-gui之后,运行的时候进程会崩溃。
上面的情况,一般建议使用命令行版本进行操作。
参考链接
MAC修改主机名/计算机名
mac安装完成以后会默认将你的机器设成"longsky's Macbook Pro"之类的名字。这个本身看着就不爽,如果这台机器是别人先用你再用的话,就想把它改掉了。如果你想改计算机名的话,直接去"系统设置"->"共享"里改计算机名(Computer Name)就好了。这样大家在网络邻居里看到的你的名字就可以了。
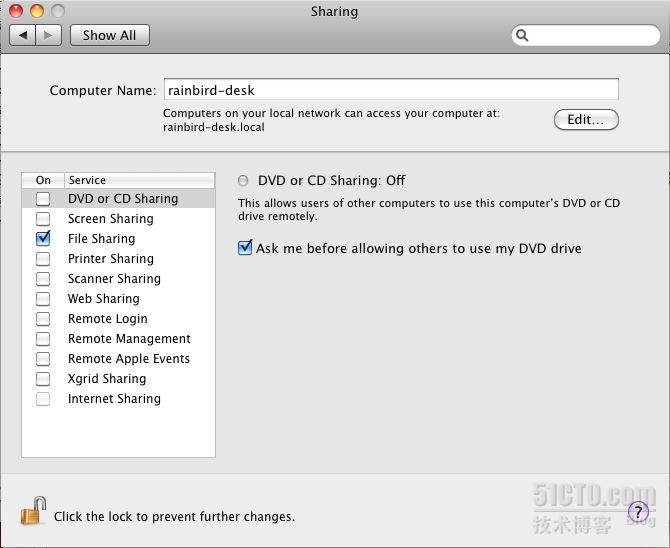 对于大多数用户来说到这里就完事了。但是对于系统管理员来说,每次打开终端的时候发现还有一个"longsky's Macbook Pro"的东东在那里还是感觉很不爽。估计这个想改的人少,笔者费了九牛二虎之力才在mac的一个论坛的不起眼的小角落翻出来修改它的命令:
继续阅读MAC修改主机名/计算机名
对于大多数用户来说到这里就完事了。但是对于系统管理员来说,每次打开终端的时候发现还有一个"longsky's Macbook Pro"的东东在那里还是感觉很不爽。估计这个想改的人少,笔者费了九牛二虎之力才在mac的一个论坛的不起眼的小角落翻出来修改它的命令:|
1 |
$ sudo scutil --set HostName longskys-MBP |
继续阅读MAC修改主机名/计算机名
ubuntu 16.04.5升级到ubuntu 18.04启动时出现"No symbol table found."
ubuntu 16.04.5 升级到 ubuntu 18.04.1 启动时出现 "Error: no symbol table"
|
1 2 |
# 升级系统执行如下命令 $ sudo do-release-upgrade -d |
重启之后,出现错误信息
|
1 2 |
No symbol table found. Press any key to continue... |
不做任何操作,过几秒之后,能跳过。
解决方法如下:
|
1 2 3 4 5 |
$ sudo grub-install /dev/sda $ sudo update-grub $ sudo reboot |
参考链接
ubuntu 16.04.5升级到ubuntu 18.04出现systemd-shim升级失败
ubuntu 16.04.5 升级到 ubuntu 18.04.1 出现 systemd-shim 升级失败,重启系统之后,继续执行软件升级,出现如下错误信息:
|
1 2 3 4 5 6 7 8 9 10 11 12 13 14 15 16 17 18 19 20 21 22 23 24 |
$ sudo apt-get dist-upgrade 正在读取软件包列表... 完成 正在分析软件包的依赖关系树 正在读取状态信息... 完成 正在计算更新... 完成 下列软件包将被【卸载】: systemd-shim 下列软件包将被升级: apache2 apache2-bin apache2-data apache2-utils libmspack0 linux-firmware 升级了 6 个软件包,新安装了 0 个软件包,要卸载 1 个软件包,有 0 个软件包未被升级。 有 1 个软件包没有被完全安装或卸载。 需要下载 0 B/72.5 MB 的归档。 解压缩后会消耗 4,250 kB 的额外空间。 您希望继续执行吗? [Y/n] (正在读取数据库 ... 系统当前共安装有 415046 个文件和目录。) 正在卸载 systemd-shim (9-1bzr4ubuntu1) ... 正在删除 systemd-shim 导致 /usr/share/dbus-1/system-services/org.freedesktop.systemd1.service 转移到 /usr/share/dbus-1/system-services/org.freedesktop.systemd1.service.systemd dpkg-divert: 错误: 更改 /usr/share/dbus-1/system-services/org.freedesktop.systemd1.service.systemd 文件名会覆盖 /usr/share/dbus-1/system-services/org.freedesktop.systemd1.service, 不允许此操作 dpkg: 处理软件包 systemd-shim (--remove)时出错: installed systemd-shim package post-removal script subprocess returned error exit status 2 在处理时有错误发生: systemd-shim E: Sub-process /usr/bin/dpkg returned an error code (1) |
如果语言是英文的,可能会出现如下信息:
|
1 2 3 4 5 6 7 8 9 10 11 12 13 14 15 16 17 18 19 20 21 22 23 24 |
$ sudo apt-get dist-upgrade Reading package lists... Done Building dependency tree Reading state information... Done Calculating upgrade... Done The following packages will be REMOVED: systemd-shim The following packages will be upgraded: apache2 apache2-bin apache2-data apache2-utils libmspack0 linux-firmware 6 upgraded, 0 newly installed, 1 to remove and 0 not upgraded. 1 not fully installed or removed. Need to get 0 B/72.5 MB of archives. After this operation, 4,250 kB of additional disk space will be used. Do you want to continue? [Y/n] (Reading database ... 415046 files and directories currently installed.) Removing systemd-shim (9-1bzr4ubuntu1) ... Removing 'diversion of /usr/share/dbus-1/system-services/org.freedesktop.systemd1.service to /usr/share/dbus-1/system-services/org.freedesktop.systemd1.service.systemd by systemd-shim' dpkg-divert: error: rename involves overwriting '/usr/share/dbus-1/system-services/org.freedesktop.systemd1.service' with different file '/usr/share/dbus-1/system-services/org.freedesktop.systemd1.service.systemd', not allowed dpkg: error processing package systemd-shim (--remove): installed systemd-shim package post-removal script subprocess returned error exit status 2 Errors were encountered while processing: systemd-shim E: Sub-process /usr/bin/dpkg returned an error code (1) |
解决方案如下:
|
1 2 3 4 5 |
$ sudo mv /usr/share/dbus-1/system-services/org.freedesktop.systemd1.service /usr/share/dbus-1/system-services/org.freedesktop.systemd1.service.bak $ sudo apt-get dist-upgrade $ sudo rm -rf /usr/share/dbus-1/system-services/org.freedesktop.systemd1.service.bak |
参考链接
尝试修复希捷固件门硬盘(SV35系列ST3000VX000)
最近家里的NAS 服务器上的希捷硬盘挂了,总寿命不超过 1 万小时,当时买硬盘的时候,记得是特意规避过希捷的 STX000DM001 这个版本的硬盘,这个版本的硬盘由于质量问题,基本上都会挂掉。 结果没想到,ST3000VX000不过是 ST3000DM001 的马甲而已。
中招,经过下面的修复之后,依旧没有办法修复,数据无法读取成功。尝试其他命令之后,整盘报废,ST3000DM001 系列硬盘完全没办法用,尽管关键数据都已经冗余备份,但是部分次要数据依旧丢失。
下面只是记录一下操作过程,没有实际意义。
希捷硬盘型号信息查询网站: https://apps1.seagate.com/downloads/request.html
继续阅读尝试修复希捷固件门硬盘(SV35系列ST3000VX000)
解决IPFire(IPFire 2.21 (x86_64) - Core Update 130 )网页上配置DHCP只能在192.168.1.x网段的问题
默认情况下在 IPFire ( IPFire 2.21 (x86_64) - Core Update 130 (RED+GREEN)) 管理页上配置 DHCP 的网段的时候,发现只能配置为 192.168.1.x 网段,其他网段都报告错误 DHCP on GREEN: Invalid start address. 。
具体错误信息如下图:
继续阅读解决IPFire(IPFire 2.21 (x86_64) - Core Update 130 )网页上配置DHCP只能在192.168.1.x网段的问题
在Ubuntu 16.04/18.04/20.04 LTS上安装OpenGrok-1.3.11/1.3.16/1.5.12/1.7.25浏览Android源码
更加推荐通过 Podman/Docker 方式进行部署,参考链接 Ubuntu 22.04使用Podman部署OpenGrok的详细教程 。
OpenGrok 是一个快速,便于使用的源码搜索引擎与对照引擎,它能够帮助我们快速的搜索、定位、对照代码树。接下来就具体讲解 Ubuntu 16.04/18.04/20.04 LTS 环境下 OpenGrok 的安装及使用。
OpenGrok 1.3.11/1.3.16 依赖 Java 1.8 , Tomcat 8
OpenGrok 1.5.12 依赖 Java 11 , Tomcat 9 。
从 OpenGrok 1.6.0开始依赖 Java 11 , Tomcat 10 。
1.依旧参照 UBUNTU 13.10 APACHE 2.2 通过 AJP 整合 TOMCAT 7 中讲述的方法,进行 Tomcat 8/9, Apache 2.4的配置安装,只不过路径中的 Tomcat7 目录替换成 Tomcat8 (ubuntu 20.04 默认 Tomcat9)。
2.安装 Tomcat 8 (ubuntu 18.04)
|
1 2 3 4 5 6 7 8 9 10 |
$ sudo apt-get install tomcat8 # 一般卸载 tomcat7 $ sudo apt-get remove --purge tomcat7* # 调整内存,默认的128MB 默认配置运行会导致OOM $ sudo touch /usr/share/tomcat8/bin/setenv.sh $ echo 'export JAVA_OPTS="-Xms512M -Xmx1024M"' | sudo tee -a /usr/share/tomcat8/bin/setenv.sh |
安装 Tomcat 9 (ubuntu 20.04)
|
1 2 3 4 5 6 7 8 9 10 11 12 |
# 一般卸载 tomcat7/8 $ sudo apt-get remove --purge tomcat7* $ sudo apt-get remove --purge tomcat8* $ sudo apt-get install tomcat9 # 调整内存,默认的128MB 默认配置运行会导致OOM # sudo touch /usr/share/tomcat9/bin/setenv.sh $ echo 'export JAVA_OPTS="-Xms512M -Xmx1024M"' | sudo tee -a /usr/share/tomcat9/bin/setenv.sh |
3.安装 universal-ctags 用于对 C\C++ 代码的支持
给代码建立索引时,要使用到universal-ctags工具,但是一般通过apt-get安装的都是exuberant-ctags,所以要先删除原有的ctags版本,然后安装universal-ctags.
|
1 2 3 4 5 6 7 8 9 10 11 12 13 14 15 16 17 18 19 20 21 22 23 24 25 |
$ sudo apt-get purge ctags $ sudo apt-get install git $ sudo apt-get install autoconf $ sudo apt-get install pkg-config $ cd ~ $ git clone --depth=1 https://github.com/universal-ctags/ctags.git $ cd ctags $ ./autogen.sh $ ./configure $ make $ sudo make install $ cd .. $ rm -rf ctags |
4.下载并安装OpenGrok
可以到"https://oracle.github.io/opengrok/"手工下载文件,然后上传到服务器,也可以直接用wget命令来下载,一般选择安装在"/opt"目录下面。
|
1 2 3 4 5 6 7 8 9 10 11 |
$ sudo apt-get install aria2 $ cd /opt $ sudo aria2c -c "https://github.com/oracle/opengrok/releases/download/1.3.11/opengrok-1.3.11.tar.gz" # sudo aria2c -c "https://github.com/oracle/opengrok/releases/download/1.3.16/opengrok-1.3.16.tar.gz" # sudo aria2c -c "https://github.com/oracle/opengrok/releases/download/1.5.12/opengrok-1.5.12.tar.gz" # sudo aria2c -c "https://github.com/oracle/opengrok/releases/download/1.7.25/opengrok-1.7.25.tar.gz" |
解压缩文件到当前目录"/opt"
|
1 2 3 4 5 6 7 |
$ sudo tar xvf opengrok-1.3.11.tar.gz # sudo tar xvf opengrok-1.3.16.tar.gz # sudo tar xvf opengrok-1.5.12.tar.gz # sudo tar xvf opengrok-1.7.25.tar.gz |
创建一个软链接,方便后续的修改
|
1 2 3 4 5 6 7 8 9 10 11 12 13 14 15 16 17 18 19 20 21 |
$ sudo ln -s opengrok-1.3.11 /opt/opengrok # sudo ln -s opengrok-1.3.16 /opt/opengrok # sudo ln -s opengrok-1.5.12 /opt/opengrok # sudo ln -s opengrok-1.7.25 /opt/opengrok # 安装工具,必须是Python3 ,Python2 安装会失败 $ sudo apt-get install python3-pip $ sudo pip3 install --upgrade pip # 如果报错 ModuleNotFoundError: No module named 'pip._internal' # 执行如下命令 # sudo python3 -m pip install --upgrade pip # 解决 AttributeError: module 'setuptools.dist' has no attribute 'check_specifier' $ sudo pip3 install --upgrade setuptools $ sudo pip3 install /opt/opengrok/tools/opengrok-tools.tar.gz |
链接"/opt/opengrok/lib/source.war"到 Tomcat8 的工程目录"/var/lib/tomcat8/webapps/",比如我们有多个源代码工程,建议进行链接操作。
如下:
|
1 2 3 4 5 6 7 |
$ sudo ln -s /opt/opengrok/lib/source.war /var/lib/tomcat8/webapps/Android_4.2.2.war $ sudo ln -s /opt/opengrok/lib/source.war /var/lib/tomcat8/webapps/Android_7.0.0_r21.war $ sudo ln -s /opt/opengrok/lib/source.war /var/lib/tomcat8/webapps/Android_10.0.0_r40.war $ sudo ln -s /opt/opengrok/lib/source.war /var/lib/tomcat8/webapps/Chromium.war |
访问"http://localhost:8080/source/"确认OpenGrok是否已经安装成功,如果安装成功,出现下面的界面: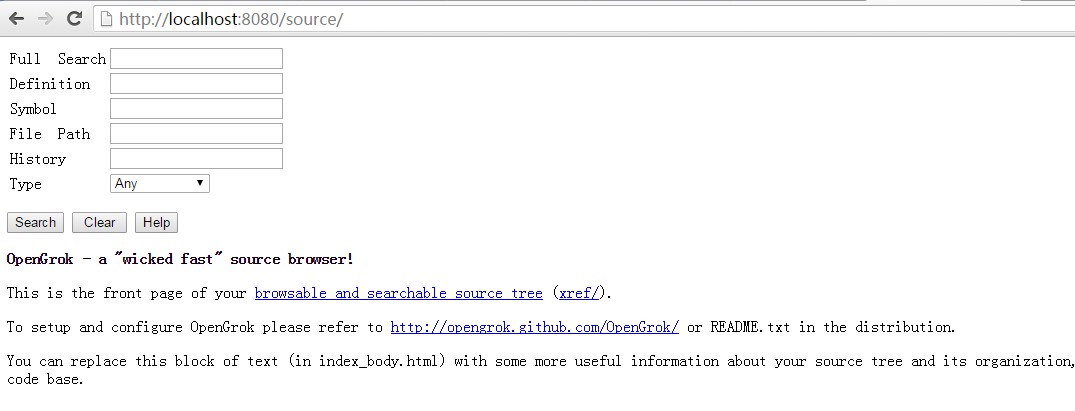
5.出于安全原因,禁止外网访问Tomcat的8080端口
只允许Tomcat在本地的8080端口监听即可,修改
|
1 |
$ sudo vim /var/lib/tomcat8/conf/server.xml |
添加 address="127.0.0.1"
|
1 2 3 |
<Connector port="8080" address="127.0.0.1" protocol="HTTP/1.1" connectionTimeout="20000" redirectPort="8443" /> |
重启Tomcat8
|
1 |
$ sudo service tomcat8 restart |
6.配置Apache2对Tomcat通过AJP进行反向代理
Apache2 的配置文件“ /etc/apache2/sites-enabled/000-default.conf” (如果开启了HTTPS,则需要同步修改 /etc/apache2/sites-enabled/000-default-le-ssl.conf 或者 /etc/apache2/sites-enabled/default-ssl.conf) 中,增加如下配置:
|
1 2 3 4 5 6 7 8 9 10 11 12 13 14 15 |
<VirtualHost *:80> #for Tomcat 8 openGrok Android Source ProxyPass /Android_4.2.2/ ajp://127.0.0.1:8009/Android_4.2.2/ ProxyPassReverse /AndroidXRef_4.2.2/ ajp://127.0.0.1:8009/AndroidXRef_4.2.2/ ProxyPass /Android_7.0.0_r21/ ajp://127.0.0.1:8009/Android_7.0.0_r21/ ProxyPassReverse /Android_7.0.0_r21/ ajp://127.0.0.1:8009/Android_7.0.0_r21/ ProxyPass /Android_10.0.0_r40/ ajp://127.0.0.1:8009/Android_10.0.0_r40/ ProxyPassReverse /Android_10.0.0_r40/ ajp://127.0.0.1:8009/Android_10.0.0_r40/ #for Tomcat 8 OpenGrok Chromium ProxyPass /Chromium/ ajp://127.0.0.1:8009/Chromium/ ProxyPassReverse /Chromium/ ajp://127.0.0.1:8009/Chromium/ </VirtualHost> |
Tomcat8 的配置文件/var/lib/tomcat8/conf/server.xml中增加如下配置<Context path="/Android_4.2.2" docBase="Android_4.2.2/"/>,解决跳转404问题。ProxyPass后面必须携带“/”,否则就会出现404问题。
|
1 2 3 4 5 6 7 8 9 10 11 12 13 14 15 16 17 18 19 20 21 22 23 24 25 |
<Host name="localhost" appBase="webapps" unpackWARs="true" autoDeploy="true"> <Context path="/Android_4.2.2" docBase="Android_4.2.2/"/> <Context path="/Android_7.0.0.r21" docBase="Android_7.0.0_r21/"/> <Context path="/Android_10.0.0_r40" docBase="Android_10.0.0_r40/"/> <Context path="/Chromium" docBase="Chromium/"/> <!-- SingleSignOn valve, share authentication between web applications Documentation at: /docs/config/valve.html --> <!-- <Valve className="org.apache.catalina.authenticator.SingleSignOn" /> --> <!-- Access log processes all example. Documentation at: /docs/config/valve.html Note: The pattern used is equivalent to using pattern="common" --> <Valve className="org.apache.catalina.valves.AccessLogValve" directory="logs" prefix="localhost_access_log." suffix=".txt" pattern="%h %l %u %t "%r" %s %b" /> <!-- 隐藏版本号 --> <Valve className="org.apache.catalina.valves.ErrorReportValve" showReport="false" showServerInfo="false" /> </Host> |
7.配置OpenGrok对源代码进行解析
设置要建立索引的源代码目录的位置,以存储在"/data/OpenGrok/Android_4.2.2"上的Android代码为例子:
|
1 2 3 |
$ export OPENGROK_INSTANCE_BASE=/data/OpenGrok/Android_4.2.2/ $ export OPENGROK_WEBAPP_CONTEXT=Android_4.2.2 |
注意:
由于我们使用了Apache2的反向代理才需要设置 OPENGROK_WEBAPP_CONTEXT,如果没有设置反向代理,请不要设置。
OPENGROK_WEBAPP_CONTEXT 内容就是在 Apache2 中设置的 ProxyPassReverse 指定的参数。
在使用反向代理的时候如果不设置OPENGROK_WEBAPP_CONTEXT会导致在点击具体的变量定义的时候,出现404。
不使用反向代理的时候请只设置OPENGROK_INSTANCE_BASE。
这个变量的本质功能就是在建立文件索引的时候,在链接头部增加 OPENGROK_WEBAPP_CONTEXT 指定的路径,比如原来的路径是 https://www.mobibrw.com/a.html ,那么指定路径后,就变成了 https://www.mobibrw.com/ Android_4.2.2/a.html。
创建源代码索引
|
1 2 3 4 5 6 7 8 9 10 11 12 13 14 15 16 17 18 19 20 21 22 23 24 25 26 27 28 29 30 31 32 33 34 35 36 37 38 39 40 41 42 43 44 45 46 47 48 49 50 51 |
$ cd /data/OpenGrok/Android_4.2.2/src # 删除源代码下面可能存在的".git",".svn"隐藏目录 $ find . -name .svn -print0 | xargs -0 rm -r -f $ find . -name .git -print0 | xargs -0 rm -r -f # 删除无法进行索引的文件 $ find . -name *.apk -print0 | xargs -0 rm -r -f $ find . -name *.zip -print0 | xargs -0 rm -r -f $ find . -name *.jar -print0 | xargs -0 rm -r -f # 编译工具是没有必要的目录 $ rm -rf prebuilts $ export IDX_ROOT=/data/OpenGrok/Android_4.2.2/ # Android 源代码目录 $ export IDX_SRC=${IDX_ROOT}src/ $ export IDX_DATA=${IDX_ROOT}data/ $ export IDX_CONF=${IDX_ROOT}etc/configuration.xml # 清理以前生成的索引数据 # 索引数据目录 $ cd ${IDX_ROOT} $ rm -rf data # 日志目录 $ rm -rf log # 配置文件目录 $ rm -rf etc $ rm -rf logging.properties $ mkdir etc # 限制索引内存占用,避免建立索引过程中引发OOM, # 如果依旧出现OOM,则在参数中指定 “-T 1” 限制只能使用一个线程,不允许并发,减少内存开销 # 其实由于磁盘IO是整个索引的性能瓶颈,因此多线程并不能缩短太多的时间,反而占用了太多的内存 # 因此限制只能使用一个线程,在大多数情况下,是没问题的 # 同时使用 "-m 256" 参数增加 Lucene 4.x 使用的缓存的大小,避免出现问题 # Android 10的源代码至少需要2GB内存才能成功索引 $ export JAVA_OPTS="-Xmx2048m" $ opengrok-indexer -J=-Xmx2g -a /opt/opengrok/lib/opengrok.jar -- -m 256 -s $IDX_SRC -d $IDX_DATA -T 1 -H -P -S -G -W $IDX_CONF |
执行时间在40分钟左右,执行完成 。(如果通过SSH远程登录,可能会出现中途连接断开的情况,原因为某项操作比较耗时,导致长时间没有数据通信,网络超时断开。 参考 Linux SSH保持连接(解决Broken pipe))生成的索引文件在源代码的"data"目录下面,重建索引的时候需要执行如下操作,才能再次建立索引
|
1 2 3 4 5 6 7 8 9 10 11 12 13 |
# 切换回到项目根目录 $ cd ${IDX_ROOT} # 索引数据目录 $ rm -rf data # 日志目录 $ rm -rf log # 配置文件目录 $ rm -rf etc $ rm -rf logging.properties |
注意,请务必删除源代码中的"prebuilts"目录,这个目录下面存储的是一系列的编译工具,在浏览代码的时候,完全用不上,但是占据的磁盘空间确是巨大的。
注意,如果服务器上面的内存比较有限,请使用如下命令进行内存限制,否则建立索引的时候,会触发内存不足的情况:
|
1 2 3 4 |
# 早期版本使用如下参数限制内存 $ export JAVA_OPTS="-Xmx1024m" # 最新版本OpenGrok-1.3.11/1.3.16使用-J=-Xmx2g 进行内存限制,Android 10的源代码至少需要2GB内存才能成功索引 |
修改OpenGrok配置文件
|
1 |
$ sudo vim /var/lib/tomcat8/webapps/Android_4.2.2/WEB-INF/web.xml |
修改其中的
|
1 2 3 4 5 |
<context-param> <param-name>CONFIGURATION</param-name> <param-value>/var/opengrok/etc/configuration.xml</param-value> <description>Full path to the configuration file where OpenGrok can read it's configuration</description> </context-param> |
为具体的工程目录"/data/OpenGrok/Android_4.2.2",修改后的配置如下:
|
1 2 3 4 5 |
<context-param> <param-name>CONFIGURATION</param-name> <param-value>/data/OpenGrok/Android_4.2.2/etc/configuration.xml</param-value> <description>Full path to the configuration file where OpenGrok can read it's configuration</description> </context-param> |
刷新浏览器,可以看到Android_4.2.2的源码可以搜索出来了。
参考链接
- Android系统源码极速搜索引擎(OpenGrok)
- Linux下Opengrok安装部署与使用
- 在Ubuntu 12.04.2 LTS上安装OpenGrok浏览Android源码
- 在Ubuntu 12.04 LTS上安装OpenGrok浏览Android源码
- Opengrok的安装及配置
- 解决“ImportError: 'module' object has no attribute 'check_specifier'”
- 在阿里云的Ubuntu 14.04系统上解决Tomcat 7由于OOM(Out Of Memory)而被系统杀掉的问题
- 在Ubuntu 14.04 系统中的Apache Tomcat上部署Apache Archiva 2.2.1
- indexer of AOSP fails with OutOfMemoryError and other exceptions #2647
- Tuning for large code bases
- OutOfMemoryError when indexing AOSP #2074
- Ubuntu Server 18.04 LTS隐藏Tomcat-9.0.16.0的版本号与操作系统类型