ubuntu 20.04升级到ubuntu 22.04报错“update-alternatives: 错误: /var/lib/dpkg/alternatives/mpi 损坏:次要链接与主链接 /usr/bin/mpicc 相同”

ubuntu 20.04 升级到 ubuntu 22.04 报错,报错内容如下:

正在设置 openmpi-bin (4.1.2-2ubuntu1) ...
update-alternatives: 错误: /var/lib/dpkg/alternatives/mpi 损坏:次要链接与主链接 /usr/bin/mpicc 相同
dpkg: 处理软件包 openmpi-bin (--configure)时出错:
 已安装 openmpi-bin 软件包 post-installation 脚本 子进程返回错误状态 2
dpkg: 依赖关系问题使得 mpi-default-bin 的配置工作不能继续:
 mpi-default-bin 依赖于 openmpi-bin;然而:
  软件包 openmpi-bin 尚未配置。

dpkg: 处理软件包 mpi-default-bin (--configure)时出错:
 依赖关系问题 - 仍未被配置
dpkg: 依赖关系问题使得 libcoarrays-openmpi-dev:amd64 的配置工作不能继续:
 libcoarrays-openmpi-dev:amd64 依赖于 openmpi-bin;然而:
  软件包 openmpi-bin 尚未配置。

dpkg: 处理软件包 libcoarrays-openmpi-dev:amd64 (--configure)时出错:
 依赖关系问题 - 仍未被配置
dpkg: 依赖关系问题使得 libopenmpi-dev:amd64 的配置工作不能继续:
 libopenmpi-dev:amd64 依赖于 openmpi-bin (>= 3.0.0-1);然而:
  软件包 openmpi-bin 尚未配置。

dpkg: 处理软件包 libopenmpi-dev:amd64 (--configure)时出错:
 依赖关系问题 - 仍未被配置
dpkg: 依赖关系问题使得 libboost-mpi-python1.74.0 的配置工作不能继续:
 libboost-mpi-python1.74.0 依赖因为错误消息指示这是由于上一个问题导致的错误,没有写入 apport 报告。
                  因为错误消息指示这是由于上一个问题导致的错误,没有写入 apport 报告。
      由于已经达到 MaxReports 限制,没有写入 apport 报告。
                                                          由于已经达到 MaxReports 限制,没有写入 apport 报告。
                              由于已经达到 MaxReports 限制,没有写入 apport 报告。
  由于已经达到 MaxReports 限制,没有写入 apport 报告。
                                                      由于已经达到 MaxReports 限制,没有写入 apport 报告。
                          由于已经达到 MaxReports 限制,没有写入 apport 报告。
                                                                              由于已经达到 MaxReports 限制,没有写入 apport 报告。
                                                  由于已经达到 MaxReports 限制,没有写入 apport 报告。
                      由于 mpi-default-bin;然而:
  软件包 mpi-default-bin 尚未配置。

dpkg: 处理软件包 libboost-mpi-python1.74.0 (--configure)时出错:
 依赖关系问题 - 仍未被配置
dpkg: 依赖关系问题使得 libboost-mpi-python1.74-dev 的配置工作不能继续:
 libboost-mpi-python1.74-dev 依赖于 libboost-mpi-python1.74.0 (= 1.74.0-14ubuntu3);然而:
  软件包 libboost-mpi-python1.74.0 尚未配置。

dpkg: 处理软件包 libboost-mpi-python1.74-dev (--configure)时出错:
 依赖关系问题 - 仍未被配置
dpkg: 依赖关系问题使得 libboost-mpi-python-dev 的配置工作不能继续:
 libboost-mpi-python-dev 依赖于 libboost-mpi-python1.74-dev;然而:
  软件包 libboost-mpi-python1.74-dev 尚未配置。

dpkg: 处理软件包 libboost-mpi-python-dev (--configure)时出错:
 依赖关系问题 - 仍未被配置
dpkg: 依赖关系问题使得 libboost-all-dev 的配置工作不能继续:
 libboost-all-dev 依赖于 libboost-mpi-python-dev;然而:
  软件包 libboost-mpi-python-dev 尚未配置。

dpkg: 处理软件包 libboost-all-dev (--configure)时出错:
 依赖关系问题 - 仍未被配置
dpkg: 依赖关系问题使得 mpi-default-dev 的配置工作不能继续:
 mpi-default-dev 依赖于 libopenmpi-dev;然而:
  软件包 libopenmpi-dev:amd64 尚未配置。

dpkg: 处理软件包 mpi-default-dev (--configure)时出错:
 依赖关系问题 - 仍未被配置
dpkg: 依赖关系问题使得 libboost-mpi1.74-dev 的配置工作不能继续:
 libboost-mpi1.74-dev 依赖于 mpi-default-dev;然而:
  软件包 mpi-default-dev 尚未配置。

dpkg: 处理软件包 libboost-mpi1.74-dev (--configure)时出错:
 依赖关系问题 - 仍未被配置
dpkg: 依赖关系问题使得 libboost-mpi-dev 的配置工作不能继续:
 libboost-mpi-dev 依赖于 libboost-mpi1.74-dev;然而:
  软件包 libboost-mpi1.74-dev 尚未配置。

dpkg: 处理软件包 libboost-mpi-dev (--configure)时出错:
 依赖关系问题 - 仍未被配置
在处理时有错误发生:
 openmpi-bin
 mpi-default-bin
 libcoarrays-openmpi-dev:amd64
 libopenmpi-dev:amd64
 libboost-mpi-python1.74.0
 libboost-mpi-python1.74-dev
 libboost-mpi-python-dev
 libboost-all-dev
 mpi-default-dev
 libboost-mpi1.74-dev
 libboost-mpi-dev
E: Sub-process /usr/bin/dpkg returned an error code (1)

解决方法:

$ sudo mv /var/lib/dpkg/alternatives/mpi /var/lib/dpkg/alternatives/mpi.bak

$ sudo apt-get dist-upgrade

ubuntu 20.04.4系统升级后全部应用图标都无法显示

ubuntu 20.04.4系统执行升级命令后全部应用图标都无法显示,系统变成如下图:

很多应用也无法打开了,点击之后无任何反应。

查看系统日志可以看到如下错误信息:

(gnome-calculator:4038): Gtk-WARNING **: 06:23:42.942: Could not load a pixbuf from icon theme.
This may indicate that pixbuf loaders or the mime database could not be found.
**
Gtk:ERROR:../../../../gtk/gtkiconhelper.c:494:ensure_surface_for_gicon: assertion failed (error == NULL): Failed to load /usr/share/icons/Yaru/16x16/status/image-missing.png: Unrecognized image file format (gdk-pixbuf-error-quark, 3)
Bail out! Gtk:ERROR:../../../../gtk/gtkiconhelper.c:494:ensure_surface_for_gicon: assertion failed (error == NULL): Failed to load /usr/share/icons/Yaru/16x16/status/image-missing.png: Unrecognized image file format (gdk-pixbuf-error-quark, 3)
[1]    4038 abort (core dumped)  gnome-calculator

这个原因是由于 gdk-pixbuf 的改动导致的系统 BUG,只需要重新生成一下应用图标缓存即可。

执行如下命令:

$ sudo apt-get install shared-mime-info

$ sudo update-mime-database /usr/share/mime

$ sudo chmod 644 /usr/share/applications/mimeinfo.cache

$ sudo /usr/lib/x86_64-linux-gnu/gdk-pixbuf-2.0/gdk-pixbuf-query-loaders --update-cache

参考链接


Flutter构建Linux应用

从3.0之后的版本,flutter已经正式支持构建Linux应用

条件

  • ubuntu 22.04
  • Android Studio Chipmunk |  2021.2.1
  • flutter sdk 3.x

方法

1. 打开Linux的平台支持

输入如下指令(如下命令可以使用flutter config查看,2.10以上的版本默认开启

flutter config --enable-linux-desktop

# 其他平台
flutter config --[no-]enable-macos-desktop

flutter config --[no-]enable-windows-desktop

可以使用flutter doctor查看情况。

安装编译依赖

# 安装Android Studio
$ sudo snap install android-studio --classic

# 安装 Flutter SDK
$ sudo snap install flutter

# 更新 Flutter SDK
$ flutter

$ sudo apt-get install cmake

$ sudo apt-get install ninja-build

$ sudo apt-get install clang

$ sudo apt-get install gtk+-3.0

$ sudo apt-get install libssl-dev

$ sudo apt-get install git

$ sudo apt-get install vim
2. 在旧项目中添加Linux平台支持

在项目地址输入如下指令

flutter create --platforms=linux[,macos,windows] .

注意: 项目的名称必须是全小写,如果出现大小写则会报错

"TxxxFxxx" is not a valid Dart package name.

See https://dart.dev/tools/pub/pubspec#name for more information.
3. 构建Linux项目
flutter build linux
4. 报错
Launching lib/main.dart on Linux in debug mode...
Building Linux application...
CMake Error at cmake_install.cmake:66 (file):
  file INSTALL cannot copy file
  "/xxxx/xxxx/build/linux/x64/debug/intermediates_do_not_run/xxx"
  to "/usr/local/xxx": Permission denied.


Exception: Build process failed

出现这个问题

flutter clean //执行这个然后重启 Android Studio

参考链接


Visual Studio Code调试Flutter报错“[CHROME]:need to run as root or suid”

在最新的 Ubuntu 22.04 系统上使用Visual Studio Code调试Flutter应用,Chrome使用Snap安装。

通过指定 CHROME_EXECUTABLE=/snap/bin/chromium,在调试的时候,报错如下:

Launching lib/main.dart on Chrome in debug mode...
lib/main.dart:1
[CHROME]:need to run as root or suid
Failed to launch browser after 3 tries. Command used to launch it: /snap/bin/chromium --user-data-dir=/tmp/flutter_tools.SEVTFD/flutter_tools_chrome_device.AMHTFX --remote-debugging-port=38457 --disable-background-timer-throttling --disable-extensions --disable-popup-blocking --bwsi --no-first-run --no-default-browser-check --disable-default-apps --disable-translate http://localhost:42407
Failed to launch browser. Make sure you are using an up-to-date Chrome or Edge. Otherwise, consider using -d web-server instead and filing an issue at https://github.com/flutter/flutter/issues.
Exited (sigterm)

解决方法就是指定真实的Chrome安装路径,直接调用,而不是通过Snap的沙箱,解决沙箱无法调试的问题。

如下:

#export CHROME_EXECUTABLE=/snap/bin/chromium
export CHROME_EXECUTABLE=/snap/chromium/current/usr/lib/chromium-browser/chrome

上述方法同样可以解决 Android Studio 在 Ubuntu 22.04 系统上无法找到 Chrome 的问题。

参考链接


How to get the snap-based chromium to access a separately mounted filesystem?

解决远程桌面执行sudo启动X应用报错“Gtk-WARNING **: 12:39:47.296: cannot open display: :10.0”

通过远程桌面(RDP)连接到远程Ubuntu服务器桌面,执行调用X窗口应用的时候,报错如下:

$ sudo update-manager
No protocol specified
Unable to init server: Could not connect: Connection refused
No protocol specified
Unable to init server: 无法连接: Connection refused
No protocol specified
Unable to init server: 无法连接: Connection refused

(update-manager:2547): Gtk-WARNING **: 12:39:47.296: cannot open display: :10.0

原因因为:
XServer默认情况下不允许别的用户的图形程序的图形显示在当前屏幕上

如果需要别的用户的图形显示在当前屏幕上,则应以当前登陆的用,也就是切换身份前的用户执行如下命令。

当前登陆普通用户执行:xhost +

$ xhost +
access control disabled, clients can connect from any host

$ sudo update-manager

参考链接


Ubuntu gedit报错Gtk-WARNING **: cannot open display: 问题解决

禁止ubuntu 20.04/21.10自动休眠

ubuntu 20.04/21.10使用 RDP 远程登陆之后,如果系统较长时间不操作,系统就自动休眠了。

如果重启之后,从来都没有登陆,就不会出现系统自动休眠的情况。

观察系统日志,发现类似如下的内容:

Feb 25 22:15:38 server NetworkManager[737]: <info>  [1582668938.0193] manager: sleep: sleep requested (sleeping: no  enabled: yes)
Feb 25 22:15:38 server NetworkManager[737]: <info>  [1582668938.0239] manager: NetworkManager state is now ASLEEP
Feb 25 22:15:38 server whoopsie[1025]: [22:15:38] offline
Feb 25 22:15:38 server gnome-shell[956]: Screen lock is locked down, not locking
Feb 25 22:15:38 server systemd[1]: Reached target Sleep.
Feb 25 22:15:38 server systemd[1]: Starting Suspend...
Feb 25 22:15:38 server kernel: [ 1235.212537] PM: suspend entry (s2idle)
Feb 25 22:15:38 server systemd-sleep[1705]: Suspending system...

发现是触发了systemd的自动休眠功能,检查休眠功能的状态以及历史记录,如下:

$ systemctl status sleep.target

 ● sleep.target - Sleep
    Loaded: loaded (/lib/systemd/system/sleep.target; static; vendor preset: enabled)
    Active: inactive (dead)
      Docs: man:systemd.special(7)
 Feb 24 13:18:08 xps systemd[1]: Reached target Sleep.
 Feb 26 13:29:31 xps systemd[1]: Stopped target Sleep.
 Feb 26 13:29:57 xps systemd[1]: Reached target Sleep.
 Feb 26 13:30:19 xps systemd[1]: Stopped target Sleep.

普通桌面应用这个情况问题不大,但是如果是作为服务器使用的时候,我们一般远程访问系统,这个功能就会导致我们无法远程控制服务器,因此我们需要关闭这个功能。

执行关闭休眠功能的命令,如下:

$ sudo systemctl mask sleep.target suspend.target hibernate.target hybrid-sleep.target

 Created symlink /etc/systemd/system/sleep.target → /dev/null.
 Created symlink /etc/systemd/system/suspend.target → /dev/null.
 Created symlink /etc/systemd/system/hibernate.target → /dev/null.
 Created symlink /etc/systemd/system/hybrid-sleep.target → /dev/null.

再次观察系统休眠状态,如下:

$ systemctl status sleep.target

● sleep.target
   Loaded: masked (Reason: Unit sleep.target is masked.)
   Active: inactive (dead)

发现自动休眠功能已经被关闭,不会出现自动休眠导致远程控制无法访问的情况了。

参考链接


禁止ubuntu 20.04自动休眠

ubuntu 21.10(GeForce GTX 3060 12GB)编译StyleGAN3

安装驱动:

# 清理全部的其他版本的nvidia驱动
$ sudo apt-get purge nvidia-*

$ sudo reboot

# nvidia-smi
$ sudo apt install nvidia-utils-470

# 驱动
$ sudo apt install nvidia-driver-470

# cuda 11.3 
$ sudo apt install nvidia-cuda-toolkit

$ sudo apt-get update

# 部分驱动可能会更新,需要执行更新,否则可能依旧不正常
$ sudo apt-get dist-upgrade

$ sudo apt-get autoremove

# 重启,否则部分驱动可能工作不正常
$ sudo reboot

Anaconda 上建立独立的编译环境,然后执行编译:

# wget https://repo.anaconda.com/archive/Anaconda3-2020.02-Linux-x86_64.sh
# 国内镜像下载
$ wget https://mirrors.tuna.tsinghua.edu.cn/anaconda/archive/Anaconda3-2021.11-Linux-x86_64.sh

$ bash Anaconda3-*-Linux-x86_64.sh

# 更新到最新版本
$ conda update -n base -c defaults conda

参考 Anaconda conda切换为国内源  加速下载。

编译配置StyleGAN3

$ sudo apt-get install git

$ git clone git@github.com:NVlabs/stylegan3.git

$ cd stylegan3

$ conda env create -f environment.yml

$ conda activate stylegan3

$ pip install psutil

# cudnn加速
$ conda install cudnn

# 目前测试 RTX 3060 12GB的情况下,batch建议是2,更高会报告OOM
# 并且当batch低于4的时候,需要同时指定 --mbstd-group=2
$ python train.py --outdir=~/training-runs --cfg=stylegan3-t --data=~/datasets/metfaces-1024x1024.zip --gpus=1 --batch=2 --mbstd-group=2 --gamma=8.2 --mirror=1 --metrics=none

如果报错:

Constructing networks...
Setting up PyTorch plugin "bias_act_plugin"... Failed!
Traceback (most recent call last):
  File "~/source/stylegan3/train.py", line 286, in <module>
    main() # pylint: disable=no-value-for-parameter
  File "~/anaconda3/envs/stylegan3/lib/python3.9/site-packages/click/core.py", line 1128, in __call__
    return self.main(*args, **kwargs)
  File "~/anaconda3/envs/stylegan3/lib/python3.9/site-packages/click/core.py", line 1053, in main
    rv = self.invoke(ctx)
  File "~/anaconda3/envs/stylegan3/lib/python3.9/site-packages/click/core.py", line 1395, in invoke
    return ctx.invoke(self.callback, **ctx.params)
  File "~/anaconda3/envs/stylegan3/lib/python3.9/site-packages/click/core.py", line 754, in invoke
    return __callback(*args, **kwargs)
  File "~/source/stylegan3/train.py", line 281, in main
    launch_training(c=c, desc=desc, outdir=opts.outdir, dry_run=opts.dry_run)
  File "~/source/stylegan3/train.py", line 96, in launch_training
    subprocess_fn(rank=0, c=c, temp_dir=temp_dir)
  File "~/source/stylegan3/train.py", line 47, in subprocess_fn
    training_loop.training_loop(rank=rank, **c)
  File "~/source/stylegan3/training/training_loop.py", line 168, in training_loop
    img = misc.print_module_summary(G, [z, c])
  File "~/source/stylegan3/torch_utils/misc.py", line 216, in print_module_summary
    outputs = module(*inputs)
  File "~/anaconda3/envs/stylegan3/lib/python3.9/site-packages/torch/nn/modules/module.py", line 1071, in _call_impl
    result = forward_call(*input, **kwargs)
  File "~/source/stylegan3/training/networks_stylegan3.py", line 511, in forward
    ws = self.mapping(z, c, truncation_psi=truncation_psi, truncation_cutoff=truncation_cutoff, update_emas=update_emas)
  File "~/anaconda3/envs/stylegan3/lib/python3.9/site-packages/torch/nn/modules/module.py", line 1071, in _call_impl
    result = forward_call(*input, **kwargs)
  File "~/source/stylegan3/training/networks_stylegan3.py", line 151, in forward
    x = getattr(self, f'fc{idx}')(x)
  File "~/anaconda3/envs/stylegan3/lib/python3.9/site-packages/torch/nn/modules/module.py", line 1071, in _call_impl
    result = forward_call(*input, **kwargs)
  File "~/source/stylegan3/training/networks_stylegan3.py", line 100, in forward
    x = bias_act.bias_act(x, b, act=self.activation)
  File "~/source/stylegan3/torch_utils/ops/bias_act.py", line 84, in bias_act
    if impl == 'cuda' and x.device.type == 'cuda' and _init():
  File "~/source/stylegan3/torch_utils/ops/bias_act.py", line 41, in _init
    _plugin = custom_ops.get_plugin(
  File "~/source/stylegan3/torch_utils/custom_ops.py", line 136, in get_plugin
    torch.utils.cpp_extension.load(name=module_name, build_directory=cached_build_dir,
  File "~/anaconda3/envs/stylegan3/lib/python3.9/site-packages/torch/utils/cpp_extension.py", line 1080, in load
    return _jit_compile(
  File "~/anaconda3/envs/stylegan3/lib/python3.9/site-packages/torch/utils/cpp_extension.py", line 1318, in _jit_compile
    return _import_module_from_library(name, build_directory, is_python_module)
  File "~/anaconda3/envs/stylegan3/lib/python3.9/site-packages/torch/utils/cpp_extension.py", line 1701, in _import_module_from_library
    module = importlib.util.module_from_spec(spec)
  File "<frozen importlib._bootstrap>", line 565, in module_from_spec
  File "<frozen importlib._bootstrap_external>", line 1173, in create_module
  File "<frozen importlib._bootstrap>", line 228, in _call_with_frames_removed
ImportError: ~/anaconda3/envs/stylegan3/lib/python3.9/site-packages/torch/lib/../../../../libstdc++.so.6: version `GLIBCXX_3.4.29' not found (required by ~/.cache/torch_extensions/bias_act_plugin/3cb576a0039689487cfba59279dd6d46-nvidia-geforce-rtx-3060/bias_act_plugin.so)

上述报错产生的原因是在 Anaconda 下载的包,在进行编译的时候,使用了高版本的 libstdc++.so。而运行时却使用了Anaconda 环境里低版本的 libstdc++.so 导致报错。

了解了原因,解决方法就比较简单了,可以手工升级 Anaconda 环境下的 libstdc++.so 动态库。

如下:

$ conda activate stylegan3

$ conda install cmake

$ conda install make

# 关键升级命令,更新当前项目里面的 libstdc++.so
$ conda install -c conda-forge libstdcxx-ng

# 删除上次失败时候的编译缓存
$ rm -rf ~/.cache

# 目前测试 RTX 3060 12GB的情况下,batch建议是2,更高会报告OOM
# 当batch=4的时候会在第11天的时候报告OOM
# 并且当batch低于4的时候,需要同时指定 --mbstd-group=2
$ python train.py --outdir=~/training-runs --cfg=stylegan3-t --data=~/datasets/metfaces-1024x1024.zip --gpus=1 --batch=2 --mbstd-group=2 --gamma=8.2 --mirror=1 --metrics=none

目前测试发现,当batch=4的时候会在第11天的时候报告OOM,如下:

tick 444   kimg 1776.0   time 11d 17h 14m  sec/tick 2292.6  sec/kimg 573.16  maintenance 0.2    cpumem 5.40   gpumem 7.69   reserved 10.03  augment 0.344
Traceback (most recent call last):
  File "~/source/stylegan3/train.py", line 286, in <module>
    main() # pylint: disable=no-value-for-parameter
  File "~/anaconda3/envs/stylegan3/lib/python3.9/site-packages/click/core.py", line 1128, in __call__
    return self.main(*args, **kwargs)
  File "~/anaconda3/envs/stylegan3/lib/python3.9/site-packages/click/core.py", line 1053, in main
    rv = self.invoke(ctx)
  File "~/anaconda3/envs/stylegan3/lib/python3.9/site-packages/click/core.py", line 1395, in invoke
    return ctx.invoke(self.callback, **ctx.params)
  File "~/anaconda3/envs/stylegan3/lib/python3.9/site-packages/click/core.py", line 754, in invoke
    return __callback(*args, **kwargs)
  File "~/source/stylegan3/train.py", line 281, in main
    launch_training(c=c, desc=desc, outdir=opts.outdir, dry_run=opts.dry_run)
  File "~/source/stylegan3/train.py", line 96, in launch_training
    subprocess_fn(rank=0, c=c, temp_dir=temp_dir)
  File "~/source/stylegan3/train.py", line 47, in subprocess_fn
    training_loop.training_loop(rank=rank, **c)
  File "~/source/stylegan3/training/training_loop.py", line 278, in training_loop
    loss.accumulate_gradients(phase=phase.name, real_img=real_img, real_c=real_c, gen_z=gen_z, gen_c=gen_c, gain=phase.interval, cur_nimg=cur_nimg)
  File "~/source/stylegan3/training/loss.py", line 81, in accumulate_gradients
    loss_Gmain.mean().mul(gain).backward()
  File "~/anaconda3/envs/stylegan3/lib/python3.9/site-packages/torch/_tensor.py", line 255, in backward
    torch.autograd.backward(self, gradient, retain_graph, create_graph, inputs=inputs)
  File "~/anaconda3/envs/stylegan3/lib/python3.9/site-packages/torch/autograd/__init__.py", line 147, in backward
    Variable._execution_engine.run_backward(
  File "~/anaconda3/envs/stylegan3/lib/python3.9/site-packages/torch/autograd/function.py", line 87, in apply
    return self._forward_cls.backward(self, *args)  # type: ignore[attr-defined]
  File "~/source/stylegan3/torch_utils/ops/grid_sample_gradfix.py", line 50, in backward
    grad_input, grad_grid = _GridSample2dBackward.apply(grad_output, input, grid)
  File "~/source/stylegan3/torch_utils/ops/grid_sample_gradfix.py", line 59, in forward
    grad_input, grad_grid = op(grad_output, input, grid, 0, 0, False)
RuntimeError: CUDA out of memory. Tried to allocate 1.39 GiB (GPU 0; 11.76 GiB total capacity; 7.06 GiB already allocated; 443.88 MiB free; 10.02 GiB reserved in total by PyTorch)

参考链接


VNC还是RDP? 云上的远程桌面究竟该如何选

这里说的VNC是什么?

简单来说,所谓的 VNC(Virtual Network Computing)是一种图形化的桌面共享系统,它使用远程帧缓冲协议 (RFB) 来远程控制另一台计算机。它将键盘和鼠标事件从一台计算机传输到另一台计算机,通过网络向另一个方向转发图形屏幕更新。

类似这样的技术VNC不是绝无仅有,但VNC 的流行和普及却因为其具有的过人之处 –

  • VNC是平台无关的—— 有多种客户端和服务器的实现,几乎涵盖了所有的主流平台。甚至一些VNC的实现被称“无客户端”,这是因为不需要安装插件或客户端软件而,而是依靠HTML5技术,只需要一个浏览器就可以访问远程桌面了。
  • VNC是开源的—— VNC最初是在英国剑桥的Olivetti & Oracle研究实验室开发的。原始的VNC源代码和许多现代的衍生品在GNU通用公共许可证下是开放源码的。
  • VNC的协议是简单、普适的—— VNC使用的是 RFB(Remote Framebuffer) 协议。这是一个开放且简单的协议。因为它在framebuffer级别工作,协议是基于像素的所以适用于所有窗口系统和应用程序,包括Microsoft Windows、macOS和X Window系统。这个协议的性能表现是很出色的。

说起来满满的都是优点,那么

访问云上的实例,为什么不选择VNC呢?


VNC 的优点很多,很多场景下都能看到VNC。例如,访问树莓派的桌面,对 headless 服务器的管理等等。但是,对于云上实例的远程图形化的访问VNC却不是好的选择。考虑到我们的使用场景是通过互联网来访问云上的主机,这就引出了否定 VNC 最主要的原因– 安全性。

默认情况下,RFB并不是一个安全的协议。虽然这个协议下密码不以明文方式发送,但如果能从网络中嗅出加密密钥和已编码的密码,还是有可能破解成功的。因此,建议密码至少有8个字符。另一方面,VNC的一些版本也有8个字符的限制; 如果发送的密码超过8个字符,则删除多余的字符,并将截断的字符串与密码进行比较。

在VNC生态系统中,”Big Four” 指的是LibVNC、UltraVNC、Tight VNC和TurboVNC 这四家提供VNC 产品的厂商。2019年,Kaspersky Lab 的研究人员对这四家公司进行了审计,以了解它们的安全性。他们的发现是令人失望的。总的来说,研究人员发现这四个程序的客户端和服务器部分共有37个严重缺陷。其中22个在 UltraVNC,另外10个在 LibVNC, 4个在 TightVNC,还有一个在 TurboVNC,但这是一个严重的漏洞,它会让攻击者在服务器端远程执行代码。

有人会建议通过 SSH 或 VPN 连接进行 VNC 的隧道化,通过这种方法增加一个具有更强加密功能的额外安全层。但是这种方法并不完美,除了增加了复杂性也容易引起其它的一些安全问题,例如中间人攻击等。

否定一个技术是简单的,但我们是否有替代技术呢?答案就是 Remote Desktop Protocol (RDP)。

那么,RDP又是什么?

有过 Windows 使用经验的人对于远程桌面(Remote Desktop Protocol ,RDP)一定不会陌生。RDP 是由微软公司开发的一种专有协议,它为用户提供了通过网络连接到另一台计算机的图形界面。在使用上,用户需要使用 RDP 客户端软件,而在远程另一台计算机则需要运行 RDP 服务器软件。

微软的Windows、Linux、macOS、iOS、Android等操作系统都有客户端。Windows操作系统内置RDP服务器;Linux与 macOS 可以安装一个 RDP 服务器。缺省配置下,服务器监听 TCP 端口 3389 和 UDP 端口 3389。

微软目前把他们的官方RDP客户端软件称为Remote Desktop Connection,以前叫做 “Terminal Services client”

与VNC 相比,RDP的安全性有很大的提升。主要的安全特性包括了:

  • 128位加密,使用RC4加密算法(版本6加入)
  • 提供了对TLS的支持(版本2加入)

此外,正如前面提到的VNC协议是基于像素的。尽管这带来了极大的灵活性,可以显示任何类型的桌面,但它的效率往往不如那些更好地理解底层图形布局(例 如: X11)或桌面(例如:RDP )的解决方案。这些协议以更简单的形式(例如:打开窗口)发送图形原语或高级命令,而 VNC 的 RFB 协议尽管支持压缩但只能是发送原始像素数据。

如何使用RDP?

在 Windows 环境下使用RDP是再简单不过的事情。我想谈的是在 Linux 环境下RDP 的安装部署与使用。虽然微软公司没有为 Linux 提供 RDP 的软件,但是我们可以使用开源的xRDP,这是RDP协议在Linux平台 的实现。

xRDP是一个开源的远程桌面协议服务器,它用来实现Linux接受来自 Windows、Mac 或者 Linux 远程桌面客户端或的连接。这意味着你不需要在我们所使用的 Windows 或 macOS 机器上安装额外的第三方应用程序。

Linux 安装 xRDP的方法如下。这里我以 Ubuntu 20.04 为例 –

  • 安装Gnome

GNOME是一个Linux 操作系统下的桌面环境,完全由免费和开源软件组成。缺省情况下在EC2上安装的Linux 操作系统都不包含Gnome,需要额外安装。Ubuntu 缺省的桌面窗口管理器就是Gnome,用以下命令安装。

$ sudo apt update

$ sudo apt install ubuntu-desktop

安装 xRDP除了Gnome 以外,我们还可以选择 LXDE、Xface 等等。相比之下,LXDE 是轻量级的窗口管理器,Xface 则具备类似 Windows 界面的风格。如果不在乎额外增加的大约 5GB 的磁盘存储的开销,我还是推荐使用Gnome。原因在于这与我们本地使用的 Ubuntu 具有一致性的体验。

$ sudo apt install -y xrdp
$ sudo systemctl status xrdp

输出结果如下:安装完成后,xRDP服务将自动启动。可以通过这个命令来检查其状态:

  • 接下来,要为Linux的用户(ubuntu)设置登录密码
$ sudo passwd ubuntu 

$ sudo adduser ubuntu ssl-cert

此外,如果我们的 EC2 实例绑定了Elastics IP 并且拥有自己的域名,我推荐使用Let’s Encrypt 发出的免费SSL证书替换缺省的自签发的证书。需要注意的一点,Let’s Encrypt 证书的有效期是90天。可以考虑配置crontab 使用cerbot 自动更新证书。这里设置的密码将被用来登录到目标的 EC2 实例,出于安全的理由务必使其符合密码安全的策略。第二条命令是将 用户ubuntu 加入到 ssl-cert 用户组中。这是因为默认情况下,xRDP 使用的是自签发的证书,这个证书保存在 /etc/ssl/private/ssl-cert-snakeoil目录下。证书的密钥文件只能由 “ssl-cert” 用户组的成员读取。

  • 修改安全组 RDP 协议缺省使用3389端口。务必记得在EC2的安全组中打开TCP与UDP在这个端口上的访问许可。

  • 登录

在这里,username 输入ubuntu,password 输入刚刚修改过的用户密码。成功登录之后熟悉的Ubuntu 桌面就会立刻出现在眼前。

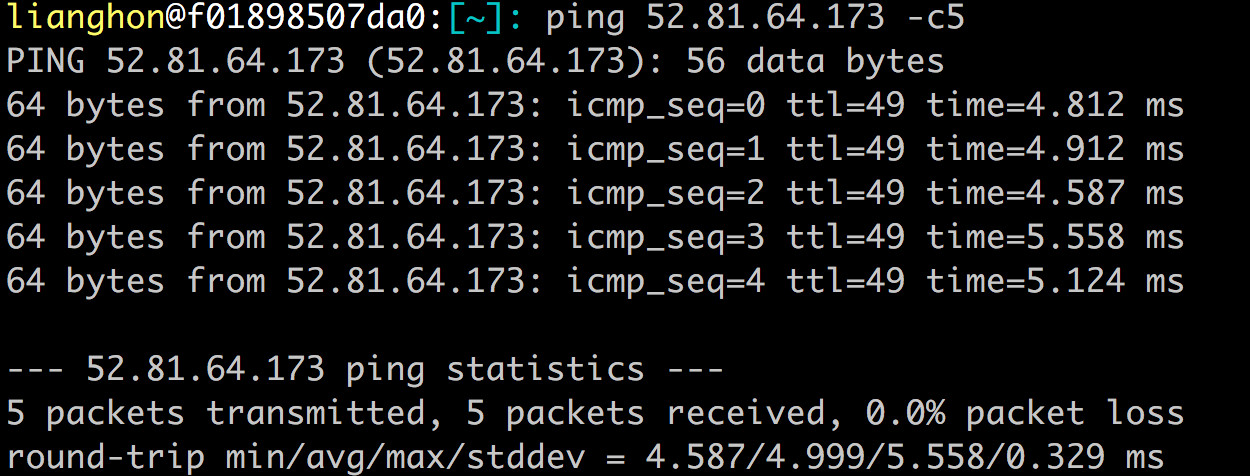
按照我的体验,网络延迟在35ms以内xRDP 的与本地Linux 桌面的操作体验几乎没有差别。实测之下,通过我所使用的100M联通宽带访问AWS 中国(北京)区域的EC2 实例,网络延迟大约在5ms左右。

单以鼠标、键盘的使用体验而论,本地桌面与远程桌面的差别已经微乎其微了,我终于可以放心的将许多工作移到云端。无论是通过我的笔记本电脑、iPad 甚至是一台树莓派都能够让我接入顺利的接入远程桌面。如此一来,开发在云端岂不是再简单不过的事情了。

参考链接


certbot-auto不再支持所有的操作系统,新的ssl证书方法

最近在一台服务器执行letsencrypt-auto命令出现错误:

$ sudo ./certbot-auto 
Your system is not supported by certbot-auto anymore.
certbot-auto and its Certbot installation will no longer receive updates.
You will not receive any bug fixes including those fixing server compatibility
or security problems.
Please visit https://certbot.eff.org/ to check for other alternatives.
Saving debug log to /var/log/letsencrypt/letsencrypt.log

系统不再被支持!!!

查看certbot(https://github.com/certbot/certbot/releases)

2021年1月的更新日志:

●certbot-auto was deprecated on all systems. For more information about this
change, see
https://community.letsencrypt.org/t/certbot-auto-no-longer-works-on-debian-based-systems/139702/7.

可知:

certbot-auto不再支持所有的操作系统!根据作者的说法,certbot团队认为维护certbot-auto在几乎所有流行的UNIX系统以及各种环境上的正常运行是一项繁重的工作,加之certbot-auto是基于python 2编写的,而python 2即将寿终正寝,将certbot-auto迁移至python 3需要大量工作,这非常困难,因此团队决定放弃certbot-auto的维护。

既然如此,现在我们还能继续使用certbot吗?certbot团队使用了基于snap的新的分发方法。

1. 环境
操作系统:CentOS 7

Webserver:Nginx

2. 安装letsencrypt
2.1. 安装letsencrypt之前,需要先安装snaps

a. 先安装epel

$ yum install epel-release

b. 安装snapd

$ yum install snapd

c. 启用snapd.socket

$ systemctl enable --now snapd.socket

d. 创建/var/lib/snapd/snap/snap之间的链接。

$ ln -s /var/lib/snapd/snap /snap

e. 退出账号并重新登录,或者重启系统,确保snap启用。

f. 将snap更新至最新版本。

$ sudo snap install core

$ sudo snap refresh core

2.2. 卸载已安装的certbot

如果之前在系统上已经部署过certbot,则需要先将其进行卸载。

a. 卸载certbot

$ yum remove certbot

b. 根据certbot安装位置删除相关文件。

$ rm /usr/local/bin/certbot-auto

c. 删除certbot附加软件包。

$ rm -rf /opt/eff.org/certbot

2.3. 安装certbot

a. 通过snap安装certbot

$ snap install --classic certbot

b. 创建/snap/bin/certbot的软链接,方便certbot命令的使用。

$ ln -s /snap/bin/certbot /usr/bin/certbot

3. letsencrypt的使用
3.1. 获取证书。

a. 生成证书。

确保nginx处于运行状态,需要获取证书的站点在80端口,并且可以正常访问。

$ certbot certonly --nginx --email xxx@mail.com -d a.do.com -d b.do.com

b. 更新nginx配置并重启nginx

3.2. 更新证书。

$ certbot renew

ubuntu系统的话,使用如下命令方式安装:

$ sudo snap install --classic certbot

参考链接


certbot-auto不再支持所有的操作系统,新的ssl证书方法

fail2ban with OpenVPN(ubuntu 20.04)

This page describes how to set up fail2ban with OpenVPN 2.4.7 (tested on ubuntu 20.04)

Create /etc/fail2ban/filter.d/openvpn.conf containing:

# Fail2Ban filter for selected OpenVPN rejections
#
#

[Definition]

# Example messages (other matched messages not seen in the testing server's logs):
# Fri Sep 23 11:55:36 2016 TLS Error: incoming packet authentication failed from [AF_INET]59.90.146.160:51223
# Thu Aug 25 09:36:02 2016 117.207.115.143:58922 TLS Error: TLS handshake failed

failregex = ^ TLS Error: incoming packet authentication failed from \[AF_INET\]<HOST>:\d+$
            ^ <HOST>:\d+ Connection reset, restarting
            ^ <HOST>:\d+ TLS Auth Error
            ^ <HOST>:\d+ TLS Error: TLS handshake failed$
            ^ <HOST>:\d+ VERIFY ERROR

ignoreregex = 

Create /etc/fail2ban/jail.local containing:

# Fail2Ban configuration fragment for OpenVPN

[openvpn]
enabled  = true
port     = 1194
protocol = udp
filter   = openvpn
logpath  = /var/log/openvpn/openvpn.log
maxretry = 3

To effect the configuration change:

$ service fail2ban restart

To test the configuration change, check /var/log/fail2ban.log initially for service start messages and later for WARNING [openvpn] Ban and Unban messages.

参考链接


HOWTO fail2ban with OpenVPN