评论邮件通知的方法:
对于服务器上需要使用SMTP验证的,需要使用PHPMailer替代默认的WordPress默认的Mail发送邮件时配置SMTP相关信息,如下:
|
1 2 3 4 5 6 7 8 9 10 11 12 13 14 15 16 17 18 19 20 21 22 23 24 25 26 |
function mailer_config(PHPMailer $mailer){ $mailer->IsSMTP(); $mailer->Host = "smtp.sina.com"; // your SMTP server $mailer->Port = 465; $mailer->SMTPDebug = 0; // write 0 if you don't want to see client/server communication in page $mailer->CharSet = "UTF-8"; $wp_email = get_bloginfo ('admin_email'); /////下面是一些服务器要求的配置 $mailer->SMTPAuth = true; // 允许 SMTP 认证 // 如果是用网站的管理员邮箱地址 ,可以如下代码 $mailer->Username = $wp_email; // $mailer->Username = '邮箱用户名'; // SMTP 用户名 即邮箱的用户名 // 这里强烈建议使用授权码而不是密码进行认证,授权码可以提供比较高的安全保护 $mailer->Password = '密码或者授权码'; // SMTP 密码 部分邮箱是授权码(例如163邮箱/新浪邮箱) $mailer->SMTPSecure = 'ssl'; // 允许 TLS 或者SSL协议 //Content $mailer->isHTML(true); // 是否以HTML文档格式发>送 发送后客户端可直接显示对应HTML内容 //网站发出的邮件,最好都存档一下 // $mailer->addCC($wp_email); // 添加抄送人 // $mailer->addCC($wp_email); // 添加多个抄送人 // $mailer->ConfirmReadingTo = $wp_email; // 添加发送回执邮件地址,即当收件人打开邮件后,会询问是否发生回执 $mailer->addBCC($wp_email); // 秘密抄送到指定邮箱 } add_action( 'phpmailer_init', 'mailer_config', 10, 1); |
注意,目前测试在WordPress 5.8版本,上述的代码会诱发异常
|
1 |
Got error 'PHP message: PHP Fatal error: Uncaught TypeError: Argument 1 passed to mailer_config() must be an instance of PHPMailer, instance of PHPMailer\\PHPMailer\\PHPMailer given |
解决方法为注释掉函数的类型(PHPMailer)声明,如下:
|
1 2 3 4 5 6 7 8 9 10 11 12 13 14 15 16 17 18 19 20 21 22 23 24 25 26 |
function mailer_config(/*PHPMailer*/ $mailer){ $mailer->IsSMTP(); $mailer->Host = "smtp.sina.com"; // your SMTP server $mailer->Port = 465; $mailer->SMTPDebug = 0; // write 0 if you don't want to see client/server communication in page $mailer->CharSet = "UTF-8"; $wp_email = get_bloginfo ('admin_email'); /////下面是一些服务器要求的配置 $mailer->SMTPAuth = true; // 允许 SMTP 认证 // 如果是用网站的管理员邮箱地址 ,可以如下代码 $mailer->Username = $wp_email; // $mailer->Username = '邮箱用户名'; // SMTP 用户名 即邮箱的用户名 // 这里强烈建议使用授权码而不是密码进行认证,授权码可以提供比较高的安全保护 $mailer->Password = '密码或者授权码'; // SMTP 密码 部分邮箱是授权码(例如163邮箱/新浪邮箱) $mailer->SMTPSecure = 'ssl'; // 允许 TLS 或者SSL协议 //Content $mailer->isHTML(true); // 是否以HTML文档格式发>送 发送后客户端可直接显示对应HTML内容 //网站发出的邮件,最好都存档一下 // $mailer->addCC($wp_email); // 添加抄送人 // $mailer->addCC($wp_email); // 添加多个抄送人 // $mailer->ConfirmReadingTo = $wp_email; // 添加发送回执邮件地址,即当收件人打开邮件后,会询问是否发生回执 $mailer->addBCC($wp_email); // 秘密抄送到指定邮箱 } add_action( 'phpmailer_init', 'mailer_config', 10, 1); |
1.所有回复都发送邮件通知
登陆博客后台,点击“外观”选项卡下的“编辑”选项进入主题编辑界面,在functions.php文件中的<?php和?>之间添加以下函数即可:
|
1 2 3 4 5 6 7 8 9 10 11 12 13 14 15 16 17 18 19 20 21 22 23 24 25 26 27 28 29 30 31 32 33 34 35 |
/* comment_mail_notify v1.0 by willin kan. (所有回复都发邮件) */ function comment_mail_notify($comment_id) { $comment = get_comment($comment_id); $parent_id = $comment->comment_parent ? $comment->comment_parent : ''; $spam_confirmed = $comment->comment_approved; if (($parent_id != '') && ($spam_confirmed != 'spam')) { /* 对于没有自己邮件服务器的个人网站来说, 如果需要使用站长自己的邮箱地址发送, 那么邮箱头必须是登陆账号的邮箱地址, 否则邮箱服务器(比如新浪)会拒绝发送邮件, 报错返回邮箱地址跟登陆地址不一致 */ $wp_email = get_bloginfo ('admin_email'); // $wp_email = 'no-reply@' . preg_replace('#^www\.#', '', strtolower($_SERVER['SERVER_NAME'])); //e-mail 发出点, no-reply 可改为可用的 e-mail. $to = trim(get_comment($parent_id)->comment_author_email); $subject = '您在 [' . get_option("blogname") . '] 的留言有了回复'; $message = ' <div style="background-color:#eef2fa; border:1px solid #d8e3e8; color:#111; padding:0 15px; -moz-border-radius:5px; -webkit-border-radius:5px; -khtml-border-radius:5px;"> <p>' . trim(get_comment($parent_id)->comment_author) . ', 您好!</p> <p>您曾在《' . get_the_title($comment->comment_post_ID) . '》的留言:<br />' . trim(get_comment($parent_id)->comment_content) . '</p> <p>' . trim($comment->comment_author) . ' 给您的回复:<br />' . trim($comment->comment_content) . '<br /></p> <p>您可以 <a href="'.get_comment_link($comment).'">点击</a> 查看完整內容</p> <p>欢迎再度光临 <a href="'.home_url().'">'.get_option('blogname').'</a></p> <p>(此邮件由系统自动发送,请勿回复.)</p> </div>'; $from = "From: \"" . get_option('blogname') . "\" <$wp_email>"; $headers = "$from\nContent-Type: text/html; charset=" . get_option('blog_charset') . "\n"; wp_mail( $to, $subject, $message, $headers ); //echo 'mail to ', $to, '<br/> ' , $subject, $message; // for testing } } add_action('comment_post', 'comment_mail_notify'); // -- END ---------------------------------------- |
2.让访客自己选择是否邮件通知
在functions.php文件中的<?php和?>之间添加以下函数,该函数将会在评论框底部生成要不要收回复通知的选项(与主题有关)
|
1 2 3 4 5 6 7 8 9 10 11 12 13 14 15 16 17 18 19 20 21 22 23 24 25 26 27 28 29 30 31 32 33 34 35 36 37 38 39 40 41 42 43 44 45 46 47 48 49 |
/* 开始*/ function comment_mail_notify($comment_id) { $admin_notify = '1'; // admin 要不要收回复通知 ( '1'=要 ; '0'=不要 ) $admin_email = get_bloginfo ('admin_email'); // $admin_email 可改为你指定的 e-mail. $comment = get_comment($comment_id); $comment_author_email = trim($comment->comment_author_email); $parent_id = $comment->comment_parent ? $comment->comment_parent : ''; global $wpdb; if ($wpdb->query("Describe {$wpdb->comments} comment_mail_notify") == '') $wpdb->query("ALTER TABLE {$wpdb->comments} ADD COLUMN comment_mail_notify TINYINT NOT NULL DEFAULT 0;"); if (($comment_author_email != $admin_email && isset($_POST['comment_mail_notify'])) || ($comment_author_email == $admin_email && $admin_notify == '1')) $wpdb->query("UPDATE {$wpdb->comments} SET comment_mail_notify='1' WHERE comment_ID='$comment_id'"); $notify = $parent_id ? get_comment($parent_id)->comment_mail_notify : '0'; $spam_confirmed = $comment->comment_approved; if ($parent_id != '' && $spam_confirmed != 'spam' && $notify == '1') { /* 对于没有自己邮件服务器的个人网站来说, 如果需要使用站长自己的邮箱地址发送, 那么邮箱头必须是登陆账号的邮箱地址, 否则邮箱服务器(比如新浪)会拒绝发送邮件, 报错返回邮箱地址跟登陆地址不一致 */ $wp_email = get_bloginfo ('admin_email'); // $wp_email = 'no-reply@' . preg_replace('#^www\.#', '', strtolower($_SERVER['SERVER_NAME'])); // e-mail 发出点, no-reply 可改为可用的 e-mail. $to = trim(get_comment($parent_id)->comment_author_email); $subject = '您在 [' . get_option("blogname") . '] 的留言有了回复'; $message = ' <div style="background-color:#eef2fa; border:1px solid #d8e3e8; color:#111; padding:0 15px; -moz-border-radius:5px; -webkit-border-radius:5px; -khtml-border-radius:5px;"> <p>' . trim(get_comment($parent_id)->comment_author) . ', 您好!</p> <p>您曾在《' . get_the_title($comment->comment_post_ID) . '》的留言:<br />' . trim(get_comment($parent_id)->comment_content) . '</p> <p>' . trim($comment->comment_author) . ' 给您的回复:<br />' . trim($comment->comment_content) . '<br /></p> <p>您可以 <a href="'.get_comment_link($comment).'">点击</a> 查看完整內容</p> <p>欢迎再度光临 <a href="'.home_url().'">'.get_option('blogname').'</a></p> <p>(此邮件由系统自动发送,请勿回复.)</p> </div>'; $from = "From: \"" . get_option('blogname') . "\" <$wp_email>"; $headers = "$from\nContent-Type: text/html; charset=" . get_option('blog_charset') . "\n"; wp_mail( $to, $subject, $message, $headers ); //echo 'mail to ', $to, '<br/> ' , $subject, $message; // for testing } } add_action('comment_post', 'comment_mail_notify'); /* 自动加勾选栏 */ function add_checkbox() { echo '<input type="checkbox" name="comment_mail_notify" id="comment_mail_notify" value="comment_mail_notify" checked="checked" style="margin-left:20px;" /><label for="comment_mail_notify">有人回复时邮件通知我</label>'; } add_action('comment_form', 'add_checkbox'); |
3.让博客管理员决定什么情况下发邮件
在functions.php文件中的<?php和?>之间添加以下函数:
|
1 2 3 4 5 6 7 8 9 10 11 12 13 14 15 16 17 18 19 20 21 22 23 24 25 26 27 28 29 30 31 32 33 34 35 36 37 38 39 40 41 42 43 |
/* comment_mail_notify v1.0 by willin kan. (无勾选栏) */ function comment_mail_notify($comment_id) { $admin_email = get_bloginfo ('admin_email'); // $admin_email 可改为你指定的 e-mail. $comment = get_comment($comment_id); $comment_author_email = trim($comment->comment_author_email); $parent_id = $comment->comment_parent ? $comment->comment_parent : ''; $to = $parent_id ? trim(get_comment($parent_id)->comment_author_email) : ''; $spam_confirmed = $comment->comment_approved; if (($parent_id != '') && ($spam_confirmed != 'spam') && ($to != $admin_email) && ($comment_author_email == $admin_email)) { /* 上面的判断式,决定发出邮件的必要条件: ($parent_id != '') && ($spam_confirmed != 'spam'): 回复的, 而且不是 spam 才可发, 必需!! ($to != $admin_email) : 不发给 admin. ($comment_author_email == $admin_email) : 只有 admin 的回复才可发. 可视个人需修改上面的条件. */ /* 对于没有自己邮件服务器的个人网站来说, 如果需要使用站长自己的邮箱地址发送, 那么邮箱头必须是登陆账号的邮箱地址, 否则邮箱服务器(比如新浪)会拒绝发送邮件, 报错返回邮箱地址跟登陆地址不一致 */ $wp_email = get_bloginfo ('admin_email'); // $wp_email = 'no-reply@' . preg_replace('#^www\.#', '', strtolower($_SERVER['SERVER_NAME'])); // e-mail 发出点, no-reply 可改为可用的 e-mail. $subject = '您在 [' . get_option("blogname") . '] 的留言有了回复'; $message = ' <div style="background-color:#eef2fa; border:1px solid #d8e3e8; color:#111; padding:0 15px; -moz-border-radius:5px; -webkit-border-radius:5px; -khtml-border-radius:5px;"> <p>' . trim(get_comment($parent_id)->comment_author) . ', 您好!</p> <p>您曾在《' . get_the_title($comment->comment_post_ID) . '》的留言:<br />' . trim(get_comment($parent_id)->comment_content) . '</p> <p>' . trim($comment->comment_author) . ' 给您的回复:<br />' . trim($comment->comment_content) . '<br /></p> <p>您可以 <a href="'.get_comment_link($comment).'">点击</a> 查看完整內容</p> <p>欢迎再度光临 <a href="'.home_url().'">'.get_option('blogname').'</a></p> <p>(此邮件由系统自动发送,请勿回复.)</p> </div>'; $from = "From: \"" . get_option('blogname') . "\" <$wp_email>"; $headers = "$from\nContent-Type: text/html; charset=" . get_option('blog_charset') . "\n"; wp_mail( $to, $subject, $message, $headers ); //echo 'mail to ', $to, '<br/> ' , $subject, $message; // for testing } } add_action('comment_post', 'comment_mail_notify'); // -- END ---------------------------------------- |
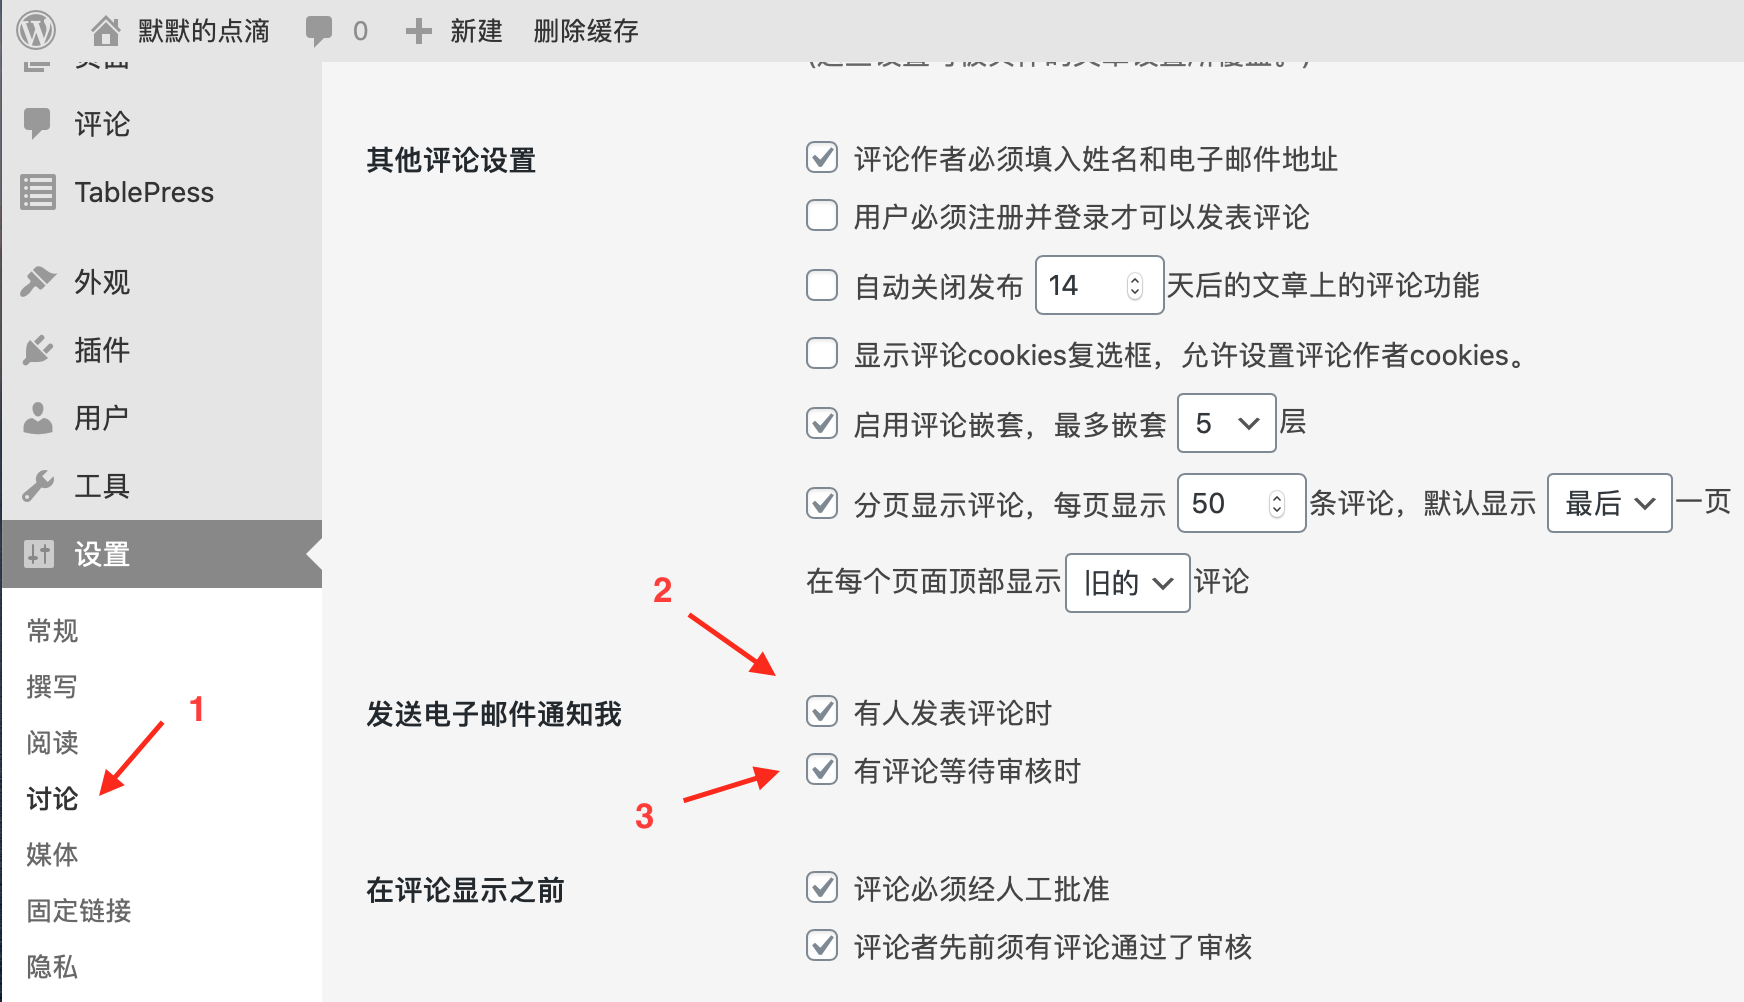
4、WORDPRESS实现评论审核通过 邮件回复功能
先在WP设置中,两个关于邮件的选项勾选:
然后将下面的代码添加到当前主题的 functions.php 即可:
|
1 2 3 4 5 6 7 8 9 10 11 12 13 14 15 16 17 18 19 20 21 22 23 24 25 26 27 28 29 30 31 32 33 34 35 36 37 38 39 40 41 42 43 |
/* comment_mail_notify v1.0 by willin kan. (无勾选栏) */ function comment_mail_notify($comment_id) { $admin_email = get_bloginfo ('admin_email'); // $admin_email 可改为你指定的 e-mail. $comment = get_comment($comment_id); $comment_author_email = trim($comment->comment_author_email); $parent_id = $comment->comment_parent ? $comment->comment_parent : ''; $to = $parent_id ? trim(get_comment($parent_id)->comment_author_email) : ''; $spam_confirmed = $comment->comment_approved; if (($parent_id != '') && ($spam_confirmed != 'spam') && ($to != $admin_email) && ($comment_author_email == $admin_email)) { /* 上面的判断式,决定发出邮件的必要条件: ($parent_id != '') && ($spam_confirmed != 'spam'): 回复的, 而且不是 spam 才可发, 必需!! ($to != $admin_email) : 不发给 admin. ($comment_author_email == $admin_email) : 只有 admin 的回复才可发. 可视个人需修改上面的条件. */ /* 对于没有自己邮件服务器的个人网站来说, 如果需要使用站长自己的邮箱地址发送, 那么邮箱头必须是登陆账号的邮箱地址, 否则邮箱服务器(比如新浪)会拒绝发送邮件, 报错返回邮箱地址跟登陆地址不一致 */ $wp_email = get_bloginfo ('admin_email'); // $wp_email = 'no-reply@' . preg_replace('#^www\.#', '', strtolower($_SERVER['SERVER_NAME'])); // e-mail 发出点, no-reply 可改为可用的 e-mail. $subject = '您在 [' . get_option("blogname") . '] 的留言有了回复'; $message = ' <div style="background-color:#eef2fa; border:1px solid #d8e3e8; color:#111; padding:0 15px; -moz-border-radius:5px; -webkit-border-radius:5px; -khtml-border-radius:5px;"> <p>' . trim(get_comment($parent_id)->comment_author) . ', 您好!</p> <p>您曾在《' . get_the_title($comment->comment_post_ID) . '》的留言:<br />' . trim(get_comment($parent_id)->comment_content) . '</p> <p>' . trim($comment->comment_author) . ' 给您的回复:<br />' . trim($comment->comment_content) . '<br /></p> <p>您可以 <a href="'.get_comment_link($comment).'">点击</a> 查看完整內容</p> <p>欢迎再度光临 <a href="'.home_url().'">'.get_option('blogname').'</a></p> <p>(此邮件由系统自动发送,请勿回复.)</p> </div>'; $from = "From: \"" . get_option('blogname') . "\" <$wp_email>"; $headers = "$from\nContent-Type: text/html; charset=" . get_option('blog_charset') . "\n"; wp_mail( $to, $subject, $message, $headers ); //echo 'mail to ', $to, '<br/> ' , $subject, $message; // for testing } } add_action('comment_post', 'comment_mail_notify'); // -- END ---------------------------------------- |
好了,经过一番折腾,邮件测试一切OK。
兄弟,方便加个微信? zerotwos , 最近在做项目 CC1310 Launchpad 和 NodeMcu相关的通信,看了你的 https://www.mobibrw.com/2018/13746 这篇文章非常有收获,希望可以有项目的合作
您直接在这里提问即可,CC1310我已经不捣鼓了。能回答的尽量回答你。
我目前用的是CC1310 LaunchPad 想让NodeMcu 读取 接收的数据 目前引脚 使用的是 3.3v 对NodeMcu 的3.3v GND 对NodeMcu的GND DIO2 对应 NodeMcu 的 D0 想读出 CC1310 接收的数据 遇到了点麻烦
pin = 0;
rf = digitalRead(pin);
具体现象描述一下,很多时候,我们需要用逻辑分析仪结合示波器来分析数据的,有时候不是代码的问题,有可能出现在通信布线上的干扰。