0x00 概要
在Transformer中,把每个 Token(对应离散的输入数据,如单词或符号)映射到高维稠密向量空间的工作是由嵌入层(Embedding Layer)来实现的。输入嵌入层是Transformer框架中不可或缺的一部分,它的作用如下:
- 将输入数据转换为模型可以处理的形式。例如对于”新年大吉“这四个字,假设高维空间是512维,则嵌入层会生成一个 4 x 512 维的嵌入矩阵(Embedding Matrix)。每个token对应矩阵中的一个行,即一个向量。
- 为模型提供了必要的语义。有研究发现,在Transformer类模型中,概念的形成过程始于输入嵌入层。这与人类早期认知发展相似。
- 通过位置编码为模型提供序列中每个单词的位置信息,使得模型能够处理序列数据并保留位置信息。
这些工作为后续模块(如自注意力机制和前馈网络)的处理和任务执行奠定了基础。

0x01 演进思路
1.1 概念
首先,我们要看看嵌入(Embedding)和向量化(Vectorization)这两个和嵌入层密切相关的概念。有的文章中并没有区分它们。而有的文章做了精细区分,认为虽然它们都与将数据表示为向量有关,但在概念、应用和实现上有显著的区别。
简单来说,向量化就是把其它格式的数据转换为向量形式,这里的其它格式包括我们常见的一切格式的数据,文本,图像,视频,音频等等。因此,可以直接把向量化理解为一种数据格式转换的技术。
在大模型技术体系中,向量化主要存在以下两种情况:
虽然两种方式都是向量化,但还是有本质区别的。数据向量化是一种数值转化的过程,是机械式的;而Embedding则是更高层次的智能化的向量化。比如,对于“我爱中国”这四个字,数据向量化的逻辑中,它们可能只是4个函数,生成4个独立的向量。而在Embedding中,它蕴含着更多的信息,包括主谓宾的语义结构、主语宾语的位置、情感、动作等等,这些信息被统一称为语言特征。数据向量化和Embedding两者关系如下表所示。
| 维度 |
嵌入(Embedding) |
向量化(Vectorization) |
| 目的 |
学习低维稠密语义表示。经过嵌入之后的数据是具有语义关系的,而不是毫无关系的离散向量 |
将数据转换为数值向量,可能稀疏,也可能稠密。更注重数据表示的直接性,指的是数值表示形式本身 |
| 是否需要学习 |
需要(通常通过神经网络或优化算法学习) |
不需要(可以基于规则或统计方法生成) |
| 语义表示能力 |
强调以有意义和结构化的方式表示数据的概念,需要维护数据之间的深层语义关系和相似性 |
可能不保留语义,仅是特征的机械化表示 |
| 典型方法 |
word2vec、GloVe、BERT、node2vec |
词袋模型(BoW)、TF-IDF、独热编码(One-hot Encoding) |
| 结果向量维度 |
通常低维且稠密。此”低“是和向量化相比,实际上是高维且稠密 |
通常是高维且稀疏 |
以文本翻译为例,Transformer的输入层首先要把输入文本的每个词(或者字)转换到高维稠密的向量空间,得到文本语义含义的信息密集表示,这就是Token Embedding,也就是深度学习中常说的词嵌入(Word Embedding)。Transformer实际上是把人类的语义通过向量化“编码”成自己的语言(Embedding)。Word Embedding可以为后续的计算提供更加丰富和表达能力的输入特征。同时,这些Embedding也是可以训练的。在训练过程中,模型会依据从数据中学习到的知识来调整这些Embedding的数字以提高其任务执行能力。
一旦得到Embedding,Transformer就将其传递给自注意力层,自注意力会分析输入序列中token之间的关系,从Embedding中提取各种丰富的知识和结构,然后进行关联、并加权积累生成新的embedding。最后会把新的embedding“编码”回人类的语言。本质上看,Transformer其实是构建了一个高维的语言体系,可以将自然语言,程序语言,视觉听觉语言,映射(或者叫编码)到这个高维的语言空间中。
我们看看如何从文本晋级到Embedding的演化思路,即如何把一个词编码成Embedding的过程。
1.2 需求
为何要把输入数据(通常是文本数据中的单词或字符)从离散的符号形式转换为连续的数值向量形式?这是因为计算机无法直接处理非数值性计算,所有的计算都需要将计算对象转换成数值才行。但是数值计算的方式有很多,为什么会选择向量作为载体,而非其它形式?这就需要我们深入分析,看看计算对象转换的发展历程。
1.3 文本
词是人类语言的抽象总结,是NLP领域的主要处理对象。但是如何在计算机中表示一个单词?ASCII是一种有效的方式,其满足唯一性和可区分性。但是ASCII只能告诉我们这个词是什么,却无法传递词汇的深层含义。在文本时代,搜索是基于关键词的搜索,即最原始的字符匹配。
但是我们所期望的是语义搜索,即找出包含最相似含义的文本。语义搜索能够让计算机更好的理解人类的语言和需求;它能够根据你的语义理解你想做什么;而不是你必须给出明确的指令,它才能明白你想做什么。
虽然语义搜索对普通人来说似乎很容易,但对计算机却是困难的,因为语言是相当复杂的,想做到语义搜索就要理解语义。语义理解是自然语言的基础,也是实现人工智能必不可少的一环。另外,我们不仅仅希望只做到语义搜索,还希望做到相似性搜索,即应用到图像搜索,混合搜索,智能推荐等多种应用场景。
所以我们继续探寻。
1.4 数字
计算的基础是数,所以计算机把数字视为语言,却无法直接理解文字。因此很容易想到的做法是让文字转换为数字,这样便于计算机进行处理和理解。
解决方案很容易,我们用整个文本库中出现的词汇构建词典,词典是无重复且有序的,每个词在词典都有一个下标索引。于是我们以词汇在词典中的索引来表示词汇。这其实是一种索引表示。即为每个单词分配一个基于模型已知的所有单词列表的唯一数字。为行文方便,我们将这个转换过程叫做索引化。
整数的好处是连续、有序并且非常容易索引。比如词典中有4个单词:新年快乐,我们给这四个字分配如下索引:1,2,3,4。再比如,我们以前面生成的词典对象为例,vocab对象有8185个单词,每个单词可以使用一个index来进行唯一标识,这样计算机才可以识别。
|
|
vocab = {Vocab: 8185} <torchtext._torchtext.Vocab object at 0x0000021A26983DF0> 0000 = {str} '<s>' 0001 = {str} '</s>' 0002 = {str} '<blank>' 0003 = {str} '<unk>' 0004 = {str} '.' 0005 = {str} 'Ein' 0006 = {str} 'einem' ...... |
这个方案有一个问题:数字携带的信息量太少,无法描述语义,导致数字化后的数值与词义之间缺乏联系。比如在英文字典中,abeyance(缓办,中止),abide(遵守),ability(能力)这三个单词会被赋予临近的数值,但是其语义相差甚远。而a和an这两个同质的词却隔得非常远。这样不利于计算机理解共性、区分特性。因而模型需要更多的参数才能描述同等的信息量,学习的过程显然困难也会更大。
因为单一的数字缺少表达能力,当用一个标量来表示一个词时,词和词之间的关系只能基于两个标量间的差值得到,这显然无法满足需求。因此需要多个数字一起来表达概念,即把多个数字分散嵌入到一个数学空间中。当需要一个多维的数字形态时,我们很自然会想到使用向量 ——— 对于每一个词,我们可以表达为一组数,而非一个数;我们可以利用这些数字来做些事情,比如计算距离和角度。这样一来,就可以在不同的维度上定义远近,词与词之间复杂的关系便能在这一高维的空间中得到表达。
因此我们来到了第三种方案:向量。
1.5 向量
在数学中,向量(也称为欧几里得向量、几何向量)指具有大小(magnitude)和方向的量。它可以形象化地表示为带箭头的线段。箭头所指代表向量的方向。线段长度代表向量的大小。从通俗意义来讲,向量是标量值(即数字)的有序列表。例如,二维坐标(4,3)是一个二维向量,可以表示一个二维位置。接下来我们讲讲把文本变成向量的方法,即向量化。
向量化是一种将数据转换为向量形式的过程,通常用于将非数值数据转化为数值形式,便于机器学习模型处理。 向量化主要是将原始数据表示为可以直接输入模型的数值向量。向量化可以是简单的规则转换,而不需要通过训练得到。 向量化的结果不一定是稠密向量,也可能是稀疏向量。
为什么要向量化(Vectorization)? 原因就在于向量的几个优秀特性:
- 便于计算机进行处理。
- 能够表示文本,图像等之间的语义关系。
- 可以使用矩阵来表示多个向量,这样计算效率更高。
因此,在神经网络中唯一能够处理的数据格式就只有一种——向量,向量就是是大模型的底层数据结构。任何需要输入到模型的数据都需要向量化,不仅仅是实体需要向量化,记录语义关系的数据也都需要向量化。
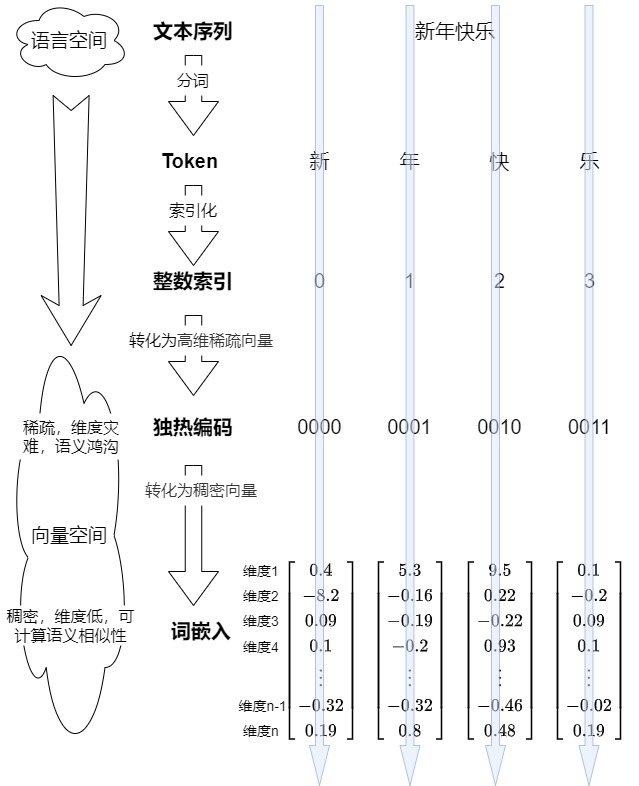
独热编码
独热编码(One-Hot Encoding)大概是最常见的向量,这是一种常见且众所周知的表示分类数据的方法。其本质上是用一个“只含一个 1、其他都是 0”的二进制向量来唯一表示某个单词。独热编码的编码过程具体如下:
- 把语料中所有词的集合构建成一个词典,假设这个词典的大小为$|V|$,每个词在词典都有一个下标索引。
- 为每个词构造一个唯一的长度为$|V|$的向量,该向量中,只有该单词对应的索引位置是1,其余位置是0,向量的维度就等于词表的大小。具体向量如下图所示。
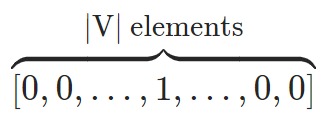
比如:假如词表中有“新、年、快、乐”这四个字,独热编码就是给这四个字分别用0-1来编码:每个单词都由一个向量表示,该向量在与该单词对应的位置上为“1”,其他地方为“0”。
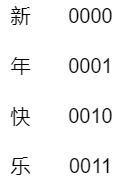
独热编码有以下显著的缺点:
- 单维向量,无法承载更多信息。独热编码的每个向量只有一个有信息量的维度。而且该维度上只是1,能表达的信息太少,导致效率低下。
- 高维稀疏。我们总希望模型可以处理更多的词,这意味着词典长度$|V|$越大越好,结果就是词表存储过大。而且,词典中有多少字,向量就有多少维,这样向量维度容易过大,变得非常稀疏,会导致词特征的维度过高,从而内存消耗高。
- 缺少语义信息。在独热编码中,每个单词与其他单词的距离相等,这样基本上将所有单词视为相互独立的实体,没有相似性或上下文的概念。或者说,在独热编码中,单词之间都是正交的,没有任何联系,故无法捕捉单词之间的任何语义关系。
- 硬编码,无法调整或者训练。
改进诉求
目前为止,我们已经找到了可以用于表达词义的数字化形式 —— 向量。也发现独热编码这个常见向量的众多问题。我们希望在独热编码基础上进行改进。于是针对one-hot的缺点,我们需要:
- 增维,从单维变成多维,进而承载更多信息。此处的增维指的是用更多的维度来表示语义信息。
- 降维,从稀疏性变成稠密性。此处降维指的是降低向量的总体维度。独热编码这种稀疏性不是我们想要的,它会带来计算和存储的双重负担。我们更希望要稠密的向量。因此需要采用某些方法来降维,把每一个单词的向量维度从词典大小降维到较小的维度。
- 语义相似性。增加关系表达能力,最好可以表示文本,图像等之间的语义关系(语义相似性)。因为随着互联网技术的发展,非结构化数据变得越来越多,比如图像,音视频,图文混合等等多种类型的数据格式。我们需要一种可以处理非结构化数据的方法。
- 不要硬编码,可以学习。独热编码是硬编码,我们希望可以通过训练进行调整。
我们来分析下这几个改进的必要性。
增维
独热编码是单维向量,我们需要拓展为用多维向量来表示语义信息。为什么要把一个词用多维向量表示?因为人类的概念就是复杂多样,无法用单一维度表达的。假定一个桌子,我们需要多方面特征才能完整的表示出来其特点,比如:长、宽、高、重量、材质、款式等,每一个方面都是一个维度。单词也具备多维度的信息。比如instant这个单词就有多种词性,而每种词性可能又有多种含义。
- 作为名词,其意义是瞬息,顷刻,刹那。
- 作为形容词,其意义是立即的,即刻的;速溶的;速食的;紧急的,急迫的;现时的,目下的,此刻的;坚持的,不屈不挠的;瞬间产生(或发生)的;事先未准备(或考虑)的,即兴的,当场完成任务的;
- 作为副词,其意义是立即,立刻。
多维的意义在于:概念信息分布在整个向量上,而不是局限于任何单个维度的局部。
降维
此处有两层含义或者说思考的维度。
- 从稀疏性变成稠密性,即把每一个单词的向量维度从词典大小降维到较小的维度。因为embedding的长度实质上代表特征的维度数目,而如果是ont-hot编码,则特征维度的数目需要和字典中的token数量相同。
- 前面提及了多维向量,但是究竟多少维度适合?如果维度过高,虽然可以表达丰富的语义,但是可能依然会出现类似独热编码的问题。
第一点可以理解,这样可以减少计算和存储的双重负担。比如,降维可以减少模型的参数数量,从而减轻过拟合的风险,并提高模型的训练效率。
第二点是如何确定新的多维向量的维度。我们仔细分析下。依据Johnson–Lindenstrauss 引理,任何高维数据集均可以被随机投影到一个较低维度的欧氏空间,同时可以控制pairwise距离的失真。比如一个一百万维空间里的随便一万个点,一定可以大致被装进一个几十维的子空间里。具体来说,即假设有N个向量,不管这N个向量原来是多少维的,我们都可以将它们降到O(logN),并将相对距离的误差控制在一定范围内。即,只需要O(logN)维空间就可以塞下N个向量,使得原本高维空间中的检索问题可以降低到O(logN)维空间中。这其实对应了另外一种说法:语言模型就是一个压缩器。而降维是一种压缩方法:提取共性,保留个性,过滤噪声。
语义相似性
我们希望向量可以表达单词之间的语义相似性(semantic similarity),这样我们可以把我们见过的事物和从未见过的事物联系起来。语义相似性是基于分布假说的, 这是一个基本的语言学假设,即出现在相似语境中的单词在语义上是相互关联的。比如从下面句子中我们可以知道,数学家和物理学家之间语义关联很大。
- 数学家跑向商店。
- 物理学家跑向商店。
- 数学家喜欢喝咖啡。
- 物理学家喜欢喝咖啡。
- 数学家解决了这个悬而未决的问题。
- 物理学家解决了这个悬而未决的问题。
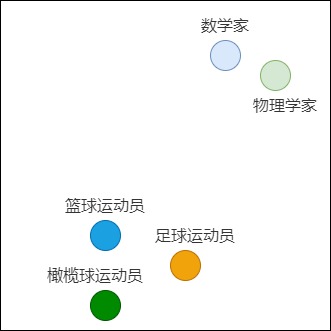
因为one-hot编码不具备语义,所以无法表达数学家和物理学家之间的密切相关性。而稠密向量恰好可以弥补这个缺点。为了进一步说明词与词之间的关系,我们还可以将单词对应的向量在平面上绘制出来。例如,在下图中,物理学家与数学家的含义相近,它们就聚在一起。篮球运动员、足球运动员和橄榄球运动员的语义差异比数学家大,所以他们距离物理学家就相对较远。
另外,我们也希望用数学方法来比较向量的语义相似性和差异性,因为向量把自然语言转化为一串数字,从此自然语言可以计算,所以我们希望可以通过向量来表达:郭靖 - 黄蓉 = man - women。

可训练
我们期望向量是可以被训练的。随着训练的进行,模型可以通过反向传播来调整嵌入向量,使得相似词的向量更加接近,不相似词的向量则更远离。
小结
我们现在知道具备语义性的稠密多维向量的重要性,或者说,语义分析是人工智能实现的基础,而语义分析实现的基础却是稠密多维向量。RGB(三原色)就是非常好的具备语义性的稠密向量示例,其特点如下:
- 任何颜色都可以用一个 RGB 向量来表示。
- 这三个维度都有明确的物理含义(语义),而且解释性很强。
- 每一维度都是事先规定好的。
- 物理含义(语义)相近的向量在颜色空间内位置相近。可以通过计算高维向量之间的距离来表示两个单词含义的相近程度。
1.5 Embedding
其实,具备语义性的稠密多维向量就是Embedding。我们先看看权威机构对Embedding的定义。
-
Pytorch网站上给出的定义是:Word embeddings are dense vectors of real numbers, one per word in your vocabulary。
-
Tensorflow 社区给出的定义是:An embedding is a mapping from discrete objects, such as words, to vectors of real numbers.
-
OpenAI 官方文档中是这样解释的:
Embeddings are numerical representations of concepts converted to number sequences, which make it easy for computers to understand the relationships between those concepts.
我们再给出自己的定义:词嵌入是从高维稀疏向量转化而来的稠密向量,向量的每个维度可以代表相应对象的某个特征,这样就可以把将一个对象从复杂的空间投射到相对简单的空间,也可以在向量中编码语义相似性,这使得计算机能够轻松理解这些概念之间的关系。
我们接下来看看词嵌入的两个关键点:表征概念,表达关系(以相似性进行举例)。
表征概念
我们知道,目前LLM所作的是根据之前的单词来预测下一个单词。因此我们要看看人类如何预判,或者说对于人类的预判来说,什么是最关键的。事实上,人类先进的预见能力必须依赖于同样先进的表征能力。从广义上讲, 这些表征能力被称为抽象能力或抽象思维。 即,人类将具象物理的世界抽象到主观认识中,形成了概念。
NLP处理的是语言。语言作为一个抽象符号,人是可以理解每个语言单词(概念)的意义的,但是计算机并没有办法直接的从感知抽象出每个语言符号的意义。这是因为成功的语言交流依赖于对世界的共同体验。正是这种共同的经历使话语变得有意义。比如 man 是一个很抽象的词语概念,其含义包含了视觉、听觉、交互、关系及更抽象的责任等等。人类的概念之所以如此复杂且有效,是因为其具有如下特点:
- 它们可以被投影(可能是非线性的)到多种用途中。
- 在概念空间里,通过相关性,不同事物被广泛的联系在一起。
- 概念不仅相互关联,而且支持特定形式的逻辑推断和复杂的计算。
如果我们希望某一个途径或者方法可以精确的表征人类概念,则此方法不但要能够表达出各种属性,而且还应该能够处理心理学中的关键现象,包括相似性的计算、建立关系、类比推理,以及把某些概念重新组合成新的结构化思维等。也可以这样认为:语言破坏了空间关系,却形成了一个概念空间。在此概念空概念内,几何和微积分不再适用。它需要新的数学或者新的语言。这个统一结构和语言, 连接几何空间和概念空间的就是Embedding。以Sora为例,具象的物理空间和语言都被表达为Embedding 进行联合训练,物理和语言空间被统一表示为Embedding 和Embedding 的连接构建关系。
上面这段话也许过于学术性,我们用通俗的语言来看看一个良好的Embedding方法应该具备何种特性,才可以精确的表征人类概念。
-
唯一性。词和Embedding必须一一对应,不能重复。因为如果重复则会增加计算机理解语言的难度,类似多音字或者多义字给人们带来的麻烦。
-
可区分性。从数学表示来看,词义相近词需要有"相近"的量化值(在空间中相邻);词义不相近的词量化值需要尽量“远离”。
-
可计算性。不论两个“词”如何构成,它们都应该能在同一个空间内做计算,且计算结果也在同一个空间内。比如,词的表示能通过简单的数学计算“连接”起来,表示一个新“词”。
-
蕴含深层语义信息。ELMo的作者认为在理想情况下,一个好的Embedding应该对以下两个方面进行建模:
- 单词使用的复杂特征(如句法和语义)。
- 这些用法在语言语境中的变化(即对多义词进行建模)。
即在正确的架构中,该方法可以像单词一样发挥作用。
而认知心理学及相关领域最近的理论和计算进展表明,向量可能满足表达人类概念所需的所有特性。这部分原因是因为向量是作用在向量空间之上。向量空间是向量的集合,是一个线性代数概念,它描述了向量的集合在一定维度和基下的分布和操作。向量空间具有标准的数学运算,例如,机器学习中的高维数据可以看作是向量空间中的点,不同的距离度量(如欧几里得距离、余弦相似度)可以用于计算点之间的关系。也可以通过相加两个向量或用一个数缩放一个向量来创建新的向量。因为向量空间的存在,任何特定向量的意义都不能孤立地确定,而是来自于这些向量在更大计算过程中所起的作用。在最基本的层面上,这种作用包括向量之间的几何关系,包括距离和角度,但也包括向量上的动态计算。
样例
比如,我们可以把数学家和物理学家都投射成向量,每个属性(比如是否可以跑,是否喜欢咖啡等等)都是向量的一个维度。我们看到数学家和物理学家都可以跑步,都喜欢喝咖啡,所以我们可以给这些维度一个较高的分数,这样就将词语或短语从词汇表映射到向量的实数空间中。使得数据对象的某些属性被编码到其向量表示的几何属性中,从而可以表达相似性。
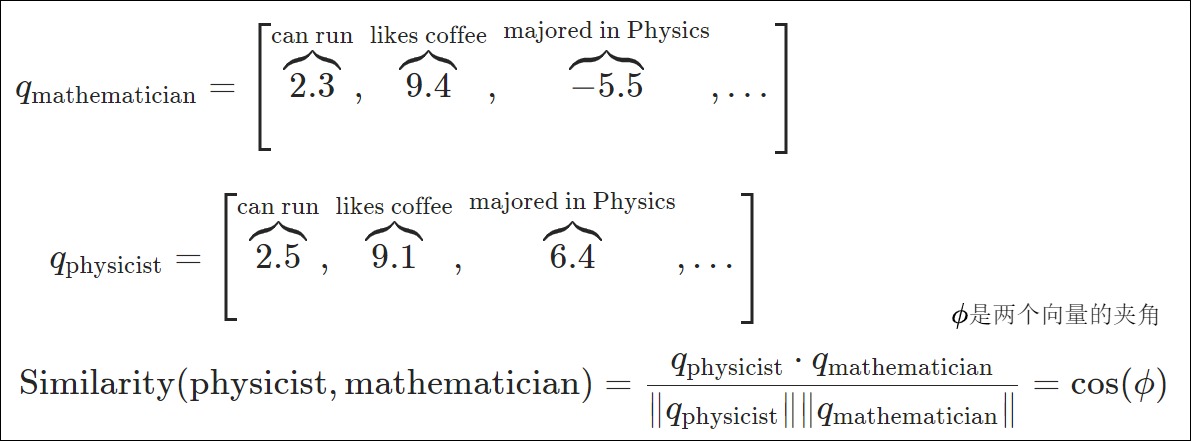
请注意,word embedding可能无法解释。也就是说,尽管通过我们上面手工制作的向量,我们可以看到数学家和物理学家都喜欢咖啡,但这些向量中的数字意味着什么尚不清楚。我们只是知道它们在某些潜在的语义维度上是相似的。
相似性
我们接下来看看相似性。
从心理学角度看,向量就是把概念映射到某个空间(通常是二维或三维)中的点,使向量空间的几何结构与心理量的实证测量(如项目之间的相似性、距离等)保持一致。虽然得到的向量坐标不能单独解释,但向量之间的关系承载着关于心理测量的意义。两个相似的概念在向量空间中会彼此靠近,而这个空间中的距离会与人们在这两个概念之间进行泛化的意愿相一致。我们接下来仔细分析。
首先,我们从数值的角度来看。词嵌入就是将单词与一系列数字(向量)关联的一种方式,类似的单词会被关联到接近的数字,而不相似的单词则被关联到相距较远的数字。相似性是通过为相似的词分配大的数字,为不同的词分配小的数字,来度量两个词(或句子)的相似程度的一种方式。我们相信,在一个好的词嵌入中,“bank”和“the”这样的词之间的相似性几乎为零,因为它们无关。因此,模型将知道忽略“the,转而专注于那些可能与"bank"有较高相似度的词。
其次,概念在高维向量空间中得到了充分表征,其背后逻辑是概念可以通过向量之间的相互关系和计算动态得出的。这其实对应了另外一个逻辑。即通过丘奇编码目标系统来动态模拟任何其他计算系统。丘奇编码是数学逻辑中的一个思想,其中一个系统的动态可以反映出另一个系统的动态。
相似度计算
词嵌入本质上是向量,因此,如果想了解两个单词或句子在语义上的接近程度,我们可以根据不同向量之间的关系,如距离,长度,方向等去计算不同格式数据之间的相关性。比如我们可以用向量之间的距离来度量。距离越小,其语义意义上越接近,借以实现语义搜索。有几种不同的度量方法可以用来衡量两个向量之间的距离:
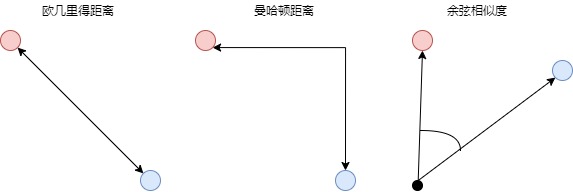
欧几里得距离(L2)
欧几里得距离是定义两点(或向量)之间距离的最标准方法,也是日常生活中最常用的度量方法,即连接两个点的线段的长度。欧几里得距离缺点是:尽管这是一种常用的距离度量,但欧式距离并不是尺度不变的,这意味着所计算的距离可能会根据特征的单位发生倾斜。因此,通常在使用欧式距离度量之前,需要对数据进行归一化处理。此外,随着数据维数的增加,欧氏距离的作用也会变小。这与维数灾难(curse of dimensionality)有关。
曼哈顿距离(L1)
$distance = \sum _{i=1}^n|x_i - y_i|distance = \sum _{i=1}^n|x_i - y_i|$
曼哈顿距离(也称为L1范数)通常称为出租车距离或城市街区距离,用来计算实值向量之间的距离。这个名称来源于纽约的曼哈顿,因为这个岛有一个街道网格布局,而在曼哈顿两点之间的最短路线将是L1距离。
曼哈顿距离在计算距离时不涉及对角线移动。想象一下均匀网格棋盘上的物体,它们只能移动直角,因为你需要遵循街道网格。当数据集具有离散或二进制属性时,曼哈顿距离似乎工作得很好,因为它考虑了在这些属性的值中实际可以采用的路径。对比以下,欧式距离会在两个向量之间形成一条直线,但实际上这是不可能的。
缺点:尽管曼哈顿距离在高维数据中似乎可以工作,但它比欧式距离直观性差,尤其是在高维数据中使用时。此外,由于它可能不是最短路径,有可能会比欧氏距离给出一个更高的距离值。
余弦相似度
$Similarity = \frac{\vec x \cdot \vec y} {||\vec x||\times ||\vec y||}$
余弦相似度通过测量两个向量的夹角的余弦值来度量它们之间的相似性,这就像是测量两个向量之间的夹角,夹角越小,相似度越高。余弦相似度衡量的是两个向量之间的角度差异,而非它们的长度,因为这是在方向上的度量。余弦相似度的值范围是从-1到1。值越接近1,表示两个向量的方向越相似;值为0,则表示它们是正交的;而值为-1,则表示它们方向完全相反。
余弦相似度经常被用作抵消高维欧式距离问题。通过计算向量之间的余弦相似度,我们可以更精确地评估它们在语义上的相似度,而不仅仅是比较它们的数值大小或直线距离。
缺点:没有考虑向量的大小,而只考虑它们的方向。以推荐系统为例,余弦相似度就没有考虑到不同用户之间评分尺度的差异。
点积
点积或标量积的公式如下,即我们将一对数字相乘,然后相加。
$\vec x \cdot \vec y = \sum _{i=1}^n x_i \times y_i$
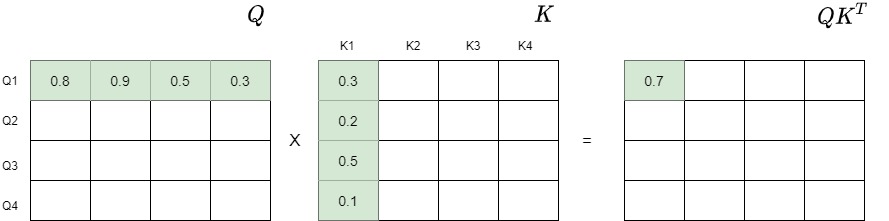
点积运算的几何意义是两个向量的夹角,表征一个向量在另一个向量上的投影,两个向量越相似,他们的点积就越大,反而就越小。如果两个向量的夹角为90度,则这两个向量线性无关,完全没有相关性。基于这个内积,我们可以建立距离、长度、角度等概念。事实上,Transformer就是用点积来表征两个向量之间的相似度。
另外,点积的结果很大程度上依赖于向量的大小;例如,让我们计算两对向量之间的点积:
- 对于向量A=(1,1)和B=(1,1),它们的点积计算结果是1∗1+1∗1=2。
- 当我们考虑另一对向量C=(1,1)和D=(10,10)时,点积为1∗10+1∗10=20。
尽管这两对向量在方向上保持一致,但由于它们的大小存在差异,导致它们的点积有很大的不同。这就解释了为什么在进行向量比较时,点积并非总是最合适的选择。
进展
在机器学习和数据科学领域,余弦相似度长期以来一直是衡量高维对象之间语义相似度的首选指标。余弦相似度已广泛应用于从推荐系统到自然语言处理的各种应用中。它的流行源于人们相信它捕获了嵌入向量之间的方向对齐,提供了比简单点积更有意义的相似性度量。
然而,论文“Is Cosine-Similarity of Embeddings Really About Similarity?” Netflix 和康奈尔大学的一项研究挑战了我们对这种流行方法的理解:余弦相似度给出的答案经常与实际情况不符。北大的相关分析PPT。
对于从正则化线性模型派生的Ebmedding,论文结论是:对于某些线性模型来说,相似度甚至不是唯一的,而对于其他模型来说,它们是由正则化隐式控制的。除了线性模型,类似的问题在更复杂的场景中也存在:深度学习模型通常会同时使用多种不同的正则化技术,这可能会对最终嵌入的余弦相似度产生意想不到的影响。在通过点积优化来学习嵌入时,如果直接使用余弦相似度,可能会得到难以解释且没有实际意义的结果。
基于这些见解,研究团队得出结论:不要盲目使用余弦相似度,并概述了替代方案。
- 直接针对余弦相似度训练模型。
- 完全避免在嵌入空间中工作。相反,在应用余弦相似度之前,先将嵌入投影回原始空间。
- 在学习过程中或之前应用归一化或减少流行度偏差,而不是像余弦相似度那样仅在学习后进行归一化。
在论文的基础上,博客作者 Amarpreet Kaur 归纳了一些可以替换余弦相似度的备选项:
-
欧几里得距离:虽然由于对向量大小敏感而在文本数据中不太流行,但在嵌入经过适当归一化时可以发挥作用。
-
点积:在某些应用中,嵌入向量之间的非归一化点积被发现优于余弦相似度,特别是在密集段落检索和问答任务中。
-
软余弦相似度:这种方法除了考虑向量表示外,还考虑了单个词之间的相似度,可能提供更细致的比较。
-
语义文本相似度(STS)预测:专门为语义相似度任务训练的微调模型 (如 STSScore) 有望提供更稳健和和更可解释的相似度度量。
-
归一化嵌入与余弦相似度:在使用余弦相似度之前,应用层归一化等归一化技术能有效提升相似度计算的准确性。
在选择替代方案时,必须考虑任务的具体要求、数据的性质以及所使用的模型架构。通常需要在特定领域的数据集上进行实证评估,以确定最适合特定应用的相似度。
1.6 小结
对比
我们首先看看Embedding和独热编码的对比,具体可以从如下几个角度来思考:
- 可以把独热向量看作是 Word Embedding 的特例,其中每个单词基本上都有相似性0。而 Word Embedding 向量是密集的,也就是说它们的维度上的数值(通常)是非零的。
- 直观上看,Embedding 相当于是对 独热向量 做了平滑,而独热向量相当于是对 Embedding 做了 max pooling。
- 引用苏神的话:"Embedding层就是以one hot为输入、中间层节点为字向量维数的全连接层!而这个全连接层的参数,就是一个“字向量表”!字向量就是one hot的全连接层的参数!"。
- 独热向量编码会产生一个高维稀疏向量,而嵌入向量是低维的稠密向量,更加节省存储空间,另外独热向量编码无法捕捉类别之间的关系,而嵌入向量通过训练可以学习到类别之间的语义相似性。
一种经典建模方法,就是从字符的整数索引为基础,查表得到一个向量,这样就很容易使用神经网络把一串字符向量处理成任意级别的向量。而one hot型的矩阵和其它矩阵相乘,就像是相当使用独热编码来查表,即把one hot型的矩阵运算简化为了查表操作。当查表操作得到了这个全连接层的参数之后,我们可以直接用这个全连接层的参数作为特征传给Transformer后续的模块,或者说,用这个全连接层的参数作为字、词的表示,从而得到了字、词的向量。
$\begin{pmatrix}1 & 0 & 0 & 0 \\0 & 1 & 0 & 0 \end{pmatrix}\begin{pmatrix}w11 & w12 & w13 & w14 \\w21 & w22 & w23 & w24 \\w31 & w32 & w33 & w34 \\w41 & w42 & w43 & w44 \\ \end{pmatrix} = \begin{pmatrix} w11 & w12 &w13 & w14 \\ w21 & w23&w23 & w24 \end{pmatrix}$
实际上,词表就是这两个矩阵之间的映射。
流转过程
其次,下图展示了从文本到Embedding的流转过程,从中能够看到两个空间之间的转换。
优势
再次,我们看看Embedding的优点。
-
语义理解:基于 Embedding 的检索方法通过词向量来表示文本,能够根据上下文为词语赋予不同的向量表示。这使得模型能够捕捉到词汇之间的语义联关系,在处理一词多义的情况时更具优势。相比之下,基于关键词的检索往往关注字面匹配,可能忽略了词语之间的语义联系,可能无法很好地区分同一个词在不同语境下的含义。
-
容错性:由于基于 Embedding 的方法能够理解词汇之间的关系,所以在处理拼写错误、同义词、近义词等情况时更具优势。而基于关键词的检索方法对这些情况的处理相对较弱。
-
多语言支持:许多 Embedding 方法可以支持多种语言,有助于实现跨语言的文本检索。比如你可以用中文输入来查询英文文本内容,而基于关键词的检索方法很难做到这一点。
-
可扩展性和灵活性:输入嵌入层的设计允许模型轻松地适应不同的语言或领域,只需通过调整词汇表和嵌入矩阵即可。这种灵活性使得Transformer模型可以广泛应用于多种自然语言处理任务。
-
高效:Embedding嵌入模型经过矩阵算法的优化,比传统的向量化方式效率更高,效果更好。
因此,业界有一种说法“万物皆可嵌入”。Pinecone的创建者Edo Liberty在博客中这样写道: “机器学习将一切都表示为向量,包括文档、视频、用户行为等等。这些表示使得不同事物可根据相似性或相关性,就能够准确检索、搜索、排名和分类。在很多场景中,如产品推荐、语义搜索、图像搜索、异常检测、欺诈检测、人脸识别等都有应用”。
嵌入层的作用就是,将文本中词汇的数字表示转变为高维的向量表示,旨在高维空间捕捉词汇间的关系。下面我们来详细解析输入嵌入层的关键作用和构建过程。
2.1 流程&架构
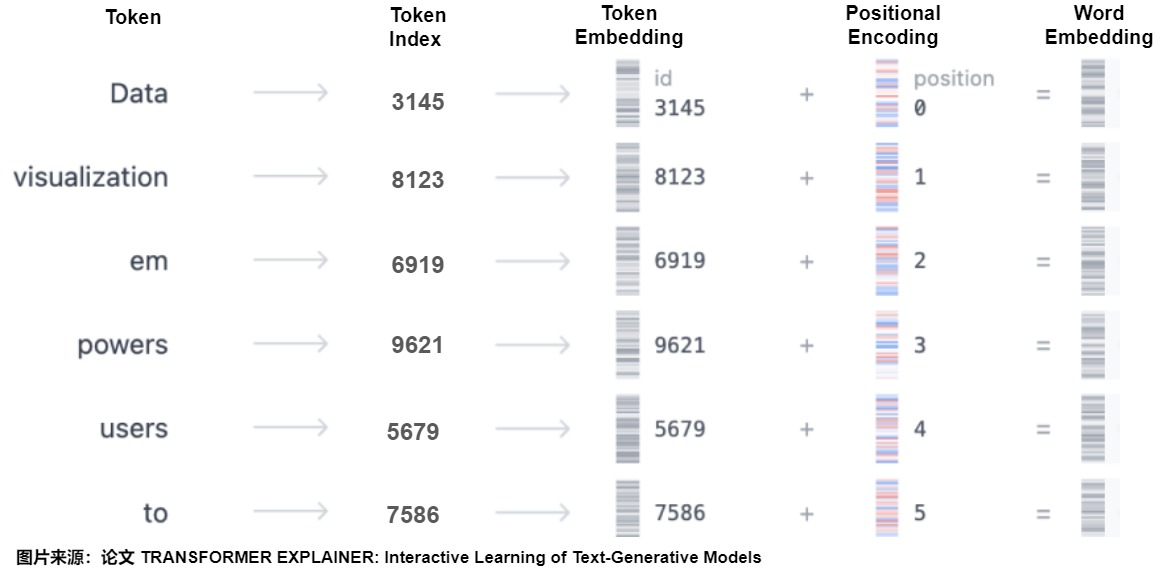
下图在前面文章中已经有涉及,此处重新展示是为了让读者更好理解。
假设模型的输入是句子“Data visualization empowers users to”,因为这个句子并不能被模型理解,因此我们需要把自然语言进行编码,也就是对文字进行向量化。具体分为以下几个步骤:
- 对输入文字进行Tokenize(词元化)。
- 把每个token对应到一个input embedding。此处作用是把词本身的信息投射到embedding空间,所以这操作是一个整数(0~V-1)到向量空间的映射。V代表词表大小。
- 给序列中的每个位置添加一个位置编码。位置编码的作用是告诉模型正确的语序,所以此操作也是一个整数(0~n-1)到向量空间的映射。n代表句子序列长度。
- 把input embedding和位置编码相加,得到最终的word embedding。因为Embedding和Position Encoding之间需要相加,所以两者维度相同。
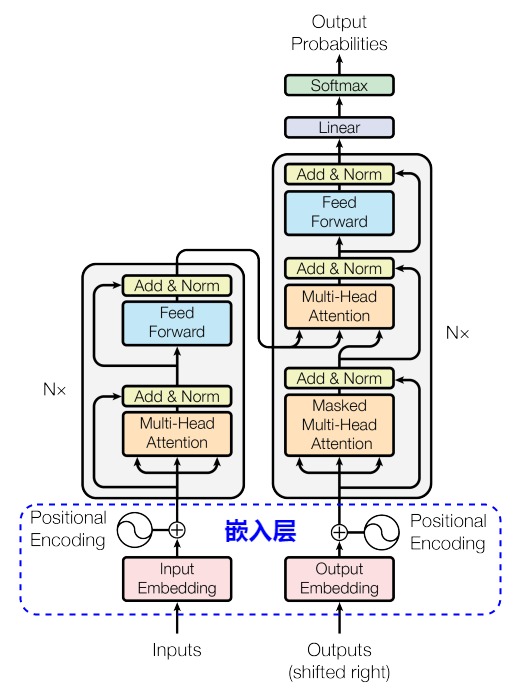
上述流程的后面三步在Transformer的架构图中对应蓝色框部分。从下图可以看到,输入和输出(其实也被转换为输入)都会先压缩为Embedding,然后加上Positional Encoding之后,输入到注意力层,即用图上的概念来表示:
$\begin{aligned}&Multi Head\ Attention\ 输入 =Input\ Embedding(Inputs) + Positional\ Encoding \\&Masked\ MultiHead\ Attention\ 输入 = Output\ Embedding(Outputs) + Positional\ Encoding\end{aligned}$
思考
在BERT、XLNet、RoBERTa中,词表的embedding size(E)和 Transformer 层的hidden size(H)是相等的。两者一定要相等嘛?其实也有不同观点。如果两者相等,则有两个缺点:
- 从建模的角度来看,wordpiece的单词表征向量学习到的是上下文独立的表征。而 Transformer 所学习到的表示应该是依赖内容的。因此理论上,存储了上下文信息的H要远大于E。让H和E解耦有利于减少参数量( 𝐻 >> 𝐸 时)。
- 从实际的角度出发,NLP领域的词汇表大小 𝑉 往往比较大。如果让 𝐸=𝐻 ,当 𝐻 增大时, 𝐸 也会跟着增大,那么词嵌入矩阵 𝑉∗𝐸 = 𝑉∗𝐻 将会非常庞大。而且Embedding在实际的训练中更新地也比较稀疏。
ALBERT的作者就认为没有必要,因为预训练模型主要的捕获目标是H所代表的“上下文相关信息,而非E所代表的“上下文无关信息”。因此,ALBERT没有直接用独热编码去映射到大小为 𝐻 的隐层空间,而是使用因式分解(Factorized),先映射到一个低维空间 𝐸 ,然后再映射到隐层空间 𝐻。通过这种分解的方式,参数量从 𝑂(𝑉∗𝐻) 变为 𝑂(𝑉∗𝐸+𝐸∗𝐻) 。当 𝐻>>𝐸 时,参数量大大减少。将庞大的词嵌入矩阵转换成两个小的矩阵,分离了隐层大小和词嵌入大小,使得增加隐层大小时而不用改变词嵌入的大小。
另外,词向量是否越大越好?论文“massive exploration of neural machine translation architectures ”中就提到, 2048 维的词向量相比512 维的词向量相比,效果提升不大。道理很简单:词向量只要能把相似单词聚在一起就完成了它的任务。即便词向量只有 100 维,并且每个维度只能取 {0, 1} 两个值,整个词向量空间也可以编码 $2^{100}$ 个不同的单词,把几万个单词嵌入到这个空间里绰绰有余。
2.2 实现
嵌入层的目标是把token序列转换为词嵌入。因此需要做两步:
- 通过梯度下降学习到更有意义的词向量表示,这些词向量构成嵌入矩阵。
- 从嵌入矩阵nn.Embedding中查找token对应的嵌入向量。即把token从原本的词向量维度(d_vocab)投射到我们自定义的维度大小(d_model)。这里d_model大小也会决定模型最终的参数量。
注:我们此处只给出Input Embedding对应的实现,会在后续章节进行分析位置编码的实现。
嵌入矩阵
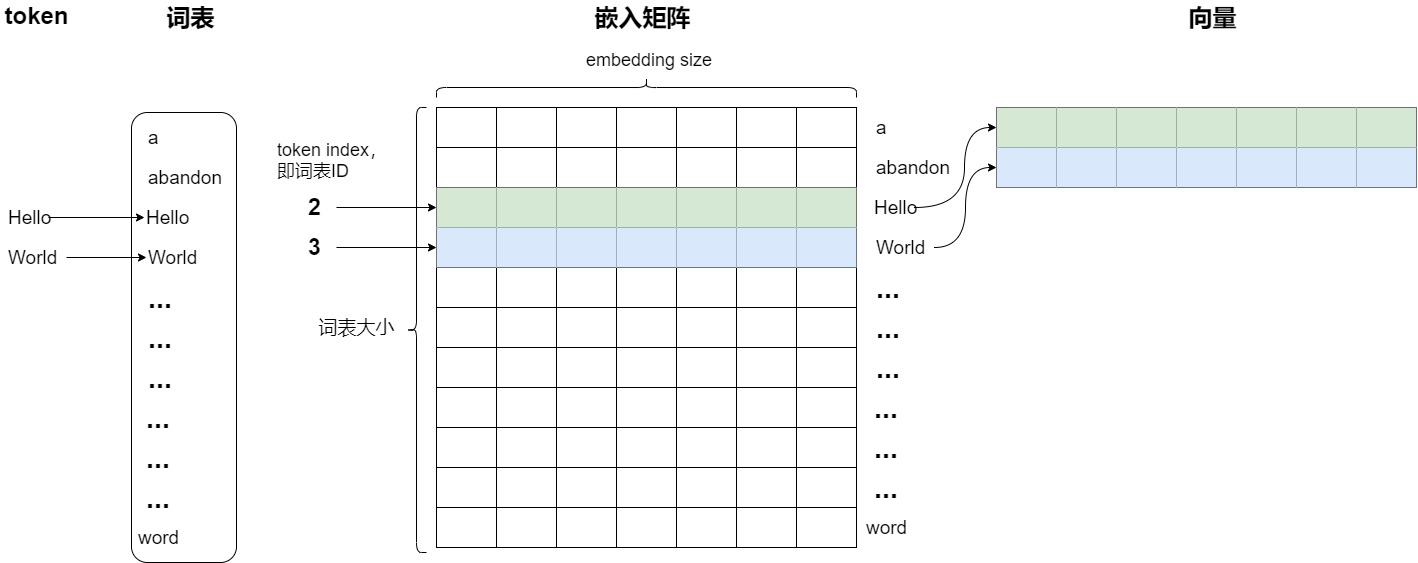
在大语言模型中,嵌入层本质上是一个嵌入矩阵,被用来把输入和输出的token ID转换为$d_{model}$维的向量。嵌入矩阵本质就是一个由词表衍生出来的查找表,这是一个保存“所有”单词的表。里面存储了模型词汇表中每个 Token(词或子词)的向量表示。嵌入矩阵的维度可以看作一个大小为 V x D 的二维矩阵,其中:
举例:假设词汇表大小为 V = 10000,词向量维度 D = 300,那么嵌入矩阵的大小就是 10000 x 300,每一个词表中的词都有一个 300 维的向量表示。因此,嵌入矩阵的大小由词汇表的大小和词向量的维度决定。
在训练或推理过程中,当输入经过 Token 化并转化为词表 ID 序列后,嵌入层会利用这些 ID 在嵌入矩阵中查找相应的词向量。这是通过查找(lookup)机制完成的。使用Embedding来编码就是使用token index(词表ID)来在矩阵中查询相应的向量。每个单词会定位这个表中的某一行,而这一行就是这个单词学习到的在嵌入空间的语义。这样就完成了从离散的词 ID 到连续向量空间的转换。
下图中用不同颜色标明了两个embedding分别的计算过程。对于第三个单词'Hello',就是直接使用token序号为2来进行查找,取出embedding矩阵的第3行(index为2)。同理,对于单词'World',相当于取出embedding矩阵的第四行(index为3)。嵌入层输出的就是这些对应的向量,然后模型会将这些向量作为输入,送入神经网络的后续层进行处理。

从另一个角度讲,token序号可以认为是独热编码,比如2就是 [0,0,1,0,0,0] ,依据token 序号来查找就相当于用独热编码乘以Embedding矩阵,embedding矩阵中有且仅有一行被激活。行间互不干扰。或者说,Embedding查表操作其实就是把 one-hot 向量转换为高维向量了。
下面是从 ALBERT 中摘取的代码,可以看出来是如何处理独热编码的。所以,实际上我们可以将one-hot 编码理解为一种在MLP权重中查询知识的过程,而输出结果就是一个嵌入表示向量,而这个输出结果实际上是可逆的(就是一个矩阵方程而已)。
1 2 3 4 5 6 7 8 9 10 11 12 13 14 15 16 17 18 19 20 21 22 23 24 25 26 27 28 29 30 31 32 33 34 35 36 37 38 39 40 41 42 43 44 45 46 |
def embedding_lookup(input_ids, vocab_size, embedding_size=128, initializer_range=0.02, word_embedding_name="word_embeddings", use_one_hot_embeddings=False): """Looks up words embeddings for id tensor. Args: input_ids: int32 Tensor of shape [batch_size, seq_length] containing word ids. vocab_size: int. Size of the embedding vocabulary. embedding_size: int. Width of the word embeddings. initializer_range: float. Embedding initialization range. word_embedding_name: string. Name of the embedding table. use_one_hot_embeddings: bool. If True, use one-hot method for word embeddings. If False, use `tf.nn.embedding_lookup()`. Returns: float Tensor of shape [batch_size, seq_length, embedding_size]. """ # This function assumes that the input is of shape [batch_size, seq_length, # num_inputs]. # # If the input is a 2D tensor of shape [batch_size, seq_length], we # reshape to [batch_size, seq_length, 1]. if input_ids.shape.ndims == 2: input_ids = tf.expand_dims(input_ids, axis=[-1]) embedding_table = tf.get_variable( name=word_embedding_name, shape=[vocab_size, embedding_size], initializer=create_initializer(initializer_range)) if use_one_hot_embeddings: flat_input_ids = tf.reshape(input_ids, [-1]) one_hot_input_ids = tf.one_hot(flat_input_ids, depth=vocab_size) output = tf.matmul(one_hot_input_ids, embedding_table) else: output = tf.nn.embedding_lookup(embedding_table, input_ids) input_shape = get_shape_list(input_ids) output = tf.reshape(output, input_shape[0:-1] + [input_shape[-1] * embedding_size]) return (output, embedding_table) |
哈佛代码
Embeddings类定义如下。
1 2 3 4 5 6 7 8 9 10 11 12 13 14 15 16 17 18 19 20 21 |
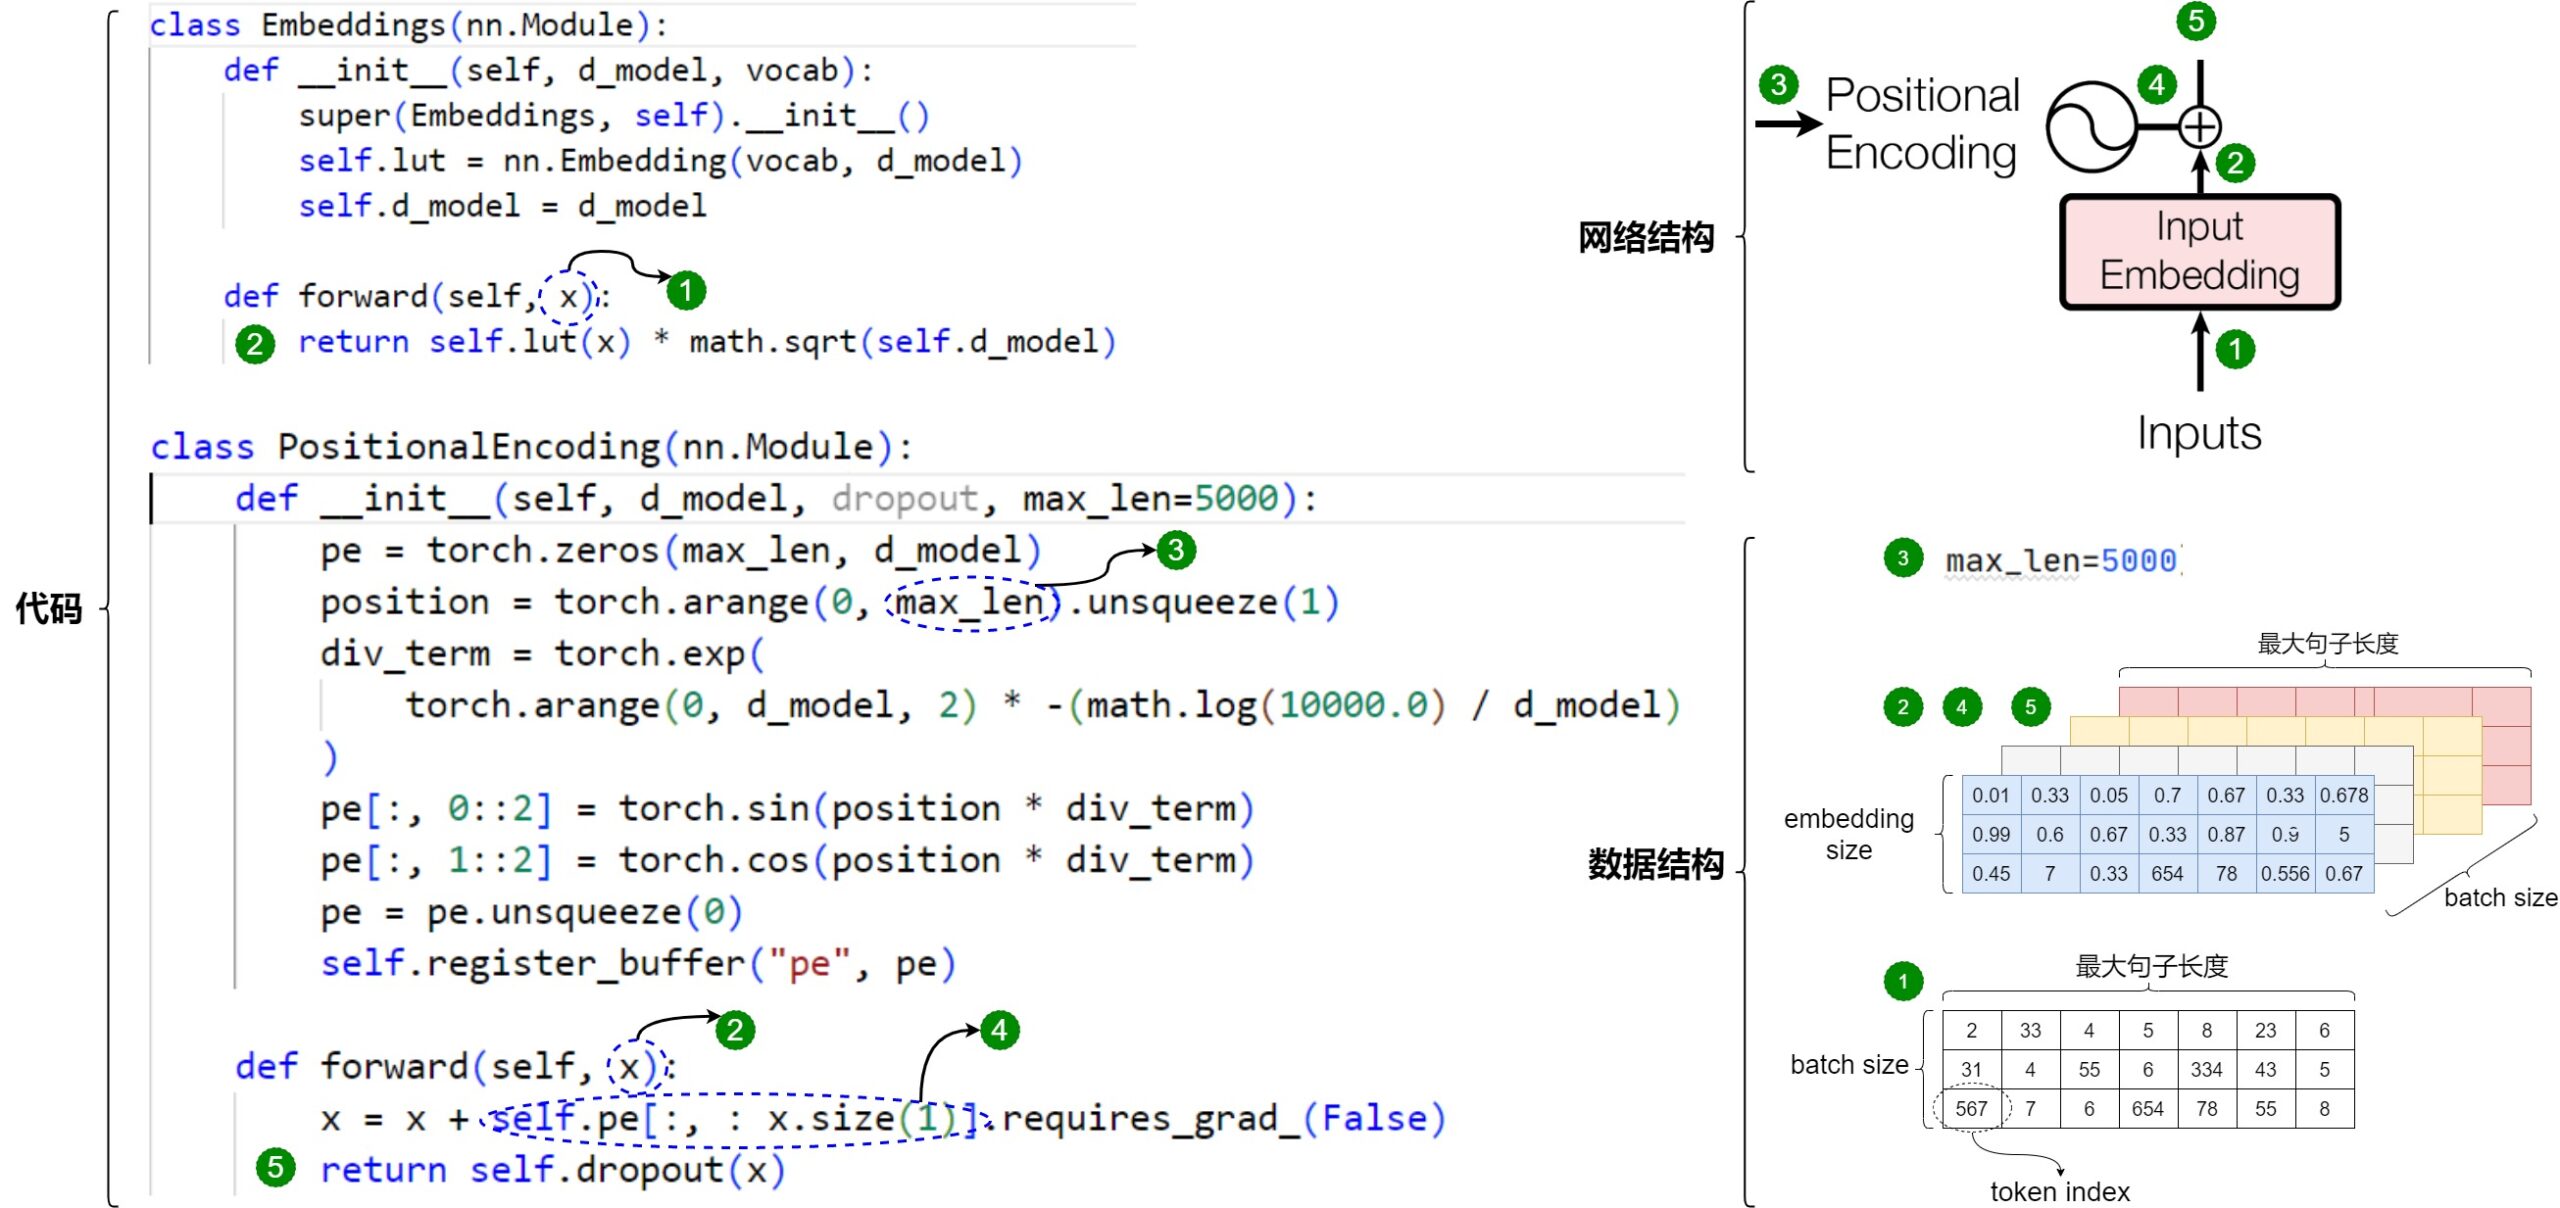
# 继承自PyTorch的nn.Module类 class Embeddings(nn.Module): # 初始化函数 def __init__(self, d_model, vocab): """ 输入参数是: d_model:词嵌入维度 vocab:词表大小 """ # 调用父类初始化方法 super(Embeddings, self).__init__() # 创建一个nn.Embedding作为词嵌入层,参数为词表大小和词嵌入维度 self.lut = nn.Embedding(vocab, d_model) # 将词嵌入维度保存为类属性 self.d_model = d_model # 前向传播函数 def forward(self, x): # 通过词嵌入层将输入x编码为向量,并乘以词嵌入维度的平方根进行缩放 # x是token的索引 return self.lut(x) * math.sqrt(self.d_model) |
上述代码有一个细节:在获取输入词向量之后需要对矩阵乘以embedding size的开方。这是因为在计算注意力分数时会涉及到一个点积操作,如果词嵌入维度很大时会导致点积的结果也很大,进而导致在训练过程中出现梯度消失或梯度爆炸。而将词嵌入矩阵乘以嵌入维度(embedding dimension)的平方根可以使得点积的范围更加合理,从而帮助增加训练稳定性,使模型可以更有效地学习从输入到输出的映射。
另外,乘以embedding size的开方也会使 Embedding 和 Position Encoding 的规模一致。具体的原因是:
-
因为Position Encoding是通过三角函数算出来的,值域为[-1, 1]。
-
而如果使用 Xavier 初始化,Embedding 的方差为 1/d_model,当d_model非常大时,矩阵中的每一个值都会减小。通过乘一个 d_model 的平方根可以将方差恢复到1。
所以当加上 Position Encoding 时,需要放大 embedding 的数值,否则规模不一致相加后会丢失信息。
简而言之,这个操作的目的是为了数值稳定性和训练稳定性,帮助模型更有效地学习从输入到输出的映射。
PyTorch Embedding
Embeddings类中最主要逻辑由nn.Embedding(vocab, d_model)完成,因此我们看看nn.Embedding(vocab, d_model)的细节。nn.Embedding 是 PyTorch 提供的一个非常重要的层,主要用于将离散的词汇索引 (或其他类别索引) 映射到连续的稠密向量空间中。nn.Embedding的参数本身就是模型参数的一部分,会参与梯度下降计算,通过训练可以学习到类别之间的语义相似性。
与 torch.nn.Linear 对比,nn.Embedding 专门用于离散索引到向量的映射,而 nn.Linear 是一个全连接层,用于任意形状的输入到输出的线性变换。另外 nn.Embedding 的每个索引都有独立的嵌入向量,而 nn.Linear 的权重是一个共享的线性变换矩阵。
Embedding类定义如下:
1 2 3 4 5 6 7 8 9 10 11 12 13 14 15 16 17 18 19 20 21 22 23 24 25 26 27 28 29 30 31 32 33 34 35 36 37 38 39 40 |
class Embedding(Module): __constants__ = ['num_embeddings', 'embedding_dim', 'padding_idx', 'max_norm', 'norm_type', 'scale_grad_by_freq', 'sparse'] num_embeddings: int # 词典的大小,即不同类别的总数,例如在词嵌入中,通常是词汇表的大小 embedding_dim: int # 每个嵌入向量的维度,即将单词编码成多少维的向量 padding_idx: Optional[int] # 指定一个索引,用于填充 (padding) max_norm: Optional[float] # 如果设置了该值,每次嵌入向量更新后会将其范数裁剪到不超过 max_norm norm_type: float # 用于裁剪范数的类型,默认为 2,即 L2 范数 scale_grad_by_freq: bool # 梯度将会被频率 (即每个索引出现的次数) 缩放 weight: Tensor # 用于初始化嵌入矩阵的权重 sparse: bool # 使用稀疏梯度,这在处理大型词汇表时可以节省内存 def __init__(self, num_embeddings: int, embedding_dim: int, padding_idx: Optional[int] = None, max_norm: Optional[float] = None, norm_type: float = 2., scale_grad_by_freq: bool = False, sparse: bool = False, _weight: Optional[Tensor] = None, device=None, dtype=None) -> None: factory_kwargs = {'device': device, 'dtype': dtype} super(Embedding, self).__init__() self.num_embeddings = num_embeddings self.embedding_dim = embedding_dim if padding_idx is not None: if padding_idx > 0: assert padding_idx < self.num_embeddings, 'Padding_idx must be within num_embeddings' elif padding_idx < 0: padding_idx = self.num_embeddings + padding_idx self.padding_idx = padding_idx self.max_norm = max_norm self.norm_type = norm_type self.scale_grad_by_freq = scale_grad_by_freq if _weight is None: self.weight = Parameter(torch.empty((num_embeddings, embedding_dim), **factory_kwargs)) self.reset_parameters() else: self.weight = Parameter(_weight) self.sparse = sparse def forward(self, input: Tensor) -> Tensor: return F.embedding( input, self.weight, self.padding_idx, self.max_norm, self.norm_type, self.scale_grad_by_freq, self.sparse) |
nn.Embedding的输入是 Token ID,输出则是对应的嵌入向量。当给定一个 Token 时,嵌入层会根据 Token ID,直接从嵌入矩阵中取出相应的嵌入向量。nn.Embedding的使用代码示例如下。比如下面是把[0,2,0,5] 这四个单词的index进行编码的结果。可以看到,nn.Embedding 类似于一个查找表,它将每个离散的输入索引 (通常是整数) 映射到一个固定大小的向量 (即嵌入向量)。这种映射允许模型将离散的类别信息转化为连续的向量表示,从而能够更好地捕捉类别之间的语义关系。
|
|
# 10个向量,每个嵌入向量的维度为 3 embedding = nn.Embedding(10, 3, padding_idx=0) # 输入的索引 input = torch.LongTensor([[0,2,0,5]]) # 获取嵌入向量 embedding(input) # 输出 tensor([[[ 0.0000, 0.0000, 0.0000], [ 0.1535, -2.0309, 0.9315], [ 0.0000, 0.0000, 0.0000], [-0.1655, 0.9897, 0.0635]]]) |
调用
在哈佛代码中,构建模型时候会用到Embeddings类生成EncoderDecoder类的实例,进而在EncoderDecoder类的forward()函数中会利用Embedding类来对输入和输出序列进行编码。
1 2 3 4 5 6 7 8 9 10 11 12 13 14 15 16 17 18 19 20 21 22 23 24 25 26 27 28 29 30 31 32 33 34 35 36 37 38 39 40 41 42 43 |
model = make_model(len(vocab_src), len(vocab_tgt), N=6) def make_model( src_vocab, tgt_vocab, N=6, d_model=512, d_ff=2048, h=8, dropout=0.1 ): c = copy.deepcopy attn = MultiHeadedAttention(h, d_model) ff = PositionwiseFeedForward(d_model, d_ff, dropout) position = PositionalEncoding(d_model, dropout) # src_vocab是词典大小 model = EncoderDecoder( Encoder(EncoderLayer(d_model, c(attn), c(ff), dropout), N), Decoder(DecoderLayer(d_model, c(attn), c(attn), c(ff), dropout), N), nn.Sequential(Embeddings(d_model, src_vocab), c(position)), nn.Sequential(Embeddings(d_model, tgt_vocab), c(position)), Generator(d_model, tgt_vocab), ) class EncoderDecoder(nn.Module): """ A standard Encoder-Decoder architecture. Base for this and many other models. """ def __init__(self, encoder, decoder, src_embed, tgt_embed, generator): super(EncoderDecoder, self).__init__() self.encoder = encoder self.decoder = decoder # 对应nn.Sequential(Embeddings(d_model, src_vocab), c(position)) self.src_embed = src_embed # 对应nn.Sequential(Embeddings(d_model, tgt_vocab), c(position)) self.tgt_embed = tgt_embed self.generator = generator def forward(self, src, tgt, src_mask, tgt_mask): "Take in and process masked src and target sequences." return self.decode(self.encode(src, src_mask), src_mask, tgt, tgt_mask) def encode(self, src, src_mask): return self.encoder(self.src_embed(src), src_mask) # 这里会调用到 def decode(self, memory, src_mask, tgt, tgt_mask): return self.decoder(self.tgt_embed(tgt), memory, src_mask, tgt_mask) # 这里会调用到 |
输入输出
假设我们正在做机器翻译,有三个句子,一句话最大长度是10个字,则Embedding的输入输出如下。
- Input Embedding的输入是token index序列,形状是 torch.Size([3, 10]),即[batch_size, seq_len]。对应图上的标签1。
- Input Embedding的输出是一个3x10x512的张量,每个句子对应的字向量是一个10 X 512的二维矩阵(每一行的512维向量代表一个字)。对应图上的标签2。
- Positional Encoding的输入是句子长度,对应图上的标签3。Positional Encoding的输出是位置向量,这也是一个10 X 512的二维矩阵(每一行代表对应字的位置信息)。对应图上的标签4。这里要注意的是,在哈佛代码中,PositionalEncoding其实是做了相加操作,所以PositionalEncoding类的输入是Embedding的输出,其形状是 torch.Size([3, 10, 512]),即[batch_size, seq_len, d_model]。
- 每个句子对应的两个矩阵相加得的新二维矩阵能更好更全面的表达语义,这就是Word Embedding。对应图上的标签5。
2.3 训练
Embedding的来源
单词的 Embedding 通常有两种选择:
- 直接使用预训练好的词向量且对词向量不做改变。例如可以采用 Word2Vec、Glove 等算法预训练得到。因为在使用模型时(推理阶段),这些嵌入向量会作为输入送入模型的后续层进行处理,不会发生变化,因此在这种情况下,嵌入矩阵实际就是一个查找表。如果监督数据较少,我们可以固定Embedding,只让模型学习其它的参数。这也可以看成一种 Transfer Learning。
- 使用动态词向量。所谓动态词向量就是在训练一个特定任务的同时,同时也基于语料来训练词向量了,Embedding矩阵就是模型训练后的产出。具体来说就是Transformer 中训练得到一个embedding层。每个token在Embedding层中都有一个对应的高维表示,这种映射关系在模型训练的过程中一直在更新,不断进行改进。
为何要再训练?
为何要再进行一次训练?因为预训练的embedding是固化的。而对于有效的自然语言模型来说,需要能够以理解每个单词、短语、句子或段落在不同语境下可能的含义。因此我们有必要在实际上下文中继续训练。而且,一般来说,静态embedding 是神经网络倒数第一层的参数权重,只具有整体意义和相对意义,不具备局部意义和绝对含义,这与 embedding 的产生过程有关。
让模型自己设计
机器学习模型不使用非结构化数据。为了使模型能够理解文本或图像,我们必须将它们转换为数字表示。在机器学习之前,这样的表示通常是通过Feature Engineering“手工”创建的。但随着特征数目的增加,向量维度越来越大,这些新的向量是一个很大的痛苦:你可以想到某个物体有数千个不同的语义属性,你到底会如何设置不同属性的值?
随着深度学习的出现,复杂数据中的非线性特征交互是由模型学习而不是人工设计的。因为深度学习的核心思想是:让神经网络自己学习特征的表示,而不是要求程序员自己设计它们。因此,研究人员就提出让词嵌入成为模型中的参数,然后在训练过程中进行更新。
训练流程
在训练中基本是如下流程。
-
初始化。首先我们要初始化字向量为[vocab size, embedding dimension], vocab size为总共的字库数量,embedding dimension为字向量的维度,也是每个字的数学表达。假设选用了3000个常用汉字,每个字对应一个512维的随机向量,则整个字向量就是一个3000 X 512 的二维矩阵,每一行代表一个字。嵌入矩阵的初始化有两种方式:
- 随机初始化:大多数模型在一开始会用随机数来初始化嵌入矩阵的每个向量。为了保持向量的可区分性,向量通常被设置为正交的。实现正交性的一个简单方法是随机性:在高维空间中,两个随机生成的向量近似正交,因此符号通常被初始化为随机的高维向量,这样可以让生成的各个向量间尽可能的独立,即没有相关性。比如就像“你、我、他、拿、和、中”指代的具体意思在最初定义时是可以随机互换的,之间也无关系,这些词之间的相关性/关系是在语境中根据语义、语法、文化等因素形成的。
- 预训练嵌入:在某些情况下,模型可能使用预训练的词向量来初始化嵌入矩阵。例如,可以使用 Word2Vec、GloVe 或 FastText 等模型生成的词向量作为嵌入层的初始值。这些预训练的词向量已经通过大量语料训练,包含了丰富的词汇语义关系,为后续的Transformer层(如自注意力层和前馈网络层)提供了良好的处理基础。然后在训练过程中,预训练的嵌入向量会结合模型的损失函数和训练任务(如掩码语言模型或下一个词预测)再进一步微调更新,从而学习到具体的语义表示。
-
更新。嵌入矩阵的向量在模型的训练过程中通过训练数据进行学习。transformer的目标就是在训练中逐步调整这些嵌入,让这些向量可以互相交流,通过互相传递信息来更新自己的值。
- 学习过程的目标是让共享上下文的单词也共享相似的向量。我们可以通过反向传播来调整单词的向量来做到这一点。一方面在数值空间中将相近的向量推得更近。使其更像其邻居的向量。另一方面,训练将向量推离不共享其上下文的随机单词的向量。因此这些向量不仅仅编码一个单独的词,而是融入了更加丰富的上下文含义。
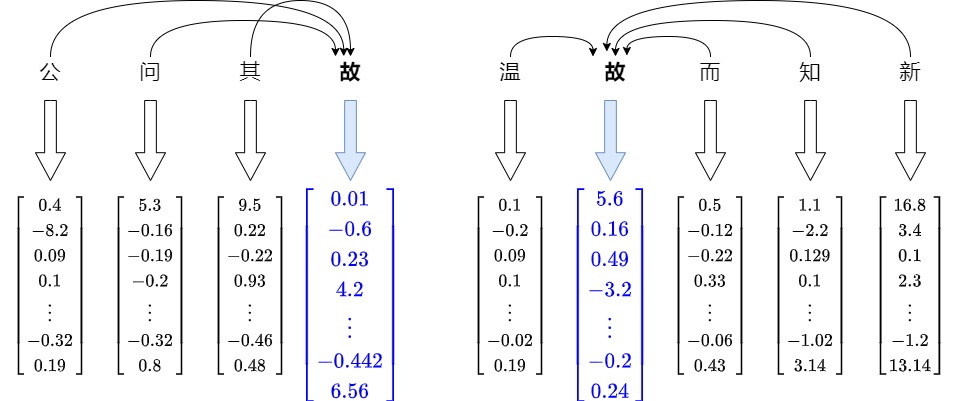
- 随着优化算法,不断迭代更新。这个过程不是一次性的事情。它更像是一个循环。你浏览语料库中的每个单词,根据其邻居更新其向量。有时,你还会让它与随机的、不相关的单词略有不同。随着你不断重复这个过程,迭代一次又一次,向量开始稳定下来。它们会找到一种平衡点,在这个点上的调整会变得越来越小,这样,具有相似模式的词语就会把这些相似更新累积到可观的程度,这意味着相似的单词(如同义词)在嵌入空间中会有相似的向量表示。比如,在注意力机制中,会让周围的嵌入把自己的信息传入给“故”对应的嵌入,无论位置远近。见下图。
-
固化。最后网络收敛停止迭代的时候,网络各个层的参数就相对固化,得到隐层权重表(此时就相当于得到了我们想要的 embedding)。这就是收敛,向量现在不仅代表随机分配,还代表基于单词出现的上下文的有意义的关系。这个过程重复足够多次后,就会揭示出你的语料库中隐藏的结构,即从头开始构建的单词关系图。
-
然后在通过查表可以单独查看每个元素的 embedding。embedding过程也是查表过程,因为它们之间也是一个一一映射的关系。每个token都有一个对应的高维表示,这种映射关系在模型训练的过程中一直在更新。
整个流程如下图所示。

0x03 文本嵌入
Text Embedding就是将文本转成一组固定维度的向量表示。Word Embedding是以 Token为基本单位,而Text Embedding则是以文本为基本单位的。理想的Text Embedding应该尽可能保留文本的语义信息,相同语义但不同表述方式的文本可以被映射到同一个位置,而不同语义的文本在向量空间应该保持对应的距离。实际上,Text Embedding和Word Embedding很可能就是使用同样的模型。
3.1 历史
文本嵌入模型旨在将自然语言文本的语义内容编码为向量表示,然后促进各种自然语言处理(NLP)任务,如语义文本相似性、信息检索和聚类。论文”When Text Embedding Meets Large Language Model: A Comprehensive Survey“给出了文本Embedding的历史。
- 统计机器学习时代。在早期,研究人员主要依靠手动设计的特征来表示文本。该方法的发展伴随着输出向量形式的转换,即从词袋模型(独热向量)到TF-IDF(稀疏向量),然后到词嵌入(密集向量)。这些方法需要领域专家手动选择和设计特征,而特征的质量和数量限制了它们的有效性。随着机器学习技术的进步,研究人员开始探索使用统计方法学习文本嵌入的方法,如潜在语义分析(Latent Semantic Analysis,LSA)、潜在狄利克雷分配(Latent Dirichlet Allocation,LDA)等。虽然这些方法可以自动学习文本嵌入,但在捕获复杂的语义和句法结构方面仍然存在局限性。
- 深度学习时代:随着深度学习技术的出现,词嵌入已经成为文本嵌入学习的一个重大突破。Word2Vec、GloVe和FastText等模型可以将单词映射到低维连续向量空间,以捕捉单词之间的语义和句法关系。在过去的几年里,首先提出了具有数百万个参数的预训练语言模型(PLM),例如BERT和RoBERTa。“预训练-微调”范式在各种下游任务中表现良好,并在实际应用中发挥了重要作用。然而,这些PLM的嵌入空间被证明是各向异性的(anisotropic),导致为任何两个文本计算体现出惊人的高相似性。
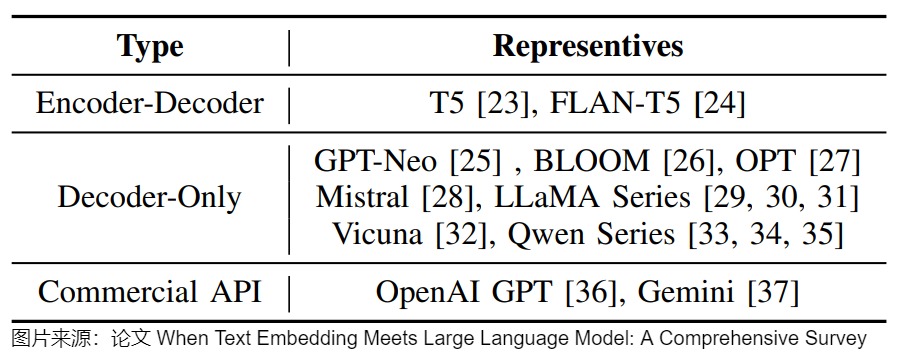
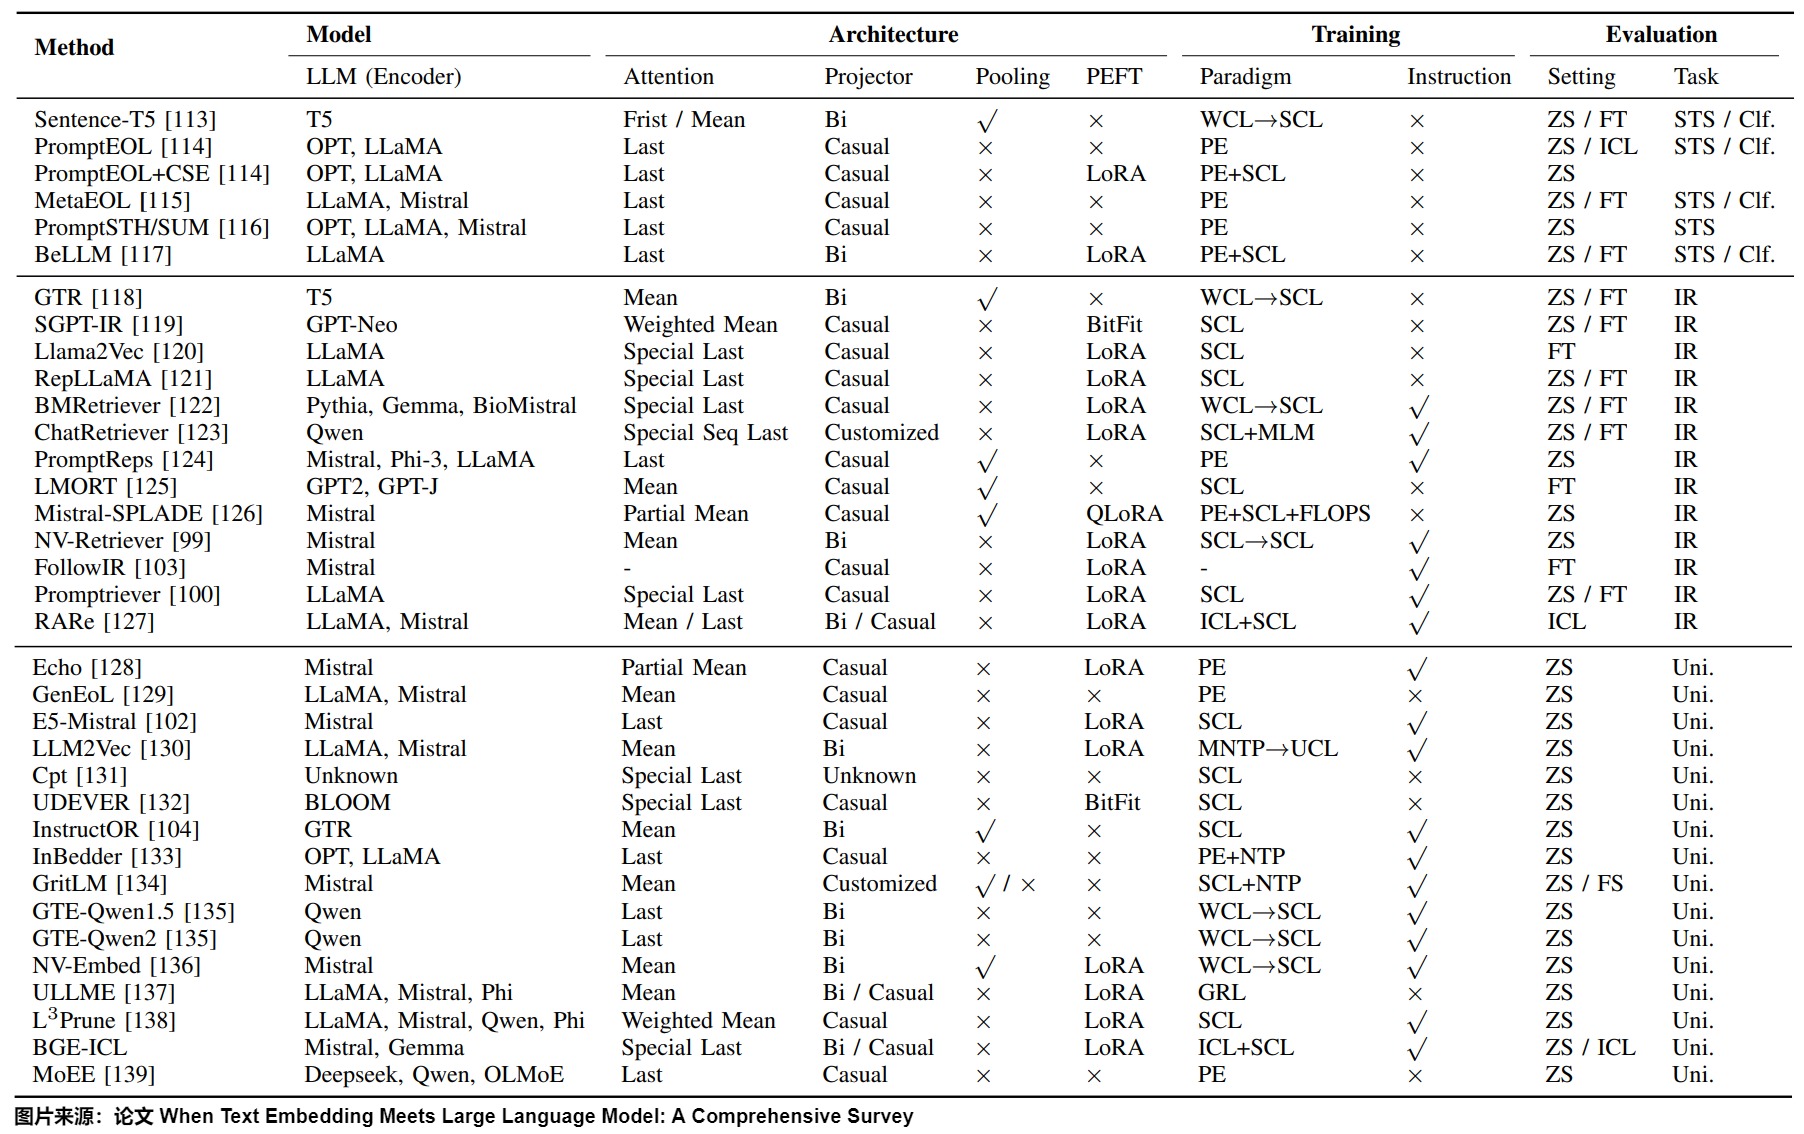
- LLM时代:LLM本身的表征直接用于Embedding,比如用于检索/聚类/STS等任务,效果其实不太好。因此才需要将Embedding模型和大模型区分开来。然而,使用LLM来生成Embedding是近来的趋势。该论文将模型参数数量超过1B的语言模型称为LLM,这样就排除了基于Transformer编码器的预训练语言模型(如BERT和RoBERTa)和通常具有较小参数计数的神经网络(如LSTM和GRU)。论文给出的生成Embedding的LLM如下图所示。
各大模型服务商,以及开源社区都发布了大量的Embedding模型来提供给用户使用。而Embedding就是一种经过专门训练的用来向量化数据的神经网络模型。只不过Embedding嵌入模型经过矩阵算法的优化,比传统的向量化方式效率更高,效果更好。
我们接下来看看嵌入模型以及Embedding在演化进程的几个典型案例。
3.2 Word2Vec
一个比较容易想到的方法是,令词义的不同维度和向量不同维度进行关联。例如,对词义的维度进行全面的拆分:名词性、动词性、形容词性、数量特征、人物、主动、被动、情感色彩、情感强度、空间上下、空间前后、空间内外、颜色特征,只要维度的数量足够多,一定是可以把词义所包含的信息全都囊括在内;一旦我们给出每一个维度的定义,就可以给出每个词在相应维度上的数值,从而完成词的向量化,并且完美地符合以上给出的两点性质。但这个看似可行的设计,并不具备可实现性。
首先,需要极高的维度才能够囊括所有词义的不同维度,而对词义进行这么精细的切分是非常困难的。其次,即使切分出来极高的维度,要将每个词不同维度的意义赋予有效的数值,哪怕是再资深的语言学家恐怕也会难以感到棘手。
既然纯构建的方式不可行,于是人们想出了一个大力出奇迹的方法,就是由Google在2013年提出的Word2Vec:通过训练来让模型自己学习如何关联。
思路
Word2Vec的总体思路是:一个词的意义可以被它所出现的上下文定义,因此我们可以通过上下文来理解某个单词的意义,使用该词的上下文来表示这个单词的特征。这句话换一种说法又可以表述为:上下文相似的词在词义上也一定存在相似性。这个观点就是语言学家 Zellig Harris 在1954 年提出的“Distribution Hypothesis”。
比如我们不熟悉"Puma"这个单词,但是下面有一些该词的描述句子。
- 外观上没有花纹且头骨较小。雄性大于雌性。雄性头体长1.02-1.54米,雌性头体长860-1310毫米。
- 躯体均匀,四肢中长,趾行性。视、听、嗅觉均很发达。犬齿及裂齿极发达。
- 常相居在山谷丛林中,善于游泳和爬树,尤其喜欢在树上活动,也善于奔跑,每小时能跑53-64千米。跳跃能力极强,能从12-13米高的树上或悬崖上跳下,轻轻一跃能达8-9米多远,也能跃过3米以上至6米的高度或5米以上至13米的距离,所以对20米以内的猎物,只要奋力跳跃两次就可以捕到。
- 栖息于森林、丛林、丘陵、草原、半沙漠和高山等多种生境,其中包括山地针叶林、低地热带森林、灌丛、沼泽以及任何有足够遮盖物和猎物的地区。
- 在拉普拉塔,主要猎食麋鹿、鸵鸟、绒鼠和其他四足小动物;在智利,猎食小马和牛等。
从这样的一些描述里面,我们可以比较放心地猜测"Puma"是类似于金钱豹之类的动物。因为上面的这些描述里面,如果我们把"Puma"替换成"金钱豹"我们会发现这就是经常对"金钱豹"的一些描述。也就是说,因为"Puma"和"金钱豹"有很多相似的上下文,所以我们认为它们本身也是相似的。
从这一点出发,我们不再去统计一个单词在一个大文档里面出现的次数,而是统计一个单词有哪些单词以多高的频率出现在它的上下文(一般来说,我们以当前单词为中心,把它前后N个单词叫做它的上下文)。有了上下文的定义之后,我们就去构造一个word-context的矩阵,进而获取单词对应的向量。
Word2Vec的第一篇论文是Efficient Estimation of Word Representations in Vector Space。论文题目提到了表示论(Representation Theory),这属于数学中抽象代数的一个分支。表示论将抽象代数结构中的元素“表示”成向量空间上的线性变换,并研究这些代数结构上的模,藉以研究结构的性质。表示论的妙用在于能将抽象代数问题转为较容易解决的线性代数问题。例如Word2Vec论文中"Additive Compositionality" 有一些论述,模型中学到的词和短语表现出一种线性结构,这使得使用简单的向量运算进行精确的类比推理成为可能,同时一些简单的元素级别的向量表示加法可以有意义地组合单词。比如:“apple”与“apples”之间的几何向量关系大致与“car”与“cars”之间的关系相同,这意味着我们可以将“apples”计算为“apple + car - cars”。这实际上就是构建了这样的二元运算群到线性空间的映射,使得它们在线性空间的运算和群的操作同构。
架构
Word2Vec有两种主要的架构:CBOW(Continuous Bag of Words)和Skip-Gram。
- CBOW架构会基于词的上下文来预测目标单词,其本质上就是“输入一个中心词的上下文后得到的就是中心词”。
- Skip-Gram正好相反,它基于目标单词预测其上下文。Skip-Gram和CBOW非常类似,只不过是“输入中心词,预测上下文的词“。
两者的模型结构如下图。以CBOW为例,输入层初始化的时候直接为每个词随机生成一个n维的向量,并且把这个n维向量作为模型参数学习,最终得到该词向量。生成词向量的过程是一个参数更新的过程。
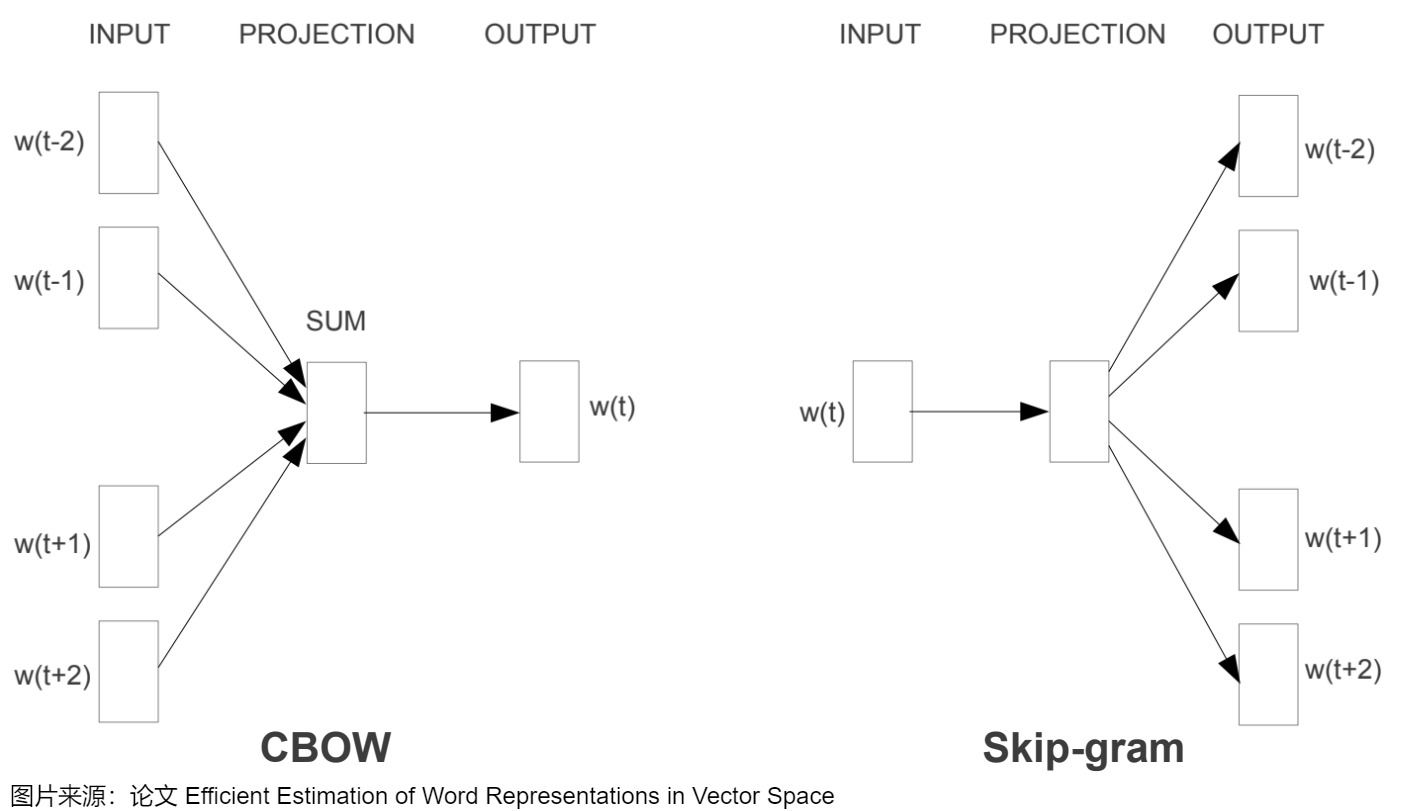
我们再仔细分析上下文或者说窗口机制。在用语言模型进行无监督训练时会使用窗口机制,即通过一个字附近n个字来预测这个字,这n个字就是这是个单词的直接邻域,是它在句子世界中的社交圈。比如一个句子"我要去后海玩",如果我们使用大小为2的窗口,那么去的上下文就是[我,要,后,海]四个字。CBOW就是使用[我,要,后,海]去预测“去”这个字。本质上就是「输入一个中心词的contex后得到的就是中心词」。
在训练中,同一个窗口内的词语会有相似的更新,而具有相似模式的词语就会把这些相似更新累积到可观的程度。“相似的模式”指的是在特定的语言任务中,它们是可替换的。比如"我特别喜欢吃苹果”中的“苹果”被“香蕉”替换之后,该句子依然成立。因此“苹果”和“香蕉”在特定的语言任务中必然具有相似的词向量。或者说“麒麟”这两个字,几乎是连在一起用的,更新“麒”的同时,几乎也会更新“麟”,因此它们的更新几乎都是相同的,这样“麒”、“麟”的字向量必然几乎是一样的。
本质上来说,经过Word Embedding之后,在word-context矩阵里面一个单词所在的那一行就是该单词的一个向量表示。各个word就组合成了一个相对低维空间上的一组向量,这些向量之间的远近关系则由他们之间的语义关系决定。这些表达有以下的特征:
- 把一个单词嵌入到一个高维欧式空间中,成为欧式空间的一个向量。
- 相似的文字在欧式空间中相邻。
问题
无论使用哪种架构,Word2Vec的核心都是一个“静态”的词嵌入:每个单词都被映射到固定的,预先训练好的向量上。这意味着无论该词出现在何种上下文中,它的向量表示都是相同的。
CBOW模型在训练期间确实通过滑动窗口考虑了词的局部上下文,但是Word2Vec只是利用和挖掘了“Distribution Hypothesis”的浅层结构。并没有尝试去理解句子内的语义。所以一旦模型训练完成,每个词的嵌入就被固定下来,不会随着不同上下文场景的变化而改变。因此,这种嵌入被认为是静态的缺失语境信息的。
而对于语言模型来说,一个巨大的挑战是一个词在不同的情境中可以被使用。在语境中,孤立的单词大多没有意义,我们需要从共享的知识和经验中汲取,才能理解它们。因此,有效的自然语言模型需要可以理解每个单词、短语、句子或段落在不同语境下可能的含义。
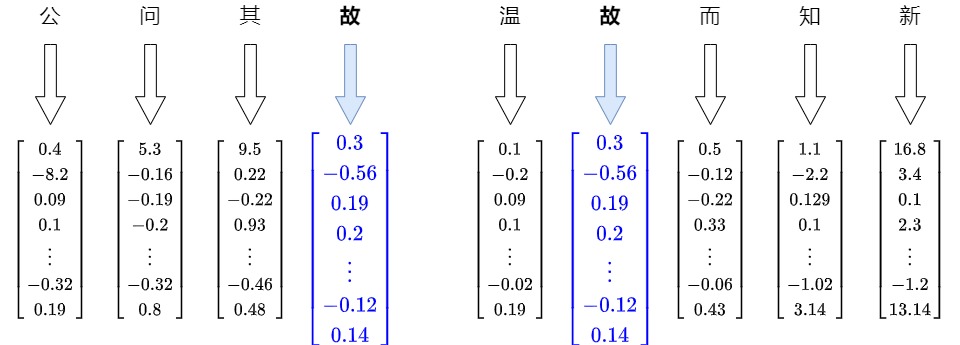
在这点上,固化的或者说静态词嵌入有一个巨大的软肋:拥有多个定义的词。比如“故”这个字,在每句话中依据上下文有不同的意思。
- 公问其故(原因,缘故)。
- 温故(旧的知识)而知新。
静态Embedding本质上是从查找表中读取出来,无论在哪种上下文中,“故”这个词都有一个与之对应的固定向量。都是只编码了该特定词的含义,没有上下文参照,这限制了它在理解和区分不同意义时的能力。即,Word2Vec虽然在训练时考虑到了局部上下文,但一旦训练完成,每个单词的嵌入就固定了,不再变化。
因为静态向量表示无法解决多义词问题,人们就提出了动态向量。在动态向量表示中,模型不再是简单的向量对应查表关系,而是通过一个训练好的模型即时计算出来。在对词进行向量表示时,模型根据当前语境对多义词进行理解,推断出每个词对应的意思,从而得到该文本的词向量。如果上下文不同,则计算出的向量会有所改变。动态词向量相较于静态词向量,更加充分利用了上下文信息,所以可以解决一词多义的问题。
3.3 ELMO
针对word embedding无法解决多义词的问题,ELMO( Embedding from Language Models )提出了一个简洁有效的解决方案。
思路
ELMo不是对每个单词使用固定的嵌入,而是在为每个单词分配嵌入之前查看整个句子。ELMo的本质思想是:根据当前上下文对Word Embedding动态调整。我们从ELMO的论文题目“Deep contextualized word representation”中的”contextualized “一词就可以看出来其中精髓。
ELMo首先使用语言模型学好一个单词的Word Embedding,此时word Embedding中已经有了一定的语义信息。当实际使用Word Embedding时,ELMo再依据单词的上下文来调整单词的Word Embedding表示。这样经过调整后的Word Embedding更能表达在这个上下文中的具体含义,自然也就解决了多义词的问题了。
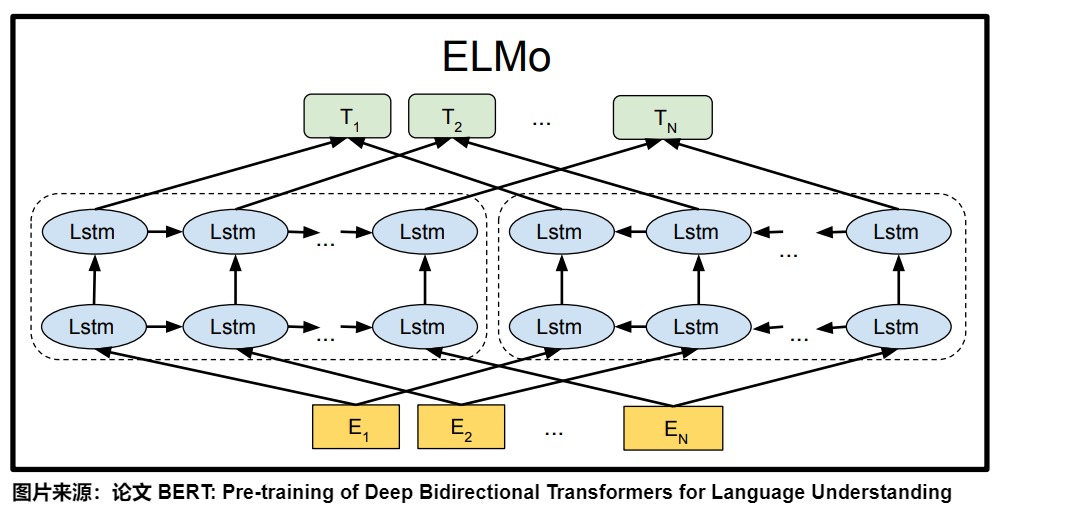
ELMo模型的双向语言模型(双向双层LSTM)由前向语言模型和后向语言模型组成。前向语言模型从左到右对文本进行编码,而后向语言模型则从右到左进行编码。然后将这两部分信息进行整合,得到单词的上下文信息。这种双向设计使得ELMo不仅能看到本单词前面的单词,也能看到本单词后续的单词,从而同时捕捉到词语在前后文中的信息,生成更加丰富的词向量表示。
在实际模型中,这样的前向后向LSTM网络可能是多层的。对于每一层,将每个token的正向和反向LSTM输出拼接起来,得到这个token在该层的表示。
训练
在ELMo之前的模型中,embedding模型很多是单独训练的,而ELMo之后则爆发了直接将embedding层和上面的语言模型层共同训练的浪潮(ELMo的全名就是Embeddings from Language Model)。
ELMo用了一个典型的两阶段过程来做预训练。
- 第一阶段是利用语言模型进行预训练。提取字符级别的特征,这就是对应单词的最初词表示(word embedding)。在预训练过程中,ELMO不仅学会了单词的word embedding,也学会了一个双层双向的LSTM网络结构(这代表了每个词语的前向和后向表示)。
- 第二阶段是做下游任务时,ELMo模型通过将这多层双向LSTM的隐藏状态和字符嵌入以某种方式组合在一起(连接后加权求和),并通过一个线性变换(比如用与任务相关的缩放系数进行加权求和)得到最终的上下文相关词向量,作为下游任务模型的输入。这个操作等于将单词融合进了上下文的语义,可以更准确的表达单词的真实含义。
训练阶段具体如下图所示。

目前预训练有两种方法:
- Feature-based:将训练出的表征作为feature用于下游任务,从词向量、句向量、段向量、文本向量都是这样的。新的ELMo也属于这类,但迁移后需要重新计算出输入的表征。
- Fine-tuning:这个主要借鉴于CV,就是在预训练好的模型上加些针对任务的层,再对后几层进行精调。新的ULMFit和OpenAI GPT属于这一类。
3.4 BERT
BERT(Bidirectional Encoder Representations from Transformers)使用了Transformer架构,特别是通过自注意力机制(self-attention)能够捕捉每个词与句子中其他所有词之间的关系。这意味着,BERT为词生成的嵌入不仅仅依赖于该词本身,还依赖于它所处的上下文。
动机
ELMo在拼接正反向LSTM输出时,只是简单地将前后向信息拼接,未考虑到左侧上下文和右侧上下文之间的交互。而GPT使用从左往右的解码器,每个单词只能获得上文信息。这些结构对于句子级别的、需要双向上下文信息的任务(比如NER、情感分析)是次优的。因此 BERT 决定真正地融合双向的上下文信息。
思路
在模型的推理阶段(即使用模型进行预测时),BERT会根据当前输入的上下文动态调整每个词的嵌入,这样就可以为同一个词在不同句子中生成不同的嵌入表示。而且,BERT的关键特点是其双向性,模型在处理任何单词时都会考虑到它的整个上下文(即,左边和右边的所有单词)。这使得BERT能够更精确地捕捉语言的复杂性和细微差别。
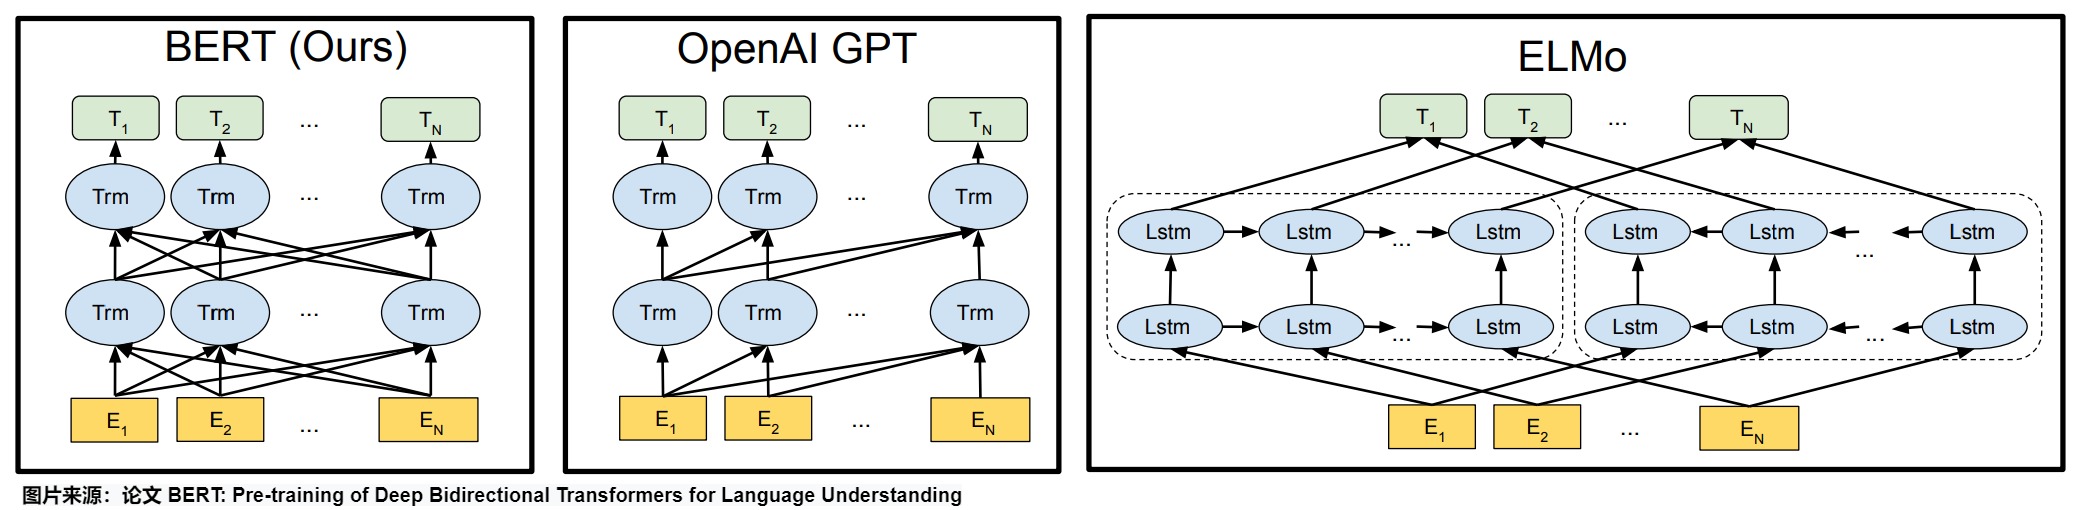
下图给出了预训练模型架构的差异。BERT使用双向Transformer。OpenAI GPT使用从左到右的Transformer。ELMo使用独立训练的从左到右和从右到左LSTM的连接来为下游任务生成特征。在这三者中,只有BERT表示在所有层中都受到左和右上下文的共同制约。除了架构差异外,BERT和OpenAI GPT是微调方法,而ELMo是一种基于特征的方法。
对比OpenAI GPT(Generative pre-trained transformer),BERT是双向的Transformer block连接;就像单向RNN和双向RNN的区别,直觉上来讲效果会好一些。
对比ELMo,虽然都是“双向”,但目标函数其实是不同的。ELMo是分别以𝑃(𝑤𝑖|𝑤1,...𝑤𝑖−1) 和 𝑃(𝑤𝑖|𝑤𝑖+1,...𝑤𝑛) 作为目标函数,独立训练处两个representation然后拼接,而BERT则是以 𝑃(𝑤𝑖|𝑤1,...,𝑤𝑖−1,𝑤𝑖+1,...,𝑤𝑛) 作为目标函数训练LM。
BERT 提出了两个学习任务:1)Masked语言建模(MLM),首先Mask文本中的部分单词,然后通过上下文信息对Mask的单词进行预测;2)Next-sentence-prediction(NSP),即预测两个句子的前后关系。和GPT类似,BERT也使用特殊token:每个输入最前面加[CLS],句子间隔和结束用[SEP]。
Embedding
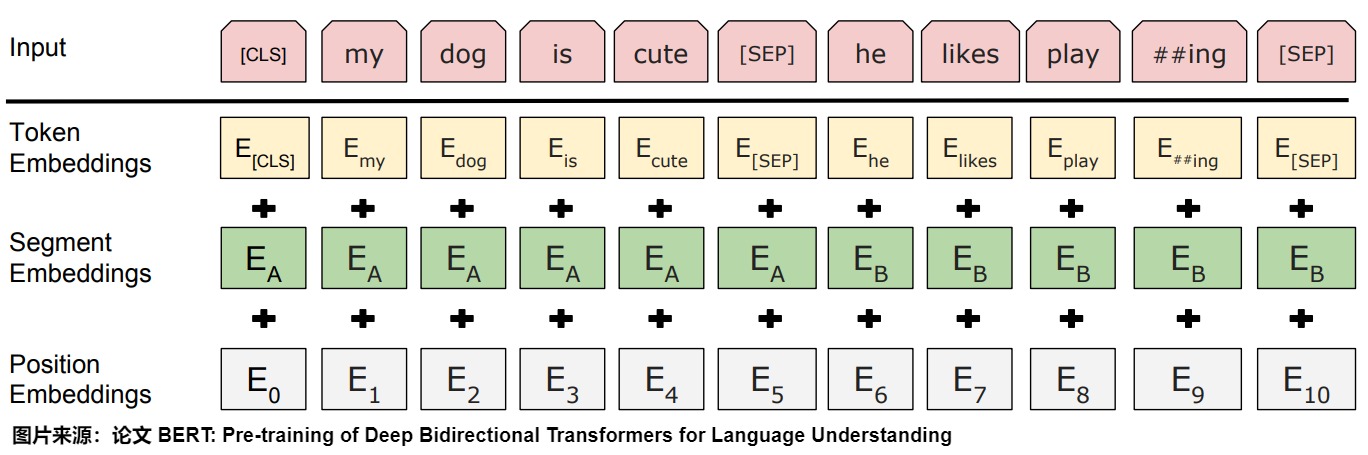
BERT的输入的编码向量是3种Embedding特征element-wise和,如下图所示。这三种Embedding特征分别是:
- Token Embeddings是单词的词向量,第一个单词是CLS标志,可以用于之后的分类任务。
- Segment Embeddings是两个句子的区分标识,因为预训练不光做LM还要做以两个句子为输入的分类任务。如B是否是A的下文(对话场景,问答场景等)。对于句子对,第一个句子的特征值是0,第二个句子的特征值是1。例如 “[CLS] My name is xx [SEP] How are you [SEP]” 那么对应的 SegmentEmbeddings 就是 0000001111,粗体0后1表示对应的单词
- Position Embeddings:将单词的位置信息编码成特征向量,Position embedding能有效将单词的位置关系引入到模型中,提升模型对句子理解能力。此处不是三角函数而是学习出来的。
为什么 Bert 的三个 Embedding 可以进行相加?以下是一些深刻的解释。
- 这三个embedding对应三种不同的频率,从信号处理的角度来看,叠加或者是加法是一个比较常规的操作。
- Embedding的数学本质是以one hot为输入的单层全连接,因此三种embedding先用one-hot编码,然后concat到一起,最后过一个MLP,和直接的embedding相加是等价的。
- 三种embedding的相加,是把符号空间、符号属性空间和位置空间通过线性映射到一个统一的、同质的特征空间上去,然后再以求和的方式做坐标综合。
代码
具体代码如下。这部分主要通过生成三个Embedding层,再通过截断正态分布赋予权重。
1 2 3 4 5 6 7 8 9 10 11 12 13 14 15 16 17 18 19 20 21 22 23 24 25 26 27 28 29 30 31 32 33 34 35 36 37 38 39 40 41 42 43 44 45 46 47 48 49 50 51 52 53 54 55 56 57 58 59 |
class BertEmbeddings(nn.Module): """Construct the embeddings from word, position and token_type embeddings.""" def __init__(self, config): super().__init__() self.word_embeddings = nn.Embedding(config.vocab_size, config.hidden_size, padding_idx=config.pad_token_id) self.position_embeddings = nn.Embedding(config.max_position_embeddings, config.hidden_size) self.token_type_embeddings = nn.Embedding(config.type_vocab_size, config.hidden_size) # self.LayerNorm is not snake-cased to stick with TensorFlow model variable name and be able to load # any TensorFlow checkpoint file self.LayerNorm = nn.LayerNorm(config.hidden_size, eps=config.layer_norm_eps) self.dropout = nn.Dropout(config.hidden_dropout_prob) # position_ids (1, len position emb) is contiguous in memory and exported when serialized self.position_embedding_type = getattr(config, "position_embedding_type", "absolute") self.register_buffer( "position_ids", torch.arange(config.max_position_embeddings).expand((1, -1)), persistent=False ) self.register_buffer( "token_type_ids", torch.zeros(self.position_ids.size(), dtype=torch.long), persistent=False ) def forward( self, input_ids: Optional[torch.LongTensor] = None, token_type_ids: Optional[torch.LongTensor] = None, position_ids: Optional[torch.LongTensor] = None, inputs_embeds: Optional[torch.FloatTensor] = None, past_key_values_length: int = 0, ) -> torch.Tensor: if input_ids is not None: input_shape = input_ids.size() else: input_shape = inputs_embeds.size()[:-1] seq_length = input_shape[1] if position_ids is None: position_ids = self.position_ids[:, past_key_values_length : seq_length + past_key_values_length] if token_type_ids is None: if hasattr(self, "token_type_ids"): buffered_token_type_ids = self.token_type_ids[:, :seq_length] buffered_token_type_ids_expanded = buffered_token_type_ids.expand(input_shape[0], seq_length) token_type_ids = buffered_token_type_ids_expanded else: token_type_ids = torch.zeros(input_shape, dtype=torch.long, device=self.position_ids.device) if inputs_embeds is None: inputs_embeds = self.word_embeddings(input_ids) token_type_embeddings = self.token_type_embeddings(token_type_ids) embeddings = inputs_embeds + token_type_embeddings if self.position_embedding_type == "absolute": position_embeddings = self.position_embeddings(position_ids) embeddings += position_embeddings embeddings = self.LayerNorm(embeddings) embeddings = self.dropout(embeddings) return embeddings |
3.5 BGE
在中文世界,智源研究院在论文"C-Pack: Packaged Resources To Advance General Chinese Embedding"中提出的BGE是比较有名的开源embedding model。BGE希望做中文世界的通用embedding模型,这就意味着BGE需要支持所有的embedding使用场景,包括但不限于:retrieval、re-rank、clustering、classification、pair-classification等任务。我们接下来看看论文作者们都做了哪些努力。
数据集
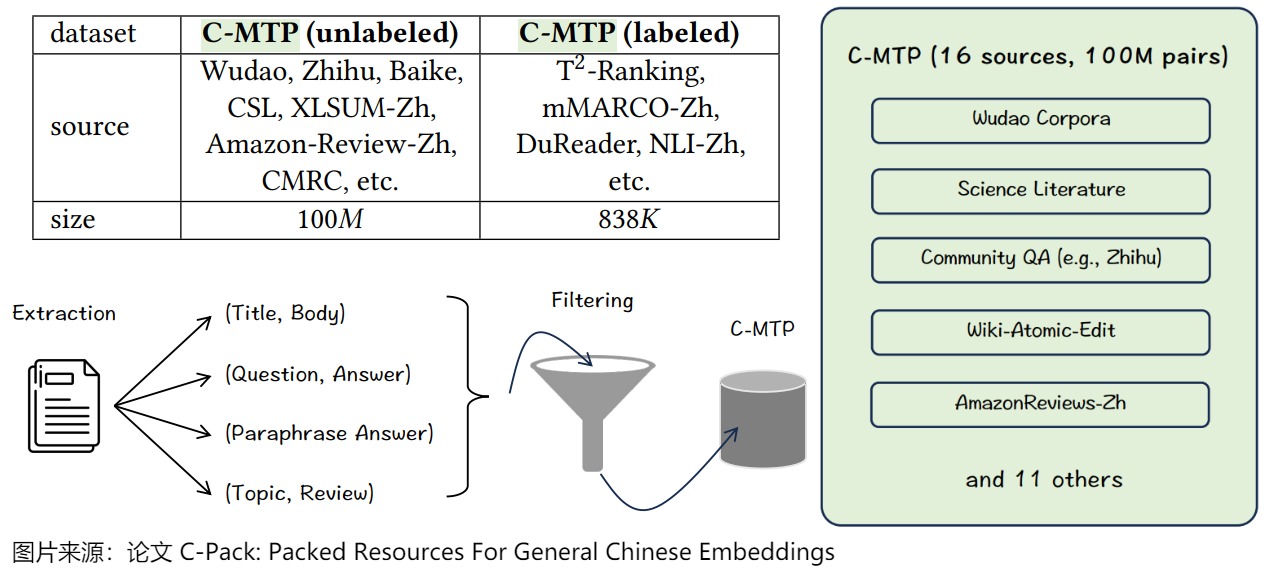
论文作者为通用中文嵌入训练策划了最大的数据集C-MTP,兼顾scale、diversity、quality这三个维度,确保了文本嵌入的通用性,这是通用embedding模型能训练出来的前提。
C-MTP从两个来源来收集数据:大部分数据基于海量未标记数据的管理,即C-MTP(未标记),它包含了1亿对文本。一小部分来自高质量标记数据的全面整合,即C-MTP(标记),这包括了大约100万对文本。
训练
论文使用3阶段训练策略,从pre-training 到 general-purpose fine-tuning 再到 task-specific fine-tuning;前两个阶段是保证通用性的基石,最后一个阶段则在保持通用的基础上,进一步精进下游任务的效果。
pre-training阶段在Wudao Corpora上进行,此阶段未在任何文本对数据上训练,其目标是训练出更适合embedding任务的pre-trained model。此处的核心技术是RetroMAE训练策略。
general-purpose fine-tuning阶段在C-MTP(unlabeled)上进行,该阶段在100M的文本对上训练,可以视作一种大规模的弱监督学习过程,其目标是初步学习出通用embedding model;这一阶段的核心技术是对比学习,采用in-batch negative sample方法和大batch size来进行训练。而且重点优化了retrieval任务。
最后的task-specific fine-tuning阶段,在C-MTP(labeled)上进行,通过在少而精的下游任务labeled data上微调,在保证通用性的同时,强化模型在具体任务上的表现。这一阶段的难点在于:在任务间存在差异的情况下,如何更好地multi-task learning。论文采取了两个关键技术来解决技术难点:instruction-based fine-tuning和hard negative sampling。

RetroMAE
pre-training阶段的目标是为了学习出更适合embedding的pre-trained model。
目前主流的语言模型的预训练任务都是token级别的,比如MLM或者Seq2Seq,但是这种训练任务难以让模型获得一个高质量的基于句子级别的句向量,这限制了语言模型在检索任务上的潜力。针对这个弊端,目前有两者针对检索模型的预训练策略,第一种是self-contrastive learning,这种方式往往受限于数据增强的质量,并且需要采用非常庞大数量的的负样本。另一种基于anto-encoding,一种自重建方法,不受数据增强跟负样本采样策略的影响。决定基于这种方法的模型性能好坏有两个关键因素,其一是重建任务必须要对编码质量有足够的要求,其二是训练数据需要被充分利用到。
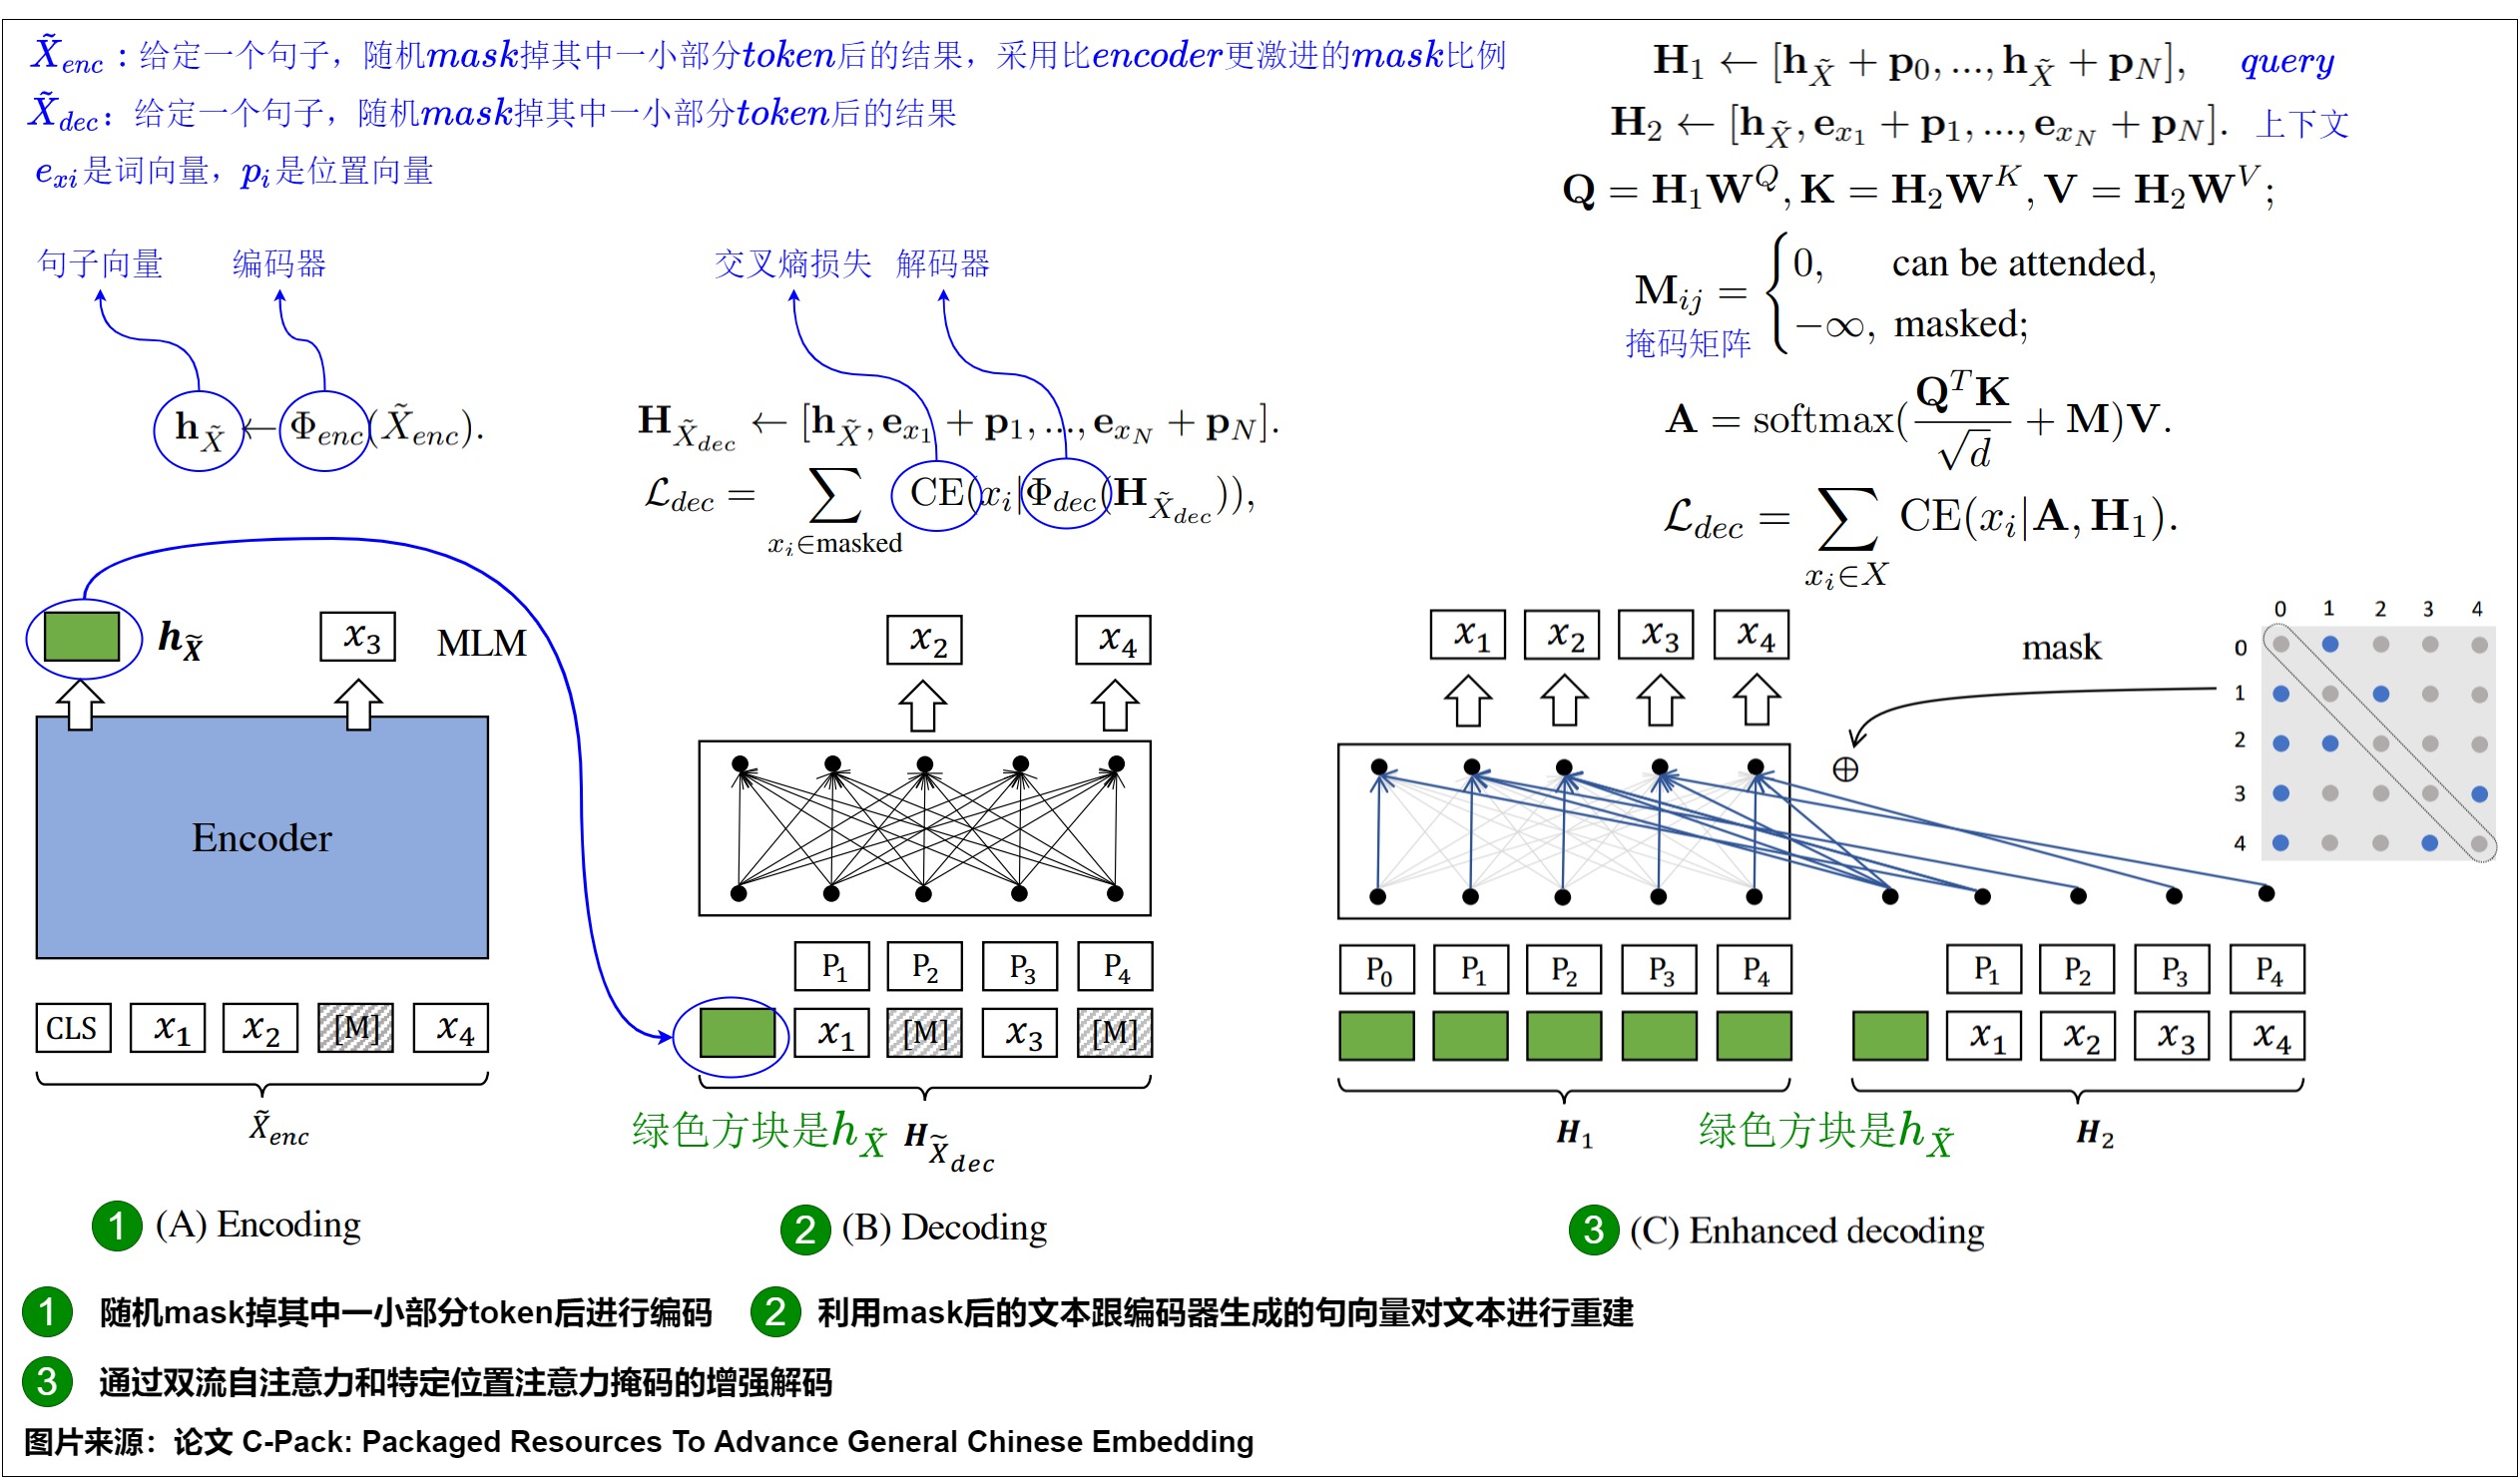
论文作者提出了RetraoMAE,它包括两个模块:
- 首先使用类似于BERT的编码器先对输入进行随机Mask,然后进行编码。
- 然后使用一个一层transformer的解码器再进行重构。通过这一过程,强迫encoder学习到良好的embedding。
Encoding
给定一个句子输入X,随机mask掉其中一小部分token后得到 $X_{enc}$ ,这里通常会采用中等的mask比例(15%~30%),从而能保留句子原本大部分的信息,然后利用一个编码器 $Φ_{enc(.)}$ 对 $X_{enc}$ 进行编码,得到对应的的句向量 ℎ 。由于采用了类似BERT的编码器,最终将[CLS]位置最后一层的隐状态作为句子向量。
Decoding
给定一个句子输入X,随机mask掉其中一部分token得到 $X_{dec}$ ,这里通常会采取比encoder部分更加激进的mask比例(50%~70%),利用mask后的文本和encoder生成的句向量对文本进行重建。
Enhanced Decoding
前面提及的解码策略有一种缺陷,就是训练信号只来源于被mask掉的token,而且每个mask掉的token都是基于同一个上下文重建的。于是研究人员提出了一种新的解码方法,Enhanced Decoding,具体做法如下。
-
首先生成两个不同的输入流H1(query)跟H2(context)
-
通过注意力机制得到新的输出A,第i个token所能看得到的其他token是通过抽样的方式决定的(要确保看不到自身token,而且要看见第一个token,也就是encoder所产出CLS句向量的信息)
-
最终利用A跟H1去重建原文本,这里重建的目标不仅仅是被mask掉的token,而是全部token。
最终RetroMAE的损失由两部分相加得到,其一是encoder部分的MLM损失,其二是deocder部分自重建的交叉熵损失。
3.6 LLM-As-Embedding
我们接下来看看使用LLM生成Embedding。下图给出了目前常见模型的总体状态。
Backbone选择
多年来,构建文本嵌入模型的主导范式依赖于预训练的双向编码器模型或仅编码器模型,如BERT和T5。之前普遍认为仅解码器模型不能用于嵌入提取。因为基于编码器的模型可以通过双向注意力捕获语义。而仅解码器模型通常使用因果注意力仅与之前的词标记交互,因此,无法像编码器 - 解码器模型那样捕获丰富的语义,例如上下文化信息。直到最近,社区才开始采用仅解码器的LLM来生成嵌入文本。从上图可以看到,在Backbone选择上,Encoder-Decoder架构中主要使用T5,Decoder-Only架构主要使用Mistral和LLaMA。
架构改进
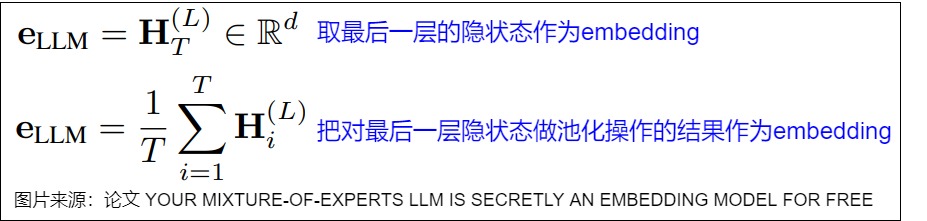
深度学习模型在处理输入数据之后得到的内部表示会具有语义和压缩的数据信息,因此我们通常提取神经网络的最后一层隐藏状态作为嵌入。
虽然Decoder-only的大模型在诸多NLP任务上表现出色,但是直接利用其生成文本表征的效果往往比较糟糕,这跟大模型本身的训练任务跟模型架构有关。因此需要对架构进行改进。
Pooling策略
Pooling是指LLM的最后一层的hidden_states经过一个额外的映射器(区别于LLM原有的Linear映射器)再得到表征,主要分为以下5种策略
-
First Pooling:使用第一个token作为表征,比如对于BERT使用 [CLS] token,对于T5使用 [START] token。
-
(Weighted) Mean Pooling:使用每个token的(加权)平均。BERT和T5使用Mean Pooling效果就较好。GPT-Style LLM让靠后的token权重更大、则效果更好。
-
(Special) Last Pooling:使用最后一个token。因为LLM的最后一个token一般和下一词的token表征对齐,所以一般采用以下两种方式进行转换:
- 使用提示词让模型在最后一个token来总结全文语义。代表工作为PromptEOL,模板是:“The sentence [X] means in a word”。
- 引入特殊token,并进行相应微调。这一系列工作主要使用句尾的作为特殊token,ChatRetriever 在末尾添加了一个Embedding序列 [EMB1], … , [EMBt]。用这部分表征作为思维链会提升表征的质量。
-
Partial Pooling:Echo 提出了Prompt 如下:Rewrite the sentence: [x], rewritten sentence: [x] 。其中两个[x]处都会填入相同的文本,从而让第2个[x]的token都能看到句子内所有token。然后取第二个[x]内的token用于pooling。
-
Trainable Pooling:在常规的pooling前加上注意力机制。NV-Embeder将LLM的最后一层hidden_states H作为Q,将K和V作为可学习参数设计了 latent attention layer,从而在Pooling前和H进行更深的交互。LMORT使用对齐均匀性指标从各层挑出一些合适的H,再输入一个多层注意力网络。
注意力架构
Decoder-Only LLM使用的单向注意力(Casual Attention)确保语言建模只能引用前缀来预测下一个令牌,然而Casual Attention可能会降低下游任务性能。因此研究人员使用以下几种方法来修改模型架构,从而适应Embedding任务。
-
保留随意注意力并使用其他技巧(例如,使用各种pooling策略)。
-
转换为双向注意力并让模型适应新结构。BELLM将LLM的最后几层改为双向注意力。NV-Embeder 进一步发现使用充足数据时,LLM无需额外操作即可全部转换至双向注意力。LLM2Vec 提出了结合MLM(masked language model)的MNTP任务(masked next token prediction任务),从而更好地利用更多数据。
额外投影层(Additional Projector)
投影层是文本嵌入中常用的策略,具体分为如下:
- 低维表征映射。将表征映射到较低维度表征(比如4096=>1024)。
- 稀疏表征映射。使用门控机制、topk-masking、正则项等方法将表征转换为稀疏表征。
- 其他用途映射。InBedder使用较短的问答对作为训练数据,预测下一词得到表征。
- Parameter-Efficient Fune-Tuning Module:是否使用参数高效的微调技术主要取决于使用的数据量,而不是资源限制。一些研究引入了BitFit或者LoRA作为PEFT模块,并使用单个数据集进行微调,这些小规模数据可以激发LLM本身所具备的语义泛化能力。其他工作使用基于数百个数据集的全参数调整和(多阶段)微调,这足以允许对模型参数进行大幅更改并避免过拟合。
我们接下来介绍几个利用大模型生成embedding的方案。
3.7 LLM2Vec
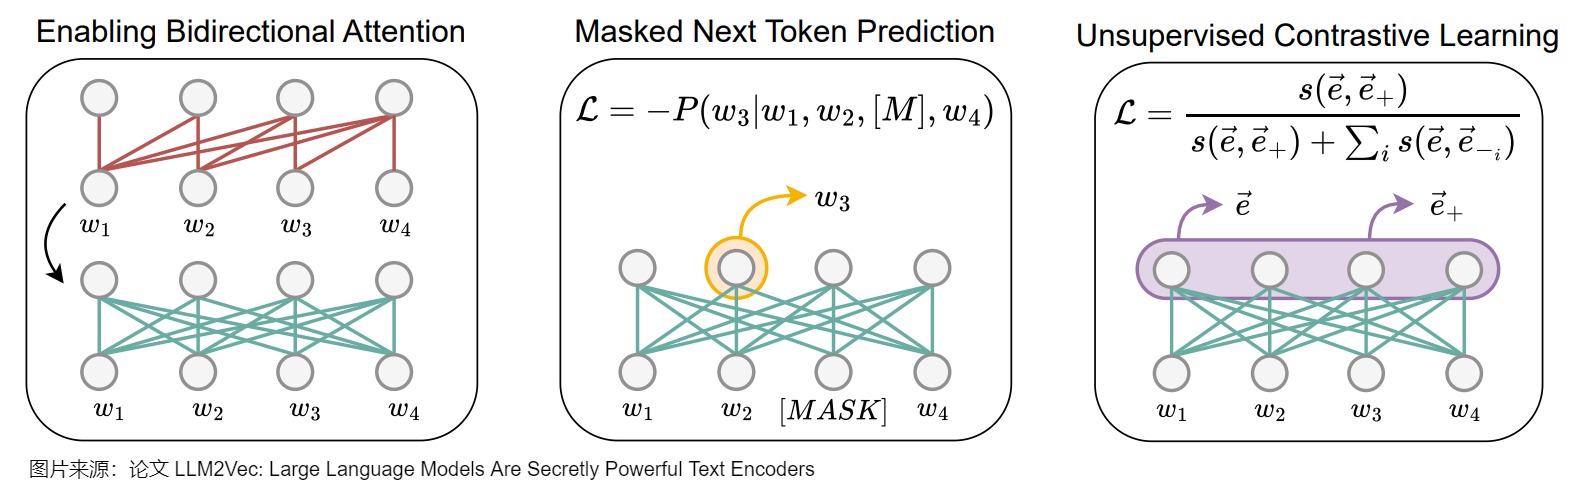
因果注意力机制的特点是每个单词只能关注之前的单词,这限制了对整个句子意义的全面理解。而LLM2Vec正是为了解决这个问题。LLM2Vec是一种能将任何decoder-only模型改造成文本表征模型的无监督方法,该方法主要涉及了双向注意力机制改造,masked next token prediction任务,以及无监督对比学习三个部分。这种方法能够有效的将大模型改造成通用化的文本编码器,而不需要其他适配任务或者数据。相比其他进一步训练的方案,LLM2Vec不需要高昂成本的标注训练数据就可以在不增加输入长度的情况下,保证推理成本。
LLM2Vec包括修改注意力机制以及两个无监督训练任务,具体如下。
- 首先直接将单向注意力机制改成双向注意力机制,使每个token都能访问序列中的所有其他token。
- 然后利用MNTP(Masked Next Token Prediction)进行训练使得模型能适配双向注意力机制,这个时候其实模型已经具备生成高质量的token级别表征的能力。
- 最后再利用无监督对比学习SimCSE(Unsupervised Contrastive Learning)进一步训练,使得模型可以生成高质量的句子级别的表征。
LLM2Vec虽然涉及两个训练任务,但都是无监督学习,不需要高质量的标注数据。
双向注意力机制
LLM2Vec的第一步是将decoder-only LLM的的单向注意力机制改成双向注意力机制,使得每个位置的token都可以看到其他位置的信息。改造的原因在于研究人员认为decoder-only LLM看不到未来信息的机制可能会损害文本表征的质量。具体操作是将解码器LLM的因果注意力掩码(causal attention mask)替换为全一掩码矩阵(all-ones attention mask),使每个token都能访问序列中的所有其他token。下图最左侧展示了LLM2Vec如何通过改变注意力掩码,将每个单词的注意力范围扩展到整个序列。这种方式允许每个单词同时考虑上下文中的所有其他单词,从而显著提升模型对语境的理解能力。
Masked next token prediction(MNTP)
完成第一步改造后,需要让模型适应新的双向注意力机制,于是研究人员就设计了MNTP这个任务,跟BERT预训练的MLM任务相似,在此步骤中,模型会隐藏句子中的某些单词,然后通过查看其他所有单词(包括隐藏单词之前和之后的上下文)来预测这些单词。具体参见下图中间部分。这一步帮助模型习惯于同时关注前后文,从而更好地理解和表示文本。
Unsupervised contrastive learning
前两步改造使得LLM可以生成高质量的token级别的表征,但是还不能生成高质量的句子级别的表征,所以研究人员直接搬用了SimCSE的无监督对比学习,对LLM做进一步的训练。具体而言是将每个位置的隐状态通过mean pooling作为句向量,通过最大化同一序列的两个不同表示之间的相似性,同时最小化与批次中其他序列表示的相似性,来提升模型性能。即通过对比学习的方式去拉进相似文本的距离,疏远不相似文本之间的距离。这样能够让模型更好地区分相似和不同的句子,从而提高句子表示的质量。具体参见下图右侧部分。
以上三步让LLM2Vec能够将任何大型语言模型转化为一个在各种NLP任务中都非常实用的文本理解和表示工具。
3.8 NV Embedding
截止2025.01,MTEB榜单里NV-Embed-v2 平均72.31分数夺得榜首,其改进思路值得借鉴。NV-Embed-v2来自论文"NV-Embed: Improved Techniques for Training LLMs as Generalist Embedding Models"。论文中基于 Mistral-7B 的预训练模型进行改造,通过增加潜在注意力层来提高表征能力。
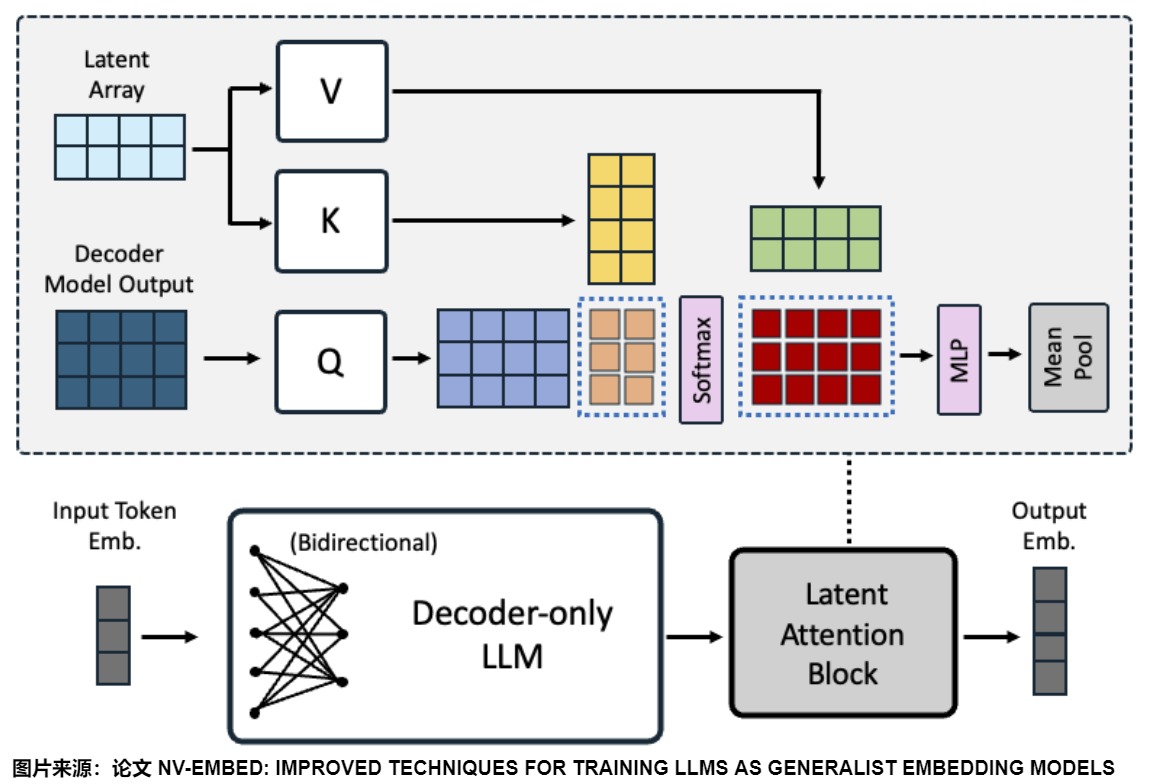
上图给出了由仅解码器LLM和潜在注意力层组成的架构设计:一个潜在注意力层层后面接上一个MLP层。
双向注意力
论文没有使用LLM2VEC和GRIT的技巧,而是直接在对比学习过程中去除了decoder-only LLM的因果注意掩码(causal attention mask),结果发现它的效果非常好。
潜在注意力层
有两种流行的方法可以获得一系列令牌的嵌入:i)mean pooling(均值池),ii)the last token embedding(最后一个令牌嵌入)。
以前的双向嵌入模型通常使用均值池mean pooling,而the last token embedding在仅解码器的LLM嵌入模型中更受欢迎。然而,这两种方法都有一定的局限性。mean pooling只是取令牌嵌入的平均值,可能会稀释关键短语中的重要信息,同时the last token embedding可能会受到近因偏差的影响,严重依赖于最后一个标记的输出嵌入。
NV-Embed提出了一个潜在注意力层(latent attention layer),该层可以在通用嵌入任务中实现更具表现力的序列池。具体来说,潜在注意力层作为一种交叉注意力的形式,把decoder-only LLM最后一层的隐状态作为query,把可训练的潜在数组(latent array)作为key和values。蓝色虚线表示QKV注意力机制中涉及的两个矩阵乘法。
MLP层
MLP就是常规MLP,它由两个线性变换组成,中间有GELU激活。
Embedding 聚合
论文在MLP层之后,可以采用两种方式来聚合输出向量,获得整个序列的嵌入。
- 采用文本的结尾的EOS token对应的输出作为整句的embedding。
- Mean-Pool: 每个token在Embeddings做平均,保留每个token的特征信息。
NV-Embed采用Mean-Pool 的方式。
3.9 通过提示工程的方法
论文“Simple Techniques for Enhancing Sentence Embeddings in Generative Language Models”通过提示工程的方法,来增加大模型的直接生成文本表征能力。
如何更好地将生成模型预测下一个Token的方式,与生成一个向量的偏差更小呢?在此论文之前,PromptEOL 是比较常见的方式(PromptEOL由一篇发表于2023年的论文"Scaling sentence embeddings with large language models"提出,是一种使用特定提示模板让LLM生成句子embedding的方法)。此论文在PromptEOL 基础上,提出了PromptSTH和PromptSUM。这三种方式具体如下:
- PromptEOL :将句子用一个“word”表示,即 This sentence : "[X]" means in one word:"。
- PromptSTH:将句子用“something”表示,即 This sentence : "[X]" means something。
- PromptSUM:本句子可以总结成什么内容,即 This sentence : "[X]" can be summarized as。
从结果上来看,在直接生成向量时,PromptEOL方式效果更好,说明与与大模型本身预训练阶段更加吻合。但相较于BERT模型直接生成向量来说,还是存在差距。
那是不是大模型直接生成向量的效果就是不理想呢?论文参考COT和ICL方式,提出Pretended Chain of Thought和Knowledge Enhancement方法,具体如下:
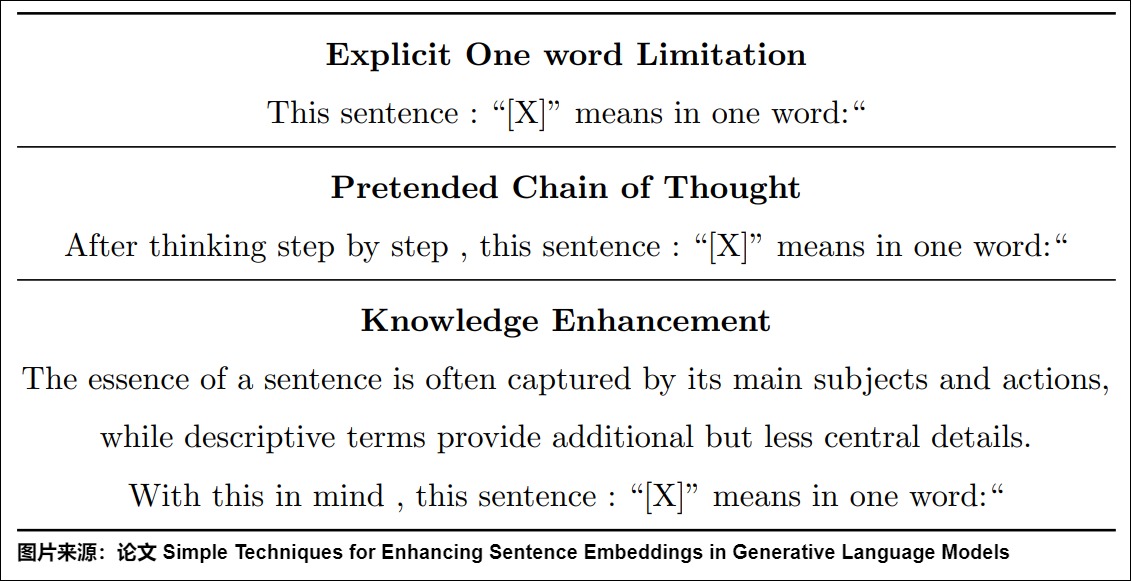
从结果上来看,通过提示词工程,不仅可以激发大模型的推理能力,大模型的向量表征能力同样可以被激发出来。
3.10 使用MoE进行Embedding
论文“YOUR MIXTURE-OF-EXPERTS LLM IS SECRETLY AN EMBEDDING MODEL FOR FREE”提出了基于MoE来生成Embedding,即MoE嵌入(MOEE),用于解决LLMs作为嵌入模型的问题。
研究背景
尽管LLMs在生成任务上表现出色,但其解码器架构限制了其在没有进一步表示微调的情况下作为嵌入模型的潜力。研究难点在于:LLMs的最终或中间隐藏状态(HS)可能无法捕捉输入令牌的关键特征和所有信息,尤其是当涉及到细微语义差异时。此外,现有的嵌入方法通常依赖于静态架构,可能忽略了输入的可变性。
动机
作者们发现 MoE 中的路由权重可以为解码器嵌入提供补充信息。MoE模型通过动态路由机制将输入分配给不同的专家。每个专家专注于输入的特定特征,每一层的路由权重反映了对输入标记的推理选择,或者说,路由权重表示每个专家对最终输出的贡献。因此路由权重包含了隐藏状态嵌入可能丢失的输入的语义信息。通过连接所有层的路由权重,可以形成基于路由的嵌入$e_{RW}$。像下图标号1那样描述。其中 g 是 门控函数,H 表示隐藏状态。论文将所有 MoE 层的路由权重连接起来,以避免丢失模型的推理选择。
论文又通过聚类分析和相关性分析,研究了RW和HS嵌入的不同之处。发现RW和HS嵌入在聚类行为和主题上有所不同,且它们之间的相关性较低,这表明它们具有互补性。具体来说,RW和HS嵌入的聚类结果显示出中等的重叠(AMI和NMI在0.29左右),但它们的Jaccard相似度和精确匹配率较低(分别为0.06和45.54%)。这表明RW和HS嵌入在结构化和主题上捕获了不同的信息。进一步的分析显示,RW嵌入强调输入的不同主题,而HS嵌入则更好地捕捉到句子的整体结构和意义。

因此,基于RW和HS嵌入的互补性,为了充分利用路由权重和解码器嵌入,作者们提出了一种称为 MoE 嵌入(MoEE)的方法,以形成更全面的嵌入表示。MoEE 有两种类型。
- 串联组合:如上图标号2所示。这种方法很简单,我们只需将路由权重和解码器嵌入直接连接起来。作者们称这种方法为 MoEE(concat)。它可以保留每个路由权重捕获的不同信息,同时允许下游任务利用组合表示。该方案的优点是:简单直观,保留了HS和RW嵌入的独立信息,允许下游任务灵活地利用这两种表示。该方案的缺点是:可能会引入冗余信息,因为两种嵌入的类型和结构不同,简单的串联可能导致某些信息的重复或抵消。
- 加权求和集成:如上图标号3所示。分别计算HS和RW嵌入的相似度得分,然后进行加权求和,表示为 MoEE (sum)。𝛂 是一个超参数,用于控制路由权重的贡献。该方案的优点是:通过加权求和可以平衡RW和HS嵌入的贡献,避免直接融合带来的复杂性。这种方法允许根据不同任务的需求调整RW和HS的权重,优化性能。该方案的缺点是:需要设置超参数α来控制RW的贡献,这可能需要额外的实验和调整。此外,加权求和可能会掩盖某些嵌入的特定优势。
此外,作者们利用 PromptEOL 技术 来增强 MoEE。PromptEOL的使用显著增强了MOEE方法的稳定性和性能,使其在不确定性较高的提示条件下也能保持较高的嵌入质量。
0xFF 参考
ALBERT: A Lite BERT for Self-supervised Learning of Language Representations[C]// International Conference on Learning Representations
Distributed Representations of Words and Phrases and their Compositionality
Echo embedding: 把文本重复两次,自回归模型就能生成更高质量的embedding,
Efficient Estimation of Word Representations in Vector Space
Embeddings等技术解析J
https://arxiv.org/pdf/2307.16645.pdf
Is Cosine-Similarity of Embeddings Really About Similarity?
LLM2Vec: Large Language Models Are Secretly Powerful Text Encoders
LLM2Vec: 改造Decoder-only LLM以生成高质量text embedding 泽龙
RetroMAE v2: Duplex Masked Auto-Encoder For Pre-Training Retrieval-Oriented Language Models
RetroMAE: Pre-Training Retrieval-oriented Language Models Via Masked Auto-Encoder
RetroMAE: Pre-Training Retrieval-oriented Language Models Via Masked Auto-Encoder阅读笔记 陌路
SimCSE: Simple Contrastive Learning of Sentence Embeddings
Simple Techniques for Enhancing Sentence Embeddings in Generative Language Models
When Text Embedding Meets Large Language Model: A Comprehensive Survey
Word Embeddings: Encoding Lexical Semantics
Your Mixture-of-Experts LLM is Secretly an Embedding Model for Free
YOUR MIXTURE-OF-EXPERTS LLM IS SECRETLY AN EMBEDDING MODEL FOR FREE
【LLM论文日更】 | 你的专家组合LLM是秘密的免费嵌入模型 OptimaAI
【手撕LLM_Nv Embed】英伟达的LLM-as-Embedding ICLR高分, RAG检索有救了! 小冬瓜AIGC [手撕LLM]
为什么 Bert 的三个 Embedding 可以进行相加?
从数学到神经网络(一)结构篇:从几何、语言到TOKEN 大象Alpha [大象Alpha]
余弦相似度可能没用?对于某些线性模型,相似度甚至不唯一 [机器之心]
关于维度公式“n > 8.33 log N”的可用性分析 苏剑林
啥是Embedding(嵌入技术)?【UNDONE】 番子xiwa
大模型之嵌入与向量化的区别是什么? DFires [AI探索时代]
如何快速提高大模型的向量表征效果能力? 刘聪NLP
如何用MoE进行Embedding的获取 Alex [算法狗]
如何看待瘦身成功版BERT——ALBERT?
微软E5-mistral-7b-instruct: 站在LLM肩膀上的text embedding
最小熵原理(六):词向量的维度应该怎么选择? 苏剑林
残差网络解决了什么,为什么有效?
深入解析 Transformers 框架(五):嵌入(Embedding)机制和 Word2Vec 词嵌入模型实战 [老牛同学]
深度学习——Bert深度解析
综述分享-北航&阿里-当LLM遇上Embedding BrownSearch
论文分享|Arxiv2024'麦吉尔大学|LLM2Vec—将LLM转换为文本编码器 BrownSearch
词向量与Embedding究竟是怎么回事? 苏剑林
词向量嵌入发展综述 安德安德鲁
详解Albert:A LITE BERT FOR SELF-SUPERVISED LEARNING OF LANGUAGE REPRESENTATIONS boom
语言模型之Text embedding(思考篇) 泽龙
语言模型输出端共享Embedding的重新探索 苏剑林
https://colala.berkeley.edu/papers/piantadosi2024why.pdf
https://pytorch.org/tutorials/beginner/nlp/word_embeddings_tutorial.html
参考链接
探秘Transformer系列之(7)--- embedding