使用GIT,免不了会接触到GIT的命令行界面,但是在这个界面上面貌似不能复制粘贴,比较麻烦,网上查询了一下,可以按照下图的方式来操作,就是有些费劲啊。
右击标题栏,在弹出的菜单里面选择复制粘贴。
作者: 默默
码农
调试UMDF驱动
相对于调试运行在最高特权级的WDM、KMDF驱动,调试运行在ring3的UMDF驱动难度大为降低,不需要双机调试,我们可以像调试普通应用程序和服务一样在一台电脑上完成。
调试方法:
- 编译好需要调试的驱动(包括安装用的inf等),连接硬件,把需要调试的驱动安装上。然后断开硬件连接(对于USB设备来说直接拔出就可以了)。
- 启动WinDBG,设置好符号路径,特别是被调试驱动的符号。详细设置可以参考Debugging Tools的文档。
- 运 行regedit,打开
1HKEY_LOCAL_MACHINE\SOFTWARE\Microsoft\Windows NT\CurrentVersion\WUDF\Services\{193a1820-d9ac-4997-8c55-be817523f6aa}
如果之前从 未调试过UMDF驱动,会发现HostProcessDbgBreakOnDriverLoad键值为0,这个键值的含义是延迟多少秒加载驱动对象。我们 把它修改为15秒(十六进制0xF,如果手慢可以改得更大)。注意这个键值不影响DllMain,如果要调试DllMain,请修改 HostProcessDbgBreakOnStart。 - 插入硬件,并且在15秒内使用WinDBG的Attach to Process(快捷键是F6),找到UMDFHost.exe,attach即可。注意如果系统有多个使用UMDF驱动的硬件,就会有多个 UMDFHost.exe进程,为了不致混淆,请提前移除不用的硬件。
- 完成调试后,请恢复注册表(将延迟修改为0),以免正常硬件的驱动加载被延迟。
链接 http://hyperiris.blog.163.com/blog/static/180840059201026477127/
Windows打开应用,提示“此程序被组策略阻止”
Windows打开应用,提示“此程序被组策略阻止”,该问题为组策略限制了用户使用某个应用程序,一般可以在
|
1 |
控制面板--->管理工具--->本地安全策略-->软件限制策略 |
中找到并且解除限制。但是有时候采用域控制的网络,这个控制信息可能存储在域控制服务器上面,这个时候就不好处理了,其实域控制的信息,也是要提前写入到本机的,总不能用户拔掉网线就可以使用某个应用,插上网线就不能使用某个应用了吧。因此只要找到注册表位置,删除即可。
组策略的注册表位置如下所示
|
1 |
[HKEY_LOCAL_MACHINE\Software\Policies\Microsoft] |
先备份一下注册表,然后全部删除,重启机器即可。
其他的可能存储软件限制逻辑的注册表位置如下所示,可以自行尝试。
|
1 2 3 4 5 6 |
[HKEY_LOCAL_MACHINE\Software\Policies\Microsoft] [HKEY_LOCAL_MACHINE\Software\Microsoft\Windows\CurrentVersion\Policies] [HKEY_LOCAL_MACHINE\Software\Microsoft\Windows\CurrentVersion\Group Policy] [HKEY_CURRENT_USER\Software\Policies\Microsoft] [HKEY_CURRENT_USER\Software\Microsoft\Windows\CurrentVersion\Group Policy] [HKEY_CURRENT_USER\Software\Microsoft\Windows\CurrentVersion\Policies] |
How to successfully build packages for WD My Cloud from source
The WD My Cloud comes with a Debian wheezy system on it. However WD customized that in a way that it is hardly possible (if not impossible at all) to install new packages using the standard "apt-get install <package name>" way, especially when you update the device firmware to version 4.x or later. The latest firmware, in fact, uses a modified Debian system with 64K sized memory pages: if you install a package using "apt-get install <package name>" from the standard repositories, almost certainly it won't run and produce just a laconic "Killed" output.
继续阅读How to successfully build packages for WD My Cloud from source
继续阅读How to successfully build packages for WD My Cloud from source
Ubuntu下HTTP多线程下载工具
Windows下的下载工具--迅雷,之所以下载速度快,乃是它能搜索资源、为己所用,而不是仅仅从原始地址这单一资源处下载。
Ubuntu下也有类似的工具,那就是aira2。
aira2是一个命令行下载工具,可以配合其他图形界面的下载软件使用。我用的是uget+aria2。uget本身是一个小巧实用的多线程下载工具,加上aria2作为插件,下载速度有明显提高。
一、安装。
uget和aria2都可以在“软件中心”中安装。但是版本都是比较旧的版本。
如果需要安装最新的版本,可以在终端中添加ppa进行安装:
1.uget的安装:
|
1 2 3 |
sudo add-apt-repository ppa:plushuang-tw/uget-stable sudo apt-get update sudo apt-get install uget |
2.aria2的安装:
|
1 2 3 |
sudo add-apt-repository ppa:t-tujikawa/ppa sudo apt-get update sudo apt-get install aria2 |
安装完aria2后,可以在终端中运行aria2 -v,查看版本和支持的特性。需要1.10以上的版本才能支持资源搜索。
二、使用与设置技巧
1.主界面及版本
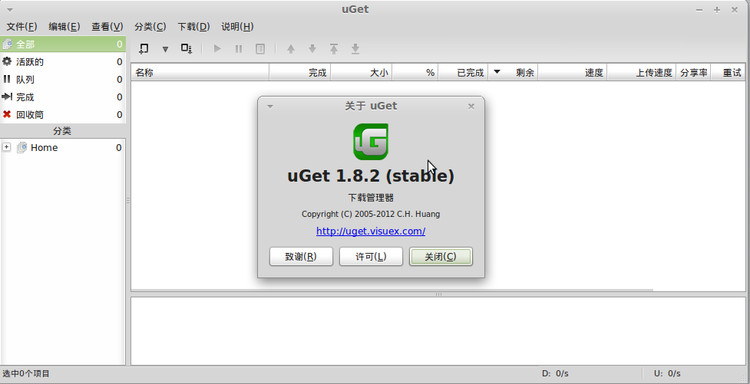
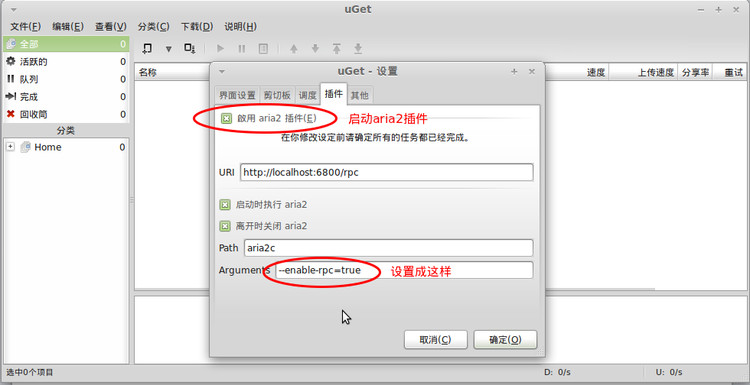
2.启用aria2插件
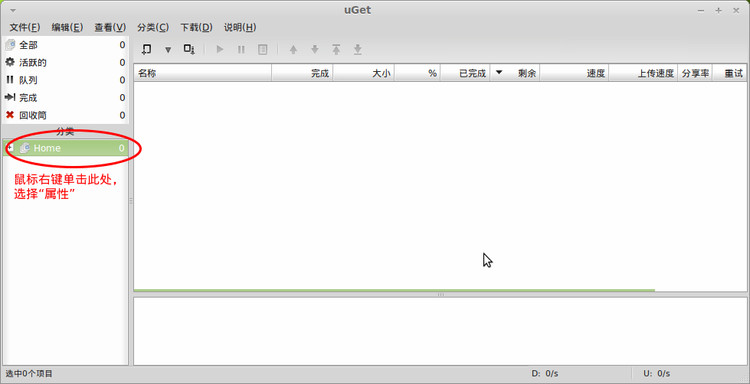
3.设置下载任务的属性(同时下载几个任务、多少个服务器、保存位置等)
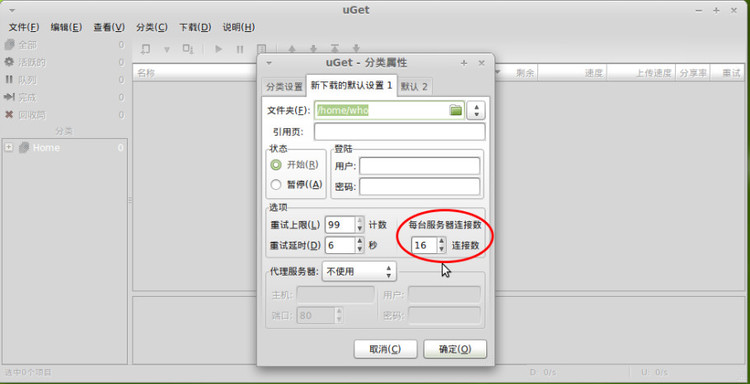
服务器数设置为16比较合适。
参考网址 http://blog.csdn.net/luojiming1990/article/details/9078447
UTF8 + BOM产生问题与小结
写python脚本的时候发现这样一个问题:从xls文件导出到txt时,无法直接转换为int型数据,输出查看发现和文件编码方式产生的附加信息有关用一个简单的文件举例
|
1 2 3 4 5 6 7 8 9 10 |
90905 90907 90908 90909 90939 90940 90946 90959 90961 90965 |
当文件分别用ascii,utf8,utf8+bom作为编码格式时,显示输出结果如下:
使用ascii编码的输出:
|
1 |
['90905\r\n', '90907\r\n', '90908\r\n', '90909\r\n', '90939\r\n', '90940\r\n', '90946\r\n', '90959\r\n', '90961\r\n', '90965'] |
使用utf8编码的输出:
|
1 |
['90905\r\n', '90907\r\n', '90908\r\n', '90909\r\n', '90939\r\n', '90940\r\n', '90946\r\n', '90959\r\n', '90961\r\n', '90965'] |
使用bom编码的输出:
|
1 |
['\xef\xbb\xbf90905\r\n', '90907\r\n', '90908\r\n', '90909\r\n', '90939\r\n', '90940\r\n', '90946\r\n', '90959\r\n', '90961\r\n', '90965'] |
原来utf8+bom不能直接转换int的原因在这里,它在文件头插入了一个表示文件编码的信息\xef\xbb\xbf,那么UTF-8(无BOM)和UTF-8这两个有什么区别呢?BOM是什么呢?
什么是BOM?
BOM: Byte Order Mark
UTF-8 BOM又叫UTF-8 签名,其实UTF-8 的BOM对UFT-8没有作用,是为了支持UTF-16,UTF-32才加上的
BOM,BOM签名的意思就是告诉编辑器当前文件采用何种编码,方便编辑器识别,但是BOM虽然在编辑器中不显示,但是会产生输出,就像多了一个空行。
Byte Order Marks are special characters at the beginning of a Unicode file to indicate whether it is big or little endian, in other words does the high or low order byte come first. These codes also tell whether the encoding is 8, 16 or 32 bit. You can recognise Unicode files by their starting byte order marks, and by the way Unicode-16 files are half zeroes and Unicode-32 files are three-quarters zeros. Unicode Endian Markers
Byte-order mark Description
EF BB BF UTF-8
FF FE UTF-16 aka UCS-2, little endian
FE FF UTF-16 aka UCS-2, big endian
00 00 FF FE UTF-32 aka UCS-4, little endian.
00 00 FE FF UTF-32 aka UCS-4, big-endian.
UTF的字节序和BOM
UTF- 8以字节为编码单元,没有字节序的问题。UTF-16以两个字节为编码单元,在解释一个UTF-16文本前,首先要弄清楚每个编码单元的字节序。例如收到 一个“奎”的Unicode编码是594E,“乙”的Unicode编码是4E59。如果我们收到UTF-16字节流“594E”,那么这是“奎”还是 “乙”?
Unicode规范中推荐的标记字节顺序的方法是BOM。BOM不是“Bill Of Material”的BOM表,而是Byte Order Mark。BOM是一个有点小聪明的想法:
在 UCS编码中有一个叫做"ZERO WIDTH NO-BREAK SPACE"的字符,它的编码是FEFF。而FFFE在UCS中是不存在的字符,所以不应该出现在实际传输中。UCS规范建议我们在传输字节流前,先传输 字符"ZERO WIDTH NO-BREAK SPACE"。
这样如果接收者收到FEFF,就表明这个字节流是Big-Endian的;如果收到FFFE,就表明这个字节流是Little-Endian的。因此字符"ZERO WIDTH NO-BREAK SPACE"又被称作BOM。
UTF-8不需要BOM来表明字节顺序,但可以用BOM来表明编码方式。字符"ZERO WIDTH NO-BREAK SPACE"的UTF-8编码是EF BB BF。所以如果接收者收到以EF BB BF开头的字节流,就知道这是UTF-8编码了。
Windows就是使用BOM来标记文本文件的编码方式的。
原来BOM是在文件的开始加了几个字节作为标记。有了这个标记,一些协议和系统才能识别。
ok,说了这么多背景,那么如何解决这个问题呢?
如何使用BOM头
BOM头的删除
对UTF-16, Python将BOM解码为空字串。然而对UTF-8, BOM被解码为一个字符,如例:
|
1 2 3 |
>>> codecs.BOM_UTF16.decode( "utf16" ) >>> codecs.BOM_UTF8.decode( "utf8" ) u'\ufeff' |
简单的做法是在文件读入时使用
|
1 2 3 |
import codecs f = codecs.open(sys.argv[1],'r', 'utf_8_sig') |
即可,具体可以参见[http://docs.python.org/library/codecs.html#module-encodings.utf_8_sig|http://docs.python.org/library/codecs.html#module-encodings.utf_8_sig]
或者:
|
1 |
u.lstrip( unicode( codecs.BOM_UTF8, "utf8" ) ) |
BOM头的添加
|
1 2 3 4 5 6 7 8 |
out = file( "someFile", "w" ) out.write( codecs.BOM_UTF8 ) out.write( unicodeString.encode( "utf-8" ) ) out.close() out = file( "someFile", "w" ) out.write( codecs.BOM_UTF8 ) out.write( unicodeString.encode( "utf-8" ) ) out.close() |
参考 http://www.cnblogs.com/DDark/archive/2011/11/28/2266085.html
python下的编码检测——chardet
在处理字符串时,常常会遇到不知道字符串是何种编码,如果不知道字符串的编码就不能将字符串转换成需要的编码。面对多种不同编码的输入方式,是否会有一种有效的编码方式?chardet是一个非常优秀的编码识别模块。
chardet 是python的第三方库,需要下载和安装。现在 pip 已经可以很好的支持这个版本的下载了,建议使用pip 安装,关于pip 的安装部分,可以参考Windows下python的包管理器pip安装
在安装完chardet模块,我就可以使用它了,来看一段示例代码。
|
1 2 3 4 5 6 7 8 9 |
import chardet import urllib #可根据需要,选择不同的数据 TestData = urllib.urlopen('http://www.baidu.com/').read() print chardet.detect(TestData) 运行结果: {'confidence': 0.99, 'encoding': 'GB2312'} |
运行结果表示有99%的概率认为这段代码是GB2312编码方式。
另外一个相对高级的应用。
|
1 2 3 4 5 6 7 8 9 10 11 12 13 14 15 16 17 |
import urllib from chardet.universaldetector import UniversalDetector usock = urllib.urlopen('http://www.baidu.com/') #创建一个检测对象 detector = UniversalDetector() for line in usock.readlines(): #分块进行测试,直到达到阈值 detector.feed(line) if detector.done: break #关闭检测对象 detector.close() usock.close() #输出检测结果 print detector.result 运行结果: {'confidence': 0.99, 'encoding': 'GB2312'} |
应用背景,如果要对一个大文件进行编码识别,使用这种高级的方法,可以只读一部,去判别编码方式从而提高检测速度。
Windows下python的包管理器pip安装
做python开发,要用到第三方包,关于MAC下面如何安装Pip ,可以参考前面的 Mac OS 10.9 下python安装easy_install pip 现在我们看看在Windows下面的操作,打开 Pip的官方安装指南https://pip.pypa.io/en/latest/installing.html
Installation
Python & OS Support
pip works with CPython versions 2.6, 2.7, 3.1, 3.2, 3.3, 3.4 and also pypy.
pip works on Unix/Linux, OS X, and Windows.
Note
Python 2.5 was supported through v1.3.1, and Python 2.4 was supported through v1.1.
Install pip
To install or upgrade pip, securely download get-pip.py.(如果官网下载不下来,可以点这个链接在本网站下载)
Then run the following (which may require administrator access):
|
1 |
python get-pip.py |
If setuptools (or distribute) is not already installed, get-pip.py will install setuptools for you. [2]
To upgrade an existing setuptools (or distribute), run pip install -U setuptools. [3]
To enable the use of pip from the command line, ensure the Scripts subdirectory of your Python installation is available on the system PATH. (This is not done automatically.)
Additionally, get-pip.py supports using the pip install options and the general options. Below are some examples:
Install from local copies of pip and setuptools:
|
1 |
python get-pip.py --no-index --find-links=/local/copies |
Install to the user site [4]:
|
1 |
python get-pip.py --user |
Install behind a proxy:
|
1 |
python get-pip.py --proxy="[user:passwd@]proxy.server:port" |
Using Package Managers
On Linux, pip will generally be available for the system install of python using the system package manager, although often the latest version will be unavailable.
On Debian and Ubuntu:
|
1 |
sudo apt-get install python-pip |
On Fedora:
|
1 |
sudo yum install python-pip |
RicheditCtrl 控件在不同语言环境的操作系统上可能出现的乱码问题
由于工作上需要,把软件移植到英文版的os上(软件已是unicode版本的),发现RicheditCtrl
控件上显示的字体(本来内容应该显示为中文)乱码了。
发生乱码的具体代码:
|
1 2 3 |
mRichEditCtrl.SetSel(-1, -1); mRichEditCtrl.ReplaceSel( (LPCTSTR)Message.GetBuffer()); Message.ReleaseBuffer(); |
查找原因:可能是控件不了解字符串已经是unicode代码,所以控件根据locale 的code page来硬性将代码转换为unicode显示,所以出现乱码。
解决方法:
|
1 2 3 4 5 6 7 8 9 10 11 |
mRichEditCtrl.SetSel(-1, -1); #if UNICODE SETTEXTEX SetTxtEx = {0,}; SetTxtEx.flags = ST_SELECTION; SetTxtEx.codepage = 1200; BOOL bRet = ::SendMessage(mRichEditCtrl.GetSafeHwnd(), EM_SETTEXTEX, (WPARAM)&SetTxtEx, (LPARAM)Message.GetBuffer()); ASSERT(bRet); #else mRichEditCtrl.ReplaceSel( (LPCTSTR)Message.GetBuffer()); #endif Message.ReleaseBuffer(); |
The code page used to translate the text to Unicode. If codepage is 1200 (Unicode code page), no translation is done. If codepage is CP_ACP, the system code page is used.
Ubuntu 14使用Nexus2.x为Maven3.x搭建私服构件仓库
一、下载与安装Nexus
想为Maven搭建私服,我们可以选择使用Nexus工具,目前已知提供war包的版本为2.2.0,其下载地址为:http://www.sonatype.org/nexus/go
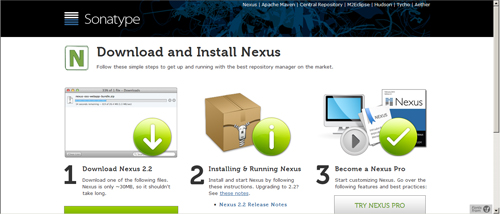
这里我们下载War包,直接部署到Tomcat 7 下面,Ubuntu 下面是 /var/lib/tomcat7/webapps。
接下来我们可以在浏览器中输入http://127.0.0.1:8080/nexus/查看Nexus是否成功.
如果提示错误,则到 /var/log/tomcat7/localhost.YYYY-MM-DD.log 下面查看日志,有可能报告 /usr/share/tomcat7/sonatype-work 权限问题,则说明Nexus 没有权限创建这个目录,因此我们需要手工创建这个目录,然后赋予这个目录 777权限,然后重启 Tomcat.
目前最新的版本Nexus 2.12.0-01,(Nexus OSS官网下载2.x的Tomcat/WAR版本) 。3.x版本已经不提供WAR包下载了,只能是使用Jetty的版本了。
Ubuntu下面的操作如下:
|
1 2 3 4 5 6 7 8 9 |
$ cd ~ $ wget https://sonatype-download.global.ssl.fastly.net/nexus/oss/nexus-2.12.0-01-bundle.tar.gz $ sudo mkdir /var/opt/nexus-2.12.0-01 $ sudo tar -zxvf nexus-latest-bundle.tar.gz -C /var/opt/nexus-2.12.0-01 $ sudo ln -s /var/opt/nexus-2.12.0-01/nexus-2.12.0-01/ /var/opt/nexus |
修改bin/jsw/conf/wrapper.conf,设置wrapper.java.command=jdk所在目录/bin/java。
|
1 2 3 4 |
$ whereis java java: /usr/bin/java /usr/share/java /usr/share/man/man1/java.1.gz $ sudo vim /var/opt/nexus/bin/jsw/conf/wrapper.conf |
修改后的内容如下:
|
1 2 3 |
.......... wrapper.java.command=/usr/bin/java .......... |
设置目录的权限
|
1 2 3 4 5 6 7 8 9 |
$ chmod -R 777 /var/opt/nexus-2.12.0-01/sonatype-work $ chmod -R 777 /var/opt/nexus/logs $ chmod -R 777 /var/opt/nexus/tmp $ chmod -R 777 /var/opt/nexus/bin/jsw/linux-x86-64 $ chmod -R 777 /var/opt/nexus/bin/jsw/linux-x86-32 |
启动服务
|
1 2 3 4 |
$ /var/opt/nexus/bin/nexus start Starting Nexus OSS... Started Nexus OSS. |
这种安装模式下,访问的链接地址为http://localhost:8081/nexus
注意,首次启动的耗时时间很长,貌似需要建立数据库等,需要耐心等待几分钟。
如果成功,则出现下面的界面
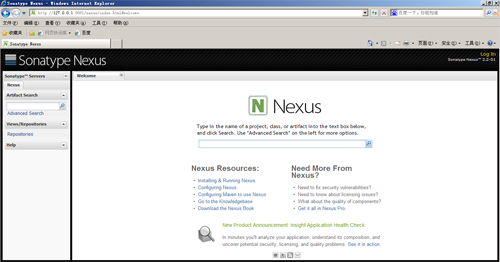
通过上图我们可以发现我们已经成功的启动了Nexus,那么接下来要做的事情就更有意思了,在后续章节中笔者会陆续讲到应该如何使用Nexus工具来配置和管理咱们的私服仓库。
二、仓库类型
在上一章节中,笔者讲解了如何下载与安装Nexus工具。那么本章节咱么来看看如何使用Nexus工具配置和管理私服仓库。当然在使用Nexus之前你是需要登录的,缺省账号密码为:
account:admin;
password:admin123;
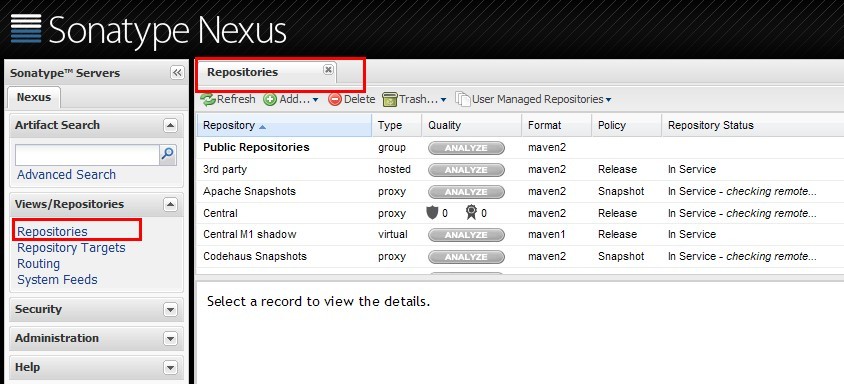
当成功登录后,你可以单击 Repositories属性看到如下页面:
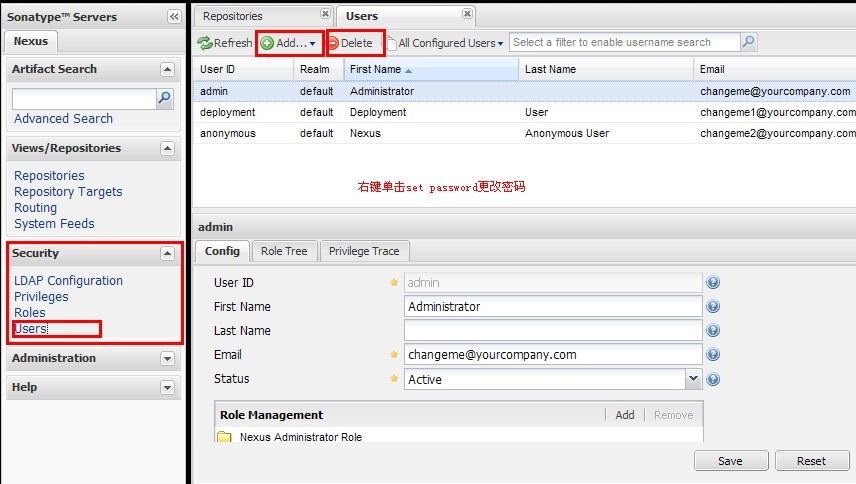
由于admin这个账号是属于Administrator权限的,你也可以通过单击Security属性进行账户的配置:
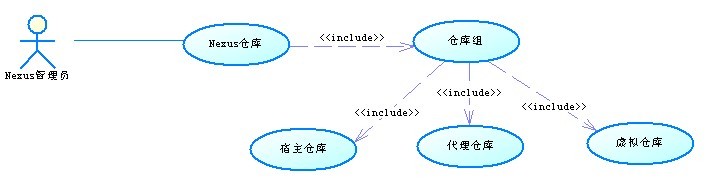
Nexus的仓库类型一共有4种,每一种仓库类型均对应有不同的操作方式:
1、group: 仓库组;
2、hosted:宿主;
3、proxy:代理;
4、virtual:虚拟;
来吧,咱们先谈谈仓库组这个概念,一个仓库组类似一个仓库集合,它和仓库之间是一对多的关系,也就是说一个仓库组可以允许包含多个仓库,Nexus仓库用例图如下:
在咱们弄明白仓库组的作用后,咱们接着来看宿主仓库是干什么的。其实所谓宿主仓库可以理解为自定义仓库,用于存放一些在中央仓库无法下载的构件,比如自定义构件(你可以手动将自定义构件上传至hosted中)。
代理仓库起到的作用是代理作用,假设本地仓库向私服进行请求时,首先会去私服仓库的本地路径中寻找构件,如果没有找到则会从中央仓库进行下载。
虚拟仓库省略...
三、使用Nexus管理私服仓库
在了解Nexus的4种仓库类型后,咱们接下来要做的事情就是使用Nexus工具来管理咱们的私服仓库。先来看看Nexus为我们提供的一些缺省仓库:
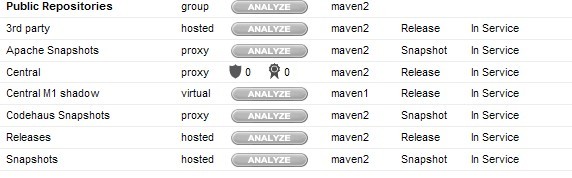 从上图我们可以看出Nexus缺省为我们定义了1个仓库组,7个仓库。当中最主要的几个仓库为:
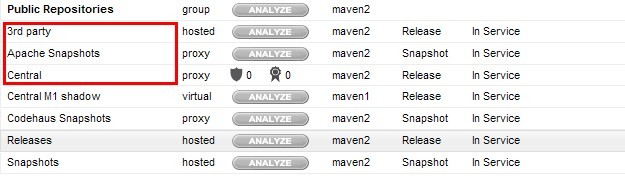
3rd party(宿主仓库):用于存放一些在中央仓库无法下载的构件仓库;
Apache Snapshots(代理仓库):代理ApacheMaven仓库快照版本的构件仓库;
Central(代理仓库):代理Maven中央仓库中发布版本构件的仓库;
当然你可以根据项目需要新建仓库组及仓库,但在建立这些私有的仓库之前,咱们还是先来看看如何使用Nexus为咱们提供的缺省构件仓库(其实很多时候你真没必要去新建仓库)。
选择Public Repositories分组,单击configuration选项,你可以为仓库组添加对应的仓库:
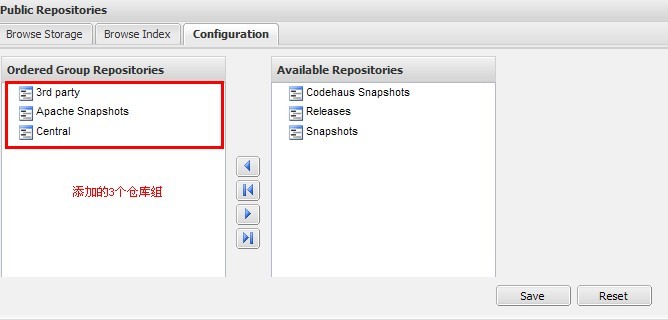
单击Save按钮保存即可配置完成。这里有一点需要提醒大家的是,仓库的添加顺序直接决定了构件的下载顺序,换句话来说我们应该把需要从中央仓库或者其他远程仓库下载构件的代理仓库添加在最后。
当咱们成功将指定的仓库集合添加进仓库组后,接下来我们来为3rd party(宿主仓库)上传自定义构件,所谓自定义构件指的是无法从Maven的中央仓库进行下载的构建。
笔者在此选用的是最简单方便的手动上传构件(当然上传构件至宿主仓库还有一些方式,但笔者还是侧重于最简便的方式)。
单击3rd party(宿主仓库)的Artifact Upload选项,我们首先来上传一个基于Maven项目的自定义构件: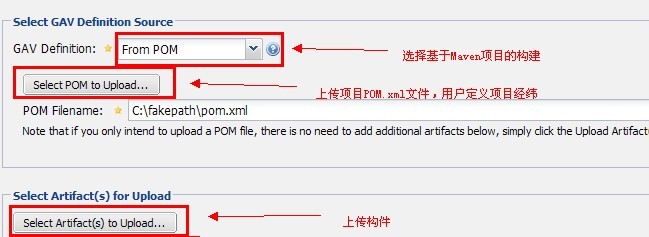
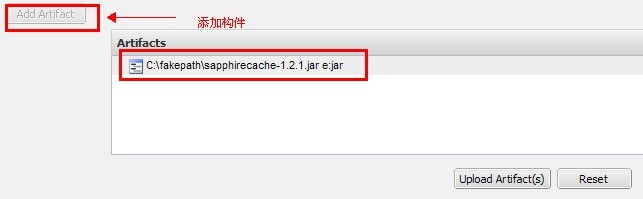
最后别忘记了添加构件:
如果你的构件不是基于Maven的呢?那么你可以选择GAV Parameters属性: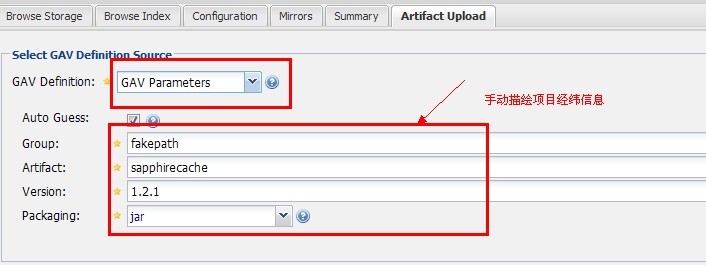
接下来,需要配置 Maven 来连接到似有仓库,如果需要全局配置,则配置地址为 ~\.m2\setting.xml,如果需要根据工程配置,则需要跟pom.xml在同一个目录下面即可,文件存在则修改,不存在则创建,内容如下
|
1 2 3 4 5 6 7 8 9 10 11 12 13 14 15 16 17 18 19 20 21 22 23 24 25 26 27 28 29 30 31 32 33 |
<profiles> <profile> <id>dev</id> <repositories> <repository> <id>nexus</id> <url>http://127.0.0.1:8080/nexus/content/groups/public/</url> <releases> <enabled>true</enabled> </releases> <snapshots> <enabled>true</enabled> </snapshots> </repository> </repositories> <pluginRepositories> <pluginRepository> <id>nexus</id> <url>http://127.0.0.1:8080/nexus/content/groups/public</url> <releases> <enabled>true</enabled> </releases> <snapshots> <enabled>true</enabled> </snapshots> </pluginRepository> </pluginRepositories> </profile> </profiles> <activeProfiles> <activeProfile>dev</activeProfile> </activeProfiles> |