WEP加密报文如下,其加密密钥为ASCII字符串:12345

将报文以十六进制显示,红色表示加密部分
0010 00 11 22 33 44 55 10 00 00 00 3C FC BF 00 9A 6E
0020 50 1D C4 2D 3D 6B B1 55 FD DB D9 2F 9F EB 81 5F
0030 A0 53 E2 DD CD E5 25 83 E9 87 98 D1 70 2E 55 8A
0040 9D A9 21 35 FF 09 E8 03 0E 77 DD F9 8D 5C 0A 78
0050 E8 C6 08 76 99 BD 6F BF 75 48 4F BD 5D 76 C5 F9
0060 3D A5 5D BA EE DD
具体加密过程见下图 -- 引用自 Wikipedia(加上评注)
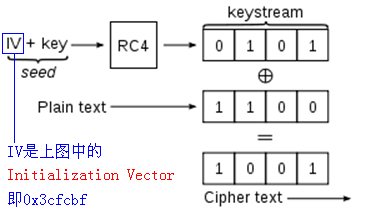
上图说明,将报文中的 Initialization Vector 字段和 WEP 密钥(连接后)作为 RC4 算法的密钥种子,生成密钥码流,再逐个与明文异或,就得到密文
现在已知报文密钥,剩下就是利用工具对其解密得到明文—这里我们继续利用 OpenSSL
OpenSSL 的 enc 命令支持 rc4 算法,其 -K 选项后跟 RC4 密钥种子,对应上图中的 seed
不过在使用前,需要改动一点代码,因为 enc 命令强制使用固定长度的 seed(实际 RC4 允许变长的 seed),具体为
rc4 128 bit
rc4-40 40 bit
如果 -K 选项指定的 seed 长度不足,则会用零补齐,凑够固定长度,如下
|
1 2 |
C:\>openssl rc4 -K ABC -iv 0 -nosalt -e -nopad -P key=ABC00000000000000000000000000000 |
如果 seed 超出固定长度,则截短为固定长度
|
1 2 |
C:\>openssl rc4 -K 0123456789ABCDEF0123456789ABCDEF0 -iv 0 -nosalt -e -nopad -P key=0123456789ABCDEF0123456789ABCDEF |
以上使用 -P 选项打印实际的 key(其实是 seed)
这里 RC4 密钥种子为 Initialization Vector||WEP Key = 0x3cfcbf3132333435,为 64 位,会被补零,造成解密错误
怎么改呢?只要修改文件 crypto\evp\e_rc4.c,如下,将 EVP_CIPHER_CTX_key_length(ctx) 改为 strlen(key)
|
1 2 3 4 5 6 7 |
static int rc4_init_key(EVP_CIPHER_CTX *ctx, const unsigned char *key, const unsigned char *iv, int enc) { RC4_set_key(&data(ctx)->ks, /*EVP_CIPHER_CTX_key_length(ctx)*/ strlen(key), key); return 1; } |
需要指出,这只是临时的 Workaround,它会影响 -k(小写) 选项:OpenSSL 内部会先调用 EVP_BytesToKey 函数进行 Key Derivation
随后在 rc4_init_key 函数中,RC4_set_key 的入参会发生变化。感兴趣可以调试跟踪一下
顺带说下,EVP_BytesToKey 不兼容标准的 PBKDF2(参见 RFC2898)
运行修改版本的 OpenSSL
|
1 2 |
C:\>openssl rc4 -K 3cfcbf3132333435 -iv 0 -nosalt -e -nopad -p -in wep_cipher.txt -out wep_plain.txt key=3CFCBF31323334350000000000000000 |
wep_cipher.txt 文件内容如下
00000000h: 9A 6E 50 1D C4 2D 3D 6B B1 55 FD DB D9 2F 9F EB
00000010h: 81 5F A0 53 E2 DD CD E5 25 83 E9 87 98 D1 70 2E
00000020h: 55 8A 9D A9 21 35 FF 09 E8 03 0E 77 DD F9 8D 5C
00000030h: 0A 78 E8 C6 08 76 99 BD 6F BF 75 48 4F BD 5D 76
00000040h: C5 F9 3D A5 5D BA EE DD
wep_plain.txt 文件内容如下
00000000h: AA AA 03 00 00 00 08 00 45 00 00 3C 7A 8C 00 00
00000010h: 80 01 3C CC C0 A8 01 16 C0 A8 01 02 00 00 86 56
00000020h: 02 00 CD 05 61 62 63 64 65 66 67 68 69 6A 6B 6C
00000030h: 6D 6E 6F 70 71 72 73 74 75 76 77 61 62 63 64 65
00000040h: 66 67 68 69 42 74 BA 61
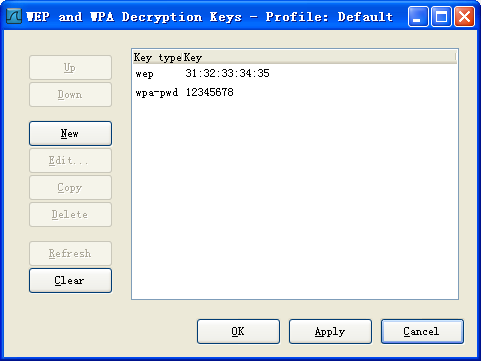
究竟明文是什么报文呢?我们可以使用 wireshark(本例为版本 1.8.6)查看,前提是添加解密密钥,如下
菜单【Edit】-->【Preferences】,选 IEEE 802.11 --> Edit
下图为 wiresharek 显示的明文

原来是 ICMP ping 报文
有两个地方需要注意
1、wireshark 显示明文长度为 68 字节,少了 wep_plain.txt 后面的 4 个字节(见上面蓝色4字节),原因是 WEP 使用 CRC32 来校验明文的完整性
实际上 CRC 结果是明文的一部分,只是没有显示在解密窗口中
可以利用 perl 自带的 crc32.bat 脚本(位于 perl\bin 目录)进行验证,命令结果为 61ba7442(字节序恰好与 42 74 BA 61 相反)
2、在IP层下方还有一层 Logical-Link Control,与常见的以太报文相比,这是 WiFi 报文的特殊之处
另外,较新版本(>=1.8.6)的 wiresharek 提供了工程文件 wireshark.vcproj,这样就可以直接在 VC 中进行编译、调试
最后考虑一下 WEP 的安全性,这里用 4 个字母缩写表示主要考虑的安全指标:SCIA,后续对安全协议将使用这些指标进行衡量,解释如下
Signature —— 签名(即对方不能否认发出的消息)
Confidentiality —— 机密(数据被加密)
Integrality —— 完整(加密数据解密后,可以知道是否受到有意无意的损坏)
Authentication —— 认证(能够识别对方的真实身份)
其他还有一些安全指标,比如授权、可用/可靠性、行为审计等,不再考虑,本文聚焦在密码学意义上的安全指标
WEP 提供了数据的机密和完整性保证,由于是对称算法,原则上无法识别对方身份(一个 AP 通常由多个无线终端共享一个 WEP 密钥接入,无法区分谁是谁),不可否认也谈不上。(事实上 WEP 是有认证之说的,分为 Open System 和 Shared Key 两种,但都不符合前面提到的强认证,即识别对方的真实身份)
我们要记住的是,WEP 已经不安全了(现在已经有诸多针对它的攻击工具,参见http://www.backtrack-linux.org/),尽量不要使用,
应该使用更安全的 wpa/wpa2/wpa-psk/wpa2-psk 方式
为什么不安全,由于涉及广泛,一篇文章无法覆盖完全,本文不再说明。
引用 http://www.cnblogs.com/efzju/archive/2013/06/12/3018661.html