GSON序列化时排除字段的几种方式


使用transient


这个方法最简单,给字段加上 transient 修饰符就可以了,如下所示:

class GsonSerialization {
    public transient int x; // <---
    public int y;
    public GsonSerialization(int x, int y) {   
        this.x = x;   
        this.y = y;  
    }   
}

单元测试用例:

@Test 
public void testGsonSerialization() {
	GsonSerialization obj = new GsonSerialization(1, 2);
	String json = new Gson().toJson(obj);
	Assert.assertEquals("{\"y\":2}", json); // <--- 
}

使用Modifier指定


这个方法需要用GsonBuilder定制一个GSON实例,如下所示:

class GsonSerialization {
	protected int x; // <---
	public int y;
	public GsonSerialization(int x, int y) {   
		this.x = x;   
		this.y = y;  
	}   
}

单元测试用例:

@Test 
public void testGsonSerialization() {
	Gson gson = new GsonBuilder().excludeFieldsWithModifiers(Modifier.PROTECTED).create();  // <---      
	GsonSerialization obj = new GsonSerialization(1, 2);
	String json = gson.toJson(obj); // <---  
	Assert.assertEquals("{\"y\":2}", json);
}

使用@Expose注解


注意,没有被 @Expose 标注的字段会被排除,如下所示:

class GsonSerialization {
	public int x; // <---
	@Expose
	public int y;
	public GsonSerialization(int x, int y) {   
		this.x = x;   
		this.y = y;  
	}   
}

单元测试用例:

@Test 
public void testGsonSerialization() {
	Gson gson = new GsonBuilder().excludeFieldsWithoutExposeAnnotation().create();  // <---      
	GsonSerialization obj = new GsonSerialization(1, 2);
	String json = gson.toJson(obj); // <---  
	Assert.assertEquals("{\"y\":2}", json);
}

使用ExclusionStrategy定制排除策略


这种方式最灵活,下面的例子把所有以下划线开头的字段全部都排除掉:

class GsonSerialization {
	public int x; // <---
	public int y;
	public GsonSerialization(int x, int y) {   
		this.x = x;   
		this.y = y;  
	}   
}

单元测试用例:

@Test 
public void testGsonSerialization() {  
	ExclusionStrategy myExclusionStrategy = new ExclusionStrategy() {   
		@Override   
		public boolean shouldSkipField(FieldAttributes fa){
			return fa.getName().startsWith("_");   
		}   
		@Override   
		public boolean shouldSkipClass(Class<?> clazz){   
			return false;   
		}    
	};    
	Gson gson = new GsonBuilder().setExclusionStrategies(myExclusionStrategy).create();// <---       
	MyObj obj = new MyObj(1, 2);  
	String json = gson.toJson(obj);  
	Assert.assertEquals("{\"y\":2}", json);
}

参考链接


GSON序列化时排除字段的几种方式

解决Gson解析Json时,Json 中Key为Java关键字的问题

最近在一个项目中,服务器使用 json 作为返回信息的格式,为了加快开发速度,我使用 Gson 代替 Java 语言中自带的 JSONObject 来解析 json 格式。

当我正在享受 Gson 给我带来的便利的时候,我遇到问题了。

因为 Gson 在转化 json 字符串到对象的时候,要求类的成员变量的名称必须和 json 中的 key 值相同。但是郁闷的是,在封装一个接口的时候发现,json 字符串中的 key 为 Java 的关键字。

{
...
"new": false
...
}

按照 Gson 的约定,就必须编写一个变量名为new的类,但是结果可想而知,编译不通过。

public class BoxSubject {
    private boolean new;
}

幸好,Google 已经为我们想好了解决办法,只要对该变量添加Field Naming Support就可以了。

public class BoxSubject {
    @SerializedName("new")
    private boolean new;
}

到此,就完美地解决了我们遇到的问题。

引用链接 解决Gson解析Json时,Json 中Key为Java关键字的问题

Android Studio(JAVA) 编译警告:使用了未经检查或不安全的操作

在编译Android Studio(JAVA)程序时发生了如下的警告:

使用了未经检查或不安全的操作
要了解详细信息,请使用 "-Xlint:unchecked" 重新编译。

  • 如何设置Android Stuido开启 "-Xlint:unchecked"

修改build.gradle

apply plugin: 'com.android.application'

android {
    compileSdkVersion 23
    buildToolsVersion "23.0.1"

    defaultConfig {
        applicationId "com.a.b.c"
        minSdkVersion 15
        targetSdkVersion 23
        versionCode 1
        versionName "1.0"
    }

    buildTypes {
        release {
            minifyEnabled false
            proguardFiles getDefaultProguardFile('proguard-android.txt'), 'proguard-rules.pro'
        }
        debug {
            minifyEnabled false
        }
    }
}

dependencies {
    compile fileTree(dir: 'libs', include: ['*.jar'])
    testCompile 'junit:junit:4.12'
    compile 'com.android.support:appcompat-v7:23.0.1'
    compile 'com.android.support:design:23.0.1'
}

增加

tasks.withType(JavaCompile) {
   options.compilerArgs << "-Xlint:unchecked"
}

修改后的如下:

apply plugin: 'com.android.application'

android {
    compileSdkVersion 23
    buildToolsVersion "23.0.1"

    defaultConfig {
        applicationId "com.a.b.c"
        minSdkVersion 15
        targetSdkVersion 23
        versionCode 1
        versionName "1.0"
    }

    buildTypes {
        release {
            minifyEnabled false
            proguardFiles getDefaultProguardFile('proguard-android.txt'), 'proguard-rules.pro'
        }
        debug {
            minifyEnabled false
        }
    }

    tasks.withType(JavaCompile) {
       options.compilerArgs << "-Xlint:unchecked"
    }
}

dependencies {
    compile fileTree(dir: 'libs', include: ['*.jar'])
    testCompile 'junit:junit:4.12'
    compile 'com.android.support:appcompat-v7:23.0.1'
    compile 'com.android.support:design:23.0.1'
}
  • 警告信息的处理例子

包含-Xlint:unchecked警告的代码

final LinkedHashMap<WeakReference<Object>,WeakReference<Object>> aWeakArray = new LinkedHashMap<>();
for (Iterator iter = aWeakArray.entrySet().iterator(); iter.hasNext(); ) {
	LinkedHashMap.Entry element = (LinkedHashMap.Entry)iter.next();
	WeakReference<Object> aWeakObj = (WeakReference<Object>)element.getKey();
	WeakReference<Object> aWeakTag = (WeakReference<Object>)element.getValue();
}

消除警告后的代码如下:

final LinkedHashMap<WeakReference<Object>,WeakReference<Object>> aWeakArray = new LinkedHashMap<>();
for (Iterator<LinkedHashMap.Entry<WeakReference<Object>,WeakReference<Object>> > iter = aWeakArray.entrySet().iterator(); iter.hasNext(); ) {
	LinkedHashMap.Entry<WeakReference<Object>,WeakReference<Object>> element = iter.next();
	WeakReference<Object> aWeakObj = element.getKey();
	WeakReference<Object> aWeakTag = element.getValue();
}

同样的方法适用于"-Xlint:deprecation"。

升级到OS X Yosemite后 Android Studio启动崩溃 Symbol not found: _CGContextSetAllowsAcceleration

Mac OS 升到Yosemite后, 打开 Android Studio报

Symbol not found: _CGContextSetAllowsAcceleration   
Referenced from: /Library/Java/JavaVirtualMachines/1.6.0_35-b10-428.jdk/Contents/Libraries/libawt.jnilib

解决方法,是重新安装Apple的Java支持:
Apple官网下载或者本站下载

Ubuntu 14使用Nexus2.x为Maven3.x搭建私服构件仓库

一、下载与安装Nexus

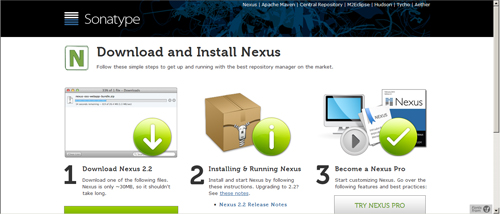
想为Maven搭建私服,我们可以选择使用Nexus工具,目前已知提供war包的版本为2.2.0,其下载地址为:http://www.sonatype.org/nexus/go

39e36edc-a0d2-3b49-afd8-d0e4a175eb5a

这里我们下载War包,直接部署到Tomcat 7 下面,Ubuntu 下面是 /var/lib/tomcat7/webapps。
接下来我们可以在浏览器中输入http://127.0.0.1:8080/nexus/查看Nexus是否成功.

如果提示错误,则到 /var/log/tomcat7/localhost.YYYY-MM-DD.log 下面查看日志,有可能报告 /usr/share/tomcat7/sonatype-work 权限问题,则说明Nexus 没有权限创建这个目录,因此我们需要手工创建这个目录,然后赋予这个目录 777权限,然后重启 Tomcat.

目前最新的版本Nexus 2.12.0-01,(Nexus OSS官网下载2.x的Tomcat/WAR版本) 。3.x版本已经不提供WAR包下载了,只能是使用Jetty的版本了。

Ubuntu下面的操作如下:

$ cd ~

$ wget https://sonatype-download.global.ssl.fastly.net/nexus/oss/nexus-2.12.0-01-bundle.tar.gz

$ sudo mkdir /var/opt/nexus-2.12.0-01

$ sudo tar -zxvf nexus-latest-bundle.tar.gz -C /var/opt/nexus-2.12.0-01

$ sudo ln -s /var/opt/nexus-2.12.0-01/nexus-2.12.0-01/ /var/opt/nexus

修改bin/jsw/conf/wrapper.conf,设置wrapper.java.command=jdk所在目录/bin/java

$ whereis java
java: /usr/bin/java /usr/share/java /usr/share/man/man1/java.1.gz

$ sudo vim /var/opt/nexus/bin/jsw/conf/wrapper.conf

修改后的内容如下:

..........
wrapper.java.command=/usr/bin/java
..........

设置目录的权限

$ chmod -R 777 /var/opt/nexus-2.12.0-01/sonatype-work

$ chmod -R 777 /var/opt/nexus/logs

$ chmod -R 777 /var/opt/nexus/tmp

$ chmod -R 777 /var/opt/nexus/bin/jsw/linux-x86-64

$ chmod -R 777 /var/opt/nexus/bin/jsw/linux-x86-32

启动服务

$ /var/opt/nexus/bin/nexus start

Starting Nexus OSS...
Started Nexus OSS.

这种安装模式下,访问的链接地址为http://localhost:8081/nexus

注意,首次启动的耗时时间很长,貌似需要建立数据库等,需要耐心等待几分钟。

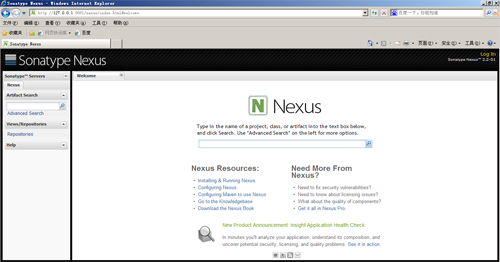
如果成功,则出现下面的界面

39e36edc-a0d2-3b49-afd8-d0e4a175eb5a

通过上图我们可以发现我们已经成功的启动了Nexus,那么接下来要做的事情就更有意思了,在后续章节中笔者会陆续讲到应该如何使用Nexus工具来配置和管理咱们的私服仓库。

二、仓库类型

在上一章节中,笔者讲解了如何下载与安装Nexus工具。那么本章节咱么来看看如何使用Nexus工具配置和管理私服仓库。当然在使用Nexus之前你是需要登录的,缺省账号密码为:

account:admin;

password:admin123;

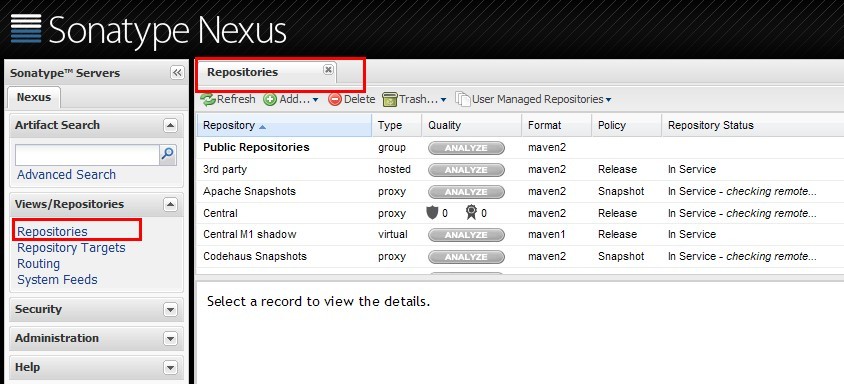
当成功登录后,你可以单击 Repositories属性看到如下页面:
d5600d88-1881-37aa-a4e3-d4e7c12bbf29

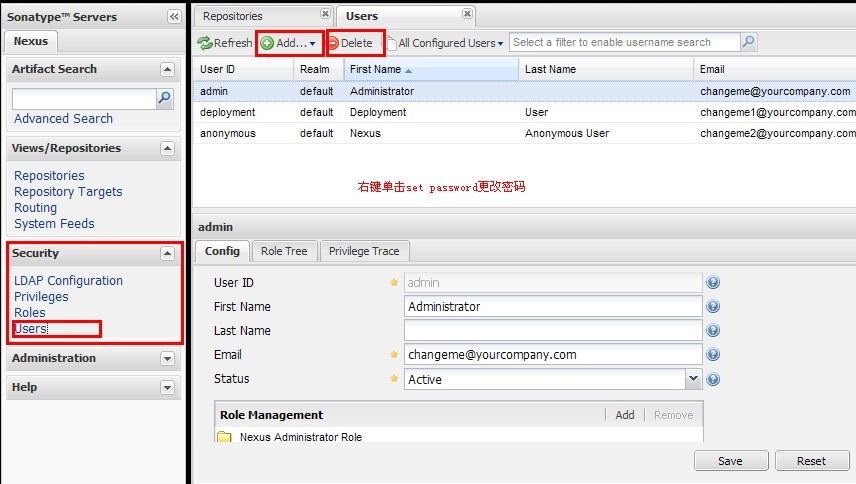
由于admin这个账号是属于Administrator权限的,你也可以通过单击Security属性进行账户的配置:

9a6d675e-b13b-327d-b1cb-3c05132db8a7

Nexus的仓库类型一共有4种,每一种仓库类型均对应有不同的操作方式:

1、group: 仓库组;

2、hosted:宿主;

3、proxy:代理;

4、virtual:虚拟;

来吧,咱们先谈谈仓库组这个概念,一个仓库组类似一个仓库集合,它和仓库之间是一对多的关系,也就是说一个仓库组可以允许包含多个仓库,Nexus仓库用例图如下:

96308ff7-be2f-38a3-bc0b-63c8056b1999

在咱们弄明白仓库组的作用后,咱们接着来看宿主仓库是干什么的。其实所谓宿主仓库可以理解为自定义仓库,用于存放一些在中央仓库无法下载的构件,比如自定义构件你可以手动将自定义构件上传至hosted中

代理仓库起到的作用是代理作用,假设本地仓库向私服进行请求时,首先会去私服仓库的本地路径中寻找构件,如果没有找到则会从中央仓库进行下载。

虚拟仓库省略...

 三、使用Nexus管理私服仓库

在了解Nexus的4种仓库类型后,咱们接下来要做的事情就是使用Nexus工具来管理咱们的私服仓库。先来看看Nexus为我们提供的一些缺省仓库:

ac73186e-3406-3004-8849-fab7ad41f8d9从上图我们可以看出Nexus缺省为我们定义了1个仓库组,7个仓库。当中最主要的几个仓库为:

9461f779-b4b9-3b03-b616-5d1ad4c8f494

3rd party(宿主仓库):用于存放一些在中央仓库无法下载的构件仓库;

Apache Snapshots(代理仓库):代理ApacheMaven仓库快照版本的构件仓库;

Central(代理仓库):代理Maven中央仓库中发布版本构件的仓库;

当然你可以根据项目需要新建仓库组及仓库,但在建立这些私有的仓库之前,咱们还是先来看看如何使用Nexus为咱们提供的缺省构件仓库(其实很多时候你真没必要去新建仓库)。

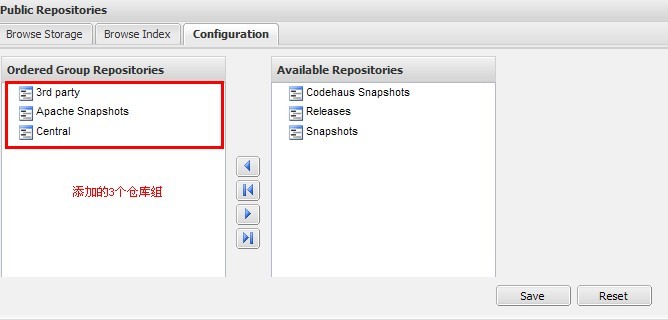
选择Public Repositories分组,单击configuration选项,你可以为仓库组添加对应的仓库:

b07178d7-64b8-3a7f-8b99-93451450ea92

单击Save按钮保存即可配置完成。这里有一点需要提醒大家的是,仓库的添加顺序直接决定了构件的下载顺序,换句话来说我们应该把需要从中央仓库或者其他远程仓库下载构件的代理仓库添加在最后

当咱们成功将指定的仓库集合添加进仓库组后,接下来我们来为3rd party(宿主仓库)上传自定义构件,所谓自定义构件指的是无法从Maven的中央仓库进行下载的构建。

笔者在此选用的是最简单方便的手动上传构件(当然上传构件至宿主仓库还有一些方式,但笔者还是侧重于最简便的方式)。

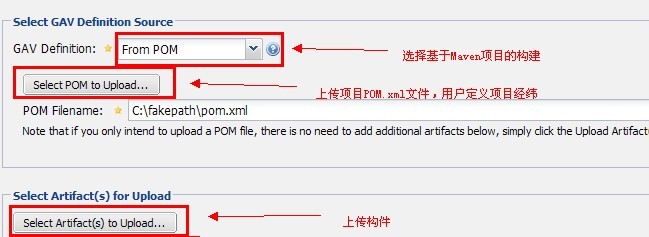
单击3rd party(宿主仓库)的Artifact Upload选项,我们首先来上传一个基于Maven项目的自定义构件:773c6508-1474-3853-ba4e-217198d96ee5

最后别忘记了添加构件:

c7016c60-68b4-38b9-afd4-e14fe4730fd4

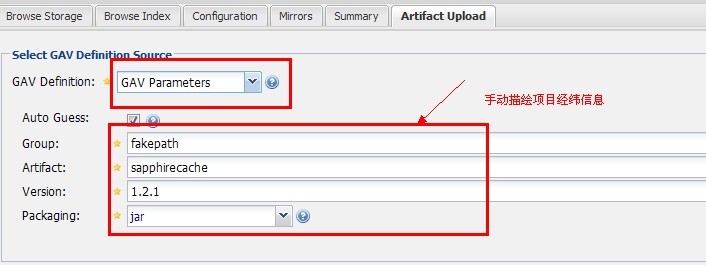
如果你的构件不是基于Maven的呢?那么你可以选择GAV Parameters属性:61fe1457-f7e3-3452-a30b-886879c7d62b

接下来,需要配置 Maven 来连接到似有仓库,如果需要全局配置,则配置地址为 ~\.m2\setting.xml,如果需要根据工程配置,则需要跟pom.xml在同一个目录下面即可,文件存在则修改,不存在则创建,内容如下

<profiles>
	<profile>
		<id>dev</id>
		<repositories>
			<repository>
				<id>nexus</id>
				<url>http://127.0.0.1:8080/nexus/content/groups/public/</url>
				<releases>
					<enabled>true</enabled>
				</releases>
				<snapshots>
					<enabled>true</enabled>
				</snapshots>
			</repository>
		</repositories>
		<pluginRepositories>
			<pluginRepository>
				<id>nexus</id>
				<url>http://127.0.0.1:8080/nexus/content/groups/public</url>
				<releases>
					<enabled>true</enabled>
				</releases>
				<snapshots>
					<enabled>true</enabled>
				</snapshots>
			</pluginRepository>
		</pluginRepositories>
	</profile>
</profiles>

<activeProfiles>
	<activeProfile>dev</activeProfile>
</activeProfiles>

参考 http://gao-xianglong.iteye.com/blog/1735536

Method类invoke方法的使用

java.lang.reflect.Method
public Object invoke(Object obj,Object args[])
参数:
    obj - 从中调用底层方法的对象,必须是实例化的对象
    args - 用于方法调用的参数,是个Object数组,因为参数有可能有多个
返回:
    使用参数 args 在 obj 上指派该对象所表示方法的结果

例如:

String result = (String)method.invoke(obj , sql);

执行obj的method方法(参数为sql),返回String类型结果

args参数可以为空,就是对应方法没有参数

如:

new Car().getBM() ---- method.invoke( obj );//method为getBM,obj为Car类

obj可以为空,但必填null,表示同类中的公用方法,

如:

getName(type) ---- method.invoke(null,args);//method为getName,args为type

参数args是个Object数组,即使只有一个参数,也要建object数组

如:

getName(String aaa , String bbb )----需要2个参数,method.invoke(null , new Object[] {aaa , bbb});//aaa , bbb分别为getName的2个参数

注意:obj必须是实例化的对象,如果有对应的方法名,就可以实例化

部分代码如下:

Class clz = getClass(clzName);
Object obj = null;
//实例化对象
try {
    obj = clz.newInstance();
} catch (InstantiationException e1) {
    e1.printStackTrace();
} catch (IllegalAccessException e1) {
    e1.printStackTrace();
}

//invoke,执行对应类的method方法
try {
    method.invoke(obj, new Object[]{elValue.trim()});
} catch (IllegalArgumentException e) {
    e.printStackTrace();
} catch (IllegalAccessException e) {
    e.printStackTrace();
} catch (InvocationTargetException e) {
    e.printStackTrace();
}

getClass在下面:

public static Class getClass(String className) {
    Class clz = null;
    try {
        clz = Class.forName(className);
    } catch (ClassNotFoundException e) {
        e.printStackTrace();
    }
    return clz;
}

newInstance() 的参数版本与无参数版本详解

通过反射创建新的类示例,有两种方式:

Class.newInstance()
Constructor.newInstance()

以下对两种调用方式给以比较说明:
Class.newInstance() 只能够调用无参的构造函数,即默认的构造函数;
Constructor.newInstance() 可以根据传入的参数,调用任意构造构造函数。Class.newInstance() 抛出所有由被调用构造函数抛出的异常。

Class.newInstance() 要求被调用的构造函数是可见的,也即必须是public类型的;

Constructor.newInstance() 在特定的情况下,可以调用私有的构造函数。

Class A(被调用的示例):

public class A {
	private A() {
		System.out.println("A's constructor is called.");
	}

	private A(int a, int b) {
		System.out.println("a:" + a + " b:" + b);
	}
}

Class B(调用者):

public class B { 
	public static void main(String[] args) { 
		B b=new B(); 
		out.println("通过Class.NewInstance()调用私有构造函数:"); 
		b.newInstanceByClassNewInstance(); 
		out.println("通过Constructor.newInstance()调用私有构造函数:"); 
		b.newInstanceByConstructorNewInstance(); 
	} 
	/*通过Class.NewInstance()创建新的类示例*/ 
	private void newInstanceByClassNewInstance(){ 
		try {/*当前包名为reflect,必须使用全路径*/ 
			A a=(A)Class.forName("reflect.A").newInstance(); 
		} catch (Exception e) { 
			out.println("通过Class.NewInstance()调用私有构造函数【失败】"); 
		}
	}

	/*通过Constructor.newInstance()创建新的类示例*/ 
	private void newInstanceByConstructorNewInstance(){ 
		try {/*可以使用相对路径,同一个包中可以不用带包路径*/ 
			Class c=Class.forName("A"); 
			/*以下调用无参的、私有构造函数*/ 
			Constructor c0=c.getDeclaredConstructor(); 
			c0.setAccessible(true); 
			A a0=(A)c0.newInstance(); 
			/*以下调用带参的、私有构造函数*/ 
			Constructor c1=c.getDeclaredConstructor(new Class[]{int.class,int.class}); 
			c1.setAccessible(true); 
			A a1=(A)c1.newInstance(new Object[]{5,6}); 
		} catch (Exception e) { 
			e.printStackTrace(); 
		} 
	} 
}

输出结果如下:

通过Class.NewInstance()调用私有构造函数:
通过Class.NewInstance()调用私有构造函数【失败】
通过Constructor.newInstance()调用私有构造函数:
A's constructor is called.
a:5 b:6

说明方法newInstanceByClassNewInstance调用失败,而newInstanceByConstructorNewInstance则调用成功。如果被调用的类的构造函数为默认的构造函数,采用Class.newInstance()则是比较好的选择,一句代码就OK;如果被调用的类带参构造函数、私有构造函数,就需要采用Constractor.newInstance(),两种情况视使用情况而定。
不过Java Totorial中推荐采用Constractor.newInstance()。

参考 http://xiaohuafyle.iteye.com/blog/1607258

Mac Gradle 编译报告Failure initializing default system SSL context

Mac 10.9 版本下使用Gradle 编译 Android 项目,报告错误

Failure initializing default system SSL context

使用 -debug 参数,得到的详细输出如下

2:34:15.273 [ERROR] [org.gradle.BuildExceptionReporter]     at org.gradle.launcher.bootstrap.ProcessBootstrap.runNoExit(ProcessBootstrap.java:50)
22:34:15.278 [ERROR] [org.gradle.BuildExceptionReporter]     at org.gradle.launcher.bootstrap.ProcessBootstrap.run(ProcessBootstrap.java:32)
22:34:15.279 [ERROR] [org.gradle.BuildExceptionReporter]     at org.gradle.launcher.GradleMain.main(GradleMain.java:26)
22:34:15.281 [ERROR] [org.gradle.BuildExceptionReporter] Caused by: java.io.FileNotFoundException: /System/Library/Frameworks/JavaVM.framework/Versions/1.5.0/Home/lib/security/cacerts (No such file or directory)
22:34:15.284 [ERROR] [org.gradle.BuildExceptionReporter]     at java.io.FileInputStream.open(Native Method)
22:34:15.285 [ERROR] [org.gradle.BuildExceptionReporter]     at java.io.FileInputStream.<init>(FileInputStream.java:106)
22:34:15.286 [ERROR] [org.gradle.BuildExceptionReporter]     at org.apache.http.conn.ssl.SSLSocketFactory.createSystemSSLContext(SSLSocketFactory.java:299)
22:34:15.288 [ERROR] [org.gradle.BuildExceptionReporter]     at org.apache.http.conn.ssl.SSLSocketFactory.createSystemSSLContext(SSLSocketFactory.java:366)
22:34:15.289 [ERROR] [org.gradle.BuildExceptionReporter]     ... 147 more

可以看到,异常信息为

22:34:15.281 [ERROR] [org.gradle.BuildExceptionReporter] Caused by: java.io.FileNotFoundException: /System/Library/Frameworks/JavaVM.framework/Versions/1.5.0/Home/lib/security/cacerts (No such file or directory)

到具体的目录下面去看,这个文件果然是不存在的,有些版本链接到了一个不存在的目录,这种情况一般是经历过系统升级,往往会造成这个现象,另外,就是系统安装的Java 是Apple 提供的 Java 版本,而不是 Orcale 官网下载的独立版本。

解决方法是可以到Orcale 官网下载最新版本的 Java ,安装替换即可解决问题。

Java: Finding/Setting JDK/$JAVA_HOME on Mac OS X

As long as I’ve been using a Mac I always understood that if you needed to set $JAVA_HOME for any program.

On my machine this points to the 1.6 JDK:

$ls -alh `whereis java`
lrwxr-xr-x  1 root  wheel    74B 10 24 16:19 /usr/bin/java -> /System/Library/Frameworks/JavaVM.framework/Versions/Current/Commands/java

This was a bit surprising to me since I’ve actually got Java 7 installed on the machine as well so I’d assumed the symlink would have been changed:

$ java -version
java version "1.7.0_09"
Java(TM) SE Runtime Environment (build 1.7.0_09-b05)
Java HotSpot(TM) 64-Bit Server VM (build 23.5-b02, mixed mode)

Andres and I were looking at something around this yesterday and wanted to set $JAVA_HOME to the location of the 1.7 JDK on the system if it had been installed.

We eventually came across the following article which explains that you can use the /usr/libexec/java_homecommand line tool to do this.

For example, if we want to find where the 1.7 JDK is we could run the following:

$ /usr/libexec/java_home -v 1.7
/Library/Java/JavaVirtualMachines/jdk1.7.0_09.jdk/Contents/Home

And if we want 1.6 the following does the trick:

$ /usr/libexec/java_home -v 1.6
/System/Library/Java/JavaVirtualMachines/1.6.0.jdk/Contents/Home

We can also list all the JVMs installed on the machine:

$ /usr/libexec/java_home  -V
Matching Java Virtual Machines (2):
    1.6.0_35-b10-428, x86_64:	"Java SE 6"	/Library/Java/JavaVirtualMachines/1.6.0_35-b10-428.jdk/Contents/Home
    1.6.0_35-b10-428, i386:	"Java SE 6"	/Library/Java/JavaVirtualMachines/1.6.0_35-b10-428.jdk/Contents/Home

/Library/Java/JavaVirtualMachines/1.6.0_35-b10-428.jdk/Contents/Home

Tomcat7 JSP Ajax 提交中文乱码

在JS文件中存在中文,在调用 Ajax 提交数据的时候,中文总是乱码,在调用 JS的时候也已经指定了JS的编码为

<script type="text/javascript" src="./js/index/worklist.js" charset="UTF-8"></script>

但是仍然不奏效。最后打开Tomcat的server.xml文件发现默认的配置是这样的

<Connector connectionTimeout="20000" port="8080" protocol="HTTP/1.1" redirectPort="8443" />

因为要一切都统一为UTF-8所以修改为

<Connector connectionTimeout="20000" port="8080" protocol="HTTP/1.1" redirectPort="8443" URIEncoding="UTF-8"/>

问题就解决了。