Android源代码中经常出现同步问题,最常见的就是本地无意修改了某些文件,那么,如何取消掉这些更改呢?
执行如下命令:
|
1 |
$repo forall -vc "git reset --hard" |
如果执行完成后,依旧提示某个目录有改动,则切换到有问题的目录,继续执行
|
1 |
$git reset --hard |
完成后,删除所有没有增加到Git中的文件即可。
Android源代码中经常出现同步问题,最常见的就是本地无意修改了某些文件,那么,如何取消掉这些更改呢?
执行如下命令:
|
1 |
$repo forall -vc "git reset --hard" |
如果执行完成后,依旧提示某个目录有改动,则切换到有问题的目录,继续执行
|
1 |
$git reset --hard |
完成后,删除所有没有增加到Git中的文件即可。
Ubuntu 15.10 中,已经可以使用Ubuntu Make简化Android开发环境配置了,具体方法如下:
1.安装Ubuntu Make
|
1 |
$ sudo apt-get install ubuntu-make |
2.配置Android开发环境
|
1 |
$ umake android |
然后根据提示,一步一步操作就可以了。
一会之后,就会发现Android Studio已经安装成功了。
就是这么简单!
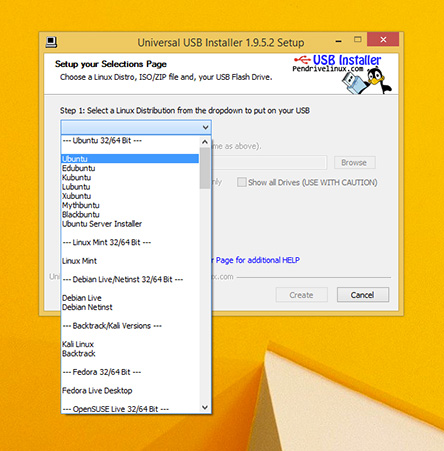
要从U盘运行Ubuntu,需要插入一个至少2G空余空间的U盘。使用USB安装器是将Ubuntu安装到U盘最简单的方式,它由 pendrivelinux.com 提供。下载Pen Drive Linux’s USB安装器后,安装并运行。也可本站下载。
从下拉选项中选择Ubuntu桌面版本,或者自行用BT、迅雷等软件下载Ubuntu ISO文件。
点击“浏览”然后打开已下载的ISO文件。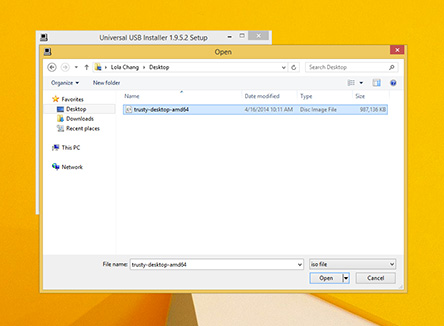
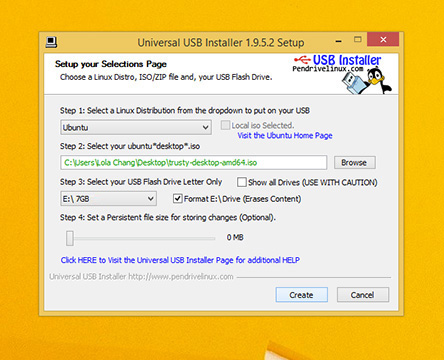
选择一个USB驱动器并点击“创建”,注意,U盘里的数据请备份,“创建”过程会格式化U盘。
Ubuntu系统本身附带一个小程序Startup Disk Creator,直接制作可启动U盘Ubuntu系统。本站下载
|
1 2 3 4 5 6 |
java.util.concurrent.TimeoutException: com.android.internal.os.BinderInternal$GcWatcher.finalize() timed out after 10 seconds at com.android.org.conscrypt.NativeCrypto.EVP_MD_CTX_destroy(Native Method) at com.android.org.conscrypt.OpenSSLDigestContext.finalize(OpenSSLDigestContext.java:27) at java.lang.Daemons$FinalizerDaemon.doFinalize(Daemons.java:191) at java.lang.Daemons$FinalizerDaemon.run(Daemons.java:174) at java.lang.Thread.run(Thread.java:818) |
|
1 2 3 4 |
java.util.concurrent.TimeoutException: com.android.internal.os.BinderInternal$GcWatcher.finalize() timed out after 10 seconds at java.lang.Daemons$Daemon.isRunning(Daemons.java:79) at java.lang.Daemons$FinalizerDaemon.run(Daemons.java:171) at java.lang.Thread.run(Thread.java:818) |
|
1 2 3 |
The reason for this timeout can come from two options: 1. A problem in the finalize code - trying to perform complex logic in the native destroy part. 2. CPU/Screen timeouts - the screen will dim and power off, followed by a System deep sleep state. the deep sleep can happen in a Garbage collection run, and when the device wakes up - a timeout can happen. |
后台备案号的设置是从 WP 3.7 开始的,查看网站根目录的 wp-config.php 文件,一般会看到 define('WP_ZH_CN_ICP_NUM', true); 这个定义,这个就是用来添加后台备案号设置的。如果你的 WP 版本在 3.7 以上,而且 wp-config.php 含有define('WP_ZH_CN_ICP_NUM', true); 就可以在后台 设置 - 常规 中看到配置选项。
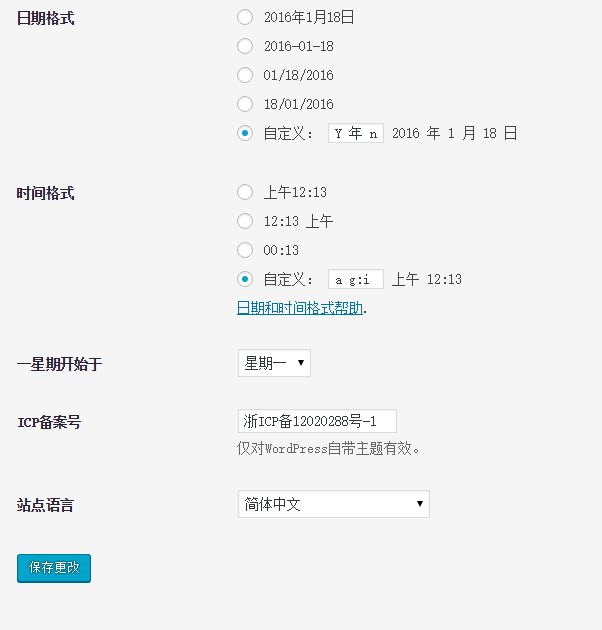
这个“ICP备案号”仅对WordPress自带主题有效。
如果使用的是第三方WordPress主题,因此不能享受到 WordPress 这个新添加的小功能实在是让人窝火。不过好在你只需要在自己所用的主题的footer.php中添加一行代码,即可让在WordPress 后台添加的ICP备案号显示出来了。
|
1 2 3 |
<a href="http://www.beian.miit.gov.cn/" rel="external nofollow" target="_blank"> <?php echo get_option( 'zh_cn_l10n_icp_num' );?> </a> |
如果你不希望链接到工信部网站,只添加下面的代码即可。
|
1 |
<?php echo get_option( 'zh_cn_l10n_icp_num' );?> |