Flutter CustomPainter自动绘制属性repaint原理

这篇文章主要讨论的是Fluter中CustomPainter中使用repaint属性实现自动paint的原理。

首先使用CustomPaint创建一个StatefulWidget,demo中根据点击位置,对蓝色的圆进行位置变换。

代码如下

import 'package:flutter/material.dart';

void main() => runApp(MyPaint());

class MyPaint extends StatefulWidget {
  const MyPaint({Key? key}) : super(key: key);

  @override
  _MyPaintState createState() => _MyPaintState();
}

class _MyPaintState extends State<MyPaint> {
  ValueNotifier<double> _vn = ValueNotifier<double>(0);
  @override
  Widget build(BuildContext context) {
    return GestureDetector(
      onPanUpdate: parse,
      child: CustomPaint(
        painter: BoxPainter(vn: _vn),
      ),
    );
  }

  dynamic parse(DragUpdateDetails details) {
    _vn.value = details.globalPosition.dy;
  }
}

class BoxPainter extends CustomPainter {
  ValueNotifier<double> vn;
  BoxPainter({@required this.vn}) : super(repaint: vn);

  @override
  void paint(Canvas canvas, Size size) {
    canvas.translate(size.width / 2, 0);
    canvas.drawCircle(Offset(0, vn.value), 66, Paint()..color = Colors.blue);
  }

  @override
  bool shouldRepaint(BoxPainter oldDelegate) => false;

  @override
  bool shouldRebuildSemantics(BoxPainter oldDelegate) => false;
}

继续阅读Flutter CustomPainter自动绘制属性repaint原理

flutter升级到3.3.9后报错“Library not loaded: @rpath/libswiftCore.dylib”

flutter 升级到 3.3.9 后,代码编译报错,如下:

$ flutter run
Launching lib/main.dart on iPhone in debug mode...
Automatically signing iOS for device deployment using specified development team
in Xcode project: 4XS4BW9489
Running Xcode build...                                                  
 └─Compiling, linking and signing...                         7.6s
Xcode build done.                                           35.3s
(lldb) dyld[627]: Library not loaded: @rpath/libswiftCore.dylib
  Referenced from: <8B0D72DF-EF41-3748-B8B5-8EF789672FF7> /private/var/containers/Bundle/Application/89C785E1-48B5-4139-8D0B-F392A3865D0B/Runner.app/Runner
  Reason: tried: '/private/var/containers/Bundle/Application/89C785E1-48B5-4139-8D0B-F392A3865D0B/Runner.app/Frameworks/libswiftCore.dylib' (errno=2), '/private/var/containers/Bundle/Application/89C785E1-48B5-4139-8D0B-F392A3865D0B/Runner.app/Frameworks/libswiftCore.dylib' (errno=2), '/private/preboot/Cryptexes/OS@rpath/libswiftCore.dylib' (errno=2), '/private/var/containers/Bundle/Application/89C785E1-48B5-4139-8D0B-F392A3865D0B/Runner.app/Frameworks/libswiftCore.dylib' (errno=2), '/private/var/containers/Bundle/Application/89C785E1-48B5-4139-8D0B-F392A3865D0B/Runner.app/Frameworks/libswiftCore.dylib' (errno=2), '/usr/local/lib/libswiftCore.dylib' (errno=2), '/usr/lib/libswiftCore.dylib' (errno=2, not in dyld cache)
* thread #1, stop reason = signal SIGABRT
    frame #0: 0x00000001e6efeebc
->  0x1e6efeebc: b.lo   0x1e6efeedc
    0x1e6efeec0: pacibsp 
    0x1e6efeec4: stp    x29, x30, [sp, #-0x10]!
    0x1e6efeec8: mov    x29, sp
Target 0: (Runner) stopped.
Installing and launching...                                        26.6s
Error launching application on iPhone.

解决方法就是在工程的 "Build Settings->Linking->Runpath Search Paths" 加上 "/usr/lib/swift" 。

如下图:

继续阅读flutter升级到3.3.9后报错“Library not loaded: @rpath/libswiftCore.dylib”

VirtualBox 7.0.4安装macOS Monterey 12.6.1

硬件要求

Intel E3-1230 v3 可以成功安装, AMD Ryzen 5900 CPU 在 Linux 系统上,需要配置 CPU 模仿 Intel CPU 的特性。并且 CPU 部分,不要启用 嵌套VT-x/AMD-V

生成系统安装镜像

macOS (实验使用的系统是 macOS Big Sur (11.7.1))系统上,执行如下命令,生成系统安装镜像

$ hdiutil create -o /tmp/Monterey.cdr -size 15000m -layout SPUD -fs HFS+J

$ hdiutil attach /tmp/Monterey.cdr.dmg -noverify -mountpoint /Volumes/install_build

$ sudo ~/Install\ macOS\ Monterey.app/Contents/Resources/createinstallmedia --volume /Volumes/install_build

$ hdiutil detach /Volumes/Install\ macOS\ Monterey

$ mv /tmp/Monterey.cdr.dmg ~/Desktop/InstallSystem.dmg

$ hdiutil convert ~/Desktop/InstallSystem.dmg -format UDTO -o ~/Desktop/Monterey.iso

继续阅读VirtualBox 7.0.4安装macOS Monterey 12.6.1

ubuntu 22.04升级到cpp-12后flutter编译报错"找不到 -lstdc++"

在今天晚上 ubuntu 22.04 执行如下升级命令之后

$ sudo apt-get dist-upgrade 
正在读取软件包列表... 完成
正在分析软件包的依赖关系树... 完成
正在读取状态信息... 完成                 
正在计算更新... 完成
下列【新】软件包将被安装:
  cpp-12 gcc-12 libasan8 libgcc-12-dev libtsan2
下列软件包将被升级:
  apport apport-gtk dkms firmware-sof-signed libexpat1 libexpat1:i386
  libexpat1-dev libflac8 libfreerdp-client2-2 libfreerdp-server2-2
  libfreerdp2-2 libwinpr2-2 python3-apport python3-problem-report rsync
  xserver-common xserver-xephyr xserver-xorg-core xserver-xorg-legacy xwayland
升级了 20 个软件包,新安装了 5 个软件包,要卸载 0 个软件包,有 0 个软件包未被升级。

再次执行 flutter 的构建命令,报错。

操作过程如下:

$ flutter run
Launching lib/main.dart on Linux in debug mode...
Building Linux application...
/usr/include/glib-2.0/glib/glib-typeof.h:39:10: fatal error: 'type_traits' file not found
Exception: Build process failed

$ flutter --version
Flutter 3.3.9 • channel stable • https://github.com/flutter/flutter.git
Framework • revision b8f7f1f986 (2 天前) • 2022-11-23 06:43:51 +0900
Engine • revision 8f2221fbef
Tools • Dart 2.18.5 • DevTools 2.15.0

$ flutter clean

$ flutter run
Multiple devices found:
Linux (desktop) • linux  • linux-x64      • Ubuntu 22.04.1 LTS 5.15.0-53-generic
Chrome (web)    • chrome • web-javascript • Chromium 107.0.5304.110
[1]: Linux (linux)
[2]: Chrome (chrome)
Please choose one (To quit, press "q/Q"): 1
Running "flutter pub get" in xxxx...                            6.2s
Launching lib/main.dart on Linux in debug mode...
CMake Error at /usr/share/cmake-3.22/Modules/CMakeTestCXXCompiler.cmake:62 (message):
  The C++ compiler

    "/usr/bin/clang++"

  is not able to compile a simple test program.

  It fails with the following output:

    Change Dir: /home/xxxx/xxxx/xxxxx/build/linux/x64/debug/CMakeFiles/CMakeTmp

    Run Build Command(s):/usr/bin/ninja cmTC_8cfda && [1/2] Building CXX object CMakeFiles/cmTC_8cfda.dir/testCXXCompiler.cxx.o
    [2/2] Linking CXX executable cmTC_8cfda
    FAILED: cmTC_8cfda 
    : && /usr/bin/clang++   CMakeFiles/cmTC_8cfda.dir/testCXXCompiler.cxx.o -o cmTC_8cfda   && :
    /usr/bin/ld: 找不到 -lstdc++: 没有那个文件或目录
    clang: error: linker command failed with exit code 1 (use -v to see invocation)
    ninja: build stopped: subcommand failed.


  CMake will not be able to correctly generate this project.
Call Stack (most recent call first):
  CMakeLists.txt:3 (project)

Building Linux application...                                           
Exception: Unable to generate build files

解决方法是手工安装依赖:

$ sudo apt install lib32stdc++-12-dev

之后再执行构建命令。

参考链接

Android R(11)文件选择兼容

对于 Android R(11) 使用 ContentResolver 检索图片,音乐,视频文件,参考 Android R(11) ContentResolver报错java.lang.IllegalArgumentException: Invalid token limit 里面的代码即可实现。但是如果想上传 PDFTXT等文件的时候,则会发现系统无任何数据返回。

下面探讨一下如何解决这个问题:

一.储存

首先,我们需要对Android的储存有所了解
Android储存器可分为内部储存外部储存,这里的内部储存和外部储存不是说有两个物理储存器而是系统在硬盘上划分了两个专用目录用作内部储存和外部储存。简单来说,我们通过系统文件管理器看到的目录都属于外部储存,外部储存又可分为三类目录,私有目录公共目录其它目录,而内部储存对于用户是隐藏的,如数据库、SharedPreferences等文件都放在内部储存中。

内部储存
//内部储存的文件目录获取方法,打印路径:/data/user/0/{应用包名}/files
//
Context.getFilesDir()

//内部储存的缓存目录获取方法,打印路径:/data/user/0/{应用包名}/cache
Context.getCacheDir()

内部储存对应的目录为/data/user/0/{应用包名},该目录下应用有权限进行文件操作,目录对外不可见,应用删除对应的目录也会被删除。

外部储存
1.私有目录
//私有目录的文件目录获取方法,打印路径:/storage/emulated/0/Android/data/{应用包名}/files
//方法参数可选,例如传入Environment.DIRECTORY_PICTURES拿到的目录为/storage/emulated/0/Android/data/com.example.android11/files/Pictures
Context.getExternalFilesDir(null)

//私有目录的缓存目录获取方法,打印路径:/storage/emulated/0/Android/data/{应用包名}/cache
Context.getExternalCacheDir()

私有目录获取和内部储存获取方式类似,都有file和cache目录,且该目录下应用有权限进行文件操作,目录对外可见,应用删除对应的目录也会被删除。
从Android11开始,私有目录不能被外部访问,即使获取了“所有文件管理”权限也不行(当然也是有其它方式可以实现Data目录的访问,不过目前看来并不完美)

2.公共目录

Downloads、Documents、Pictures 、DCIM、Movies、Music、Ringtones等目录都是公共目录,Android11前可以通过文件路径直接访问,Android11后需要通过MediaStore来进行访问。

3.其它目录

外部储存中除了私有目录和公共目录外都是其它目录,Android11后不能直接对其它目录进行访问。

二.分区存储

Android10中已经加入了分区储存机制,不过是非强制的,适配Android10只需在AndroidManifest.xml中添加 android:requestLegacyExternalStorage="true"即可。而在Android11已经强制应用使用分区储存。

三.兼容方式

1.MANAGE_EXTERNAL_STORAGE(不推荐)
<!-- manifest中注册 -->
<uses-permission android:name="android.permission.MANAGE_EXTERNAL_STORAGE"
        tools:ignore="ScopedStorage" />

开启授权页面

        if (Build.VERSION.SDK_INT >= Build.VERSION_CODES.R && !Environment.isExternalStorageEmulated()) {
            val intent = Intent(Settings.ACTION_MANAGE_ALL_FILES_ACCESS_PERMISSION)
            intent.addFlags(Intent.FLAG_ACTIVITY_NEW_TASK)
            startActivity(intent)
        }

获取“所有文件管理”的权限可以读写除私有目录外的所有文件,但是这种权限一般为文件管理类的软件才需要申请。一般APP申请此类权限若上架Google,华为等应用市场大概率被拒。

2.存储访问框架 (SAF)(推荐)

应用如果有做文件选择上传类的功能可以使用此方式,通过启动一个系统的文件浏览页面,选择需要的文件后返回一个uri,之后将uri转成流上传或者将通过uri复制文件到私有目录再操作复制后的文件进行上传,这里切记不能直接将uri转成File去进行操作。

//启动SAF文件选择
Intent intent = new Intent(Intent.ACTION_OPEN_DOCUMENT);
intent.addCategory(Intent.CATEGORY_OPENABLE);
intent.setType(MimeTypeMap.getSingleton().getMimeTypeFromExtension("pdf"));//这里以打开PDF选择为例
startActivityForResult(intent, 10086);
    @Override
    public void onActivityResult(int requestCode, int resultCode, Intent data) {
        if (requestCode == 10086 && resultCode == getActivity().RESULT_OK) {
                if (data.getData() != null) {
                  uriToFileApiQ(this, data.getData())
                }
        }
    }
    //将uri对应的文件复制一份到私有目录,之后就可以操作复制后的File了
    @RequiresApi(Build.VERSION_CODES.Q)
    public File uriToFileApiQ(Context context, Uri uri) {
        File file = null;
        if (uri == null) return file;
        //android10以上转换
        if (uri.getScheme().equals(ContentResolver.SCHEME_FILE)) {
            file = new File(uri.getPath());
        } else if (uri.getScheme().equals(ContentResolver.SCHEME_CONTENT)) {
            //把文件复制到沙盒目录
            ContentResolver contentResolver = context.getContentResolver();
            String displayName = "uritofile"
                    + "." + MimeTypeMap.getSingleton().getExtensionFromMimeType(contentResolver.getType(uri));
            InputStream is = null;
            try {
                is = contentResolver.openInputStream(uri);
                File cache = new File(context.getCacheDir().getAbsolutePath(), displayName);
                FileOutputStream fos = new FileOutputStream(cache);
                byte[] b = new byte[1024];
                while ((is.read(b)) != -1) {
                    fos.write(b);// 写入数据
                }
                file = cache;
                fos.close();
                is.close();
            } catch (FileNotFoundException e) {
                e.printStackTrace();
            } catch (IOException e) {
                e.printStackTrace();
            }
        }
        return file;
    }

参考链接

如何将其他设备通过 Windows 10 自带的“连接”功能无线投屏到计算机中

请确保计算机端已打开连接窗口,再使用无线投屏功能。

在计算机端打开“连接”窗口
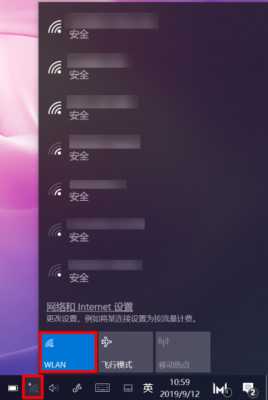
  1. 点击任务栏中的网络图标,开启 WLAN 功能。

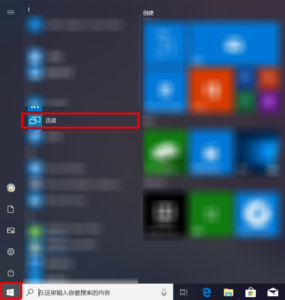
  2. 点击 Windows 图标。
    • 若有连接选项,请继续步骤 3 的操作。

    • 若无连接选项,请先进行如下操作后再进行步骤 3 的操作:
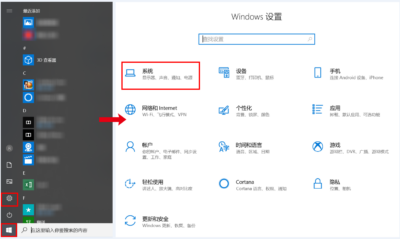
      1. 连接网络状态下,点击 Windows 图标 > 设置图标,选择系统。

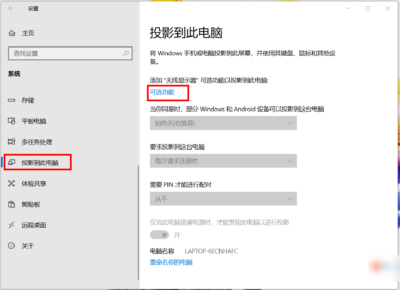
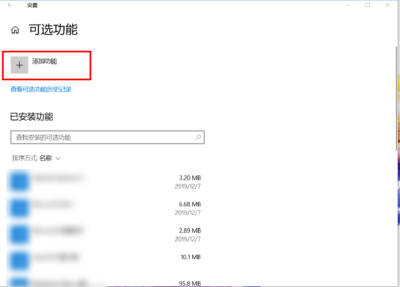
      2. 点击投影到此电脑,选择可选功能。

      3. 点击添加功能。

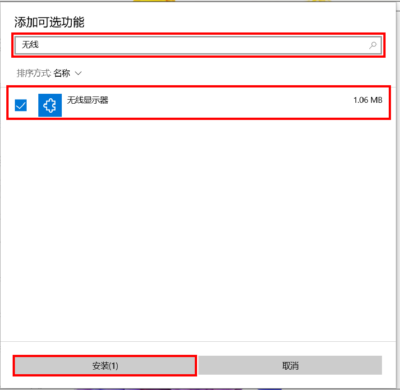
      4. 在添加可选功能搜索框中输入无线,在搜索结果中勾选无线显示器,点击安装。

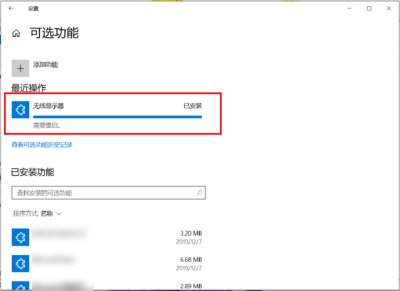
      5. 安装完成后,重启计算机(若您的计算机有更新,请更新后重启),您就可以在 Windows 应用列表中看到连接选项。

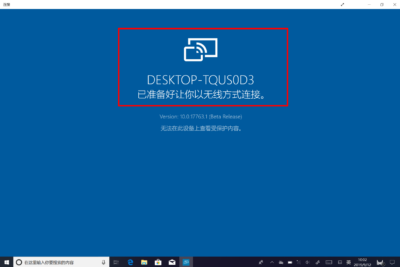
  3. 在连接窗口,您可以看到您的计算机设备名称,并显示您的计算机已准备好无线连接方式。

使用无线投屏功能

在其他设备端(如手机、平板、其他计算机)中打开无线投屏模式,搜索投影设备为上述计算机名称,进行连接即可。


  • 不同的设备打开无线投屏模式的操作不一样,具体请咨询设备供应商。
  • 通过华为电脑管家将手机与计算机连接,可能会影响到手机的无线投屏功能,请在我的设备>我的手机>断开连接中断开连接,并在计算机端关闭连接窗口,再重新尝试。

以华为 P30 为例:

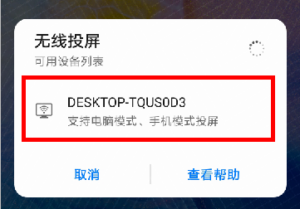
  1. 下拉打开通知面板,开启 WLAN 功能,选择无线投屏。

  2. 手机端将自动搜索附近的可投屏设备,在可投屏的设备中选择计算机设备名称。

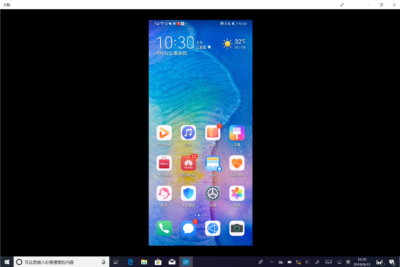
  3. 计算机端的连接窗口中将显示手机的投屏界面。

  4. 若要断开无线投屏,点击连接窗口右上角的关闭按钮,或关闭手机端的无线投屏功能即可。

参考链接


如何将其他设备通过 Windows 10 自带的“连接”功能无线投屏到计算机中

Windows 11右键设计反人类?教你恢复完整右键菜单

微软已经在10月5日发布了Windows 11正式版,很多朋友也已经升级了。不过对于Windows 11的一些新设计,并不是所有人都能适应的,例如新的右键快捷菜单,就不少朋友表示接受不了。

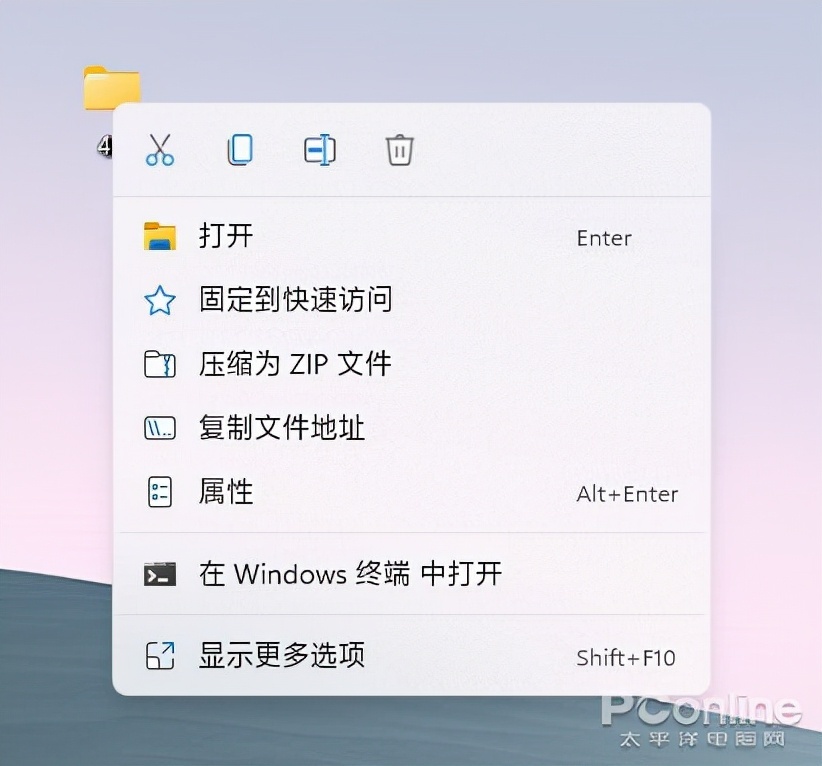
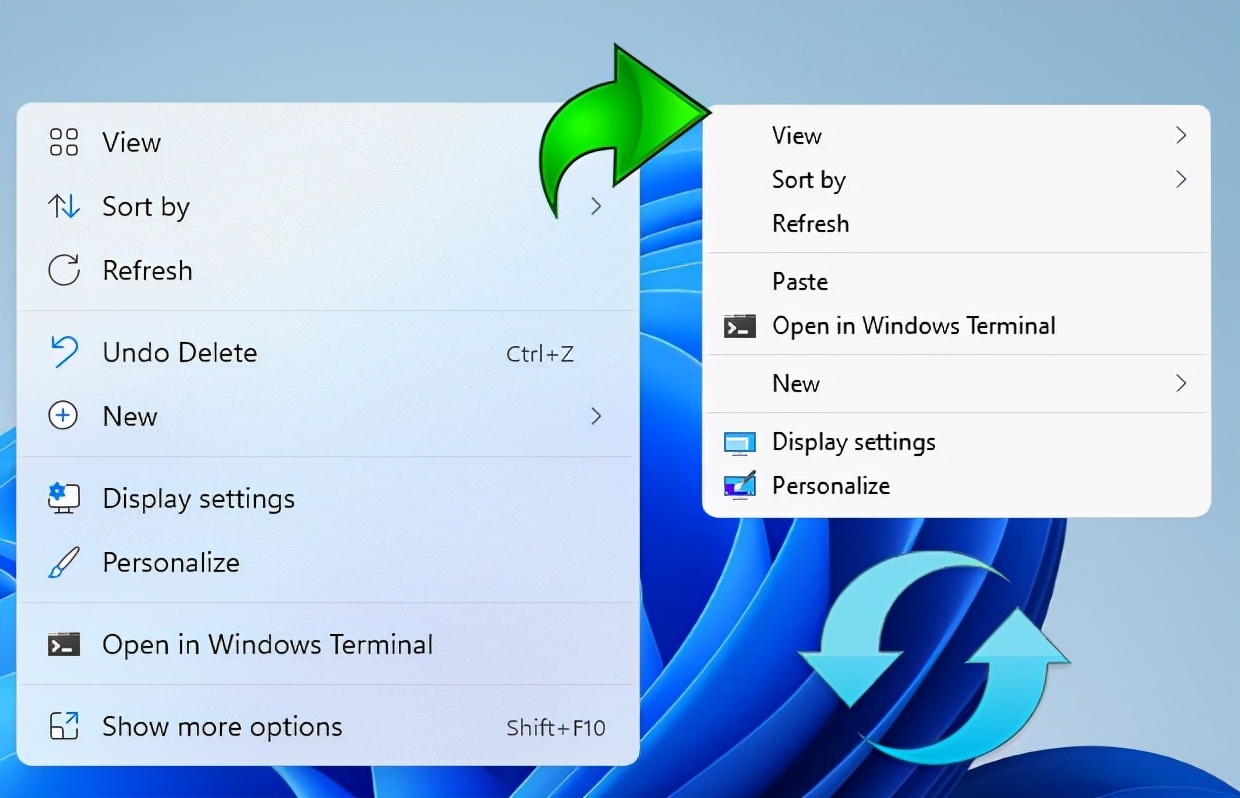
Windows 11的新右键菜单相比之前的旧款式,颜值上的确大有提升,不仅使用了Fluent Design设计语言,而且优化了文字排版,行间距更宽,便于阅读和触控。然而,Win11的右键菜单隐藏了很多选项,如果想要找到一些常用的功能,需要点击“显示更多选项”才能展开,这操作起来颇为麻烦。怎么办?今天就来给大家分享一些恢复Windows 11完整右键菜单的方法!

使用注册表修改

首先,通过修改注册表,我们就可以将Win11的右键菜单改为老样式。下面是具体的方法。

  ·运行“regedit”,开启注册表编辑器,定位到“HKEY_CURRENT_USER\SOFTWARE\CLASSES\CLSID”;

  ·接着,右键点击“CLSID”键值,新建一个名为{86ca1aa0-34aa-4e8b-a509-50c905bae2a2}的项;

  ·右键点击新创建的项,新建一个名为InprocServer32的项,按下回车键保存;

  ·最后选择新创建的项,然后双击右侧窗格中的默认条目,什么内容都不需要输入,按下回车键。

保存注册表后,重启explorer.exe,即可看到右键菜单恢复成旧样式了。

如果想要恢复成为Windows 11的设计,那么删掉InprocServer32的项就可以了。

参考链接


Win11右键设计反人类?教你恢复完整右键菜单

Android:加载PDF几种方法汇总对比

在安卓项目中,加载PDF文件,是一个比较常见的需求。又分为两大类,

1.加载网络PDF

2.加载一个本地静态PDF。


查阅资料,纵观网上在安卓中打开PDF的各种方式,大致可以分为以下几类,

1.直接使用第三方软件打开(包括浏览器打开和第三方软件打开)

如果是在app内部加载PDF文件,虽然安卓原生API对于PDF的支持又不是太好,但是各种第三方专门的阅读或者办公软件支持的是很不错的,可以通过Intent配置data和type实现。

其中,在实际需求中又会分为加载本地PDF和网络PDF的情况。

使用浏览器打开PDF:(APP外部打开,适用于加载网络PDF)

public static void openPDFInBrowser(Context context, String url) {
        Uri uri = Uri.parse(url);
        Intent intent = new Intent(Intent.ACTION_VIEW, uri);
        intent.putExtra(Browser.EXTRA_APPLICATION_ID, context.getPackageName());
        try {
            context.startActivity(intent);
        } catch (ActivityNotFoundException e) {
            Log.w("error", "Activity was not found for intent, " + intent.toString());
        }
    }

使用手机上已安装的可以打开PDF的第三方软件来打开PDF:(APP外部打开,适用于加载本地PDF)

(使用这种方式缺点是:手机上如果一个可以打开PDF的软件,那么就尴尬了~)

 public static void openPDFInNative(Context context, String FILE_NAME) {
        File file = new File(context.getExternalCacheDir(),FILE_NAME);
        Intent intent = new Intent(Intent.ACTION_VIEW);
        Uri uri = Uri.fromFile(file);
        intent.addFlags(Intent.FLAG_ACTIVITY_NEW_TASK);
        intent.setDataAndType(uri, "application/pdf");
        try {
            context.startActivity(intent);
        } catch (ActivityNotFoundException e) {
            Log.w("URLSpan", "Activity was not found for intent, " + intent.toString());
        }
    }

2.连接Google服务器解析

安卓的WebView不支持PDF解析,因此通过连接Google的一个服务器转换成功后返回给WebView显示。但是,但是,但是呢,大家都懂的,天朝和Google之间有一道高高的墙。方法还是贴出来,作为国际化APP的一种方案。

mWebView.loadUrl("http://docs.google.com/gview?embedded=true&url="+ pdfUrl);

3.用第三方库加载

Github上有一个Java开源项目 https://github.com/barteksc/AndroidPdfViewer ,
这个库的大致原理,是内置了一个PDF解析器,以流的方式将网络PDF从网上Down下来,然后再以流的方式将其还原成PDF展示出来(具体细节没关注)。亲测中,这个库每次进入webview页面都会解析加载一遍PDF,如果PDF过大,费时无缓存不说,最致命的问题乃是,

APK包体积会瞬间增大15M左右,

具体原因不明,估计应该是内置PDF解析器的问题。于是,此方法被我抛弃了。


4.使用Moliza开源的Pdf.js

这个JS类库也是很强大的,配合原生的WebView使用,支持预览,缩放,翻页的功能,实现效果和WKWebView没差。同样也有体积问题,全部放到本地apk的话包大小差不多会增加5M左右。但相比上一种方式还是轻量一些:
http://www.jb51.net/article/136364.htm


5.使用安卓自带的PdfRenderer类加载

如果要求支持的功能不是很多,用安卓提供的PdfRender就可以满足需求了。PdfRender加载多页的话可以配合ViewPager或者RecyclerView使用。需要注意的是使用PdfRender需要先将PDF文件下载到本地,是线程不安全的,并且API>=21才能使用。因为这种方式是将PDF下载到本地,于是就产生了新问题:占内存。如果是静态的PDF文件不大还好,但是如果是频繁加载网络PDF的需求,那就头疼了,这种方式需要做好定时清理删除PDF的工作,否则,GG。

这里提供的示例是阿里巴巴Android开发手册,放到assets目录下.

@TargetApi(Build.VERSION_CODES.LOLLIPOP)
public class MainActivity extends AppCompatActivity {

    private ViewPager vpPdf;

    private LayoutInflater mInflater;
    private ParcelFileDescriptor mDescriptor;
    private PdfRenderer          mRenderer;

    public static final String FILE_NAME = "alibaba.pdf";

    @Override
    protected void onCreate(Bundle savedInstanceState) {
        super.onCreate(savedInstanceState);
        setContentView(R.layout.activity_main);

        mInflater = LayoutInflater.from(this);
        vpPdf =findViewById(R.id.vp_pdf);

        try {
            openRender();
        } catch (IOException e) {
            e.printStackTrace();
        }
    }


    @TargetApi(Build.VERSION_CODES.LOLLIPOP)
    private void openRender() throws IOException {

        File file = new File(getExternalCacheDir(), FILE_NAME);
        if (!file.exists()) {
            //复制文件到本地存储
            InputStream asset = getAssets().open(FILE_NAME);
            FileOutputStream fos = new FileOutputStream(file);
            byte[] buffer = new byte[1024];

            int size;
            while ((size = asset.read(buffer)) != -1) {
                fos.write(buffer, 0, size);
            }

            asset.close();
            fos.close();
        }

        //初始化PdfRender
        mDescriptor = ParcelFileDescriptor.open(file, ParcelFileDescriptor.MODE_READ_ONLY);
        if (mDescriptor != null) {
            mRenderer = new PdfRenderer(mDescriptor);
        }

        //初始化ViewPager的适配器并绑定
        MyAdapter adapter = new MyAdapter();
        vpPdf.setAdapter(adapter);
    }

    @Override
    protected void onDestroy() {
        //销毁页面的时候释放资源,习惯
        try {
            closeRenderer();
        } catch (IOException e) {
            e.printStackTrace();
        }
        super.onDestroy();
    }

    private void closeRenderer() throws IOException{
        mRenderer.close();
        mDescriptor.close();

    }

    class MyAdapter extends PagerAdapter{

        @Override
        public int getCount() {
            return mRenderer.getPageCount();
        }

        @Override
        public boolean isViewFromObject(View view, Object object) {
            return view==object;
        }

        @Override
        public Object instantiateItem(ViewGroup container, int position) {
            View view = mInflater.inflate(R.layout.item_pdf, null);

            PhotoView pvPdf = view.findViewById(R.id.iv_pdf);
            pvPdf.enable();

            if (getCount() <= position) {
                return view;
            }

            PdfRenderer.Page currentPage = mRenderer.openPage(position);
            Bitmap bitmap = Bitmap.createBitmap(1080, 1760, Bitmap.Config
                    .ARGB_8888);
            currentPage.render(bitmap, null, null, PdfRenderer.Page.RENDER_MODE_FOR_DISPLAY);
            pvPdf.setImageBitmap(bitmap);
            //关闭当前Page对象
            currentPage.close();

            container.addView(view);
            return view;
        }

        @Override
        public void destroyItem(ViewGroup container, int position, Object object) {
            //销毁需要销毁的视图
            container.removeView((View) object);
        }
    }
}

PdfRender的大致调用方式是:

  • 初始化PdfRender,将PDF文件转换为ParcelFileDescriptor作为入参
  • 通过getPageCount()获得Pdf的总页数
  • 循环遍历,通过openPage()获得一个封装了当前页Pdf参数的内部类Page
  • 创建一个Bitmap对象,,用上步获取的Page加载,相当于把当前Pdf页的内容渲染到了Bitmap上
  • 对Bitmap进行你想要的操作,每次循环结束后关闭当前Page。

大部分都是常规操作,但要注意两点:

1. 每次循环创建的Page对象在使用完毕后必须调用close()。否则其内部的openPage()判断会抛异常;

2.Bitmap占用内存较大,如果用ViewPager加载一定要重写Adapter中的destroyItem(),及时的将需要销毁的视图从父容器中移除,否则快速滑动几页后会OOM。

参考链接


android:加载PDF几种方法汇总对比

Flutter的新一代图形渲染器Impeller

Impeller项目启动背景

20226 月在 Flutter 3.0 版本中 Google 官方正式将渲染器 Impeller 从独立仓库中合入 Flutter Engine 主干进行迭代,这是 2021Flutter 团队推动重新实现 Flutter 渲染后端以来,首次正式明确了 Impeller 未来代替 Skia 作为 Flutter 主渲染方案的定位。 Impeller 的出现是 Flutter 团队用以彻底解决 SkSLSkia Shading Language) 引入的 Jank 问题所做的重要尝试。官方首次注意到 FlutterJank 问题是在 2015 年,当时推出的最重要的优化是对 Dart 代码使用 AOT 编译优化执行效率。 在 Impeller出现之前,Flutter 对渲染性能的优化大多停留在 Skia 上层,如渲染线程优先级的提升,在着色器编译过久的情况下切换 CPU 绘制等策略性优化。

Jank 类型分为两种:首次运行卡顿(Early-onset Jank)和非首次运行卡顿,Early-onset Jank 的本质是运行时着色器的编译行为阻塞了 Flutter Raster 线程对渲染指令的提交。在 Native 应用中,开发者通常会基于 UIkit 等系统级别的 UI 框架开发应用,极少需要自定义着色器,Core Animationframework 使用的着色器在 OS 启动阶段就可以完成编译,着色器编译产物对所有的 app 而言全局共享,所以 Native 应用极少出现着色器编译引起的性能问题更常见的是用户逻辑对 UI 线程过度占用官方为了优化 Early-onset Jank ,推出了SkSLWarmup 方案,Warmup 本质是将部分性能敏感的 SkSL 生成时间前置到编译期,仍然需要在运行时将 SkSL 转换为 MSL 才能在 GPU 上执行。Warmup 方案需要在开发期间在真实设备上捕获 SkSL 导出配置文件在应用打包时通过编译参数可以将部分 SkSL 预置在应用中。此外由于 SkSL 创建过程中捕获了用户设备特定的参数,不同设备 Warmup 配置文件不能相互通用,这种方案带来的性能提升非常有限。

2019Apple 宣布在其生态中废弃 OpenGL 后, Flutter 迅速完成了渲染层对 Metal 的适配。 与预期不符的是, Metal 的切换使得 Early-onset Jank 的情况更加恶化,Warmup 方案的实现需要依赖 Skia 团队对 Metal 的预编译做支持,由于 Skia 团队的排期问题,一度导致 Warmup 方案在 Metal 后端上不可用。与此同时社区中对 iOS 平台 Jank 问题的反馈更加强烈,社区中一度出现屏蔽 MetalFlutter Engine Build,回退到 GL 后端虽然能一定程度改善首帧性能但是在 iOS 平台上会出现视觉效果的退化,与之相对的是,由于 Android 平台上拥有 iOS 缺失的着色器机器码的缓存能力, Android 平台出现 Jank 的概率比 iOS 低很多。

除了社区中出现的通用问题外,Flutter infra 团队也经常收到字节内部业务方遇到的 Jank 问题的反馈,反馈较集中的有转场动画首次卡顿、列表滚动过程中随机卡顿等场景:

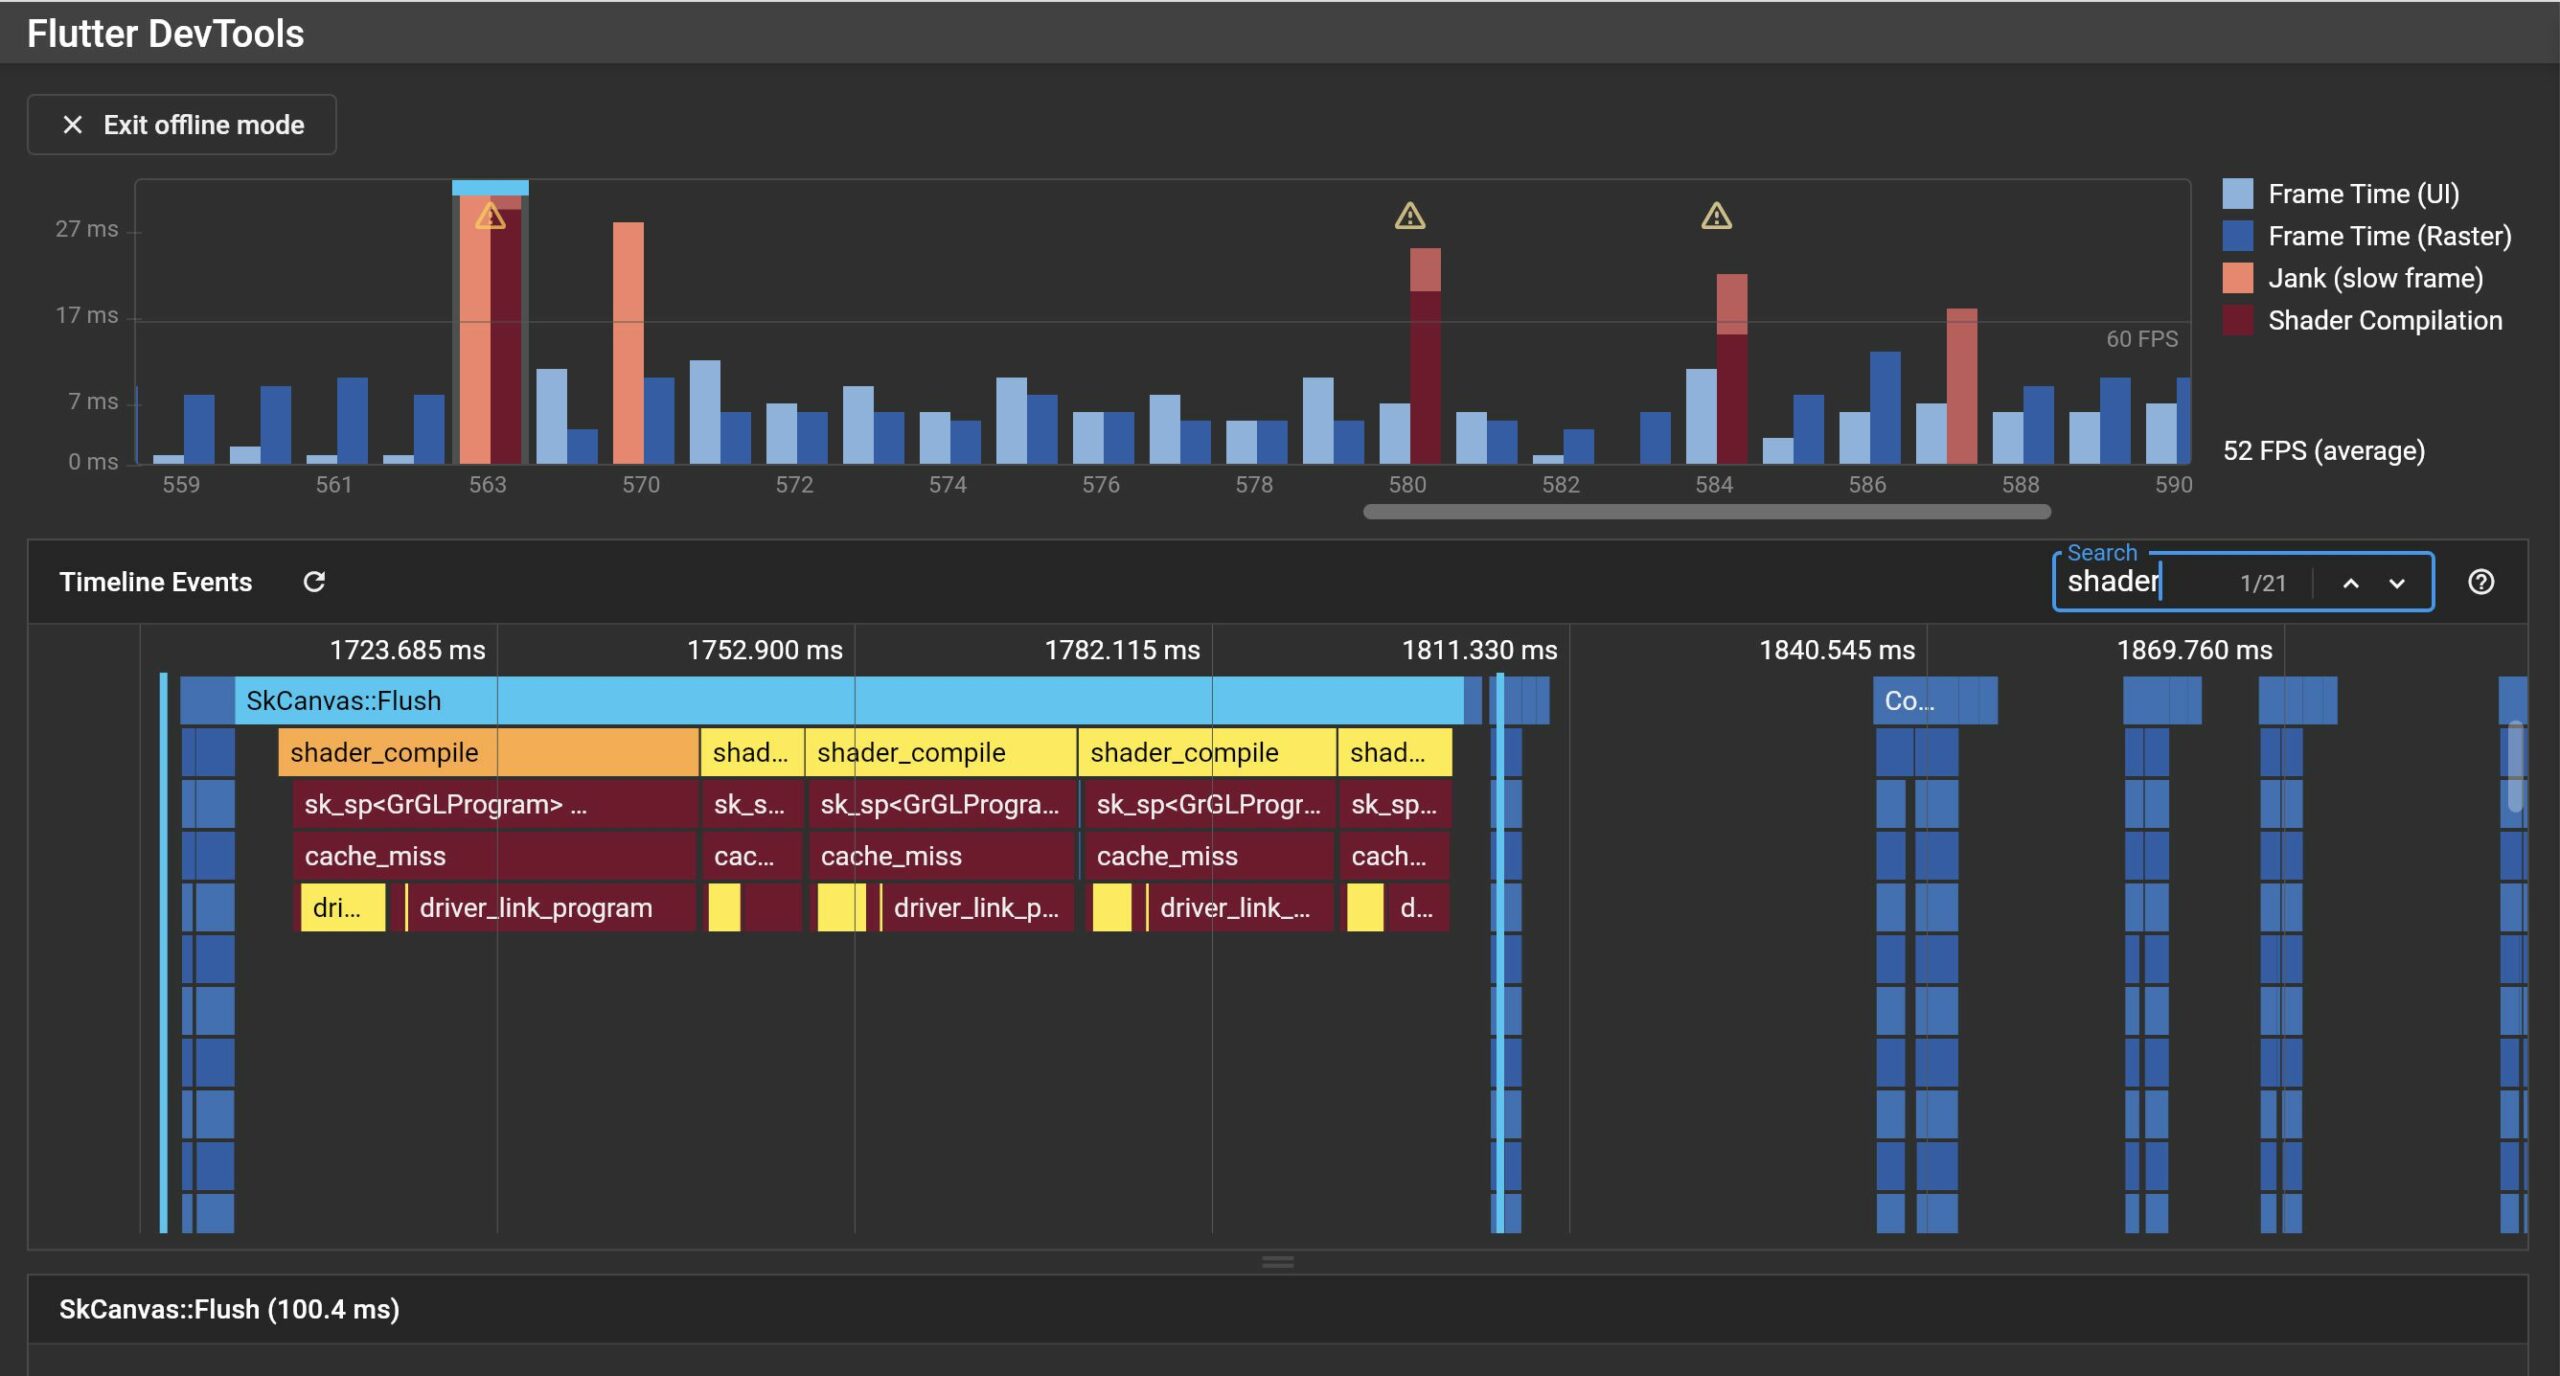
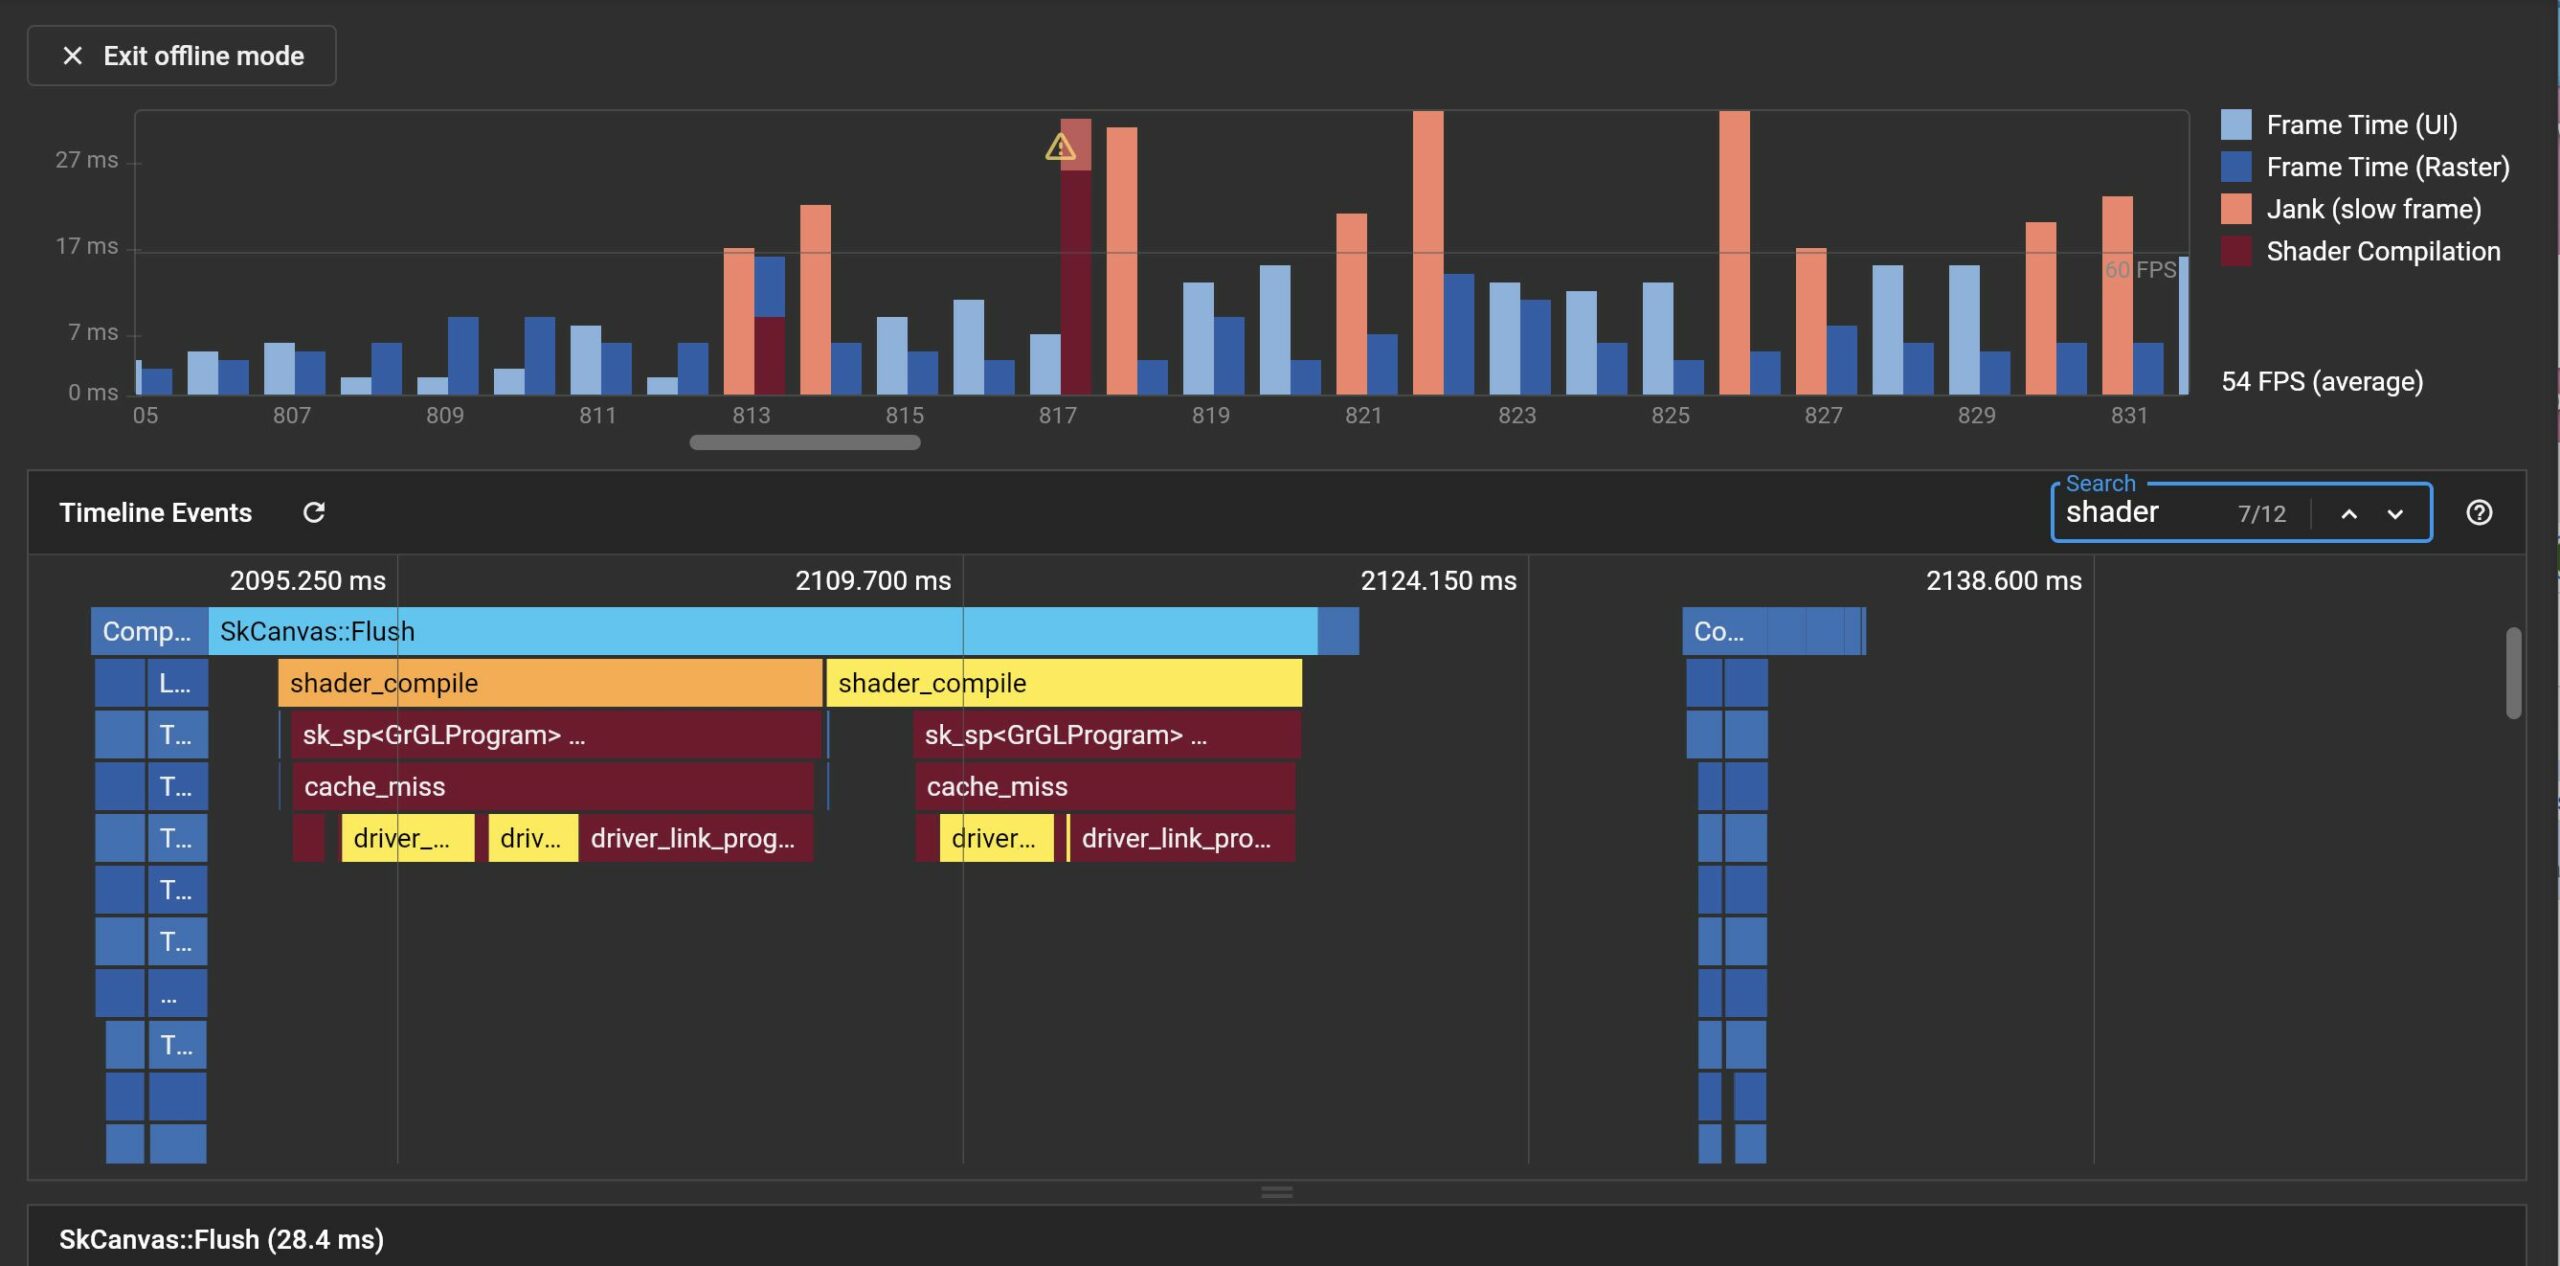
转场动画触发的着色器编译,耗时~100ms
列表滑动过程中随机触发的着色器编译,耗时~28ms

在这篇文章中,我们尝试从 Metal 着色器编译方案,矢量渲染器原理和 Flutter Engine 渲染层的接口设计三个维度去探究 Impeller 想要解决的问题和渲染器背后的相关技术。

Metal Shader Compilation演进

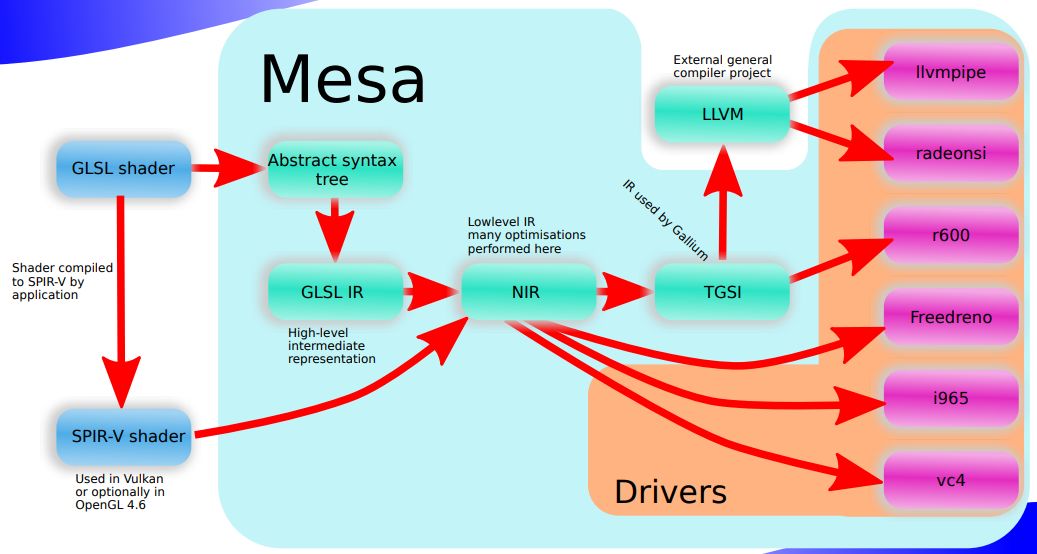
一般而言,不同的渲染后端会使用独立的着色器语言,与 JavaScript 等常见脚本语言的执行过程类似,不同语言编写的着色器程序为了能在 GPU 硬件上执行,需要经历完整的 lexical analysis / syntax analysis / Abstrat Syntax Tree (抽象语法树,下文简称 AST)构建,IR 优化,binary generation 的过程。着色器的编译处理是在厂商提供的驱动中实现,其中具体的实现对上层开发者并不可见。 Mesa 是一个在 MIT 许可证下开源的三维计算机图形库,以开源形式实现了 OpenGLapi 接口。通过 Mesa 中对 GLSL 的处理可以观察到完整的着色器处理流水线。 如下图所示,上层提供的 GLSL 源文件被 Mesa 处理为 AST 后首先会被编译为 GLSL IR, 这是一种 High-Level IR,经过优化后会生成另一种 Low-Level IRNIRNIR 结合当前 GPU 的硬件信息被处理为真正的可执行文件。不同的 IR 用来执行不同粒度的优化操作,通常底层 IR 更面向可执行文件的生成,而上层 IR 可以进行诸如 dead code elimination 等粗粒度优化。常见的高级语言(如 Swift )的编译过程也存在 High-Level IR (Swift IL) 到 Low-Level IR (LLVM IR)的转换。

随着 Vulkan 的发展, OpenGL 4.6 标准中引入了对 SPIR-V 格式的支持。SPIR-VStandard Portable Intermediate Representation)是一种标准化的 IR,统一了图形着色器语言与并行计算(GPGPU 应用)领域。它允许不同的着色器语言转化为标准化的中间表示,以便优化或转化为其他高级语言,或直接传给VulkanOpenGLOpenCL 驱动执行。SPIR-V 消除了设备驱动程序中对高级语言前端编译器的需求,大大降低了驱动程序的复杂性,使广泛的语言和框架前端能够在不同的硬件架构上运行。Mesa 中使用 SPIR-V 格式的着色器程序可以在编译时直接对接到 NIR 层,缩短着色器机器码编译的开销, 有助于系统渲染性能的提升。

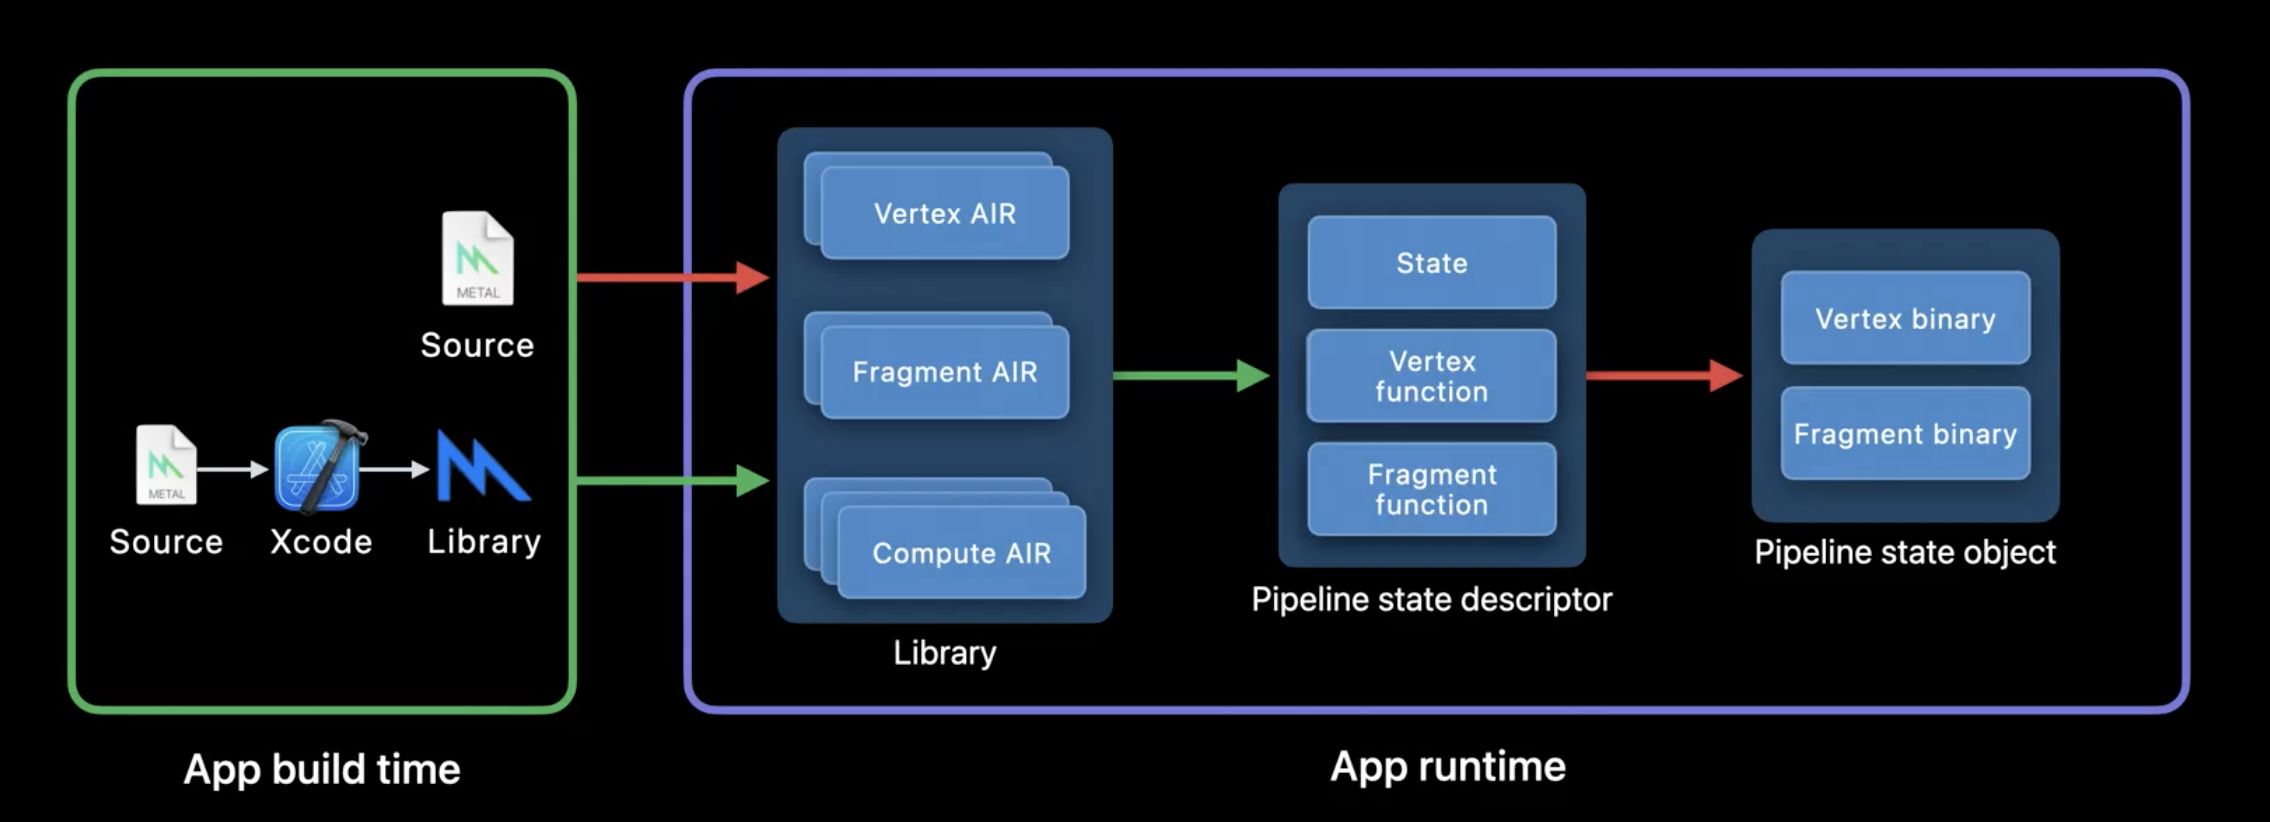
Metal 应用中, 使用 Metal Shading Language(以下简称 MSL )编写的着色器源码首先被处理为 AIR (Apple IR**) 格式的中间表示。如果着色器源码是以字符形式在工程中引用,这一步会在运行时在用户设备上进行,如果着色器被添加为工程的Target,着色器源码会在编译期在 Xcode 中跟随项目构建生成 MetalLib: 一种设计用来存放 AIR 的容器格式。随后 AIR 会在运行时,根据当前设备 GPU 的硬件信息,被 Metal Compiler ServiceJIT 编译为可供执行的机器码。相比源码形式,将着色器源码打包为 MetalLib 有助于降低运行时生着色器机器码的开销。 着色器机器码的编译会在每一次渲染管线状态对象(Pipeline State Object,下文简称 PSO)创建时发生,一个 PSO 持有当前渲染管线关联的所有状态,包含光栅化各阶段的着色器机器码,颜色混合状态,深度信息,模版掩码状态,多重采样信息等等。PSO 通常被设计为一个 immutable object(不可变对象),如果需要更改 PSO 中的状态需要创建一个新的 PSO 拷贝。

由于 PSO 可能在应用生命周期中多次创建, 为了防止着色器的重复编译开销,所有编译过的着色器机器码会被 Metal 缓存用来加速后续 PSO 的创建过程,这个缓存称为 Metal Shader Cache ,完全由 Metal 内部管理,不受开发者控制。应用通常会在启动阶段一次性创建大量 PSO 对象,由于此时 Metal 中没有任何着色器的编译缓存,PSO 的创建会触发所有的着色器完整执行从 AIR 到机器码的编译过程,整个集中编译阶段是一个 CPU 密集型操作。在游戏中通常在玩家进入新关卡前利用 Loading Screen 准备好下一场景所需的 PSO,然而常规 app 中用户的预期是能够即点即用,一旦着色器编译时间超过 16 ms,用户就会感受到明显的卡顿和掉帧。

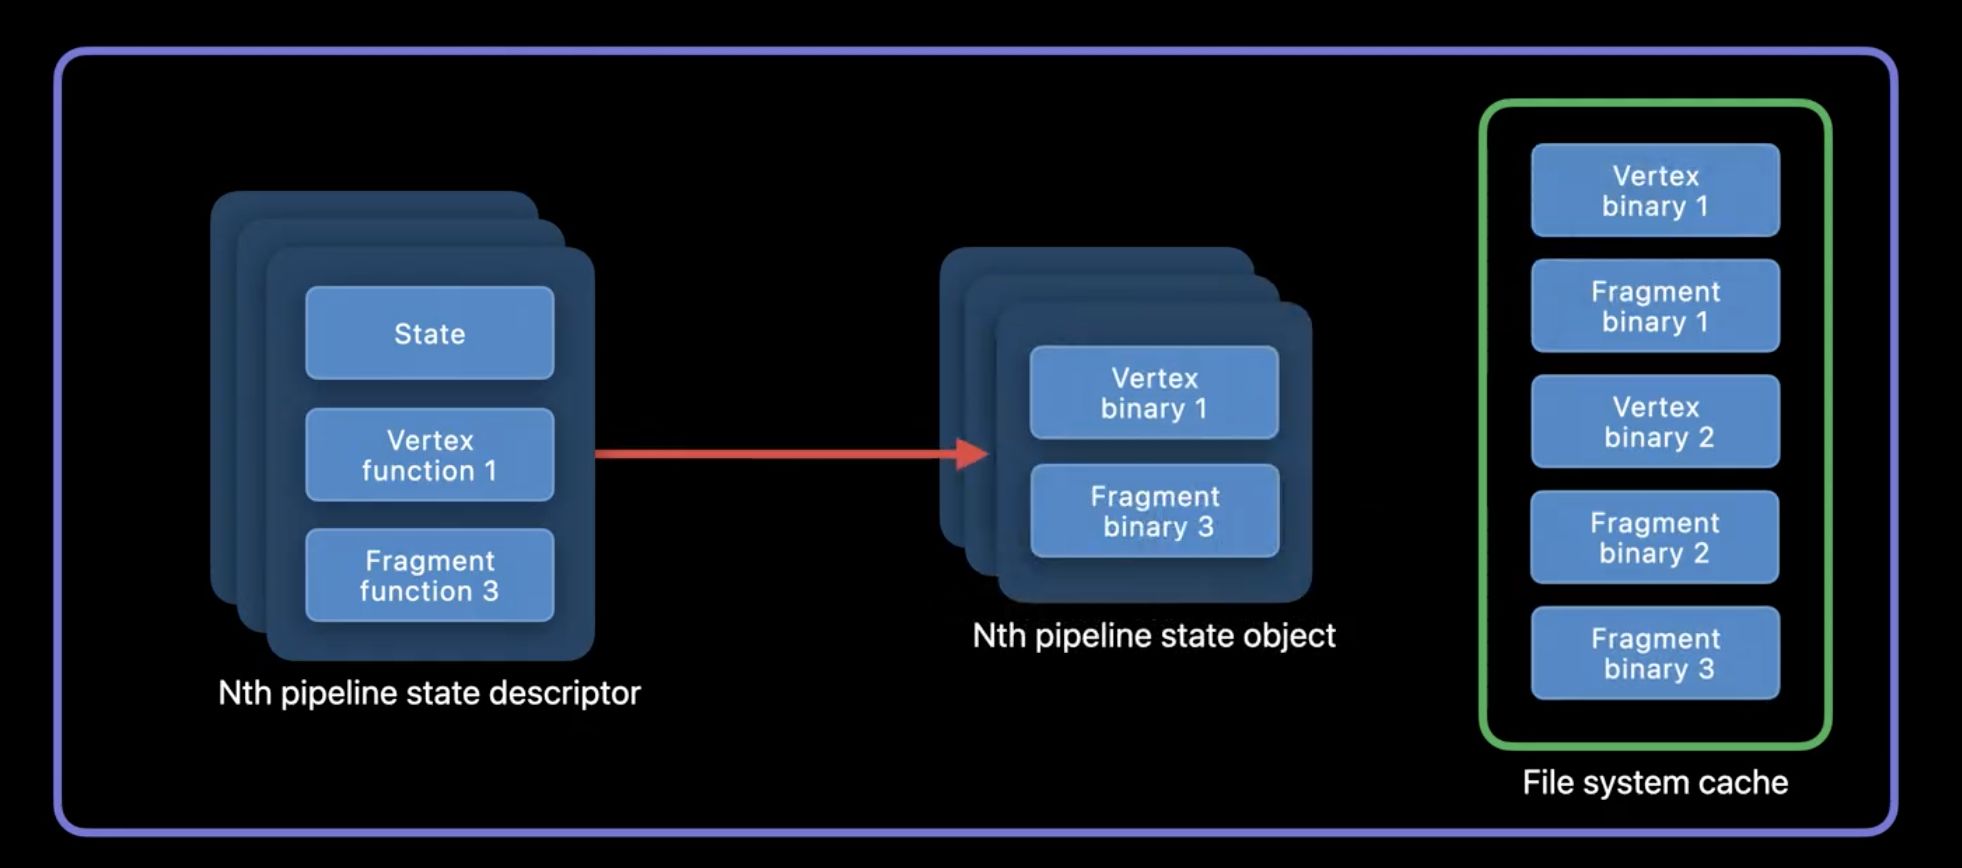
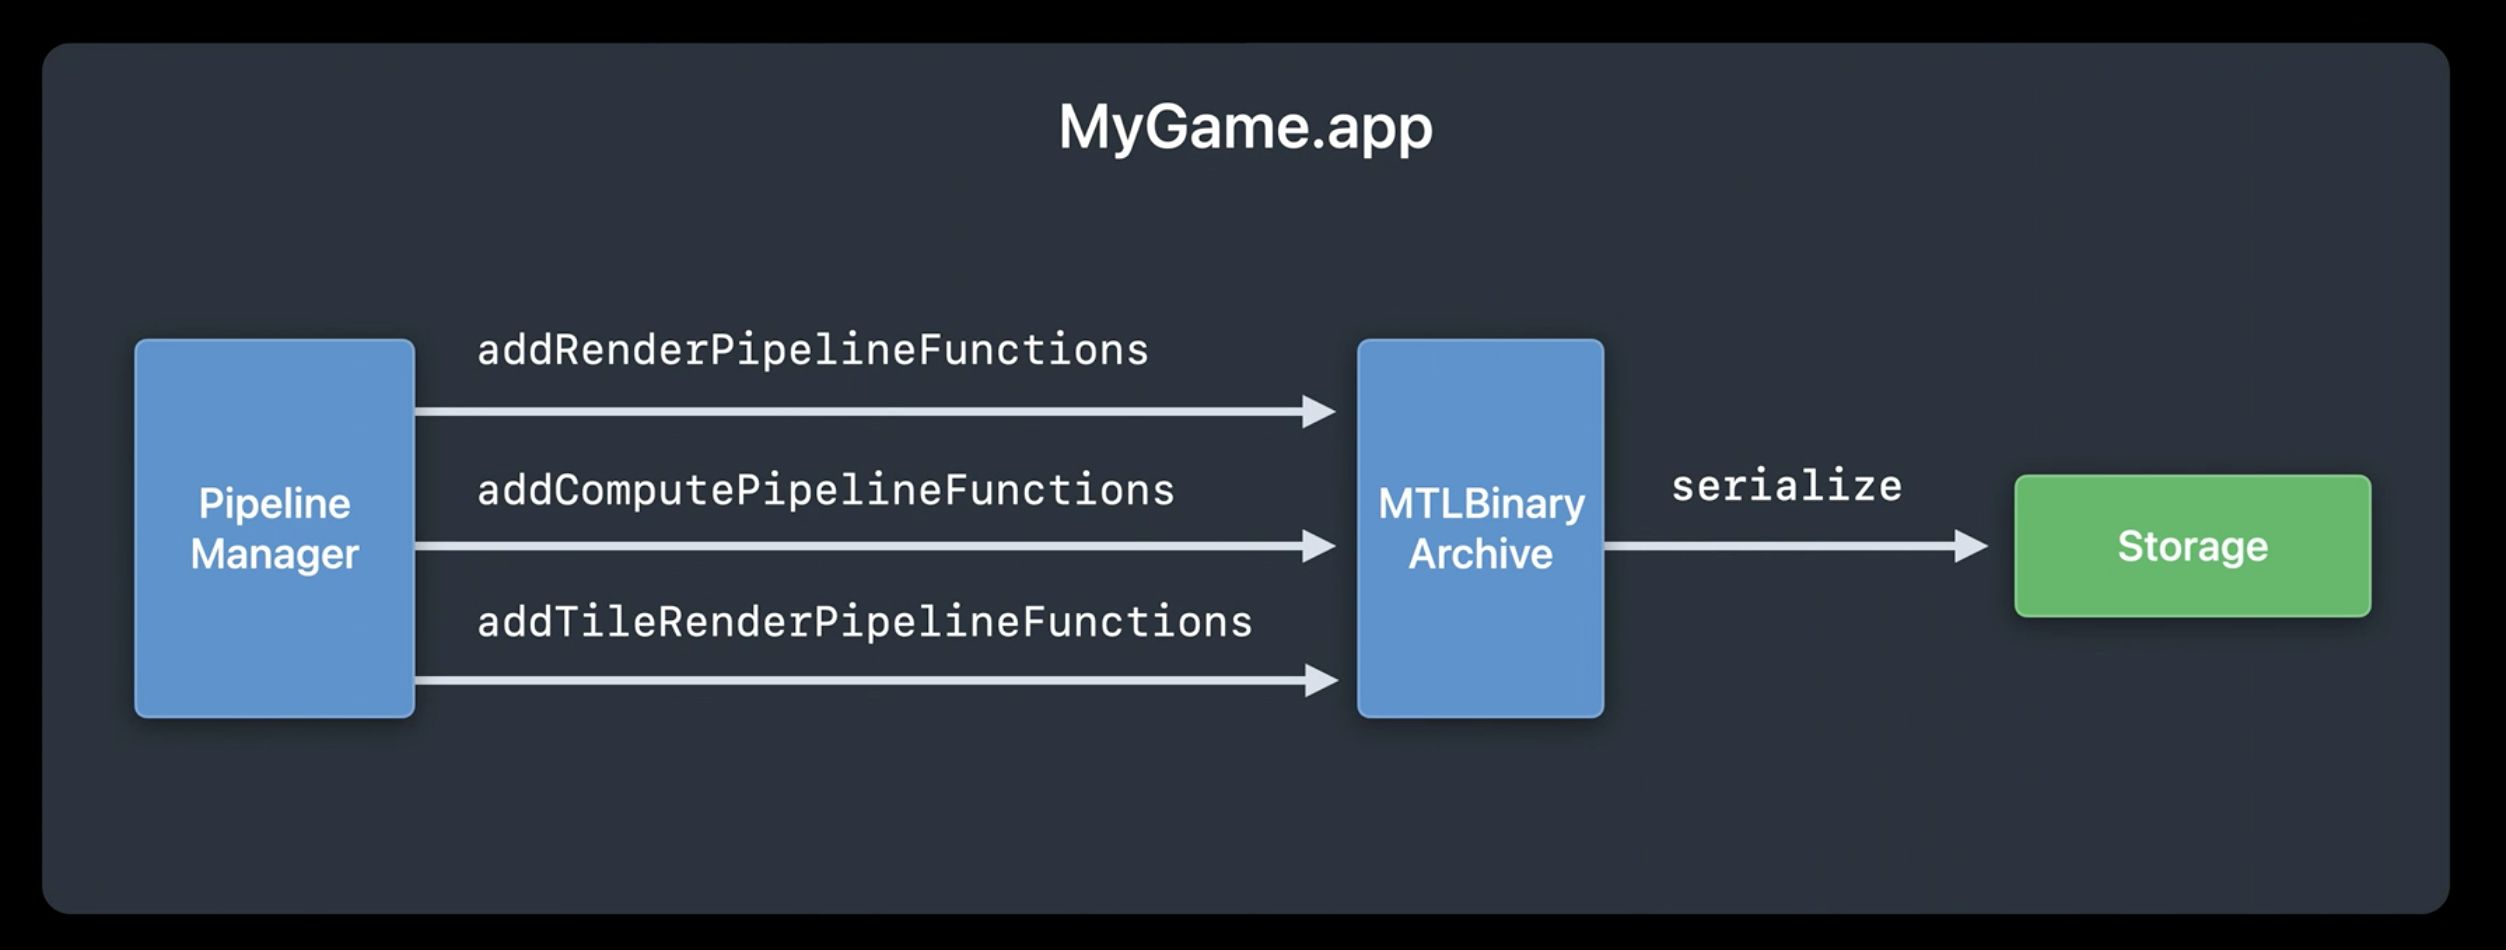
Metal 2 中, Apple 首次为开发者引入了手动控制着色器缓存的能力:Metal Binary ArchiveMetal Binary Archive 的缓存层次位于 Metal Shader Cache 之上, 这意味着 Metal Binary Archive 中的缓存在 PSO 创建时会被优先使用运行时,开发者可以通过 Metal Pipeline Manager 手动将性能敏感的着色器函数添加至 Metal Binary Archive 对象中并序列化至磁盘中。应用再次冷启后,此时创建相同的 PSO 即是一个轻量化操作,没有任何着色器编译开销。缓存的 Binary Archive 甚至可以二次分发给相同设备的用户,如果本地 Binary Archive 中缓存的机器码与当前设备的硬件信息不匹配,Metal 会回落至完整的编译流水线,确保应用的正常执行。游戏堡垒之夜「Fortnite」 在启动阶段需要创建多达 1700 个 PSO 对象,通过使用 Metal Binary Archive 来加速 PSO 创建,启动耗时从 1m26s 优化为 3s,速度提升28倍

Metal Binary Archive 通过内存映射的方式供 GPU 直接访问文件系统中的着色器缓存,因此打开 Metal Binary Archive 时会占用设备宝贵的虚拟内存地址空间。与缓存所有的着色器函数相比,更明智的做法是根据具体的业务场景将缓存分层,在页面退出后及时关闭对应的缓存释放不必要的虚拟内存空间。Metal Shader Cache 的黑盒管理机制无法保证着色器在使用时不会出现二次编译Metal Binary Archive 可以确保其中的缓存的着色器函数在应用生命周期内始终可用。Metal Binary Archive 虽然允许开发者手动管理着色器缓存,却依然需要通过在运行时搜集机器码来构建,无法保证应用初次安装时的使用体验。在 2022WWDC 中,Metal 3 终于弥补了这个遗留的缺陷,为开发者带来了在离线构建 Metal Binary Archive 的能力:

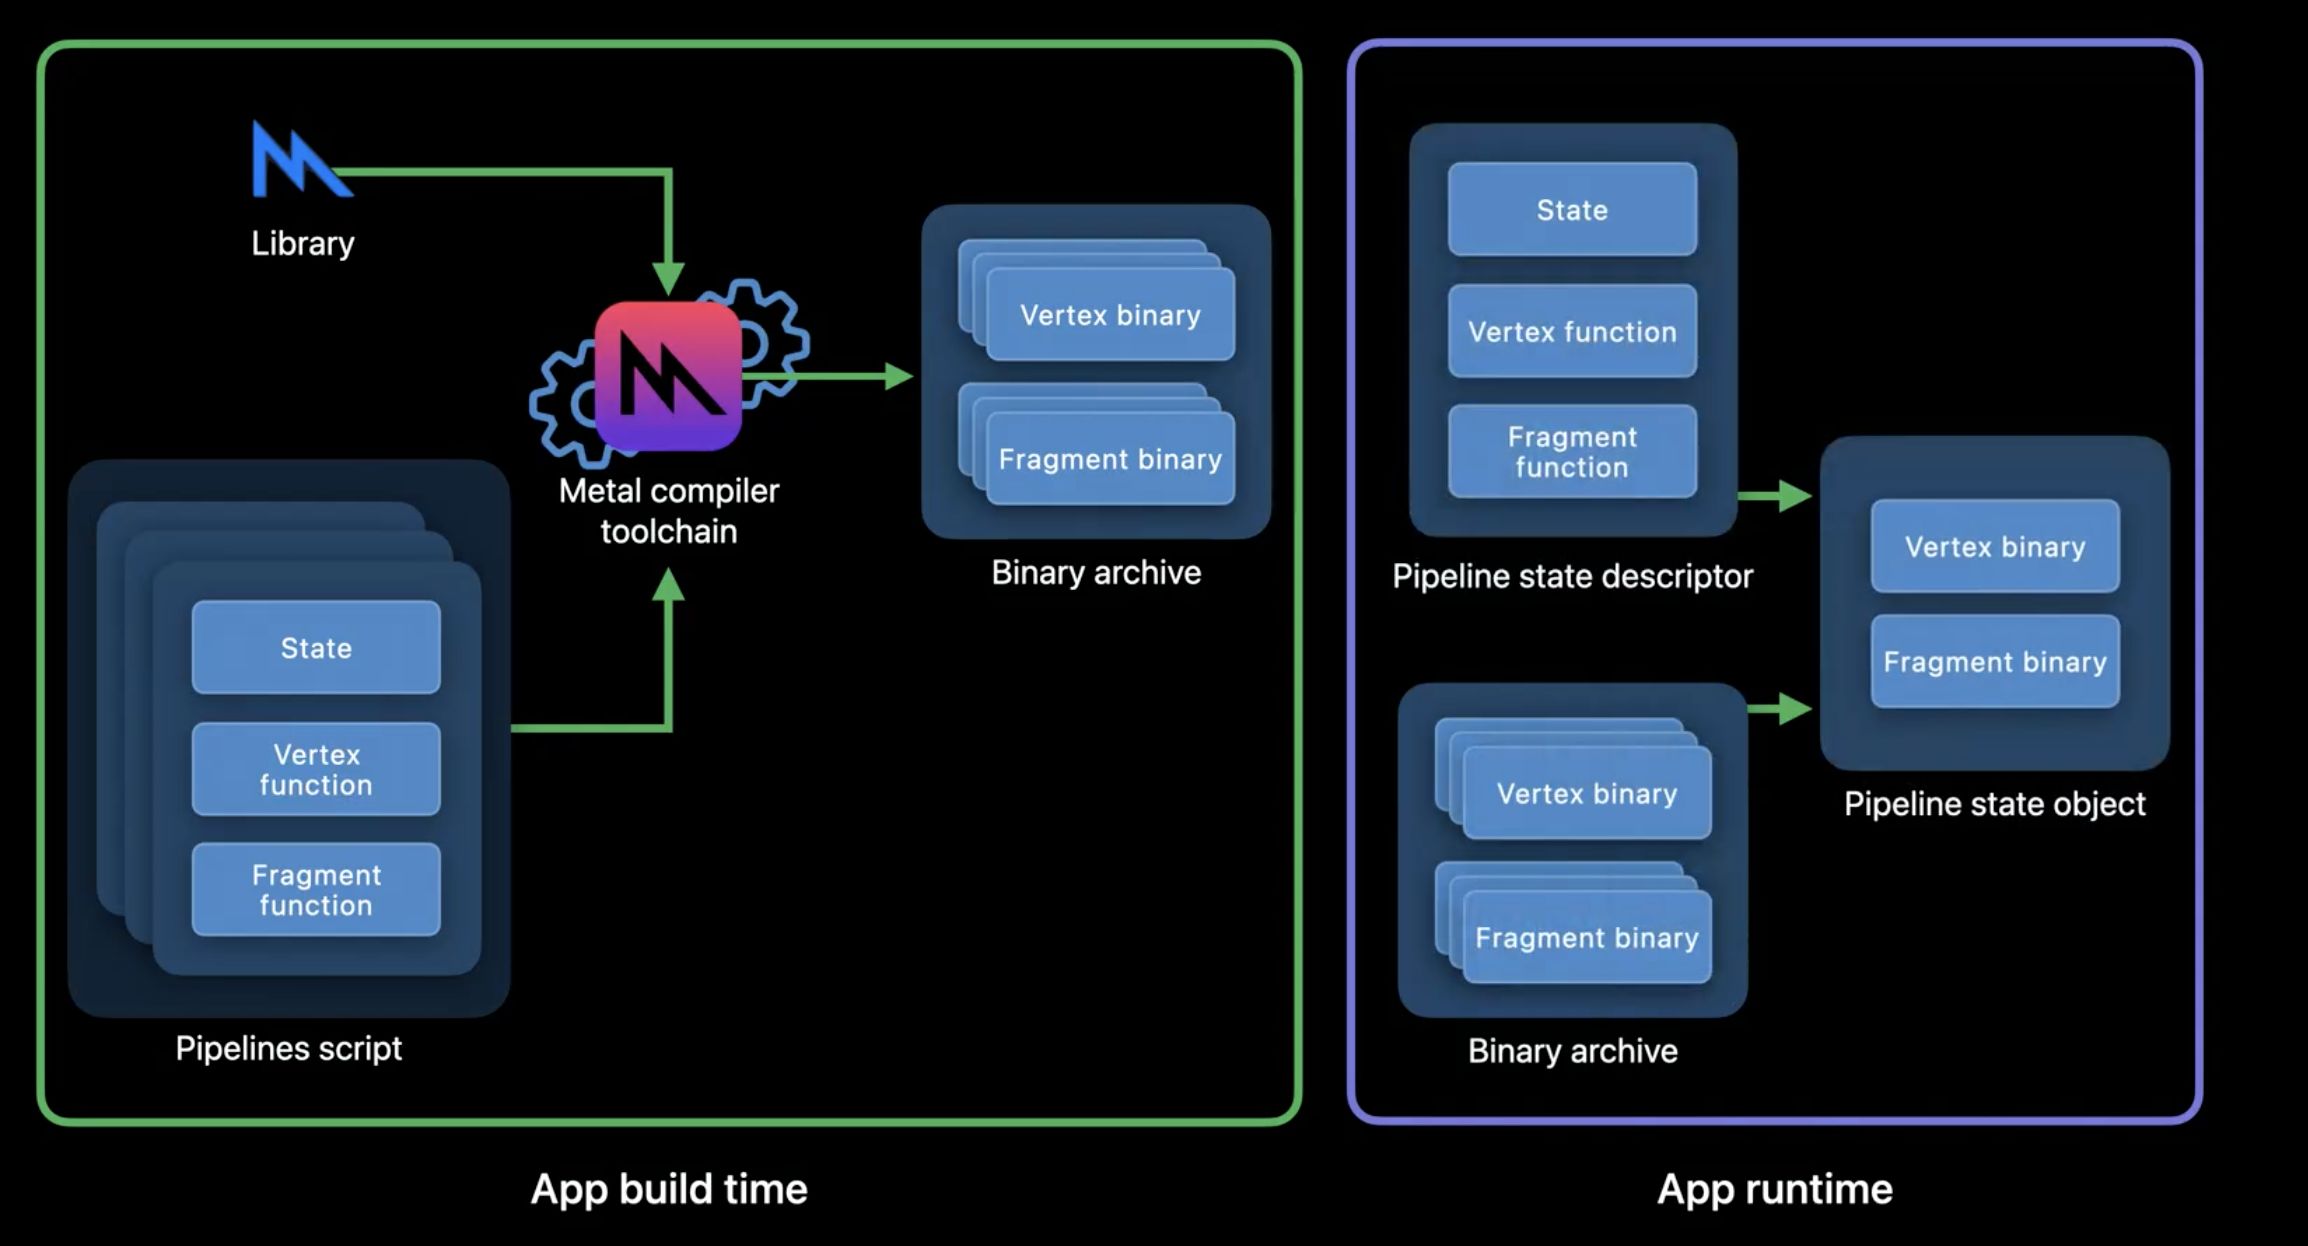
构建离线 Metal Binary Archive 需要使用一种全新的配置文件 Pipeline Script,Pipeline Script 其实是 Pipeline State Descriptor 的一种 JSON 表示,其中配置了 PSO 创建所需的各种状态信息,开发者可以直接编辑生成,也可以在运行时捕获 PSO 获得。给定 Pipeline ScriptMetalLib,通过 Metal 工具链提供的 metal 命令即可离线构建出包含着色器机器码的 Metal Binary ArchiveMetal Binary Archive 中的机器码可能会包含多种 GPU 架构由于 Metal Binary Archive 需要内置在应用中提交市场开发者可以综合考虑包体积的因素剔除不必要的架构支持。

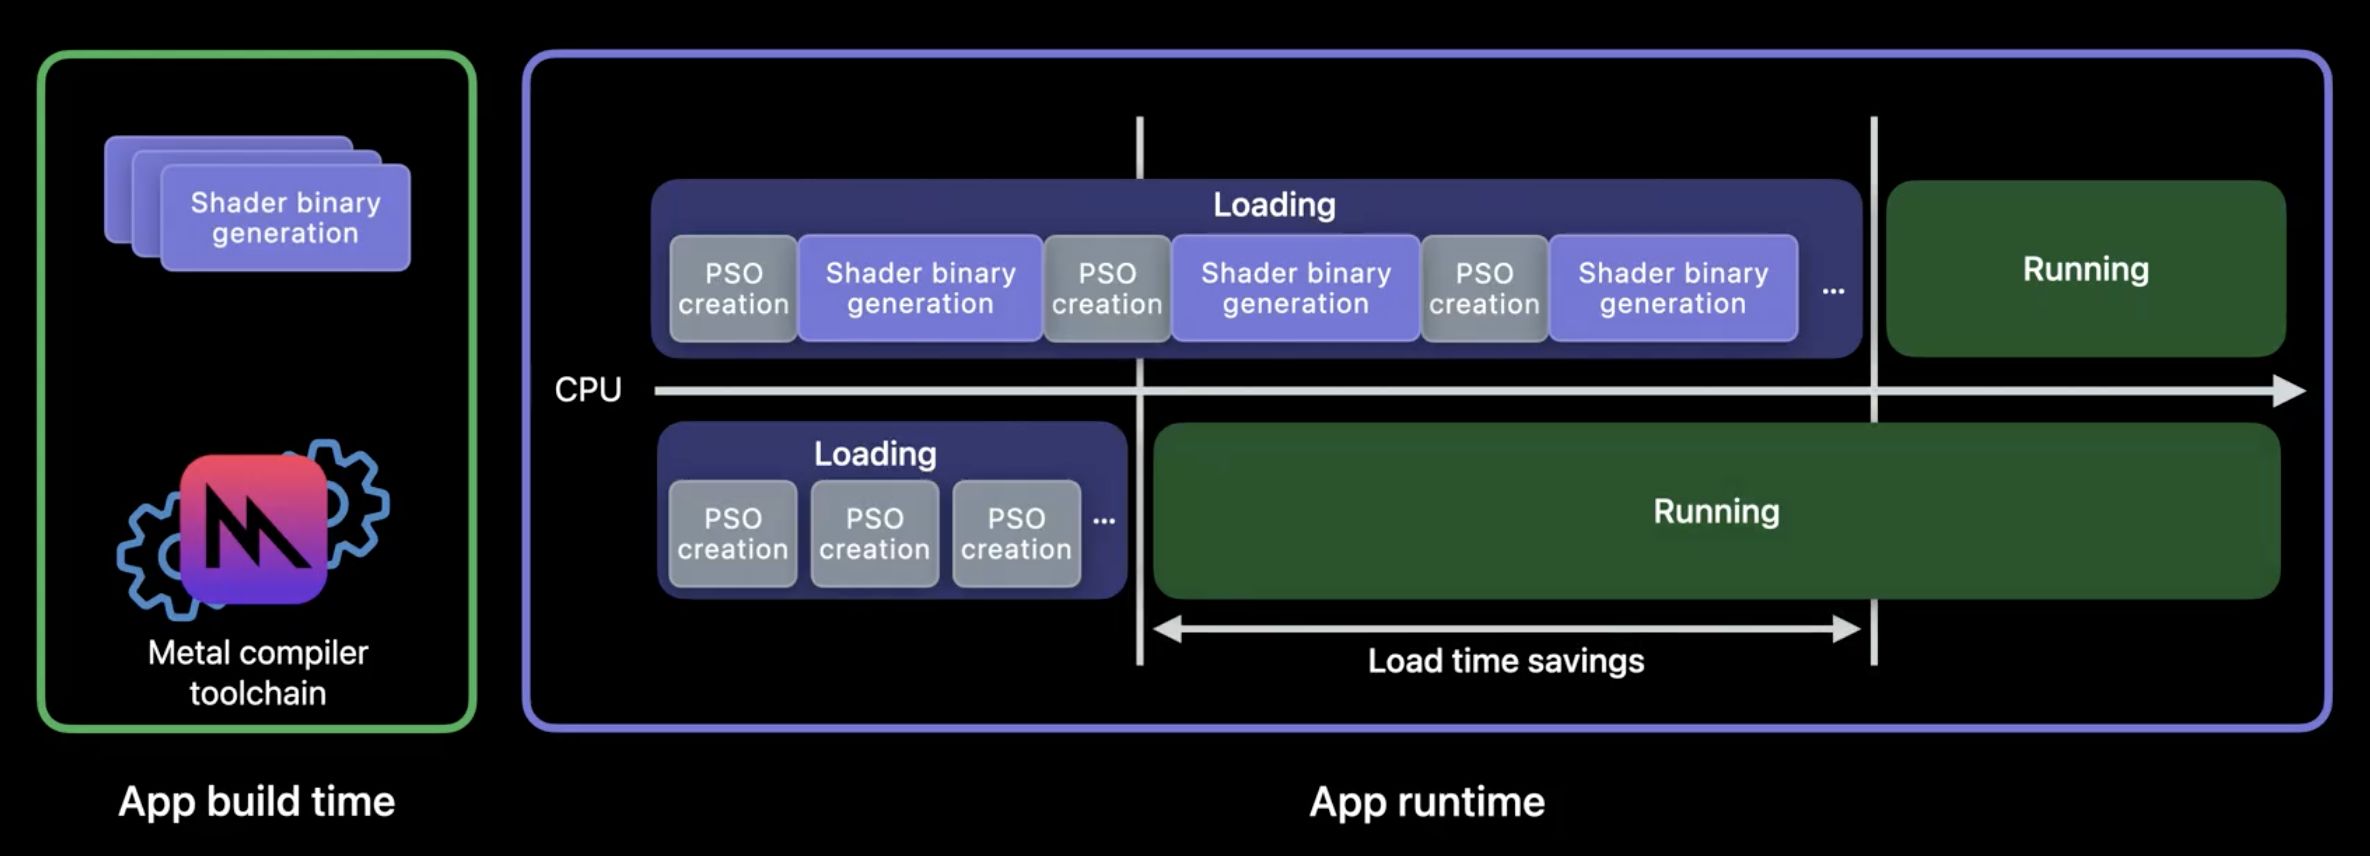
通过离线构建 Metal Binary Archive,着色器编译的开销只存在于编译阶段,应用启动阶段 PSO 的创建开销大大降低。Metal Binary Archive 不止可以优化应用的首屏性能, 真实的业务场景下,一些 PSO 对象会迟滞到具体页面才会被创建,触发新的着色器编译流程。一旦编译耗时过长,就会影响当前 RunLoopMetal 绘制指令的提交, Metal Binary Archive 可以确保在应用的生命周期内, 核心交互路径下的着色器缓存始终为可用状态,将节省的 CPU 时间片用来处理与用户交互强相关的逻辑, 大大提升应用的响应性和使用体验。

矢量渲染基础概念

矢量渲染泛指在平面坐标系内通过组装几何图元来生成图像信息的手段,通过定义一套完整的绘制指令,可以在不同的终端上还原出不失真的图形, 任何前端的视窗都可以被看作一个 2D 平面的矢量渲染画布,ChromeAndroid 渲染系统就是基于 Google2D 图形库 Skia 构建。对应用开发而言,矢量渲染技术也扮演重要角色,如文本 / 图表 / 地图 / SVG / Lottie 等都依赖矢量渲染能力来提供高品质的视觉效果。

矢量渲染的基础单元是 Path(路径),Path 可以包含单个或多个 Contour(轮廓),Contour在一些渲染器中也称为 SubPathContour 由连续的 Segment(直线/高阶贝塞尔曲线)组成,标准的几何构型(圆形/矩形)均可被视为一种特殊的 Path,一些特殊的 Path 可以包含坑洞或者自交叉(如五角星⭐️),这类 Path 的处理需要一些特殊的方案。围绕 Path 可以构造出各种复杂的图形,著名的老虎 SVG一共包含480条 Path ,通过对其中不同 Path 的描边和填充,可以呈现出极富表现力的视觉效果:

高阶贝塞尔通过起始点和额外的控制点来定义一条曲线, 在将这样的抽象曲线交付给后端进行渲染前,我们需要首先要对贝塞尔曲线做插值来近似模拟这条曲线,这个操作通常称为 FlattenGPU 真实渲染的是一组由离散的点来近似模拟的曲线。 根据 Path 定义的差异, 这一组离散的点会构成不同种类的多边形,对 Path 的处理简化为了对多边形的处理,我们以一个简单的凹多边形为例来了解 Path 的描边和填充操作是如何实现的:

多边形的描边操作,由于描边宽度的存在,描边的真实着色区域会有一半落在 Path 定义的区域之外。遍历多边形的外边缘的每条边,根据每条边两侧的顶点,描边宽度以及边缘的斜率可以组装出一组模拟描边行为的三角形图元,如上图所示:一个方向上的描边是由两个相结合的三角形构成。 针对不同的 Line Join 风格,结合处有可能需要做不同的处理, 但是原理类似。将描边的三角形提交 GPU 可以渲染得到正确的描边效果,除了纯色的描边,结合不同的着色器可以实现渐变和纹理的填充效果。

多边形的填充方法相比描边更加复杂,目前主流的矢量渲染器有两种不同的实现思路:

基于模版掩码的填充(NanoVG)

基于模版掩码的填充是在 OpenGL 红宝书中所描述的一种填充多边形的经典方法。Skia 在简单的场景下也会使用这种方法做多边形的填充。 这种绘制方法分为两步:首先利用 StencilBuffer 来记录实际绘制区域,这一步只写入 StencilBuffer,不操作 Color Attachment,然后再进行一次绘制,通过StencilBuffer 记录的模版掩码,只向特定的像素位置写入颜色信息。通过图例可以更直观的了解这个过程:第一步,打开 StencilBuffer 的写入开关,使用 GL_TRIANGLE_FAN 形式绘制所有的顶点, GL会自动根据顶点索引组装两组三角形基元 0 -> 1 -> 20 -> 2 -> 3GL 中通常指定逆时针方向为三角形片元的正面, 0 -> 1 -> 2 三角形所包围的区域在 StencilBuffer 中做 +1 操作, 由于顶点3是多边形的凹点, 0 -> 2 -> 3 三角形的环绕数被翻转为了顺时针,我们可以在 StencilBuffer 中对顺时针包裹的区域做 -1 操作, 此时 StencilBuffer 中所有标记为 1 的像素就是我们所需要的绘制区域,再次提交相同的顶点进行绘制,打开颜色写入,就可以得到正确的绘制结果。这种方法巧妙的利用了凹多边形会改变局部三角形环绕方向的特性。

模版掩码可以正确处理复杂的多边形, 但是由于需要进行两段式的绘制, 对于复杂的多边形性能绘制性能瓶颈较明显, 此外 StencilBuffer 等操作都是由 GL 驱动层所实现,几乎不可能进行任何的性能优化, 这种绘制方法常在一些追求小尺寸的矢量渲染器中使用(NanoVG), 在一些文章中通常也被称为 Stencil & Cover

基于三角剖分的填充(Skia)

Skia 中对多边形的渲染是由 TesselationTriangulation 两步构成,Tesselation 原意指在多边形中新增顶点来构造更加细分的几何图元,Triangulation 是指连接多边形自身的顶点构造可以填充满自身的若干三角图元(不增加顶点的情况下)Triangulation 可以认为是 Tessellation 的一种特例,在 Skia 中描述的 Tessellation 其实是指一种对复杂多边形的拆分操作,了解多边形的 Triangulation 首先我们需要引入单调多边形的概念:

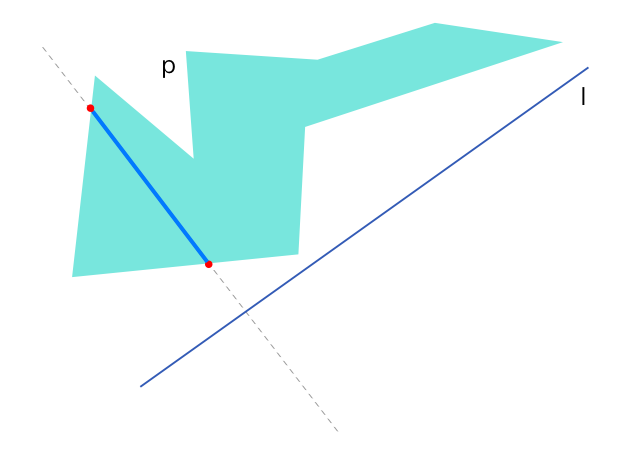
对于任意一个多边形 p 而言, 如果存在一条直线 ll 的垂线与 p 相交的部分都在 p 的内部, 那么称多边形 p 是相对于 l 的单调多边形。 单调多边形的单调性是相对于某一特定方向而言,针对上图的示例我们可以很容易找到一个方向的直线作为反例。 利用单调多边形在 l 方向上的左右两个极点可以把多边形进一步分拆为上下两条边,每条边上的顶点在 l 方向上会确保是有序的,这个特性可以用来实现剖分算法。

以下图中的凹多边形为例子,复杂多边形的完整处理思路是:首先使用 Tesselation 算法将其拆分为若干个单调多边形(下图中两个蓝色区域),通常会在多边形的凹点进行拆分,得到一组单调多边形的集合后, 再分别对每一个单调多边形进行三角化,单调多边形的 Triangulation 算法比较著名的有 EarCut, 也有一些实现如 libtess2 可以同时对复杂多边形进行 Tesselation / Triangulation 两步操作, libtess2 使用 Delaunay 算法来对单调多边形实现剖分, Delaunay 算法可以避免剖分出现过于狭长的三角形。 无论使用何种方案,最终的产物都是能够直接交付给 GPU 进行渲染的三角形 Mesh 集合。

针对上文中的凹多边形, 剖分后的产物会是如上图所示的两个三角形, 三角形可以被认为是一种最简单的单调多边形, 提交这两个三角形即可实现此凹多边形的正确填充。基于三角剖分的填充方案, 最大的瓶颈是拆分单调多边形单调多边形三角化两个步骤的的算法选择, 由于这两步完全由上层实现, 因此对后期优化更加友好, 目前业界最新的方案已经可以实现利用 GPU 或者深度学习的方法实现剖分的加速。

Flutter DisplayList

DisplayList 出现之前,Skia 使用 SkPicture 来搜集每一帧的绘制指令,随后在 Raster 线程回放完成当前帧的绘制。gl 函数在进入 GPU 执行前,仍然会有一部分逻辑如 PSO 状态检测 / 指令封装等操作在 CPU 上执行,录制回放能力可以避免绘制操作占用宝贵的主线程时间片。 DisplayListSkPicture 的作用类似,那么为什么还需要将 SkPictureDisplayList 做迁移 ?SkiaFlutter 来说属于第三方依赖,涉及到 SkPicture 的优化一般需要由 Skia 团队支持,对 Skia 团队而言 SkPicture 的能力不只服务于 Flutter 业务,Flutter 团队如果修改 SkPicture 的源码会对 Skia 的代码有比较大的入侵, 而为了解决长期遗留的 Jank 问题, Flutter 团队又不得不考虑在 SkPicture 这一层进行优化。20203 月,liyuqian 创建一个 flutter issue 中首次提出了 DisplayList 的设想,预期相较于 SkPicture 会有如下三个方面的优势:

  • DisplayList 相比 SkPicture 有更高的可操作性去优化光栅化时期产生的缓存;
  • DisplayList 有助于实现更好的着色器预热方案;
  • DisplayList 相比 SkPicture可以更好的对每一帧进行性能分析;

Flutter RoadMap 明确了 Impeller 的替换目标后,DisplayList 能更好的实现 Flutter Engine 层对渲染器的解耦,从而保障后续渲染层能无缝的从 Skia 迁移到 Impeller 中。在最新的 Flutter 3.0 代码, DisplayList 相关的代码位于 github.com/flutter/engi 中,

DisplayList 作为 Recoder 的过程和使用 SkPicture 差别不大,核心是在 canvas.cc 中进行了切换:

// https://github.com/flutter/engine/blob/main/lib/ui/painting/canvas.cc#L260
// lib/ui/painting/canvas.cc
void Canvas::drawRect(double left,
                      double top,
                      double right,
                      double bottom,
                      const Paint& paint,
                      const PaintData& paint_data) {
  if (display_list_recorder_) {
    paint.sync_to(builder(), kDrawRectFlags);
    builder()->drawRect(SkRect::MakeLTRB(left, top, right, bottom));
  }
  // 3.0 因为默认开启了 DisplayList 作为 Recorder 所以下面的已经删除 
  // else if (canvas_) {
  //  SkPaint sk_paint;
  //  canvas_->drawRect(SkRect::MakeLTRB(left, top, right, bottom),
  //                  *paint.paint(sk_paint));
  // }
}
​
// lib/ui/painting/canvas.h
DisplayListBuilder* builder() {
  return display_list_recorder_->builder().get();
}

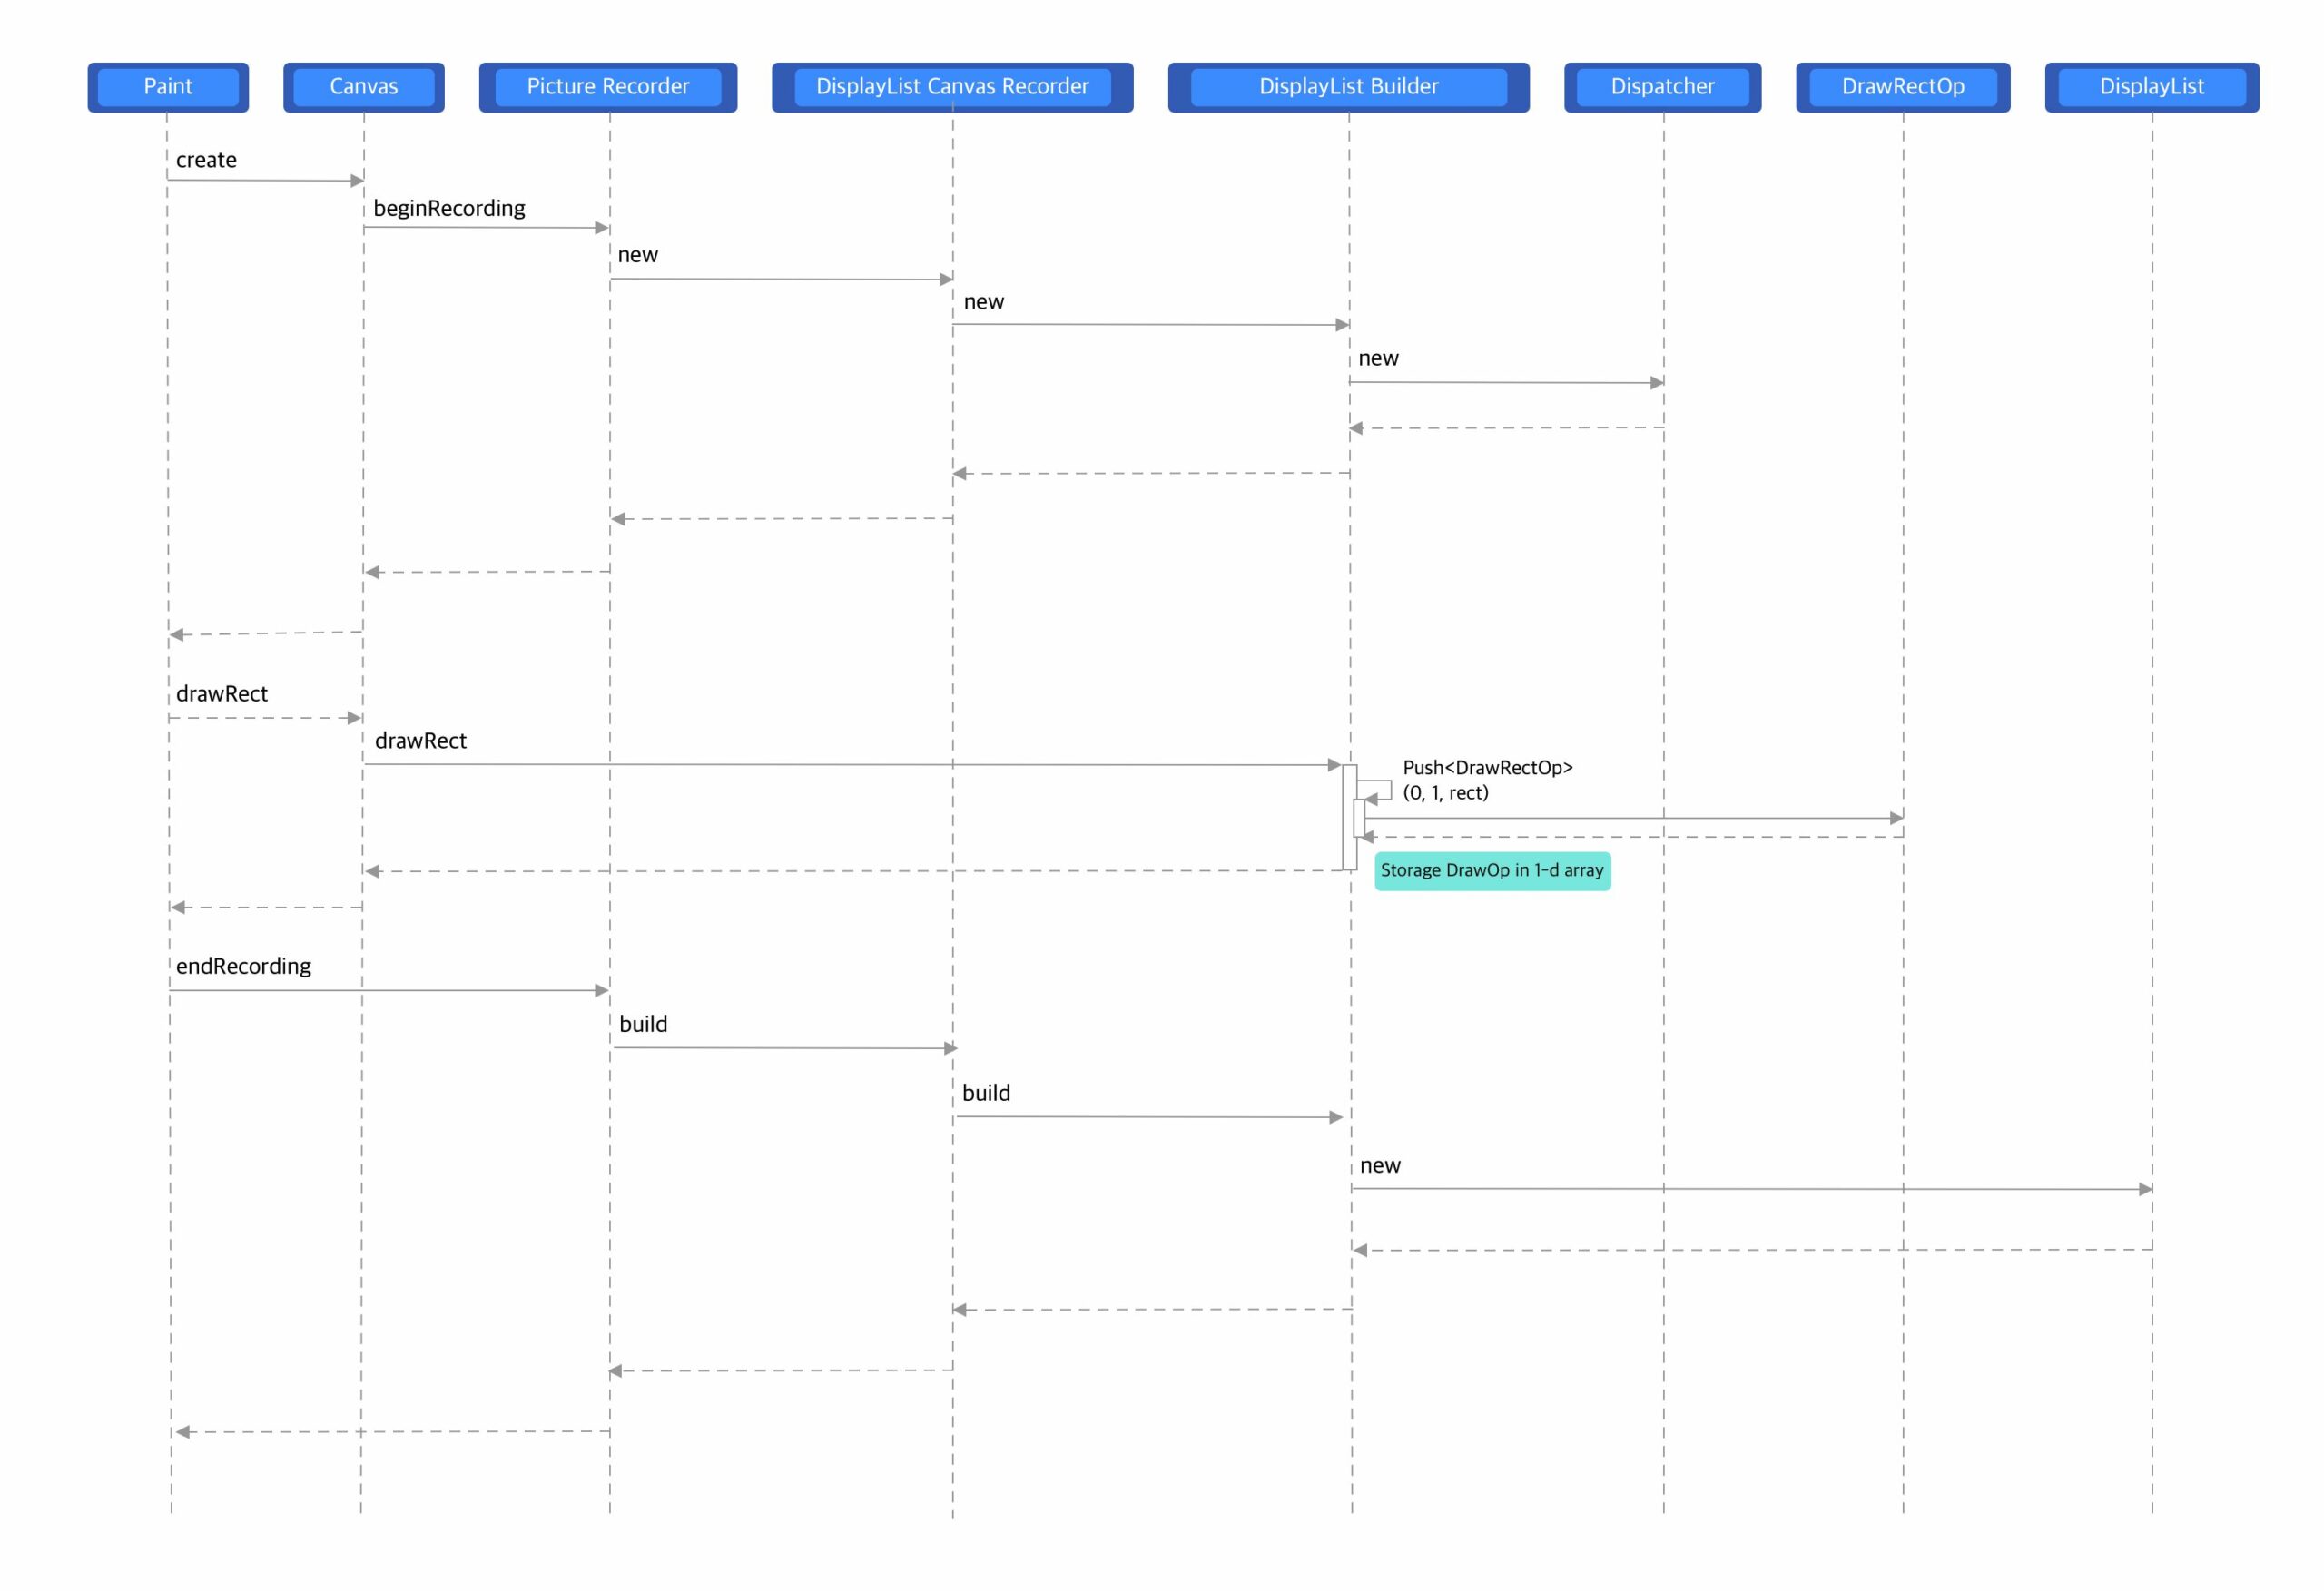
从上面的代码可以看出,是在 CanvasDrawOp 中进行了 DisplayList 还是 SkPicture 的选择,一次DrawOp 的录制过程如下图所示:

DisplayList Record DrawOp 过程

图中 Push<DrawRectOp> 的操作,DrawRectOp 定义在 display_list_ops.h 中:

// https://github.com/flutter/engine/blob/main/display_list/display_list_ops.h#L554
// display_list/display_list_ops.h
#define DEFINE_DRAW_1ARG_OP(op_name, arg_type, arg_name)                  \
  struct Draw##op_name##Op final : DLOp {                                 \
    static const auto kType = DisplayListOpType::kDraw##op_name;          \
                                                                          \
    explicit Draw##op_name##Op(arg_type arg_name) : arg_name(arg_name) {} \
                                                                          \
    const arg_type arg_name;                                              \
                                                                          \
    void dispatch(Dispatcher& dispatcher) const {                         \
      dispatcher.draw##op_name(arg_name);                                 \
    }                                                                     \
  };
DEFINE_DRAW_1ARG_OP(Rect, SkRect, rect)
DEFINE_DRAW_1ARG_OP(Oval, SkRect, oval)
DEFINE_DRAW_1ARG_OP(RRect, SkRRect, rrect)
#undef DEFINE_DRAW_1ARG_OP

将宏定义展开可以看到如下定义, 这里 DrawRectOp 是一种单参数 DLOpDrawRectOp 中的 dispatch 方法会将 drawRect 操作派发给 dispatcher 来实际执行

struct DrawRectOp final :DLOp {
    static const auto kType = DisplayListOpType::kDrawRect;
    explicit DrawRectOp(arg_type arg_name) : rect(rect) {}
    const SkRect rect;  
    void dispatch(Dispatcher& dispatcher) const {                         
      dispatcher.drawRect(arg_name);                                 
    } 
}

LLDB 中可以打印出 DrawRectOp 的相关信息:

Push<DrawRectOp> 中的Push 函数的实现如下,storage_ 是一个一维数组,同来存储 DrawOp,在添加元素前会先进行容量的判断,是否需要扩容,随后创建 DrawRectOp 并对 Type 和 参数 rect 进行赋值,并累加 op_count_,完成 DrawOp 的添加。

// https://github.com/flutter/engine/blob/main/display_list/display_list_builder.cc#L27
// display_list/display_list_builder.cc
void* DisplayListBuilder::Push(size_t pod, int op_inc, Args&&... args) {
  size_t size = SkAlignPtr(sizeof(T) + pod);
  // 扩容
  if (used_ + size > allocated_) {
    // Next greater multiple of DL_BUILDER_PAGE.
    allocated_ = (used_ + size + DL_BUILDER_PAGE) & ~(DL_BUILDER_PAGE - 1);
    storage_.realloc(allocated_);
    FML_DCHECK(storage_.get());
    memset(storage_.get() + used_, 0, allocated_ - used_);
  }
  FML_DCHECK(used_ + size <= allocated_);
  // 如 new DrawRectOp
  auto op = reinterpret_cast<T*>(storage_.get() + used_);
  used_ += size;
  new (op) T{std::forward<Args>(args)...};
  op->type = T::kType;
  op->size = size;
  op_count_ += op_inc;
  return op + 1;
}

DisplayList 记录 DrawOp 的流程如下:

  • 首先通过调用 BeginRecording 创建 DisplayListCanvasRecoder (继承自 SkCanvasNoDraw) 之后创建核心类 DisplayListBuilder 并返回 Canvas 给应用层;
  • 应用层通过 Canvas 调用如 drawRect 方法,将会被以 DrawRectOp 记录在 DisplayListBuilderstorage_ 中;
  • 最后调用 endRecordingDisplayListBuilderstorage_ 转移到 DisplayList 中,后面在 SceneBuilder 阶段,DisplayList 会被封装到 DisplayListLayer 中;

DisplayList 中的几个核心概念:DisplayListCanvasRecorder 作为命令记录的载体,其中包含了 DisplayListBuilderDisplayListBuilderstorage 是真实记录 DLOp 的载体,DisplayList 将会记录 DisplayListBuilderstorage,并最终被包裹在 DisplayListLayer 中,作为记录 DLOp 的载体。DisplayListCanvasDispatcher 作为最后派发至 SkCanvas 或者 ImpellerWrapper 层。

Impeller 渲染流程和架构设计

Impeller 概览

Impeller 的目标是为 Flutter 提供具备 predictable performance 的渲染支持,Skia 的渲染机制需要应用在启动过程中动态生成 SkSL,这一部分着色器需要在运行时转换为 MSL,才能进一步被编译为可执行的机器码,整个编译过程会对 Raster 线程形成阻塞。Impeller 放弃了使用 SkSL 转而使用 GLSL 4.6 作为上层的着色器语言,通过 Impeller 内置的 ImpellerC 编译器,在编译期即可将所有的着色器转换为 Metal Shading language, 并使用 MetalLib 格式打包为 AIR 字节码内置在应用中。Impeller 的另一个优势是大量使用 Modern Graphics APIsMetal 的设计可以充分利用 CPU 多核优势并行提交渲染指令, 大幅减少了驱动层对 PSO 的状态校验, 相对于 GL 后端仅仅将上层渲染接口的调用切换为 Metal 就可以为应用带来约 ~10% 的渲染性能提升。

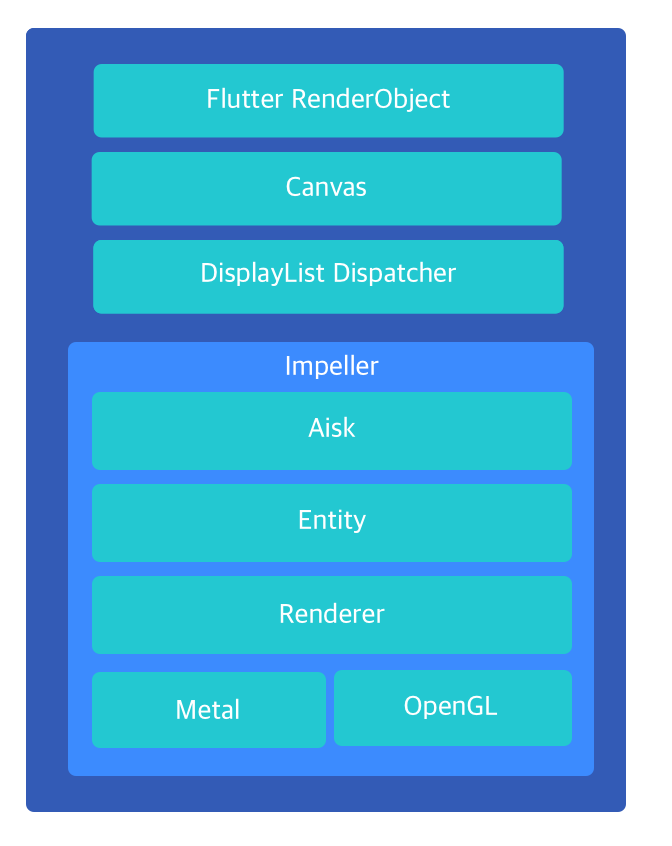
在一个 Flutter 应用中,RenderObjectPaint 操作最终会转换为 Canvasdraw options,绘制操作在 Engine 层组装成 DisplayList 之后通过 DisplayListDispatcher 分发到不同的渲染器来执行具体的渲染操作。Impeller 中实现了DisplayListDispatcher 接口,这意味着 Impeller 可以消费上层传递的 DisplayList 数据。Aiks 层维护了 Canvas,Paint 等绘制对象的句柄。Entity 可以理解为 Impeller 中的一个原子绘制行为,如 drawRect 操作,其中保存了执行一次绘制所有的状态信息,Canvas 会通过 Entity 中保存的状态设置画布的 Transform,BlendMode 等属性。 Entity 中最关键的组成部分是 ContentsContents 中持有了着色器的编译产物, 被用来实际控制当前 Entity 的绘制效果, Contents 有多种子类,来承接填充/纹理着色等不同的绘制任务。Renderer 层可以理解为与具体渲染 api 沟通的桥梁,Renderer 会将 Entity 中的信息(包含Contents 中保存的着色器句柄)转换为 Metal / OpenGL 等渲染后端的具体 api 调用。

Impeller 绘制流程

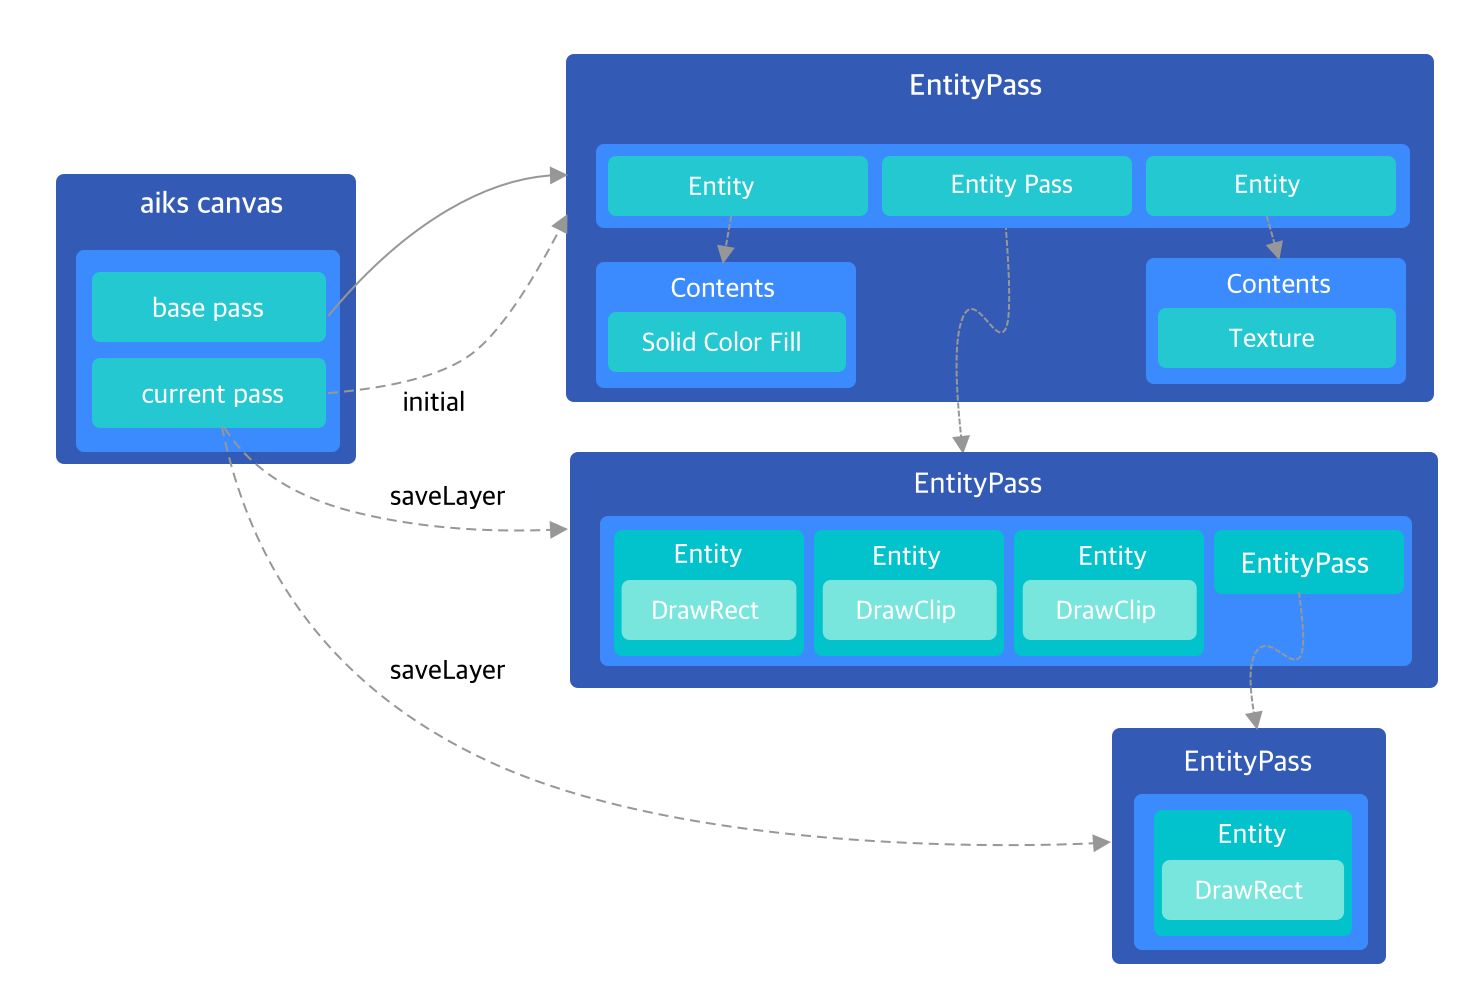
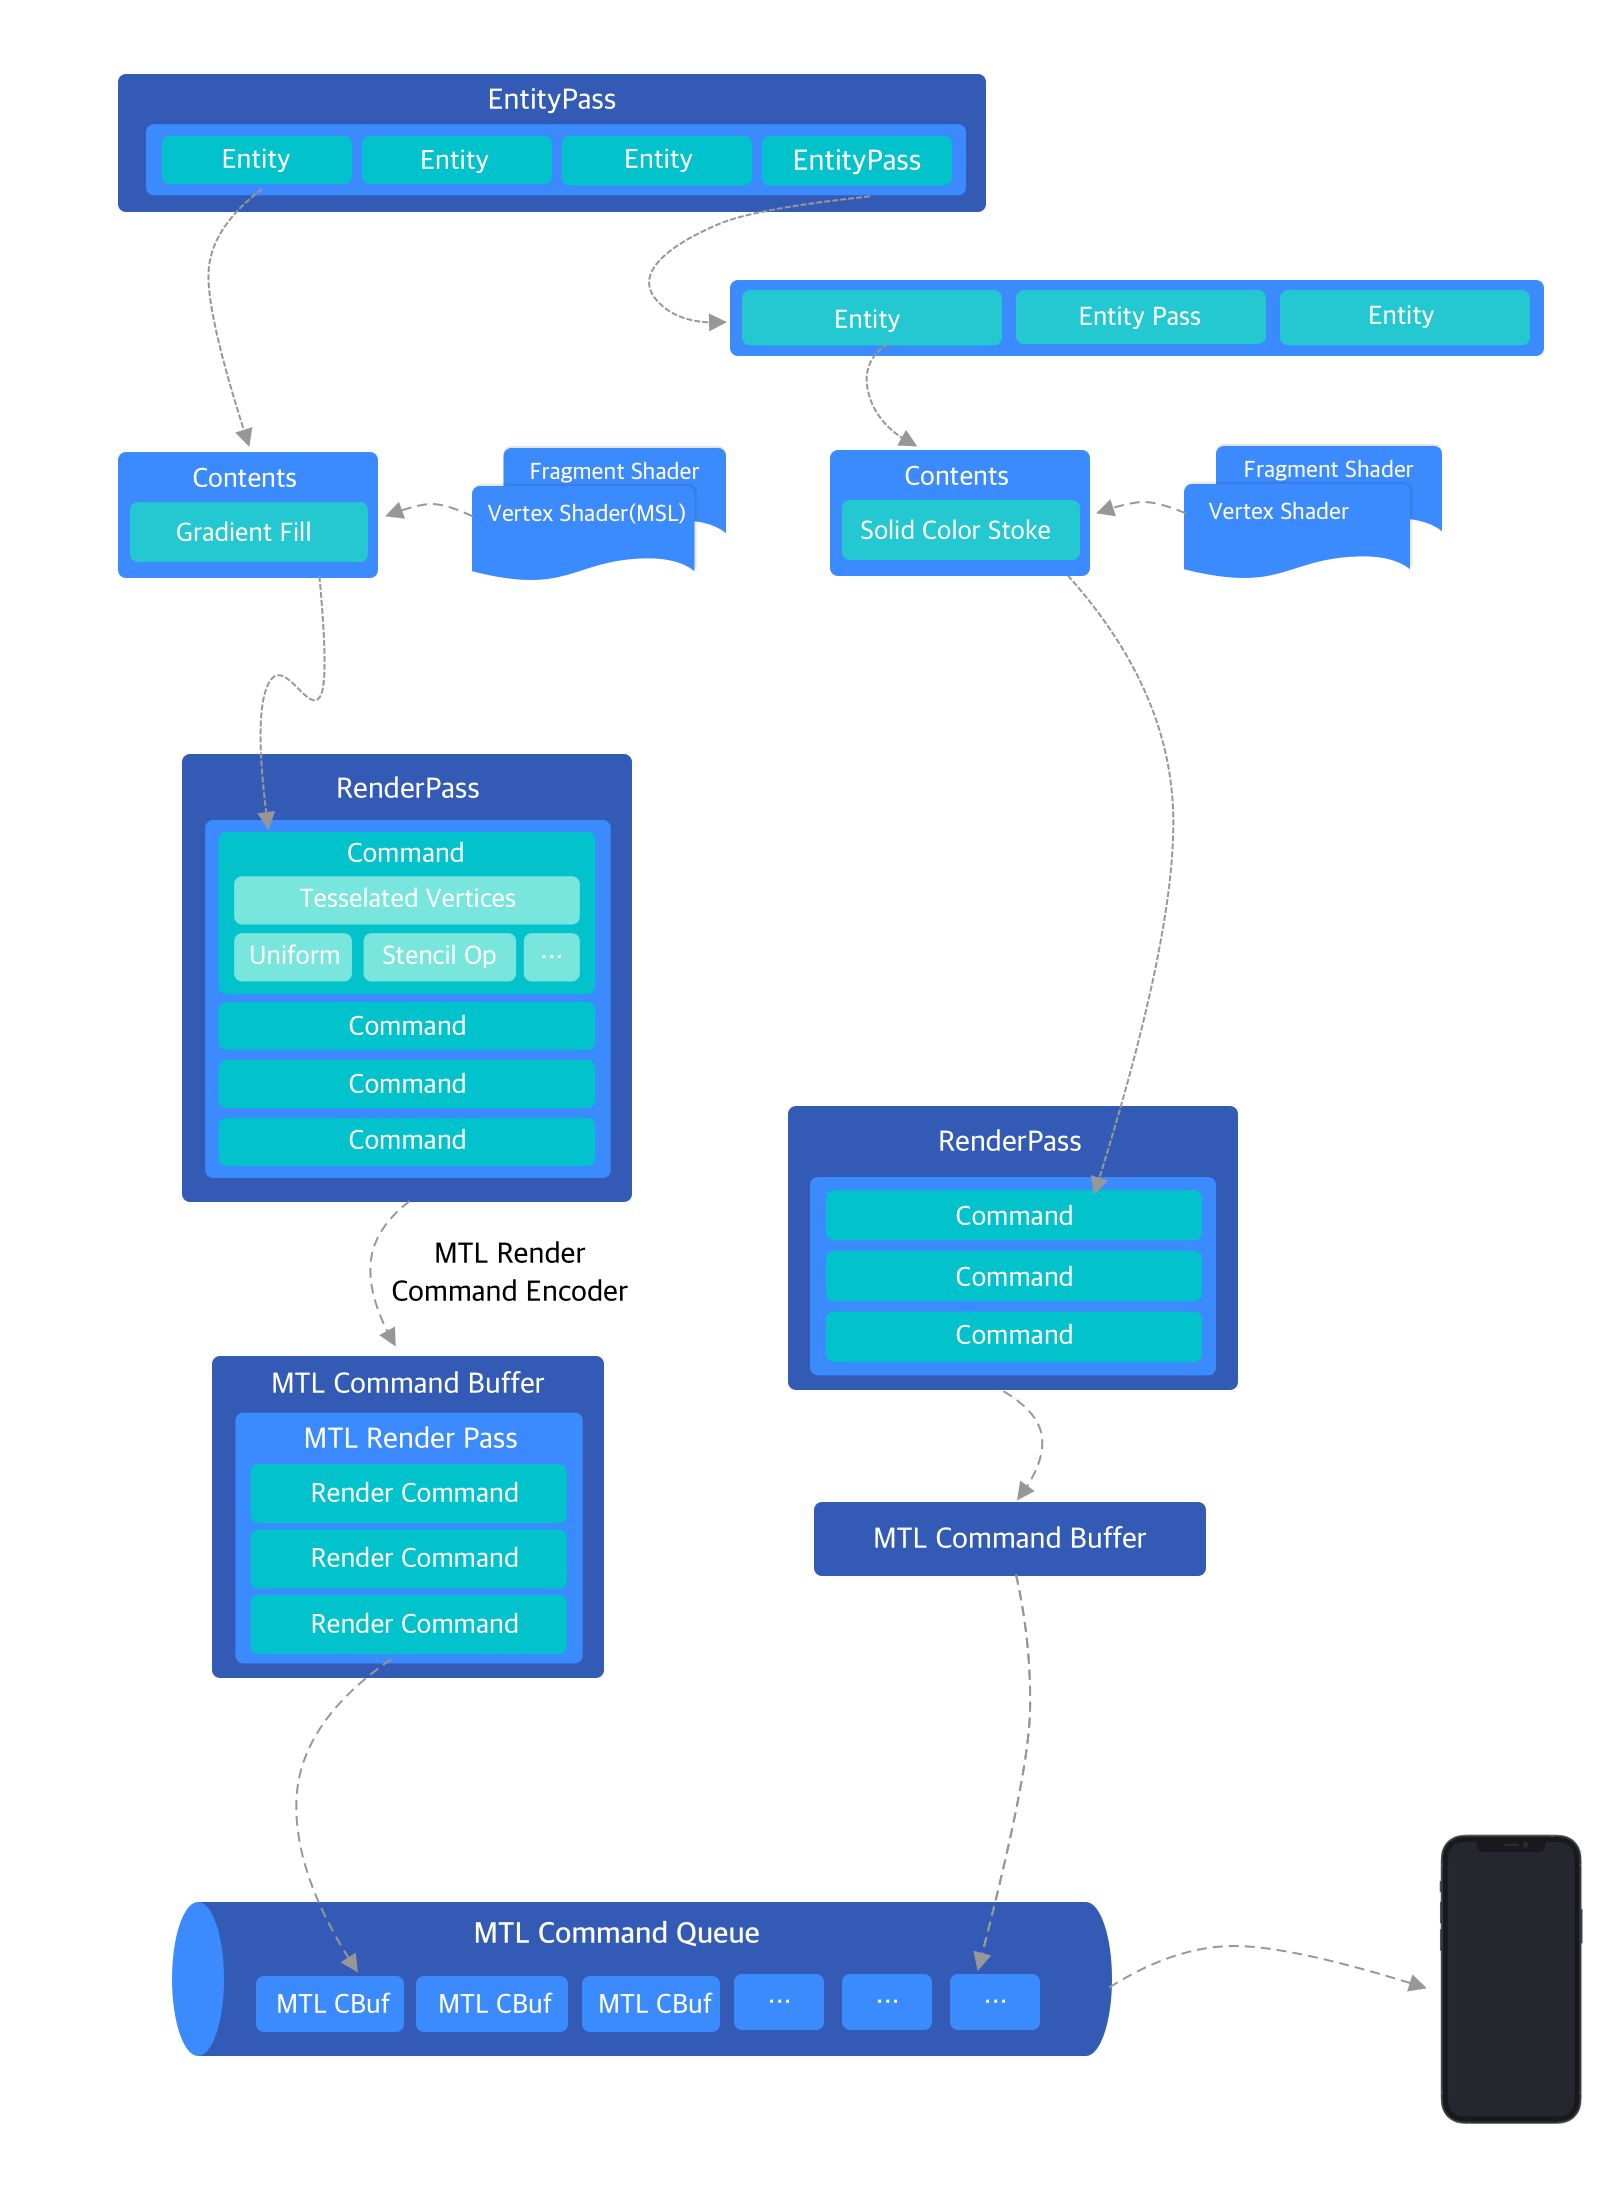
Flutter Engine 层的 LayerTree 在被 Impeller 绘制前需要首先被转换为 EntityPassTree UI 线程在接收到 v-sync 信号后会将 LayerTreeUI 线程提交到 Raster 线程,在 Raster 线程中会遍历 LayerTree 的每个节点并通过 DisplayListRecorder 记录各个节点的绘制信息以及 saveLayer 操作, LayerTree 中可以做可以 Raster Cache 的子树其绘制结果会被缓存为位图, DisplayListRecorder 会将对应子树的绘制操作转换为 drawImage 操作,加速后续渲染速度。 DisplayListRecorder 完成指令录制后,就可以提交当前帧。 DisplayListRecorder 中的指令缓存会被用来创建 DisplayList 对象DisplayListDisplayListDispatcher 的实现者(Skia / Impeller)消费,回放 DisplayList 其中所有的 DisplayListOptions 可以将绘制操作转换为 EntityPassTree。

完成 EntityPassTree 的构建之后,需要把 EntityPassTree 中的指令解析出来执行。EntityPassTree 绘制操作以 Entity 对象为单位,Impeller 中使用 Vector 来管理一个绘制上下文中多个不同的 Entity 对象。 通常 Canvas 在执行复杂绘制操作时会使用 SaveLayer 开辟一个新的绘制上下文,在 iOS 上习惯称为离屏渲染, SaveLayer 操作在 Impeller 中会被标记为创建一个新的 EntityPass,用于记录独立上下文中的 Entity,新的 EntityPass 会被记录到父节点的 EntityPass 列表中, EntityPass 的创建流程如上图所示。

Metal 在上层为设备的 GPU 硬件抽象了 CommandQueue 的概念,CommandQueueGPU 数量一一对应,CommandQueue 中可包含一个或者多个 CommandBufferCommandBuffer 是实际绘制指令 RenderCommand 存放的队列,简单的应用可以只包含一个 CommandBuffer,不同的线程可以通过持有不同CommandBuffer 来加速 RenderCommand 的提交。RenderCommandRenderCommandEncoder 的 Encode 操作产生,RenderCommandEncoder 定义了此次绘制结果的保存方式绘制结果的像素格式以及绘制开始或结束时 Framebuffer attachmement 所需要做的操作(clear / store),RenderCommand 包含了最终交付给 Metal 的真实 drawcall 操作。

Entity 中的 Command 转化为真正的 MTLRenderCommand 时,还携带了一个重要的信息:PSO 。EntityDisplayList 中继承的绘制状态最终会变为 MTLRenderCommand 关联的 PSO ,MTLRenderCommand 被消费时 Metal 驱动层会首先读取 PSO 调整渲染管线状态,再执行着色器进行绘制,完成当前的绘制操作

ImpellerC 编译器设计

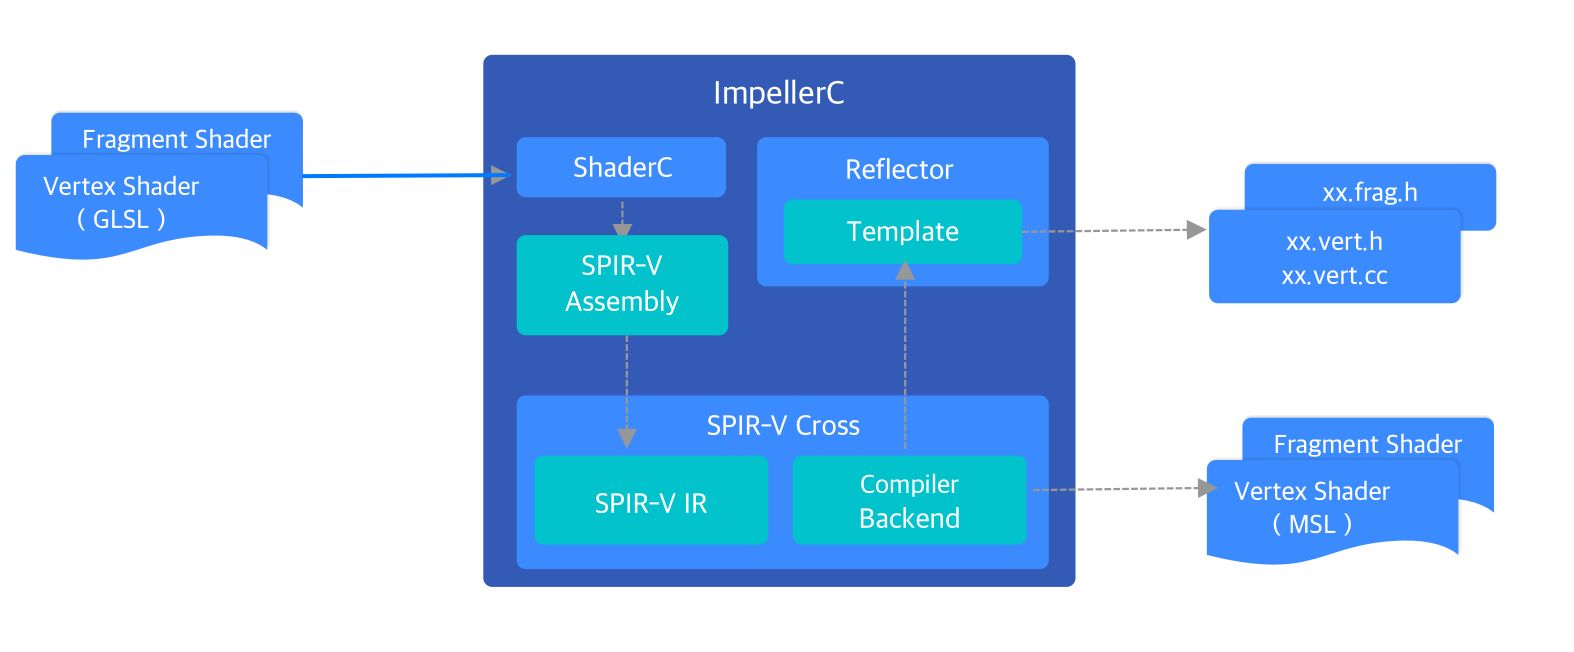
ImpellerCImpeller 内置的着色器编译解决方案,源码位于 Impellercompiler 目录下 ,它能够在编译期将 Impeller 上层编写的 glsl 源文件转化为两个产物:1. 目标平台对应的着色器文件;2. 根据着色器 uniform 信息生成的反射文件,其中包含了着色器 uniformstruct 布局等信息。反射文件中的 struct 类型作为 model 层,使得上层使用无需关心具体后端的 uniform 赋值方式,极大地增强了 Impeller 的跨平台属性,为编写不同平台的着色器代码提供了便利。

在编译 Flutter Engine 工程中 Impeller 部分时,gn 会首先将 compiler 目录下的文件编译出为 ImpellerC 可执行文件,再使用 ImpellerCentity/content/shaders 目录下的所有着色器进行预处理。GL 后端会将着色器源码处理为 hex 格式并整合到一个头文件中, 而 Metal 后端会在 GLSL 完成 MSL 的转译后进一步处理为 MetalLib。

ImpellerC 在处理 glsl 源文件时,会调用 shaderc glsl 文件进行编译。shadercGoogle 维护的着色器编译器,可以 glsl 源码编译为 SPIR-Vshaderc 的编译过程使用了 glslang 和 SPIRV-Tools 两个开源工具: glslangglsl 的编译前端负责将 glsl 处理为 ASTSPIRV-Tools 可以接管剩下的工作将 AST 进一步编译为 SPIR-V,在这一步的编译过程中,为了能得到正确的反射信息,ImpellerC 会对 shaderc 限制优化等级。

随后 ImpellerC 会调用 SPIR-V Cross 对上一步骤得到的 SPIR-V 进行反汇编,得到 SPIR-V IR ,这是一种 SPIR-V Cross 内部使用的数据结构,SPIR-V Cross 会在其之上进行进一步优化。ImpellerC 随后会调用 SPIR-V Cross 创建目标平台的 Compiler BackendMSLCompiler / GLSLCompiler / SKSLCompiler), Compiler Backend 中封装了目标平台着色器语言的具体转译逻辑 。同时 SPIR-V Cross 会从 SPIR-V IR 中提取 Uniform 数量,变量类型和偏移值等反射信息,

struct ShaderStructMemberMetadata {
  ShaderType type; // the data type (bool, int, float, etc.)
  std::string name; // the uniform member name "frame_info.mvp"
  size_t offset;
  size_t size;
};

Reflector 在得到这些信息后,会对内置的 .h.cc 模版进行填充,得到可供 Impeller 引用的 .h.cc 文件,上层可以反射文件的类型方便的生成数据 memcpy 到对应的 buffer 中实现与着色器的通讯。对于MetalGLES3 来说,由于原生支持 UBO,最终会通过对应后端提供的 UBO 接口来实现 传值,对于不支持 UBOGLES2 来说,对 UBO 的赋值需要转换为 glUniform* 系列 apiUniform 中每个字段的单独赋值,在 shader program link 后,Impeller 在运行时通过 glGetUniformLocation 得到所有字段在 buffer 中的位置,与反射文件中提取出的偏移值结合,Impeller 就可以得到每个 Uniform 字段的位置信息,这个过程会在 Imepller Context 创建时生成一次,随后 Impeller 会维护 Uniform 字段的信息。对于上层来说,不管是 GLES2 还是其他后端, 通过 Reflector 与着色器的通讯过程都是一样的。

完成着色器转译和反射文件提取后,就可以实际执行 uniform 数据的绑定,Entity 在触发绘制操作时会首先调用 ContentRender 函数, 其中会创建一个供 Metal 消费的 Command 对象,Command 会提交到 RenderPass 中等待调度, uniform 数据的绑定发生在 Command 创建这一步。 如下图所示: VS::FrameInfoFS::GradientInfo 是反射生成的两个 Struct 类型, 初始化 VS::FrameInfoFS::GradientInfo 的实例并赋值后,通过 VS::BindFrameInfoFS::BindGradientInfo 函数即可实现数据和 uniform 的绑定。

VS::FrameInfo frame_info;
frame_info.mvp = Matrix::MakeOrthographic(pass.GetRenderTargetSize()) * entity.GetTransformation();
​
FS::GradientInfo gradient_info;
gradient_info.start_point = start_point_;
gradient_info.end_point = end_point_;
gradient_info.start_color = colors_[0].Premultiply();
gradient_info.end_color = colors_[1].Premultiply();
​
Command cmd;
cmd.label = "LinearGradientFill";
cmd.pipeline = renderer.GetGradientFillPipeline(OptionsFromPassAndEntity(pass, entity));
cmd.stencil_reference = entity.GetStencilDepth();
cmd.BindVertices(vertices_builder.CreateVertexBuffer(pass.GetTransientsBuffer()));
cmd.primitive_type = PrimitiveType::kTriangle;
FS::BindGradientInfo(cmd, pass.GetTransientsBuffer().EmplaceUniform(gradient_info));
VS::BindFrameInfo(cmd, pass.GetTransientsBuffer().EmplaceUniform(frame_info));
return pass.AddCommand(std::move(cmd));

LinearGradientContents Render函数实现

Impeller 完整的着色器处理流水线如下图所示:

总结

ImpellerFlutter 为了治理 SkSL 编译耗时引入的的性能问题所做的重要尝试,Skia 的渲染机制需要在运行时动态创建 SkSL,导致着色器编译的时间后移, Impeller 通过在编译期完成 GLSLMSL 的转换,在 iOS 平台上可以直接使用 MetalLib 构建着色器机器码,并且引入确定性的缓存策略来提升渲染性能表现。随着今年 WWDCApple 补齐了离线构建 Metal Binary Archive 的能力, Metal 3 已经具备了全场景下高性能渲染的能力。 Impeller 作为 Flutter 独占的渲染方案 没有 Skia 的历史负担 更容易充分利用 Apple 的技术优化,这意味着 Impeller 的性能表现还有进一步提升的可能。

Impeller 目前使用了基于 libtess2 的三角剖分方案, 根据社区的 RoadMapImpeller 还会继续探索 GPU 剖分等高阶的三角化方案用来替换陈旧的 libtess2 实现。Impeller 总体是一个移动优先的渲染解决方案,目前已经具备 GLMetal 两个完整的渲染后端实现 Vulkan 的支持目前正在进行中,官方目前没有支持 CPU 软绘的计划。Impeller 短期内不会也没有可能作为 Skia 的替代品, 不过其优秀的架构设计使其依然有潜力剥离出 Flutter 成为一个独立的渲染解决方案, 未来可能会对基于 Skia 的自绘方案形成挑战, 我们对 Impeller 后续的发展也会持续保持关注。

注意

ImpellerFlutter 3.7(2023/01发布) 版本开始在 iOS 系统上基本可用。但是 Android 系统上依旧不能用于生产环境。

参考链接


API Availability and Target Conditionals

Writing code for multiple Apple platforms can be tricky, this post aims to provide some guidance and explanations for ways to write code that works on different Apple platforms (iOS, macOS, watchOS, tvOS) and different versions of SDKs, and the OSes at runtime.

Target conditionals

First, let’s take a look at how to tell apart the OS you are compiling for at build time, using the preprocessor (in case of Objective-C) or compilation conditions (Swift).

Swift

In Swift checking the OS you are building for at comile time is done using compilation conditionals and specific platform condition functions:

The os() function can be used to check for the OS the code is compiled for, it takes one argument, which is the operating system name (not quoted). Possible operating system names at the time of writing are macOSiOStvOSwatchOS and Linux.

For example:

#if os(macOS)
    // This code is only compiled for macOS
#elseif os(iOS) || os(tvOS)
    // This code is only compiled for iOS or tvOS
#endif

Of course sometimes you need to check if you are running the simualtor or not, to do that there is the targetEnvironment() function. It takes one argument, which is the target environment name (not quoted). Possible values are simulator and macCatalyst (since Swift 5.1).

#if os(iOS) && targetEnvironment(simulator)
    // This code is only compiled for the iOS simulator
#endif
Objective-C, C and C++

For Objective-C, C and C++ conditional compilation is handled by the preprocessor. Apple provides the TargetConditionals.h header which contains specific defines for this.

This header has a lot of defines, I will only list the most useful ones here:

TARGET_OS_OSX
Compiling for macOS
TARGET_OS_IOS
Compiling for iOS
TARGET_OS_TV
Compiling for tvOS
TARGET_OS_WATCH
Compiling for watchOS
TARGET_OS_MACCATALYST
Compiling for Catalyst
TARGET_OS_SIMULATOR
Compiling for Simulator

For example:

#if TARGET_OS_OSX
    // This code is only compiled for macOS
#elif TARGET_OS_IOS || TARGET_OS_TV
    // This code is only compiled for iOS or tvOS
#endif

To check if compiling for the simulator, just use the TARGET_OS_SIMULATOR define:

#if TARGET_OS_IOS && TARGET_OS_SIMULATOR
    // This code is only compiled for the iOS simulator
#endif

Note that there is a TARGET_OS_MAC define, while this sounds like it will be true only for macOS, it is actually true for all Darwin OSes including iOS and tvOS. Another define which can be confusing is the TARGET_OS_IPHONE, which is actually true for all “mobile” platforms, so iOS, tvOS, watchOS and Catalyst.

Clang-specific preprocessor extensions

Since Clang 6.0 or Xcode 9.3 (r320734) Clang has preprocessor extensions similar to the Swift condition functions which can be used to achieve the same as with the target conditional defines above.

To check the OS code is compiled for, there is the __is_target_os() preprocessor macro, which takes a single argument, the operating system name. Possible values for Apple OSes are macOSiOStvOSwatchOS.

For example:

#if __is_target_os(macOS)
    // This code is only compiled for macOS
#elif __is_target_os(iOS) || __is_target_os(tvOS)
    // This code is only compiled for iOS or tvOS
#endif

To check what environement the code is compiled for, similar to Swift there is the __is_target_environment() preprocessor macro, which takes as argument the environment name. Possible values are simulator and macabi (Catalyst).

#if __is_target_os(iOS) && __is_target_environment(simulator)
    // This code is only compiled for the iOS simulator
#endif

API availability

Something that usually is closely related to above discussed conditional compilation is the need to handle API availability gracefully. There are various aspects to consider about API availability, one is API availability at runtime, another is API availability at compile time depending on the used SDK version.

What is API availability?

API availability, as the name suggests, means if a specific API (function, class, method, etc.) is actually available.

macOS, iOS, tvOS and watchOS handle API availability in the same way, when a new API is introduced it is annotate with a specific macro that indicates the availability of that API. The macro expands to annotations for the API that indicate how the linker is expected to handle linking to it and can provide additional warnings or errors during compilation when using a deprecated API or trying to use a “too new” API in an application set to run on older appleOS versions that lack this API.

This sounds all very abstract and complex, so let’s have a look at this using an example, the clock_gettime() function. If we look at the manpage for clock_gettime we can see that it was introduced in macOS 10.12:

HISTORY
     These functions first appeared in Mac OSX 10.12

So let’s have a look at how the header declares this function:

__CLOCK_AVAILABILITY
int clock_gettime(clockid_t __clock_id, struct timespec *__tp);

So these functions are annotate with __CLOCK_AVAILABILITY, which expands to:

__OSX_AVAILABLE(10.12) __IOS_AVAILABLE(10.0) __TVOS_AVAILABLE(10.0) __WATCHOS_AVAILABLE(3.0)

So to be more precise than what the man page tells us, this API is available since macOS 10.12, iOS 10.0, tvOS 10.0 and watchOS 3.0, great!

Of course that still doesn’t provide the full story, to understand what exactly the availability macros do, let’s have a look at the header defining those, Availability.h. Checking this header, we can see that these macros actually expand to (indirectly using a other macros) use of the availability attribute. I recommend reading this for all the details about how exactly this works. The most important takeaway for the purpose of this article is the following:

A declaration can typically be used even when deploying back to a platform version prior to when the declaration was introduced. When this happens, the declaration is weakly linked, as if the weak_import attribute were added to the declaration. A weakly-linked declaration may or may not be present a run-time, and a program can determine whether the declaration is present by checking whether the address of that declaration is non-NULL.

Note that in addition to the Availability.h header, there is the AvailabilityMacros.h header which works similar to the Availability.h header. Depending on the Framework, it might use either the Availability.h or the older AvailabilityMacros.h header.

Checking API availability at runtime

Now let’s see how we can use such a “partially” avaialble function:

#include <stdio.h>
#include <time.h>

int main(int argc, char const *argv[])
{
    struct timespec value;
    if (clock_gettime(CLOCK_REALTIME, &value) == 0) {
        printf("Realtime seconds: %ld\n", value.tv_sec);
    }
}

If we now compile this targeting macOS 10.14 like that, it just works as expected:

$ clang --target=x86_64-apple-macosx10.14 -Wunguarded-availability availability.c && ./a.out

Realtime seconds: 1572996298

But if we were to try to compile targeting macOS 10.10, we would get a warning:

$ clang --target=x86_64-apple-macosx10.10 -Wunguarded-availability availability.c && ./a.out
availability.c:7:9: warning: 'clock_gettime' is only available on macOS 10.12 or newer
      [-Wunguarded-availability]
    if (clock_gettime(CLOCK_REALTIME, &value) == 0) {
        ^~~~~~~~~~~~~
[…]/usr/include/time.h:178:5: note: 
      'clock_gettime' has been marked as being introduced in macOS 10.12 here, but the deployment target is macOS 10.10.0
[…]
Realtime seconds: 1572996508

The -Wunguarded-availability flag is what causes the compiler to emit this warning. For APIs available since macOS 10.13, iOS 11, watchOS 4 and tvOS 11 you will get these warnings even without specifying this flag, as there is a new flag-Wunguarded-availability-new which is enabled by default in recent Clang/Xcode versions.

As the name of the warning already gives it away, it only warns about “unguarded” availability, which implies we can “guard” such API usage. There are two ways how this can be done.

Checking the symbols address

The “old” way to check if a partially available function is available would be to check its address:

if (&clock_gettime == NULL) {
    // clock_gettime is not available!
}

Not only is this a bit weird to read, it has some downsides:

  • The compiler will still warn about this
  • Objective-C methods and classes can’t easily be checked this way
  • It is cumbersome to check all relevant symbols this way
Using the availability helper

Fortunately since some time there is a bette way to handle this! In fact, the compiler would already points this out in the partial availability warning:

note: enclose 'clock_gettime' in a __builtin_available check to silence this warning

So let’s do that:

#include <stdio.h>
#include <time.h>

int main(int argc, char const *argv[])
{
    struct timespec value;
    if (__builtin_available(macOS 10.12, *)) {
        if (clock_gettime(CLOCK_REALTIME, &value) == 0) {
            printf("Realtime seconds: %ld\n", value.tv_sec);
        }
    } else {
        // clock_gettime not available!
        return 1;
    }
}

And now it will compile without warning again! On macOS at least, that is. We can check multiple platform versions just by listing them all:

if (__builtin_available(macOS 10.12, iOS 10.0, *)) {
    // Running on macOS 10.12 or iOS 10.0 or higher
}

The star at the end is mandatory and means “all other platforms”. So the previous check that just listed macOS would still compile for iOS and crash at runtime when ran on iOS versions lower than iOS 10 which lack clock_gettime. So take care to cover all cases where the code will run in your availability check!

In Objective-C there is the @available helper which looks a bit nicer than the longer version from C but is used in the exact same way:

if (@available(macOS 10.12, iOS 10.0, *)) {
    // Running on macOS 10.12 or iOS 10.0 or higher
}

In Swift there is #available, again the usage is the same except for the different name:

if #available(macOS 10.12, iOS 10.0, *) {
    // Running on macOS 10.12 or iOS 10.0 or higher
}

Note that negating the check or using it together with any other condition is not supported and does not properly guards availability!

Additionally keep in mind that this is a runtime check, so using APIs inside a availability check that are missing in the current SDK version that is compiled with is still an error. To support multiple SDK versions, see the next section for how to check at compile-time!

Checking API availability at compile-time

Sometimes it is necessary to check the availability of a specific API at compile-time, for example when you want to remain compatible with multiple Apple SDKs, where some versions offer new API that you want to use and some versions lack this API.

In the previous section I already mentioned two headers, Availability.h and AvailabilityMacros.h. These headers define two important macros:

__<OS-VARIANT>_VERSION_MAX_ALLOWED
Indicates the maximum version that we are allowed to use APIs from.
__<OS-VARIANT>_VERSION_MIN_REQUIRED
Indicates the minimum required version that we are allowed to use APIs from.

The <OS-VARIANT> needs to be replaced with the OS variant we want to check for and can be MAC_OS_XIPHONE_OSTV_OS or WATCH_OS.

The above sounds quite abstract so lets illustrate it with a example. Suppose we have a new API introduced for macOS 10.12, so it is first present in the macOS 10.12 SDK. If we were to compile with that SDK, the __MAC_OS_X_VERSION_MAX_ALLOWED macro is automatically set to the version of the SDK, as that is the maximum macOS version that we can use APIs from, we cannot ever use any APIs newer than the SDK we are using because those are simply not declared. So in case of the 10.12 SDK, __MAC_OS_X_VERSION_MAX_ALLOWED will be 101200.

If we want to stay compatible with older SDKs, we can use the following preprocessor macros:

#include <Availability.h>
#if (TARGET_OS_OSX && __MAC_OS_X_VERSION_MAX_ALLOWED >= 101200)
    if (@available(macOS 10.12, *)) {
        // Use API available since macOS 10.12 SDK
    } else {
        // Fallback to some other API available in 10.11 and older SDKs
    }
#else
    // Fallback to some other API available in 10.11 and older SDKs
#endif

Note that there are defines for the specific appleOS versions in the availability headers, like __MAC_10_12 so it is tempting to write __MAC_OS_X_VERSION_MAX_ALLOWED >= __MAC_10_12 but this will not work because lower SDK versions, like for example the macOS 10.11 SDK will not have the define for higher macOS versions like macOS 10.12!

What is important to note is that the preprocessor checks are done at compile-time, so proper availability handling at runtime is still needed, see the previous section for details about that!

The second macro, __<OS-VARIANT>_VERSION_MIN_REQUIRED, is useful when you have legacy code that you want to disable when targeting recent enough appleOS versions. Suppose we have function needed for macOS <= 10.11, we can easily disable that when targeting macOS 10.12 or higher by using the __MAC_OS_X_VERSION_MIN_REQUIRED macro:

#include <Availability.h>
#if (TARGET_OS_OSX && __MAC_OS_X_VERSION_MIN_REQUIRED <= 101100)
    void compat_stuff_for_1011() {
        // ...
    }
#endif

Of course a lot of other and more complex scenarios are possible with more complex checks, but I won’t cover all of the possibilities here.

Note that the AvailabilityMacros.h header defines MAC_OS_X_VERSION_MIN_REQUIRED without the two leading underscores, but the Availability.h header does not define those. Both define the version with the leading underscores so to prevent confusing code I would recommend to not use the version without the leading underscores.

Note that the above only works for C/C++/Objective-C code, in Swift there is currently no way to check the SDK at compile-time.

参考链接