由于原作的地址打不开链接,因此直接把Google的快照内容复制到这里。原作链接
Clear space now
If you have historical snapshots, the quickest way to get space back so that you can look at the filesystem and apply better fixes and cleanups is to drop the oldest historical snapshots.
Two things to note:
- If you have historical snapshots as described here , delete the oldest ones first, and wait (see below). However if you just just deleted 100GB, and replaced it with another 100GB which failed to fully write, giving you out of space, all your snapshots will have to be deleted to clear the blocks of that old file you just removed to make space for the new one (actually if you know exactly what file it is, you can go in all your snapshots and manually delete it, but in the common case it'll be multiple files and you won't know which ones, so you'll have to drop all your snapshots before you get the space back).
- After deleting snapshots, it can take a minute or more for btrfs fi show to show the space freed . Do not be too impatient, run btrfs fi show in a loop and see if the number changes every minute. If it does not, carry on and delete other snapshots or look at rebalancing.
Note that even in the cases described below, you may have to clear one snapshot or more to make space before btrfs balance can run. As a corollary, btrfs can get in states where it's hard to get it out of the 'no space' state it's in. As a result, even if you don't need snapshot, keeping at least one around to free up space should you hit that mis-feature/bug, can be handy
Is your filesystem really full? Mis-balanced data chunks
Look at filesystem show output:
|
|
legolas:~# btrfs fi show Label: btrfs_pool1 uuid: 4850ee22-bf32-4131-a841-02abdb4a5ba6 Total devices 1 FS bytes used 441.69GiB devid 1 size 865.01GiB used 751.04GiB path /dev/mapper/cryptroot |
Only about 50% of the space is used (441 out of 865GB), but the device is 88% full (751 out of 865MB). Unfortunately it's not uncommon for a btrfs device to fill up due to the fact that it does not rebalance chunks (3.18+ has started freeing empty chunks, which is a step in the right direction).
In the case above, because the filesystem is only 55% full, I can ask balance to rewrite all chunks that have less than 55% space used. Rebalancing those blocks actually means taking the data in those blocks, and putting it in fuller blocks so that you end up being able to free the less used blocks.
This means the bigger the -dusage value, the more work balance will have to do (ie taking fuller and fuller blocks and trying to free them up by putting their data elsewhere). Also, if your FS is 55% full, using -dusage=55 is ok, but there isn't a 1 to 1 correlation and you'll likely be ok with a smaller dusage number, so start small and ramp up as needed.
|
|
legolas:~# btrfs balance start -dusage=55 /mnt/btrfs_pool1 |
# Follow the progress along with: legolas:~# while :; do btrfs balance status -v /mnt/btrfs_pool1; sleep 60; done Balance on '/mnt/btrfs_pool1' is running 10 out of about 315 chunks balanced (22 considered), 97% left Dumping filters: flags 0x1, state 0x1, force is off DATA (flags 0x2): balancing, usage=55 Balance on '/mnt/btrfs_pool1' is running 16 out of about 315 chunks balanced (28 considered), 95% left Dumping filters: flags 0x1, state 0x1, force is off DATA (flags 0x2): balancing, usage=55 (...)
When it's over, the filesystem now looks like this (note devid used is now 513GB instead of 751GB):
|
|
legolas:~# btrfs fi show Label: btrfs_pool1 uuid: 4850ee22-bf32-4131-a841-02abdb4a5ba6 Total devices 1 FS bytes used 441.64GiB devid 1 size 865.01GiB used 513.04GiB path /dev/mapper/cryptroot |
Before you ask, yes, btrfs should do this for you on its own, but currently doesn't as of 3.14.
Is your filesystem really full? Misbalanced metadata
Unfortunately btrfs has another failure case where the metadata space can fill up. When this happens, even though you have data space left, no new files will be writeable.
In the example below, you can see Metadata DUP 9.5GB out of 10GB. Btrfs keeps 0.5GB for itself, so in the case above, metadata is full and prevents new writes.
One suggested way is to force a full rebalance, and in the example below you can see metadata goes back down to 7.39GB after it's done. Yes, there again, it would be nice if btrfs did this on its own. It will one day (some if it is now in 3.18).
Sometimes, just using -dusage=0 is enough to rebalance metadata (this is now done automatically in 3.18 and above), but if it's not enough, you'll have to increase the number.
|
|
legolas:/mnt/btrfs_pool2# btrfs fi df . Data, single: total=800.42GiB, used=636.91GiB System, DUP: total=8.00MiB, used=92.00KiB System, single: total=4.00MiB, used=0.00 Metadata, DUP: total=10.00GiB, used=9.50GiB Metadata, single: total=8.00MiB, used=0.00 |
|
|
legolas:/mnt/btrfs_pool2# btrfs balance start -v -dusage=0 /mnt/btrfs_pool2 Dumping filters: flags 0x1, state 0x0, force is off DATA (flags 0x2): balancing, usage=0 Done, had to relocate 91 out of 823 chunks |
|
|
legolas:/mnt/btrfs_pool2# btrfs fi df . Data, single: total=709.01GiB, used=603.85GiB System, DUP: total=8.00MiB, used=88.00KiB System, single: total=4.00MiB, used=0.00 Metadata, DUP: total=10.00GiB, used=7.39GiB Metadata, single: total=8.00MiB, used=0.00 |
Balance cannot run because the filesystem is full
One trick to get around this is to add a device (even a USB key will do) to your btrfs filesystem. This should allow balance to start, and then you can remove the device with btrfs device delete when the balance is finished.
It's also been said on the list that kernel 3.14 can fix some balancing issues that older kernels can't, so give that a shot if your kernel is old.
Note, it's even possible for a filesystem to be full in a way that you cannot even delete snapshots to free space. This shows how you would work around it:
|
|
root@polgara:/mnt/btrfs_pool2# btrfs fi df . Data, single: total=159.67GiB, used=80.33GiB System, single: total=4.00MiB, used=24.00KiB Metadata, single: total=8.01GiB, used=7.51GiB |
<<<< BAD
|
|
root@polgara:/mnt/btrfs_pool2# btrfs balance start -v -dusage=0 /mnt/btrfs_pool2 Dumping filters: flags 0x1, state 0x0, force is off DATA (flags 0x2): balancing, usage=0 Done, had to relocate 0 out of 170 chunks |
|
|
root@polgara:/mnt/btrfs_pool2# btrfs balance start -v -dusage=1 /mnt/btrfs_pool2 Dumping filters: flags 0x1, state 0x0, force is off DATA (flags 0x2): balancing, usage=1 ERROR: error during balancing '/mnt/btrfs_pool2' - No space left on device There may be more info in syslog - try dmesg | tail |
|
|
root@polgara:/mnt/btrfs_pool2# dd if=/dev/zero of=/var/tmp/btrfs bs=1G count=5 5+0 records in 5+0 records out 5368709120 bytes (5.4 GB) copied, 7.68099 s, 699 MB/s |
|
|
root@polgara:/mnt/btrfs_pool2# losetup -v -f /var/tmp/btrfs Loop device is /dev/loop0 |
|
|
root@polgara:/mnt/btrfs_pool2# btrfs device add /dev/loop0 . Performing full device TRIM (5.00GiB) ... |
|
|
root@polgara:/mnt/btrfs_pool2# btrfs subvolume delete space2_daily_20140603_00:05:01 Delete subvolume '/mnt/btrfs_pool2/space2_daily_20140603_00:05:01' |
|
|
root@polgara:/mnt/btrfs_pool2# for i in *daily*; do btrfs subvolume delete $i; done Delete subvolume '/mnt/btrfs_pool2/space2_daily_20140604_00:05:01' Delete subvolume '/mnt/btrfs_pool2/space2_daily_20140605_00:05:01' Delete subvolume '/mnt/btrfs_pool2/space2_daily_20140606_00:05:01' Delete subvolume '/mnt/btrfs_pool2/space2_daily_20140607_00:05:01' Delete subvolume '/mnt/btrfs_pool2/space2_daily_20140608_00:05:01' Delete subvolume '/mnt/btrfs_pool2/space2_daily_20140609_00:05:01' |
|
|
root@polgara:/mnt/btrfs_pool2# btrfs device delete /dev/loop0 |
|
|
root@polgara:/mnt/btrfs_pool2# btrfs balance start -v -dusage=1 /mnt/btrfs_pool2 Dumping filters: flags 0x1, state 0x0, force is off DATA (flags 0x2): balancing, usage=1 Done, had to relocate 5 out of 169 chunks |
|
|
root@polgara:/mnt/btrfs_pool2# btrfs fi df . Data, single: total=154.01GiB, used=80.06GiB System, single: total=4.00MiB, used=28.00KiB Metadata, single: total=8.01GiB, used=4.88GiB |
<<< GOOD
Misc Balance Resources
For more info, please read:

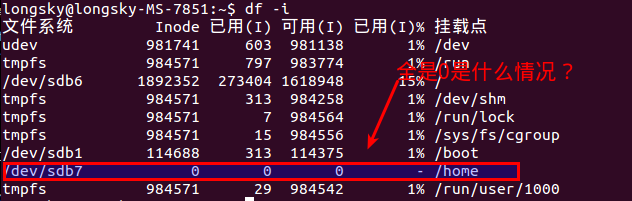 后来才知道,btrfs格式是不能使用df命令的,btrfs有自己的单独的命令查询.