WordPress安装插件提示“无法创建目录”

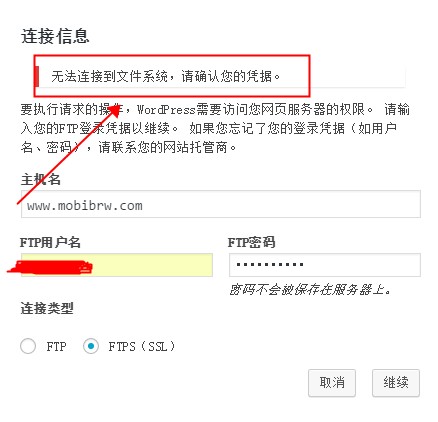
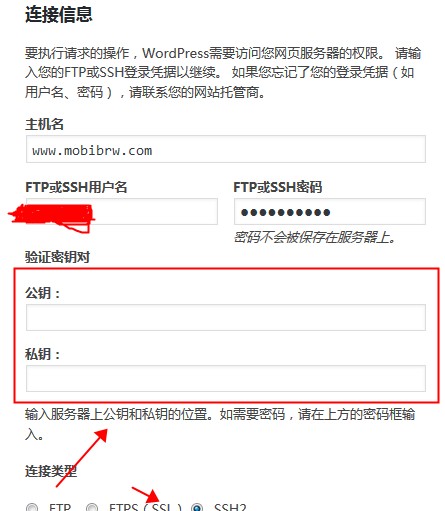
WordPress安装插件提示“无法创建目录”,这个是由于目录的权限设置导致的,一般情况下可以直接给目录/wp-content目录下面的plugins  themes   uploads upgrade目录增加 777 权限即可,但是这样做会导致服务器配置的不够安全,因此找到个更合适的方案处理。

前提,服务器系统为Ubuntu 12.04 版本,几个目录的默认所有者为 root,使用的FTP为 vsftpd ,服务器为 Apache2 ,这些条件主要限制了默认的用户组名字,如果系统不同,用户组的名字可能需要调整一下。

1.给这几个目录 755 权限,即,只有所有者才有权限写入。

chmod -R 755 plugins/ 
chmod -R 755 themes/
chmod -R 755 uploads/
chmod -R 755 upgrade/

2.逐个授权,vsftpd 的默认用户分组为ftpgroup,用户名自定义的,我们假定为 ftpuser.  Apache2 的用户分组默认都为www-data,其中plugins  themes  upgrade目录主要是ftp安装插件用的,因此写入权限只要给ftpuser 就可以了,其他用户读取权限足够了。而uploads目录是上传图片资源文件的目录,因此只要给www-data 用户写入权限就可以了。

chown -R www-data:www-data uploads/
chown -R ftpuser:ftpgroup plugins/
chown -R ftpuser:ftpgroup themes/
chown -R ftpuser:ftpgroup upgrade/

这样子,基本就安全多了。

Android + Eclipse: No grammar constraints (DTD or XML schema) detected for the document.

I don’t like having warnings in the code, and recently I’ve been getting a lot of these, these seem to popup after you accidentally press the Validate button in Eclipse…

No grammar constraints (DTD or XML schema) detected for the document.

Anyway, it is a easy fix, set the Validator to ignore (See screenshot below). Once you have changed the setting, you may have to Validate the files again (right click file -> Validate)dtd
原文 http://ucla.jamesyxu.com/?p=148

Ubuntu 12.04 Apache2安装PHP-FPM增强PHP5-CGI的功能

FPM(FastCGI 进程管理器)用于替换 PHP FastCGI 的大部分附加功能,对于高负载网站是非常有用的。

它的功能包括:

  • 支持平滑停止/启动的高级进程管理功能;
  • 可以工作于不同的 uid/gid/chroot 环境下,并监听不同的端口和使用不同的 php.ini 配置文件(可取代 safe_mode 的设置);
  • stdout 和 stderr 日志记录;
  • 在发生意外情况的时候能够重新启动并缓存被破坏的 opcode;
  • 文件上传优化支持;
  • "慢日志" - 记录脚本(不仅记录文件名,还记录 PHP backtrace 信息,可以使用 ptrace或者类似工具读取和分析远程进程的运行数据)运行所导致的异常缓慢;
  • fastcgi_finish_request() - 特殊功能:用于在请求完成和刷新数据后,继续在后台执行耗时的工作(录入视频转换、统计处理等);
  • 动态/静态子进程产生;
  • 基本 SAPI 运行状态信息(类似Apache的 mod_status);
  • 基于 php.ini 的配置文件。

1.安装PHP-FPM 支持模块

$ sudo apt-get install libapache2-mod-fastcgi php5-fpm

2.重启 Apache2

$ sudo service apache2 restart

这时候使用

$ ps -A

可以看到,进程中大约出现四五个 php5-fpm 进程。

注意 php5-cgi 进程的最大数量可以在 /etc/apache2/mods-available/fcgid.conf 中配置 DefaultMaxClassProcessCount 来限制。

Ubuntu 12.04下安装配置Worker工作模式的Apache支持PHP

其实Apache本身的并发能力是比较强大的,但是Debian/Ubuntu默认安装的是Prefork模式下的Apache。所以导致很多人后面盲目的去使用lighttpdnginx一类替代软件。但是这类软件有一定的兼容问题,部分情况下可能工作的并不好。那么, 是不是Apache并发就不行了呢?答案当然是否定的。

在进行配置之前,我们首先要知道什么是Prefork模式,什么是Worker模式,什么是Event模式,以及什么是MPM

MPM(Multi-Processing Modules,表示Apache中的多路处理模块)是Apache2引入的一个概念,就是将结构模块化。把核心任务处理作为一个可插拔的模块,即MPM,使其能针对不同的环境进行优化。在这个情况下,就诞生出了处理模式的概念。处理模式现在分为PreforkWorkerEvent三种。

Prefork MPM基于非线程模型,和Apache 1.x版本中的处理方式很相似。Prefork MPM在所有情况下都很安全,对运行非线程安全(non-thread-safe)模式的软件如PHP,它是唯一的安全选择。对于某些应用程序,包括在Apache 1.3上非常流行的程序(如简单静态页面、CGI脚本等),Prefork MPM是最好的选择。另一方面,prefork用单独的子进程来处理不同的请求,进程之间是彼此独立的,这也使其成为最稳定的MPM之一。但是由于每一个请求都会产生一个新的进程,导致系统资源(尤其是内存)消耗的很快,一旦并发量较大的时候,大量的Apache进程会占用巨大的内存空间。

Worker MPM基于线程模式,具有内存消耗低(对繁忙的服务很重要)、扩展性在某些特定应用情况下比Prefork更好等优点。在这个模式下,采用的进程和线程混合的形式处理请求。由于使用线程来处理,所以可以处理相对海量的请求,而系统资源的开销要小于基于进程的Prefork模式。

以上两种稳定的MPM方式在非常繁忙的服务器应用下都有些不足。尽管HTTPKeepalive方式能减少TCP连接数量和网络负载,但是Keepalive需要和服务进程或者线程绑定,这就导致一个繁忙的服务器会耗光所有的线程。Event MPM是解决这个问题的一种新模型,它把服务进程从连接中分离出来。在服务器处理速度很快,同时具有非常高的点击率时,可用的线程数量就是关键的资源限制,此时Event MPM方式是最有效的。一个以Worker MPM方式工作的繁忙服务器能够承受每秒好几万次的访问量(例如在大型新闻服务站点的高峰时),而Event MPM可以用来处理更高负载。值得注意的是,Event MPM在Apache 2.4 之前的版本中不能在安全HTTPHTTPS)访问下工作,Ubuntu 12.04中默认安装的版本是Apache 2.2因此还不能完全使用。

一目了然,三种MPM模式各有各的优缺点。但是如果我们经常遇到访问量一大,服务器资源就吃紧的情况,那么就是Prefork模式瓶颈了。在其他两类MPM中,通用的做法还是使用Worker模式来解决问题。Event MPM由于不支持安全连接(HTTPS)所以导致应用有一定的局限性。

下面我们就以Debian/Ubuntu下将Apache的模式从Prefork设置为Worker为例,来说明一下操作步骤。前面也提到了,由于Worker模式与PHP的执行方式不同,所以如果简单的输入

$sudo apt-get install apache2-mpm-worker

会导致PHP无法使用。当然了,如果你的网页只有静态页面,不需要使用PHP,那么使用上面这条指令就会搞定一切。这里我们着重讨论下要使用PHP的情况下,应该如何配置ApacheWorker模式。

先查看Apache当前的加载的模块

apache2 -l

查看到输出为

Compiled in modules:
  core.c
  mod_log_config.c
  mod_logio.c
  prefork.c
  http_core.c
  mod_so.c

可以看到其中的

prefork.c    #说明使用的是prefork模式

1. 安装Apache的fcgid模块,使用它来启用PHP。

sudo apt-get install libapache2-mod-fcgid

2. 设置fcgid模块的配置文件,使其能够调用PHP。

sudo vim /etc/apache2/mods-available/fcgid.conf

可以看到内容为如下

<IfModule mod_fcgid.c>
  AddHandler    fcgid-script .fcgi
  FcgidConnectTimeout 20
</IfModule>

在 AddHandler 后面增加 PHP支持,修改为

<IfModule mod_fcgid.c>
  AddHandler    fcgid-script .fcgi .php
  FcgidConnectTimeout 20
  DefaultMaxClassProcessCount 10
</IfModule>

注意 DefaultMaxClassProcessCount 10 用来限制php5-cgi 最大的进程并发数,这个可以避免创建了太多的php5-cgi进程,耗尽系统内存,导致OOM Killer 杀死服务的问题,后面的数字根据自己机器的配置情况自行调整即可。

3. 安装php5-cgi

sudo apt-get install php5-cgi

4. 设置Apache的配置文件,使其能够调用fcgid模块来启动PHP。

sudo vim /etc/apache2/sites-available/default

原内容为

<VirtualHost *:80>
        ServerAdmin webmaster@localhost
        DocumentRoot /var/www
        <Directory />
                Options FollowSymLinks
                AllowOverride None
        </Directory>
        <Directory /var/www/>
                Options Indexes FollowSymLinks MultiViews
                AllowOverride None
                Order allow,deny
                allow from all
        </Directory>
        ScriptAlias /cgi-bin/ /usr/lib/cgi-bin/
        <Directory "/usr/lib/cgi-bin">
                AllowOverride None
                Options +ExecCGI -MultiViews +SymLinksIfOwnerMatch
                Order allow,deny
                Allow from all
        </Directory>
        ErrorLog ${APACHE_LOG_DIR}/error.log

        # Possible values include: debug, info, notice, warn, error, crit,
        # alert, emerg.
        LogLevel warn
        CustomLog ${APACHE_LOG_DIR}/access.log combined
    Alias /doc/ "/usr/share/doc/"
    <Directory "/usr/share/doc/">
        Options Indexes MultiViews FollowSymLinks
        AllowOverride None
        Order deny,allow
        Deny from all
        Allow from 127.0.0.0/255.0.0.0 ::1/128
    </Directory>
</VirtualHost>

修改为

<VirtualHost *:80>
        ServerAdmin webmaster@localhost
        DocumentRoot /var/www
        <Directory />
                Options FollowSymLinks
                AllowOverride None
        </Directory>
        <Directory /var/www/>
                Options Indexes FollowSymLinks MultiViews
                AllowOverride None
                FCGIWrapper /usr/bin/php5-cgi .php
                Options ExecCGI SymLinksIfOwnerMatch
                Order allow,deny
                allow from all
        </Directory>
        ScriptAlias /cgi-bin/ /usr/lib/cgi-bin/
        <Directory "/usr/lib/cgi-bin">
                AllowOverride None
                Options +ExecCGI -MultiViews +SymLinksIfOwnerMatch
                Order allow,deny
                Allow from all
        </Directory>

        ErrorLog ${APACHE_LOG_DIR}/error.log

        # Possible values include: debug, info, notice, warn, error, crit,
        # alert, emerg.
        LogLevel warn

        CustomLog ${APACHE_LOG_DIR}/access.log combined

    Alias /doc/ "/usr/share/doc/"
    <Directory "/usr/share/doc/">
        Options Indexes MultiViews FollowSymLinks
        AllowOverride None
        Order deny,allow
        Deny from all
        Allow from 127.0.0.0/255.0.0.0 ::1/128
    </Directory>
</VirtualHost>

即在<Directory /var/www/></Directory>之间增加

FCGIWrapper /usr/bin/php5-cgi .php
Options ExecCGI SymLinksIfOwnerMatch

5. 安装Apache的Worker MPM模块。

sudo apt-get install apache2-mpm-worker

需要注意的是,如果之前有安装了php5-gd和php5-mysql模块,Ubuntu在配置Apache的Worker模式的时候可能会将其卸载,可以重新安装一次以防万一:

sudo apt-get install php5-gd php5-mysql

完成之后继续执行

apache2 -l

查看到输出为

Compiled in modules:
  core.c
  mod_log_config.c
  mod_logio.c
  worker.c
  http_core.c
  mod_so.c

可以看到其中的

worker.c    #说明使用的是work模式

Eclipse上安装ivy插件

Apache Ivy 是Apache Ant 下的一个子项目。Apache Ivy是一个优秀的管理(记录、跟踪、解析和报告)项目依赖的工具,提供了强大的依赖管理功能,可与Apache Ant紧密集成。项目相关网址:(http://ant.apache.org/ivy/

ivyDe是eclipse的一个插件,用来支持ivy。

要安装ivyDe,可以从eclipse在线安装,地址是http://www.apache.org/dist/ant/ivyde/updatesite

Ubuntu 12.04/14.04/18.04使用squid架设Http正向代理服务器

配置普通HTTP正向代理

安装

$ sudo apt-get install squid squid-common

配置squid3

# ubuntu 12.04/14.04默认配置文件路径
$ sudo vim /etc/squid3/squid.conf

# ubuntu 18.04默认配置文件路径
$ sudo vim /etc/squid/squid.conf

搜索此句

http_access deny all

修改为

http_access allow all

搜索此句(squid默认允许访问本地(localhost)服务,但建议禁止

http_access allow localhost

修改为

http_access deny localhost

启动/重启squid3

# ubuntu 12.04/14.04
$ sudo service squid3 restart

# ubuntu 18.04
$ sudo service squid restart

注意: squidhttp默认代理端口为3128

配置HTTPS正向代理(单向认证)

由于ubuntu 12.04/14.04/18.04默认安装的squid版本是不支持SSL的,因此只能重新编译支持SSL.

1.安装编译依赖

$ cd ~

$ mkdir squid_src

$ cd squid_src

$ sudo apt-get install build-essential fakeroot devscripts gawk gcc-multilib dpatch

$ sudo apt-get build-dep squid3

$ sudo apt-get build-dep openssl

$ sudo apt-get install libssl-dev

$ sudo apt-get install openssl

$ apt-get source squid3

2.修改默认的编译选项,增加SSL支持
ubuntu 12.04

$ vim squid3-3.1.19/debian/rules

DEB_CONFIGURE_EXTRA_FLAGS字段中增加--enable-ssl

...
DEB_CONFIGURE_EXTRA_FLAGS := --datadir=/usr/share/squid3 \
                --sysconfdir=/etc/squid3 \
                --mandir=/usr/share/man \
                --with-cppunit-basedir=/usr \
                --enable-inline \
                --enable-ssl \
...

ubuntu 14.04/18.04

# ubuntu 14.04
$ vim squid3-3.3.8/debian/rules

# ubuntu 18.04
$ vim squid3-3.5.27/debian/rules

对于Ubuntu 14.04来说,除了要在DEB_CONFIGURE_EXTRA_FLAGS字段中增加--enable-ssl外,由于squid3-3.3.8默认去掉了对于NCSA的支持,而我们下面认证密码的配置是基于NCSA算法的,因此需要在DEB_CONFIGURE_EXTRA_FLAGS--enable-auth-basic字段中增加对于NCSA的支持,否则无法使用NCSA算法进行账号认证,修改后的样子如下:

...
DEB_CONFIGURE_EXTRA_FLAGS := --datadir=/usr/share/squid3 \
                --sysconfdir=/etc/squid3 \
                --mandir=/usr/share/man \
                --enable-inline \
                --enable-ssl\
                --enable-async-io=8 \
                --enable-storeio="ufs,aufs,diskd,rock" \
                --enable-removal-policies="lru,heap" \
                --enable-delay-pools \
                --enable-cache-digests \
                --enable-underscores \
                --enable-icap-client \
                --enable-follow-x-forwarded-for \
                --enable-auth-basic="NCSA,DB,fake,getpwnam,LDAP,MSNT,MSNT-multi-domain,NCSA,NIS,PAM,POP3,RADIUS,SASL,SMB" \
...

注意,这样修改后squid3-3.3.8版本编译出来的在/usr/lib/squid3/下的ncsa_auth被重命名成了basic_ncsa_auth,因此配置文件中制定认证应用的时候要修改一下。

对于Ubuntu 18.04来说,这个参数不需要调整,默认支持NCSA

注意,如果需要禁用`ipv6`的支持,则增加`--disable-ipv6`选项,这个目前是唯一的可以彻底禁用`ipv6`代理访问的方式。这个需求的原因是由于配置问题,某些网站的`ipv6`地址存在,但是无法正常访问

3.配置编译
ubuntu 12.04

$ cd squid3-3.1.19/

$ debuild -us -uc -b

ubuntu 14.04

$ cd squid3-3.3.8/

$ debuild -us -uc -b

ubuntu 18.04

$ cd squid3-3.5.27/

$ debuild -us -uc -b

4.安装(编译后的文件存在在上层的squid_src目录下面)
ubuntu 12.04

$ cd ..

$ sudo dpkg -i squid3_3.1.19-1ubuntu3.12.04.2_amd64.deb squid3-common_3.1.19-1ubuntu3.12.04.2_all.deb squid3-dbg_3.1.19-1ubuntu3.12.04.2_amd64.deb

ubuntu 14.04

$ cd ..

$ sudo dpkg -i squid3-common_3.3.8-1ubuntu6.6_all.deb squid_3.3.8-1ubuntu6.6_amd64.deb squid3_3.3.8-1ubuntu6.6_amd64.deb squid3-dbg_3.3.8-1ubuntu6.6_amd64.deb

ubuntu 18.04

$ cd ..

$ sudo dpkg -i squid-common_3.5.27-1ubuntu1.9_all.deb squid_3.5.27-1ubuntu1.9_amd64.deb squid_3.5.27-1ubuntu1.9_amd64.deb squid-dbg_3.5.27-1ubuntu1.9_amd64.deb

5.验证安装后的版本是否支持SSL

$ squid3 -v | grep enable-ssl

如果看到enable-ssl输出,则说明编译成功。

6.生成自签名证书

$ openssl req -new -keyout key.pem -nodes -x509 -days 365 -out cert.pem

7.移动服务器证书到squid3配置目录

$ sudo mv cert.pem /etc/squid3/cert.pem

$ sudo mv key.pem /etc/squid3/key.pem

8.配置squit3

$ sudo vim /etc/squid3/squid.conf

搜索https_port,如果搜索到,则在搜索到的位置增加,搜索不到则在文件的最后增加

https_port 443 cert=/etc/squid3/cert.pem key=/etc/squid3/key.pem

9.验证配置文件是否配置正确

$ squid3 -k parse

10.启动/重启squid

# ubuntu 12.04/14.04
$ sudo service squid3 restart

# ubuntu 18.04
$ sudo service squid restart

11.安装stunnel,配置安装目录下的stunnel.conf,把原来的内容都删掉,粘贴下面的内容

client = yes
[https]
accept = 127.0.0.1:8080
connect = www.mobibrw.com:443

12.设置浏览器代理服务器地址

7442F5AA-EF60-49C8-B7BB-97D750C72231

13.重新启动stunnel

注意,如果只支持Https协议,可以注释掉原来的 

http_port 3128

配置Squid3用户名密码认证

1. 安装htpasswd(如果装了apache就省掉这一步)
(这个是用来产生密码的)

$ sudo apt-get install apache2-utils

也可以

$ sudo apt-get install mini-httpd

2.生成密码文件

$ htpasswd -c /etc/squid3/passwd user1

会让你输入user1的密码
3.改一下权限,确保squid能够读出密码文件

$ sudo chmod o+r /etc/squid3/passwd

4.修改squid.conf,增加或修改成下面的样子

对于ubuntu 12.04版本上编译出来的的Squid3-3.1.19,执行如下配置:

auth_param basic program /usr/lib/squid/ncsa_auth /etc/squid3/passwd
acl ncsa_users proxy_auth REQUIRED
http_access allow ncsa_users

对于ubuntu 14.04版本上编译出来的的Squid3-3.3.8,由于验证程序的名字被修改成了basic_ncsa_auth,因此执行如下配置:

auth_param basic program /usr/lib/squid/basic_ncsa_auth /etc/squid3/passwd
acl ncsa_users proxy_auth REQUIRED
http_access allow ncsa_users

简单的修改可以在VIM中查询 "auth_param basic program /usr/lib/squid/ncsa_auth" 找到后修改一下即可.
然后搜索 "http_access allow all" 找到后替换为 "http_access allow ncsa_users"
在"http_access allow all" 上面就是acl控制部分,直接增加"acl ncsa_users proxy_auth REQUIRED"
如果配置文件是从Squid3-3.1.19升级到Squid3-3.3.8版本的,那么根据如下两个链接的描述:
http://wiki.squid-cache.org/SquidFaq/ConfiguringSquid
https://forums.gentoo.org/viewtopic-t-952948-start-0.html

3.2 further configuration cleanups have been done to make things easier and safer. The manager, localhost, and to_localhost ACL definitions are now built-in.

这两个链接上的信息,从Squid3-3.2版本开始,原来配置文件中的acl控制信息已经不需要再从配置文件中读取了,这部分的功能已经集成进入应用内部了。
因此需要注释掉下面这几句话,否则无法正常启动Squid3.

# Recommended minimum configuration:
#
acl manager proto cache_object
acl localhost src 127.0.0.1/32 ::1
acl to_localhost dst 127.0.0.0/8 0.0.0.0/32 ::1

5.重启squid3

# ubuntu 12.04/14.04
$ sudo service squid3 restart

# ubuntu 18.04
$ sudo service squid restart

限制单个用户的下载速度

squid3在默认编译的时候,已经包含了--enable-delay-pools选项,因此已经默认支持限速了,我们只需要设置限速配置就可以了。

$ sudo vim /etc/squid3/squid.conf

在文件最后增加如下配置:

delay_pools 1
delay_class 1 1
delay_access 1 allow all
delay_parameters 1 50000/50000 # 限制网速在50K以内
delay_initial_bucket_level 50

参数的具体解释请在squid.conf中搜索delay-pools查看。

重启squid3

# ubuntu 12.04/14.04
$ sudo service squid3 restart

# ubuntu 18.04
$ sudo service squid restart

参考链接


删除目录下所有的 .svn .git 隐藏子目录

使用SVN 1.6 之前版本 checkout出来的代码,在本地每个文件夹下都有个 .svn ,可利用这个命令来删除

Linux

find . -name .svn -print0 | xargs -0 rm -r -f

Windows(需要在批处理文件中执行)

for /r . %%a in (.) do @if exist %%a\.svn rd /s /q %%a\.svn

对于Git的目录也可以如此操作:

Linux

find . -name .git -print0 | xargs -0 rm -r -f

Windows(需要在批处理文件中执行)

for /r . %%a in (.) do @if exist %%a\.git rd /s /q %%a\.git

WordPress报告 “建立数据库连接时出错” 的问题

使用 WordPress 构筑的 Blog 最近总是会报告 “建立数据库连接时出错” ,查看 Apache 的日志得到如下信息

$ sudo vim /var/log/apache2/error.log

在日志的最后得到类似如下的内容

[Mon Jan 06 16:30:06 2014] [error] [client 5.10.83.83] WordPress SELECT * FROM wp_posts  WHERE (post_type = 'page' AND post_status = 'publish')     ORDER BY menu_order,wp_posts.post_title .......MySQL server has gone away

这个 “MySQL server has gone away” 有些莫名奇妙,MySql 怎么会无缘无故的没有了呢。
于是查看系统日志

$ sudo vim /var/log/syslog

看到如下的输出

Jan  6 16:30:05 AY130422143404983ad9 kernel: [236491.346180] Out of memory: Kill process 755 (mysqld) score 91 or sacrifice child
Jan  6 16:30:05 AY130422143404983ad9 kernel: [236491.346267] Killed process 755 (mysqld) total-vm:887016kB, anon-rss:45820kB, file-rss:0kB
Jan  6 16:30:05 AY130422143404983ad9 kernel: [236491.422036] init: mysql main process (755) killed by KILL signal
Jan  6 16:30:05 AY130422143404983ad9 kernel: [236491.422096] init: mysql main process ended, respawning

可以明显看到,是由于系统内存不足,导致了 Linux 系统自带的 OOM Killer 动作。执行

$ free -lm

可以看到,实际的内存已经严重不足了,这台机器只配置了512M内存,跑一阵子之后,系统的剩余内存不足 10MB的样子了。

没办法,花钱加内存到1G。悲剧的是,还是会死掉,具体解决办法可以查看

Ubuntu 12.04下安装配置Worker工作模式的Apache 支持PHP
Ubuntu 12.04 Apache2 安装 PHP-FPM 增强 PHP5-CGI 的功能

通过限制DefaultMaxClassProcessCount 的数量来限制php5-cgi 的数量来避免太多的并发进程耗尽资源。

Android 4.2.2 API 17 Content Provider 报错 SecurityException: Permission Denial: opening provider

两个APK 通过Content Provider 来共享数据,在Android 4.2.2 API 17  之前都是正常的,但是到Android 4.2.2 API 17  上面就会报告异常类似如下的异常信息

09-17 12:15:52.221: E/AndroidRuntime(4551): FATAL EXCEPTION: main
09-17 12:15:52.221: E/AndroidRuntime(4551): java.lang.RuntimeException: Unable to start activity ComponentInfo{com.identifier.gamecenter.gctictactoe/com.identifier.gamecenter.game.MainActivity}: java.lang.SecurityException: Permission Denial: opening provider com.identifier.gamecenterapp.contentprovider.MyGamesContentProvider from ProcessRecord{42622078 4551:com.identifier.gamecenter.gctictactoe/u0a10108} (pid=4551, uid=10108) that is not exported from uid 10072
09-17 12:15:52.221: E/AndroidRuntime(4551):     at android.app.ActivityThread.performLaunchActivity(ActivityThread.java:2211)
09-17 12:15:52.221: E/AndroidRuntime(4551):     at android.app.ActivityThread.handleLaunchActivity(ActivityThread.java:2261)
09-17 12:15:52.221: E/AndroidRuntime(4551):     at android.app.ActivityThread.access$600(ActivityThread.java:141)
09-17 12:15:52.221: E/AndroidRuntime(4551):     at android.app.ActivityThread$H.handleMessage(ActivityThread.java:1256)
09-17 12:15:52.221: E/AndroidRuntime(4551):     at android.os.Handler.dispatchMessage(Handler.java:99)
09-17 12:15:52.221: E/AndroidRuntime(4551):     at android.os.Looper.loop(Looper.java:137)
09-17 12:15:52.221: E/AndroidRuntime(4551):     at android.app.ActivityThread.main(ActivityThread.java:5103)
09-17 12:15:52.221: E/AndroidRuntime(4551):     at java.lang.reflect.Method.invokeNative(Native Method)
09-17 12:15:52.221: E/AndroidRuntime(4551):     at java.lang.reflect.Method.invoke(Method.java:525)
09-17 12:15:52.221: E/AndroidRuntime(4551):     at com.android.internal.os.ZygoteInit$MethodAndArgsCaller.run(ZygoteInit.java:737)
09-17 12:15:52.221: E/AndroidRuntime(4551):     at com.android.internal.os.ZygoteInit.main(ZygoteInit.java:553)
09-17 12:15:52.221: E/AndroidRuntime(4551):     at dalvik.system.NativeStart.main(Native Method)
09-17 12:15:52.221: E/AndroidRuntime(4551): Caused by: java.lang.SecurityException: Permission Denial: opening provider c.identifier.gamecenterapp.contentprovider.MyGamesContentProvider from ProcessRecord{42622078 4551:com.identifier.gamecenter.gctictactoe/u0a10108} (pid=4551, uid=10108) that is not exported from uid 10072
09-17 12:15:52.221: E/AndroidRuntime(4551):     at android.os.Parcel.readException(Parcel.java:1431)
09-17 12:15:52.221: E/AndroidRuntime(4551):     at android.os.Parcel.readException(Parcel.java:1385)
09-17 12:15:52.221: E/AndroidRuntime(4551):     at android.app.ActivityManagerProxy.getContentProvider(ActivityManagerNative.java:2611)
09-17 12:15:52.221: E/AndroidRuntime(4551):     at android.app.ActivityThread.acquireProvider(ActivityThread.java:4515)
09-17 12:15:52.221: E/AndroidRuntime(4551):     at android.app.ContextImpl$ApplicationContentResolver.acquireUnstableProvider(ContextImpl.java:2036)
09-17 12:15:52.221: E/AndroidRuntime(4551):     at android.content.ContentResolver.acquireUnstableProvider(ContentResolver.java:1149)
09-17 12:15:52.221: E/AndroidRuntime(4551):     at android.content.ContentResolver.query(ContentResolver.java:398)
09-17 12:15:52.221: E/AndroidRuntime(4551):     at android.content.ContentResolver.query(ContentResolver.java:357)
09-17 12:15:52.221: E/AndroidRuntime(4551):     at ch.ethz.csg.wlanopp.gapi.GameCenterController.getIdByGameTitle(GameCenterController.java:602)
09-17 12:15:52.221: E/AndroidRuntime(4551):     at ch.ethz.csg.wlanopp.gapi.GameCenterController.isRegistered(GameCenterController.java:343)
09-17 12:15:52.221: E/AndroidRuntime(4551):     at ch.ethz.csg.wlanopp.gapi.GameCenterController.addGame(GameCenterController.java:352)
09-17 12:15:52.221: E/AndroidRuntime(4551):     at ch.ethz.csg.gamecenter.gctictactoe.MainActivity.onCreate(MainActivity.java:130)
09-17 12:15:52.221: E/AndroidRuntime(4551):     at android.app.Activity.performCreate(Activity.java:5133)
09-17 12:15:52.221: E/AndroidRuntime(4551):     at android.app.Instrumentation.callActivityOnCreate(Instrumentation.java:1087)
09-17 12:15:52.221: E/AndroidRuntime(4551):     at android.app.ActivityThread.performLaunchActivity(ActivityThread.java:2175)
09-17 12:15:52.221: E/AndroidRuntime(4551):     ... 11 more
09-17 12:20:52.487: I/Process(4551): Sending signal. PID: 4551 SIG: 9

在AndroidManifest.xml中原来的定义如下

<provider     
    android:name="com.identifier.gamecenterapp.contentprovider.MyGamesContentProvider"
    android:authorities="com.identifier.gamecenterapp.contentprovider" >
</provider>

并且没有定义 android:targetSdkVersion

查找了很多地方,最终发现原因

Content providers are no longer exported by default. That is, the default value for the android:exported attribute is now “false". If it’s important that other apps be able to access your content provider, you must now explicitly set android:exported="true".

This change takes effect only if you set either android:targetSdkVersion or android:minSdkVersion to 17 or higher. Otherwise, the default value is still “true" even when running on Android 4.2 and higher.

具体的网页在 http://developer.android.com/about/versions/android-4.2.html

因此修改为如下即可 也就是增加 android:exported="true"

<provider     
android:name="com.identifier.gamecenterapp.contentprovider.MyGamesContentProvider"
android:authorities="com.identifier.gamecenterapp.contentprovider"       
android:exported="true">
</provider>