CCMP(CTR with CBC-MAC Protocol) 是 IEEE 802.11i 中推出使用基于 AES 的 CCM 模式的安全加密协议。
与原来脆弱的 WEP 算法及临时补救措施 TKIP 协议相比,它具有更好的安全性,在 WiFi 中得到广泛的应用。
CCM(Counter with CBC-MAC) 定义在 RFC 3610 中,它是一种使用分组算法(例如 AES)进行数据认证和加密的通用模式。
下面是 RFC 3610 中重要部分的中文注释和说明
1. Introduction
Counter with CBC-MAC (CCM) is a generic authenticated encryption block cipher mode.
CCM 对明文数据(记为 m,其长度记为 l(m))进行分组加密和认证,处理结果同时包括密文和认证字段
CCM is defined for use with 128-bit block ciphers, such as the Advanced Encryption Standard (AES).
专门用于 block size 为 128 位的分组加密算法,如 AES
2. CCM Mode Specification
For the generic CCM mode there are two parameter choices.
CCM 有 2 个参数选项
The first choice is M, the size of the authentication field.
Valid values are 4, 6, 8, 10, 12, 14, and 16 octets.
第 1 个选项: M -- 输出的认证字段长度(单位:字节),取值范围:4, 6, 8, 10, 12, 14, and 16
The second choice is L, the size of the length field.
Valid values of L range between 2 octets and 8 octets.
第 2 个选项: L -- 表示 l(m) 值的字节数( l(m) < 2^(8L) ),取值范围:2-8
将 M 和 L 转换为 M' 和 L'(以便容纳在一个字节中),转换关系如下
Name Description Size Encoding
---- ---------------------------------------- ------ --------
M' Number of octets in authentication field 3 bits (M-2)/2
L' Number of octets in length field 3 bits L-1
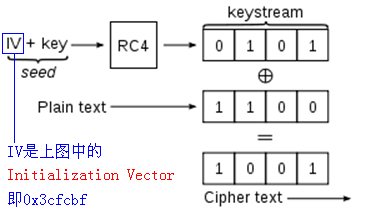
CCMP 协议规定:M = 8 L = 2, 即 m 最长为 65535 字节,认证字段为 8 字节
2.1. Inputs -- 认证加密 m 所需的参数
1. An encryption key K suitable for the block cipher.
分组密钥 K
2. A nonce N of 15-L octets. Within the scope of any encryption key K,
the nonce value MUST be unique.
随机数 N,15-L 字节长,在 K 的生命过程中要确保 N 不被重复使用
3. The message m, consisting of a string of l(m) octets where 0 <=
l(m) < 2^(8L). The length restriction ensures that l(m) can be
encoded in a field of L octets.
此段内容上面已讲得很清楚
4. Additional authenticated data a, consisting of a string of l(a)
octets where 0 <= l(a) < 2^64. This additional data is
authenticated but not encrypted, and is not included in the
output of this mode. It can be used to authenticate plaintext
packet headers, or contextual information that affects the
interpretation of the message. Users who do not wish to
authenticate additional data can provide a string of length zero.
附加认证数据 a,用于数据的完整性校验(不参与加密运算),可选
通常用于认证 报文头的明文字段 或 对消息理解有影响的上下文
The inputs are summarized as:
Name Description Size
---- ----------------------------------- -----------------------
K Block cipher key/分组加密密钥 Depends on block cipher
N Nonce/随机数 15-L octets
m Message to authenticate and encrypt l(m) octets
a Additional authenticated data/附加认证数据 l(a) octets
2.2. Authentication -- 生成认证字段
The first step is to compute the authentication field T. This is
done using CBC-MAC [MAC]. We first define a sequence of blocks B_0,
B_1, ..., B_n and then apply CBC-MAC to these blocks.
第一步计算认证字段 T,使用 CBC-MAC 算法,该算法涉及输入分组 B_0,B_1, ..., B_n
The first block B_0 is formatted as follows, where l(m) is encoded in
most-significant-byte first order:
第一个数据分组 B_0 构成如下
Octet Number Contents
------------ ---------
0 Flags 1 字节
1 ... 15-L Nonce N 15-L 字节
16-L ... 15 l(m) L 字节(L 的值见 Flags 字节)
Within the first block B_0, the Flags field is formatted as follows:
分组 B_0 中的首字节 Flags 构成如下
Bit Number Contents
---------- ----------------------
7 Reserved (always zero)
6 Adata
5 ... 3 M' (1--7) = (M-2)/2 (M:4--16)
2 ... 0 L' (1--7) = L-1 (L:2--8)
Another way say the same thing is: Flags = 64*Adata + 8*M' + L'.
B_0 构成如下
长度 1 15-L L
+----+-----+-----------+------------+
|字节 | 0 | 1 .. 15-L | 16-L .. 15 |
+----+-----+-----------+------------+
|内容 |Flags| Nonce N | m 的长度 |
+----+-----+-----------+------------+
/ \ ^
/ \ |
/ \ L -- m 的长度表示范围
/ \ (L 越大,m 可以越长)
/ Flags 展开后 \ |
+----+-+-----+-+-+-+-+-+-+ |L'(L) 决定
|位 |7| 6 |5|4|3|2|1|0| |Nonce 的长度
+----+-+-----+-+-+-+-+-+-+ |
|内容 |0|Adata| M' | L' | ---+
+----+-+-----+-+-+-+-+-+-+
The Adata bit is set to zero if l(a)=0, and set to one if l(a)>0.
如果 Bit6(Adata 位)=0,表示要生成附加认证数据 a,否则表示没有
If l(a)>0 (as indicated by the Adata field), then one or more blocks
of authentication data are added. These blocks contain l(a) and a
encoded in a reversible manner. We first construct a string that
encodes l(a).
生成附加认证数据 a,需要构造认证数据块(一个或多个),数据块编码如下
If 0 < l(a) < (2^16 - 2^8), then the length field is encoded as two
octets which contain the value l(a) in most-significant-byte first
order.
a 长度 < 65536-256,此情况比较普遍
The length encoding conventions are summarized in the following
table. Note that all fields are interpreted in most-significant-byte
first order.
First two octets Followed by Comment
----------------- ---------------- -------------------------------
0x0000 Nothing Reserved
0x0001 ... 0xFEFF Nothing For 0 < l(a) < (2^16 - 2^8)
0xFF00 ... 0xFFFD Nothing Reserved
0xFFFE 4 octets of l(a) For (2^16 - 2^8) <= l(a) < 2^32
0xFFFF 8 octets of l(a) For 2^32 <= l(a) < 2^64
The blocks encoding a are formed by concatenating this string that
encodes l(a) with a itself, and splitting the result into 16-octet
blocks, and then padding the last block with zeroes if necessary.
These blocks are appended to the first block B0.
将 l(a)||a 分成 16 字节长的分组,必要时最后一个分组添加 0x00 补齐
这些分组依次添加到 B_0 后面(记为 B_1、B_2……)
After the (optional) additional authentication blocks have been
added, we add the message blocks. The message blocks are formed by
splitting the message m into 16-octet blocks, and then padding the
last block with zeroes if necessary. If the message m consists of
the empty string, then no blocks are added in this step.
附加认证分组添加后,我们构造明文分组,将 m 分成 16 字节长的分组
必要时最后一个分组补 0 对齐(如果 m 为空串,则此步省略)
The result is a sequence of blocks B0, B1, ..., Bn. The CBC-MAC is
computed by:
最终得到 B_0||附加认证分组||明文分组,按下列公式计算 CBC-MAC
X_1 := E( K, B_0 )
X_i+1 := E( K, X_i XOR B_i ) for i=1, ..., n
T := first-M-bytes( X_n+1 ) -- T 作为 MAC 值
B_0 B_1 B_2 B_n
| | | |
| V V V
| +-->XOR +-->XOR +-->XOR
| | | | | | |
V | V | V | V
+----+ | +----+ | +----+ | +----+
K-->|加密 | | |加密| | |加密 | ... | |加密|
+----+ | +----+ | +----+ | +----+
| | | | | | |
+----+ +----+ +--> ->-+ |
| | | X_n |
V V V V
X_1 X_2 X_3 X_n+1
2.3. Encryption -- 生成密文
To encrypt the message data we use Counter (CTR) mode. We first
define the key stream blocks by:
使用 Counter (CTR) 模式加密,首先计算如下密钥流
S_i := E( K, A_i ) for i=0, 1, 2, ...
The values A_i are formatted as follows, where the Counter field i is
encoded in most-significant-byte first order:
Octet Number Contents
------------ ---------
0 Flags
1 ... 15-L Nonce N
16-L ... 15 Counter i
The Flags field is formatted as follows:
Bit Number Contents
---------- ----------------------
7 Reserved (always zero)
6 Reserved (always zero)
5 ... 3 Zero
2 ... 0 L'
Another way say the same thing is: Flags = L'.
A_i 构成如下
长度 1 15-L L
+----+-----+-----------+------------+
|字节 | 0 | 1 .. 15-L | 16-L .. 15 |
+----+-----+-----------+------------+
|内容 |Flags| Nonce N | Counter i | -- Counter i 的值能够在 L 字节内表示
+----+-----+-----------+------------+ (因为 i <= l(m))
/ \ ^
/ \ |
/ \ |
/ \ |
/ Flags 展开后 \ |
+----+-+-----+-+-+-+-+-+-+ |L'(L) 决定
|位 |7|Adata|5|4|3|2|1|0| |Nonce 的长度
+----+-+-----+-+-+-+-+-+-+ |
|内容 |0| 0 |M'=0 | L' | ---+
+----+-+-----+-+-+-+-+-+-+
|
M' 不同于 B_0(B_0 中始终不为 0)
The message is encrypted by XORing the octets of message m with the
first l(m) octets of the concatenation of S_1, S_2, S_3, ... . Note
that S_0 is not used to encrypt the message.
明文与密钥流异或,得到密文,S_0 不用于加密,但参与数据校验
A_0 A_1 A_2 A_n
| | | |
V V V V
+----+ +----+ +----+ +----+
K-->|加密 | |加密| | 加密| ... |加密|
+----+ +----+ +----+ +----+
| | | |
| |S_1 |S_2 |S_n
| | | | 密钥: S_1 | S_2 | ... | S_n
| V V V XOR
| M_1-->XOR M_2-->XOR M_n-->XOR 明文: M_1 | M_2 | ... | M_n
| | | | |
V V V V V
S_0 C_1 C_2 C_n 密文: C_1 | C_2 | ... | C_n
The authentication value U is computed by encrypting T with the key
stream block S_0 and truncating it to the desired length.
T 与 S_0 的异或结果取前 M 字节,得到认证字段
U := T XOR first-M-bytes( S_0 )
2.4. Output -- 最终输出
取前 l(m) 字节 取前 M 字节
================================= ============
S_1/E(K,A_1) | S_2/E(K,A_2) | ... || S_0/E(K,A_0)
XOR m || X_n+1
-----------------------------------------------------
= 最终输出 c
其中 X_i 计算如下
X_1 := E( K, B_0 )
X_i+1 := E( K, X_i XOR B_i ) for i=1, ..., n
8. Test Vectors -- 使用测试数据进行计算演示
=============== Packet Vector #1 ==================
AES Key = C0 C1 C2 C3 C4 C5 C6 C7 C8 C9 CA CB CC CD CE CF
Nonce = 00 00 00 03 02 01 00 A0 A1 A2 A3 A4 A5
Total packet length = 31. [Input with 8 cleartext header octets]
扣除 8 字节明文头,只有 31-8=23 字节需要处理
00 01 02 03 04 05 06 07 08 09 0A 0B 0C 0D 0E 0F
10 11 12 13 14 15 16 17 18 19 1A 1B 1C 1D 1E
明文分组
M_1 -- 08 09 0A 0B 0C 0D 0E 0F 10 11 12 13 14 15 16 17
M_2 -- 18 19 1A 1B 1C 1D 1E
以下计算数据认证字段
CBC IV in: 59 00 00 00 03 02 01 00 A0 A1 A2 A3 A4 A5 00 17 -- 实际就是 B_0
| | | |
| |<--------------- Nonce --------------->| |
| 23 字节
Flags = 0 1 0 1 1 0 0 1 (binary)
| | |---| |---|
| | | |
| | | L'=1 <--> L=2
| | M'=3 <--> M=8
| Adata=1 表示有认证字段
Reserved (always zero)
CBC IV out:EB 9D 55 47 73 09 55 AB 23 1E 0A 2D FE 4B 90 D6
验证 X_1 := E( K, B_0 )
C:\>perl -e "binmode STDOUT; print pack('H*','5900000003020100A0A1A2A3A4A50017')" > B_0.txt
C:\>openssl enc -aes-128-ecb -K C0C1C2C3C4C5C6C7C8C9CACBCCCDCECF -iv 0 -nopad -in B_0.txt > X_1.txt
C:\>od -An -tx1 -v X_1.txt
eb 9d 55 47 73 09 55 ab 23 1e 0a 2d fe 4b 90 d6
After xor: EB 95 55 46 71 0A 51 AE 25 19 0A 2D FE 4B 90 D6 [hdr]
验证 X_1 XOR B_1 -- xor.pl 源码见后面
C:\>perl xor.pl 00080001020304050607000000000000 EB9D5547730955AB231E0A2DFE4B90D6
00080001020304050607000000000000 B_1 附加认证数据(8 字节)
EB9D5547730955AB231E0A2DFE4B90D6 X_1
--------------------------------------
XOR = EB955546710A51AE25190A2DFE4B90D6
After AES: CD B6 41 1E 3C DC 9B 4F 5D 92 58 B6 9E E7 F0 91
验证 X_2 := E( K, X_1 XOR B_1 )
C:\>perl -e "binmode STDOUT; print pack('H*','EB955546710A51AE25190A2DFE4B90D6')" > X_1_XOR_B_1.txt
C:\>openssl enc -aes-128-ecb -K C0C1C2C3C4C5C6C7C8C9CACBCCCDCECF -iv 0 -nopad -in X_1_XOR_B_1.txt > X_2.txt
C:\>od -An -tx1 -v X_2.txt
cd b6 41 1e 3c dc 9b 4f 5d 92 58 b6 9e e7 f0 91
After xor: C5 BF 4B 15 30 D1 95 40 4D 83 4A A5 8A F2 E6 86 [msg]
验证 X_2 XOR B_2
C:\>perl xor.pl 08090A0B0C0D0E0F1011121314151617 CDB6411E3CDC9B4F5D9258B69EE7F091
08090A0B0C0D0E0F1011121314151617 B_2 -- 从 B_2 开始起为明文部分
CDB6411E3CDC9B4F5D9258B69EE7F091 X_2
--------------------------------------
XOR = C5BF4B1530D195404D834AA58AF2E686
After AES: 9C 38 40 5E A0 3C 1B C9 04 B5 8B 40 C7 6C A2 EB
验证 X_3 := E( K, X_2 XOR B_2 )
C:\>perl -e "binmode STDOUT; print pack('H*','C5BF4B1530D195404D834AA58AF2E686')" > X_2_XOR_B_2.txt
C:\>openssl enc -aes-128-ecb -K C0C1C2C3C4C5C6C7C8C9CACBCCCDCECF -iv 0 -nopad -in X_2_XOR_B_2.txt > X_3.txt
C:\>od -An -tx1 -v X_3.txt
9c 38 40 5e a0 3c 1b c9 04 b5 8b 40 c7 6c a2 eb
After xor: 84 21 5A 45 BC 21 05 C9 04 B5 8B 40 C7 6C A2 EB [msg]
验证 X_3 XOR B_3
C:\>perl xor.pl 18191A1B1C1D1E000000000000000000 9C38405EA03C1BC904B58B40C76CA2EB
18191A1B1C1D1E000000000000000000 B_3 -- B_3 作为明文最后一个分组,以 0 字节补齐
9C38405EA03C1BC904B58B40C76CA2EB X_3
--------------------------------------
XOR = 84215A45BC2105C904B58B40C76CA2EB
After AES: 2D C6 97 E4 11 CA 83 A8 60 C2 C4 06 CC AA 54 2F
验证 X_4 := E( K, X_3 XOR B_3 )
C:\>perl -e "binmode STDOUT; print pack('H*','84215A45BC2105C904B58B40C76CA2EB')" > X_3_XOR_B_3.txt
C:\>openssl enc -aes-128-ecb -K C0C1C2C3C4C5C6C7C8C9CACBCCCDCECF -iv 0 -nopad -in X_3_XOR_B_3.txt > X_4.txt
C:\>od -An -tx1 -v X_4.txt
2d c6 97 e4 11 ca 83 a8 60 c2 c4 06 cc aa 54 2f
CBC-MAC : 2D C6 97 E4 11 CA 83 A8 -- 取前 8 字节
以下计算密钥流
S_i := E( K, A_i ) for i=0, 1, 2, ...
A_i 是 L、Nonce、i 的函数,格式如下
01 00 00 00 03 02 01 00 A0 A1 A2 A3 A4 A5 00 00
| | | |
| |<--------------- Nonce --------------->| |
| Counter(0000、0001、0002...)
Flags = 0 0 0 0 0 0 0 1 (binary)
| | |---| |---|
| | | |
| | | L'=1 <--> L=2
| | Zero
| 相当于 Adata=0
Reserved (always zero)
CTR Start: 01 00 00 00 03 02 01 00 A0 A1 A2 A3 A4 A5 00 01 -- A_1
CTR[0001]: 50 85 9D 91 6D CB 6D DD E0 77 C2 D1 D4 EC 9F 97 -- S_1
CTR[0002]: 75 46 71 7A C6 DE 9A FF 64 0C 9C 06 DE 6D 0D 8F -- S_2
CTR[MAC ]: 3A 2E 46 C8 EC 33 A5 48 -- S_0 取前 M 字节
C:\>od -An -tx1 -v A_.txt
01 00 00 00 03 02 01 00 a0 a1 a2 a3 a4 a5 00 00 -- A_0
01 00 00 00 03 02 01 00 a0 a1 a2 a3 a4 a5 00 01 -- A_1
01 00 00 00 03 02 01 00 a0 a1 a2 a3 a4 a5 00 02 -- A_2
C:\>openssl enc -aes-128-ecb -K C0C1C2C3C4C5C6C7C8C9CACBCCCDCECF -iv 0 -nopad -in A_.txt > key.txt
C:\>od -An -tx1 -v key.txt
3a 2e 46 c8 ec 33 a5 48 56 20 54 2c 02 2c c0 7d -- S_0
50 85 9d 91 6d cb 6d dd e0 77 c2 d1 d4 ec 9f 97 -- S_1
75 46 71 7a c6 de 9a ff 64 0c 9c 06 de 6d 0d 8f -- S_2
Total packet length = 39. [Authenticated and Encrypted Output]
00 01 02 03 04 05 06 07 58 8C 97 9A 61 C6 63 D2
F0 66 D0 C2 C0 F9 89 80 6D 5F 6B 61 DA C3 84 17
E8 D1 2C FD F9 26 E0
注意
m T
----------------------------------------------================
08090A0B0C0D0E0F101112131415161718191A1B1C1D1E2DC697E411CA83A8
S_1 S_2 S_0
--------------------------------==============----------------
50859d916dcb6ddde077c2d1d4ec9f977546717ac6de9a3a2e46c8ec33a548
C:\>perl xor.pl 08090A0B0C0D0E0F101112131415161718191A1B1C1D1E2DC697E411CA83A8 50859d916dcb6ddde077c2d1d4ec9f977546717ac6de9a3a2e46c8ec33a548
08090A0B0C0D0E0F101112131415161718191A1B1C1D1E2DC697E411CA83A8
50859d916dcb6ddde077c2d1d4ec9f977546717ac6de9a3a2e46c8ec33a548
--------------------------------------------------------------------
XOR = 588C979A61C663D2F066D0C2C0F989806D5F6B61DAC38417E8D12CFDF926E0 正确
在 CCMP 中,对称密钥 K 同时对明文数据进行加密和认证,C(Confidentiality) 和 I(Integrality) 都得到了保证
而 S(Signature) 和 A(Authentication) 是否达标,则取决于对称密钥 K 的安全性
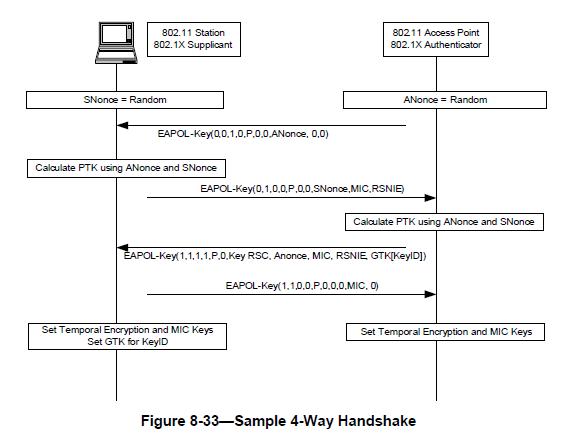
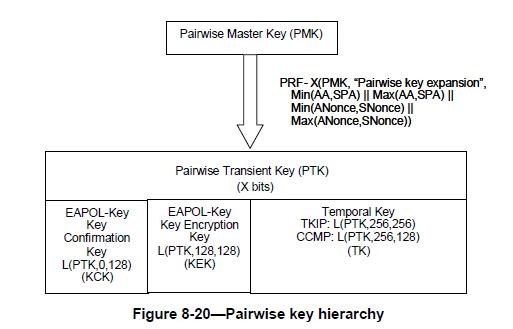
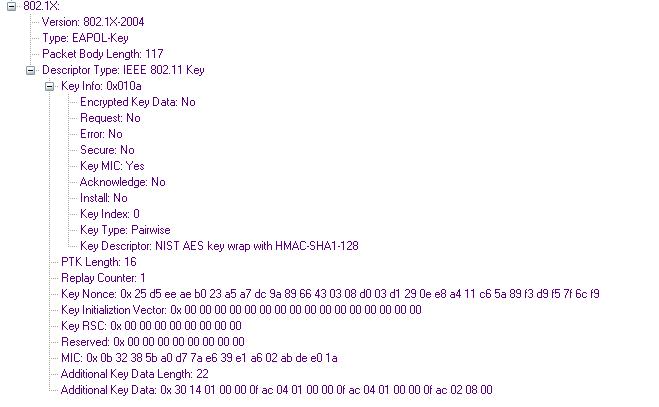
从 IEEE 802.11i 中我们知道,K 是由著名的 EAPOL-Key 四次握手衍生得到,其安全性又取决于 PMK
PMK 又来自哪里?
IEEE 802.11i 标准中有两种工作模式:PSK 和 802.1X。
在 PSK 模式中,AP 和所有 STA 预先共享同一个密钥,该共享密钥经过简单的变换得到 PMK(后面将给出公式)
原则上 AP 无法区别不同的 STA -- 排除其他方式比如 MAC 地址过滤 -- 所以做不到 A(Authentication)
因为 AP 只知道有一个掌握了预共享密钥的家伙连上我了
至于这个家伙是谁?他的预共享密钥是不是偷来的?AP 一概不知
PSK 模式下 STA 反过来也无法认证 AP,这有点类似 GSM 网络中的伪基站
在 802.1X 模式中,安全性得到了增强,认证协议为 EAP,包含的认证子协议有 EAP-TLS/EAP-TTLS/EAP-PEAP 等
上述三种子协议都采用 TLS 隧道加密,天然支持 STA 对 AP 的认证
如果是 EAP-TLS 协议,还需要部署 STA 证书,因而可以做到相互认证,在这种情况下 SCIA,安全特性一个也不少
最后附上 xor.pl 源代码
1 2 3 4 5 6 7 8 9 10 11 12 13 14 15 16 17 18 19 20 21 22 23 24 25 26 27 28 29 30 31 32 33 34 35 36 37 38 39 40 41 42 43 44 45 46 47 48 |
if ( $#ARGV <= 0 ) { print <<QQQ; 用法:perl $0 arg1[十六进制] arg2[十六进制] ... 举例:perl $0 01234567 23456789 34567890 规定:入参个数必须 >= 2,且所有入参长度必须相同(因为是位操作) QQQ exit 0; } $debug = 1; $first_arg = $ARGV[0]; $first_arg_len = length $first_arg; die "$first_arg is NOT hex number\n" if ( ! is_hex($first_arg) ); die $first_arg, "'s length is NOT even number\n" if ( $first_arg_len % 2 ); # 检查其余入参是否为十六进制和长度相等 foreach (@ARGV){ $cur = $_; die "$cur is NOT hex number\n" if ( ! is_hex($cur) ); $curlen = length($cur); die $cur, "'s length is NOT equal to first arg: [$first_arg]'s\n" if ( $curlen != $first_arg_len ); } print " $_\n" foreach @ARGV; print " ------", "-" x $first_arg_len, "\n XOR = "; # 从前往后,逐一抽取所有入参的每个字节,进行 XOR $xor_len = $first_arg_len / 2; foreach $cur_index (1 .. $xor_len){ my @bytearry = map {substr($_,2*($cur_index-1),2)} @ARGV; xor_args(@bytearry); } sub xor_args { my $result = pack('H2', "00"); foreach (@_){ my $cur_byte = pack('H2', $_); $result = $result ^ $cur_byte; } print uc unpack('H2', $result); } sub is_hex { return 0 if ($_[0] =~ /[^A-Fa-f0-9]/); 1; } |