使用Ubuntu和Fedora的用户经常会在进入GNOME时出现
|
|
Could not update /home/$USER/.ICEauthority |
这样的提示。然后就不能正常进入GNOME了(之前在GNOME上的配置都消失了)
解决办法:以root的用户执行
|
|
chown $USER:$USER -R /home/$USER/ chmod 644 /home/$USER/.ICEauthority |
解决问题很简单,但为什么会出现这种情况呢?下面是我的一些个人理解
首先:先介绍下sudo和gksudo
sudo和gksudo都是使用root权限来执行应用,sudo执行程序时使用的是当前用户的配置和家目录,而gksudo使用的是root用户 的家目录和配置,一般情况下看不出什么区别,但是对于那些针对不同用户有不同的配置文件和表现形式的应用程序来说,这两种方式的结果区别就很明显了。比如 下面原文中举的firefox例子。在不通过终端运行程序时,sudo没有办法提供一个界面来输入管理员密码,比如在快捷方式中。还有些GUI程序只能用 gksudo。细心的朋友肯定发现了,在/root下并没有.ICEauthority。那么当用sudo运行程序之后,由于使用的是当前用户的配置和家 目录,
系统将整个家目录的所属者和所属组归属到root:root下,并将.ICEauthority的权限修改成600。故当再次以普通用户身份登入系统时,由于没有权限故无法读取用户的配置文件。根据上述分析,显然,当使用gksudo将能避免这种情况的发生。
一般情况下,可以这样,运行命令行程序时使用sudo,运行GUI程序时用gksudo。
下面是原文:
What’s the Issue?
Since most Ubuntu documentation asks you to use sudo even with graphical applications, I often get asked by Ubuntu users why I recommendgksudo or kdesu for graphical applications instead of sudo.
For example, a lot of guides (including the first book ever published about Ubuntu) will ask you to type this sort of command:
|
|
sudo gedit /etc/apt/sources.list |
I will always recommend, however, that people use instead this sort of command:
|
|
gksudo gedit /etc/apt/sources.list |
And reserve sudo for command-line applications, like so:
|
|
sudo nano /etc/apt/sources.list |
Why is it an issue?
Well, to be perfectly honest, most of the time it isn’t. For a lot of applications, you can run them the improper way—using sudo for graphical applications and see no adverse side effects.
1. There are other times, though, when side effects can be as mild as Firefox extensions not sticking or as extreme as as not being able to log in any more because the permissions on your .ICEauthority changed. You can read a full discussion on the issue here.
These errors occur because sometimes when sudo launches an application, it launches with root privileges but uses the user’s configuration file.
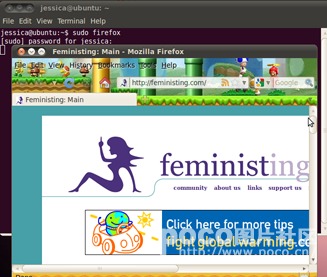
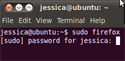
For example, if you launch Firefox with the command
it uses root’s Firefox configuration file.
But if you launch Firefox with the command
Change a few settings while launched as root, and you'll see if you dig into your Firefox profile that certain files are now owned by root.

it runs with root privileges but uses the user’s configuration file (in this case, you can see the homepage and theme are different).
2. Running graphical applications with sudo also has the downside of always having to be run from the terminal. If you don’t use the proper command—gksudo or kdesu, you will not be able to use the command as an icon launcher or keyboard shortcut because there will be no graphical dialogue box to enter your sudo password in.
3. There are also some graphical applications that simply will not run with the sudo command. Kate, for example, can be run as
but cannot be run as
Why not make exceptions?
Bottom line: most of the time when you use sudo for graphical applications, it’s fine. Some of the time, though, it is not fine, and is, in fact, extremely bad.
If you made exceptions, you would have to give people a list of all the graphical applications that are okay to run as sudo and a list of all the graphical applications that must be run as gksudo or kdesu.
Why make a list that needs to be compiled and updated, that most people won’t refer to, and that is completely unnecessary? Just be consistent in suggesting good practice: gksudo and kdesu for graphical applications. sudo for command-line applications.
But gksudo sometimes gives me an error… even though it appears to work…
You may notice that even though gksudo is the proper way to launch graphical applications, if you launch a gksudo application it will sometimes give you what appears to be an error. This, for example:
|
|
(gedit:####): GnomeUI-WARNING **: While connecting to session manager: Authentication Rejected, reason : None of the authentication protocols specified are supported and host-based authentication failed. |
or these
|
|
Initializing nautilus-gdu extension Nautilus-Share-Message: Called "net usershare info" but it failed: 'net usershare' returned error 255: net usershare: cannot open usershare directory /var/lib/samba/usershares. Error No such file or directory Please ask your system administrator to enable user sharing. |
That is not a real error, and there’s already been a bug report filed on the message appearing. The developers have seen the bug and labeled it a low priority. In the meantime, just ignore the message and keep encouraging people to not use sudo for graphical applications so they won’t potentially mess up their ~/.ICEauthority and other user configuration files.
参考:http://czmmiao.iteye.com/blog/1003810