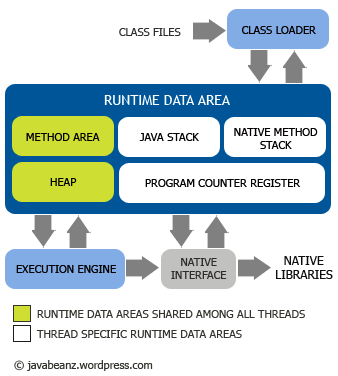
首先了解一下dalvik的Garbage Collection:
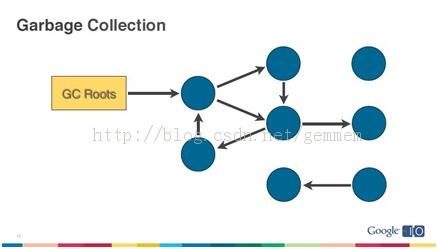
如上图所示,GC会选择一些它了解还存活的对象作为内存遍历的根节点(GC Roots),比方说thread stack中的变量,JNI中的全局变量,zygote中的对象(class loader加载)等,然后开始对heap进行遍历。到最后,部分没有直接或者间接引用到GC Roots的就是需要回收的垃圾,会被GC回收掉。如下图蓝色部分。
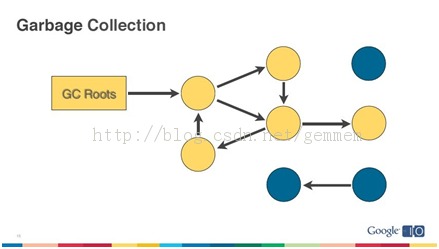
Java内存泄漏指的是进程中某些对象(垃圾对象)已经没有使用价值了,但是它们却可以直接或间接地引用到gc roots导致无法被GC回收。无用的对象占据着内存空间,使得实际可使用内存变小,形象地说法就是内存泄漏了。下面分析一些可能导致内存泄漏的情景。
常见的内存泄漏
1、非静态内部类的静态实例容易造成内存泄漏
1 2 3 4 5 6 7 8 9 10 11 12 13 14 15 16 17 18 |
public class MainActivity extends Activity { static Demo sInstance = null; @Override public void onCreate(BundlesavedInstanceState) { super.onCreate(savedInstanceState); setContentView(R.layout.activity_main); if (sInstance == null) { sInstance= new Demo(); } } class Demo { voiddoSomething() { System.out.print("dosth."); } } } |
上面的代码中的sInstance实例类型为静态实例,在第一个MainActivity act1实例创建时,sInstance会获得并一直持有act1的引用。当MainAcitivity销毁后重建,因为sInstance持有act1的引用,所以act1是无法被GC回收的,进程中会存在2个MainActivity实例(act1和重建后的MainActivity实例),这个act1对象就是一个无用的但一直占用内存的对象,即无法回收的垃圾对象。所以,对于lauchMode不是singleInstance的Activity, 应该避免在activity里面实例化其非静态内部类的静态实例。
2、activity使用静态成员
|
|
private static Drawable sBackground; @Override protected void onCreate(Bundle state) { super.onCreate(state); TextView label = new TextView(this); label.setText("Leaks are bad"); if (sBackground == null) { sBackground = getDrawable(R.drawable.large_bitmap); } label.setBackgroundDrawable(sBackground); setContentView(label); } |
由于用静态成员sBackground 缓存了drawable对象,所以activity加载速度会加快,但是这样做是错误的。因为在android 2.3系统上,它会导致activity销毁后无法被系统回收。
label .setBackgroundDrawable函数调用会将label赋值给sBackground的成员变量mCallback。
上面代码意味着:sBackground(GC Root)会持有TextView对象,而TextView持有Activity对象。所以导致Activity对象无法被系统回收。
下面看看android4.0为了避免上述问题所做的改进。
先看看android 2.3的Drawable.Java对setCallback的实现:
|
|
public final void setCallback(Callback cb) { mCallback = cb; } |
看看android 4.0的Drawable.Java对setCallback的实现:
|
|
public final void setCallback(Callback cb) { mCallback = newWeakReference<Callback> (cb); } |
在android 2.3中要避免内存泄漏也是可以做到的, 在activity的onDestroy时调用
|
|
sBackgroundDrawable.setCallback(null)。 |
以上2个例子的内存泄漏都是因为Activity的引用的生命周期超越了activity对象的生命周期。也就是常说的Context泄漏,因为activity就是context。
想要避免context相关的内存泄漏,需要注意以下几点:
- 不要对activity的context长期引用(一个activity的引用的生存周期应该和activity的生命周期相同)
- 如果可以的话,尽量使用关于application的context来替代和activity相关的context
- 如果一个acitivity的非静态内部类的生命周期不受控制,那么避免使用它;正确的方法是使用一个静态的内部类,并且对它的外部类有一WeakReference,就像在ViewRootImpl中内部类W所做的那样。
3、使用handler时的内存问题
我们知道,Handler通过发送Message与主线程交互,Message发出之后是存储在MessageQueue中的,有些Message也不是马上就被处理的。在Message中存在一个 target,是Handler的一个引用,如果Message在Queue中存在的时间越长,就会导致Handler无法被回收。如果Handler是非静态的,则会导致Activity或者Service不会被回收。 所以正确处理Handler等之类的内部类,应该将自己的Handler定义为静态内部类。
HandlerThread的使用也需要注意:
当我们在activity里面创建了一个HandlerThread,代码如下:
1 2 3 4 5 6 7 8 9 10 11 12 13 14 15 16 17 18 |
public class MainActivity extends Activity { @Override public void onCreate(BundlesavedInstanceState) { super.onCreate(savedInstanceState); setContentView(R.layout.activity_main); Thread mThread = newHandlerThread("demo", Process.THREAD_PRIORITY_BACKGROUND); mThread.start(); MyHandler mHandler = new MyHandler( mThread.getLooper( ) ); ……. ……. ……. } @Override public void onDestroy() { super.onDestroy(); } } |
这个代码存在泄漏问题,因为HandlerThread的run方法是一个死循环,它不会自己结束,线程的生命周期超过了activity生命周期,当横竖屏切换,HandlerThread线程的数量会随着activity重建次数的增加而增加。
应该在onDestroy时将线程停止掉:
|
|
mThread.getLooper().quit(); |
另外,对于不是HandlerThread的线程,也应该确保activity消耗后,线程已经终止,可以这样做:在onDestroy时调用
4、注册某个对象后未反注册
注册广播接收器、注册观察者等等,比如:
假设我们希望在锁屏界面(LockScreen)中,监听系统中的电话服务以获取一些信息(如信号强度等),则可以在LockScreen中定义一个PhoneStateListener的对象,同时将它注册到TelephonyManager服务中。对于LockScreen对象,当需要显示锁屏界面的时候就会创建一个LockScreen对象,而当锁屏界面消失的时候LockScreen对象就会被释放掉。
但是如果在释放LockScreen对象的时候忘记取消我们之前注册的PhoneStateListener对象,则会导致LockScreen无法被GC回收。如果不断的使锁屏界面显示和消失,则最终会由于大量的LockScreen对象没有办法被回收而引起OutOfMemory,使得system_process进程挂掉。
虽然有些系统程序,它本身好像是可以自动取消注册的(当然不及时),但是我们还是应该在我们的程序中明确的取消注册,程序结束时应该把所有的注册都取消掉。
5、集合中对象没清理造成的内存泄露
我们通常把一些对象的引用加入到了集合中,当我们不需要该对象时,如果没有把它的引用从集合中清理掉,这样这个集合就会越来越大。如果这个集合是static的话,那情况就更严重了。
比如某公司的ROM的锁屏曾经就存在内存泄漏问题:
这个泄漏是因为LockScreen每次显示时会注册几个callback,它们保存在KeyguardUpdateMonitor的ArrayList<InfoCallback>、ArrayList<SimStateCallback>等ArrayList实例中。但是在LockScreen解锁后,这些callback没有被remove掉,导致ArrayList不断增大, callback对象不断增多。这些callback对象的size并不大,heap增长比较缓慢,需要长时间地使用手机才能出现OOM,由于锁屏是驻留在system_server进程里,所以导致结果是手机重启。
6、资源对象没关闭造成的内存泄露
资源性对象比如(Cursor,File文件等)往往都用了一些缓冲,我们在不使用的时候,应该及时关闭它们,以便它们的缓冲及时回收内存。它们的缓冲不仅存在于Java虚拟机内,还存在于Java虚拟机外。如果我们仅仅是把它的引用设置为null,而不关闭它们,往往会造成内存泄露。因为有些资源性对象,比如SQLiteCursor(在析构函数finalize(),如果我们没有关闭它,它自己会调close()关闭),如果我们没有关闭它,系统在回收它时也会关闭它,但是这样的效率太低了。因此对于资源性对象在不使用的时候,应该立即调用它的close()函数,将其关闭掉,然后再置为null.在我们的程序退出时一定要确保我们的资源性对象已经关闭。
程序中经常会进行查询数据库的操作,但是经常会有使用完毕Cursor后没有关闭的情况。如果我们的查询结果集比较小,对内存的消耗不容易被发现,只有在长时间大量操作的情况下才会复现内存问题,这样就会给以后的测试和问题排查带来困难和风险。
7、一些不良代码成内存压力
有些代码并不造成内存泄露,但是它们或是对没使用的内存没进行有效及时的释放,或是没有有效的利用已有的对象而是频繁的申请新内存,对内存的回收和分配造成很大影响的,容易迫使虚拟机不得不给该应用进程分配更多的内存,增加vm的负担,造成不必要的内存开支。
7.1 Bitmap使用不当
虽然,系统能够确认Bitmap分配的内存最终会被销毁,但是由于它占用的内存过多,所以很可能会超过Java堆的限制。因此,在用完Bitmap时,要及时的recycle掉。recycle并不能确定立即就会将Bitmap释放掉,但是会给虚拟机一个暗示:“该图片可以释放了”。
有时候,我们要显示的区域很小,没有必要将整个图片都加载出来,而只需要记载一个缩小过的图片,这时候可以设置一定的采样率,那么就可以大大减小占用的内存。如下面的代码:
|
|
private ImageView preview; BitmapFactory.Options options = newBitmapFactory.Options(); options.inSampleSize = 2;//图片宽高都为原来的二分之一,即图片为原来的四分之一 Bitmap bitmap =BitmapFactory.decodeStream(cr.openInputStream(uri), null, options); preview.setImageBitmap(bitmap); |
有些时候,我们使用Bitmap后没有保留对它的引用,因此就无法调用Recycle函数。这时候巧妙的运用软引用,可以使Bitmap在内存快不足时得到有效的释放。如下:
|
|
SoftReference<Bitmap> bitmap_ref= new SoftReference<Bitmap>(BitmapFactory.decodeStream(inputstream)); …… …… if(bitmap_ref.get()!= null) bitmap_ref.get().recycle(); |
7.2 构造Adapter时,没有使用缓存的 convertView
以构造ListView的BaseAdapter为例,在BaseAdapter中提共了方法:
|
|
public View getView(intposition, View convertView, ViewGroup parent) |
来向ListView提供每一个item所需要的view对象。初始时ListView会从BaseAdapter中根据当前的屏幕布局实例化一定数量的view对象,同时ListView会将这些view对象缓存起来。当向上滚动ListView时,原先位于最上面的list item的view对象会被回收,然后被用来构造新出现的最下面的list item。这个构造过程就是由getView()方法完成的,getView()的第二个形参 View convertView就是被缓存起来的list item的view对象(初始化时缓存中没有view对象则convertView是null)。
由此可以看出,如果我们不去使用convertView,而是每次都在getView()中重新实例化一个View对象的话,即浪费时间,也造成内存垃圾,给垃圾回收增加压力,如果垃圾回收来不及的话,虚拟机将不得不给该应用进程分配更多的内存,造成不必要的内存开支。ListView回收list item的view对象的过程可以查看:
android.widget.AbsListView.Java--> void addScrapView(View scrap) 方法。
|
|
public View getView(int position, View convertView, ViewGroupparent) { View view = newXxx(...); return view; } |
修正示例代码:
|
|
public View getView(intposition, View convertView, ViewGroup parent) { View view = null; if (convertView != null){ view = convertView; populate(view, getItem(position)); } else { view = new Xxx(...); } return view; } |
7.3 不要在经常调用的方法中创建对象,尤其是忌讳在循环中创建对象。可以适当的使用 hashtable , vector 创建一组对象容器,然后从容器中去取那些对象,而不用每次 new 之后又丢弃。
关于内存泄漏的调试
下面的介绍是很早之前的操作方式,目前推荐的方式是集成 LeakCanary 在线分析内存泄露,比以前的要方便很多。
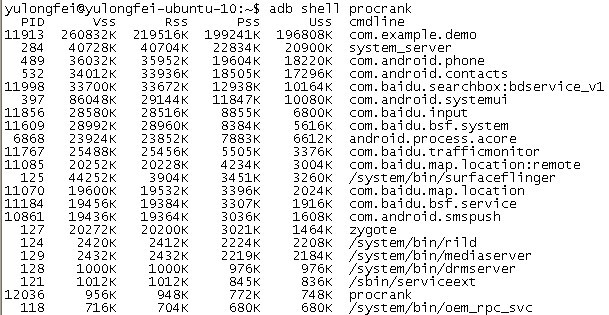
(1).内存监测工具 DDMS --> Heap
无论怎么小心,想完全避免bad code是不可能的,此时就需要一些工具来帮助我们检查代码中是否存在会造成内存泄漏的地方。Android tools中的DDMS就带有一个很不错的内存监测工具Heap(这里我使用eclipse的ADT插件,并以真机为例,在模拟器中的情况类似)。用 Heap监测应用进程使用内存情况的步骤如下:
1. 启动eclipse后,切换到DDMS透视图,并确认Devices视图、Heap视图都是打开的;
2. 将手机通过USB链接至电脑,链接时需要确认手机是处于“USB调试”模式,而不是作为“MassStorage”;
3. 链接成功后,在DDMS的Devices视图中将会显示手机设备的序列号,以及设备中正在运行的部分进程信息;
4. 点击选中想要监测的进程,比如system_process进程;
5. 点击选中Devices视图界面中最上方一排图标中的“Update Heap”图标;
6. 点击Heap视图中的“Cause GC”按钮;
7. 此时在Heap视图中就会看到当前选中的进程的内存使用量的详细情况。
说明:
a) 点击“Cause GC”按钮相当于向虚拟机请求了一次gc操作;
b) 当内存使用信息第一次显示以后,无须再不断的点击“CauseGC”,Heap视图界面会定时刷新,在对应用的不断的操作过程中就可以看到内存使用的变化;
c) 内存使用信息的各项参数根据名称即可知道其意思,在此不再赘述。
如何才能知道我们的程序是否有内存泄漏的可能性呢。这里需要注意一个值:Heap视图中部有一个Type叫做dataobject,即数据对象,也就是我们的程序中大量存在的类类型的对象。在data object一行中有一列是“Total Size”,其值就是当前进程中所有Java数据对象的内存总量,一般情况下,这个值的大小决定了是否会有内存泄漏。可以这样判断:
a) 不断的操作当前应用,同时注意观察data object的Total Size值;
b) 正常情况下Total Size值都会稳定在一个有限的范围内,也就是说由于程序中的的代码良好,没有造成对象不被垃圾回收的情况,所以说虽然我们不断的操作会不断的生成很多对象,而在虚拟机不断的进行GC的过程中,这些对象都被回收了,内存占用量会会落到一个稳定的水平;
c) 反之如果代码中存在没有释放对象引用的情况,则dataobject的Total Size值在每次GC后不会有明显的回落,随着操作次数的增多Total Size的值会越来越大,
直到到达一个上限后导致进程OOM被kill掉。
(2).内存分析工具 MAT(Memory Analyzer Tool)
并不是所有的内存泄漏都可以用观察heap size的方法检测出来,因为有的程序只是泄漏了几个对象,而且泄漏的对象个数不会随着程序的运行而增加,这种内存泄漏不会直接导致OOM,但是无用对象无法回收,无疑是对内存的浪费,会影响到程序的性能,我们需要使用MAT工具才能发现这种比较隐蔽的内存泄漏。
使用MAT之前有2个概念是要掌握的:Shallowheap和Retained heap。Shallow heap表示对象本身所占内存大小,一个内存大小100bytes的对象Shallow heap就是100bytes。Retained heap表示通过回收这一个对象总共能回收的内存,比方说一个100bytes的对象还直接或者间接地持有了另外3个100bytes的对象引用,回收这个对象的时候如果另外3个对象没有其他引用也能被回收掉的时候,Retained heap就是400bytes。
MAT使用Dominator Tree这样一种来自图形理论的概念。
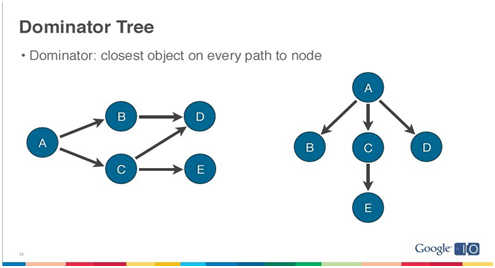
所谓Dominator,就是Flow Graph中从源节点出发到某个节点的的必经节点。那么根据这个概念我们可以从上图左侧的Flow Graph构造出右侧的Dominator Tree。这样一来很容易就看出每个节点的Retained heap了。Shallow heap和Retained heap在MAT中是非常有用的概念,用于内存泄漏的分析。
我们做一个Demo。在工程的MainActivity当中加入如下代码:
|
|
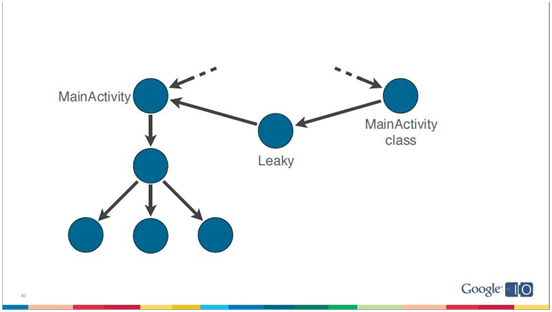
public class MainActivity extends Activity{ static Leaky leak=null; class Leaky{ void doSomething(){ System.out.println("Wheee!!!"); } } @Override public void onCreate(Bundle savedInstanceState){ super.onCreate(savedInstanceState); if(leak==null){ leak =new Leaky(); } ... |
上面这段代码,对Java熟悉的同学都应该了解非静态内部类对象默认持有外部类对象引用,而leak作为静态变量在非空判断下只产生了一个对象,因此当旋转屏幕时生成新的Activity的时候旧的Activity的引用依然被持有,如下图:
通过观察旋转屏幕前后Log中GC的信息也能看出heap的data object分配往上涨了一点,并且在GC执行完heap的分配稳定之后并没有降下来,这就是内存泄漏的迹象。
我们通过MAT来进行分析。先下载MAT,可以作为Eclipse插件下载,也可以作为RCP应用下载,本质上没有区别。DDMS中选中应用对应的进程名,点击Dump HPROF file的按钮,等一小段时间生成HPROF文件,如果是Eclipse插件的话,Eclipse会为这个HPROF自动转化成标准的HPROF并自动打开MAT分析界面。如果是作为RCP应用的话,需要用sdk目录tools中的hprof-conv工具来进行转化
|
|
hprof-conv orig.hprof converted.hprof |
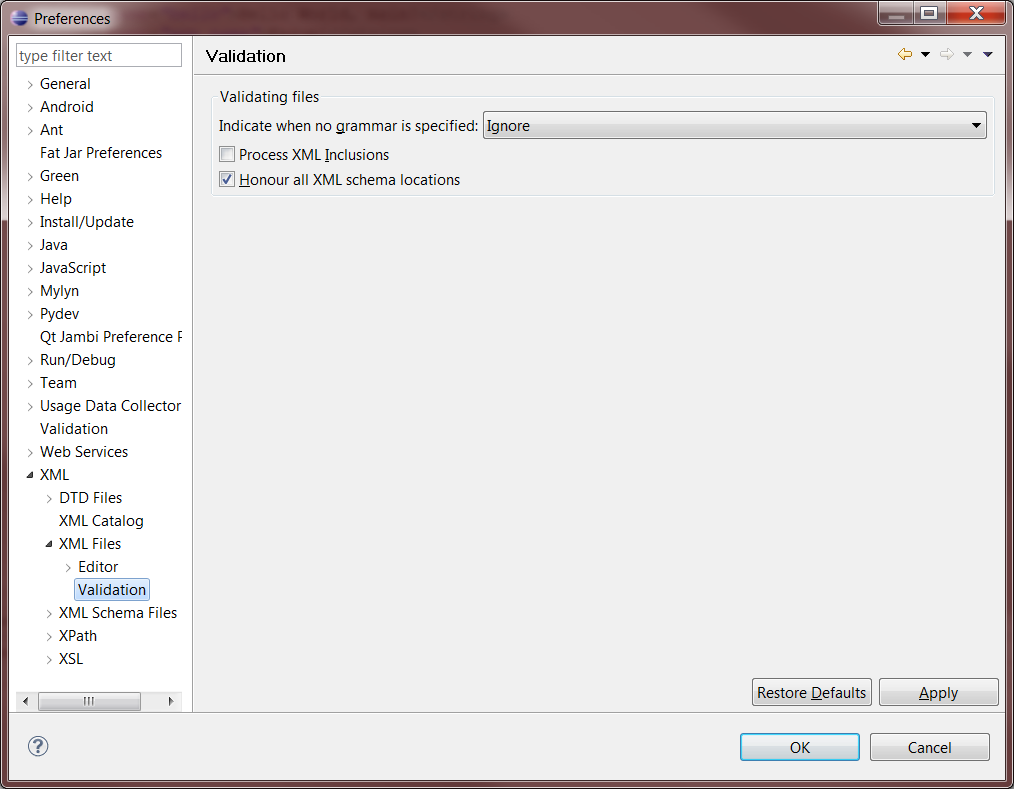
这种方式保存HPROF文件的位置选择更为自主,你也可以修改Eclipse的设置让Eclipse提示保存而不是自动打开,在Preferences -> Android -> DDMS中的HPROFAction由Open in Eclipse改为Save todisk。打开MAT,选择转化好的HPROF文件,可以看到Overview的界面如下图: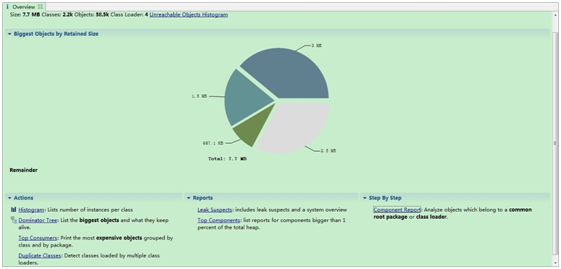
中间的饼状图就是根据我们上文所说的Retained heap的概念得到的内存中一些Retained Size最大的对象。点击饼状图能看到这些对象类型,但对内存泄漏的分析还远远不够。再看下方Action中有Dominator Tree和Histogram的选项,这一般来说是最有用的工具。还记得我们上文说过的DominatorTree的概念吗,这就是我们用来跟踪内存泄漏的方式。点开Dominator Tree,会看到以Retained heap排序的一系列对象,如下图:
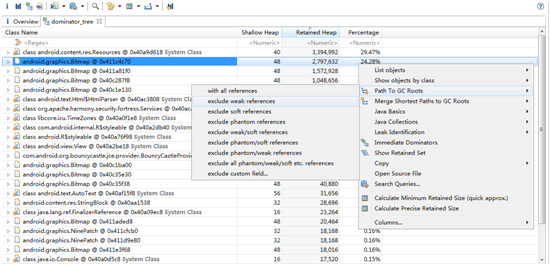
Resources类型对象由于一般是系统用于加载资源的,所以Retained heap较大是个比较正常的情况。但我们注意到下面的Bitmap类型对象的Retained heap也很大,很有可能是由于内存泄漏造成的。所以我们右键点击这行,选择Path To GC Roots ->exclude weak references,可以看到下图的情形: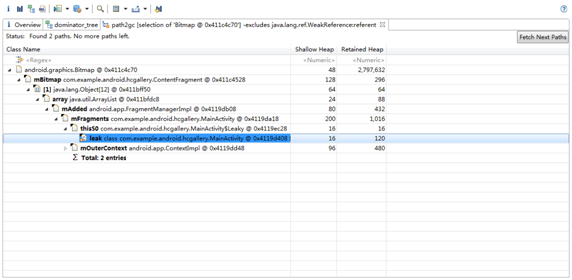
Bitmap最终被leak引用到,这应该是一种不正常的现象,内存泄漏很可能就在这里了。MAT不会告诉哪里是内存泄漏,需要你自行分析,由于这是Demo,是我们特意造成的内存泄漏,因此比较容易就能看出来,真实的应用场景可能需要你仔细的进行分析。
根据我们上文介绍的Dominator的概念,leak对象是该Bitmap对象的Dominator,应该出现在Dominator Tree视图里面,但实际上却没有。这是由于MAT并没有对weak references做区别对待,这也是我们选择exclude weakreferences的原因。如果我们Path To GC Roots ->with all references,我们可以看到下图的情形:
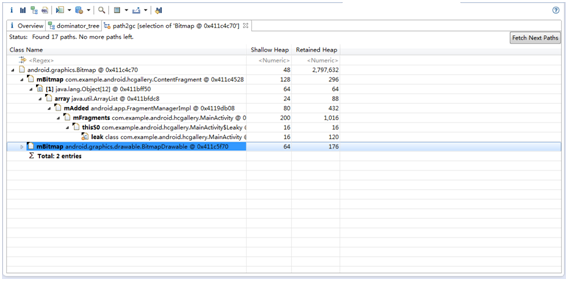
可以看到还有另外一个对象在引用着这个Bitmap对象,了解weak references的同学应该知道GC是如何处理weak references,因此在内存泄漏分析的时候我们可以把weak references排除掉。
有些同学可能希望根据某种类型的对象个数来分析内存泄漏。我们在Overview视图中选择Actions -> Histogram,可以看到类似下图的情形:
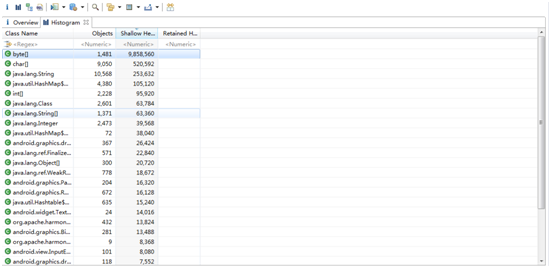
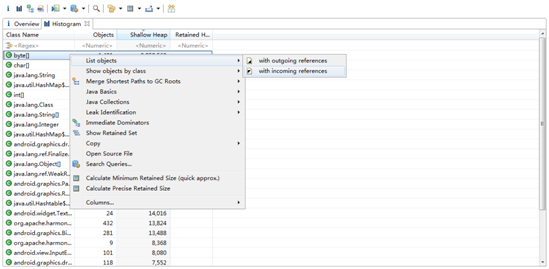
上图展示了内存中各种类型的对象个数和Shallow heap,我们看到byte[]占用Shallow heap最多,那是因为Honeycomb之后Bitmap Pixel Data的内存分配在Dalvik heap中。右键选中byte[]数组,选择List Objects -> with incomingreferences,可以看到byte[]具体的对象列表:

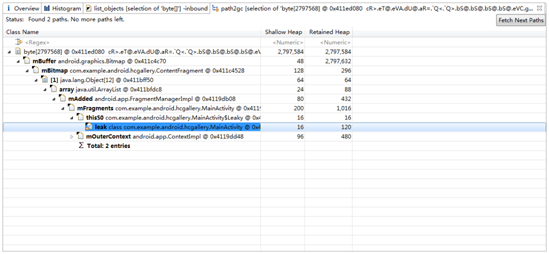
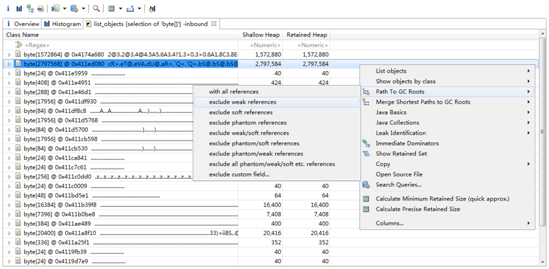
我们发现第二个byte[]的Retained heap较大,内存泄漏的可能性较大,因此右键选中这行,Path To GC Roots -> exclude weak references,同样可以看到上文所提到的情况,我们的Bitmap对象被leak所引用到,这里存在着内存泄漏。
在Histogram视图中第一行<Regex>中输入com.example.android.hcgallery,过滤出我们自己应用中的类型,如下图:
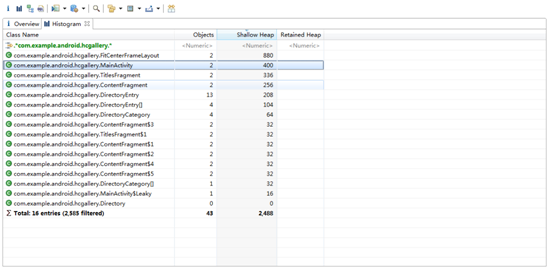
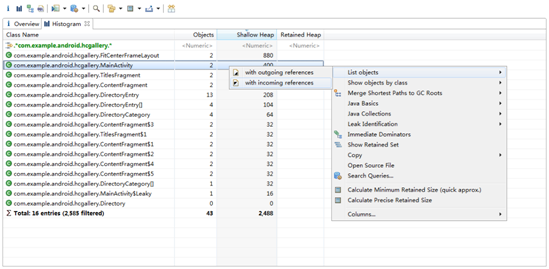
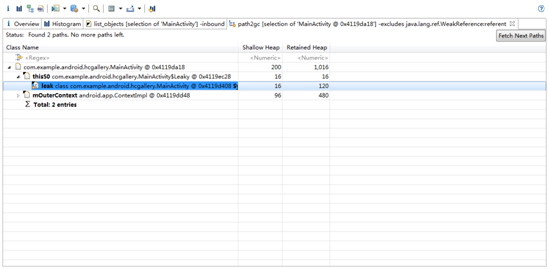
我们发现本应该只有一个MainActivity现在却有两个,显然不正常。右键选择List Objects-> with incoming references,可以看到这两个具体的MainActivity对象。右键选中Retained heap较大的MainActivity,Path To GC Roots -> exclude weak references,再一次可疑对象又指向了leak对象。

引用 http://blog.csdn.net/gemmem/article/details/13017999