目录
-
-
-
-
-
-
-
-
-
-
-
-
简介
interpolator可以翻译成插值器。
Android中interpolator最底层的接口如下:
1 2 3 4 5 6 7 8 9 10 11 12 13 14 15 16 17 18 19 20 21 22 23 24 25 26 27 28 |
package android.animation; /** * 时间插值器定义了一个动画的变化率。 * 这让动画让非线性的移动轨迹,例如加速和减速。 * <hr/> * A time interpolator defines the rate of change of an animation. This allows animations * to have non-linear motion, such as acceleration and deceleration. */ public interface TimeInterpolator { /** * 将动画已经消耗的时间的分数映射到一个表示插值的分数。 * 然后将插值与动画的变化值相乘来推导出当前已经过去的动画时间的动画变化量。 * <hr/> * Maps a value representing the elapsed fraction of an animation to a value that represents * the interpolated fraction. This interpolated value is then multiplied by the change in * value of an animation to derive the animated value at the current elapsed animation time. * * @param input 一个0到1.0表示动画当前点的值,0表示开头。1表示结尾<br/> A value between 0 and 1.0 indicating our current point * in the animation where 0 represents the start and 1.0 represents * the end * @return 插值。它的值可以大于1来超出目标值,也小于0来空破底线。<br/>The interpolation value. This value can be more than 1.0 for * interpolators which overshoot their targets, or less than 0 for * interpolators that undershoot their targets. */ float getInterpolation(float input); } |
TimeInterpolator是在Android API11时加入的,之前类就叫Interpolator。
现在Interpolatro继承了它。
1 2 3 4 5 6 7 8 9 10 11 12 13 14 15 16 17 18 19 |
package android.view.animation; import android.animation.TimeInterpolator; /** * * 一个定义动画变化率的插值器。 * 它允许对基本的(如透明,缩放,平移,旋转)进行加速,减速,重复等动画效果 * <hr/> * An interpolator defines the rate of change of an animation. This allows * the basic animation effects (alpha, scale, translate, rotate) to be * accelerated, decelerated, repeated, etc. */ public interface Interpolator extends TimeInterpolator { // A new interface, TimeInterpolator, was introduced for the new android.animation // package. This older Interpolator interface extends TimeInterpolator so that users of // the new Animator-based animations can use either the old Interpolator implementations or // new classes that implement TimeInterpolator directly. } |
简单插值器
注意下面的图,对应你脑海中的插值的大小应该是斜率。
1.AccelerateInterpolator 加速插值器
源代码如下:
1 2 3 4 5 6 7 8 9 10 11 12 13 14 15 16 17 18 19 20 21 22 23 24 25 26 27 28 29 30 31 32 33 34 35 36 37 38 39 40 41 42 43 44 45 46 47 48 49 50 51 52 53 54 55 56 57 58 |
package android.view.animation; import android.content.Context; import android.content.res.TypedArray; import android.util.AttributeSet; /** * * 一个开始很慢然后不断加速的插值器。 * <hr/> * An interpolator where the rate of change starts out slowly and * and then accelerates. * */ public class AccelerateInterpolator implements Interpolator { private final float mFactor; private final double mDoubleFactor; public AccelerateInterpolator() { mFactor = 1.0f; mDoubleFactor = 2.0; } /** * Constructor * * @param factor * 动画的快慢度。将factor设置为1.0f会产生一条y=x^2的抛物线。 增加factor到1.0f之后为加大这种渐入效果(也就是说它开头更加慢,结尾更加快) * <br/>Degree to which the animation should be eased. Seting * factor to 1.0f produces a y=x^2 parabola(抛物线). Increasing factor above * 1.0f exaggerates the ease-in effect (i.e., it starts even * slower and ends evens faster) */ public AccelerateInterpolator(float factor) { mFactor = factor; mDoubleFactor = 2 * mFactor; } public AccelerateInterpolator(Context context, AttributeSet attrs) { TypedArray a = context.obtainStyledAttributes(attrs, com.android.internal.R.styleable.AccelerateInterpolator); mFactor = a.getFloat(com.android.internal.R.styleable.AccelerateInterpolator_factor, 1.0f); mDoubleFactor = 2 * mFactor; a.recycle(); } @Override public float getInterpolation(float input) { if (mFactor == 1.0f) { return input * input; } else { return (float)Math.pow(input, mDoubleFactor); } } } |
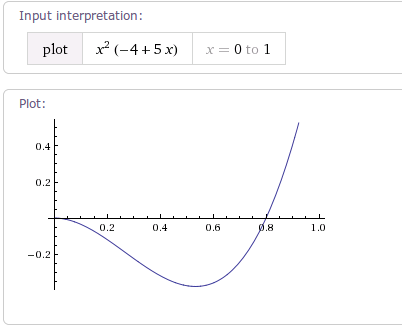
加速的快慢度由参数fractor决定。
当fractor值为1.0f时,动画加速轨迹相当于一条y=x^2的抛物线。如下图:
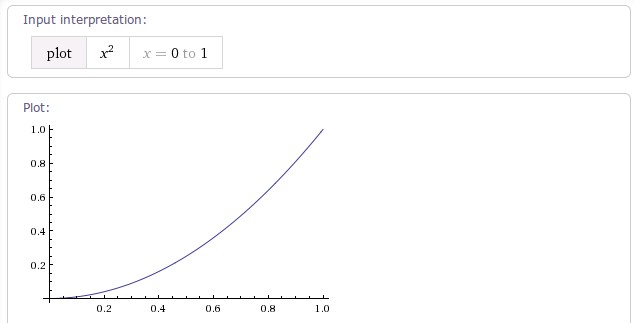
当fractor不为1时,轨迹曲线是y=x^(2*fractor)(0<x<=1)的曲线。
示例:当fractor为4时,插值器的加速轨迹曲线如下图:
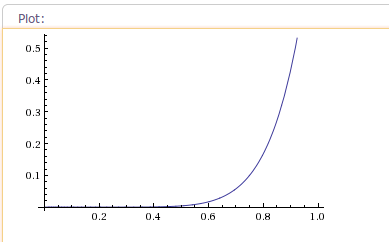
如果你在使用AccelerateInterpolator时,想要那种一开始很慢,然后突然就很快的加速的动画效果的话。
就将fractor设置大点。
你可以到这里调试下你想要的抛物线效果:http://www.wolframalpha.com/input/?i=x%5E%282*3%29%280%3Cx%3C%3D1%29
Android提供的一个不同factor的加速插值器:
(1)accelerate_cubic, factor为1.5
2. DecelerateInterpolator 减速插值器
源代码如下:
1 2 3 4 5 6 7 8 9 10 11 12 13 14 15 16 17 18 19 20 21 22 23 24 25 26 27 28 29 30 31 32 33 34 35 36 37 38 39 40 41 42 43 44 45 46 47 48 49 50 51 52 53 54 |
package android.view.animation; import android.content.Context; import android.content.res.TypedArray; import android.util.AttributeSet; /** * 一个开始比较快然后减速的插值器 * <hr/> * An interpolator where the rate of change starts out quickly and * and then decelerates. * */ public class DecelerateInterpolator implements Interpolator { public DecelerateInterpolator() { } /** * Constructor * * @param factor * 动画的快慢度。将factor值设置为1.0f时将产生一条从上向下的y=x^2抛物线。 * 增加factor到1.0f以上将使渐入的效果增强(也就是说,开头更快,结尾更慢) * <br/> * Degree to which the animation should be eased. Setting factor to 1.0f produces * an upside-down y=x^2 parabola. Increasing factor above 1.0f makes exaggerates the * ease-out effect (i.e., it starts even faster and ends evens slower) */ public DecelerateInterpolator(float factor) { mFactor = factor; } public DecelerateInterpolator(Context context, AttributeSet attrs) { TypedArray a = context.obtainStyledAttributes(attrs, com.android.internal.R.styleable.DecelerateInterpolator); mFactor = a.getFloat(com.android.internal.R.styleable.DecelerateInterpolator_factor, 1.0f); a.recycle(); } @Override public float getInterpolation(float input) { float result; if (mFactor == 1.0f) { result = (1.0f - ((1.0f - input) * (1.0f - input))); } else { result = (float)(1.0f - Math.pow((1.0f - input), 2 * mFactor)); } return result; } private float mFactor = 1.0f; } |
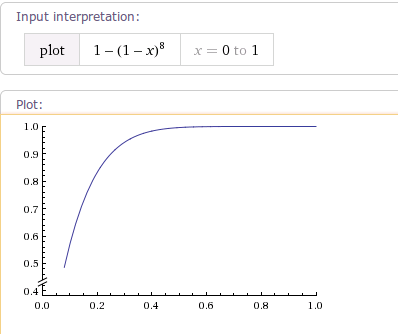
根据getInterpolationa(float input);方法可以知道。
当fractor为1.0f。它减速的轨迹曲线为1-(1-x)^2。如下图:

当fractor增大到4时,曲线轨迹如下图:
3. AccelerateDecelerateInterpolator 加速减速插值器
源代码如下:
1 2 3 4 5 6 7 8 9 10 11 12 13 14 15 16 17 18 19 20 21 22 23 24 25 |
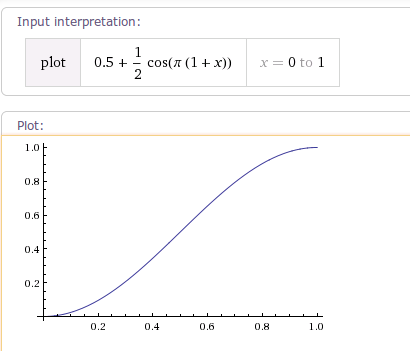
package android.view.animation; import android.content.Context; import android.util.AttributeSet; /** * 一个变化率开始慢从中间后开始变快。 * <hr/> * An interpolator where the rate of change starts and ends slowly but * accelerates through the middle. * */ public class AccelerateDecelerateInterpolator implements Interpolator { public AccelerateDecelerateInterpolator() { } @SuppressWarnings({"UnusedDeclaration"}) public AccelerateDecelerateInterpolator(Context context, AttributeSet attrs) { } @Override public float getInterpolation(float input) { return (float)(Math.cos((input + 1) * Math.PI) / 2.0f) + 0.5f; } } |
根据getInterpolation()方法可以得出其变化曲线如下:
4. LinearInterpolator 线性插值器
这可是最简单的插值器:
|
|
/** * An interpolator where the rate of change is constant * */ public class LinearInterpolator implements Interpolator { public LinearInterpolator() { } public LinearInterpolator(Context context, AttributeSet attrs) { } public float getInterpolation(float input) { return input; } } |
5. BounceInterpolator 弹跳插值器
源代码如下:
1 2 3 4 5 6 7 8 9 10 11 12 13 14 15 16 17 18 19 20 21 22 23 24 25 26 27 28 29 30 31 32 33 34 35 36 |
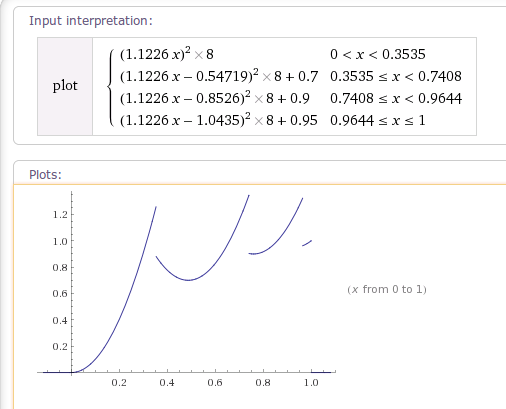
package android.view.animation; import android.content.Context; import android.util.AttributeSet; /** * 这个插值器的插值在后面呈弹跳状态。 * An interpolator where the change bounces at the end. */ public class BounceInterpolator implements Interpolator { public BounceInterpolator() { } @SuppressWarnings({"UnusedDeclaration"}) public BounceInterpolator(Context context, AttributeSet attrs) { } private static float bounce(float t) { return t * t * 8.0f; } @Override public float getInterpolation(float t) { // _b(t) = t * t * 8 // bs(t) = _b(t) for t < 0.3535 // bs(t) = _b(t - 0.54719) + 0.7 for t < 0.7408 // bs(t) = _b(t - 0.8526) + 0.9 for t < 0.9644 // bs(t) = _b(t - 1.0435) + 0.95 for t <= 1.0 // b(t) = bs(t * 1.1226) t *= 1.1226f; if (t < 0.3535f) return bounce(t); else if (t < 0.7408f) return bounce(t - 0.54719f) + 0.7f; else if (t < 0.9644f) return bounce(t - 0.8526f) + 0.9f; else return bounce(t - 1.0435f) + 0.95f; } } |
根据getInterpolation()得到以下插值曲线图:
6.AnticipateInterpolator 回荡秋千插值器
这个插值器的值变化过程,可以想像成荡秋千时的一个段过程。(此时秋千已经在比较上面的位置了,一放手就可以荡下来)。你开始用力推向更上面,然后秋千终将荡回下面。
tension值就好比推力的大小。
源代码如下:
1 2 3 4 5 6 7 8 9 10 11 12 13 14 15 16 17 18 19 20 21 22 23 24 25 26 27 28 29 30 31 32 33 34 35 36 37 38 39 40 41 42 43 44 45 46 |
package android.view.animation; import android.content.Context; import android.content.res.TypedArray; import android.util.AttributeSet; /** * 一个开始向后荡,然后向前荡的插值器。 * <hr/> * An interpolator where the change starts backward then flings forward. */ public class AnticipateInterpolator implements Interpolator { private final float mTension; public AnticipateInterpolator() { mTension = 2.0f; } /** * @param tension * 绷紧程度,当绷紧程序为0.0f时,也就没有了反向作用力。插值器将退化成一个y=x^3的加速插值器。 * <br/> * Amount of anticipation. When tension equals 0.0f, there is * no anticipation and the interpolator becomes a simple * acceleration interpolator. */ public AnticipateInterpolator(float tension) { mTension = tension; } public AnticipateInterpolator(Context context, AttributeSet attrs) { TypedArray a = context.obtainStyledAttributes(attrs, com.android.internal.R.styleable.AnticipateInterpolator); mTension = a.getFloat(com.android.internal.R.styleable.AnticipateInterpolator_tension, 2.0f); a.recycle(); } @Override public float getInterpolation(float t) { // a(t) = t * t * ((tension + 1) * t - tension) return t * t * (((mTension + 1) * t) - mTension); } } |
根据getInterpolation()方法。
当tension为默认值2.0f时,曲线图如下:

当tension值为4.0f时,曲线图如下:
7. AnticipateOvershootInterpolator
源代码如下:
1 2 3 4 5 6 7 8 9 10 11 12 13 14 15 16 17 18 19 20 21 22 23 24 25 26 27 28 29 30 31 32 33 34 35 36 37 38 39 40 41 42 43 44 45 46 47 48 49 50 51 52 53 54 55 56 57 58 59 60 61 62 63 64 65 66 67 68 69 70 71 72 73 74 |
package android.view.animation; import android.content.Context; import android.content.res.TypedArray; import android.util.AttributeSet; /** * 一个插值器它开始向上推,然后向下荡,荡过最低线。然后再回到最低线。 * <hr/> * An interpolator where the change starts backward then flings forward and overshoots * the target value and finally goes back to the final value. */ public class AnticipateOvershootInterpolator implements Interpolator { private final float mTension; public AnticipateOvershootInterpolator() { mTension = 2.0f * 1.5f; } /** * @param tension * anticipation/overshoot的比值。当和tension值为0.0f时, * 也就没有anticipation/overshoot的比值了,插值器退化为一个加速/减速插值器。 * <br/> * Amount of anticipation/overshoot. When tension equals 0.0f, * there is no anticipation/overshoot and the interpolator becomes * a simple acceleration/deceleration interpolator. */ public AnticipateOvershootInterpolator(float tension) { mTension = tension * 1.5f; } /** * @param tension Amount of anticipation/overshoot. When tension equals 0.0f, * there is no anticipation/overshoot and the interpolator becomes * a simple acceleration/deceleration interpolator. * @param extraTension * 乘以tension的值。例如,在上面构造函数中extraTension的值为1.5f * <br/> * Amount by which to multiply the tension. For instance, * to get the same overshoot as an OvershootInterpolator with * a tension of 2.0f, you would use an extraTension of 1.5f. */ public AnticipateOvershootInterpolator(float tension, float extraTension) { mTension = tension * extraTension; } public AnticipateOvershootInterpolator(Context context, AttributeSet attrs) { TypedArray a = context.obtainStyledAttributes(attrs, AnticipateOvershootInterpolator); mTension = a.getFloat(AnticipateOvershootInterpolator_tension, 2.0f) * a.getFloat(AnticipateOvershootInterpolator_extraTension, 1.5f); a.recycle(); } private static float a(float t, float s) { return t * t * (((s + 1) * t) - s); } private static float o(float t, float s) { return t * t * (((s + 1) * t) + s); } @Override public float getInterpolation(float t) { // a(t, s) = t * t * ((s + 1) * t - s) // o(t, s) = t * t * ((s + 1) * t + s) // f(t) = 0.5 * a(t * 2, tension * extraTension), when t < 0.5 // f(t) = 0.5 * (o(t * 2 - 2, tension * extraTension) + 2), when t <= 1.0 if (t < 0.5f) return 0.5f * a(t * 2.0f, mTension); else return 0.5f * (o((t * 2.0f) - 2.0f, mTension) + 2.0f); } } |
根据getInterpolation()方法,
可以得到当tension为默认值时,曲线图为:
|
|
plot Piecewise[{{0.5((2x)*(2x)*((2+1)*2x-2)), 0<x<0.5}, {0.5*(((2x-2)*(2x-2)*((2+1)*(2x-2)+2))+2),0.5<=x<=1}}] |

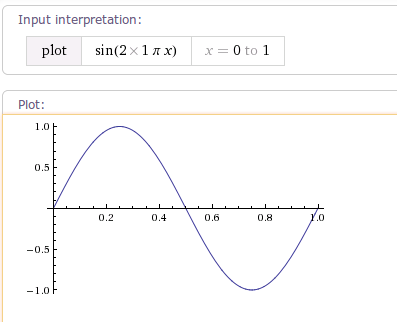
8. CycleInterpolator 正弦周期变化插值器
源代码:
1 2 3 4 5 6 7 8 9 10 11 12 13 14 15 16 17 18 19 20 21 22 23 24 25 26 27 28 29 30 31 32 33 34 35 36 37 38 39 |
package android.view.animation; import android.content.Context; import android.content.res.TypedArray; import android.util.AttributeSet; /** * * 以指定的周期重复动画。变化率曲线为正弦。 * <hr/> * Repeats the animation for a specified number of cycles(周期). The * rate of change follows a sinusoidal(正弦) pattern. * */ public class CycleInterpolator implements Interpolator { /** * * @param cycles 要重复的周期数 */ public CycleInterpolator(float cycles) { mCycles = cycles; } public CycleInterpolator(Context context, AttributeSet attrs) { TypedArray a = context.obtainStyledAttributes(attrs, com.android.internal.R.styleable.CycleInterpolator); mCycles = a.getFloat(com.android.internal.R.styleable.CycleInterpolator_cycles, 1.0f); a.recycle(); } @Override public float getInterpolation(float input) { return (float)(Math.sin(2 * mCycles * Math.PI * input)); } private float mCycles; } |
当cycle时为1时,即变化一周时,曲线图如下:
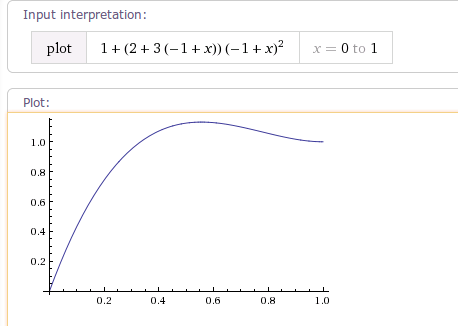
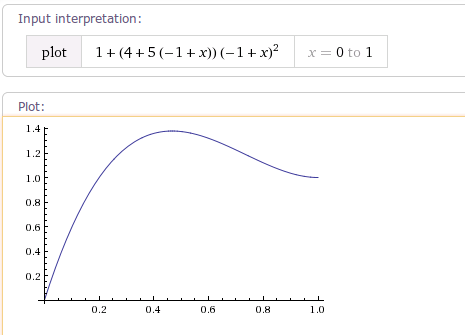
9. OvershootInterpolator
源代码:
1 2 3 4 5 6 7 8 9 10 11 12 13 14 15 16 17 18 19 20 21 22 23 24 25 26 27 28 29 30 31 32 33 34 35 36 37 38 39 40 41 42 43 44 45 |
package android.view.animation; import android.content.Context; import android.content.res.TypedArray; import android.util.AttributeSet; /** * An interpolator where the change flings forward and overshoots the last value * then comes back. */ public class OvershootInterpolator implements Interpolator { private final float mTension; public OvershootInterpolator() { mTension = 2.0f; } /** * @param tension Amount of overshoot. When tension equals 0.0f, there is * no overshoot and the interpolator becomes a simple * deceleration interpolator. */ public OvershootInterpolator(float tension) { mTension = tension; } public OvershootInterpolator(Context context, AttributeSet attrs) { TypedArray a = context.obtainStyledAttributes(attrs, com.android.internal.R.styleable.OvershootInterpolator); mTension = a.getFloat(com.android.internal.R.styleable.OvershootInterpolator_tension, 2.0f); a.recycle(); } @Override public float getInterpolation(float t) { // _o(t) = t * t * ((tension + 1) * t + tension) // o(t) = _o(t - 1) + 1 t -= 1.0f; return (t * t * (((mTension + 1) * t) + mTension)) + 1.0f; //plot {(x-1)(x-1)((tension+1)(x-1)+tension)+1,(0<x<=1)} } } |
当tension为默认值2时,曲线图如下:
当tension的值为4时,曲线图如下:
通过学习了解Android自带的这些Interpolator,我们可以很好的根据自己的使用场景使用这些Interpolator了。也可以很容易的写出我们自己的Interpolator。
参考链接
android动画(一)Interpolator