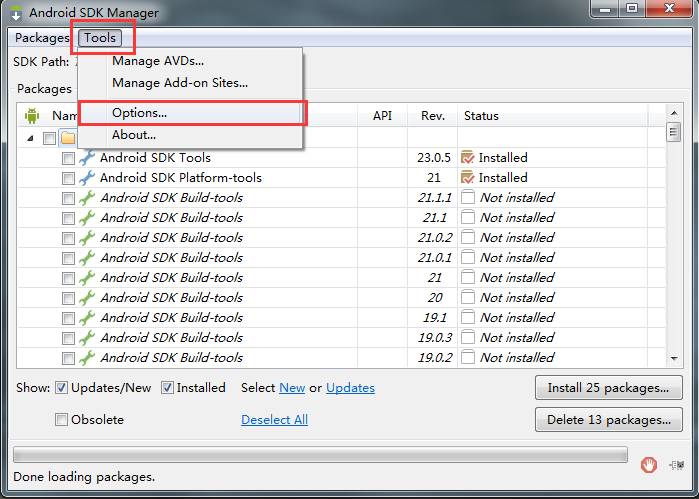
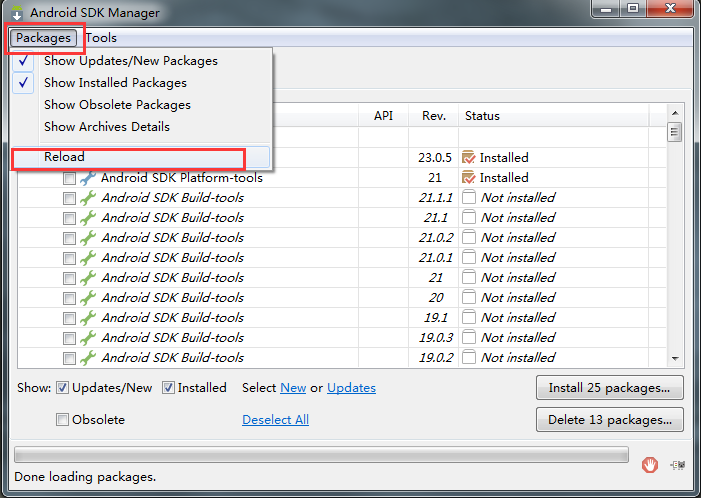
最近更新Android SDK的时候奇慢无比,频繁失败,到了无法使用的地步,搜索了一下找到一个比较好用的国内镜像。
北京化工大学镜像站 http://ubuntu.buct.edu.cn/
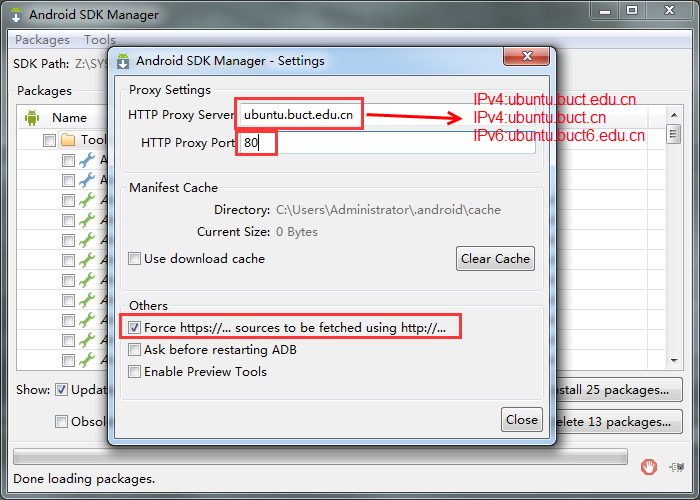
2.代理服务器填写ubuntu.buct.edu.cn或ubuntu.buct.cn或ubuntu.buct6.edu.cn(IPv6),端口80,强制HTTP
注:该代理并非正向代理也不是反向代理,所有代理请求将被重定向至本站镜像。
Android是一种基于Linux的自由及开放源代码的操作系统,主要使用于移动设备,如智能手机和平板电脑,由Google公司和开放手机联盟领导及开发。
最近更新Android SDK的时候奇慢无比,频繁失败,到了无法使用的地步,搜索了一下找到一个比较好用的国内镜像。
北京化工大学镜像站 http://ubuntu.buct.edu.cn/
2.代理服务器填写ubuntu.buct.edu.cn或ubuntu.buct.cn或ubuntu.buct6.edu.cn(IPv6),端口80,强制HTTP
注:该代理并非正向代理也不是反向代理,所有代理请求将被重定向至本站镜像。
一直在Eclipse中开发Android
,切换到Android Studio
中之后,各种不习惯。基本的创建keystore
文件的操作也是找了半天才找到。
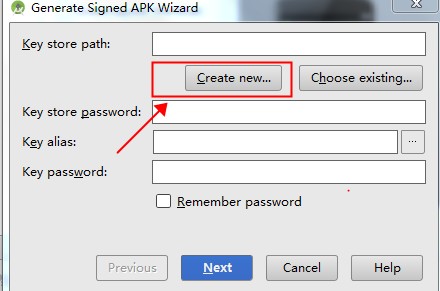
1.点击Build ,在下拉框中选择 "Generate Signed APK"
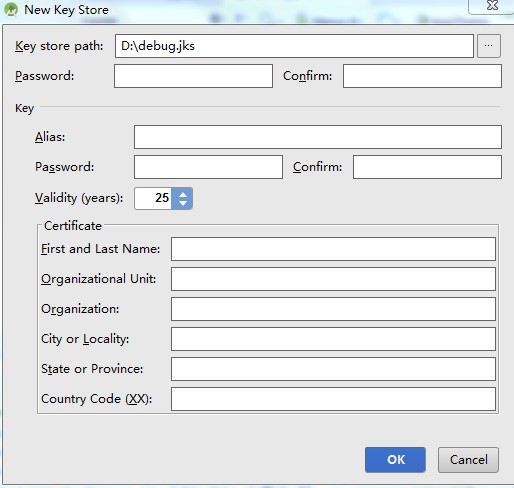
2.选择 "Create new"
3.按照里面的内容填写即可,注意最后文件的扩展名变为".jks",而不是以前的".keystore".
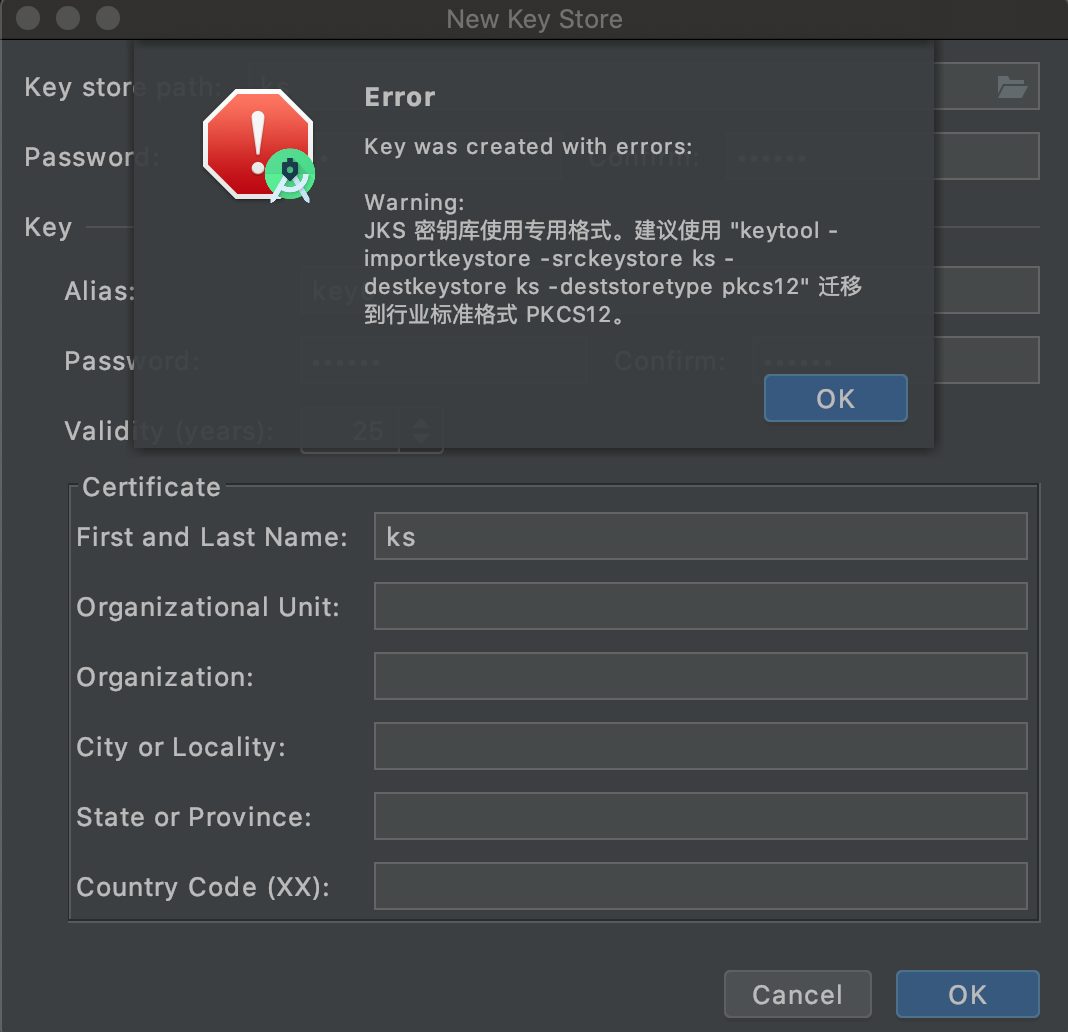
注意:最新的Android Studio 4.x
版本已经没办法按照上面的办法创建证书了,创建证书会报告如下错误:
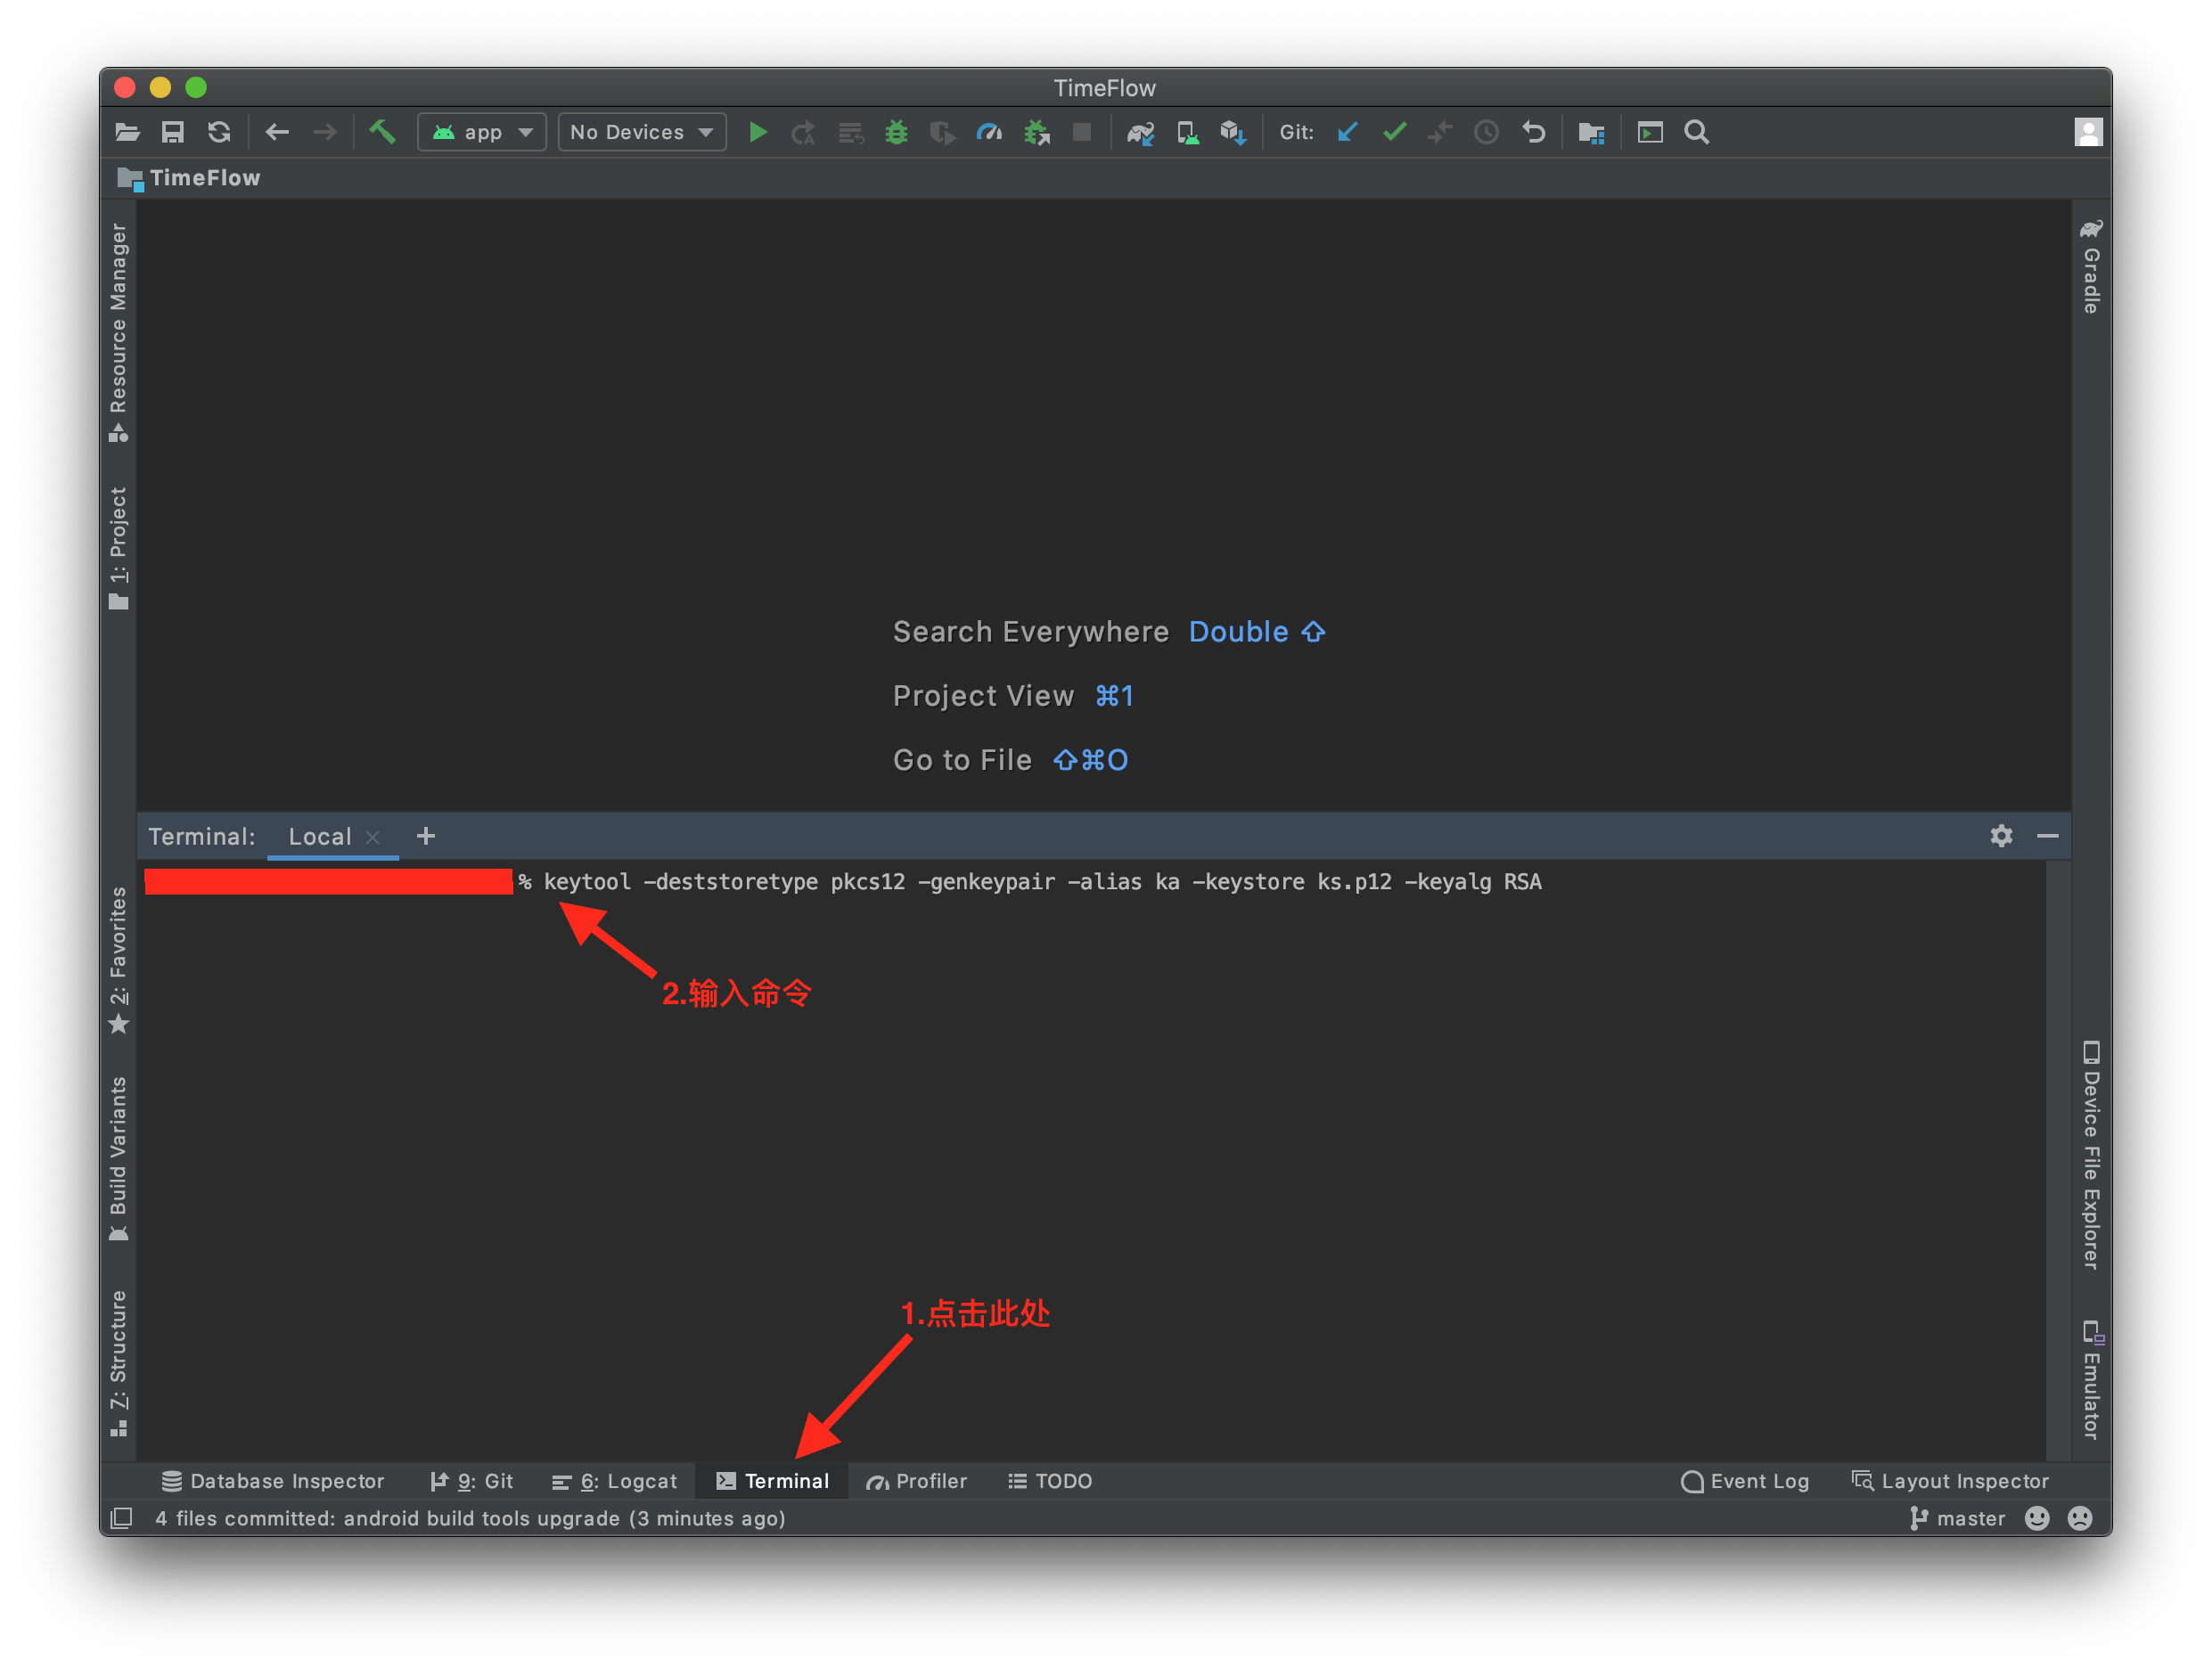
解决方法是在Android Studio
的命令行中执行证书创建命令,创建pkcs12
格式的证书,如下:
1 |
$ keytool -deststoretype pkcs12 -genkeypair -alias ka -keystore ks.p12 -keyalg RSA |
参考下图:
根据提示,补充内容即可。
Android Studio
中使用证书:
1 2 3 4 5 6 7 8 9 10 11 12 13 14 15 16 17 18 19 20 21 22 23 24 25 26 27 |
signingConfigs { release { File strFile = new File("ks.p12") storeFile file(strFile) keyAlias 'ka' keyPassword 'password' storePassword 'password' } debug { File strFile = new File("ks.p12") storeFile file(strFile) keyAlias 'ka' keyPassword 'password' storePassword 'password' } } buildTypes { release { signingConfig signingConfigs.release minifyEnabled false proguardFiles getDefaultProguardFile('proguard-android.txt'), 'proguard-rules.pro' } debug { signingConfig signingConfigs.debug } } |
1. 手机要有root权限
2. 下载tcpdump
http://www.strazzere.com/android/tcpdump
3.上传tcpdump到手机
1 |
$ adb push c:\wherever_you_put\tcpdump /data/local/tcpdump |
如果提示
1 |
failed to copy 'tcpdump' to '/data/local/tcpdump': Permission denied |
则如下操作后重试
1 2 3 4 5 6 7 |
$ adb shell $ su $ chmod -R 777 /data/local $ exit |
4.给予tcpdump 执行权限
1 |
$ adb shell chmod 6755 /data/local/tcpdump |
5.连接到手机的控制端,获得root权限
1 2 3 |
$ adb shell $ su |
6.切换到tcpdump 的所在目录
1 |
$ cd /data/local |
7.抓包
1 |
$ ./tcpdump -i any -p -s 0 -w /sdcard/capture.pcap |
tcpdump 命令参数:
# "-i any": listen on any network interface
# "-p": disable promiscuous mode (doesn't work anyway)
# "-s 0": capture the entire packet
# "-w": write packets to a file (rather than printing to stdout)
... do whatever you want to capture, then ^C to stop it ...
8.从手机端下载文件到电脑
1 |
$ adb pull /sdcard/capture.pcap d:/ |
9.在电脑上用wireshark打开capture.pcap即可分析log.
如果需要执行包过滤,只抓取得某些类型的报文,可以参考下面的介绍。
Execute the following if you would like to watch packets go by rather than capturing them to a file (-n skips DNS lookups. -s 0 captures the entire packet rather than just the header):
1 |
$ adb shell tcpdump -n -s 0 |
Typical tcpdump options apply. For example, if you want to see HTTP traffic:
1 |
$ adb shell tcpdump -X -n -s 0 port 80 |
根据以上的信息,写一个bat去执行(tcpdump文件必须在当前目录里)。
开始tcpdump
1 2 3 4 5 6 7 8 9 |
$ adb push tcpdump /data/local/tcpdump $ adb shell chmod 6755 /data/local/tcpdump $ adb shell rm -r /sdcard/capture.pcap $ adb shell /data/local/tcpdump -i any -p -s 0 -w /sdcard/capture.pcap $ pause |
下载tcpdump文件到电脑
1 |
$ adb pull /sdcard/capture.pcap capture.pcap |
问题:有些机器root后通过adb shell 后,默认不是root用户,需要输入 su才能切换到root,这样在执行批处理会有问题,解决方法如下
1 2 3 4 5 |
$ adb shell "su -c 'sleep 1'" $ adb start-server $ adb push tcpdump /data/local/tcpdump |
因没有root权限导致的问题
1 |
$ adb shell su -c "/data/local/tmp/tcpdump -i any -p -s 0 -w /sdcard/netCapture.pcap" |
有时候 Eclipse 启动后,会一直阻塞在 "Android Library Update" 任务中,无法执行任何操作,包括保存文件修改、编译、运行等,甚至正常退出 Eclipse 都不行。这一般是由于上一次的不正常退出所导致的。
如果反复重启 Eclipse 依然如此,可以试试这个办法:在启动 Eclipse 后,立即执行 "Clean all projects" 任务(必须赶在 "Android Library Update" 自动执行之前,否则会被其阻塞而无法做任何事情)。执行完 "Clean all projects" 之后,应该就不会再被阻塞了。
更彻底的办法是,删掉 workspace
下面的 .metadata
目录,不过该方法比较暴力,将会清除所有的 project 信息,建议慎用。
Android 字体调整,比如调整为超大字体,此时会导致Configuration 中的fontScale 变化导致界面显示异常。目前找到的办法为,在Application 的OnCreate 事件中增加如下代码
1 |
getResources().getDisplayMetrics().scaledDensity = getResources().getDisplayMetrics().scaledDensity/getResources().getConfiguration().fontScale; |
继承并覆盖 onConfigurationChanged 方法
1 2 3 4 5 |
@Override public void onConfigurationChanged(Configuration newConfig) { getResources().getDisplayMetrics().scaledDensity = getResources().getDisplayMetrics().scaledDensity/newConfig.fontScale; super.onConfigurationChanged(newConfig); } |
在 AndroidManifest.xml 中的 application 部分增加处理 onConfigurationChanged 事件的声明
1 2 |
<application android:configChanges="fontScale" |
可以解决问题,但是会不会引起其他副作用,暂时未知。
一般情况下,在使用比较复杂的布局的时候,尤其是 Fragment + ViewPager + SlideMenu 这种组合的情况下,会报告类似如下内容的崩溃栈信息
1 2 3 4 5 6 7 |
at android.view.View.draw(View.java:6880) at android.view.ViewGroup.drawChild(ViewGroup.java:1646) at android.view.ViewGroup.dispatchDraw(ViewGroup.java:1373) at android.view.View.draw(View.java:6883) at android.view.ViewGroup.drawChild(ViewGroup.java:1646) at android.view.ViewGroup.dispatchDraw(ViewGroup.java:1373) ... |
该异常在 2.X版本的Android系统上面表现尤为明显,往往 4.X版本的一切正常或者偶有卡顿,在 2.X版本上面直接崩溃。
分析一下,是一个 draw()
-> dispatchDraw()
-> drawChild()
的深度递归调用导致栈的溢出越界。对于 Android目前使用的 dalvik 虚拟机而言,系统默认的栈深度如下
Browsing for stack sizes through the dalvik source history:
也就是说,如果 draw()
-> dispatchDraw()
-> drawChild()
递归的深度太深,就会导致栈的不足问题。
解决方法, 目前貌似 dalvik 虚拟机 并不支持动态的修改栈的深度,这导致问题复杂化,首先,Fragment + ViewPager + SlideMenu 这种组合,即是什么都不增加,就已经有超过 10 层的递归了,这个可以在崩溃栈中的 drawChild 函数的数量就可以统计出来,这也就意味着,目前只有一条路可以走,那就是想办法减少布局的层次。有建议废弃 Fragment 来自己实现一套完整的东西,暂时还不建议如此操作。
一般方法就是
1.使用RelativeLayout 来减少尤其是 LinearLayout导致的布局深度问题,尽量在同层展开。
2.复杂布局的情况下,可以使用自定义View来实现,实在不行,可以自己计算坐标,直接绘制,比如用类似游戏的SurfaceView 之类的东西来替代。
3.利用 merge 来简化收缩布局,目前貌似FrameLayout 上面比较合适。
4.继承ViewGroup 的自定义View也是一层,这点不要忘记,能直接继承View的,就不要继承 ViewGroup
其他的方法,根据实际项目来处理好了。
在布局优化中,Android的官方提到了这三种布局,并介绍了这三种布局各有的优势,下面也是简单说一下他们的优势,以及怎么使用,记下来权当做笔记。
1、布局重用
标签能够重用布局文件,简单的使用如下:
1 2 3 4 5 6 7 8 9 10 11 12 13 14 15 16 17 |
<LinearLayout xmlns:android="http://schemas.android.com/apk/res/android" android:orientation="vertical" android:layout_width=”match_parent” android:layout_height=”match_parent” android:background="@color/app_bg" android:gravity="center_horizontal"> <include layout="@layout/titlebar"/> <TextView android:layout_width=”match_parent” android:layout_height="wrap_content" android:text="@string/hello" android:padding="10dp" /> ... </LinearLayout> |
1)标签可以使用单独的layout属性,这个也是必须使用的。
2)可以使用其他属性。标签若指定了ID属性,而你的layout也定义了ID,则你的layout的ID会被覆盖。
3)在include标签中所有的android:layout_*都是有效的,前提是必须要写layout_width和layout_height两个属性。
4)布局中可以包含两个相同的include标签,引用时可以使用如下方法解决(参考):
1 2 |
View bookmarks_container_2 = findViewById(R.id.bookmarks_favourite); bookmarks_container_2.findViewById(R.id.bookmarks_list); |
2、减少视图层级
标签在UI的结构优化中起着非常重要的作用,它可以删减多余的层级,优化UI。多用于替换FrameLayout或者当一个布局包含另一个时,标签消除视图层次结构中多余的视图组。例如你的主布局文件是垂直布局,引入了一个垂直布局的include,这是如果include布局使用的LinearLayout就没意义了,使用的话反而减慢你的UI表现。这时可以使用标签优化。
1 2 3 4 5 6 7 8 9 10 11 12 13 |
<merge xmlns:android="http://schemas.android.com/apk/res/android"> <Button android:layout_width="fill_parent" android:layout_height="wrap_content" android:text="@string/add"/> <Button android:layout_width="fill_parent" android:layout_height="wrap_content" android:text="@string/delete"/> </merge> |
现在,当你添加该布局文件时(使用标签),系统忽略节点并且直接添加两个Button。更多介绍可以参考《Android Layout Tricks #3: Optimize by merging》
3、需要时使用
标签最大的优点是当你需要时才会加载,使用他并不会影响UI初始化时的性能。各种不常用的布局想进度条、显示错误消息等可以使用标签,以减少内存使用量,加快渲染速度。是一个不可见的,大小为0的View。标签使用如下:
1 2 3 4 5 6 7 |
<ViewStub android:id="@+id/stub_import" android:inflatedId="@+id/panel_import" android:layout="@layout/progress_overlay" android:layout_width="fill_parent" android:layout_height="wrap_content" android:layout_gravity="bottom" /> |
当你想加载布局时,可以使用下面其中一种方法:
1 2 3 |
((ViewStub) findViewById(R.id.stub_import)).setVisibility(View.VISIBLE); // or View importPanel = ((ViewStub) findViewById(R.id.stub_import)).inflate(); |
当调用inflate()函数的时候,ViewStub被引用的资源替代,并且返回引用的view。 这样程序可以直接得到引用的view而不用再次调用函数findViewById()来查找了。
注:ViewStub目前有个缺陷就是还不支持 标签。
更多标签介绍可以参考《Android Layout Tricks #3: Optimize with stubs》
一般布局设置的背景图都是做拉伸处理,有时候我们需要背景图片做平铺处理,类似于网页开发中CSS的repeat。
在Android中可以使用如下方法使背景图片平铺。在drawable目录下创建一个repeat_bg.xml:
1 2 3 4 |
<?xml version="1.0" encoding="utf-8"?> <bitmap xmlns:android="http://schemas.android.com/apk/res/android" android:src="@drawable/bg" android:tileMode="repeat" /> |
然后在布局的xml文件中可以这样引用:
1 2 3 4 5 |
<LinearLayout android:layout_width="fill_parent" android:layout_height="fill_parent" android:background="@drawable/repeat_bg"> </LinearLayout> |
通过如下步骤,可以很方便的通过wifi调试Android程序:
1、root手机;
2、到市场下载Android Terminal Emulator应用并安装(Android Terminal Emulator是一款安卓手机上使用的终端模拟器,可以进行linux命令集),或者到从GitHub 下载源代码自己编译,地址为 https://github.com/jackpal/Android-Terminal-Emulator,源代码编译的时候注意要增加NDK支持,底层是需要 C/C++层支持的。
3、安装后打开,输入如下命令:
1 2 3 4 5 6 7 |
su //获取超级用户权限 setprop service.adb.tcp.port 5555 //设置监听的端口,端口可以自定义,如5554,5555是默认的 stop adbd //关闭adbd start adbd //重新启动adbd |
4、看一下手机的IP,并记下来,比如:192.168.1.111;
5、在电脑上,上运行cmd命令提示符,切换目录至adb文件所对应文件夹,如:D:\Android\android-sdk\platform-tools,键入如下命令:
1 |
adb connect 192.168.1.111:5555 |
如果提示连接成功,则说明搞定了。
6、在Eclipse中运行调试应用