无刷电机的工作原理
匈牙利算法
零、前言
匈牙利算法是一个经典的解决二部图最小权值匹配问题的算法。网上也有不少资料,但是看完之后总觉得有两个核心问题没有解决:算法为什么一定能得到最优匹配?算法复杂度为什么不再是指数级了?
最后读到了python的库函数scipy.optimize.linear_sum_assignment源代码里引用的文章,才算理解算法的实现,再花了一点时间弄清楚了上边两个问题。
Munkres' Assignment Algorithm
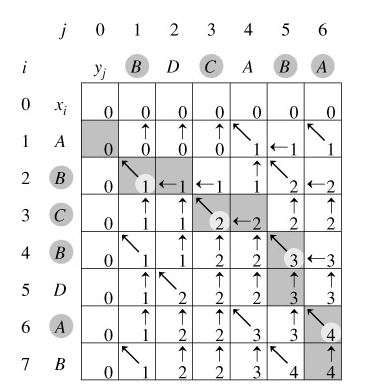
Assignment Problem - Let C be an nxn matrix representing the costs of each of n workers to perform any of n jobs. The assignment problem is to assign jobs to workers so as to minimize the total cost. Since each worker can perform only one job and each job can be assigned to only one worker the assignments constitute an independent set of the matrix C.
求最长公共子序列

最长递增子序列(Longest Increasing Subsequence)
最长递增子序列的解法,可以转化为 求最长公共子序列,也就是生成从目标序列从小到大排序之后的新序列,然后计算原始序列与新序列的 最长公共子序列。但是遇到重复数字的时候,会出现问题。也就是这个解法只能解决无重复数字的最长递增子序列。
另外需要注意的就是 最长公共子串(Longest Common Substring)与 最长公共子序列(Longest Common Subsequence)的区别: 子串要求在原字符串中是连续的,而子序列则只需保持相对顺序,并不要求连续。
整个的求解过程其实很好理解:
- 假定要计算的序列为 K = {K1,K2,K3,……,Kn,Kn+1,……,Km}
- 初始化计数数组 N = {N1,N2,N3,……,Nn,Nn+1,……,Nm} ,(计数数组跟序列的长度相同,Kn 的最长递增子序列长度计数对应于 Nn)用来记录最长递增子序列的长度,每个项的初始化值都设置为 1 (即使最小的项,项本身也算一个长度,因此最小的长度是 1)
- 必须从头部(K1)开始遍历
- 当计算 Kn 结尾的最长递增子序列的时候,只要遍历序列 K 的前 [0 ~ n-1] 个项,找到数值 小于(或者小于等于) Kn (必须遍历,Kn 之前的最长递增子序列不一定是 Kn-1 对应的 Nn-1 ),并且在计数数组 N 中对应的计数最大的项 Ni ,然后 Nn = Ni + 1 。
本方法的时间复杂度是 O(n2)
例子:
设数组 K = { 2, 5, 1, 5, 4, 5 } 那么求最长递增子序列的代码如下:
|
1 2 3 4 5 6 7 8 9 10 11 12 13 14 15 16 17 18 19 20 21 22 23 24 25 26 27 28 29 30 31 32 33 34 35 36 37 38 39 40 41 42 43 44 45 46 47 48 |
#include <iostream> #include <vector> int calcMaxLISLength(const std::vector<int>& K) { std::vector<int> N(K.size(), 1); int maxL = 0; for(int i = 0; i < K.size(); i++) { int Ki = K[i]; int maxNi = 0; for(int j = 0; j < i; j++) { int Kj = K[j]; if(Kj < Ki) { int Nj = N[j]; if(Nj > maxNi) { maxNi = Nj; } } } int Ni = maxNi + 1; N[i] = Ni; if(maxL < Ni) { maxL = Ni; } } return maxL; } int main(int argc, char** argv) { // 2 5 1 5 4 5 // 3 std::vector<int> K = {2, 5, 1, 5, 4, 5}; int r = calcMaxLISLength(K); std::cout << r << std::endl; // 17 K = {317, 211, 180, 187, 104, 285, 63, 117, 320, 35, 288, 299, 235, 282, 105, 231, 253, 74, 143, 148, 77, 249, 310, 137, 191, 184, 88, 8, 194, 12, 117, 108, 260, 313, 114, 261, 60, 226, 133, 61, 146, 297, 291, 13, 198, 286, 254, 96, 135, 48, 135, 307, 23, 155, 203, 258, 168, 42, 301, 45, 164, 193, 26, 290, 280, 172, 94, 230, 156, 36, 250, 174, 47, 188, 148, 138, 194, 89, 71, 119, 218, 325, 136, 63, 271, 210, 320, 309}; r = calcMaxLISLength(K); std::cout << r << std::endl; return 0; } |
第二个测试用例的数据如下:
|
1 2 3 4 5 6 7 8 |
输入数据个数 88 实际数据 317 211 180 187 104 285 63 117 320 35 288 299 235 282 105 231 253 74 143 148 77 249 310 137 191 184 88 8 194 12 117 108 260 313 114 261 60 226 133 61 146 297 291 13 198 286 254 96 135 48 135 307 23 155 203 258 168 42 301 45 164 193 26 290 280 172 94 230 156 36 250 174 47 188 148 138 194 89 71 119 218 325 136 63 271 210 320 309 期望结果 17 |
涉及到的面试题目如下类型:
梅花桩问题
合唱队问题
|
1 2 3 4 5 6 7 8 9 10 11 12 13 14 15 16 17 18 19 20 21 22 23 24 |
题目描述 : Redraiment是走梅花桩的高手。Redraiment总是起点不限,从前到后,往高的桩子走,但走的步数最多,不知道为什么?你能替Redraiment研究他最多走的步数吗? 样例输入 6 2 5 1 5 4 5 样例输出 3 提示 Example: 6个点的高度各为 2 5 1 5 4 5 如从第1格开始走,最多为3步, 2 4 5 从第2格开始走,最多只有1步,5 而从第3格开始走最多有3步,1 4 5 从第5格开始走最多有2步,4 5 所以这个结果是3。 输入例子: 6 2 5 1 5 4 5 输出例子: 3 |
合唱队问题
|
1 2 3 4 5 6 7 8 9 10 11 12 13 14 15 16 |
题目描述 计算最少出列多少位同学,使得剩下的同学排成合唱队形 说明: N位同学站成一排,音乐老师要请其中的(N-K)位同学出列,使得剩下的K位同学排成合唱队形。 合唱队形是指这样的一种队形:设K位同学从左到右依次编号为1,2…,K,他们的身高分别为T1,T2,…,TK, 则他们的身高满足存在i(1<=i<=K)使得T1<T2<......<Ti-1<Ti>Ti+1>......>TK。 你的任务是,已知所有N位同学的身高,计算最少需要几位同学出列,可以使得剩下的同学排成合唱队形。 输入描述: 整数N 输出描述: 最少需要几位同学出列 示例1 输入 8 186 186 150 200 160 130 197 200 输出 4 |
合唱队问题其实是 求最长递增子序列 与 最长递减子序列 的 和 最大。
最长递减子序列的求法其实就是把原始序列反序,然后 求最长递增子序列 然后把最后的结果反序即可。
代码如下:
|
1 2 3 4 5 6 7 8 9 10 11 12 13 14 15 16 17 18 19 20 21 22 23 24 25 26 27 28 29 30 31 32 33 34 35 36 37 38 39 40 41 42 43 44 45 46 47 48 49 50 51 52 53 54 55 56 57 58 59 60 61 62 63 64 65 66 67 68 69 70 71 72 73 74 75 76 77 78 79 80 81 82 83 84 85 86 87 88 89 90 91 92 |
#include <iostream> #include <vector> static void calcMaxLIS(const std::vector<int>& K, std::vector<int>& N) { for(int i = 0; i < K.size(); i++) { int Ki = K[i]; int maxNi = 0; for(int j =0; j<i; j++) { int Kj = K[j]; if(Ki > Kj) { int Nj = N[j]; if(maxNi < Nj) { maxNi = Nj; } } } N[i] = maxNi + 1; } } static void calcMaxLDS(const std::vector<int>& K, std::vector<int>& N) { std::vector<int> rK(K.rbegin(), K.rend()); std::vector<int> rN(N); calcMaxLIS(rK, rN); for(int i = 0; i<rN.size(); i++) { N[i] = rN[rN.size() - 1 - i]; } } static int calcMaxVal(const std::vector<int>& K) { std::vector<int> N(K.size(), 1); std::vector<int> rN(K.size(), 1); std::vector<int> KN(K.size(), 0); calcMaxLIS(K, N); calcMaxLDS(K, rN); // /*for(int i = 0; i<N.size(); i++) { std::cout << N[i]; } std::cout << std::endl; for(int i = 0; i<rN.size(); i++) { std::cout << rN[i]; } std::cout << std::endl;*/ for(int i = 0; i<N.size(); i++) { KN[i] = N[i] + rN[i]; } /* for(int i = 0; i<KN.size(); i++) { std::cout << KN[i]; } std::cout << std::endl;*/ int maxL = 0; for(int i = 0; i < KN.size(); i++) { if(maxL < KN[i]) { maxL = KN[i]; } } return maxL - 1; } static void test_calcMaxVal() { std::vector<int> K = {186, 186, 150, 200, 160, 130, 197, 200}; int r = calcMaxVal(K); std::cout << K.size() - r << std::endl; } static void main_test() { test_calcMaxVal(); } static void main_task() { int n = 0; while(std::cin >> n) { std::vector<int> K; for(int i = 0; i<n; i++) { int v = 0; std::cin >> v; K.push_back(v); } int r = calcMaxVal(K); std::cout << n - r << std::endl; } } int main(int argc, char** argv) { //main_test(); main_task(); return 0; } |
解法介绍
|
1 2 3 4 5 6 7 8 9 10 11 12 13 14 15 16 17 18 19 20 21 22 23 24 25 26 27 28 29 30 31 32 33 34 35 36 37 38 39 40 41 42 43 44 |
首先计算每个数在最大递增子串中的位置 186 186 150 200 160 130 197 200 quene 1 1 1 2 2 1 3 4 递增计数 然后计算每个数在反向最大递减子串中的位置--->计算反向后每个数在最大递增子串中的位置 200 197 130 160 200 150 186 186 反向quene 1 1 1 2 3 2 3 3 递减计数 然后将每个数的递增计数和递减计数相加 186 186 150 200 160 130 197 200 quene 1 1 1 2 2 1 3 4 递增计数 3 3 2 3 2 1 1 1 递减计数 4 4 3 5 4 2 4 5 每个数在所在队列的人数+1(自己在递增和递减中被重复计算) 如160这个数 在递增队列中有2个人数 150 160 在递减队列中有2个人数 160 130 那么160所在队列中就有3个人 150 160 130 每个数的所在队列人数表达就是这个意思 总人数 - 该数所在队列人数 = 需要出队的人数 |
参考链接
兔子生兔子问题详解(斐波那契数列)
有一只兔子,从出生后第3个月起每个月都生一只兔子,小兔子长到第三个月后每个月又生一只兔子,假如兔子都不死,问每个月的兔子总数为多少?
斐波那契数列(Fibonacci sequence),又称黄金分割数列、因数学家列昂纳多·斐波那契(Leonardoda Fibonacci)以兔子繁殖为例子而引入,故又称为“兔子数列”,指的是这样一个数列:1、1、2、3、5、8、13、21、34、……在数学上,斐波那契数列以如下被以递推的方法定义:F(1)=1,F(2)=1, F(n)=F(n - 1)+F(n - 2)(n ≥ 3,n ∈ N*)在现代物理、准晶体结构、化学等领域,斐波纳契数列都有直接的应用,为此,美国数学会从 1963 年起出版了以《斐波纳契数列季刊》为名的一份数学杂志,用于专门刊载这方面的研究成果。
这个问题可能我比较笨,看大多数解释都是一句话,f(n) = f(n-1) + f(n-2),但是总有点想不明白这个。列了个表格才看清楚咋回事。
| 月份 | 1 | 2 | 3 | 4 | 5 | 6 | 7 |
| 兔子总数 | 1 | 1 | 2 | 3 | 5 | 8 | 13 |
|---|---|---|---|---|---|---|---|
| 具有生育能力兔子 | 0 | 0 | 1 | 1 | 2 | 3 | 5 |
如果这个月是第n个月,那要求这个月兔子的总数,其实就是上个月的兔子总数加上新生出来的兔子。也就是f(n) = f(n-1) + x。这个x是比较难理解的地方。那这个月到底新生出来多少兔子呢?这就是求这个月已经有生育能力的兔子是多少,上上个月所有的兔子就是这个月所有的有生育能力的兔子,这里可以结合表格推一推就很好理解了。所以x就是f(n-2)。
因此可以得到递推f(n) = f(n-1) + f(n-2)。
其实比较简单的问题,不过自己光凭笨脑子想,突然没想明白,记一下这个思考过程。
还有就是牛客网上的高赞答案详解:
|
1 2 3 4 5 6 7 8 9 10 11 12 13 14 15 |
#include <iostream> using namespace std; int main(){ int m; while(cin>>m){ int a=1,b=0,c=0;//a:一个月兔子数,b:两个月兔子数,c:三个月兔子个数 while(--m){//每过一个月兔子数变化 c+=b; b=a; a=c; } cout<<a+b+c<<endl; } } |
有人是以a表示一个月的兔子,b表示两个月的兔子,c表示三个月的兔子(原文这么注释的),我因为这个注释半天没看懂,后来明白了,c意思是已经成熟的兔子,也就是表示3个月及以上的兔子,也就是说c表示能生兔子的兔子。
那就可以以月份循环,每到达新的一个月,b都会成熟,所以c+=b,c就更新了,仍然表示所有成熟了的兔子,b怎么更新呢?b其实就是上个月那些成熟度是1个月的兔子,所以再更新b,用b=a;a呢?a就是现在更新后的c,因为更新后的c表示这个月成熟了的兔子,那这些兔子都会生一只新的兔子,新兔子就是成熟度为1个月的,所以用a=c。这样现在这个月的兔子总数就是a+b+c。
这是我自己没找到注释,自己总结出来的答案详解,这个方法比递归复杂度低,空间占用更是比用数组先去存要少很多。
参考链接
牛顿迭代法
什么是牛顿迭代法?
牛顿迭代法(Newton's method)又称为牛顿-拉夫逊(拉弗森)方法(Newton-Raphson method),它是牛顿在17世纪提出的一种在实数域和复数域上近似求解方程的方法。
阿里云从ubuntu16.04.5升级到ubuntu 18.04.3后调整PHP 7.0到PHP 7.2
目前使用的阿里云服务器是通过参考 阿里云ECS ubuntu 14.04.5 LTS升级到ubuntu 16.04.2 LTS 升级上来的。
升级之后,默认情况下,依旧使用的是 ubuntu 16.04.5 自带的 PHP 7.0 ,然而 ubuntu 18.04.3 系统自带的是 PHP 7.2 。我们希望在升级之后的系统上,能启用比较新版本的 PHP 7.2 。
其实更关键的是,在 ubuntu 18.04.3 系统上, PHP 7.0 相关的部分附加组件,比如 PHP7.0-CURL 已经没办法通过源安装了 ,安全补丁相关的更新估计也不能及时提供。另外就是较新版本的 PHP 7.2 在性能上有不错的提升。
执行如下切换命令(PHP-FPM模式):
|
1 2 3 4 5 6 7 8 9 10 11 12 13 14 15 16 17 18 19 20 21 22 23 24 25 |
$ sudo apt-get install php7.2-fpm # 备份配置文件 $ sudo mv /etc/php/7.2/fpm/php.ini /etc/php/7.2/fpm/php.ini.bak # 拷贝配置文件 $ sudo cp /etc/php/7.0/fpm/php.ini /etc/php/7.2/fpm/php.ini $ sudo systemctl disable php7.0-fpm # 调整Apache与PHP-FPM通信的端口 $ sudo sed -i "s/php7.0-fpm.sock/php7.2-fpm.sock/g" /etc/apache2/sites-enabled/*.conf # 禁用旧服务 $ sudo service php7.0-fpm stop #重启服务 $ sudo service php7.2-fpm restart $ sudo service apache2 restart # 如果使用了WP-Statistics统计插件,需要安装依赖 $ sudo apt-get install php7.2-curl $ sudo apt-get install php7.2-bcmath |
网站响应速度有明显的提升,以前的卡顿表现明显改善。
参考链接
求两个字符串的最长公共子串
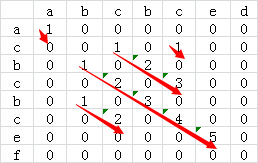
问题:有两个字符串str和str2,求出两个字符串中最长公共子串长度。
比如:str=acbcbcef,str2=abcbced,则str和str2的最长公共子串为bcbce,最长公共子串长度为5。
需要注意的就是 最长公共子串(Longest Common Substring)与 最长公共子序列(Longest Common Subsequence)的区别: 子串要求在原字符串中是连续的,而子序列则只需保持相对顺序,并不要求连续。
算法思路:
1、把两个字符串分别以行和列组成一个二维矩阵。
2、比较二维矩阵中每个点对应行列字符中否相等,相等的话值设置为1,否则设置为0。
3、通过查找出值为1的最长对角线就能找到最长公共子串。
针对于上面的两个字符串我们可以得到的二维矩阵如下:

从上图可以看到,str1和str2共有5个公共子串,但最长的公共子串长度为5。
为了进一步优化算法的效率,我们可以再计算某个二维矩阵的值的时候顺便计算出来当前最长的公共子串的长度,即某个二维矩阵元素的值由record[i][j]=1演变为record[i][j]=1 +record[i-1][j-1],这样就避免了后续查找对角线长度的操作了。修改后的二维矩阵如下:
C++代码实现如下:
|
1 2 3 4 5 6 7 8 9 10 11 12 13 14 15 16 17 18 19 20 21 22 23 24 25 |
string getLCS(string str1, string str2) { vector<vector<int> > record(str1.length(), vector<int>(str2.length())); int maxLen = 0, maxEnd = 0; for(int i=0; i<static_cast<int>(str1.length()); ++i) for (int j = 0; j < static_cast<int>(str2.length()); ++j) { if (str1[i] == str2[j]) { if (i == 0 || j == 0) { record[i][j] = 1; } else { record[i][j] = record[i - 1][j - 1] + 1; } } else { record[i][j] = 0; } if (record[i][j] > maxLen) { maxLen = record[i][j]; maxEnd = i; //若记录i,则最后获取LCS时是取str1的子串 } } return str1.substr(maxEnd - maxLen + 1, maxLen); } |
参考链接
以太帧、ip帧、udp/tcp帧、http报文结构
从最简单的一个http请求开发,根据TCP/IP协议,分开来看每一层的数据帧结构,以及它们是怎样承担起网络服务的。
协议栈
因特网协议栈共有五层:
1.应用层,是网络应用程序及其应用层协议存留的地方。因特网的应用层包括许多协议,常见的有HTTP(它为web文档提供了请求和传送)、SMTP(它提供了电子邮件报文的传输)和FTP(它提供了两个端系统之间的文件传送)。
2.传输层,负责为信源和信宿提供应用程序进程(包括同一终端上的不同进程)间的数据传输服务,这一层上主要定义了两个传输协议,传输控制协议即TCP和用户数据报协议UDP。
3.网络层,负责将数据报独立地从信源发送到信宿,主要解决路由选择、拥塞控制和网络互联等问题。
4.链路层,负责将IP数据报封装成合适在物理网络上传输的帧格式并传输,或将从物理网络接收到的帧解封,取出IP数据报交给网络层。
5.物理层,负责将比特流在结点间传输,即负责物理传输。该层的协议既与链路有关也与传输介质有关。