我们需要在
具体配置过程如下
macOS Mojave (10.14.2)配置连接在OpenVPN服务器实现加密上网或者翻墙。这里我们使用在Tunnelblick 3.7.8实现我们需要的功能。具体配置过程如下
程序启动之后,在顶部的菜单栏中出现程序图标,跟蓝牙,无线等的图标在一排。
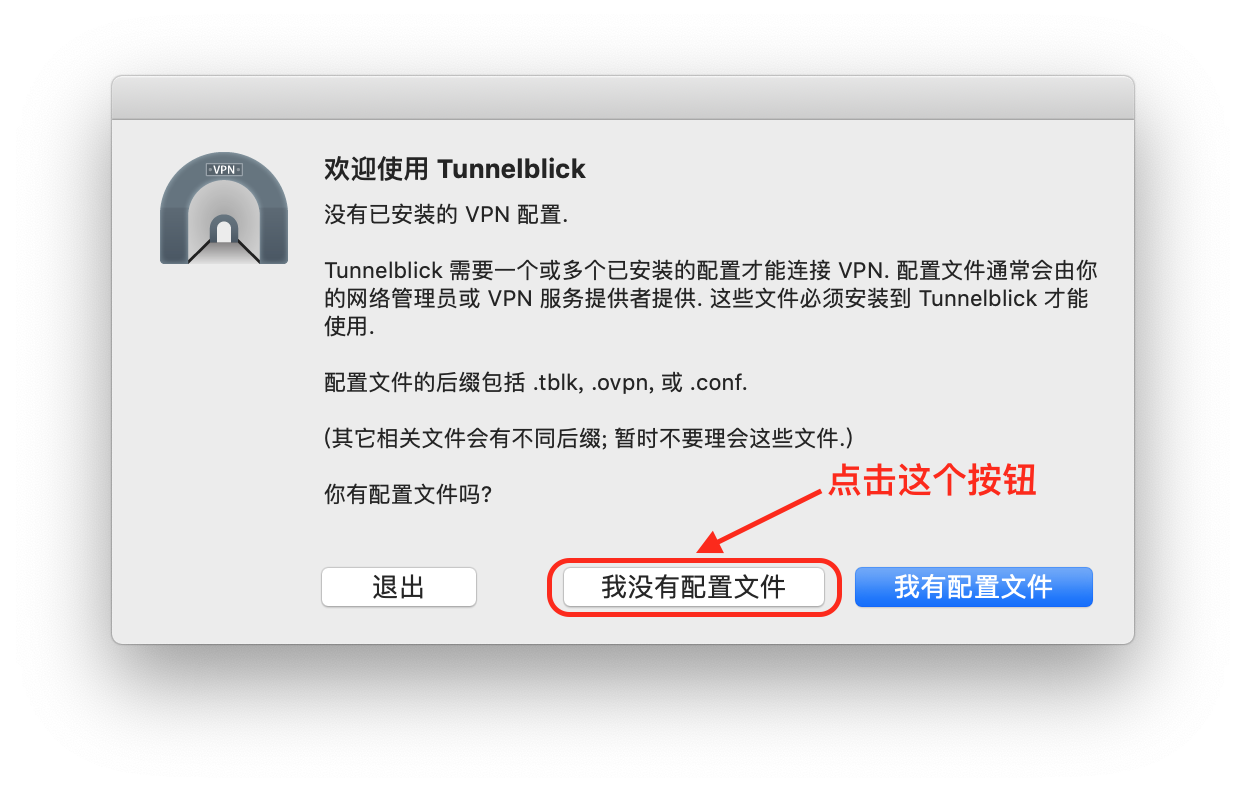
程序第一次启动,如果没有找到配置文件,会出现如下图的界面:

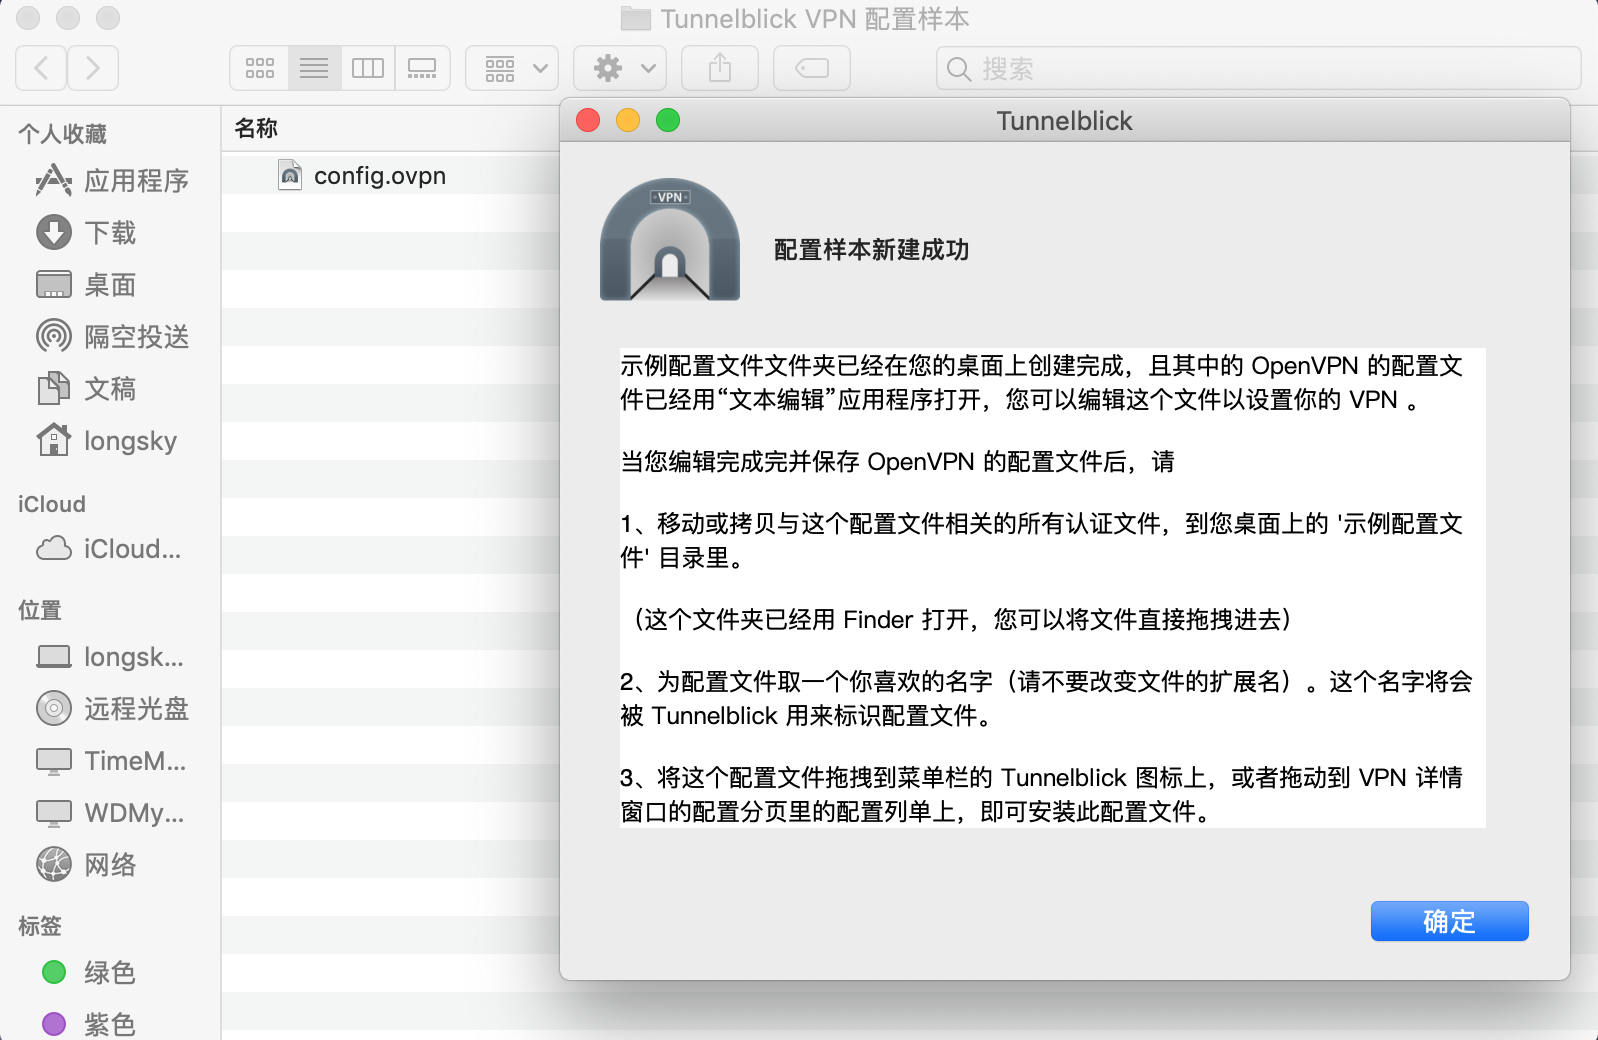
点击之后,会出现一个文件编辑器,并且在桌面上生成一个名为Tunnelblick VPN 配置样本的文件夹,然后我们编辑 config.ovpn 文件,填入我们需要设置的服务器地址,用户名,网络协议等信息。
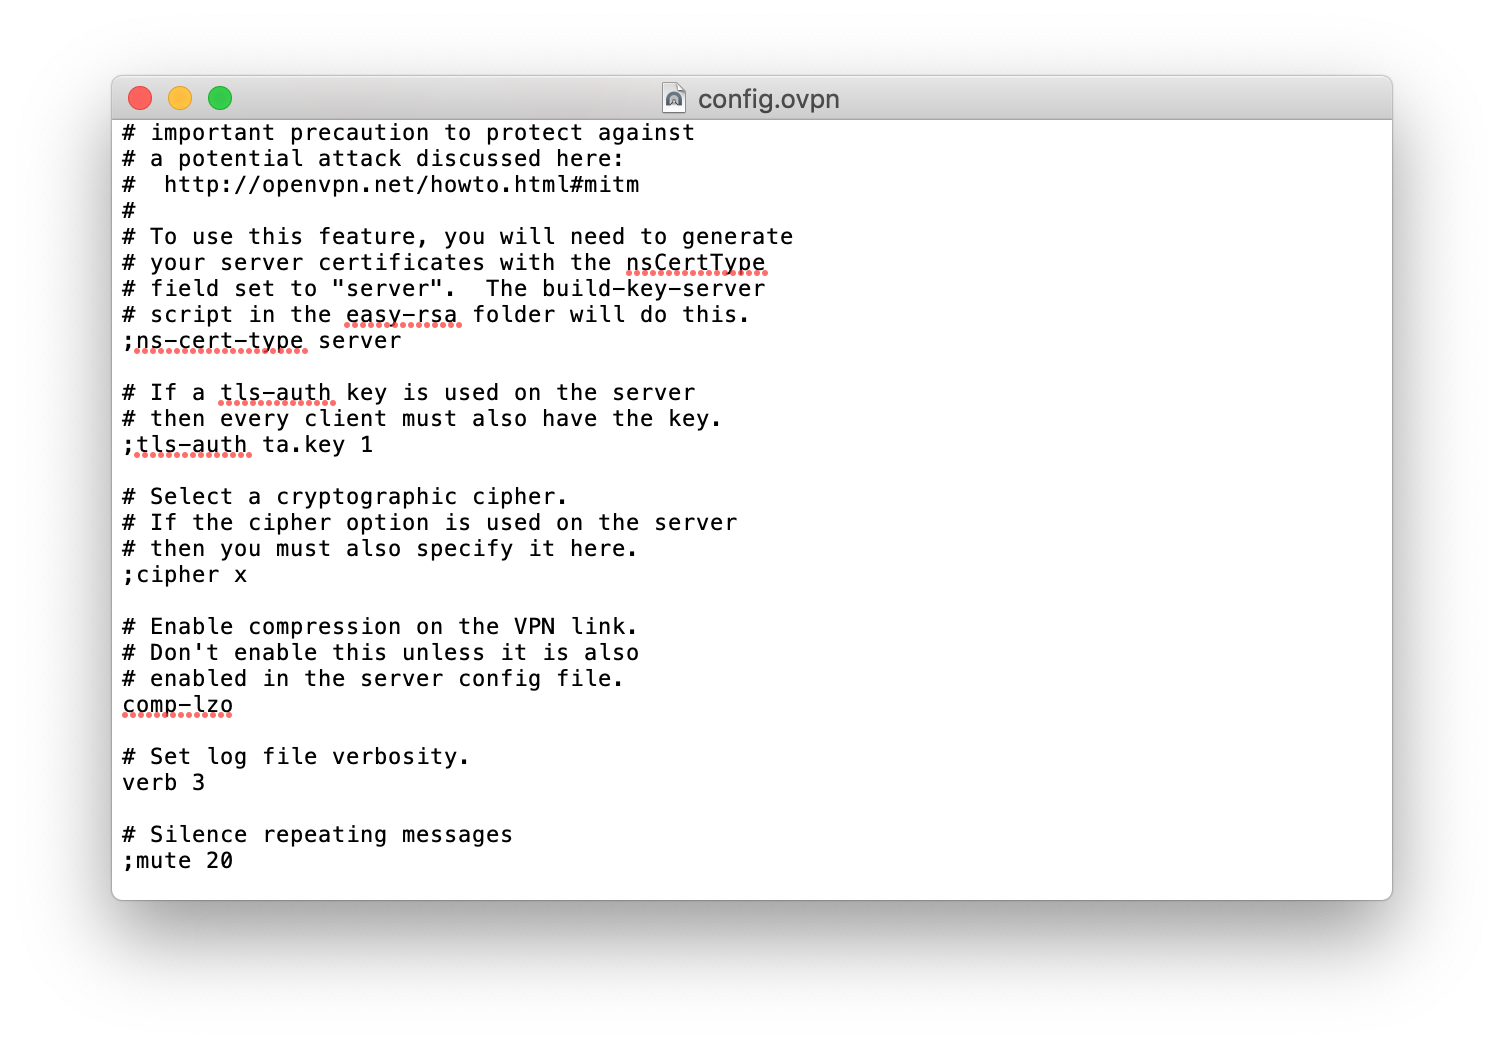
配置文件 config.ovpn 里面的内容如下:
|
1 2 3 4 5 6 7 8 9 10 11 12 13 14 15 16 17 18 19 20 21 22 23 24 25 26 27 28 29 30 31 32 33 34 35 36 37 38 39 40 41 42 43 44 45 46 47 48 49 50 51 52 53 54 55 56 57 58 59 60 61 62 63 64 65 66 67 68 69 70 71 72 73 74 75 76 77 78 79 80 81 82 83 84 85 86 87 88 89 90 91 92 93 94 95 96 97 98 99 100 101 102 103 104 105 106 107 108 109 110 111 112 113 114 115 116 117 118 119 120 121 122 123 124 125 126 |
############################################## # Sample client-side OpenVPN 2.0 config file # # for connecting to multi-client server. # # # # This configuration can be used by multiple # # clients, however each client should have # # its own cert and key files. # # # # On Windows, you might want to rename this # # file so it has a .ovpn extension # ############################################## # Specify that we are a client and that we # will be pulling certain config file directives # from the server. client # Use the same setting as you are using on # the server. # On most systems, the VPN will not function # unless you partially or fully disable # the firewall for the TUN/TAP interface. ;dev tap dev tun # Windows needs the TAP-Win32 adapter name # from the Network Connections panel # if you have more than one. On XP SP2, # you may need to disable the firewall # for the TAP adapter. ;dev-node MyTap # Are we connecting to a TCP or # UDP server? Use the same setting as # on the server. ;proto tcp proto udp # The hostname/IP and port of the server. # You can have multiple remote entries # to load balance between the servers. remote my-server-1 1194 ;remote my-server-2 1194 # Choose a random host from the remote # list for load-balancing. Otherwise # try hosts in the order specified. ;remote-random # Keep trying indefinitely to resolve the # host name of the OpenVPN server. Very useful # on machines which are not permanently connected # to the internet such as laptops. resolv-retry infinite # Most clients don't need to bind to # a specific local port number. nobind # Downgrade privileges after initialization (non-Windows only) ;user nobody ;group nobody # Try to preserve some state across restarts. persist-key persist-tun # If you are connecting through an # HTTP proxy to reach the actual OpenVPN # server, put the proxy server/IP and # port number here. See the man page # if your proxy server requires # authentication. ;http-proxy-retry # retry on connection failures ;http-proxy [proxy server] [proxy port #] # Wireless networks often produce a lot # of duplicate packets. Set this flag # to silence duplicate packet warnings. ;mute-replay-warnings # SSL/TLS parms. # See the server config file for more # description. It's best to use # a separate .crt/.key file pair # for each client. A single ca # file can be used for all clients. ca ca.crt cert client.crt key client.key # Verify server certificate by checking # that the certicate has the nsCertType # field set to "server". This is an # important precaution to protect against # a potential attack discussed here: # http://openvpn.net/howto.html#mitm # # To use this feature, you will need to generate # your server certificates with the nsCertType # field set to "server". The build-key-server # script in the easy-rsa folder will do this. ;ns-cert-type server # If a tls-auth key is used on the server # then every client must also have the key. ;tls-auth ta.key 1 # Select a cryptographic cipher. # If the cipher option is used on the server # then you must also specify it here. ;cipher x # Enable compression on the VPN link. # Don't enable this unless it is also # enabled in the server config file. # comp-lzo # 从2.5版本开始 comp-lzo 被废弃,要求使用 compress lzo 配置 # https://github.com/Nyr/openvpn-install/issues/430 compress lzo # Set log file verbosity. verb 3 # Silence repeating messages ;mute 20 |
-
remote字段,这个字段,填写服务器的域名或者IP地址以及端口号proto字段,这个字段,填写协议类型tcp或者udpca字段,这个字段,填写加密认证的证书路径。这需要服务器创建一个正常的SSL加密证书。相当于HTTPS的认证证书,必须有,否则SSL无法建立连接。即使是用户名密码认证的情况,也需要客户端使用私钥加密,服务器使用公钥解密,之后才会交换用户名密码。
如果需要用户名密码登录,那么也需要提供一个有效的 ca 证书,一般从服务端下载下来,类似HTTPS的证书,在Windows下可能不需要提供这个证书,其实是客户端从服务器主动下载了这个证书,然而Tunnelblick需要我们手工下载这个证书然后存储到指定的目录或者跟配置文件同一个文件夹下。其实从OpenVPN生成的文件中,这个 ca 证书被包含在config.ovpn文件里面了。
很多时候,我们发现这个证书其实跟网站HTTPS使用的证书是相同的!这就意味着我们可以直接使用浏览器下载的证书来连接。
完成后双击 config.ovpn 即可成功安装配置文件。
参考链接
- Tunnelblick free software for OpenVPN on OS X and macOS
- Tunnelblick/Tunnelblick
- TunnelBlick 客户端配置说明
- Tunnelblick 支持 auth-user-pass 吗
- Using Tunnelblick as a VPN Server
- openVPN--Mac版本的安装步骤
- Howto: Make Your Own Cert With OpenSSL
- OpenVPN Server with Username/Password Authentication
- Tunnelblick VPN Configurations Details
- Automating connecting with a password
- 使用openconnect代替cisco anyconnect
2020-01-08 16:40:05 Tunnelblick[4250] Converting/Installing /Users/liliqin/Desktop/Tunnelblick VPN 配置样本/client.ovpn: Converted OpenVPN configuration
2020-01-08 16:40:10 Tunnelblick[4250] Tunnelblick 需要进行需要管理员授权方可进行的操作.
2020-01-08 16:40:10 Tunnelblick[4250] Beginning installation or repair
2020-01-08 16:40:10 Tunnelblick[4250] Installation or repair succeeded; Log:
Tunnelblick installer started 2020-01-08 16:40:10. 3 arguments: 0x0001
/Users/liliqin/Library/Application Support/Tunnelblick/Configurations/client.tblk
/private/var/folders/b4/852lppw14pl2kf3yqntn19k00000gn/T/Tunnelblick-FmXjSb/client.tblk
Copied /private/var/folders/b4/852lppw14pl2kf3yqntn19k00000gn/T/Tunnelblick-FmXjSb/client.tblk
to /Users/liliqin/Library/Application Support/Tunnelblick/Configurations/client.tblk.temp
Renamed /Users/liliqin/Library/Application Support/Tunnelblick/Configurations/client.tblk.temp
to /Users/liliqin/Library/Application Support/Tunnelblick/Configurations/client.tblk
Changed ownership of /Users/liliqin/Library/Application Support/Tunnelblick/Configurations/client.tblk and its contents from 501:20 to 501:80
Deleted /Library/Application Support/Tunnelblick/Users/liliqin/client.tblk
Copied /Users/liliqin/Library/Application Support/Tunnelblick/Configurations/client.tblk
to /Library/Application Support/Tunnelblick/Users/liliqin/client.tblk.temp
Renamed /Library/Application Support/Tunnelblick/Users/liliqin/client.tblk.temp
to /Library/Application Support/Tunnelblick/Users/liliqin/client.tblk
Changed ownership of /Library/Application Support/Tunnelblick/Users/liliqin/client.tblk and its contents from 501:80 to 0:0
Changed permissions from 750 to 755 on /Library/Application Support/Tunnelblick/Users/liliqin/client.tblk
Changed permissions from 750 to 755 on /Library/Application Support/Tunnelblick/Users/liliqin/client.tblk/Contents
Changed permissions from 750 to 755 on /Library/Application Support/Tunnelblick/Users/liliqin/client.tblk/Contents/Resources
Changed permissions from 740 to 700 on /Library/Application Support/Tunnelblick/Users/liliqin/client.tblk/Contents/Resources/config.ovpn
Updated secure (shadow) copy of client.tblk
Tunnelblick installer finished without error
2020-01-08 16:40:18 Tunnelblick[4250] Cleared 'expect disconnect' flag
2020-01-08 16:40:20 Tunnelblick[4250] Keychain item retrieved successfully for service = 'Tunnelblick-Auth-client' account = 'username'
2020-01-08 16:40:20 Tunnelblick[4250] Keychain item retrieved successfully for service = 'Tunnelblick-Auth-client' account = 'password'
2020-01-08 16:40:53 Tunnelblick[4250] currentIPInfo(Name): IP address info could not be fetched within 34.3 seconds; the error was 'Error Domain=NSURLErrorDomain Code=-1001 "请求超时。" UserInfo={NSUnderlyingError=0x600003165560 {Error Domain=kCFErrorDomainCFNetwork Code=-1001 "请求超时。" UserInfo={NSErrorFailingURLStringKey=https://tunnelblick.net/ipinfo, NSErrorFailingURLKey=https://tunnelblick.net/ipinfo, _kCFStreamErrorCodeKey=-2102, _kCFStreamErrorDomainKey=4, NSLocalizedDescription=请求超时。}}, NSErrorFailingURLStringKey=https://tunnelblick.net/ipinfo, NSErrorFailingURLKey=https://tunnelblick.net/ipinfo, _kCFStreamErrorDomainKey=4, _kCFStreamErrorCodeKey=-2102, NSLocalizedDescription=请求超时。}'; the response was '(null)'
2020-01-08 16:40:53 Tunnelblick[4250] An error occured fetching IP address information before connecting
我这里写的是
remote my-server-1 1194你需要配置成自己的服务器的域名 端口 才行。Thu Jan 09 08:38:40 2020 NOTE: VPN Client 2.1 requires '--script-security 2' or higher to call user-defined scripts or executables
Thu Jan 09 08:38:40 2020 Socket Buffers: R=[8192->8192] S=[8192->8192]
Thu Jan 09 08:38:40 2020 Attempting to establish TCP connection with [AF_INET]***.**.***.***:8443
Thu Jan 09 08:38:40 2020 TCP connection established with [AF_INET]***.**.***.***:8443
Thu Jan 09 08:38:40 2020 TCPv4_CLIENT link local: [undef]
Thu Jan 09 08:38:40 2020 TCPv4_CLIENT link remote: [AF_INET]***.**.***.***:8443
Thu Jan 09 08:38:40 2020 TLS: Initial packet from [AF_INET]***.**.***.***:8443, sid=******** ********
Thu Jan 09 08:38:40 2020 VERIFY OK: depth=1, C=CN, ST=GD, L=SZ, O=********, OU=********, CN=******** CA, name=********, emailAddress=[email]support@********.com[/email]
Thu Jan 09 08:38:40 2020 VERIFY OK: nsCertType=SERVER
Thu Jan 09 08:38:40 2020 VERIFY OK: depth=0, C=CN, ST=GD, L=SZ, O=********, OU=********, CN=server, name=********, emailAddress=[email]support@********.com[/email]
Thu Jan 09 08:38:40 2020 Data Channel Encrypt: Cipher 'BF-CBC' initialized with 128 bit key
Thu Jan 09 08:38:40 2020 Data Channel Encrypt: Using 160 bit message hash 'SHA1' for HMAC authentication
Thu Jan 09 08:38:40 2020 Data Channel Decrypt: Cipher 'BF-CBC' initialized with 128 bit key
Thu Jan 09 08:38:40 2020 Data Channel Decrypt: Using 160 bit message hash 'SHA1' for HMAC authentication
Thu Jan 09 08:38:40 2020 Control Channel: TLSv1, cipher TLSv1/SSLv3 DHE-RSA-AES256-SHA, 1024 bit RSA
Thu Jan 09 08:38:40 2020 [server] Peer Connection Initiated with [AF_INET]***.**.***.***:8443
Thu Jan 09 08:38:42 2020 SENT CONTROL [server]: 'PUSH_REQUEST' (status=1)
Thu Jan 09 08:38:42 2020 PUSH: Received control message: 'PUSH_REPLY,route 192.168.88.100 255.255.255.255,route 192.168.200.183 255.255.255.255,route 192.168.200.186 255.255.255.255,route 10.1.2.16 255.255.255.255,route 10.1.2.238 255.255.255.255,route 10.1.2.64 255.255.255.255,route 192.168.196.66 255.255.255.255,route 192.168.196.40 255.255.255.255,route 192.168.196.130 255.255.255.255,route 10.1.2.22 255.255.255.255,route 10.1.2.0 255.255.255.0,route 192.168.196.0 255.255.255.0,route 10.1.19.0 255.255.255.0,route 172.17.0.0 255.255.0.0,route 192.168.66.0 255.255.255.0,route 192.168.200.181 255.255.255.255,route-gateway 192.168.254.1,ping 10,ping-restart 120,ifconfig 192.168.254.44 255.255.255.0'
Thu Jan 09 08:38:42 2020 OPTIONS IMPORT: timers and/or timeouts modified
Thu Jan 09 08:38:42 2020 OPTIONS IMPORT: --ifconfig/up options modified
Thu Jan 09 08:38:42 2020 OPTIONS IMPORT: route options modified
Thu Jan 09 08:38:42 2020 OPTIONS IMPORT: route-related options modified
Thu Jan 09 08:38:42 2020 Preserving previous TUN/TAP instance: 本地连接 2
Thu Jan 09 08:38:42 2020 Initialization Sequence Completed