在手机上去实现一些动画效果算是件比较炫酷的事情,因此Android系统在一开始的时候就给我们提供了两种实现动画效果的方式,逐帧动画 (frame-by-frame animation)和补间动画(tweened animation)。逐帧动画的工作原理很简单,其实就是将一个完整的动画拆分成一张张单独的图片,然后再将它们连贯起来进行播放,类似于动画片的工作 原理。补间动画则是可以对View进行一系列的动画操作,包括淡入淡出、缩放、平移、旋转四种。
然而自Android 3.0版本开始,系统给我们提供了一种全新的动画模式,属性动画(property animation),它的功能非常强大,弥补了之前补间动画的一些缺陷,几乎是可以完全替代掉补间动画了。对于逐帧动画和补间动画的用法,我不想再多 讲,它们的技术已经比较老了,而且网上资料也非常多,那么今天我们这篇文章的主题就是对Android属性动画进行一次完全解析。
为什么要引入属性动画?
Android 之前的补间动画机制其实还算是比较健全的,在android.view.animation包下面有好多的类可以供我们操作,来完成一系列的动画效果,比 如说对View进行移动、缩放、旋转和淡入淡出,并且我们还可以借助AnimationSet来将这些动画效果组合起来使用,除此之外还可以通过配置 Interpolator来控制动画的播放速度等等等等。那么这里大家可能要产生疑问了,既然之前的动画机制已经这么健全了,为什么还要引入属性动画呢?
其 实上面所谓的健全都是相对的,如果你的需求中只需要对View进行移动、缩放、旋转和淡入淡出操作,那么补间动画确实已经足够健全了。但是很显然,这些功 能是不足以覆盖所有的场景的,一旦我们的需求超出了移动、缩放、旋转和淡入淡出这四种对View的操作,那么补间动画就不能再帮我们忙了,也就是说它在功 能和可扩展方面都有相当大的局限性,那么下面我们就来看看补间动画所不能胜任的场景。
注意上面我在介绍补间动画的时候都有使用“对View 进行操作”这样的描述,没错,补间动画是只能够作用在View上的。也就是说,我们可以对一个Button、TextView、甚至是 LinearLayout、或者其它任何继承自View的组件进行动画操作,但是如果我们想要对一个非View的对象进行动画操作,抱歉,补间动画就帮不 上忙了。可能有的朋友会感到不能理解,我怎么会需要对一个非View的对象进行动画操作呢?这里我举一个简单的例子,比如说我们有一个自定义的View, 在这个View当中有一个Point对象用于管理坐标,然后在onDraw()方法当中就是根据这个Point对象的坐标值来进行绘制的。也就是说,如果 我们可以对Point对象进行动画操作,那么整个自定义View的动画效果就有了。显然,补间动画是不具备这个功能的,这是它的第一个缺陷。
然 后补间动画还有一个缺陷,就是它只能够实现移动、缩放、旋转和淡入淡出这四种动画操作,那如果我们希望可以对View的背景色进行动态地改变呢?很遗憾, 我们只能靠自己去实现了。说白了,之前的补间动画机制就是使用硬编码的方式来完成的,功能限定死就是这些,基本上没有任何扩展性可言。
最 后,补间动画还有一个致命的缺陷,就是它只是改变了View的显示效果而已,而不会真正去改变View的属性。什么意思呢?比如说,现在屏幕的左上角有一 个按钮,然后我们通过补间动画将它移动到了屏幕的右下角,现在你可以去尝试点击一下这个按钮,点击事件是绝对不会触发的,因为实际上这个按钮还是停留在屏 幕的左上角,只不过补间动画将这个按钮绘制到了屏幕的右下角而已。
也正是因为这些原因,Android开发团队决定在3.0版本当中引入属性动画这个功能,那么属性动画是不是就把上述的问题全部解决掉了?下面我们就来一起看一看。
新 引入的属性动画机制已经不再是针对于View来设计的了,也不限定于只能实现移动、缩放、旋转和淡入淡出这几种动画操作,同时也不再只是一种视觉上的动画 效果了。它实际上是一种不断地对值进行操作的机制,并将值赋值到指定对象的指定属性上,可以是任意对象的任意属性。所以我们仍然可以将一个View进行移 动或者缩放,但同时也可以对自定义View中的Point对象进行动画操作了。我们只需要告诉系统动画的运行时长,需要执行哪种类型的动画,以及动画的初 始值和结束值,剩下的工作就可以全部交给系统去完成了。
既然属性动画的实现机制是通过对目标对象进行赋值并修改其属性来实现的,那么之前所说的按钮显示的问题也就不复存在了,如果我们通过属性动画来移动一个按钮,那么这个按钮就是真正的移动了,而不再是仅仅在另外一个位置绘制了而已。
好了,介绍了这么多,相信大家已经对属性动画有了一个最基本的认识了,下面我们就来开始学习一下属性动画的用法。
ValueAnimator
ValueAnimator 是整个属性动画机制当中最核心的一个类,前面我们已经提到了,属性动画的运行机制是通过不断地对值进行操作来实现的,而初始值和结束值之间的动画过渡就是 由ValueAnimator这个类来负责计算的。它的内部使用一种时间循环的机制来计算值与值之间的动画过渡,我们只需要将初始值和结束值提供给 ValueAnimator,并且告诉它动画所需运行的时长,那么ValueAnimator就会自动帮我们完成从初始值平滑地过渡到结束值这样的效果。 除此之外,ValueAnimator还负责管理动画的播放次数、播放模式、以及对动画设置监听器等,确实是一个非常重要的类。
但是ValueAnimator的用法却一点都不复杂,我们先从最简单的功能看起吧,比如说想要将一个值从0平滑过渡到1,时长300毫秒,就可以这样写:
|
|
ValueAnimator anim = ValueAnimator.ofFloat(0f, 1f); anim.setDuration(300); anim.start(); |
怎 么样?很简单吧,调用ValueAnimator的ofFloat()方法就可以构建出一个ValueAnimator的实例,ofFloat()方法当 中允许传入多个float类型的参数,这里传入0和1就表示将值从0平滑过渡到1,然后调用ValueAnimator的setDuration()方法 来设置动画运行的时长,最后调用start()方法启动动画。
用法就是这么简单,现在如果你运行一下上面的代码,动画就会执行了。可是这只是一个将值从0过渡到1的动画,又看不到任何界面效果,我们怎样才能知道这个动画是不是已经真正运行了呢?这就需要借助监听器来实现了,如下所示:
|
|
ValueAnimator anim = ValueAnimator.ofFloat(0f, 1f); anim.setDuration(300); anim.addUpdateListener(new ValueAnimator.AnimatorUpdateListener() { @Override public void onAnimationUpdate(ValueAnimator animation) { float currentValue = (float) animation.getAnimatedValue(); Log.d("TAG", "cuurent value is " + currentValue); } }); anim.start(); |
可以看到,这里我们通过addUpdateListener()方法来添加一个动画的监听器,在动画执行的过程中会不断地进行回调,我们只需要在回调方法当中将当前的值取出并打印出来,就可以知道动画有没有真正运行了。运行上述代码,控制台打印如下所示:
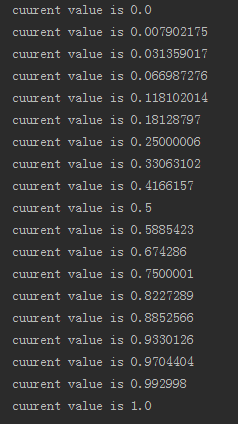
从 打印日志的值我们就可以看出,ValueAnimator确实已经在正常工作了,值在300毫秒的时间内从0平滑过渡到了1,而这个计算工作就是由 ValueAnimator帮助我们完成的。另外ofFloat()方法当中是可以传入任意多个参数的,因此我们还可以构建出更加复杂的动画逻辑,比如说 将一个值在5秒内从0过渡到5,再过渡到3,再过渡到10,就可以这样写:
|
|
ValueAnimator anim = ValueAnimator.ofFloat(0f, 5f, 3f, 10f); anim.setDuration(5000); anim.start(); |
当然也许你并不需要小数位数的动画过渡,可能你只是希望将一个整数值从0平滑地过渡到100,那么也很简单,只需要调用ValueAnimator的ofInt()方法就可以了,如下所示:
|
|
ValueAnimator anim = ValueAnimator.ofInt(0, 100); |
ValueAnimator当中最常用的应该就是ofFloat()和ofInt()这两个方法了,另外还有一个ofObject()方法,我会在下篇文章进行讲解。
那 么除此之外,我们还可以调用setStartDelay()方法来设置动画延迟播放的时间,调用setRepeatCount()和 setRepeatMode()方法来设置动画循环播放的次数以及循环播放的模式,循环模式包括RESTART和REVERSE两种,分别表示重新播放和 倒序播放的意思。这些方法都很简单,我就不再进行详细讲解了。
ObjectAnimator
相 比于ValueAnimator,ObjectAnimator可能才是我们最常接触到的类,因为ValueAnimator只不过是对值进行了一个平滑 的动画过渡,但我们实际使用到这种功能的场景好像并不多。而ObjectAnimator则就不同了,它是可以直接对任意对象的任意属性进行动画操作的, 比如说View的alpha属性。
不过虽说ObjectAnimator会更加常用一些,但是它其实是继承自ValueAnimator 的,底层的动画实现机制也是基于ValueAnimator来完成的,因此ValueAnimator仍然是整个属性动画当中最核心的一个类。那么既然是 继承关系,说明ValueAnimator中可以使用的方法在ObjectAnimator中也是可以正常使用的,它们的用法也非常类似,这里如果我们想 要将一个TextView在5秒中内从常规变换成全透明,再从全透明变换成常规,就可以这样写:
|
|
ObjectAnimator animator = ObjectAnimator.ofFloat(textview, "alpha", 1f, 0f, 1f); animator.setDuration(5000); animator.start(); |
可 以看到,我们还是调用了ofFloat()方法来去创建一个ObjectAnimator的实例,只不过ofFloat()方法当中接收的参数有点变化 了。这里第一个参数要求传入一个object对象,我们想要对哪个对象进行动画操作就传入什么,这里我传入了一个textview。第二个参数是想要对该 对象的哪个属性进行动画操作,由于我们想要改变TextView的不透明度,因此这里传入"alpha"。后面的参数就是不固定长度了,想要完成什么样的 动画就传入什么值,这里传入的值就表示将TextView从常规变换成全透明,再从全透明变换成常规。之后调用setDuration()方法来设置动画 的时长,然后调用start()方法启动动画,效果如下图所示:
学会了这一个用法之后,其它的用法我们就可以举一反三了,那比如说我们想要将TextView进行一次360度的旋转,就可以这样写:
|
|
ObjectAnimator animator = ObjectAnimator.ofFloat(textview, "rotation", 0f, 360f); animator.setDuration(5000); animator.start(); |
可以看到,这里我们将第二个参数改成了"rotation",然后将动画的初始值和结束值分别设置成0和360,现在运行一下代码,效果如下图所示:
那么如果想要将TextView先向左移出屏幕,然后再移动回来,就可以这样写:
|
|
float curTranslationX = textview.getTranslationX(); ObjectAnimator animator = ObjectAnimator.ofFloat(textview, "translationX", curTranslationX, -500f, curTranslationX); animator.setDuration(5000); animator.start(); |
这 里我们先是调用了TextView的getTranslationX()方法来获取到当前TextView的translationX的位置,然后 ofFloat()方法的第二个参数传入"translationX",紧接着后面三个参数用于告诉系统TextView应该怎么移动,现在运行一下代 码,效果如下图所示:

然后我们还可以TextView进行缩放操作,比如说将TextView在垂直方向上放大3倍再还原,就可以这样写:
|
|
ObjectAnimator animator = ObjectAnimator.ofFloat(textview, "scaleY", 1f, 3f, 1f); animator.setDuration(5000); animator.start(); |
这里将ofFloat()方法的第二个参数改成了"scaleY",表示在垂直方向上进行缩放,现在重新运行一下程序,效果如下图所示:

到 目前为止,ObjectAnimator的用法还算是相当简单吧,但是我相信肯定会有不少朋友现在心里都有同样一个疑问,就是ofFloat()方法的第 二个参数到底可以传哪些值呢?目前我们使用过了alpha、rotation、translationX和scaleY这几个值,分别可以完成淡入淡出、 旋转、水平移动、垂直缩放这几种动画,那么还有哪些值是可以使用的呢?其实这个问题的答案非常玄乎,就是我们可以传入任意的值到ofFloat()方法的 第二个参数当中。任意的值?相信这很出乎大家的意料吧,但事实就是如此。因为ObjectAnimator在设计的时候就没有针对于View来进行设计, 而是针对于任意对象的,它所负责的工作就是不断地向某个对象中的某个属性进行赋值,然后对象根据属性值的改变再来决定如何展现出来。
那么比如说我们调用下面这样一段代码:
|
|
ObjectAnimator.ofFloat(textview, "alpha", 1f, 0f); |
其实这段代码的意思就是ObjectAnimator会帮我们不断地改变textview对象中alpha属性的值,从1f变化到0f。然后textview对象需要根据alpha属性值的改变来不断刷新界面的显示,从而让用户可以看出淡入淡出的动画效果。
那 么textview对象中是不是有alpha属性这个值呢?没有,不仅textview没有这个属性,连它所有的父类也是没有这个属性的!这就奇怪 了,textview当中并没有alpha这个属性,ObjectAnimator是如何进行操作的呢?其实ObjectAnimator内部的工作机制 并不是直接对我们传入的属性名进行操作的,而是会去寻找这个属性名对应的get和set方法,因此alpha属性所对应的get和set方法应该就是:
|
|
public void setAlpha(float value); public float getAlpha(); |
那么textview对象中是否有这两个方法呢?确实有,并且这两个方法是由View对象提供的,也就是说不仅TextView可以使用这个属性来进行淡入淡出动画操作,任何继承自View的对象都可以的。
既 然alpha是这个样子,相信大家一定已经明白了,前面我们所用的所有属性都是这个工作原理,那么View当中一定也存在着setRotation()、 getRotation()、setTranslationX()、getTranslationX()、setScaleY()、 getScaleY()这些方法,不信的话你可以到View当中去找一下。
组合动画
独立的动画能够实现的视觉效果毕竟是相当有限的,因此将多个动画组合到一起播放就显得尤为重要。幸运的是,Android团队在设计属性动画的时候也充分考虑到了组合动画的功能,因此提供了一套非常丰富的API来让我们将多个动画组合到一起。
实 现组合动画功能主要需要借助AnimatorSet这个类,这个类提供了一个play()方法,如果我们向这个方法中传入一个Animator对象 (ValueAnimator或ObjectAnimator)将会返回一个AnimatorSet.Builder的实 例,AnimatorSet.Builder中包括以下四个方法:
- after(Animator anim) 将现有动画插入到传入的动画之后执行
- after(long delay) 将现有动画延迟指定毫秒后执行
- before(Animator anim) 将现有动画插入到传入的动画之前执行
- with(Animator anim) 将现有动画和传入的动画同时执行
好的,有了这四个方法,我们就可以完成组合动画的逻辑了,那么比如说我们想要让TextView先从屏幕外移动进屏幕,然后开始旋转360度,旋转的同时进行淡入淡出操作,就可以这样写:
|
|
ObjectAnimator moveIn = ObjectAnimator.ofFloat(textview, "translationX", -500f, 0f); ObjectAnimator rotate = ObjectAnimator.ofFloat(textview, "rotation", 0f, 360f); ObjectAnimator fadeInOut = ObjectAnimator.ofFloat(textview, "alpha", 1f, 0f, 1f); AnimatorSet animSet = new AnimatorSet(); animSet.play(rotate).with(fadeInOut).after(moveIn); animSet.setDuration(5000); animSet.start(); |
可以看到,这里我们先是把三个动画的对象全部创建出来,然后new出一个AnimatorSet对象之后将这三个动画对象进行播放排序,让旋转和淡入淡出动画同时进行,并把它们插入到了平移动画的后面,最后是设置动画时长以及启动动画。运行一下上述代码,效果如下图所示:
Animator监听器
在 很多时候,我们希望可以监听到动画的各种事件,比如动画何时开始,何时结束,然后在开始或者结束的时候去执行一些逻辑处理。这个功能是完全可以实现 的,Animator类当中提供了一个addListener()方法,这个方法接收一个AnimatorListener,我们只需要去实现这个 AnimatorListener就可以监听动画的各种事件了。
大家已经知道,ObjectAnimator是继承自 ValueAnimator的,而ValueAnimator又是继承自Animator的,因此不管是ValueAnimator还是 ObjectAnimator都是可以使用addListener()这个方法的。另外AnimatorSet也是继承自Animator的,因此 addListener()这个方法算是个通用的方法。
添加一个监听器的代码如下所示:
可 以看到,我们需要实现接口中的四个方法,onAnimationStart()方法会在动画开始的时候调用,onAnimationRepeat()方法 会在动画重复执行的时候调用,onAnimationEnd()方法会在动画结束的时候调用,onAnimationCancel()方法会在动画被取消 的时候调用。
但是也许很多时候我们并不想要监听那么多个事件,可能我只想要监听动画结束这一个事件,那么每次都要将四个接口全部实现 一遍就显得非常繁琐。没关系,为此Android提供了一个适配器类,叫作AnimatorListenerAdapter,使用这个类就可以解决掉实现 接口繁琐的问题了,如下所示:
|
|
anim.addListener(new AnimatorListenerAdapter() { }); |
这 里我们向addListener()方法中传入这个适配器对象,由于AnimatorListenerAdapter中已经将每个接口都实现好了,所以这 里不用实现任何一个方法也不会报错。那么如果我想监听动画结束这个事件,就只需要单独重写这一个方法就可以了,如下所示:
|
|
anim.addListener(new AnimatorListenerAdapter() { @Override public void onAnimationEnd(Animator animation) { } }); |
使用XML编写动画
我们可以使用代码来编写所有的动画功能,这也是最常用的一种做法。不过,过去的补间动画除了使用代码编写之外也是可以使用XML编写的,因此属性动画也提供了这一功能,即通过XML来完成和代码一样的属性动画功能。
通过XML来编写动画可能会比通过代码来编写动画要慢一些,但是在重用方面将会变得非常轻松,比如某个将通用的动画编写到XML里面,我们就可以在各个界面当中轻松去重用它。
如果想要使用XML来编写动画,首先要在res目录下面新建一个animator文件夹,所有属性动画的XML文件都应该存放在这个文件夹当中。然后在XML文件中我们一共可以使用如下三种标签:
- <animator> 对应代码中的ValueAnimator
- <objectAnimator> 对应代码中的ObjectAnimator
- <set> 对应代码中的AnimatorSet
那么比如说我们想要实现一个从0到100平滑过渡的动画,在XML当中就可以这样写:
|
|
<animator xmlns:android="http://schemas.android.com/apk/res/android" android:valueFrom="0" android:valueTo="100" android:valueType="intType"/> |
而如果我们想将一个视图的alpha属性从1变成0,就可以这样写:
|
|
<objectAnimator xmlns:android="http://schemas.android.com/apk/res/android" android:valueFrom="1" android:valueTo="0" android:valueType="floatType" android:propertyName="alpha"/> |
其实XML编写动画在可读性方面还是挺高的,上面的内容相信不用我做解释大家也都看得懂吧。
另外,我们也可以使用XML来完成复杂的组合动画操作,比如将一个视图先从屏幕外移动进屏幕,然后开始旋转360度,旋转的同时进行淡入淡出操作,就可以这样写:
这段XML实现的效果和我们刚才通过代码来实现的组合动画的效果是一模一样的,每个参数的含义都非常清楚,相信大家都是一看就懂,我就不再一一解释了。
最后XML文件是编写好了,那么我们如何在代码中把文件加载进来并将动画启动呢?只需调用如下代码即可:
调用AnimatorInflater的loadAnimator来将XML动画文件加载进来,然后再调用setTarget()方法将这个动画设置到某一个对象上面,最后再调用start()方法启动动画就可以了,就是这么简单。
原文链接:Android属性动画完全解析(上),初识属性动画的基本用法