WordPress插件的语言国际化

$ brew install wp-cli

# Create a POT file for the WordPress plugin/theme in the current directory
# wp i18n make-pot . languages/my-plugin.pot
# Create a POT file for the continents and cities list in WordPress core.
#wp i18n make-pot . continents-and-cities.pot --include="wp-admin/includes/continents-cities.php" --ignore-domain

$ wp i18n make-pot . languages/SpeakIt-zh_CN.po

$ brew install gettext
 
$ brew link --force gettext
 
$ brew install Gtranslator

# 比较好用的反而是QT的 Linguist, 其实直接文本编辑器编辑,更直接
$ gtranslator languages/SpeakIt-zh_CN.po

$ msgfmt -o SpeakIt-zh_CN.mo SpeakIt-zh_CN.po 

调试的时候,通过在 wp-config.php 中定义 define('WPLANG', 'zh_CN');  来切换语言类型。

参考链接


Gettext po文件编辑器

Gettext 是一个非常老牌和成熟的国际化和本地化解决方案,在 Linux 下几乎每个 GNU 程序中都能见到 Gettext 的身影。在 Gettext 中,每个 locale 对应一个 po 文件,虽说 po 文件是纯文本,但是如果用普通的文本编辑器来编辑是非常麻烦的。

正好这两天国际化 ,搜到了几个 Linux 下的 po 编辑器~,推荐 GtranslatorWordPress 翻译( i18n )的时候使用这些工具。

macOS 下安装如下命令:

$ brew install gettext

$ brew link --force gettext

$ brew install Gtranslator

$ gtranslator

继续阅读Gettext po文件编辑器

WordPress文章内容加上TTS语音朗读

浏览一些博客的时候是否有看到过在内容上面有可以选择语音朗读功能,看着感觉还是蛮炫酷的。尤其是移动端的网站阅读体验比较好,比如一些内容教程、小说类型的网站可以使用这样的功能。

这里我们一般是使用的是百度提供的TTS(Text To Speech)文本到语音功能。

如下是实现这个基本功能的插件实现的代码。如下:

<?php
/**
 * @package SpeakIt
 */
/*
Plugin Name: Speak It
Plugin URI: https://www.mobibrw.com/speakit
Description: Plugin for Speak
Version: 1.0
Author: longsky
Author URI: https://www.mobibrw.com
License: GPLv2 or later
Text Domain: SpeakIt
*/
?>
<?php
  function mbStrSplit ($string, $len = 1) { //对内容进行分割
    $start = 0;
    $strlen = mb_strlen($string);
    while ($strlen) {
      $array[] = mb_substr($string, $start, $len, "utf8");
      $string = mb_substr($string, $len, $strlen, "utf8");
      $strlen = mb_strlen($string);
    }
    return $array;
  }

  function match_chinese($chars, $encoding = 'utf8') { //过滤特殊字符串
    $pattern = ($encoding == 'utf8')?'/[\x{4e00}-\x{9fa5}a-zA-Z0-9,,。 ]/u':'/[\x80-\xFF]/';
    preg_match_all($pattern, $chars, $result);
    $temp = join('', $result[0]);
    return $temp;
  }
	
  function load_template_html($tts_uri, $ctx) {
    $template_html = '<video id="speakit_video" style="display:none">
        <source id="speakit_src" type="video/mp4">
      </video>
      <script type="text/javascript">
        var speakitOff = 0;
        var speakitUri = "'.$tts_uri.'";
        var speakitCtx = eval('.$ctx.');
        var speakitAud = document.getElementById("speakit_video");
        if (speakitCtx.length > 0) {
          speakitAud.src = speakitUri + speakitCtx[speakitOff];
        }
        function playSpeakItContent() {
          var speakitAudBtn = document.getElementById("speakit_btn");
          if (speakitAud.paused && speakitCtx.length > 0) {
            speakitAudBtn.src = "'.plugins_url('images/pause.png', __FILE__).'"; //暂停图片
            speakitAud.src = speakitUri + speakitCtx[speakitOff];
            speakitAud.onended = function() {
              speakitOff = speakitOff + 1;
              if (speakitOff < speakitCtx.length) { 
               speakitAud.src = speakitUri + speakitCtx[speakitOff];
               speakitAud.play();
              } else {
                if (!speakitAud.paused) {
                  speakitAud.pause();
                }
                speakitOff = 0;
                speakitAudBtn.src = "'.plugins_url('images/play.png', __FILE__).'"; //暂停图片
              }
			};
			speakitAud.play();
          } else {
            if (!speakitAud.paused) {
              speakitAud.pause();
            }
            speakitAudBtn.src = "'.plugins_url('images/play.png', __FILE__).'"; //播放图片
          }
        }
      </script>
      <span style="float: left; margin-right: 10px; cursor: pointer;">
        <a href="javascript:playSpeakItContent();"><img src="'.plugins_url('images/play.png', __FILE__).'" width="25" height="25" id="speakit_btn" border="0"></a>
      </span>';
			
    return $template_html;
  }

  function load_speak_html($content) {
    $str = $content;
    $str = strip_tags($str);
    $str = str_replace("、", ",", $str); //保留顿号
    $str = match_chinese($str);
    $ctx_len = mb_strlen(preg_replace('/\s/', '', html_entity_decode(strip_tags($str))), 'UTF-8');
    $r = mbStrSplit($str, 900);
    $tts_uri = "https://tts.baidu.com/text2audio?cuid=baiduid&lan=zh&ctp=1&pdt=311&tex=";
    return load_template_html($tts_uri, json_encode($r));
  }

  function speakit_main($content) {
    if(is_single()||is_feed()) {
      $html = load_speak_html($content);
      $content = $html.$content;
    }
    return $content;
  }

  add_filter ('the_content', 'speakit_main');
?>

这里我们将代码添加到WordPressplugins目录下的SpeakIt目录下。

里面有两个按钮play.png,pause.png,需要存放到SpeakIt插件的images目录下:


参考链接


ubuntu 16.04安装配置WordPress 5.3.2并建立PHP调试环境

$ sudo apt-get install apache2

$ sudo apt-get install mysql-server

$ sudo apt-get install mysql-client

$ sudo apt-get install php7.0

$ sudo apt-get install php-gd

$ sudo apt install php-mbstring

$ sudo apt install php-dom

# 如果使用了WP-Statistics统计插件,需要安装依赖
$ sudo apt-get install php7.0-curl

$ sudo apt-get install php7.0-bcmath

# PHP Zip支持,提高网络以及内存压缩工具,提升性能
$ sudo apt-get install php-zip

# PHP图像处理支持,imagick替代默认的GD图像处理,提升图像处理性能
$ sudo apt install php-imagick

# 默认imagick是不启用的,需要手工开启
$ sudo phpenmod imagick

$ sudo a2dismod mpm_prefork

$ sudo a2enmod mpm_event

$ sudo apt-get install libapache2-mod-fastcgi php7.0-fpm

$ sudo service php7.0-fpm restart

$ sudo a2enmod actions fastcgi alias proxy_fcgi

$ sudo apt-get install php-mysql

# 启用 Rewrite 模块,我们后续的WP Super Cache需要这个模块的支持
$ sudo a2enmod rewrite

$ sudo service apache2 restart

# 我们以root连接数据库,我们需要手工创建数据库,否则会出现如下错误:
# “我们能够连接到数据库服务器(这意味着您的用户名和密码正确),但未能选择wordpress数据库。”
$ mysql -u root -p -e "create database wordpress;" 

$ cd /var/www

$ sudo chown -R www-data:www-data wordpress

WordPress配置文件

<VirtualHost *:80>
	# The ServerName directive sets the request scheme, hostname and port that
	# the server uses to identify itself. This is used when creating
	# redirection URLs. In the context of virtual hosts, the ServerName
	# specifies what hostname must appear in the request's Host: header to
	# match this virtual host. For the default virtual host (this file) this
	# value is not decisive as it is used as a last resort host regardless.
	# However, you must set it for any further virtual host explicitly.
	#ServerName www.example.com

	ServerAdmin webmaster@localhost
	#DocumentRoot /var/www/html
	DocumentRoot /var/www/wordpress
	<Directory /var/www/wordpress>
		#Options Indexes FollowSymLinks MultiViews
		Options FollowSymLinks MultiViews
		AllowOverride All
#		Apache 2.2 
#		FCGIWrapper /usr/bin/php5-cgi .php
#		AddHandler fcgid-script .php
#               Options ExecCGI SymLinksIfOwnerMatch
#		Apache 2.4.10
		<FilesMatch \.php$>	
			SetHandler "proxy:unix:/run/php/php7.0-fpm.sock|fcgi://localhost"
		</FilesMatch>
		Order allow,deny
		allow from all
	</Directory>

	# Available loglevels: trace8, ..., trace1, debug, info, notice, warn,
	# error, crit, alert, emerg.
	# It is also possible to configure the loglevel for particular
	# modules, e.g.
	#LogLevel info ssl:warn

	ErrorLog ${APACHE_LOG_DIR}/error.log
	CustomLog ${APACHE_LOG_DIR}/access.log combined

	# For most configuration files from conf-available/, which are
	# enabled or disabled at a global level, it is possible to
	# include a line for only one particular virtual host. For example the
	# following line enables the CGI configuration for this host only
	# after it has been globally disabled with "a2disconf".
	#Include conf-available/serve-cgi-bin.conf
</VirtualHost>

# vim: syntax=apache ts=4 sw=4 sts=4 sr noet

继续阅读ubuntu 16.04安装配置WordPress 5.3.2并建立PHP调试环境

html数学公式显示库MathJax的使用

MathJax是一个开源的web数学公式渲染器,由JS编写而成。MathJax允许你在你的网页中包含公式,无论是使用LaTeX、MathML或者AsciiMath符号,这些公式都会被javascript处理为HTML、SVG或者MathML符号。

引入CDN

只需要在头部添加下面这句,就可以成功引入CDN

<script type="text/javascript" async
        src="https://cdnjs.cloudflare.com/ajax/libs/mathjax/2.7.5/MathJax.js?config=TeX-MML-AM_CHTML" async>
</script>
内联config说明

官方提供了一个能让我们内联一个配置选项的功能,要想让这个内联配置生效就得放在
CDN引入之前。如下

<script type="text/x-mathjax-config">
  MathJax.Hub.Config({
    showProcessingMessages: false, //关闭js加载过程信息
    messageStyle: "none", //不显示信息
    extensions: ["tex2jax.js"],
    jax: ["input/TeX", "output/HTML-CSS"],
    tex2jax: {
      inlineMath: [ ['$','$'], ["\\(","\\)"] ],
      displayMath: [ ['$$','$$'], ["\\[","\\]"] ],
      skipTags: ['script', 'noscript', 'style', 'textarea', 'pre','code', 'a', 'annotation', 'annotation-xml'],
      ignoreClass: 'crayon-.*' // 'crayon-' 开头的类,属于Wordpress代码高亮库,这部分不需要处理,否则会导致显示不正确,这部分是正则式,多条之间用'|'分割    
    },
    'HTML-CSS': {
        showMathMenu: false //禁用右键菜单
    }
  });
  MathJax.Hub.Queue(["Typeset",MathJax.Hub]);
</script>

MathJax 2.x 跟 MathJax 3.x 的配置信息是不同的,这部分的配置转换可以通过MathJax-demos-web中的v2 to v3 Configuration Converter

上面的配置信息,转换后的结果如下:

window.MathJax = {
  tex: {
    inlineMath: [ ['$','$'], ["\\(","\\)"] ],
    displayMath: [ ['$$','$$'], ["\\[","\\]"] ]
  },
  options: {
    skipHtmlTags: ['script', 'noscript', 'style', 'textarea', 'pre','code', 'a', 'annotation', 'annotation-xml'],
    ignoreHtmlClass: 'tex2jax_ignore|crayon-.*', // 'crayon-' 开头的类,属于Wordpress代码高亮库,这部分不需要处理,否则会导致显示不正确,这部分是正则式,多条之间用'|'分割
    processHtmlClass: 'tex2jax_process'
  },
  //禁用右键菜单	
  renderActions: {
    addMenu: [0, '', '']
  }
};

其中MathJax.Hub.Config()里的配置选项是重点,本例表示用来识别行内公式,$来识别行间公式。

书写公式

对应的公式在html文件中写法如下

<body>
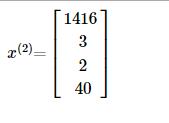
${x}^{(2)}\text{=}\begin{bmatrix} 1416\\ 3\\ 2\\ 40 \end{bmatrix}$
</body>
显示效果

WordPress上实现上述功能,最简单的方式是安装 Simple Mathjax 插件即可。

注意目前(2022/03/16)的 MathJax 3.x 还不支持多语言,不支持公式自动换行(automatic line breaking)

参考链接


解决WordPress 5.2.3/5.7.2后台ICP备案链接不能跳转到工信部网站(www.miitbeian.gov.cn)的问题

正常情况下,通过简单设置,WordPress 可以实现网站底部的链接地址跳转到工信部的备案网站。

具体配置方式参考 Wodpress主题底部显示当前网站备案号

但是最近突然发现这个网址不能访问了。

网上查询了一下,才发现这个网址被更改了,从 "http://www.miitbeian.gov.cn/" 修改成了"https://beian.miit.gov.cn/",因此需要调整网站上的代码。

具体修改参考如下:

$ vim wp-content/languages/zh_CN.php

需要修改的函数如下:

function zh_cn_l10n_icp_num( $content ) {
        if ( defined( 'WP_ZH_CN_ICP_NUM' ) && WP_ZH_CN_ICP_NUM &&
                        get_option( 'zh_cn_l10n_icp_num' ) ) {
                echo '<a href="http://www.miitbeian.gov.cn/" rel="nofollow" ' .
                        'title="工业和信息化部ICP/IP地址/域名信息备案管理系统">' .
                        esc_attr( get_option( 'zh_cn_l10n_icp_num' ) ) .
                         "</a>\n";
        }
}

注意:

设置的域名不能是http://www.beian.miit.gov.cn/ https://www.beian.miit.gov.cn/目前测试发现,上面的两个域名都返回解析错误。

只能配置为"https://beian.miit.gov.cn/"

参考链接


WordPress无法正常显示空行/回行/回车/换行的解决方法

在WordPress后台编辑文章的时候,明明有按ENTER空行,但是发表后发现空行完全不见了。

自从使用上WP之后,这个问题一直无法得到解决,一直怀疑Wordpress的编辑器不太好用。 有时候在“可视化”模式下写完文章用“HTML”模式看一下,再切换回“可视化”结果就变了。

而且经常有时候写文章想分段空一个空白行出来。必须切换到“HTML”模式中用 <br /> 来实现这个目的。关键是反复几次切换之后,手工添加的 <br /> 的也会莫名其秒的丢失。

这个是由于WordPress的 “自动省略或删除空白行” 导致的。

如果安装了 TinyMCE Advanced 可以在下面选项处关闭这个功能,如下图:

继续阅读WordPress无法正常显示空行/回行/回车/换行的解决方法

WordPress 5.0禁用古腾堡(Gutenberg)编辑器

最近升级到WordPress 5.0,这个版本的一个重要功能改进就是Gutenberg 编辑器,但是遗憾的是,这个版本的编辑器目前跟很多插件不兼容。我们只能是暂时禁用Gutenberg 编辑器,而是使用以前的经典版本的编辑器。

另外,目前试用来看,这个编辑器,也不好用。

最简单的办法就是安装官方提供的Classic Editor这个插件,如下图:
继续阅读WordPress 5.0禁用古腾堡(Gutenberg)编辑器

ubuntu 16.04系统wordpress-4.9.4修改表引擎报告错误“Invalid default value for 'comment_date'”

最近在捣鼓wordpress主从同步的时候(ubuntu 16.04配置MySQL主从同步),需要把wp_comments的数据库引擎从MyISAM切换到INNODBMyISAM不支持主从同步)。

在执行

$ mysql -u root -p -e "use wordpress; ALTER TABLE wp_comments ENGINE=INNODB;"

的时候报告错误:

Invalid default value for 'comment_date'

原因出在类似这样的建表语句

DROP TABLE IF EXISTS `wp_comments`;
CREATE TABLE `wp_comments`  (
  `comment_ID` bigint(20) UNSIGNED NOT NULL AUTO_INCREMENT,
  `comment_post_ID` bigint(20) UNSIGNED NOT NULL DEFAULT 0,
  `comment_author` tinytext CHARACTER SET utf8mb4 COLLATE utf8mb4_unicode_520_ci NOT NULL,
  `comment_author_email` varchar(100) CHARACTER SET utf8mb4 COLLATE utf8mb4_unicode_520_ci NOT NULL DEFAULT '',
  `comment_author_url` varchar(200) CHARACTER SET utf8mb4 COLLATE utf8mb4_unicode_520_ci NOT NULL DEFAULT '',
  `comment_author_IP` varchar(100) CHARACTER SET utf8mb4 COLLATE utf8mb4_unicode_520_ci NOT NULL DEFAULT '',
  `comment_date` datetime(0) NOT NULL DEFAULT '0000-00-00 00:00:00',
  `comment_date_gmt` datetime(0) NOT NULL DEFAULT '0000-00-00 00:00:00',
  `comment_content` text CHARACTER SET utf8mb4 COLLATE utf8mb4_unicode_520_ci NOT NULL,
  `comment_karma` int(11) NOT NULL DEFAULT 0,
  `comment_approved` varchar(20) CHARACTER SET utf8mb4 COLLATE utf8mb4_unicode_520_ci NOT NULL DEFAULT '1',
  `comment_agent` varchar(255) CHARACTER SET utf8mb4 COLLATE utf8mb4_unicode_520_ci NOT NULL DEFAULT '',
  `comment_type` varchar(20) CHARACTER SET utf8mb4 COLLATE utf8mb4_unicode_520_ci NOT NULL DEFAULT '',
  `comment_parent` bigint(20) UNSIGNED NOT NULL DEFAULT 0,
  `user_id` bigint(20) UNSIGNED NOT NULL DEFAULT 0,
  PRIMARY KEY (`comment_ID`) USING BTREE,
  INDEX `comment_post_ID`(`comment_post_ID`) USING BTREE,
  INDEX `comment_approved_date_gmt`(`comment_approved`, `comment_date_gmt`) USING BTREE,
  INDEX `comment_date_gmt`(`comment_date_gmt`) USING BTREE,
  INDEX `comment_parent`(`comment_parent`) USING BTREE,
  INDEX `comment_author_email`(`comment_author_email`(10)) USING BTREE
) ENGINE = MyISAM AUTO_INCREMENT = 35 CHARACTER SET = utf8mb4 COLLATE = utf8mb4_unicode_520_ci ROW_FORMAT = Dynamic;

这种报错多是mysql升级到5.7而引起的默认值不兼容的问题。看看你的字段名是什么,我的是时间字段,类型是datetime。想到可能是类型的默认值被限制了,查看sql_mode。果然:NO_ZERO_IN_DATE,NO_ZERO_DATE这两个参数限制时间不能为0

可以使用如下语句查看建表命令:

$ mysql -u root -p -e "use wordpress;show create table wp_comments\G;“

注意上面的

`comment_date` datetime(0) NOT NULL DEFAULT '0000-00-00 00:00:00', 
`comment_date_gmt` datetime(0) NOT NULL DEFAULT '0000-00-00 00:00:00',

这两句受到NO_ZERO_IN_DATE,NO_ZERO_DATE的影响。

查看 sql_mode

mysql> show variables like 'sql_mode';
+---------------+-------------------------------------------------------------------------------------------------------------------------------------------+
| Variable_name | Value |
+---------------+-------------------------------------------------------------------------------------------------------------------------------------------+
| sql_mode | ONLY_FULL_GROUP_BY,STRICT_TRANS_TABLES,NO_ZERO_IN_DATE,NO_ZERO_DATE,ERROR_FOR_DIVISION_BY_ZERO,NO_AUTO_CREATE_USER,NO_ENGINE_SUBSTITUTION |
+---------------+-------------------------------------------------------------------------------------------------------------------------------------------+
1 row in set (0.00 sec)

mysql>

临时修改:

mysql> set session
 -> sql_mode='ONLY_FULL_GROUP_BY,STRICT_TRANS_TABLES,ERROR_FOR_DIVISION_BY_ZERO,NO_AUTO_CREATE_USER,NO_ENGINE_SUBSTITUTION';
Query OK, 0 rows affected, 1 warning (0.00 sec)

mysql>

永久修改:

修改配置文件

$ sudo vim /etc/mysql/mysql.conf.d/mysqld.cnf

[mysqld]下面添加如下列:

sql_mode=ONLY_FULL_GROUP_BY,STRICT_TRANS_TABLES,ERROR_FOR_DIVISION_BY_ZERO,NO_AUTO_CREATE_USER,NO_ENGINE_SUBSTITUTION

参考链接


导入数据库时报错1067 – Invalid default value for ‘字段名’

ubuntu 16.04配置MySQL主从同步

准备工作

1.主从数据库版本最好一致

2.主从数据库内数据保持一致

主数据库:121.199.27.227 /ubuntu 16.04 MySQL 5.7.21 (阿里云

从数据库:182.254.149.39 /ubuntu 16.04 MySQL 5.7.21 (腾讯云

防火墙配置

配置主服务器只允许特定IP访问数据库的端口,避免不必要的攻击。

主库防火墙配置
# iptables -A INPUT -p tcp -s slave_ip --dport 3306 -j ACCEPT

#删除可能已经存在的配置,避免出现多条重复记录
$ sudo iptables -D INPUT -p tcp -s 182.254.149.39 --dport 3306 -j ACCEPT 
$ sudo iptables -D INPUT -p tcp -s 127.0.0.1 --dport 3306 -j ACCEPT 
$ sudo iptables -D INPUT -p tcp --dport 3306 -j DROP 
$ sudo iptables -D INPUT -p udp --dport 3306 -j DROP 
$ sudo iptables -D INPUT -p sctp --dport 3306 -j DROP

#增加配置,只允许特定地址访问数据库端口
$ sudo iptables -A INPUT -p tcp -s 182.254.149.39 --dport 3306 -j ACCEPT
$ sudo iptables -A INPUT -p tcp -s 127.0.0.1 --dport 3306 -j ACCEPT
$ sudo iptables -A INPUT -p tcp --dport 3306 -j DROP
$ sudo iptables -A INPUT -p udp --dport 3306 -j DROP
$ sudo iptables -A INPUT -p sctp --dport 3306 -j DROP

$ sudo iptables -L -n -v

#保存配置
$ sudo apt-get install iptables-persistent

#注意,iptables-persistent 与 ufw 冲突, 
#现象就是系统重启后执行 sudo ufw status 显示 inactive,
#但是sudo systemctrl ufw status 或sudo service ufw status 显示服务正常,
#实际上ufw并没有正常工作。
#如果两者同时安装,需要参考 https://www.mobibrw.com?p=29330 进行配置

$ sudo netfilter-persistent save

#配置被保存到/etc/iptables/rules.v4 /etc/iptables/rules.v6这两个文件下面,
#最好确认一下实际保存的内容,尤其是安装了denyhosts等其他安全软件的情况下,
#可能会记录了多余的规则,需要手工删除
从库防火墙配置
# iptables -A OUTPUT -p tcp -d master_ip --dport 3306 -j ACCEPT

#删除可能已经存在的配置,避免出现多条重复记录
$ sudo iptables -D OUTPUT -p tcp -d 121.199.27.227 --dport 3306 -j ACCEPT

#增加配置
$ sudo iptables -A OUTPUT -p tcp -d 121.199.27.227 --dport 3306 -j ACCEPT

$ sudo iptables -L -n

#保存配置
$ sudo apt-get install iptables-persistent

#注意,iptables-persistent 与 ufw 冲突, 
#现象就是系统重启后执行 sudo ufw status 显示 inactive,
#但是sudo systemctrl ufw status 或sudo service ufw status 显示服务正常,
#实际上ufw并没有正常工作。
#如果两者同时安装,需要参考 https://www.mobibrw.com?p=29330 进行配置

$ sudo netfilter-persistent save

#配置被保存到/etc/iptables/rules.v4 /etc/iptables/rules.v6这两个文件下面,
#最好确认一下实际保存的内容,尤其是安装了denyhosts等其他安全软件的情况下,
#可能会记录了多余的规则,需要手工删除

主数据库master配置

1.修改mysql配置

$ sudo vim /etc/mysql/mysql.conf.d/mysqld.cnf

在[mysqld]部分进行如下修改:

[mysqld]
#开启二进制日志,默认是注释掉的,我们去掉注释
log-bin = /var/log/mysql/mysql-bin.log 

#设置server-id
server-id = 1 

#默认是127.0.0.1,此处我们设置为任意地址,放开远程访问,这么操作之前一定要确保防火墙配置正确,否则会产生安全风险
bind-address = 0.0.0.0 

#如果数据库是从5.7版本之前升级的,并且是wordpress那么会遇到无法更改数据库的情况,
#NO_ZERO_IN_DATE,NO_ZERO_DATE这两个参数限制的,我们需要去掉这个限制,原因在于
#wordpress创建的表中存在
#`comment_date` datetime(0) NOT NULL DEFAULT '0000-00-00 00:00:00',
#这样的定义是没办法进行后续的操作的,因此我们需要重新定义sql_mode来解除这个限制
sql_mode=ONLY_FULL_GROUP_BY,STRICT_TRANS_TABLES,ERROR_FOR_DIVISION_BY_ZERO,NO_AUTO_CREATE_USER,NO_ENGINE_SUBSTITUTION

2.修改需要同步的表的引擎为INNODB,只有INNODB支持主从,MyISAM不支持

# 此处以wordpress为例,默认情况下wordpress中的wp_options表为MyISAM引擎,
# 这会导致数据同步失败,可能出现的错误信息如下:
# Last_Errno: 1032
# Last_Error: Could not execute Delete_rows event on table wordpress.wp_options; Can't find record in 'wp_options', Error_code: 1032; handler error HA_ERR_KEY_NOT_FOUND; the event's master log mysql-bin.000007, end_log_pos 3678486
# 使用“show create table wp_options\G;”查看表的引擎信息
# 单个表修改的命令如下
#mysql -u root -p -e "use wordpress; ALTER TABLE wp_options ENGINE=INNODB;"

#整个数据库修改的命令如下,下面的语句只是生成执行语句,具体执行,还需要把结果拷贝出来执行
$ mysql -u root -p -e "USE wordpress; SET @DATABASE_NAME = 'wordpress'; SELECT GROUP_CONCAT(CONCAT( 'ALTER TABLE ' ,TABLE_NAME ,' ENGINE=InnoDB; ') SEPARATOR '' ) FROM information_schema.TABLES AS t WHERE TABLE_SCHEMA = @DATABASE_NAME AND TABLE_TYPE = 'BASE TABLE' AND ENGINE = 'MyISAM';"

#我这边的例子如下
$ mysql -u root -p -e "USE wordpress; ALTER TABLE wp_IPBLC_blacklist ENGINE=InnoDB; ALTER TABLE wp_IPBLC_login_failed ENGINE=InnoDB; ALTER TABLE wp_IPBLC_usernames ENGINE=InnoDB; ALTER TABLE wp_commentmeta ENGINE=InnoDB; ALTER TABLE wp_comments ENGINE=InnoDB; ALTER TABLE wp_links ENGINE=InnoDB; ALTER TABLE wp_options ENGINE=InnoDB; ALTER TABLE wp_postmeta ENGINE=InnoDB; ALTER TABLE wp_posts ENGINE=InnoDB; ALTER TABLE wp_term_relationships ENGINE=InnoDB; ALTER TABLE wp_term_taxonomy ENGINE=InnoDB; ALTER TABLE wp_terms ENGINE=InnoDB; ALTER TABLE wp_usermeta ENGINE=InnoDB; ALTER TABLE wp_users ENGINE=InnoDB;"

3.重启mysql,创建用于同步的用户账号

创建用户并授权:用户:repl 密码:slavepass

$ sudo service mysql restart

$ mysql -u root -p -e "CREATE USER 'repl'@'182.254.149.39' IDENTIFIED BY 'slavepass';" #创建用户

$ mysql -u root -p -e "GRANT REPLICATION SLAVE ON *.* TO 'repl'@'182.254.149.39';" #分配权限

$ mysql -u root -p -e "flush privileges;"  #刷新权限

$ mysql -u root -p -e "SELECT User, Host FROM mysql.user;"  #查看用户

4.查看master状态,记录二进制文件名(mysql-bin.000001)和位置(333802):

# 阻止数据库记录写入,避免后期我们备份数据库的时候数据发生变动
# 该命令对于普通账号的只读模式,root 账号无效,因此访问数据库的账号
# 尽量不要使用root账号,如果是root 账号,只能暂时停止所有访问数据库的服务了
$ mysql -u root -p -e "set global read_only=1;"  

$ mysql -u root -p -e "SHOW MASTER STATUS;"
Enter password: 
+------------------+----------+--------------+------------------+-------------------+
| File             | Position | Binlog_Do_DB | Binlog_Ignore_DB | Executed_Gtid_Set |
+------------------+----------+--------------+------------------+-------------------+
| mysql-bin.000001 |   333802 |              |                  |                   |
+------------------+----------+--------------+------------------+-------------------+

5.主库备份,为从库的第一次数据同步准备数据

使用如下脚本产生数据库备份文件

#此处以备份wordpress数据库为例子

datadump=`which mysqldump`

mysqluser="root"

userpass="password" 

wordpressdb="wordpress"

backupwordpress_sql=$wordpressdb.`date +%Y%m%d`.sql

# 注意,如果是MySQL 8.x那么 --master-data 需要修改成 --source-data 否则在备份的第一句会出现如下警告 
#“WARNING: --master-data is deprecated and will be removed in a future version. Use --source-data instead.”

ver=`mysqldump -V | sed -nre 's/^[^0-9]*(([0-9]+\.)*[0-9]+).*/\1/p'`

args='--master-data'

if [ "${ver}"\>="8.0.0" ]; then
  args='--source-data'
fi

if $datadump $args --single-transaction -u $mysqluser --password=$userpass -h localhost --opt $wordpressdb > $backupwordpress_sql 2>&1
then
  echo " backup $wordpressdb success"
else
  echo " backup $wordpressdb error"
  exit 1
fi

#检验文件尾部是否存在 “-- Dump completed on”,如果存在不存在,则说明备份出错了。
if [ 0 -eq "$(sed '/^$/!h;$!d;g' $backupwordpress_sql | grep -c "Dump completed on")" ]; 
then
  echo " backup $wordpressdb error"
  exit 1	
else
  echo " backup $wordpressdb success"
fi

执行脚本,确保最后输出备份成功

$ cd ~

$ sudo bash backup_wordpress.sh

# 取消普通账号的只读模式
$ mysql -u root -p -e "set global read_only=0;"

从服务器slave配置

1.修改mysql配置

$ sudo vim /etc/mysql/mysql.conf.d/mysqld.cnf

修改server-id,每个数据库的server-id要求是唯一的,不能相互冲突

[mysqld]
#设置server-id,必须唯一
server-id = 2

# 根据业务需要配置数据库是否只读
#read_only = on
#super_read_only = on
#tx_read_only = on

#日志也最好打开
log_bin                 = /var/log/mysql/mysql-bin.log

#如果日志开启了,最好把日志格式设置为row格式,这样如果主从数据不一致,可以尝试mysql flashback功能
binlog-format    = row 

#如果数据库是从5.7版本之前升级的,并且是wordpress那么会遇到无法更改数据库的情况,
#NO_ZERO_IN_DATE,NO_ZERO_DATE这两个参数限制的,我们需要去掉这个限制,原因在于
#wordpress创建的表中存在
#`comment_date` datetime(0) NOT NULL DEFAULT '0000-00-00 00:00:00',
#这样的定义是没办法进行后续的操作的,因此我们需要重新定义sql_mode来解除这个限制
sql_mode=ONLY_FULL_GROUP_BY,STRICT_TRANS_TABLES,ERROR_FOR_DIVISION_BY_ZERO,NO_AUTO_CREATE_USER,NO_ENGINE_SUBSTITUTION

2.首次还原数据库:

#停止可能访问数据库的应用
$ sudo service apache2 stop

$ sudo service php7.0-fpm stop

$ sudo service mysql restart

# 确保无应用访问数据库的情况下,记录主库日志位置,并执行备份脚本
 mysql -u root -p -e "SHOW MASTER STATUS;"
Enter password: 
+------------------+----------+--------------+------------------+-------------------+
| File             | Position | Binlog_Do_DB | Binlog_Ignore_DB | Executed_Gtid_Set |
+------------------+----------+--------------+------------------+-------------------+
| mysql-bin.000001 |   333802 |              |                  |                   |
+------------------+----------+--------------+------------------+-------------------+

$ sudo bash backup_wordpress.sh

# 此处已经可以启动刚刚关闭的服务了
$ sudo service php7.0-fpm start

$ sudo service apache2 start

$ scp -P 22 -r root@121.199.27.227:~/wordpress.*.sql ./

#删除可能存在的一行警告信息,这行警告信息可能导致我们无法恢复数据
$ sed -i "/^mysqldump: \[Warning\] Using a password on the command line interface can be insecure\./d" wordpress.*.sql

$ mysql -u root -p -e "stop slave;"

$ mysql -u root -p -e "drop database wordpress;"

$ mysql -u root -p -e "create database wordpress;"

$ mysql -u root -p wordpress < wordpress.*.sql

还原完成后,把数据库设置成只读模式,如果从库可写会出现冲突导致同步失败

$ sudo vim /etc/mysql/mysql.conf.d/mysqld.cnf

添加如下语句:

[mysqld]
#数据库只读 
#read_only = on 

super_read_only = on 

#tx_read_only = on

3.重启mysql,执行同步SQL语句(需要主服务器主机名,登陆凭据,二进制文件的名称和位置):

$ sudo service mysql restart

#只读模式
$ mysql -u root -p -e "set global read_only=1;"

#最好使用如下命令获得主库的起始位置
$ grep 'CHANGE MASTER TO MASTER_LOG_FILE'  wordpress.*.sql | more

$ mysql -u root -p -e "CHANGE MASTER TO MASTER_HOST='121.199.27.227', MASTER_USER='repl', MASTER_PASSWORD='slavepass', MASTER_LOG_FILE='mysql-bin.000001',MASTER_LOG_POS=333802;"

4.启动slave同步进程:

$ mysql -u root -p -e "start slave;"

5.查看slave状态:

$ mysql -u root -p -e "show slave status\G;"
Enter password:
*************************** 1. row ***************************
               Slave_IO_State: Waiting for master to send event
                  Master_Host: 121.199.27.227
                  Master_User: repl
                  Master_Port: 3306
                Connect_Retry: 60
              Master_Log_File: mysql-bin.000001
          Read_Master_Log_Pos: 9448236
               Relay_Log_File: VM-114-251-ubuntu-relay-bin.000002
                Relay_Log_Pos: 17780
        Relay_Master_Log_File: mysql-bin.000001
             Slave_IO_Running: Yes
            Slave_SQL_Running: No
              Replicate_Do_DB:
          Replicate_Ignore_DB:
           Replicate_Do_Table:
       Replicate_Ignore_Table:
      Replicate_Wild_Do_Table:
  Replicate_Wild_Ignore_Table:
        ...

当Slave_IO_Running和Slave_SQL_Running都为YES的时候就表示主从同步设置成功了。接下来就可以进行一些验证了,比如在主master数据库的test数据库的一张表中插入一条数据,在slave的test库的相同数据表中查看是否有新增的数据即可验证主从复制功能是否有效,还可以关闭slave(mysql>stop slave;),然后再修改master,看slave是否也相应修改(停止slave后,master的修改不会同步到slave),就可以完成主从复制功能的验证了。

还可以用到的其他相关参数:

master开启二进制日志后默认记录所有库所有表的操作,可以通过配置来指定只记录指定的数据库甚至指定的表的操作,具体在mysql配置文件的[mysqld]可添加修改如下选项:

# 不同步哪些数据库  
binlog-ignore-db = mysql  
binlog-ignore-db = test  
binlog-ignore-db = information_schema  
  
# 只同步哪些数据库,除此之外,其他不同步  
binlog-do-db = game

如之前查看master状态时就可以看到只记录了test库,忽略了manual和mysql库。

注意,偶尔在系统升级的时候,从库可能会丢失同步状态配置。这时候,我们需要重新同步,此时我们从从设备`/var/lib/mysql/master.info`中找到被中断的同步点。

里面的内容一般如下:

25
mysql-bin.000582
4765083
121.199.27.227
xxxx
xxxx
3306
60
1
/etc/mysql/ssl/ca.pem
/etc/mysql/ssl
/etc/mysql/ssl/client-cert.pem

/etc/mysql/ssl/client-key.pem
0
30.000

0
0b674082-f01d-11e9-8f8c-00163e0a4ffe
86400


0

注意`mysql-bin.000582`下面的`4765083`就是同步位置,在恢复的时候,就是这两个关键数据。

参考链接