Encryption, once you have a safe and well-implemented algorithm, is all about the keys. Lose control of your keys, and it’s “Game over, man!” What if we could put our keys somewhere completely out of reach, where even their owner can’t get to them? Yibikeys and HSMs can provide that security, but they’re external devices. However, recent iOS devices and MacBook Pros have something just as good: the Secure Enclave (SE).
Fortunately, using the Secure Enclave for encryption is super well documented. No, wait, it’s hardly documented at all. Trail of Bits encountered this with Tidas, and I recently plunged into the same abyss.
Some demonstration libraries are available on GitHub, but they’re all self-contained. I wanted to generate a message somewhere else, and then decrypt it in the SE. But nothing I found addressed cross-system interoperability.
This led to a long and frustrating detective story. I looked for official docs. Pored over Apple header files and source code. Investigated other example projects, read ECIES papers, and ran down several blind alleys. And of course, I made plenty of stupid mistakes along the way. But I’ll cut to the chase: I eventually figured it out, though it doesn’t quite match the formal specifications. And now, I’ll show exactly how it all works.
Theory
Let me back up a little and explain exactly what I’m trying to achieve. Current MacBook Pros and iOS devices (those with Touch ID and, as I’d forgotten, Face ID) include a Secure Enclave. The Secure Enclave is a separate computer, used for high-security features like TouchID. It comes with its own encrypted firmware, memory, and storage, and hardware-based encryption. Programs talk to the SE through a “mailbox” system, rather than a direct connection. The application places data and commands in a specific memory location, then asks the SE to execute the command. The SE then returns results in the same way.
One feature added in iOS 9, and macOS 10.13, is the ability to store keys and perform cryptography entirely within the Secure Enclave. The application asks the SE to create a public/private keypair. The SE returns the public key (which should then be stored somewhere safe), but it holds onto the private key. Then it can ask “Here, sign this message” and the SE will grab the private key, sign the message, and return the result. Or “Here, decrypt this,” and it’ll decrypt the message using the private key, and return the plaintext. The application itself never has direct access to the private key, so the key should be very secure.
Algorithm Details
Large quantities of data are usually encrypted using a symmetric key. Symmetric algorithms are fast, efficient, and can handled by dedicated hardware. But it uses the same key for encryption and decryption, which means it the Secure Enclave can’t store it. Asymmetric encryption solves this problem, but with a cost: It’s much slower. So in practice, most systems making use of public key encryption use a hybrid approach.
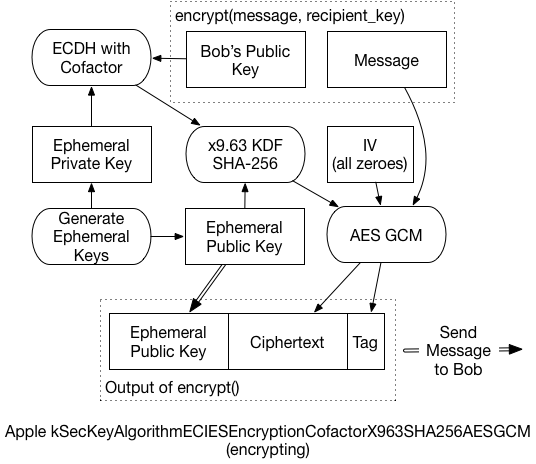
According to Apple’s documentation, the algorithm used for Symmetric Encryption with the Secure Enclave is called:
|
1 |
kSecKeyAlgorithmECIESEncryptionCofactorX963SHA256AESGCM |
which refers to an ECIES standard algorithm. The details are a little arcane, but that’s exactly why we’re here. Let’s take this ugly string one part at a time:
-
ECIES: Elliptic Curve Integrated Encryption System - an open standard that defines exactly how to do what we’re about to do
-
Cofactor: Include the elliptic curve’s “cofactor” when completing the Diffie-Hellman key agreement process
-
X963SHA256: Use the ANSI x9.63 key derivation function (KDF), with SHA-256 as an underlying hash function
-
AESGCM: For the final symmetric encryption, use AES in Galois Counter Mode (GCM), a form of authenticated encryption
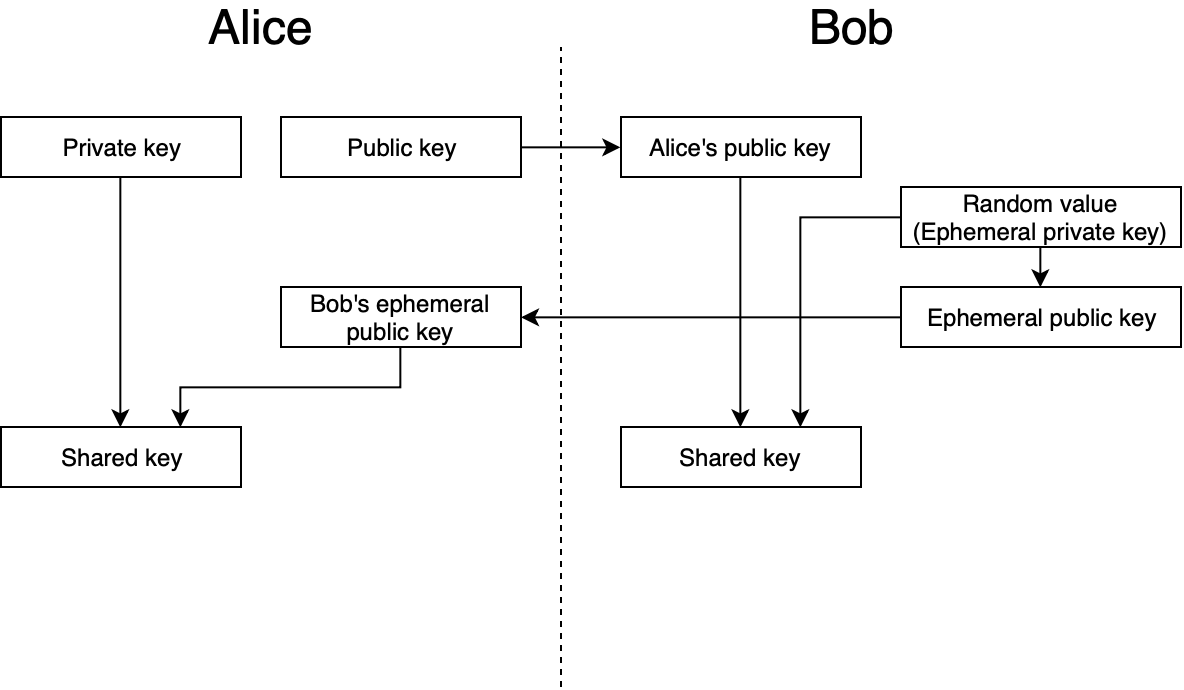
The actual process that takes place is what took some digging to understand. It’s slightly different from the EICES standards, and even from Apple’s published code. Simplified, it works like this:
-
Create a brand-new, “ephemeral” public/private keypair. We’ll use it for only this message and then throw it away.
-
Create a unique shared secret for the message, using the ephemeral private key, and the recipient’s public key. The Elliptic-Curve Diffie-Hellman Key Agreement Process (ECDH) generates the secret.
-
In some circumstances, this shared secret can leak information about the private keys. The x9.63 KDF prevents that, reducing the risk of an attacker decrypting the message. Additionally, the ephemeral public key is used as “Shared Information” for this process.
-
The final key then encrypts the message, and generates an AES-GCM authentication tag.
-
The ephemeral public key, the ciphertext, and the GCM tag are all concatenated, and returned as the final encrypted message.
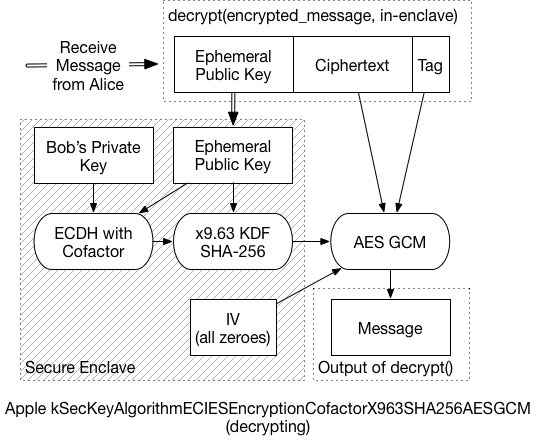
To decrypt the message, the recipient must:
-
Extract the ephemeral public key from the front of the message, and send it to the Secure Enclave.
-
Using the ephemeral key, and the recipient’s private key, the SE performs the same ECDH process. In the end, it should generate the same shared secret as the sender.
-
The SE then applies the x9.63 KDF to generate the symmetric key
-
Using that final symmetric key, the message can be decrypted.
Because the SE communicates in small chunks of data, it could take a while to decrypt a large message. So, that last bit is probably handled by the application processor, and not the SE. That is, the SE would return the final key, and application code decrypts the message. (I didn’t dig enough into this to know for certain, but it seems a reasonable assumption).
As mentioned before, this Implementation var slightly from the expected standard:
-
AES-GCM for encryption instead of XOR
-
Relies on GCM tag instead of separate authentication algorithms
-
Reorders final message to {pubkey} + {ct} + {tag} (instead of key, tag, ct)
Yet, it’s hard to completely fault Apple for straying from the vast array of choices in ECIES. In A Survey of the Elliptic Curve Integrated Encryption Scheme, the authors conclude:
|
1 |
After analyzing the ECIES descriptions contained in ANSI X9.63, IEEE 1363a, ISO/IEC 18033-2, and SECG SEC 1, it can be stated that it is not possible to implement a software version compatible with all those standards, regarding both the specific operations and the list of allowed functions and algorithms. |
So, it seems unlikely that we’ll ever see any broadly interoperable ECIES implementations. Given that, cherry-picking the best components to create a similar system isn’t much of a stretch. A later paper from the same authors reaches similar conclusions.
Technical Details
The curve generated by the SE in the demo application is a “prime256v1” curve, also known as “SecP256R1”. By reviewing keychain/SecKey.h, I was able to learn some of the deeper technical details. One such detail is the fact that this algorithm I’m spending so much time discussing is now considered “legacy” and shouldn’t be used for new code:
|
1 2 3 4 5 |
@constant kSecKeyAlgorithmECIESEncryptionCofactorX963SHA256AESGCM Legacy ECIES encryption or decryption, use kSecKeyAlgorithmECIESEncryptionCofactorVariableIVX963SHA256AESGCM in new code. Encryption is done using AES-GCM with key negotiated by kSecKeyAlgorithmECDHKeyExchangeCofactorX963SHA256. AES Key size is 128bit for EC keys <=256bit and 256bit for bigger EC keys. Ephemeral public key data is used as sharedInfo for KDF, and static public key data is used as authenticationData for AES-GCM processing. AES-GCM uses 16 bytes long TAG and all-zero 16 byte long IV (initialization vector). |
This comment also indicates that the AES-GCM uses the “static public key data” (the recipient’s public key) as additional authentication data (AAD). But it doesn’t work if you include that. So the docs are wrong, or the implementation is broken…or both.
For the preferred “VariableIV” algorithm, the KDF generates the IV, as well as the key. Instead of deriving 16 bytes, the KDF returns 32 bytes: The first 16 are the 128-bit AES key, the following 16 are the IV. For a curve that’s larger than 256 bits, you’d derive 48 bytes – 32 bytes of key material, then 16 bytes of IV. This VariableIV algorithm also does not appear to use AAD.
The KDF itself is actually less of a black box than I’d initially thought. It’s simply a hash of three concatenated values: sha-256( { shared_key } + counter + { shared_info} ):
- The shared_key is the result of the ECDH function.
- Shared_info is the ephemeral public key data
- The counter is a four-byte, big-endian number, starting at ‘0000 0001’
- The counter increments by one for every block that the KDF produces
Since SHA-256 produces 32-byte outputs, we only need to run through the KDF once. If we have to produce a 2nd block (bytes 33-64), then the counter changes to ‘0000 0002’, and a new hash is generated. And so on.
Example Code
None of this would’ve been possible if I hadn’t found some library to help me with the various primitives. The x9.63 KDF is pretty simple, but I needed to find the ECDH function, and AES-GCM. The last isn’t as widely available in popular python cryptography libraries.
I’m making use of the “hazmat” primitives available in the pyca/cryptography library. I also used PyCryptodome to verify the GCM output. For fun, I replicated the KDF function myself using an off-the-shelf SHA-256 routine (not shown here). So the only black box left (to me, anyway) is the ECDH key agreement phase, but that’s standard too. Plus, the script works with the SE demo code, so I’m confident that everything is working fine.
Again, I’m using this macOS demo application, from GitHub. To use my test script:
- Start up the demo application, and click on Encryption
- Then click “Encrypt” to fill the lower box with a ciphertext. We don’t need it, but we do need the public key.
- Copy the public key displayed in the interface
- Replace the “bob_pem” value in the script with the public key
- Run the script, and copy the result into the demo app, overwriting the original ciphertext. (You may need to backspace once to get rid of any trailing newlines).
- Click “Decrypt”, and if necessary, authenticate via TouchID
- Gaze in wonder at the properly decrypted message
Here’s the bare minimum of the test script. A full, commented version can be found in this Gist on Github.
|
1 2 3 4 5 6 7 8 9 10 11 12 13 14 15 16 17 18 19 20 21 22 23 24 25 26 27 28 29 30 31 32 33 34 35 36 37 38 39 40 41 42 43 44 |
message = 'The Magic Words are still Squeamish Ossifrage' bob_pem = ''' -----BEGIN PUBLIC KEY----- MFkwEwYHKoZIzj0CAQYIKoZIzj0DAQcDQgAEHiG0sllsW2K9uX/Ey1nxJsv4u/1z 28JgocZcuFcmE/BuKXZ1w5CB35VxrYqF6RKUucnaauk4VfjSAfYr6gC+GA== -----END PUBLIC KEY-----''' import binascii, base64 from cryptography.hazmat.backends import default_backend from cryptography.hazmat.primitives import hashes from cryptography.hazmat.primitives.asymmetric import ec from cryptography.hazmat.primitives.serialization import Encoding, PublicFormat, load_pem_public_key from cryptography.hazmat.primitives.kdf.x963kdf import X963KDF from cryptography.hazmat.primitives.ciphers.aead import AESGCM backend = default_backend() bob_public = load_pem_public_key(bob_pem, backend) bob_pub_bytes = bob_public.public_bytes(Encoding.DER, PublicFormat.SubjectPublicKeyInfo)[-65:] alice_priv = ec.generate_private_key(ec.SECP256R1(), backend) alice_pub_bytes = alice_priv.public_key().public_bytes(Encoding.DER, PublicFormat.SubjectPublicKeyInfo)[-65:] shared_key = alice_priv.exchange(ec.ECDH(), bob_public) xkdf = X963KDF( algorithm=hashes.SHA256(), length=16, sharedinfo=alice_pub_bytes, backend=backend ) key_enc = xkdf.derive(shared_key) iv = binascii.a2b_hex('00000000000000000000000000000000') C = AESGCM(key_enc) ct = C.encrypt(iv, message, "") final_ct = alice_pub_bytes + ct print "\nFinal message, Base-64 Encoded, to drop back into the demo app:\n" print base64.b64encode(final_ct) |
上面的例子,介绍了 Python 下编解码 Apple's Secure Enclave 算法的逻辑。那么如何在 Java 下实现相同的逻辑呢?可以参考 iOS-compatible ECIES implementation in Java 中的代码实现(可以点击这里下载代码拷贝)。需要注意的是,工程介绍里面声明实现的是 SecKeyAlgorithmECIESEncryptionCofactorVariableIV* 算法,而我们使用的是 SecKeyAlgorithmECIESEncryptionCofactor* 算法。我们只需要在代码中,加解密的地方传入16位全零的数组,即可兼容两者。
如下:
|
1 2 3 4 5 6 7 8 9 10 11 12 13 14 15 16 17 18 19 20 21 22 23 24 25 26 |
private static String encrypt(String plaintext, byte[] publicKeyBytes, String curveName) throws Exception { org.bouncycastle.jce.spec.ECNamedCurveParameterSpec spec = ECNamedCurveTable.getParameterSpec(curveName); KeyFactory keyFactory = KeyFactory.getInstance("EC", new BouncyCastleProvider()); org.bouncycastle.jce.spec.ECNamedCurveSpec curvedParams = new ECNamedCurveSpec(curveName, spec.getCurve(), spec.getG(), spec.getN()); java.security.spec.ECPoint point = org.bouncycastle.jce.ECPointUtil.decodePoint(curvedParams.getCurve(), publicKeyBytes); java.security.spec.ECPublicKeySpec pubKeySpec = new ECPublicKeySpec(point, curvedParams); org.bouncycastle.jce.interfaces.ECPublicKey publicKey = (ECPublicKey) keyFactory.generatePublic(pubKeySpec); byte[] inputBytes = plaintext.getBytes(); final BlockCipher aesCipher = AESEngine.newInstance(); // kSecKeyAlgorithmECIESEncryptionCofactorX963SHA256AESGCM 算法 org.bouncycastle.jce.spec.IESParameterSpec params = new IESParameterSpec(null, null, 128, 128, new byte[16]); // kSecKeyAlgorithmECIESEncryptionCofactorVariableIVX963SHA256AESGCM 算法 // org.bouncycastle.jce.spec.IESParameterSpec params = new IESParameterSpec(null, null, 128, 128, null); IESCipherGCM cipher = new IESCipherGCM( new IESEngineGCM( new ECDHBasicAgreement(), new KDF2BytesGenerator(new SHA256Digest()), new AESGCMBlockCipher(aesCipher)), 16); cipher.engineInit(Cipher.ENCRYPT_MODE, publicKey, params, new SecureRandom()); byte[] cipherResult = cipher.engineDoFinal(inputBytes, 0, inputBytes.length); return Base64.encodeToString(cipherResult, Base64.DEFAULT); } |
Changes for Variable IV, Other Curves
I mentioned before that this algorithm has been deprecated by Apple. The recommended algorithm is now “kSecKeyAlgorithmECIESEncryptionCofactorVariableIVX963SHA256AESGCM.” To support this algorithm, which derives a unique IV instead of using all zeroes, we only need minor changes:

This rough demo script isn’t set up to handle curves other than Prime256v1. But since the Secure Enclave only supports 256-bit curves, it’s not really an issue. We’d need to inspect the recipient’s public key, and use the same curve for the ephemeral keys. Then, if the curve is larger than 256 bits, we need to derive a larger symmetric key. In the above snippet, change the length from 32 to 48. The encryption key comes from the first 32 bytes, while the IV is the last 16.
Conclusion
So why is all this cool? Because we can be confident that nobody can read our data without our device. Granted, this presumes that the Secure Enclave is, in fact, Secure. We haven’t yet seen any (public) breaks of SE security, but that doesn’t mean it’s impossible. But since it’s so crucial to iOS and now MacBook security, I expect it’s likely pretty good.
What would be even better is if some decrypted items could remain in the Secure Enclave. Consider a system with many layers of encryption keys. The iOS Data Protection hierarchy is a good example of such a system. If you decrypt a group key with the Secure Enclave, then the key gets returned to the application. An attacker may be able to extract that key from the process' memory space. But if that key never leaves the SE, then there’s no risk of it getting leaked through application memory.
Hopefully features like this are in the works for future versions of iOS and macOS. In the meantime, it’s still a very powerful tool, and definitely worth investigating.
References
- Standards for Efficient Cryptography, SEC 1: Elliptic Curve Cryptography, Daniel R. L. Brown, Certicom Research, May 2009: http://www.secg.org/sec1-v2.pdf
- Integrated Encryption Scheme, Wikipedia: https://en.wikipedia.org/wiki/Integrated_Encryption_Scheme
- A Survey of the Elliptic Curve Integrated Encryption Scheme, Martínez, Encinas, and Ávila, 2010: https://www.researchgate.net/publication/255970113_A_Survey_of_the_Elliptic_Curve_Integrated_Encryption_Scheme
- Security and Practical Considerations When Implementing the Elliptic Curve Integrated Encryption Scheme, Martínez, Encinas, and Dios, 2015: https://www.researchgate.net/publication/277941706
- Storing Keys in the Secure Enclave, Apple: https://developer.apple.com/documentation/security/certificate_key_and_trust_services/keys/storing_keys_in_the_secure_enclave?language=objc